
Chapter 6
Installing and Configuring AD CS
IN THIS CHAPTER
![]() Understanding the Certificate Authority (CA) Architecture and Hierarchy
Understanding the Certificate Authority (CA) Architecture and Hierarchy
![]() Installing a Windows Server 2022 certificate authority
Installing a Windows Server 2022 certificate authority
![]() Configuring certificate auto-enrollment with Active Directory Certificate Services
Configuring certificate auto-enrollment with Active Directory Certificate Services
At some point in your career, you will most likely need to work with certificates. If you’re managing your own Windows Public Key Infrastructure (PKI), you’ll most likely be using Active Directory Certificate Services (AD CS).
If you’re not sure what a certificate is or why you might want one, check out Chapter 5 of this minibook. There, I cover what certificates are and some of the more common templates that are used to issue certificates. As a brief recap, certificates are used to prove identity and/or encrypt data. Certificates are issued by servers in a public key infrastructure (PKI). Because certificates purchased from third-party certificate authorities can become cost-prohibitive for organizations, many organizations install their own internal PKIs to support internal systems or applications.
In this chapter, I fill you in on AD CS specifically. I explain certificate authority (CA) architecture and how to install and configure a Windows Server 2022 CA.
Introducing Certificate Authority Architecture
Before you build out your PKI, you need to plan out how you’re going to architect it. The PKI that you architect will support the certificate needs of your organization — everything from allowing encryption of credentials to secure replication to code signing and more. There are important decisions that need to be made, such as whether your root CA will be an offline CA or an enterprise CA, and how many issuing CAs you need, as well as whether you should have a separate policy CA. Don’t worry if you didn’t understand that last sentence. In the following sections, I define each of these CA roles and why you might need or want them.
Root certificate authorities
The root CA is the first level of trust for all certificates. It has the highest level in the certificate trust chain when it comes to validating that the certificate is good. It’s the only CA that will have a self-signed certificate. As such, it must be protected properly, or you could have an attacker issuing certificates from your certificate authority that are trusted by everything on your network.
A root CA should never be used to issue day-to-day certificates. The best practice is to have one root CA and one issuing CA at a minimum. The root CA issues a subordinate CA certificate to the issuing CA, and that should be it. Technically, you can combine the two roles and have the root CA also be an issuing CA, but that approach is not recommended.
If the root CA is offline, it can’t be attacked. This is the most secure type of root CA; it’s known as an offline root CA. With this architecture, the root CA is brought online to issue certificates based off of the subordinate CA template for the issuing CAs. After it has issued the certificate and the certificate revocation lists (CRLs) have been updated, it’s turned off again.
 A CRL is used to identify which certificates have been revoked, meaning that they’re no longer valid certificates.
Offline root certificate authorities are the most secure option and should be the preferred choice. The downside to offline root CAs, however, is that you have to distribute its certificate through Group Policy and manually publish the CRLs, which can be time consuming. For a small IT department, the skill set may not be there to support this kind of maintenance. If your environment doesn’t have strict regulatory requirements regarding the safeguarding of your PKI, an enterprise root CA is a good solution. The enterprise root CA is attached to Active Directory, so it can publish its own certificate and CRLs automatically. This is the simplest method of deployment, too, because there is very little manual work. If you choose to go this route, make sure that the operating system is hardened, that access is limited to the bare essential users, and that it has good anti-malware software running on it. You need to take some extra precautions with an enterprise root CA because it’s online all the time.
Issuing certificate authorities
Issuing CAs are the workhorses of the PKI world. When a user or a system requests a certificate, that request is routed to your issuing CA, which will fulfill the request and return the certificate to you. You can have standalone issuing CAs, but the most common configuration is an enterprise issuing CA. This means that there is integration between the certificate authority and Active Directory. The issuing CA is able to communicate with Active Directory, including the publishing of CRLs.
Policy certificate authorities
The policy CA is a special use case and is only traditionally seen in very large and heavily secured enterprises. If a policy CA is in place, it will issue certificates to an issuing CA. Policy CAs are used to create and enforce the policies and procedures regarding the validation of identity as it pertains to certificate holders and to secure the CAs in the CA architecture.
In most common smaller organizations, the issuing CA and the policy CA are one and the same and the policy CA enforces its own policies and procedures that are set.
Installing a Certificate Authority
So, you’ve gotten to the point where you’ve figured out what your PKI architecture is going to look like and you’re ready to build it out. I’m going to assume that your Windows Server 2022 servers are already built, and that they’re ready to go. In the following sections, I cover the steps involved.
Creating the CAPolicy.inf file
For any certificate authority that you build, you should use a CAPolicy.inf file. This sets a lot of the basic parameters including the renewal date and CRL validity length, and it can specify a policy if you're using the policies in Certificate Services. This is only used to control the CA renewal, not the renewal of other certificates.
Creating this file is a simple process. There is a lot of configuration that can be done with the CAPolicy.inf file, so I recommend doing your research to determine what you want the settings in the file to be. Pay close attention to the validity periods that you define. You don’t want your certificate authority certificates to be extremely long lived, but too short of a lifespan will impact issued certificates and their validity periods. Issued certificates can’t have longer validity periods than the CA they were issued on.
[Version]
Signature="$Windows NT$"
[Certsrv_Server]
RenewalKeyLength=2048
RenewalValidityPeriod=Years
RenewalValidityPeriodUnits=5
AlternateSignatureAlgorithm=0
You can type this into Notepad and save it as CAPolicy.inf into the C:Windows directory. The name and location are important. If these are not correct, then the settings will not be applied. The [Version] section is the only required section in the file, and it always has to be at the beginning.
You may be wondering what the other settings are for. This is what each of them is doing:
RenewalKeyLength: This sets the size of the key when a certificate is renewed. When the certificate is first created, it uses whatever the CA is set to use for certificates.RenewalValidityPeriod: This specifies what type of timeframe you want a renewed certificate to be good for. You can choose from hours, days, weeks, months or years.RenewalValidityPeriodUnits: This is where you specify the actual number you want the certificate to be good for. For instance, in the example file above, I have selected 5 which ends up being a validity period of 5 years.AlternateSignatureAlgorithm: When set to 0, this is enabled and will create a certificate request that includes the PKCS #1 (RSA) signature format.
 If you're going to install an offline CA, it’s important that you add a CRL Period to the
 CAPolicy.inf file. If you’ll only bring the root CA up once a year, then set it to once a year, as in the following example. You need to add the following two lines into the [Certsrv_Server] section:
CRLPeriod=years
CRLPeriodUnits=1
After you've created your CAPolicy.inf file and placed it in C:Windows, you're ready to build out your new certificate authority. Let’s look at root CAs first.
Installing the root certificate authority
Installing the root CA is one of the very first steps that you must take to establish your PKI. On Windows Server, the Active Directory Certificate Services (AD CS) role will allow you to do that. The installation process between the offline root and enterprise root CAs are very similar. In the following sections, I walk you through the installation process for both of them.
Offline root certificate authority
I’m going to start your journey into certificate authorities with the installation of an offline root CA. As you might recall from earlier in this chapter, this is the most secure form of root CA, but it also requires some manual work. Follow these steps:
- From Server Manager, click Manage and then click Add Roles and Features.
- On the Before You Begin screen, click Next.
- On the Select Installation Type screen, click Next.
- On the Select Destination Server screen, click Next.
- On the Select Server Roles screen, select Active Directory Certificate Services, click Add Features, and then click Next.
- On the Select Features screen, click Next.
- On the Active Directory Certificate Services screen, click Next.
- On the Select Role Services screen, select Certificate Authority, and leave everything else unchecked; then click Next.
- On the Confirm Installation Selections screen, click Install.
- After installation has completed, click Close.
- Click the flag at the top of Server Manager and click Configure Active Directory Certificate Services on the destination service, shown in Figure 6-1.
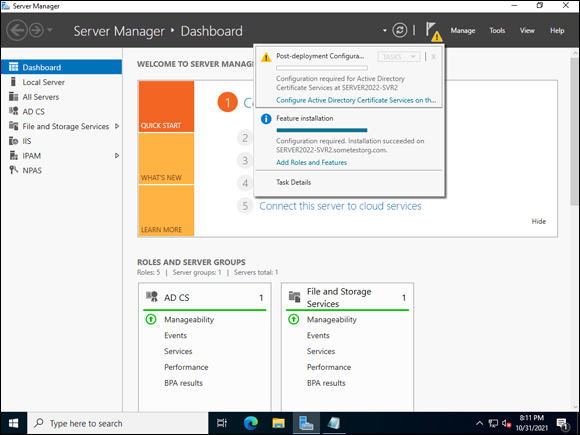
FIGURE 6-1: After AD CS has been installed, it needs to be configured.
- On the Credentials screen, enter an account that is in the Local Administrators group on the server, and click Next.
- On the Role Services screen, select Certification Authority, and click Next.
- On the Setup Type screen, select Standalone CA (as shown in Figure 6-2), and click Next.
- On the CA Type screen, select Root CA, and click Next.
- On the Private Key screen, select Create a New Private Key, and click Next.
- On the Cryptography for CA screen, ensure your key length is a minimum of 2048, and select SHA256 for certificate signing (see Figure 6-3); then click Next.
On the CA Name screen, change the Common Name to whatever you like and then click Next.
I changed mine to ROOTCA.
- For the Validity Period screen, accept the default of five years and click Next.
- On the CA Database screen, click Next.
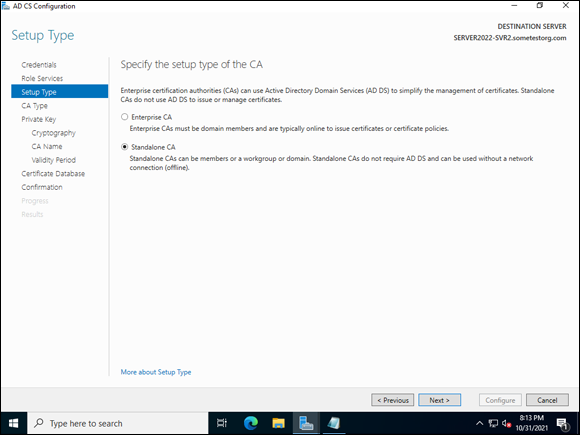
FIGURE 6-2: You can’t change this selection later, without reinstalling AD CS.
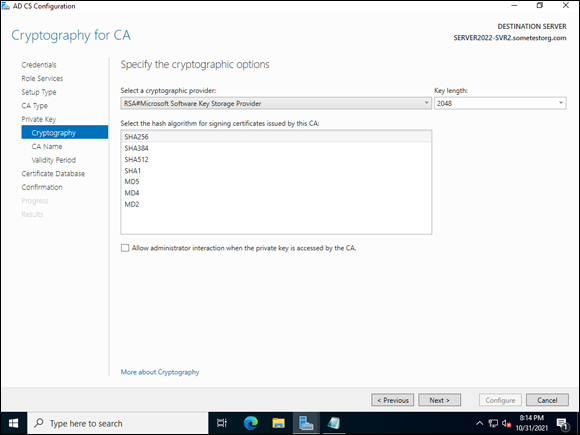
FIGURE 6-3: The Cryptography for CA screen allows you to set important security parameters for your CA.
On the Confirmation screen, click Configure.
When configuration is finished, you get the Results screen with a Configuration Succeeded message.
- Click Close.
Next you need to get the certificate and the CRL off the root CA so that you can publish them to Active Directory. Typically, you copy these to a flash drive because the root CA should not be on the network.
The files are located at C:WindowsSystem32CertSrvCertEnroll, which you can see in Figure 6-4.
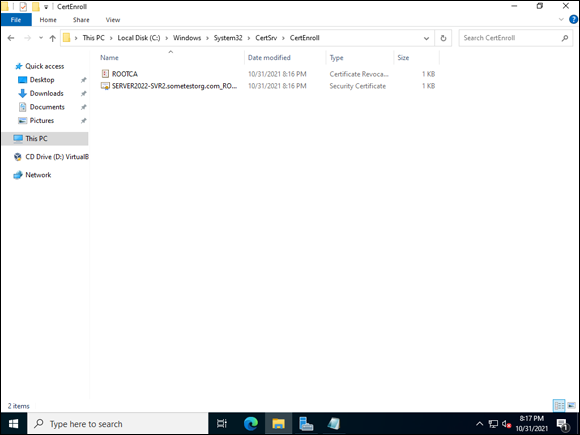
FIGURE 6-4: The newly created root certificate file and the CRL need to be copied off the root CA.
Copy the files to a system where you can log in with an account that is a member of either the Domain Admins or Enterprise Admins security groups in Active Directory. Open PowerShell as an administrator, and then run these commands:
certutil.exe –dspublish –f "certificatename.crt" RootCA
certutil –f –dspublish "CRL_Name.crl"
certutil.exe –addstore –f root "certificatename.crt"
The first command publishes the certificate to Active Directory where it will be replicated out to any AD-joined systems within approximately eight hours. The second command publishes the new CRL, and the third command ensures that the root CA cert gets added to the relevant certificate stores on any subordinate CAs.
Enterprise root certificate authority
The Enterprise root certificate authority is integrated into the Windows domain and is left powered on. It automatically publishes CRLs through Active Directory.
- Follow steps 1 through 13 from the preceding section.
- On the Setup Type screen, select Enterprise CA and click Next.
- On the CA Type screen, select Root CA and click Next.
- On the Private Key screen, select Create a New Private Key and click Next.
- On the Cryptography for CA screen, ensure your key length is a minimum of 2048, and select SHA256 for certificate signing (refer to Figure 6-3); then click Next.
On the CA Name screen, change the Common Name to whatever you like and then click Next.
I changed mine to ROOTCA.
- On the Validity Period screen, accept the default of five years and click Next.
- On the CA Database screen, click Next.
On the Confirmation screen, click Configure.
When configuration is finished, you get the Results screen with a Configuration Succeeded message.
- Click Close.
After the configuration is complete, you don’t have any manual tasks to complete as you did with the offline root. The certificates and CRLs are published directly into Active Directory.
Installing the issuing certificate authority
When you have your root CA built, you have a great foundation. Now you need an issuing CA that will actually issue the certificates for you. The following steps are built off the assumption that you have built an enterprise root CA.
- Follow steps 1 through 13 from the “Offline root certificate authority” section.
- On the Setup Type screen, select Enterprise CA and click Next.
- On the CA Type screen, select Subordinate CA and click Next.
- On the Private Key screen, select Create a New Private Key and click Next.
- On the Cryptography for CA screen, ensure your key length is a minimum of 2048, select SHA256 for certificate signing (refer to Figure 6-3), and click Next.
On the CA Name screen, select a common name for your certificate authority and click Next.
I chose ISSUECA.
On the Certificate Request screen, select Send a Certificate Request to a Parent CA and click the Select button, click the root CA, and then click OK.
You should see the previously created enterprise root CA in the list, as shown in Figure 6-5. Note that if you created the offline root CA, you can select the other bubble on this screen to generate a certificate signing request (CSR).
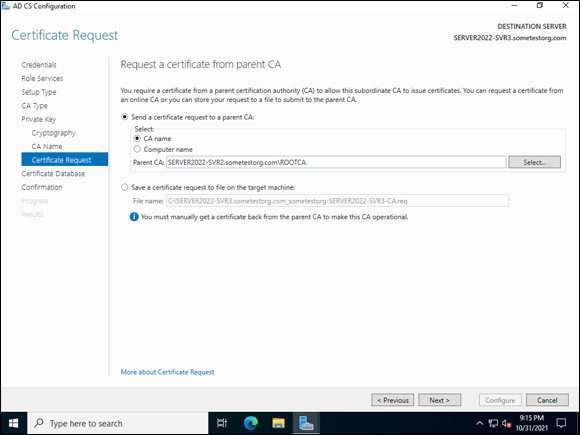
FIGURE 6-5: Selecting the root CA, assuming the root CA is an enterprise CA, to issue the issuing CA’s certificate.
- On the Certificate Request screen, click Next.
- On the CA Database screen, click Next.
On the Confirmation screen, click Configure.
When configuration is finished, you get the Results screen with a Configuration Succeeded message.
- Click Close.
Enrolling for certificates
Now you have certificate authorities set up. What should you do first? I like to issue certificates to my domain controllers so that I can start using LDAP over SSL (LDAPS). This will encrypt replication traffic between domain controllers and directory queries. I have logged on to my domain controller. Here are the steps to enroll in a certificate from the machine where you want the certificate to be:
- Click Start, type mmc.exe, and press Enter.
- Choose File⇒ Add/Remove Snap-in.
- Choose Certificates, and then click Add (as shown in Figure 6-6).
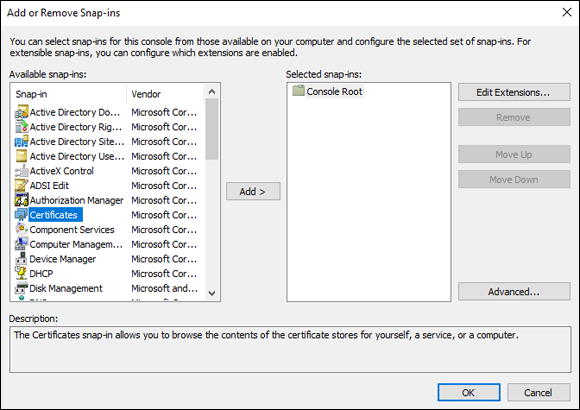
FIGURE 6-6: The Microsoft Management Console (MMC) gives you lots of configuration options for your system, including certificates.
- On the Certificates Snap-in screen, choose Computer Account, and click Next.
- On the Select Computer screen, leave Local Computer selected and click Finish.
- Click OK.
- Expand Certificates and then expand Personal.
- If there is a Certificates subfolder select that; if there isn’t do the next step on the Personal folder.
- With the Certificates folder selected, right-click the white space next to it, choose All Tasks and then Request New Certificate (see Figure 6-7).

FIGURE 6-7: Requesting a certificate within the MMC starts when you select the certificate store and make the request.
- On the Certificate Enrollment screen, click Next.
On the Select Certificate Enrollment Policy screen, select Active Directory Enrollment Policy and click Next.
You see all the available certificate templates.
Choose Domain Controller, as shown in Figure 6-8, and then click Enroll.
The server will make the request and return with a Success message after the certificate has been issued.
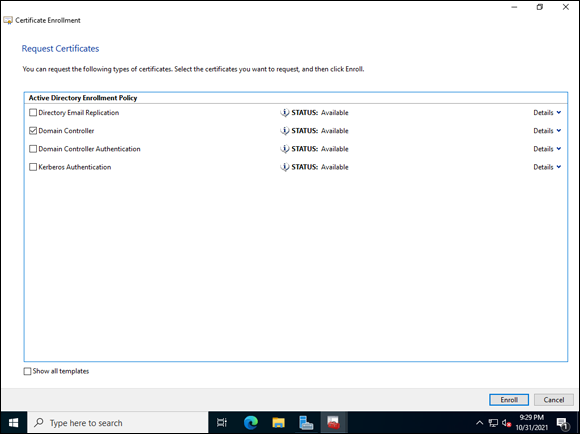
FIGURE 6-8: You’re presented with the certificate templates that you have permissions to use.
That’s all you have to do to enroll in a certificate from an enterprise issuing CA on an AD-joined system.
Setting up web enrollment
With enterprise CAs, you can enroll in certificates from whatever machine you’re on. You may have some devices that are not connected to Active Directory. Are those systems just out of luck? Of course not! The web enrollment interface allows you to issue certificates with a certificate signing request (CSR) that you’ve generated from just about any device.
A CSR is generated when you want to create a certificate. It contains the public key that you want to include in the certificate, as well as the information you want to include on the certificate like the name, organization, and so on. The name is referred to as a common name and consists of the fully qualified domain name of the system (for example, www.dummies.com).
Let’s return to the enterprise issuing CA you installed earlier and add the web enrollment piece:
- From Server Manager, click Manage, and then click Add Roles and Features.
- On the Before You Begin screen, click Next.
- On the Select Installation Type screen, click Next.
- On the Select Destination Server screen, click Next.
- On the Select Server Roles screen, expand Active Directory Certificate Services.
- Select Certification Authority Web Enrollment.
- Click Add Features and then click Next.
- On the Select Features screen, click Next.
- On the Web Server Role (IIS) screen, click Next.
- On the Select Role Services screen, click Next.
- On the Confirm Installation Selections screen, click Install.
- After installation is complete, click the Configure Active Directory Certificate Services on the Destination Server link.
- On the Credentials screen, ensure you have credentials for someone in the Enterprise Admin group and click Next.
- Select the check box for Certification Authority Web Enrollment and click Next.
- On the Confirmation screen, click Configure.
- On the Results screen, click Close.
You may be asking what all that work was for. You’ve given your users a web page where they can request and receive certificates on their own with no need to ask you for them. This is a fantastic way to enable your users to secure their internal applications without having to contact someone else to create the certificate for them. Your users can access the web interface (shown in Figure 6-9) at http://servername/CertSrv/Default.asp.
Installing Online Certificate Status Protocol
Historically, revocation information for certificates was received through certificate revocation lists (CRLs). The base CRL could get quite large, so delta CRLs were introduced to work with a smaller time frame. By default, the base CRL was updated once a week, while the delta CRL was updated once a day. This meant that if you revoked a certificate it may not be in the delta for a day. A better way was needed to get more timely revocation information. Online Certificate Status Protocol (OCSP) was created for that purpose. It provides near real-time revocation information. Here’s how to install OCSP:
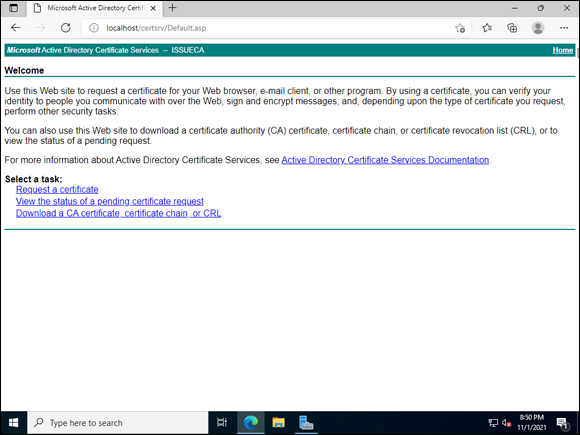
FIGURE 6-9: The Web Enrollment page for certificates is simple and easy to use.
- From Server Manager, click Manage, and then click Add Roles and Features.
- On the Before You Begin screen, click Next.
- On the Select Installation Type screen, click Next.
- On the Select Destination Server screen, click Next.
- On the Select Server Roles screen, expand Active Directory Certificate Services, select Online Responder, click Add Features, and then click Next.
- On the Select Features screen, click Next.
- On the Confirm Installation Selections screen, click Install.
- After installation is complete, click the Configure Active Directory Certificate Services on the Destination Server link.
- On the Credentials screen, ensure you have credentials for someone in the Enterprise Admin group and click Next.
- Select the check box for Online Responder and click Next.
- On the Confirmation screen, click Configure.
- On the Results screen, click Close.
Now that OCSP is installed, you need to enable its certificate template for when you configure it. Follow these steps:
- From Server Manager, choose Tools⇒ Certification Authority.
- Expand the CA name and select Certificate Templates.
- Right-click Certificate Templates, and choose New⇒ Certificate Template to Issue.
- Scroll down and select OCSP Response Signing and then click OK.
You should now see the OCSP Response Signing template listed in Certificate Templates, as shown in Figure 6-10.

FIGURE 6-10: The OCSP Response Signing template is needed to set up the revocation information as part of the OCSP configuration.
You’ve installed the Online Responder, and you’ve enabled its certificate template. Now you’re ready to configure it!
- From Server Manager, choose Tools⇒ Online Responder Management.
- Right-click n Revocation Configuration and choose Add Revocation Configuration.
- On the first screen of the Add Revocation Configuration Wizard, click Next.
Give your configuration a name and click Next.
The name can be anything you like. I’ll name mine ISSUECAREV.
- On the Select CA Certificate Location screen, leave the default Select a Certificate for an Existing Enterprise CA selected and click Next.
- On the Choose CA Certificate screen, click the Browse button next to Browse CA Certificates Published in Active Directory.
- Choose the certificate that belongs to your issuing CA and then click OK.
- Click Next.
- On the Select Signing Certificate screen, select Automatically Select a Signing Certificate and check the Auto-Enroll for an OCSP signing certificate check box. Then click Browse.
Select your issuing CA and click OK.
It will automatically select the OCSP Response Signing template, shown in Figure 6-11.
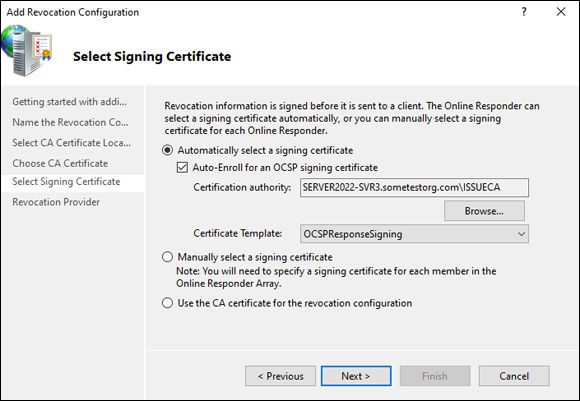
FIGURE 6-11: Setting the OCSP Revocation Configuration requires the OCSP Response Signing certificate template.
Click Next.
The revocation provider is initialized.
- Click Finish.
Your OCSP responder is now up and running! Now when a certificate is presented, the OCSP service can respond with a real-time response that indicates if the certificate is still valid or if it has been revoked.
Configuring Certificate Auto-Enrollment
You may want to have auto-enrollment occur on some certificates. A common use case would be for user certificates if your users need them for virtual private network (VPN) connections or for two-factor authentication (2FA). In this section, you set up the User certificate template to auto-enroll.
Configuring the template
The first step to setting up auto-enrollment is to set it up in the certificate template itself. So, let’s set up the template to auto-enroll the Domain Users group.
- From Server Manager, choose Tools⇒ Certification Authority.
- Double-click the CA name to expand it.
- Right-click Certificate Templates, and choose Manage.
Select the User certificate template, right-click it, and choose Duplicate Template.
 Always choose Duplicate Template when modifying certificate templates. Custom templates could get overwritten with updates or upgrades if you use the out-of-the-box template.
- On the Compatibility tab, change the Certification Authority drop-down to the lowest version of CA you have. Do the same for the Recipient drop-down for the lowest server/desktop version you have.
Select the General tab, and give the template a meaningful name.
I’ll call mine VPN User Cert.
- Select the Security tab.
Select Domain Users, and check Read and Autoenroll.
Enroll will already be selected.
- Click OK.
- Close out of the Certificate Templates Console by clicking the X in the upper-right corner.
- Right-click Certificate Templates again, but this time choose New⇒ Certificate Template to Issue.
- Select your new VPN User Cert (or whatever you named it in Step 6) and click OK.
Now the CA is set to issue the new user certificate. You’re ready to set up Group Policy so that domain-joined users will automatically get their certificates when they log in.
Configuring Group Policy
You need to move to a system that has the Group Policy Management tools installed. I’ve moved back over to my domain controller. Follow these steps:
- From Server Manager, choose Tools⇒ Group Policy Management.
- Right-click the Default Domain Policy (or whichever policy you want to place this in) and choose Edit.
- Double-click User Configuration, then Policies, then Windows Settings, then Security Settings, and then Public Key Policies.
- Double-click Certificate Services Client Auto-Enrollment.
- Change the configuration model to Enabled.
- Check both of the check boxes below Configuration Model, as shown in Figure 6-12.
- Click OK.
Your users will now receive the auto-enrolled certificate that you set up on the CA the next time they log in. If you want to verify that their system received the certificate, you can check the Issuing CA to check for the presence of their certificate, or you can open the MMC as discussed earlier and check the Personal certificate store to ensure that the certificate is there.
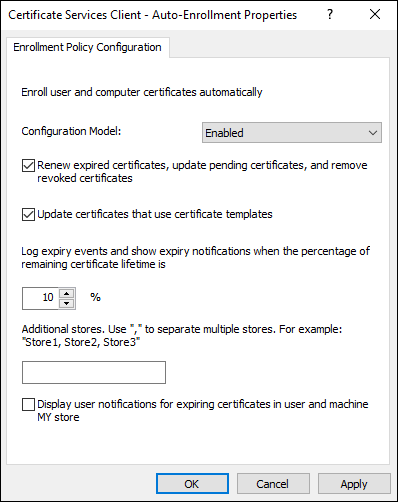
FIGURE 6-12: The last part of setting up auto-enrollment is to set Group Policy to auto-enroll user certificates.