
Chapter 7
Securing Your DNS Infrastructure
IN THIS CHAPTER
![]() Understanding how DNSSEC can protect your DNS services
Understanding how DNSSEC can protect your DNS services
![]() Examining DANE and how it complements DNSSEC
Examining DANE and how it complements DNSSEC
![]() Securing DNS with HTTPS
Securing DNS with HTTPS
Domain Name System (DNS) is a requirement of Active Directory and is what makes networks easier to work with. With DNS, you don’t have to remember IP addresses — you can just remember simple names instead. Imagine, though, that a criminal was able to make your systems believe that their DNS server was your DNS server. You and your users could be redirected to a malicious site.
In this chapter, you learn how to secure your DNS infrastructure using DNS Security Extensions (DNSSEC) and DNS-based Authentication of Named Entities (DANE).
Understanding DNSSEC
DNSSEC was designed to prevent attackers from hijacking the DNS lookup process and protect users from being given addresses to malicious servers. DNSSEC signs zones and records, which allows the endpoint that made the query to validate that a DNS record is a valid record, or if it’s redirecting to an invalid and potentially malicious location instead (DNS cache poisoning).
By digitally signing the root zone in your DNS infrastructure, you can give your users assurances that their systems are getting responses from valid DNS servers. Digital signatures create a hash — think of it as a unique thumbprint. If anything about a record has changed, the hash won’t match and the record will be invalid. It’s important to remember that DNSSEC does not encrypt data at all; it’s only validating the identity of the DNS server doing the DNS lookup.
The basics of DNSSEC
With DNSSEC, you have two keys to be aware of:
- Key Signing Key (KSK): The KSK is a long-term key used to sign ZSKs and validate DNSKEY records.
- Zone Signing Key (ZSK): The ZSK is a short-term key used to sign the actual DNS records.
To secure a zone with DNSSEC, one of the first things that occurs is the grouping of like record types into a resource record set (RRset). The RRset is then digitally signed, which provides protection for all the individual records within the resource record set.
The private key of the ZSK is used to digitally sign each RRset, and the public key of the ZSK is used to verify the signature. The digital signature of each RRset is saved as an RRSet Signature (RRSIG) record.
Records used for DNSSEC
DNSSEC introduced several new record types to work with and contains the new cryptographic features that DNSSEC added. Here are the record types that you need to remember:
- RRSIG: Contains the digital signature of an RRset that has been signed by the ZSK, or a DNSKEY record that has been signed by the KSK.
- DNSKEY: DNSKEY records can contain the public key of the ZSK or the public key of the KSK.
- DS: The Delegation Signer (DS) record allows for the transfer of trust from the parent zone to a child zone, which in turn allows the child zone to be DNSSEC-enabled. The DS record contains a hashed copy of the parent zone’s DNSKEY.
- NSEC: Traditional DNS returns an empty response if there is no match. The issue with that is that it isn’t providing an authenticated response. The NSEC records return an authenticated response with the next available secure record. For example, say you request
totallybogus.sometestorg.com. There is no record for totallybogus, so the DNS server may just return the record for www. - NSEC3: NSEC3 does the same thing as NSEC, but the owner name in the record is stored in a hashed state. By storing the owner's name in hash, you're protecting against zone enumeration, which is a form of reconnaissance that allows an attacker to construct the DNS zone based on redirects to other records.
- NSECPARAM/NSEC3PARAM: The NSECPARAM and/or NSEC3PARAM resource records select the NSEC or NSEC3 records to include in a negative response.
Configuring DNSSEC
Now you have an understanding of how DNSSEC works at a high level. Let’s actually configure it on our Windows server.
Enabling DNSSEC
When you’ve decided that you want to use DNSSEC, the first thing that you have to do is actually go in and sign the DNS zone. You need a system that has the DNS Manager administrative tool installed. Follow these steps:
- From Server Manager, choose Tools⇒ DNS.
- Expand your server and Forward Lookup Zones, and then select the domain on which you want to enable DNSSEC.
Right-click the domain and choose DNSSEC⇒ Sign the Zone, as shown in Figure 7-1.
The DNS Security Extensions (DNSSEC) Wizard appears.
- Click Next.
- On the Signing Options screen, select Customize Zone Signing Parameters and click Next.
- On the Key Master screen, select The DNS Server <yourservername> Is the Key Master and click Next.
- On the Key Signing Key screen, click Next.

FIGURE 7-1: You can enable DNSSEC on a zone by selecting Sign the Zone located under DNSSEC in the menu.
- On the second Key Signing Key screen, click Add.
- Accept the default KSK settings, shown in Figure 7-2, and click OK.
- Click Next.
- On the Zone Signing Key screen, click Next.
- On the second Zone Signing Key screen, click Add.
- Change the key length field to 2048, and then click OK.
- Click Next.
- On the Next Secure (NSEC) screen, choose Use NSEC3 and click Next.
- On the Trust Anchors screen, select the Enable the Distribution of Trust Anchors for This Zone check box, leave the other check box checked, and click Next.
- On the Signing and Polling Parameters screen, change the DS record generation algorithm to just SHA-256, as shown in Figure 7-3.
- Click Next.
On the final screen, click Next.
The zone will be signed.
- After it’s signed, click Finish.

FIGURE 7-2: Creating the KSK is simple — you can safely accept the defaults.

FIGURE 7-3: Considering that the DS record is responsible for the transfer of trust, you want to select only secure algorithms, such as SHA-256.
If you want to verify that DNSSEC is enabled, you may need to refresh, but you’ll see all the special record types I mention earlier. My example is shown in Figure 7-4.
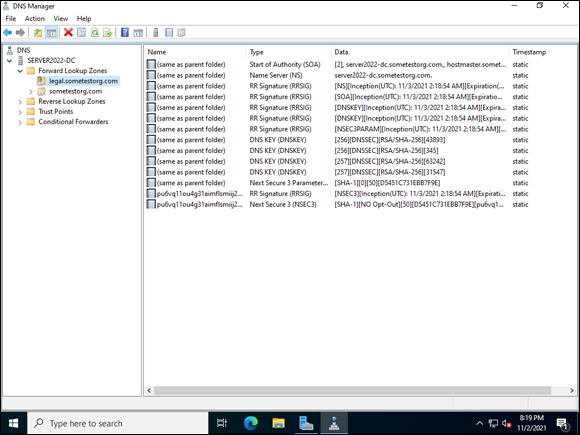
FIGURE 7-4: After the zone is signed, the special DNSSEC record types will show up in the signed zone.
Configuring clients to require DNSSEC
You may be thinking you’re all done, but you aren’t. Now that your DNS zone is DNSSEC enabled, you have to tell your systems to use DNSSEC. This is best accomplished through Group Policy. You need to be on a system that has the Group Policy Management tools installed. Follow these steps:
- From Server Manager, choose Tools⇒ Group Policy Management.
- Expand your domain and right-click Default Domain Policy.
- Click Edit.
- Navigate to Computer Configuration, then Policies, then Windows Settings, and then Name Resolution Policy.
- In the Create Rules section, ensure that Suffix is selected in the drop-down box, and then fill in the domain name.
- On the DNSSEC tab, check Enable DNSSEC in This Rule and Require DNS Clients to Check That Name and Address Data Has Been Validated by the DNS Server (as shown in Figure 7-5).
- Click Create.
That’s all there is to it. With your Name Resolution Policy in place, domain-joined systems will use DNSSEC.

FIGURE 7-5: Creating a Name Resolution Policy from within Group Policy is the simplest way to guarantee that domain-joined systems will use DNSSEC.
Understanding DANE
DANE is built on DNSSEC. Although DNSSEC tries to protect against DNS cache poisoning and spoofing, DANE adds an additional layer of protection by allowing the administrator of a domain name to specify which certificate authority is allowed to issue certificates for their organization’s domain, as well as provide a way to authenticate client and server certificates with a certificate authority. This prevents an attacker from issuing a certificate from a certificate authority and trying to pass it off as your own. It requires DNSSEC to work its magic.
The basics of DANE
DNS-based Authentication of Named Entities (DANE) uses a newer record type known as a Transport Layer Security Authentication (TLSA) record. The TLSA record is used to associate a domain name with a TLS certificate. Not all DNS hosting providers support DANE, but if your DNS servers are running Windows Server 2016 or newer, you can use DANE because Windows Server 2016 supports unknown record types.
DANE will allow you to bind a certificate to a specific DNS name using DNSSEC.
Configuring DANE
Configuring DANE consists of two parts: First, you must generate the TLSA record, and then you can install the TLSA record with PowerShell.
Generating the TLSA record
To generate the TLSA record, you need a copy of the certificate that you’re wanting to protect. Follow these steps:
Open a browser and go to the site that you want to protect.
I’m using my own
https://www.sometestorg.comsite for this demonstration.Click the padlock icon in the URL bar and click View Certificates.
This may vary depending on browser. I’m using the default browser, which is Edge.
- When the certificate properties screen comes up, click the Details tab.
- Click the Copy to File button.
- On the Welcome to the Certificate Export Wizard screen, click Next.
- On the Export File Format screen, select Base-64 encoded, and click Next.
On the File to Export screen, select Browse and choose a name and location for the file and click OK.
I’m saving it to my Desktop for now.
- Click Next.
- On the Completing the Certificate Export Wizard screen, click Finish.
- Open a browser and go to the following address:
https://www.huque.com/bin/gen_tlsa - Accept the default selections in the first three fields.
- Click the Start menu, click Windows Accessories, and then click Notepad.
- Open the certificate that you exported with Notepad by choosing File ⇒ Open, and then selecting the exported certificate file.
- Copy the text from the file starting with the:
-----BEGIN CERTIFICATE-----and ending with the:
-----END CERTIFICATE----- - Go back to the TLSA Generator page and paste the text into the Enter/Paste PEM Format X.509 Certificate Here box.
For port number, put in whatever applies.
In my case, 443 for HTTPS traffic.
Enter the transport protocol and the domain name.
In my example, the transport protocol is
tcpand the domain name issometestorg.com.Your screen should look similar to Figure 7-6.
Click Generate.
You receive an output similar to Figure 7-7. When you have this in hand, you can install the TLSA record on the server.

FIGURE 7-6: You need to generate the TLSA record before you can use it.
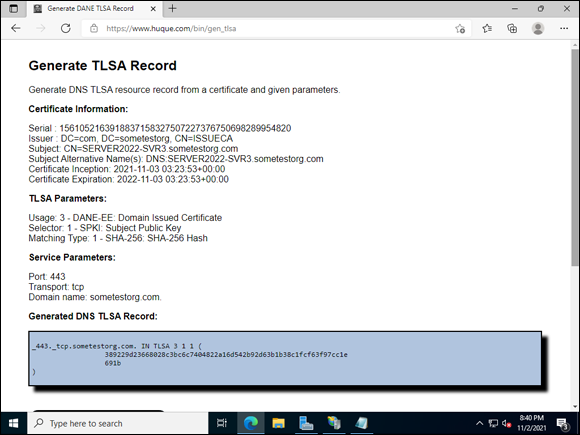
FIGURE 7-7: The page generated the TLSA record and now you can install it.
Installing the TLSA record
To install the TLSA record, follow these steps:
- Right-click the Start menu and select Windows PowerShell (Admin).
- Type the following command into the PowerShell window:
Add-DnsServerResourceRecord -TLSA -CertificateAssociationData "9933c1848f2f492f4715abff9e79f74025fdd219a2f77a34d3cc9a00f36c8a0b" -CertificateUsage DomainIssuedCertificate -MatchingType Sha256Hash -Selector FullCertificate -ZoneName sometestorg.com -name _443._tcp.www.sometestorg.com
The TLSA record is now installed. The -CertificateAssociationData parameter uses the long numerical string at the end of the generated record. You can verify that the record was successfully created by following these steps:
- From Server Manager, choose Tools⇒ DNS.
Expand you server name, expand the domain name, and in my case I expand
com, thensometestorg, thenwww, then_tcp.You see a record that says Unknown under Data.
Double-click that Unknown record.
If you see a Type of 52, it was recognized as a valid TLSA record. An example is shown in Figure 7-8.
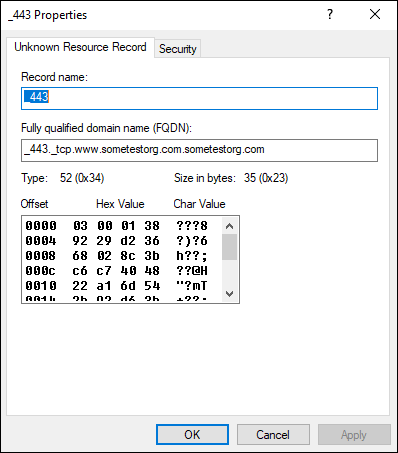
FIGURE 7-8: Verifying that the TLSA record was created properly is important.
Protecting DNS Traffic with DNS-over-HTTPS
Every time I read about DNS-over-HTTPS (DoH), I hear “Doh!” in Homer Simpson's voice. In this case, however, rather than an expression of frustration, DoH is an awesome way to protect your critical DNS traffic with a commonly used secure protocol, HTTPS. It’s also very simple to configure.
DNS-over-HTTPS allows DNS traffic to be encrypted, which provides protection and confidentiality and also effectively masks your DNS traffic as it travels over the HTTPS port 443, rather than the traditional DNS port 53.
This sounds great doesn’t it? You may be telling yourself that this is too good to be true. There couldn’t possibly be many DNSs that support DoH could there? In fact, there are several, and I suspect more will be added in time. If you’d like to see the current list of available systems, you can run the following command:
Get-DNSClientDohServerAddress
You’ll see a list of known providers that support DoH.
Enabling DoH in Server 2022
To enable DoH in Windows Server 2022, follow these steps:
- Click the Start menu, and then click Settings.
- Select Network & Internet, and then select Ethernet.
Select the network adapter on which you want to enable DoH.
In my case, I’ll choose my only adapter, which is Network 2.
- Scroll down to DNS Settings and click Edit.
Under DNS Encryption, choose from one of the three options shown in Figure 7-9.
I’ll choose Encrypted Preferred, Unencrypted Allowed because this is my lab environment. You could choose to set it to Unencrypted Only, which is the default, or to Encrypted Only, which will enforce DoH.
- Click Save.
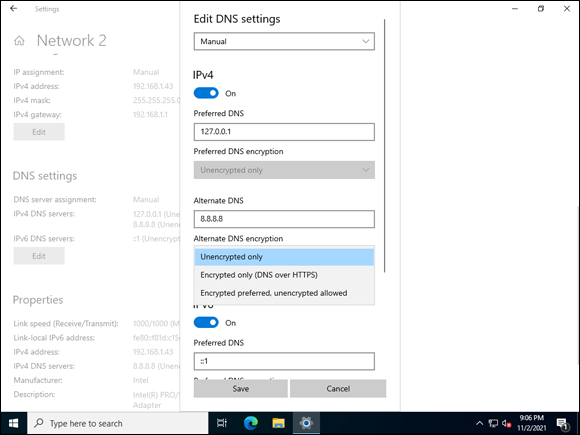
FIGURE 7-9: You have several encryption options for DNS traffic.
Using Group Policy to enable DoH
Being able to enable DoH is great, but let’s face it: You don’t want to enable it individually on systems across the enterprise. Not surprisingly, Microsoft gives you the ability to enable DoH through Group Policy. Follow these steps:
- Open Server Manager.
- Click Tools and then click Group Policy Management.
- Right-click Default Domain Policy and choose Edit.
- Navigate to
Computer ConfigurationPoliciesAdministrative TemplatesNetworkDNS Clientand double-click Configure DNS-over-HTTPS (DoH) Name Resolution, as shown in Figure 7-10.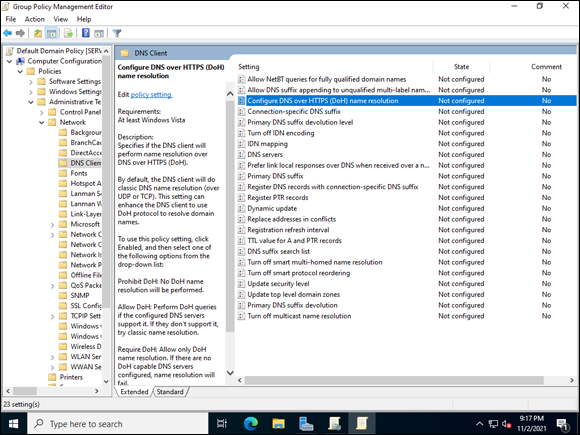
FIGURE 7-10: The new DoH feature can be configured via Group Policy.
Choose Enabled, and then choose which option you want to use for DoH.
You have the option to prohibit, allow, or require DNS-over-HTTPS. I’ll choose Allow DoH for now.
- Click OK.
That’s all there is to it! If you’ve followed along in this chapter, you’ve come a long way in improving the security of your DNS infrastructure.