
Chapter 1
Introducing PowerShell
IN THIS CHAPTER
![]() Beginning to use PowerShell, components, and concepts
Beginning to use PowerShell, components, and concepts
![]() Using PowerShell day to day
Using PowerShell day to day
![]() Using PowerShell to remotely administer systems
Using PowerShell to remotely administer systems
![]() Getting help in PowerShell
Getting help in PowerShell
![]() Addressing security issues with PowerShell
Addressing security issues with PowerShell
PowerShell is the wave of the future. As server automation becomes more commonplace, there will be a much higher demand for a system administrator who has PowerShell skills. Additionally, remote administration with PowerShell reduces the need to interact with the graphical user interface (GUI) and can allow you to make changes to one or many systems from your workstation.
This chapter covers the basics of PowerShell, from the beginning terminology to using PowerShell remoting.
Understanding the Basics of PowerShell
Before you start using a scripting language, you need to learn it. In this section, I fill you in on the basics of PowerShell so the rest of this chapter makes sense.
Objects
In PowerShell, an object is a single instance of something, like a service or a process. If you run Get-Process or Get-Service inside of the PowerShell, each row is an object (assuming you're using the default formatting). In Figure 1-1, there is a service on each line, and each service is an object.

FIGURE 1-1: Each row returned in the Get-Service command is an object.
Pipeline
The pipeline allows you to take the output of one command and send it (pipe it) to the next command. For instance, if you’re trying to figure out what methods and properties are available for a cmdlet, you can use the output of the cmdlet and pipe it to Get-Member. In Figure 1-2, I've entered in Get-Service with no filters, and then added Get-Member. In this case, because there are no filters, Get-Member is able to return all methods and properties associated with Get-Service.
You can do lots of things after the pipeline. Usually, you see things like formatting and filters, sometimes even export commands.

FIGURE 1-2: Using the pipeline allows you to send the output of one command to the input of another.
Providers
PowerShell providers allow you to access various data sources as if they were a regular data drive on your system. The providers that are built into PowerShell are listed in Table 1-1. You can view a list of the built-in providers on your system with the following command:
Get-PSProvider
TABLE 1-1 PowerShell Built-in Providers
Provider | Drive Example |
|---|---|
Registry | HKLM: |
Alias | Alias: |
Environment | Env: |
FileSystem | C: |
Function | Function: |
Variable | Variable: |
PowerShell providers allow you to interact with your system in different ways. For instance, the FileSystem provider allows you to work with the file system on your server using the PSDrive cmdlets. Get-PSDrive will return a list of all the drives that are available from within the current PowerShell session, including your system drives, as well as the drives that can be used to work with the other providers. You can also create and remove a PSDrive with the New-PSDrive and Remove-PSDrive cmdlets.
Variables
Think of a variable as a container in which you can store something. You can create a variable at any time. Variables are not case-sensitive, and they can use spaces and special characters. As a best practice, Microsoft avoids using spaces and special characters in variable names. It recommends sticking with alphanumeric characters (A–Z, 0–9) and the underscore character (_).
Variables are declared with the dollar sign ($). For instance, if I wanted to create a variable to store my first name, I could type the following:
$FirstName = "Sara"
 Variables are not case-sensitive. I capitalize the first letter of each word because it makes it easier for me to read it, but you don't have to.
When you want to display the value of a variable, all you need to do is type it with the preceding dollar sign. In Figure 1-3, you can see that I set my variable FirstName to my first name Sara. Then I typed in the name of the variable and it showed me the value of the variable.
Sessions
Sessions are used to connect to PowerShell on a remote system. This can be done to run commands or to interact directly with the PowerShell on the remote system.
For example, New-PSSession will create a new PowerShell session. This can be done on a local system or a remote system. Note that New-PSSession creates a persistent connection, whereas Enter-PSSession connects to a remote system but only creates a temporary connection that exists for as long as the command or commands are running.

FIGURE 1-3: Using the dollar sign tells the system you're working with a variable. You can create and display variables by adding the dollar sign in front of the variable name.
Comments
Whenever you write PowerShell scripts, you should always add comments, which help others understand how the code works and what it's doing. Comments can also help you if you ever need to change the code, or if you don’t run it very often. Comments start with the hash symbol (#). Everything that comes after the hash symbol on that line is a part of the comment. See the following example:
#This is a comment…
Write-Host "This is not a comment"
Aliases
Aliases are shortcuts for full commands. There are far too many to list all of the PowerShell aliases, but Table 1-2 lists some of the more common ones.
Cmdlets
A cmdlet is a piece of code that consists of a verb and a noun. Common verbs are Get, Set, New, Install, and so on. With the cmdlet Get-Command, Get is the verb and Command is the noun.
TABLE 1-2 Common PowerShell Aliases
Alias | Full Command |
|---|---|
|
|
|
|
|
|
|
|
|
|
|
|
|
|
|
|
|
|
|
|
|
|
|
|
Running Get-Command returns all cmdlets, aliases, and functions. You can find cmdlets, aliases, and functions that you're looking for with the Get-Command cmdlet. Look at the following:
Get-Command -Noun *network*
When you run this command, PowerShell returns a list of all commands where the noun includes network. The asterisks are wildcards and basically tell PowerShell that you don’t care if there is text before or after the noun you’re looking for. An example of this command is shown in Figure 1-4.
Parameters allow you to refine what you’re interested in the command doing. For instance, using the Get-Command cmdlet by default will return cmdlets, aliases, and functions. By using the -All parameter, you can get the Get-Command cmdlet to return cmdlets, aliases, functions, filters, scripts, and applications. You can find out which parameters are available for a given command by checking the help documentation for the command. I cover using help within PowerShell later in this chapter.
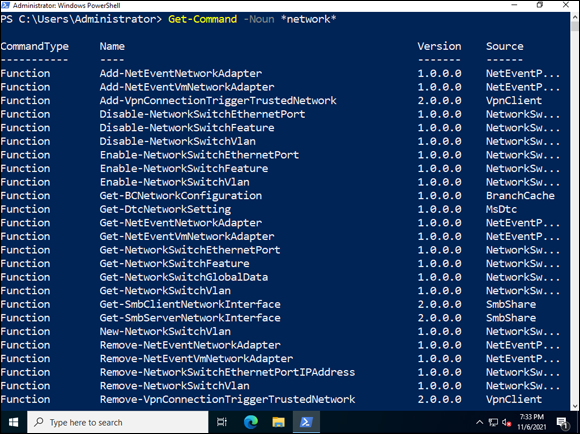
FIGURE 1-4: You can use the cmdlet Get-Command to find other commands even if you don't know the whole noun’s name.
Using PowerShell
In this section, I show you the typical day-to-day usage of PowerShell and how to accomplish the things that will make your life as a system administrator so much better.
Writing PowerShell commands and scripts
You may end up spending a significant amount of time typing out one-liners in PowerShell, or you may end up writing whole scripts. Several tools work well for writing PowerShell. I cover them in the following sections.
PowerShell Integrated Scripting Environment
You can always type directly into PowerShell, however if you're newer to PowerShell, I recommend using the PowerShell Integrated Scripting Environment (ISE). It makes suggestions based on what you’re typing and is very handy if you aren’t sure. As you can see in Figure 1-5, PowerShell ISE is correctly suggesting Get-Member based on what I started typing. Plus, you can look up commands in the right-side pane. PowerShell ISE is being deprecated; it still exists in PowerShell v5, but it will be removed in PowerShell v6. At the time of this writing, it is still included in Windows Server 2022.
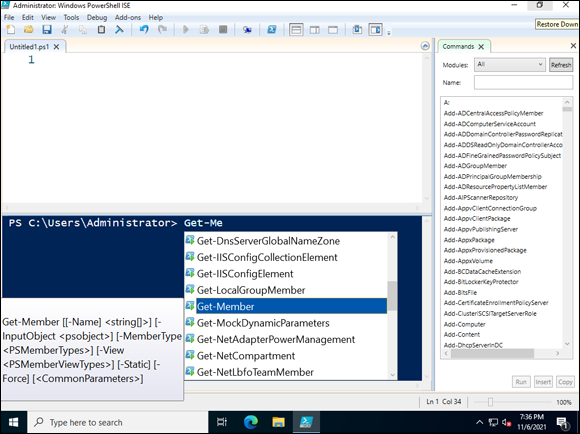
FIGURE 1-5: The PowerShell ISE is a very powerful tool for writing PowerShell scripts.
Text editors
For some system administrators, the simplicity of a simple text editor can be really tempting. Notepad is available by default in the Windows Server operating system. Personally, I love Notepad ++ because it’s a simple interface, but it still provides color coding and, with the installation of an extension, you can check the differences between two files. Notepad ++ is an open-source project, and you do have to download and install it (go to https://notepad-plus-plus.org).
Visual Studio Code
Visual Studio Code is a code editor that is designed to be a light version of the traditional and more complex products. It’s optimized for quick code development and available on Windows, Linux, and macOS, free of charge. It features many of the useful features that you’re used to if you’ve used PowerShell ISE in the past, but it adds some new features that make it a better organizational tool. It can complete commands with IntelliSense and has a much more user-friendly method of browsing PowerShell commands when you install the PowerShell extension.
For system administrators who have some familiarity with Visual Studio, or who want integration with GitHub or other code repositories, Visual Studio Code is a great option. It brings support for Git commands out of the box and can be customized with other extensions past the core PowerShell extension. Going forward, it’s what Microsoft recommends using for work in PowerShell, given that the PowerShell ISE is being deprecated.
You can download Visual Studio Code at https://code.visualstudio.com. Installation and configuration are relatively simple:
- Download the Visual Studio Code installer from
https://code.visualstudio.com. - Navigate to your Downloads folder and double-click the VS Code executable to begin installation.
- On the Setup – Visual Studio Code screen, click Next.
- On the License Agreement screen, select the I Accept the Agreement radio button, and then click Next.
- On the Select Destination Location screen, select where you want the software to install to, and then click Next.
On the Select Start Menu Folder screen, choose a folder in the Start menu if you want the application to be stored somewhere other than the default, and click Next.
You can also opt to not create a Start menu folder. I’ll accept the defaults.
- On the Select Additional Tasks screen, select the Create a Desktop Icon check box, the Add “Open with Code” Action to Windows Explorer File Context Menu check box, and the Register Code as an Editor for Supported File Types check box; leave the Add to PATH check box selected (see Figure 1-6).
- On the Ready to Install screen, click Install.
- On the Completing the Visual Studio Code Setup Wizard screen, leave Launch Visual Studio Code check box selected, and click Finish.
After VS Code has launched, click Extensions on the left side menu.
It looks like a small box being added to three other boxes.
Type PowerShell into the search box, and click Install on the extension for PowerShell, as shown in Figure 1-7.
In the figure, you can see PowerShell is the first in the list. Make sure you select the one developed by Microsoft.
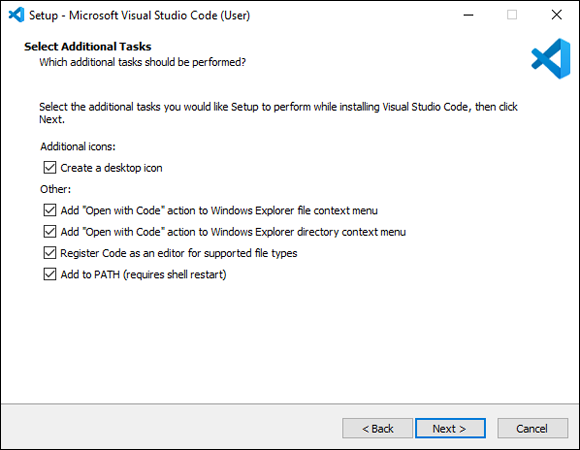
FIGURE 1-6: The Select Additional Tasks screen allows you to customize how and when you’ll interact with VS Code.
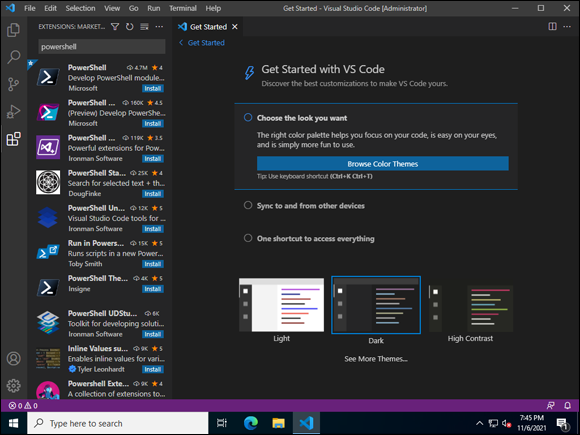
FIGURE 1-7: After VS Code is installed, you can install the PowerShell extension from the Extension Marketplace.
With the PowerShell extension installed in VS Code, you can open the PowerShell Command Explorer (see Figure 1-8). This is helpful when looking up commands. To open it, click Help and then click Show All Commands. Type PowerShell into the search box and select PowerShell Command Explorer. If you click the question mark next to a cmdlet, your browser opens to the online help page for that cmdlet. Clicking the pencil icon inserts the cmdlet into the coding window.
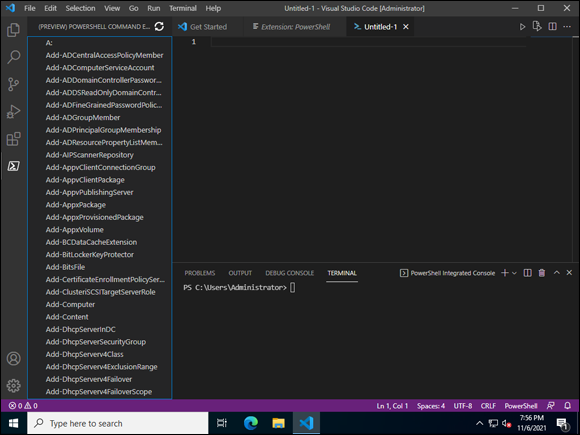
FIGURE 1-8: The PowerShell Command Explorer windows shows you PowerShell cmdlets and gives easy access to help files.
Working with objects
One of the most common things you do in PowerShell is work with objects. In fact, it would be extremely difficult not to! In the following sections, I cover some of the more common objects you use in PowerShell, and some examples of how to work with them.
Properties and methods
Properties and methods are used along with cmdlets to refine what you want the cmdlet to do. Properties are used to view the data that applies to an object, such as checking to see if an object is read-only, or to verify that data regarding an object exists. Properties are prefixed with a dash like this:
Get-Command -version: Returns the version numbers on everything returned by theGet-CommandcmdletGet-Command -verb Get: Returns aliases, cmdlets, and functions that use the verbGet
Methods are different from properties. You call them by putting a period (.) before the method name. Methods are typically used to specify some kind of action you want to take on an object. Consider the Replace method in the following example:
'This is a great For Dummies book!'.Replace('great','super')
Here, you're using the Replace method to change the word great to the word super.
Variables
As I mention earlier, variables are used to store values. They can store commands, values, and strings. You’ll use variables extensively if you do any amount of scripting because they make things simpler. You can call a variable instead of having to type a long command, for example.
Arrays
An array is a type of variable. When you create the array variable, you assign multiple values to the same variable. For instance:
$Alphabet = "A,B,C,D,E,F"
This code creates an array variable named $alphabet, which contains the letters A, B, C, D, E, and F.
To read back the contents of the array, you do the same thing that you would do to display the contents of a variable. You call the variable in the PowerShell window — in this case, $Alphabet. You get a display similar to Figure 1-9 if you use my example.
Arrays are a very useful type of variable for system administration work. For example, when you want to store a list of usernames or computer names that you exported from Active Directory so that you can run commands against each of them, an array is a perfect fit. I haven't covered loops yet, but you can run a command against each entry in an array with a loop, instead of having to run a command against an individual system.
Working with the pipeline
A pipeline is essentially a group of commands that are connected with a pipe to form a pipeline. The first command sends its output to the input of the second command, and the second command sends its output to the input of the third command.
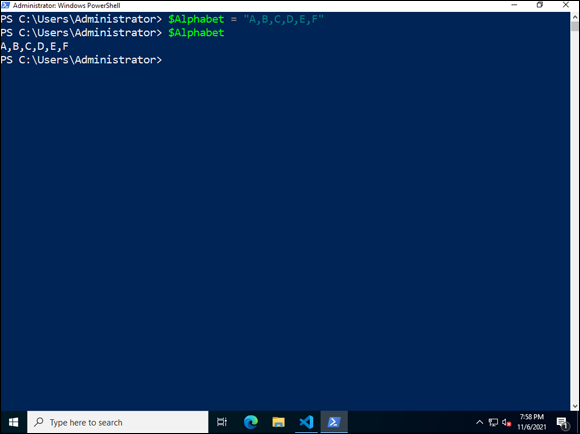
FIGURE 1-9: Creating an array variable and displaying an array variable are very similar to what you used earlier to work with variables.
The pipeline can be very handy for passing commands and/or data to another command so that you can act on it. Say, for instance, the calculator is running and you hate that pesky calculator. You can run the following command to end it.
Get-Process win32calc | Stop-Process
Sure you could’ve hit the red X to close the calculator, but what fun would that be? In the real world, you would use this command to stop a process that isn’t responding. You could use a similar version with Start-Process or other useful cmdlets, and run them against one or more servers to simplify remote administration tasks.
 The
The $_ variable represents whatever objects happens to be in the pipeline at that point in time. If you need to filter on two or more properties, this represents a really nice shorthand method to do this. Consider the following example:
Get-Process | Where {$_.CPU -gt 10}
Get-Process | Where {$_.CPU -gt 10 -AND $_.Handles -gt 700}
In this case, the $_ is passing the output of the Get-Process cmdlet and is allowing you to access the properties of the Get-Process command to run the comparison operators against. You can see the actual output of these two commands in Figure 1-10.

FIGURE 1-10: Using a pipeline with $_ to pass on the output of the first cmdlet, which allows you to use the cmdlet's properties to filter using the comparison operators.
So, when should you use the pipeline? I believe that you should use the pipeline anytime you need the output of one command to be passed to the next command. This can result in some very long pipelines, but using the pipeline is simpler than breaking each cmdlet out on its own.
Working with modules
PowerShell is very powerful out of the box, but you’ll run into scenarios when it can’t accomplish what you want it to do. For example, PowerShell out of the box does not know how to work with Active Directory objects. To tell it how to interact with Active Directory, you import the ActiveDirectory module. At its simplest, a module is just a package that contains cmdlets, providers, variables, and functions.
Browsing available modules
Modules are pretty cool, right? Your next question may be: How do I find out what modules are available to me? I’m glad you asked. The command is simple:
Get-Module -ListAvailable
If you run the command by itself, you’ll get a list of the modules that are available currently within your session. By adding the -ListAvailable parameter, you can get a list of modules that are installed on your computer and available for use. This command will take some time to return results, but when it does, you’ll have a nice list of all the PowerShell modules that are available to you on your system. I’ve included an example of the output in Figure 1-11. Please note that your output may look different because you’ll have additional modules listed based on the roles and features installed on your system.

FIGURE 1-11: Viewing the available modules in PowerShell gives you an idea of how powerful it can be, and how many tools you have at your disposal.
Browsing the properties of a module
Get-Member is the simplest method to find out what properties are available to you with modules. The following line of code will give you a printout of all the properties associated with Get-Module. The last part of the command cuts the results down to just the name column because you aren't interested in the other columns for this purpose.
Get-Module | Get-Member -MemberType Property | Format-Table Name
Working with comparison operators
Comparison operators are very useful when you need to see if two objects match or don’t match. For instance, you may use a comparison operator to find all the services on your system that are disabled. In this section, I cover the most common comparison operators.
-eq and -ne
Equal to (-eq) and not equal to (-ne) are used when you need to find an exact match to something, or when you want to ensure your results do not match. The response you get back is a true/false response. Consider the following code sample:
$num = 2
$othernum = 3
$num -eq $othernum
When the last line runs, it will return a false because 2 does not equal 3. Let's run not equal to (-ne) now, which returns a true:
$num -ne $othernum
You can see these little snippets in Figure 1-12 with their outputs.
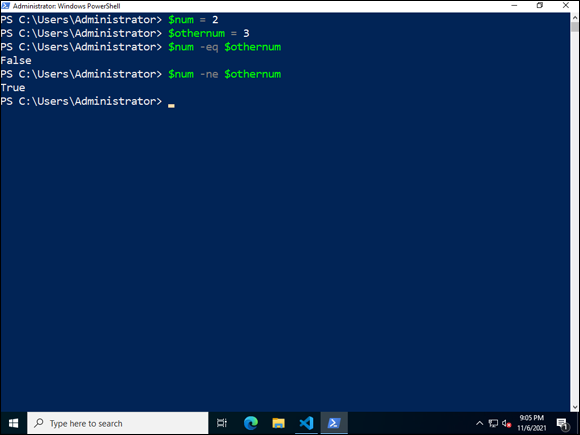
FIGURE 1-12: If you’re trying to determine whether one object matches another, a simple equal to (-eq) may be your best bet.
-gt and -lt
Greater than (-gt) and less than (-lt) are also comparison operators that return a true/false response. You can play with a really simple version of this by setting a variable to a value and then testing it. For example:
$x = 4
$x -gt 8
The preceding code will check to see if the value of x (in this case 4) is greater than 8. It is not, so the response will be false.
-and and -or
-and and -or also return true/false responses based on the conditions that they're given. -and, for example, returns a true if both statements it is fed are true. -or returns a true if one of the statements it is given is true.
For example, the following statement will be true if $a is less than $b, and $b is less than 50:
($a -lt $b) -and ($b -lt 50)
This equation is similar but will be true if $a is less than $b, or if $b is less than 50:
($a -lt $b) -or ($b -lt 50)
Getting information out of PowerShell
It's all fun and games to write equations and have PowerShell put the answer right on the screen, but the truth of the matter is that you’re usually going to want PowerShell to output the information in a different format. A common use case is exporting information on systems out of Active Directory to a CSV, so that you can filter on properties of each system like the operating system version, and whether service packs are installed. Or you may want it to write the result on the screen, but with some kind of text to give the information context. In the following sections, I examine a few of the ways to get PowerShell to output text.
Write-Host
Write-Host is used to write things onscreen. This command is very helpful when you want to give the result of something some context.
For example, you can set the value of a variable, in this case, $x to 2:
$x = 2
Then you can use Write-Host to print a sentence and the output of the variable:
Write-Host "The value of x is:" $x
This will end up printing out, “The value of x is: 2.”
Write-Output
Write-Output prints the value of a variable to a screen, much like simply typing the variable does. The main reason to use this particular command is that you can tell it not to enumerate data. If you're working with arrays, this can be helpful because the array will be passed down the pipeline as a single object rather than multiple objects.
An example from Microsoft’s web documentation for PowerShell showcases this perfectly. In both instances, you create an array with three values inside of it. If you measure the array, you get a count returned of 3, which makes sense. When you add -NoEnumerate, you get a count of 1. The three values are still there, but the array is simply being treated as one object rather than a collection of three, shown in Figure 1-13.
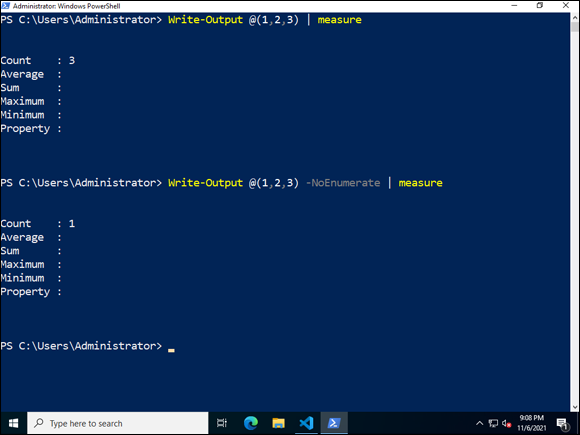
FIGURE 1-13: Adding -NoEnumerate tells PowerShell to treat arrays differently than normal.
Out-File
Out-File is another method to export data from PowerShell into a file outside of PowerShell. This is especially helpful when you need to compile the data from a script, for instance, for analysis later on.
To get a list of processes running on a system so that you can dump them to file, you could do something like this:
Get-Process | Out-File -filepath C:PSTempprocesses.txt
Scripting logic
Loops can make a PowerShell script even more powerful. For instance, say you want to run a command against an exported list of computers from Active Directory. You can use a loop to enumerate through the imported CSV file and run the command on each individual entry.
If
The If statement tests a condition to see if it's true. If it is true, it will execute the code in the block. If it isn’t true, it will check the next condition or execute the instructions in the final block. Here is a silly example:
$server = 'Windows'
If ($server -eq 'Linux') {
Write-Host 'This is a Linux server.'
}
ElseIf ($server -eq 'Solaris') {
Write-Host 'This is a Solaris system.'
}
ElseIf ($server -eq 'Windows') {
Write-Host 'This is a Windows system.'
}
Else {
Write-Host "Don't know what kind of system this is."
}
In this instance, because $server was initialized as Windows, the first two blocks will be skipped, but the third block will execute. The last block is ignored because it was not reached.
ForEach-Object
Using ForEach-Object allows you to enumerate multiple objects that have been passed through the pipeline or even imported from arrays and CSV files, just to name a few. Let's say you want to gather the names of all the processes running on your system, but you don’t want any of the other information that goes along with it. You could use ForEach-Object to accomplish this:
Get-Process | ForEach-Object {$_.ProcessName}
While
While loops are known as pretest loops because the code is not executed if the condition set for the loop is not true. Basically, the code will be executed until the expression it's evaluating becomes false. These can be very useful when you need to increment or decrement a counter. Look at the following example:
$myint = 1
DO
{
"Starting loop number $myint"
$myint
$myint++
"Now my integer is $myint"
} While ($myint -le 5)
You may be thinking, “Okay, it will count from 1 to 5.” But that’s not quite true. On the fifth loop, the While loop sees that 5 is less than or equal to 5 so it will allow it to continue. Only when it’s presented with 6 will it stop execution because 6 is not less than or equal to 5. So it will count from 1 through 6. Give it a try!
Other cool tricks
There are some other neat things you can do with PowerShell, and I would be remiss in my duties as an author if I didn’t add them to this chapter. Read on for more.
Exporting and importing CSV files
Exporting a CSV is very handy when you have output that contains multiple columns. This is my go-to command when I’m doing an export from Active Directory because it keeps everything neat and organized.
Here’s how to export the processes on a system, similar to what you did with Out-File to get to a text file:
Get-Process | Export-Csv -Path C:PSTempprocesses.csv
Importing a CSV can be the answer to a system administrator's prayers when you need to work with a lot of data and you don’t want to type it in manually. Expanding on the example earlier where you exported a process list, you can import that same list and then format it nicely. Formatting is discussed in “Formatting your output” later in this chapter.
$Procs = Import-Csv -Path c:PSTempprocesses.csv
You only need to specify -Path if you want to save output or import output from somewhere other than the directory you’re currently in.
Exporting HTML/XML
This one isn’t exactly a true export. You’re actually converting the output of a command to HTML and then using Out-File to write it to that file. Consider the following example:
Get-Process | ConvertTo-Html | Out-File c:PSTempprocesses.html
You can see this example in Figure 1-14, where I've used the Invoke-Item command to actually open my created HTML file that contains the output of the Get-Process command.
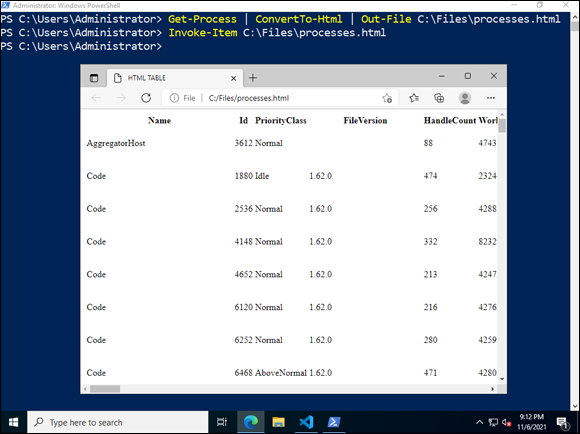
FIGURE 1-14: The ConvertTo-Html cmdlet can be used to convert the output of a previous command to an HTML format, which can then be written to file with Out-File.
Sorting through objects
Telling PowerShell how you want it to sort objects can be very useful. For example, you may want to sort on memory usage so you can see which processes are using the most resources. The Sort-Object cmdlet will sort processes in the order of least CPU-intensive to most CPU-intensive:
Get-Process | Sort-Object -Property CPU
Filtering through objects
Examples like sorting can be very useful, but it's highly unlikely that you would want to look through all the results for CPU. You probably just want to know what the most resource-intensive processes are. The Select-Object cmdlet will return the last five results from that CPU listing, which is a much more manageable and useful list if you’re troubleshooting issues.
Get-Process | Sort-Object -Property CPU | Select-Object -Last 5
Formatting your output
You’ve probably noticed from playing in PowerShell that sometimes the output isn’t as readable as it could be. So let’s look at some of the ways to format output to be a little prettier.
Run the Get-Process cmdlet to get a baseline for appearance. Figure 1-15 gives you an idea of what the cmdlet's output looks like.
FORMAT-LIST
Format-List takes the output of the cmdlet or whatever code is before it and formats the output into a list. The output of Get-Process | Format-List will look like Figure 1-16.
FORMAT-TABLE
Format-Table can take data in a list format and convert it into a table. With the Get-Process cmdlet I've been using in this chapter, it wouldn’t change the output because Get-Process is already outputting a table. You can add the -AutoSize parameter so that the column sizes in the table adjust automatically.

FIGURE 1-15: The output of Get-Process is normally in a table format.
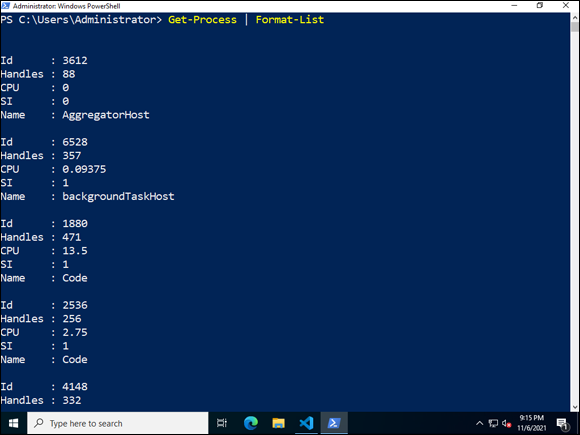
FIGURE 1-16: Get-Process formatted into a list rather than the usual table format.
FORMAT-WIDE
Format-Wide will display data in a table format, but it will only show one property of the data that it's presented. You can specify how many columns, and you can specify which property you want it to display. The example in Figure 1-17 is the output of Get-Process split into three columns. I haven’t specified a property name, but you can see that it’s using the Process Name as the property.
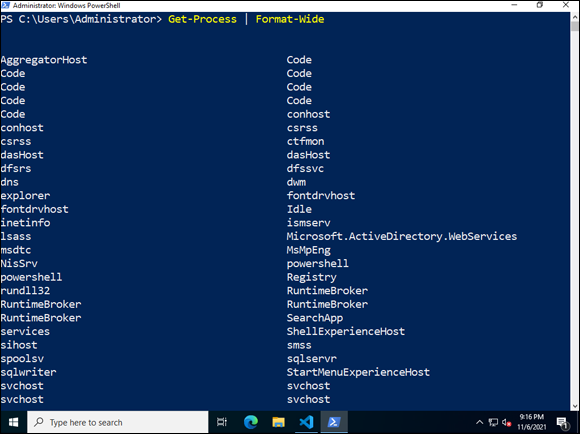
FIGURE 1-17: You can use Format-Wide to nicely format and present data in table formats.
Running PowerShell Remotely
Running PowerShell locally can be great for automating work and simplifying administrative work. But the true strength in PowerShell comes from the fact that you can also run it remotely against other systems on your network.
Invoke-Command
Invoke-Command can be used locally or remotely. Because the focus of this section is on the remote usage of the cmdlet, that's where I’ll focus. Say I wanted to run my favorite Get-Process on a system named Server3. The entire thing would look something like this:
Invoke-Command -ComputerName Server3 -Credential domainusername -ScriptBlock {Get-Process}
New-PSSession
Running New-PSSession allows you to establish a lasting, persistent connection to a remote system on your network. If you want to run command through your PSSession, you use the Invoke-Command cmdlet (see the preceding section). To open the new connection, type the following:
New-PSSession -ComputerName Server3
Enter-PSSession
Enter-PSSession allows you open an interactive session to a remote computer. The prompt changes to indicate that you're connected to the remote system. In Figure 1-18, you can see the changed prompt, as well as the commands that I ran against the remote server.
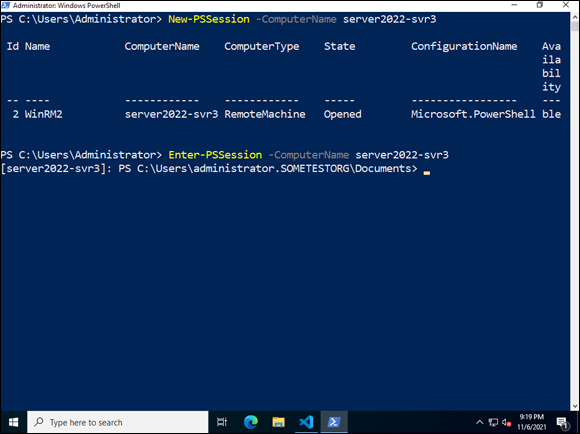
FIGURE 1-18: Interacting with a remote server is intuitive after connecting to it with Enter-PSSession.
This is extremely useful if you're running headless systems like Server Core in your environment. To exit the interactive session, you can type Exit-PSSession or simply type exit.
Getting Help in PowerShell
You can do so many things with PowerShell that it would be impossible to memorize all of them. This is where the built-in help comes in very useful. The help pages give you a description of what a command can do, along with examples and additional parameters you can use with the command.
Update-Help
One of the first things I like to do with a new system is run the Update-Help cmdlet. This cmdlet pulls down the help articles available at the moment you issue the command. It can take a bit of time, so run it when you aren’t needing to use it right away. In Figure 1-19, you can see what the update process looks like. Each module displays its progress. This process does require an Internet connection.
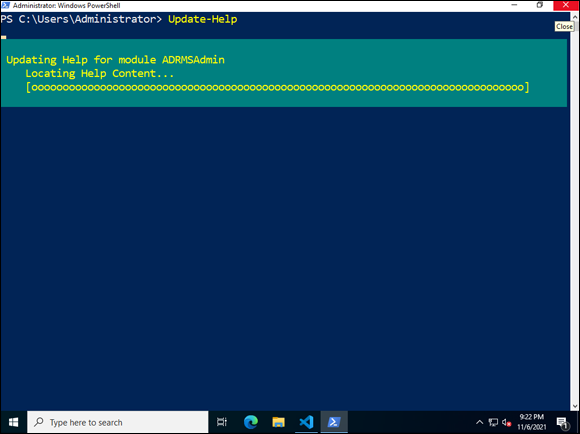
FIGURE 1-19: Updating the help pages for your PowerShell modules.
The most recent versions of the help articles are going to be on Microsoft’s PowerShell Reference pages (https://docs.microsoft.com/en-us/powershell/scripting), not by download on your system.
Get-Help
The Get-Help cmdlet is like the Swiss Army knife of cmdlets. If you don't know what you’re looking for, it can be very helpful. Here are some options:
Get-Help Get-Process: Running this command will return information about theGet-Processcommand. This is most useful if you need to learn more about a cmdlet, or if you need to learn more about how to interact with a cmdlet.Get-Help process: This command is nice when you don't know the exact name of the cmdlet you’re looking for. It will search for help topics that contain the word process and will display them to you afterward.
-Detailed and -Full
Help articles have different levels of detail that they can go into. Normally, the help article will show basic syntax to give you an idea of how to use the cmdlet. To look at more levels of detail, you can use the following:
-Detailed: The-Detailedparameter will display descriptions of parameters and examples of how to use them with the cmdlet.-Full: The-Fullparameter will truly give you all the information available regarding a cmdlet, including descriptions of parameters, examples of how to use the cmdlet, type of input/out objects, and any additional notes that are in the help file.
For example, you could type Get-Help Get-Process -Full to get all f the details available from the help files for the Get-Process cmdlet.
Identifying Security Issues with PowerShell
Given the power of PowerShell, you need to be able to secure it properly. There are several things you can do to ensure that only proper and authorized PowerShell scripts are able to run on your network.
Execution Policy
The Execution Policy allows you to define what kind of scripts are allowed to run within your network. You can set the Execution Policy through Group Policy or through the following PowerShell cmdlet:
Set-ExecutionPolicy -ExecutionPolicy <policy>
There are several policy types that can be put in place of <policy> in the preceding example:
Restricted: This is the default policy if no other policy is specified. It prevents PowerShell scripts from running and will not load configuration files.AllSigned: For a script or configuration file to run, it must be signed by a trusted certificate. I cover how to do this in the next section.RemoteSigned: This requires that any script that is downloaded from the Internet be signed by a trusted certificate. Scripts created locally do not have to be signed to run.Unrestricted: This allows you to run all scripts and load all configuration files. You're prompted for permission before a script is run. I don’t recommend using this setting.
Bypass: This is very similar to Unrestricted, except it doesn’t even prompt for permission to run a script. I caution you to never use this setting.Undefined: This removes whatever Execution Policy is currently set, unless that Execution Policy is being set through Group Policy.
Code signing
To use an Execution Policy that is more secure, a PowerShell script needs to be signed. By signing a PowerShell script, you're validating that it came from a trusted source and that it has not been altered since it was released. If you’re using RemoteSigned, then you only need to worry about signatures on scripts downloaded from the Internet. However, if your security people have gone wild and it’s set to AllSigned, you need to sign your PowerShell scripts before you can run them. In the following sections, I show you the steps involved in doing that.
Creating a Code Signing Certificate
To be able to sign a PowerShell script, you need a Code Signing Certificate (CSC). If you're publishing certificates for use on the Internet, you can purchase CSCs from some of the large public certificate authorities like GoDaddy and DigiCert. If you’re creating certificates for internal usage, then you can create a CSC using your internal certificate authority. That’s the workflow you can walk through here:
- Click Start and then type CertMgr.msc and press Enter.
- Right-click Personal, then select All Tasks, then Request New Certificate.
- On the Before You Begin screen, click Next.
- On the Select Certificate Enrollment Policy screen, choose Active Directory Enrollment Policy, and then click Next.
Select the CSC template, and then click Enroll.
On the Certificate Installation Results screen, you should see Succeeded.
- Click Finish.
Importing the certificate into the Trusted Publishers Certificate Store
If you’re only going to run scripts on your local system, you can get away with manually exporting the certificate from your Personal Store and adding it to your Trusted Publishers Certificate Store. In an Enterprise situation, you’ll want to use Group Policy to push your certificate to the Trusted Publishers Certificate Store on any system you’ll run the script from. Follow these steps to do add your code signing certificate to your Trusted Publishers Certificate Store:
- Click Start, type CertMgr.msc, and press Enter.
- Select Personal, right-click your CSC, and choose All Tasks ⇒ Export.
- On the Welcome to the Certificate Export Wizard, click Next.
- On the Export Private Key screen, leave the selection on No, and click Next.
- Leave the file format on the default .DER and click Next.
- On the File Export screen, click Browse.
Select a location, name your cert, and click Next.
I’ll name mine Demo CSC and save it to my Desktop.
On the Completing the Certificate Export Wizard, click Finish.
You get a pop-up that says “The export was successful.”
- Click OK.
- Navigate to where you saved the certificate, and double-click it.
- Click the Install Certificate button.
- On the Welcome to the Certificate Import Wizard screen, select Local Machine and click Next.
- On the Certificate Store screen, select Place All Certificates in the Following Store, and click Browse.
- Choose Trusted Publishers and click OK; then click Next.
On the Completing the Certificate Import Wizard screen, click Finish.
You’ll get a pop-up that says “The import was successful.”
- Click OK.
Signing your script
After you’ve created the certificate, and you’ve imported it into the Trusted Publishers Certificate Store, you can sign your certificate, and your system will trust it. So let’s sign the simple Do While script that I created earlier.
Set-AuthenticodeSignature c:DoWhile.ps1 @(Get-ChildItem cert:CurrentUserMy -codesign)[0]
This signs the script with the certificate that is in my Personal Store. After the script is signed, I can run it. I’m not prompted and it runs without issue. If you look at Figure 1-20, you can see what the script looks like with the signature added to it.
In the example in Figure 1-21, I show you the whole thing from start to finish. I set the Execution Policy to AllSigned. Then I try to run an unsigned script. You can see I get an ugly error message saying that the script is not digitally signed. I run the PowerShell cmdlet to sign my script, and then I run the script again and it executes successfully. Pretty cool, right?
Firewall requirements for PowerShell remoting
PowerShell remoting relies on the Windows Remote Management (WinRM) service. WinRM creates two listeners, one for HTTP and one for HTTPS. To allow remote PowerShell commands to work, you need to have ports 5985 and 5986 open. Port 5985 provides HTTP support, and Port 5986 provides HTTPS support.

FIGURE 1-20: Signing a script allows it to run even in a restrictive environment that requires all PowerShell scripts to be signed.
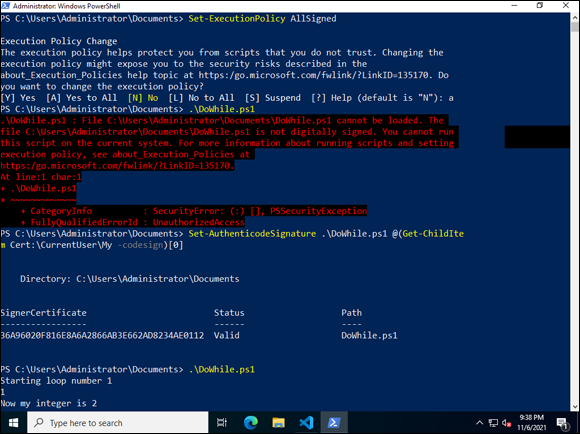
FIGURE 1-21: A demonstration of what you see when running an unsigned script, signing the script, and finally executing the signed script.
On an individual system, running the Enable-PSRemoting cmdlet does all the work needed to allow for remote PowerShell to work, including enabling the local firewall rules necessary. This cmdlet needs to be issued from an elevated (use Run as Administrator) PowerShell window.