
Chapter 5
PowerShell Desired State Configuration
IN THIS CHAPTER
![]() Introducing PowerShell Desired State Configuration
Introducing PowerShell Desired State Configuration
![]() Making your first PowerShell Desired State Configuration script
Making your first PowerShell Desired State Configuration script
![]() Using the PowerShell Desired State Configuration script
Using the PowerShell Desired State Configuration script
![]() Implementing PowerShell Desired State Configuration at scale
Implementing PowerShell Desired State Configuration at scale
PowerShell Desired State Configuration (DSC) enables system administrators to configure systems and keep them in compliance with set organizational baselines. It’s sometimes referred to Configuration as Code.
You may be wondering when you would want to use something like this. In my own career, I’ve seen PowerShell DSC used to enforce security requirements like CIS Benchmarks or anti-malware software settings on servers. It allows system administrators to modernize server deployments with Infrastructure as Code (IaC) while also guaranteeing that build requirements are being met. If a user changes a security setting, PowerShell DSC can overwrite that setting back to the secure baseline that you’ve created. It truly is a powerful tool.
In this chapter, I introduce you to PowerShell DSC and tell you how to create a DSC script and how to apply it.
Getting an Overview of PowerShell Desired State Configuration
DSC was introduced in PowerShell version 4. It provided a simple way to specify what you wanted a system to be, instead of having to build a system one line of code at a time. I like to compare it to baking: Traditional PowerShell is like following the recipe; DSC is like saying, “I want this,” and handing the picture of a cake to the baker.
DSC is exceptionally powerful. It can be used to install roles and features, copy files to specified locations, install software, and make changes to the Registry.
PowerShell DSC has three main components:
- Configurations: PowerShell scripts that are used to configure your resources according to your organization’s requirements
- Resources: Code that keeps your system in compliance with the specified configuration
- Local Configuration Manager (LCM): Handles the interactions between the configurations and the resources
In the following sections, I cover each of these components in a little deeper detail and show you what they look like in an actual DSC script.
Configurations
Because PowerShell DSC files are saved as PS1 files, you may be wondering how PowerShell knows that the file is a PowerShell DSC file. That’s a great question! It looks for the keyword configuration. This tells it that the file contains a DSC configuration. A sample in a DSC configuration may look something like this:
Configuration MyAwesomeWebsite {
 You can name the configuration whatever you like. PowerShell doesn’t care what it’s called. I suggest giving it a name that makes sense to you so that you can look at it and know from the name what you’re configuring with this particular configuration file.
A DSC script accomplishes its tasks with a slightly different feel from traditional PowerShell; it looks similar to an advanced function. With traditional PowerShell, you would write something along the lines of the following:
Install-WindowsFeature -Name "Web-Server"
This installs the Internet Information Services (IIS) web server on the Windows system that you run it on. You may also specify whether you want sub-features to be enabled and if you want the management tools for IIS to be installed.
With a DSC configuration, this is how you would accomplish the same thing as that line of PowerShell:
WindowsFeature WebServer {
            Ensure = "Present"
            Name = "Web-Server"
        }
Instead of telling it explicitly to install the Web-Server feature via PowerShell, you simply tell DSC that you want to make sure that Web-Server is present. If it is, then the script continues to execute and does not reinstall the Web-Server. If it is not installed, then the Web-Server feature will be installed.
Resources
Resources are the foundational pieces of PowerShell DSC. Resources make properties available that can contain PowerShell scripts and that can be used by LCM to implement the changes.
You may want to look up how to use a particular DSC resource. This is simple to do with the following command:
Get-DscResource Syntax <resource>
If, for instance, you run that command using service as the resource, you'll find some of the more common things that are used in relation to services, like the service name and the state of the service. Most administrators, for example, will want to check to see if a service is running. Maybe you want to verify that your antivirus service or patching service is running. The following example shows you how you can use a resource block to verify that a service is running on your local system, in this case IIS:
Configuration MyAwesomeWebsite
{
    Import-DSCResource -Name Service
    Node localhost
    {
        Service "W3SVC:Running"
        {
            Name = "W3SVC"
            State = "Running"
        }
    }
}
You may be wondering how I got that service name for IIS, the web server available in Microsoft Server 2022. You can go into the Services.msc panel and get your service names there. In the example of the web server, I scrolled down to World Wide Web Publishing Service and double-clicked it. The name that you need for DSC is listed as Service Name, shown in Figure 5-1 as W3SVC.
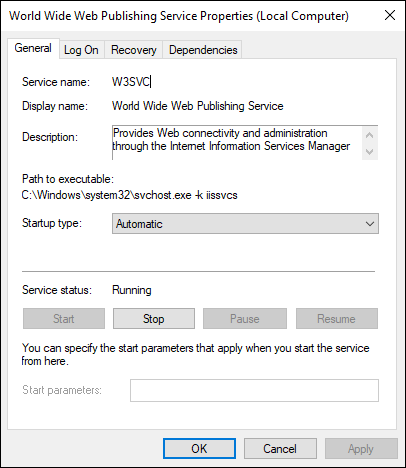
FIGURE 5-1: The service name is displayed within the services.msc panel for each service.
Of course, Service is not the only resource type available. The Import-DSCResource module contains many different resources that you can use in your DSC scripts. I have listed the more common resource types in Table 5-1.
If this table doesn't list a resource you need, you can download additional resources from the PowerShell Gallery (www.powershellgallery.com) and GitHub (https://github.com/PowerShell/DscResources).
TABLE 5-1 DSC Resources
Resource Name | Description |
|---|---|
| The |
| The |
| The |
| The |
| The |
| The |
| The |
| The |
| The |
| The |
| The |
| The |
Local Configuration Manager
The LCM receives configurations that are sent to your systems and applies those configurations. It runs on every system that you’re targeting with your DSC scripts.
LCM allows you to specify how you want to get configurations. You can use a push model or a pull model. You can also set how often each system reaches out to pull a configuration down.
If you want to see that the LCM settings are on a system on which you want to use DSC configuration scripts, you can run the following command:
Get-DscLocalConfigurationManager
This command displays the current settings for LCM. An example is shown in Figure 5-2.
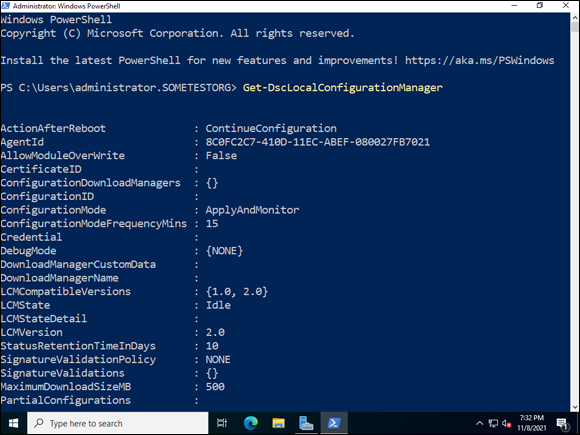
FIGURE 5-2: Checking the current settings for LCM is simple to do in PowerShell with the Get-DscLocalConfigurationManager command.
Creating a PowerShell Desired State Configuration Script
If you've read this chapter from the beginning, you’ve found out about the components of DSC at this point. Now how do you build something useful? In this section, you continue to build on the example of a web server. In your organization, you may need to be able to provision systems quickly to keep up with demand. In this example, you’re going to use DSC to ensure that IIS is installed on the system and to copy files for the website over from a source that is specified to the new web server so that it can start serving out content. Normally, the source would not be on the same server; it would simply be available on the same network.
The script starts with the keyword configuration, which tells PowerShell this is a DSC file. The next step is to import PSDesiredConfiguration, which is needed to load the custom resources that you may need in your script. Node is used to specify the system that you want to run the DSC against. In this case, I'm running it on the computer that it resides on, so Node is set to localhost (my local computer). The WindowsFeature block is where I tell it that the WebServer feature must be present. This will check to see if Internet Information Services (IIS) is installed. If it is not installed, then DSC will install the feature. The last part of this script copies the website files from the source to the destination. This can be a great way to speed the provisioning of web servers if you need to scale quickly.
Configuration MyAwesomeWebsite {
    Import-DscResource -ModuleName PsDesiredStateConfiguration
    Node 'localhost' {
        WindowsFeature WebServer {
            Ensure = "Present"
            Name = "Web-Server"
        }
        File WebsiteGoodies {
            Ensure = 'Present'
            SourcePath = 'c:PStempindex.html'
            DestinationPath = 'c:inetpubwwwroot'
        }
    }
}
MyAwesomeWebsite
You'll want to write your script in your code editor of choice and save it to a PS1 file. I’ve made this simple DSC script available on the GitHub for this book. You can reach it at https://github.com/sara-perrott/Server2022PowerShell.
You may notice that this DSC configuration was written with just one node, localhost. In most production instances, you're going to want to target multiple hosts with your DSC configuration. This is a simple change to make. Instead of the single node being defined like this:
Node 'localhost' {
It gets defined like this to support multiple nodes:
Node @('localhost','Server2') {
Applying the PowerShell Desired State Configuration Script
After you have your script written, you’ll want to actually apply it. The steps are fairly simple. First, run the PS1 file as you would any other PowerShell script. This will create a Managed Object Format (MOF) file. MOF files are what actually get used by PowerShell DSC to do its configuration work.
Compiling into MOF
Open your PowerShell window. You can reach this by right-clicking Start and then choosing Windows PowerShell Admin. Then follow these steps:
- Navigate to the directory where the new PS1 file is stored.
- Run the following command:
. .AwesomeWebsite.ps1
You can see in Figure 5-3 that running the command generates the MOF file. The MOF file takes its name from the name supplied in the resource block. In this case, the name is localhost. If you have multiple systems, you’ll have multiple MOF files, one for each system represented.
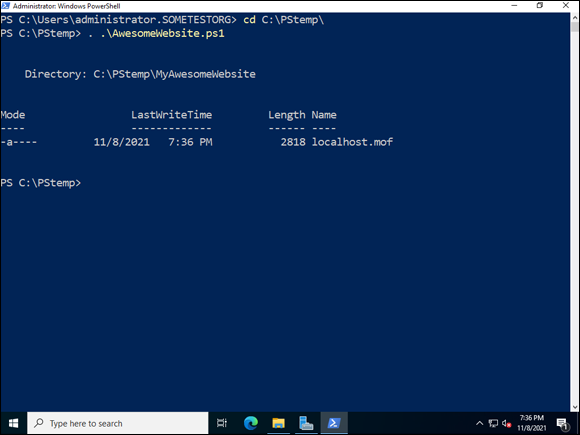
FIGURE 5-3: Compiling the PS1 into an MOF file is done by running the PowerShell script as you normally would.
If you browse to the directory where your script is located, you’ll notice that you now have a folder with the name of your configuration on it. Inside of this folder is your MOF file.
Applying the new configuration
Now that you’ve created the MOF file, it’s time to apply the configurations contained within it. You’ll want to run the Start-DscConfiguration cmdlet, which will use the MOF file to run the configuration against the system. You run the cmdlet and specify the folder that the MOF file is in:
Start-DscConfiguration .MyAwesomeWebsite
After this command is run, you get the state of the configuration, which should be Running, as shown in Figure 5-4.
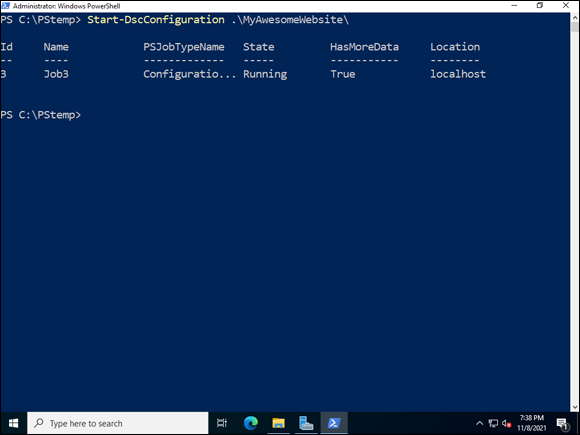
FIGURE 5-4: The DSC script has been compiled and has been run; you can see the State is currently Running.
Push and Pull: Using PowerShell Desired State Configuration at Scale
As you can see, DSC is a very powerful tool for configuring your systems. Chances are, you want to automate things a bit more. You don't want to log on to your server and run DSC manually. That’s where you need to start looking at the two configuration modes: push mode and pull mode.
Push mode
In push mode, the configuration is pushed to the destination system. It’s a one-way relationship. Push mode is done similar to the example in the “Applying the new configuration” section earlier in this chapter. You run the Start-DscConfiguration cmdlet, and you can use the -ComputerName parameter to target specific systems with the script.
You can easily automate this on a scripting server with scheduled tasks. By setting it up as a scheduled task, you can ensure that your configuration is pushed at regular intervals and that your systems are configured exactly the way you expect them to be configured.
When using push mode, you have a decision to make when it comes to the configuration mode that you want to use. You can see which one you're using currently by running the Get-DscLocalConfigurationManager command. There are three options:
ApplyOnly: Applies the configuration once, but does nothing further.ApplyandMonitor: Applies the configuration and will write any discrepancies to the logs. This is the default value.ApplyandAutoCorrect: Applies the configuration, writes discrepancies to the logs, and then applies the current configuration again.
If you make a change to the configuration script, you need to regenerate the MOF. DSC does cache configurations, so if you have made changes to your script, you need to stop and restart the process that is hosting the DSC engine. You can do that with the following commands.
First, you need to get the process ID of the process that is hosting the DSC engine.
$ProcessID = Get-WmiObject msft_providers | Where-Object {$_.provider -like 'dsccore'} | Select-Object -ExpandProperty HostProcessIdentifier
Then you stop the process using the following command:
Get-Process -Id $ProcessID | Stop-Process
After you've stopped the process, simply run Start-DscConfiguration again, and it will use the newest version of the configuration script.
Pull mode
Pull mode is a little more complicated to get started. You need to set up a pull server, which will host the DSC service and contain all the configuration and resource scripts that the clients will pull.
The sequence for setting up pull mode is to create the configuration script, set up the pull server, and then set up DSC on the system that you want the pull to occur from.
Setting up the pull server
Before you can use the pull server, you need to configure it. First, you need to install a module named xPSDesiredStateConfiguration. This module available on PowerShell Gallery. With PowerShell open, you can run the command Install-Module -Name xPSDesiredStateConfiguration, which automatically downloads and installs the module for you. You may be prompted to accept a new provider named Nuget. Press Y if that occurs. You'll be asked if you’re sure you want to install the module; press Y.
After the module is installed, you can run the script to set up the DSC pull server. I’m using the configuration script available from Microsoft’s DSC pull page. You can copy the script from https://docs.microsoft.com/en-us/powershell/dsc/pull-server/pullServer.
Configuring DSC on the system to use the pull server
After the pull server is set up, the last step is to set up the system that will be pulling the configuration from the pull server. You can run the following to set up the client.
Configuration ConfigurationForPull
{
     LocalConfigurationManager
     {
       ConfigurationID = "registration_key_from:server_setup_script";
       RefreshMode = "PULL";
       DownloadManagerName = "WebDownloadManager";
       RebootNodeIfNeeded = $true;
       RefreshFrequencyMins = 30;
       ConfigurationModeFrequencyMins = 60;
       ConfigurationMode = "ApplyAndAutoCorrect";
       DownloadManagerCustomData = @{ServerUrl = "http://PullServer:8080/PSDSCPullServer/PSDSCPullServer.svc"; AllowUnsecureConnection = "TRUE"}
     }
}
ConfigurationForPull -Output "."
Save the script and run it like you have before. And then use the Start-DscConfiguration cmdlet to apply the configuration.