
Chapter 5
High Availability in Hyper-V
IN THIS CHAPTER
![]() Understanding Hyper-V replica
Understanding Hyper-V replica
![]() Performing live migration
Performing live migration
![]() Performing storage migration
Performing storage migration
![]() Configuring Failover Clustering
Configuring Failover Clustering
No discussion about Hyper-V would be complete without a discussion on how to make it highly available. The biggest win for most organizations is the ability to reduce downtime when the underlying physical hardware fails.
In this chapter, you find out how to make your Hyper-V deployments highly available. These technologies can be used to prevent or minimize disruption due to hardware failure, or maintenance on the underlying hosts.
Hyper-V Replica
Hyper-V Replica is a great solution for disaster recovery situations. It allows you to replicate a live virtual machine (VM) to an offline Hyper-V Replica. In the event of an issue that takes the active host down, the VM can be powered on at the replica server.
Hyper-V Replicas may be in the same physical datacenter, or they may be located in geographically distant datacenters.
To use Hyper-V Replica, you must first set up the Hyper-V hosts. Then you can configure the VMs that you want to replicate.
Setting up Hyper-V Replica on the Hyper-V hosts
Before you can use Hyper-V Replica, you need to enable the replica server and configure where you want to allow replication to happen from. This can be done over an unencrypted Kerberos connection or a certificate-based (HTTPS) connection. For production environments, it’s recommended to use a certificate-based connection because the replication traffic will be encrypted. For a test or development environment where encryption would introduce overhead, the Kerberos connection would work well. For this example, let’s set up an unencrypted replica.
On the replica server, follow these steps:
- Open Hyper-V Manager, and right-click the Hyper-V host.
- Select Hyper-V Settings.
- Select Replication Configuration and select the Enable This Computer as a Replica Server check box.
- Select the Use Kerberos (HTTP) check box.
- In the Authorization and Storage section, select Allow Replication from any Authenticated Server.
- Set a storage location for the replicated VM hard disks if you want something other than the default.
Click Apply, and then click OK.
Your screen should look similar to Figure 5-1.
Now that the Hyper-V host is set up as a replica, you’ll want to verify that Windows Firewall will allow replication traffic in. There are two rules that you may need to enable:
- Hyper-V Replica HTTP Listener (TCP-In): This rule needs to be enabled if you’re using the Kerberos-based connection.
- Hyper-V Replica HTTPS Listener (TCP-In): This rule needs to be enabled if you’re using the certificate-based connection.
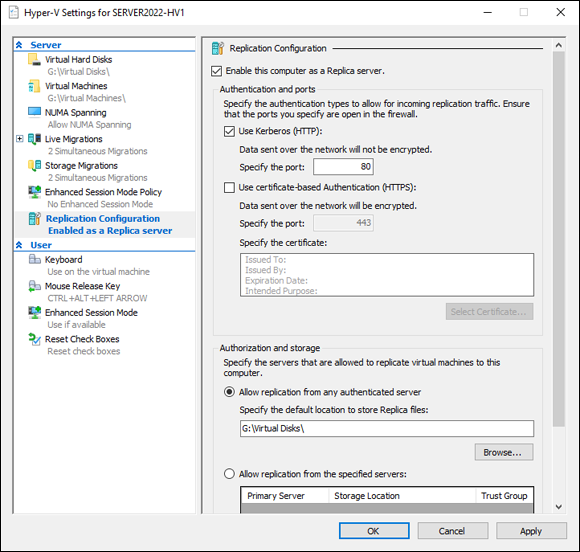
FIGURE 5-1: You must set up the replica server first, before you can replicate VMs.
To enable the rule in the Windows Firewall, follow these steps:
- Click Start, and then click the gear icon to access the Settings menu.
- Click Network & Internet.
- On the Status page, scroll down and select Windows Firewall.
- Click Allow an App through Firewall.
Scroll down to Hyper-V Replica and enable the applicable rules.
I’ve enabled the Hyper-V Replica HTTP rule for the Domain profile, as shown in Figure 5-2.
- Click OK.

FIGURE 5-2: Hyper-V Replica communications need to be allowed through the firewall for replication to occur.
Setting up replication on the virtual machines
After the Hyper-V Replica host is all set, it’s time to configure the VM to replicate to it. Follow these steps:
- From Hyper-V Manager, right-click the VM and select Enable Replication.
- On the Before You Begin screen, click Next.
- On the Specify Replica Server screen, enter the name of the server you configured in the prior section, and click Next.
On the Specify Connection Parameters screen, verify that the information presented is correct.
It should look similar to Figure 5-3 if you’ve been following along.
- Click Next.
On the Choose Replication VHDs screen, select which virtual disks you want to replicate and click Next.
This will usually be all of them, but you can uncheck one of the drives if you don’t want it to replicate.
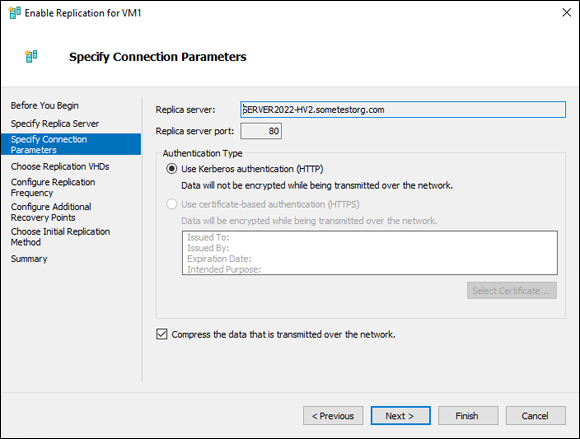
FIGURE 5-3: Make sure that the connection parameters match what you set on the Hyper-V Replica.
On the Configure Replication Frequency screen, set how much time can be between replication cycles and click Next.
You can choose among 30 seconds, 5 minutes (default), or 15 minutes. I’ll leave it on 5 minutes.
On the Configure Additional Recovery Points screen, leave this set on Maintain Only the Latest Recovery Point and click Next.
 If you’re concerned about data corruption with the data on the drive, you can set the replication to save additional recovery points, every hour. If your system is ever hit by ransomware or some other malicious activity or entity, this will give you the ability to restore to a good recovery point, rather than the potentially damaged data that was replicated over.
On the Choose Initial Replication Method screen, choose Send Initial Copy over the Network and Start Replication Immediately, as shown in Figure 5-4.
You can start immediately, or you can schedule replication. If it’s a large system, you can export the initial copy and then import on the replica.
- On the summary page, confirm that your settings look correct and then click Finish.
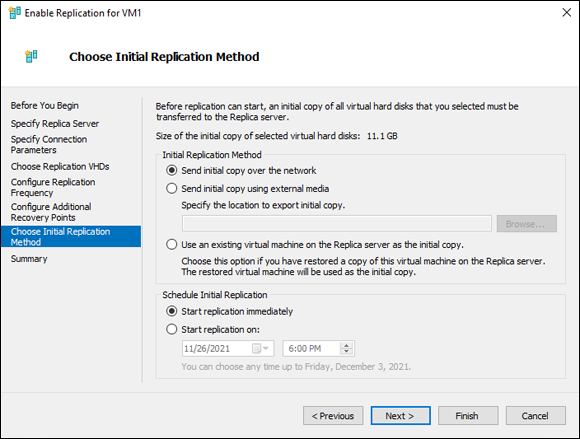
FIGURE 5-4: Setting the initial replication parameters gets the replication started.
At this point, replication is enabled, and the VM is being copied over to the replica server. You should get a message similar to Figure 5-5 if your replication was successful. This tells you that you need to connect the network adapters for the VM.
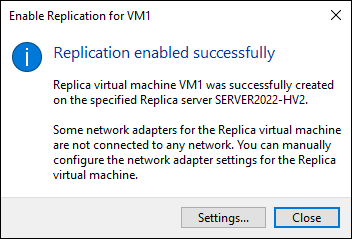
FIGURE 5-5: This message indicates that the initial replication was successful and that you need to connect to the other Hyper-V host and connect the virtual network adapters to a virtual switch.
Live Migration
Hyper-V Replica is great for disaster recovery purposes, but sometimes you just need to move VMs to another Hyper-V host so you can do maintenance. You may also have a host that’s starting to have resource constraints so you may want to move VMs for that reason.
Live migration is a great fix for both of these scenarios because it allows you to move a VM with near zero downtime. When I’ve tested this in a lab environment, I’ve found when pinging a server that I lose a single ping at the most. Pretty impressive technology.
There are two ways that you can set up live migration. CredSSP is the simplest, but it’s also the least secure. Kerberos is the most secure, but setting up constrained delegation makes it more complex to implement.
Setting up live migration
Live migration must be set up on any Hyper-V host that will be using it. The setup itself is pretty simple, and it can be used right away with CredSSP or after some additional configuration with Kerberos. (The additional configuration is covered in the “Kerberos” section.)
Follow these steps to configure your first Hyper-V host to support live migration. Be sure to do this on all your hosts or it won’t work!
- From Hyper-V Manager, right-click the Hyper-V host and choose Hyper-V Settings.
Click Live Migrations and select the check box next to Enable Incoming and Outgoing Live Migrations.
Simultaneous live migrations defaults to 2. Unless you have a reason to change it, it can be left as is.
- Under Incoming Live Migrations, leave Use Any Available Network for Live Migration selected and click OK.
CredSSP
CredSSP is the simplest method of authentication to set up when supporting live migration. It requires you to sign into the server that you want to move. If you move the server and then want to move it back after a maintenance, for example, you need to sign in to the VM before you can move it back. If you aren’t signed in when you try to move the VM, you get an error that will indicate “No credentials are available in the security package.”
Because CredSSP requires no further configuration, enabling live migration is all you need to do.
Kerberos
Using Kerberos to support live migration is preferred in enterprise environments because you don’t have to sign in to a server before you move it. If your organization wants to automate things, this is the way to go.
The only downside to using Kerberos for authentication in live migrations is that it does take a little more time to set it up properly than CredSSP does. You must configure what is referred to as constrained delegation to allow live migration to work with Kerberos. This is essentially giving the systems permissions to work with one another directly, and it’s done in Active Directory.
To set up constrained delegation for Kerberos, you need a system that has the Active Directory Users and Computers RSAT installed. Follow these steps:
- From Server Manager, choose Tools⇒ Active Directory Users and Computers.
- Double-click the Computers folder.
- Right-click the Hyper-V host that is going to be the source server, and choose Properties.
- Click the Delegation tab and select Trust This Computer for Delegation to Specified Services Only and select Use Any Authentication Protocol.
- Click Add, and then click Users or Computers.
- Type the name of the destination server and then click OK.
- Under Available Services, select the following (hold down Ctrl to select them both):
- cifs: This allows you to move the VM storage.
- Microsoft Virtual System Migration Service: This allows you to move VMs.
Click OK.
Your screen should look similar to Figure 5-6.
- Click OK again to save the changes.
- Repeat steps 3 through 9 for any other Hyper-V hosts that will participate in live migration.
After this is complete, you can kick off a live migration without having to log in to the VM.

FIGURE 5-6: You must grant permissions on the source system for the destination system to enable Kerberos authentication for live migrations.
Kicking off a live migration
Now that you have Kerberos configured and live migration configured, I’m sure you want to test it to verify that it’s working properly. Follow these steps:
- On the source Hyper-V host, open Hyper-V Manager.
- Right-click the VM you want to migrate and choose Move.
- On the Before You Begin screen, click Next.
- Select Move the Virtual Machine, and click Next.
- On the Specify Destination Computer screen, type the name of the destination Hyper-V host, and click Next.
On the Choose Move Options screen, keep the default Move the Virtual Machine’s Data to a Single Location and click Next.
You have a few options when moving your VM: - Move Your Virtual Machine’s Data to a Single Location: Moves the VM and its hard disks to the same location on the destination host.
- Move the Virtual Machine’s Data by Selecting Where to Move the Items: Allows you to select different locations for the VM and for its disks.
- Move Only the Virtual Machine: Moves the VM but not its hard disks.
- On the Choose a New Location for Virtual Machine screen, set the location on the destination server where you want the VM’s files to be stored, and click Next.
- On the Completing Move Wizard screen, validate that the settings look correct, and then click Finish.
When the migration is complete, the VM will show up on your other Hyper-V host. In Figure 5-7, you can see VM1 running on SERVER2022-HV2, which is my second Hyper-V host. I did the live migration from SERVER2022-HV1.
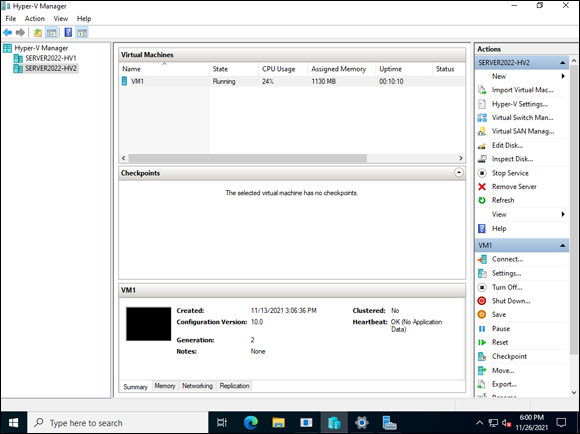
FIGURE 5-7: Live migration does not impact the uptime of the machine.
Storage Migration
Moving VMs is very useful, but sometimes you just need to move their storage. You may have purchased a lightning-fast storage area network (SAN), or you may have just added a new drive to support the virtual disks of your Hyper-V VMs. No matter the use case, storage migration can do that for you.
For this example, I have the virtual disk for a VM in my E: drive, but I want it to live in my F: drive. Here’s how you can move storage around:
- On the source Hyper-V host, open Hyper-V Manager.
- Right-click the VM you want to migrate and choose Move.
- On the Before You Begin screen, click Next.
- Select Move the Virtual Machine’s Storage, and click Next.
- Accept the default Move All the Virtual Machine’s Data to a Single Location, and click Next.
- On the Choose a New Location for Virtual Machine screen, enter the path that you want the storage to be moved to and click Next.
- On the Completing Move Wizard screen, verify that everything looks correct and click Finish.
Failover Clustering
Failover Clustering is not new to Windows Server 2022. It provides a way for system administrators to ensure that their systems are highly available. Applications or services talk to a cluster address. In the case of Hyper-V, the cluster address is the Hyper-V Replica Broker, and it handles communications for the clustered Hyper-V hosts.
Installing Failover Clustering
Failover Clustering is a feature that is available for installation in Windows Server 2022. Installing it is similar to installing other features. Follow these steps:
- From Server Manager, choose Manage⇒ Add Roles and Features.
- On the Before You Begin screen, click Next.
- On the Select Installation Type screen, click Next.
- On the Select Destination Server screen, click Next.
- On the Select Server Roles screen, click Next.
- On the Select Features screen, select Failover Clustering.
- Click Add Features, and then click Next.
- On the Confirm Installation Selections screen, click Install.
- When you get the message that installation succeeded, click Close.
Repeat these steps on the other members of the failover cluster before continuing on to the next step.
Configuring Failover Clustering
After the Failover Clustering feature is installed, you can actually create the cluster. First, you’ll run the validation, which will let you know if there are issues that will prevent the cluster from provisioning properly; then you’ll build the cluster.
- From Server Manager, choose Tools⇒ Failover Cluster Manager.
- Click Validate Configuration.
- On the Before You Begin screen, click Next.
- Enter the names of the servers in the failover cluster, and then click Next.
- Accept the default Run All Tests, and click Next.
On the Confirmation screen, click Next.
The test will begin running, and you’ll see something similar to Figure 5-8.
 Warnings won’t necessarily prevent you from creating your failover cluster, but you should address the warning items in the report before relying on your failover cluster for a production deployment.
When the test finishes, select the check box next to Create the Cluster Now Using the Validated Nodes, and then click Finish.
The Create Cluster Wizard launches.
- On the Before You Begin screen, click Next.
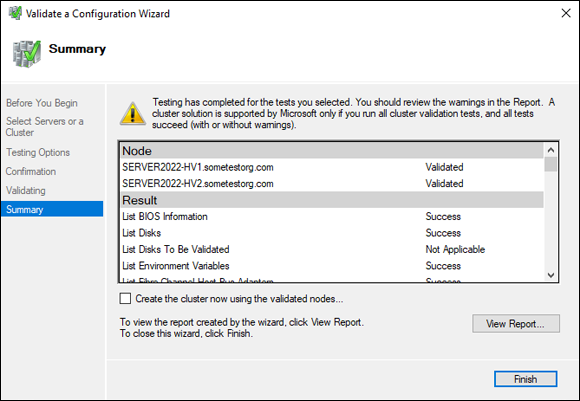
FIGURE 5-8: It’s always a good idea to run the cluster validation tools to ensure there are no issues with creating your cluster.
- On the Access Point for Administering the cluster screen, choose a cluster name, and then click Next.
- On the confirmation screen, click Next.
- When the summary page launches, click Finish.
- Click Configure Role.
- On the Before You Begin screen, click Next.
- On the Select Role screen, select Hyper-V Replica Broker and click Next.
- On the Client Access Point screen, enter a name for the cluster role and click Next.
- On the confirmation screen, click Next.
- On the Summary page, click Finish.
Your screen should look similar to Figure 5-9 at this point if you’ve been following along.

FIGURE 5-9: The failover cluster has been created and has been assigned the Hyper-V Replica Broker role.
Configuring a witness for your failover cluster
Before I jump into witness types, let’s take a step back and review the different quorum types in Windows Server Failover Clustering (see Table 5-1). Remember each node is treated as one vote.
TABLE 5-1 Quorum Types
Type | Description |
|---|---|
Node Majority | This type of quorum is used when there is an odd number of nodes. The nodes are divided into smaller subsets and whichever subset has the most nodes has the most “votes.” For instance, five nodes divide into a subset of three and a subset of two; the subset of three will be active because three votes is more than two. |
Node & Disk Majority | This type of quorum works really well when there are an even number of nodes and a clustered disk (disk witness). Each of the nodes gets a vote, and the clustered disk gets a vote, too. The disk witness adds an additional vote to even-numbered subsets so that you know which subset should be active. As an example, say you have four nodes, in two subsets of two nodes each. Whichever subset has the cluster disk has the third vote and is the active subset. |
Node & File Share Majority | This type of quorum is similar to Node & Disk Majority, except instead of a disk witness, you get a file share witness. It provides the same service as the disk witness but is usually placed in a datacenter where both failover clusters can reach. For example, say you have four nodes, in two subsets of two nodes each. Whichever subset has the file share witness has the third vote and is the active subset. |
Quorum in this sense is determined by how many systems must be operational for the cluster to start up and continue to run properly.
Now that you have an idea of what the quorum types are, let me fill you in on the types of witnesses you can use in a failover cluster. Each of these types of witnesses is able to provide a vote to make quorum in a failover cluster:
- Disk witness: A disk witness is what most system administrators are used to if they’ve worked with Failover Clustering in the past. It’s a small drive that can failover between nodes in a failover cluster.
- File share witness: A file share witness is essentially a file server that has a share configured that stores clustering information. The use case with file share witness was to have the file server with the share in a different datacenter from the other nodes in the failover cluster. If one datacenter went down, the file share witness was able to cast a deciding vote to the existing datacenter.
- Cloud Witness: Introduced in Windows Server 2016, the Cloud Witness allows you to create blob storage in Azure (hence, the reason why cloud is in the name) and use it to store clustering information. Cloud Witness was introduced as a cost-effective means of getting similar functionality to a file share witness, but without the cost of an additional file server in another datacenter.
A file share witness is relatively simple to set up, so that’s what I use for the example in this chapter. Let’s add the file share witness now. I’ve created a folder on a server that isn’t in the failover cluster, and I’ve created a share on that folder with the cluster name that I used earlier. You’ll find it created a DNS object when you went through the wizard to create the cluster. Give it read and change permissions. Now go to one of the systems that is in the failover cluster and follow these steps:
- In the Failover Cluster Manager, select the cluster to which you want to add the file share witness.
- In the Actions menu on the right, click More Actions and then click Configure Cluster Quorum Settings.
- On the Before You Begin screen, click Next.
- On the Select Quorum Configuration Option, choose Select the quorum witness and then click Next.
On the Select Quorum Witness screen, select Configure a File Share Witness and then click Next.
Figure 5-10 shows some of your quorum witness options.
- Enter the path of the file share that you’ve configured and then click Next.
- On the Confirmation screen, click Next.
- Click Finish.
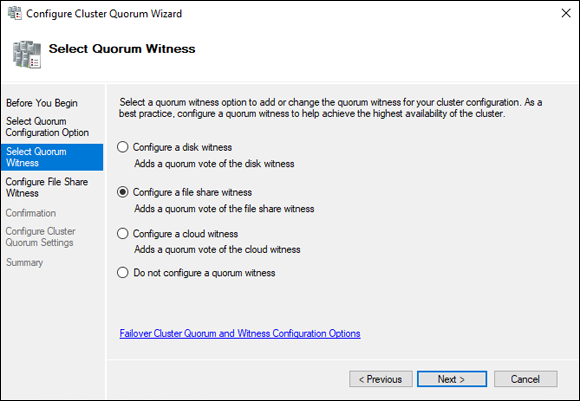
FIGURE 5-10: You have several options for configuring a quorum witness.