
Exercise 8
Working with Multichannel Audio

These exercises allow you to practice the multichannel features discussed in this lesson. You will import and modify multichannel clips, use multichannel sequence tracks, and practice automated panning.
Media Used: Agent MXZero
Duration: 20 minutes
GOALS
![]() Be able to import multichannel audio
Be able to import multichannel audio
![]() Use the Clip > Modify feature to change the Track Formats of an existing clip
Use the Clip > Modify feature to change the Track Formats of an existing clip
![]() Understand how primary active tracks affect voices during playback
Understand how primary active tracks affect voices during playback
![]() Use Pan controls in the Audio Mixer and the timeline
Use Pan controls in the Audio Mixer and the timeline
![]() Understand the differences between sequence audio format and mix mode
Understand the differences between sequence audio format and mix mode
Exercise 8.1: Modifying Clips and Experimenting with Voices
In this exercise you will modify some mono audio clips to create a surround sound clip. You will then place the clips in a timeline and observe how the track and clip types must match. You will configure your bin to display the audio track format so you can monitor the column as you work through the exercise. Then, you will import an existing music file as a stereo clip and place it on a stereo track in a sequence.
1. Open AGENT MXZERO > LESSON 8 > LESSON 8 SEQUENCES.
2. Open the TEST TONE clip into the SOURCE monitor.
It has eight tracks of tone media, which use eight voices. The Track selector panel lists tracks A1-8.
3. Select the TEST TONE clip in the LESSON 8 SEQUENCES bin.
4. Choose CLIP > MODIFY > SET MULTICHANNEL AUDIO.
5. Select the drop-down under A1 and A2 and choose 7.1 PRO TOOLS. Click OK.
The clip has been updated with the new clip format. The Track selector panel now lists A1 with a small “7.1” symbol, indicating the clip’s audio is in the 7.1 audio format.
6. Add the TRACK FORMATS column to the bin by choosing the bin’s fast menu and then select CHOOSE HEADINGS > TRACK FORMATS.
The Track Formats column confirms that the Test Tone clip is a multichannel 7.1 clip. Next, you will insert this test tone into the beginning of the Remix sequence.
7. Open the REMIX sequence in the RECORD monitor.
8. Enable SYNC LOCK for all tracks.
The Remix sequence consists of only mono audio tracks. The audio format of source clips must match the track format in the sequence, and there are no 7.1 tracks in the sequence. The A1 track of the Source monitor is unable to pair with any of the existing tracks in the timeline.
9. Select CLIP MENU > NEW AUDIO TRACK > 7.1 SURROUND.
Now the source clip has a 7.1 sequence track and can receive source clips having the 7.1 track format.
10. Splice the clip into the sequence using the SPLICE-IN button.
In the final section of this exercise, you will import a music clip while setting it to stereo at the time of import. By setting clips to their proper track format during import, you won’t have to modify them after the fact.
11. RIGHT-CLICK in the bin and select IMPORT.
12. Navigate to the MATERIALS FOR IMPORT folder that accompanies this book.
13. Select LESSON 8 STUDENT MATERIALS > ZERO THEME A.WAV.
14. Click the OPTIONS button.
15. Select the AUDIO tab of the IMPORT OPTIONS dialog box, as shown in Figure EX8.1.
Figure EX8.1
Audio Import Options allow you to configure multichannel track formats.
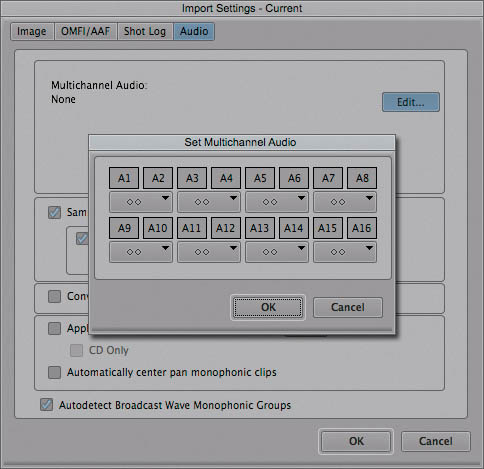
16. Click EDIT from the IMPORT OPTIONS dialog box.
17. Configure A1 and A2 as stereo tracks.
18. Press OK twice to accept the dialog boxes.
19. Import the file.
20. Confirm that the music was imported as a stereo clip by consulting the TRACK FORMATS column of the bin.
21. Create a new stereo track, called A11, in the REMIX sequence.
22. Add the ZERO THEME A to the beginning of the sequence.
ZERO THEME A will be the backing music and will play under the sound effects and dialogue.
Exercise 8.2: Understanding Active and Inactive Tracks
In this exercise, you will perform a set of experiments to better understand how the different kinds of sequence audio tracks affect Media Composer’s ability to play audio. By understanding how Media Composer plays up to 16 voices, you will be better able to predict the performance of your editing system.
Open or continue editing the Remix sequence from Exercise 8, Part 1. There are now 10 mono tracks, 1 stereo audio track, and a 7.1 surround audio track.
The 7.1 surround clip originally had eight tracks, and even though it is now occupying a single track on the timeline, it still will result in eight voices being played. Likewise, the stereo clip originally had two tracks (left channel and right channel), and it now also takes one track in the timeline.
Even though the multichannel clips occupy single tracks, Media Composer still uses the same number of internal resources to play them: The stereo clip is like playing two mono tracks, and the 7.1 surround clip is like playing eight mono tracks. In other words, the stereo clip requires two voices, and the 7.1 clip requires eight. The total voice count for the sequence is 20, but Media Composer is capable of playing back only 16 voices.
When the 7.1 track and the stereo track were added to the sequence, Media Composer deactivated some of the audio tracks to ensure that no more than 16 voices would be played back concurrently.
1. Determine which track or tracks are inactive in your timeline. Try to make them active. You will not be able to make all the tracks active because of the 16-voice limit.
2. Add another 7.1 audio track.
3. Activate both of the 7.1 tracks and play the sequence.
Of the tracks that can be active, only two of them will be active when playing back at 3x real-time. The other ones will not be played at the 3x real-time speed.
4. Use J-K-L playback to play back the sequence at 3x real-time. Achieve this by selecting the sequence and pressing L three times.
5. Check the Track control panel to determine which tracks are the primary active tracks by checking for the square around the ACTIVE (POWER) button. During playback, confirm that those are the only tracks you hear when playing back at 3x real-time.
6. Try ALT/OPTION+CLICKING on the 7.1 surround track to make it the primary active track.
The 7.1 surround track uses eight voices, but only two can be active, so no tracks will be indicated as the primary track.
7. Try ALT/OPTION+CLICKING on the stereo track. The stereo track, which uses just two voices, indicates that it is the primary track.
Media Composer is capable of allowing only two voices to play back at the 3x speed. When dealing with mono tracks, which use a single voice each, you can have two mono tracks both set as the primary active tracks. A 7.1 surround track uses eight voices, so it cannot be made the primary active track. Media Composer will use the first two channels of the surround clip but that is not reflected by the Track Active button.
Exercise 8.3: Stereo Panning
In this exercise, you will automate the pan of one or more audio clips using the Audio Mixer and observe the resulting changes on the timeline overlay. You will then automate the pan of another clip using just the timeline’s pan overlay.
1. Configure your AUDIO MIXER to use the stereo sequence format and a stereo mix format.
2. Open LESSON 8 SEQUENCES > REMIX SEQUENCE, or continue with it from the previous lesson.
The Remix sequence contains a series of sound effects for gunshots.
3. Use the techniques presented in “Stereo Panning” on page 313 of this lesson to automate the pan of the gunfire, panning the sound of the bullets from one side of the screen to the other.
4. Enable the pan display using the Track control panel (see Figure 8.22 of this lesson). Your pan animations should be visible on the timeline clips.
5. Adjust the pan of the gunfire shots by manipulating the keyframes on the clips. Try adjusting the rate of the pan by ALT/OPTION -DRAGGING the keyframes left or right to change the slope of the curve, which alters the speed of the pan.
You have now added life to your clips by automating their pans.
Exercise 8.4: Using Surround Panning (Optional)
This exercise requires surround sound monitoring hardware. It’s similar to the previous exercise, except you will be automating the pan around all of the speakers instead of just left or right stereo speakers/headphones.
1. Configure the AUDIO MIXER to use a 7.1 surround sequence format and a 7.1 Pro Tools or SMPTE mix mode. If you do not have surround sound monitoring capabilities, select a stereo mix mode.
2. Perform the same steps as in Exercise 8.3, but create pan automation in the surround sound field using the advanced panner.
Once of the great things about editing multichannel clips in Media Composer is that they are not treated any differently than the traditional mono clips. The Audio Mixer updates to give you the best interface for the kind of sequence format you are using, but the approach to adjusting the pan, automating the pan, and working the clips in the timeline is consistent regardless of track type.