
Lesson 9
Fundamentals of Audio Mixing
When you’re working as a picture editor, don’t forget about the sound. “I’m sending it to an audio editor” isn’t an excuse for not finessing your soundtrack because Media Composer has many audio tools that are easy to use and can help you and your producer visualize the finish piece. There’s little worse than having a beautiful image only to be distracted by unmixed audio or an unwanted background sound. This chapter covers the fundamentals of audio mixing so you can avoid such a pitfall.
Media Used: Agent MXZero
Duration: 60 minutes
GOALS
![]() Understand why picture editors should have basic sound editing expertise
Understand why picture editors should have basic sound editing expertise
![]() Learn how to use the Audio tool and Mixer for achieving balance in an audio mix
Learn how to use the Audio tool and Mixer for achieving balance in an audio mix
![]() Understand dynamic range as it applies to audio
Understand dynamic range as it applies to audio
![]() Be able to use the decibels full scale (dBFS) readings to determine how an audio mix needs to be adjusted
Be able to use the decibels full scale (dBFS) readings to determine how an audio mix needs to be adjusted
![]() Differentiate among attenuation, gain, and decibels
Differentiate among attenuation, gain, and decibels
![]() Learn how to adjust the audio levels of source clips
Learn how to adjust the audio levels of source clips
![]() Understand the Media Composer mixing workflow
Understand the Media Composer mixing workflow
![]() Be able to mix a sequence in Media Composer and export it for further mixing in Avid Pro Tools
Be able to mix a sequence in Media Composer and export it for further mixing in Avid Pro Tools
Sound Mixing Is Important
Great picture deserves great sound. Silent movies were not so silent, thanks to the addition of piano accompaniment. In 2012, significant attention was paid to The Artist, which had no dialogue but definitely wasn’t a silent film owing to an emotive score.
When it comes to creating your soundtrack, take your visual element as a reference but think beyond the frame. Gene Roddenberry once said that everything that’s visible and moves on the bridge of the (Star Trek) Enterprise needs to have a sound effect—each blinking light, each door that opens. If it’s on the screen and moving, give it a sound. Even the appearance of a title fading and moving into position can be backed with a subtle whoosh or flutter, as appropriate.
In contrast, Walter Murch has said in interviews and in In the Blink of an Eye that it’s sometimes the sounds that are not represented by things in the frame that end up contributing to the scene, such as the sound of the train in The Godfather as Michael kills someone for the first time.
In short, your sound complements, augments, and enhances your picture. When there are multiple sounds playing back, it takes some skill to make the individual sounds work together. That’s the skill of sound mixing, which is the topic of this lesson.
Goals of Sound Mixing
Your goal as a sound mixer is to do more than to make it “sound good.” There’s little worse than having a beautiful image only to be distracted by unmixed audio or an unwanted background sound.
You have artistic and technical responsibilities, some of which are summarized in the following sections.
Achieving Balance
You need to control which sound is dominant to the audience, much like how you control which picture is dominant through your shot selection. With 4, 8, or even 24 audio tracks, you need to ensure that the voiceover is dominant in comparison to the background music, and when the voiceover is silent, the music or other sound compensates by becoming louder so the overall level is consistent throughout the piece.
You must ensure that important audio is not buried under sounds that contribute less to the storytelling.
Broadcast Delivery Requirements
Your audio will have a “normal” audio level, referred to as the reference tone. When you add tone at the beginning of the video, you are defining the reference tone, which says, “This is the volume that most of the sound will be at. Some sounds might be louder, and some might be quieter, but this is the normal level.”
Your broadcaster will usually specify that the sound not exceed reference by more than a specific amount, such as eight decibels (dB).
Broadcasters usually have their videos on a server and the server connects to a transmitter. Between the server and the transmitter are some devices that regulate the picture and sound levels, ensuring that sound levels aren’t too loud. It’s better to reduce the levels yourself to bring your sequence into conformance with the broadcaster’s requirements, so you’re in control, as opposed to leaving it for the broadcaster’s automatic sound limiter machinery.
Tip: Always check with your broadcasters to ensure you know their expectations. Don’t assume the upper limit is 8dB over reference—it may be more or less. When selling to international markets, check the requirements of the new broadcaster. Many broadcasters will clip, limit, or compress audio levels that exceed the expected thresholds. You are better off being in control of fixing the audio as opposed to leaving it to the broadcaster’s audio limiter.
What Is Dynamic Range?
Dynamic range refers to the difference between the quietest and loudest sounds. Too much dynamic range can be annoying for your audience: some people will likely keep their finger on the volume and adjust it to try to make the audio levels consistent, others will just change the channel! On the other hand, the absence of dynamic range can also be detrimental. Imagine a symphonic concert without crescendos; it would be boring and not very dynamic.
Note: Dynamic range is also a term that’s used for the picture. When it’s used for picture, it refers to the variation between the darkest and lightest pixels. That’s also referred to as contrast.
dBFS: Decibels Full Scale
Digital Audio is measured using the decibels full scale (dBFS). The dBFS measurement scale, shown in Figure 9.1, sets 0 as a maximum value, representing the loudest possible value. Anything louder than 0 is clipped, resulting in digital distortion. Anything quieter than OdBFS has a negative value. For example, –20dBFS is quieter than –10dBFS.
Figure 9.1
The dBFS scale; distortion occurs at 0dB. North American reference tone is usually –20. Louder sounds are –20dB to 0dB; quieter sounds are –20 and lower.
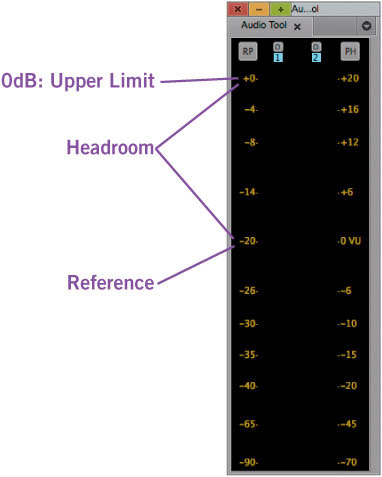
In many North American post-production facilities, –20dBFS is the reference level, whereas the number varies in other countries. Regardless of how many tracks are playing, the mixer will aim to have the output average at –20 most of the time. Setting –20dBFS as a reference level allows 20dB of headroom. The headroom is used when the soundtrack requires a loud bang or someone is shouting. In a scene with an explosion, the levels might, for example, reach –10dBFS.
If the reference level was –4, the headroom would be only 4dB and the difference between an explosion and someone speaking would neither be realistic nor as noticeable.
One of your roles as mixer is to keep an eye on the dynamic range and ensure that, overall, your audio levels register at the reference level. If the levels are constantly above or below reference, you’ll need to make an adjustment to the levels to bring them into alignment.
The best way for you to monitor audio levels within Media Composer is to use the Audio tool.
The Audio Tool
The Audio tool (choose Tools > Audio Tool) provides accurate monitoring of audio levels. Depending on the number of output channels available on your audio hardware, it will display two, four, eight, or more meters representing the output of each channel.
The left side of the tool features the digital scale, whereas the right side is an analog scale, as shown in Figure 9.2. This lesson focuses exclusively on the digital scale.
Figure 9.2
Audio tool with dBFS scale on the left, and the Reset Peak button and the Peak Hold menu.
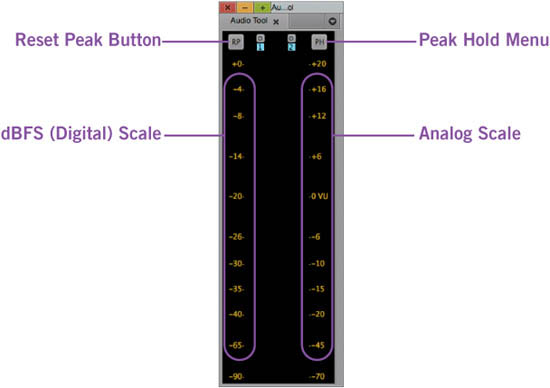
The Audio tool can be resized to be taller, which allows the meters to display more detail.
Tip: The audio meters located in the timeline are useful as a general point of reference, but aren’t good for accurate measurements because they are not labeled. Instead, use the Audio tool.
Using the Console Window to Check Audio Levels
As you play material in the Source or Record monitors, Media Composer tracks the peak values that are processed through the Audio tool. You can use the Console to access this precise information about audio peaks in a sequence.
1. Load the sequence into the RECORD monitor.
2. Open the AUDIO tool and press the RESET PEAK (RP) button, shown previously in Figure 9.2.
This clears the peaks of any previously played material from memory.
3. Play the sequence or the suspect portion of the sequence.
4. Open the CONSOLE window by choosing TOOLS > CONSOLE.
5. Click in the lower area of the CONSOLE window and type the following command:
dumpmaxpeaks
6. Press ENTER.
A list of peak values is displayed in the Console window, as shown in Figure 9.3.
Figure 9.3
Peak values displayed in the Console window.
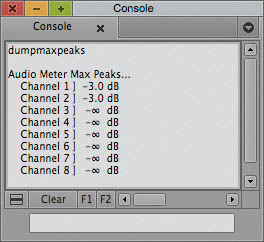
Using Figure 9.3 for reference, if your reference was set to –20dB and the broadcast specification allowed up to 8dB above reference, the program would be significantly over broadcast spec. Allowable values would be up to –12, and in Figure 9.3, the values reached –3.0, which is 9dB louder than the maximum allowable –12.
The dumpmaxpeaks command does not indicate where the peak occurs in the sequence, only the maximum gain processed since the memory was last cleared.
Once you find the illegal levels, correct them using the Audio Mixer tool.
During the finishing process, review sessions are common. Leverage the time spent in a review session to also check audio levels. If illegal levels are found, you’ll probably also have a good idea of where in the program to start looking.
Using the Audio Tool to Generate Test Tone Media
The Audio tool can also be used to generate tone media. The tone media will be saved to a bin, which you can then load into the Source monitor and place into the timeline.
To generate test tone media:
1. Select the AUDIO tool and then choose PH MENU > CREATE TONE MEDIA.
2. Specify the number of tracks and the reference tone level, as shown in Figure 9.4.
3. Select the bin. You might want to create a special bin for the test tone, slates, and imported color bars.
Figure 9.4
The Create Tone Media dialog box shows that a clip with eight tracks of tone at 1,000Hz will be generated.
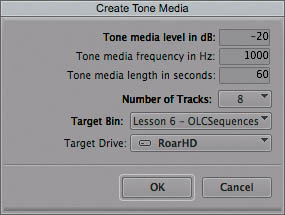
4. Click OK.
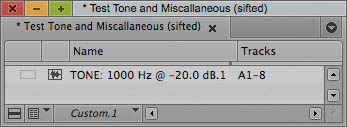
The tone media now exists in the bin, as shown in Figure 9.5. You may add it to a sequence by treating it like any other source clip. Adding reference tones to the beginning of your sequence lets the receiver of the sequence (or tape) know your reference level and calibrate their audio monitors the same way.
Figure 9.5
Audio clip generated with eight tracks.
Sound Mixing Vernacular
There are some terms that are frequently used in audio mixing and editing. It’s useful for you to be familiar with these terms so you can “talk the talk,” so to speak.
Decibel
A decibel is a unit of measurement used to describe how loud a sound is relative to the threshold of hearing (the softest sound the human ear can perceive). Abbreviated as dB, it represents the smallest possible increase or decrease in volume that a human can perceive.
Gain
Gain is an amplification of the audio signal. The amount of gain is measured in decibels. To apply gain is to turn up the volume. (To apply a lot of gain a lot is to do like Mars in the 1980s: Pump Up the Volume!)
Attenuate
This is the opposite of gain—attenuate means to make the volume quieter. Attenuating the background music means to reduce the levels. (If your child is screaming, you could say to him “Attenuate your voice immediately!”)
Tip: When mixing, remember that sound levels are relative. If something is too quiet, you can either apply gain, or you can attenuate everything else.
EXERCISE Take a moment to complete Exercise 9, Part 1.
Creating a Mix
When you mix, or add, two audio signals you combine the sound waves from each signal. The process of combining audio signals is called summing. This brings up the most fundamental principle in audio mix theory:
When you double the power output of a sound, the overall loudness of the sound increases by 3dB for each source.
Tip: The summarized version of the rule is this: The more sound waves, the louder the total output.
You would never want to solo (isolate) a track, and then adjust the audio to be perfect for that one track. That’s a poor workflow because, once you enable all the tracks, you’ll find the final level will be louder than the individual tracks and you’ll need to adjust them all again. When adjusting your audio mix, do it in the context of the entire mix and leave all your tracks on.
Also note that an audio mix perfected in a stereo audio environment will sound significantly different when it is delivered according to mono standards and vice versa. Your audio mix may sound too weak or quiet or too strong and over-modulated. Always be sure to create your audio mix using the final delivery standard of the project.
Consider Your Environment
Prior to beginning your audio mix, consider your environment by listening to it. Turn off ambient background sound, such as air conditioners and fans. Be aware of the sound that’s naturally in your environment and consider that it won’t be there for your audience. Ideally, make the room as audio-neutral as possible.
You should also calibrate your audio monitors. Audio monitors are higher-end speakers with better fidelity than regular desktop multimedia speakers. Calibrating your audio monitors consists of playing a sound at your reference level and adjusting the levels on the monitors to a point that feels comfortable. Once you’ve set your audio monitors, don’t change them. If something is too loud in your sequence, attenuate it through an adjustment with Media Composer’s Audio Mixer tool.
![]()
On the Web
For detailed information on calibrating your audio monitors (speakers), try http://audiodesignlabs.com/wordpress/2008/05/professional-monitoring-system-calibration/.
Tip: To play a reference tone, select Tools > Audio Tool > PH > Play Calibration Tone.
Using the Audio Mixer
The Audio Mixer tool is the general tool that you use to create a mix, as was introduced in Lesson 8, “Working with Multichannel Audio.” Aside from adjusting pan, it’s also used to perform attenuation or gain on clips relative to the level at which they were ingested into the Media Composer system.
The sliders for each clip can be adjusted on a scale from +12 to negative infinity dB. The adjustments are relative, not absolute. When setting a slider to +12, you are applying a gain of 12dB to the original level. An adjustment of –10dB means the level has been attenuated by 10dB. You are not setting the audio level of the clip to –10. That would be an absolute adjustment and it isn’t possible to absolutely set a clip’s level to a specific dB using the Audio Mixer.
Tip: The Audio Mixer only allows you to apply a gain of 12dB. The AudioSuite tool, however, allows you to apply a gain of up to 96dB. AudioSuite is covered in Lesson 11, “Real-Time AudioSuite (RTAS).”
Source-Side versus Record-Side Audio Mixer
The Audio Mixer behaves subtly different depending on whether the Source monitor or the Record monitor is active.
![]() When the Record monitor is active, the Audio Mixer is adjusting the clip(s) under the Current Position indicator (blue line) in the timeline.
When the Record monitor is active, the Audio Mixer is adjusting the clip(s) under the Current Position indicator (blue line) in the timeline.
![]() When the Source monitor is active, the Audio mixer is adjusting the source clip and that adjustment is saved with the clip in the bin.
When the Source monitor is active, the Audio mixer is adjusting the source clip and that adjustment is saved with the clip in the bin.
Source-side adjustments are very handy: If you have a clip that is too quiet or too loud, open it into the Source monitor and make an adjustment using the Audio Mixer. Thereafter, each time you re-open the clip, the level is set.
A typical example of when this is particularly useful involves importing audio from a compact disc. Audio from a compact disc is often imported hot (too loud). Media Composer does allow you to apply gain/attenuation on import of audio files (using Import Options), but if you forgot to make that setting, you can make the adjustment afterward using the Source monitor and the Audio Mixer.
Changes you make to a clip in the Source monitor have no effect on existing instances of that clip in the sequence.
Understanding the Mixing Workflow
Performing an audio mix consists of:
1. Separating your audio clips onto related tracks.
2. Setting an overall level for a track or region of a track.
3. Performing attenuation or gain adjustments to individual clips in a track or region.
4. Performing attenuation or gain adjustments to sections within an individual clip (fading something up or down).
5. Applying specialized effects to further enhance the dynamics and balance of the audio mix.
Steps 3 and 4 are particularly noteworthy as they indicate that each clip in Media Composer can have an overall adjustment that is consistent for the entire clip, and each clip can have variable levels within it. The two adjustments are cumulative.
The first adjustment, called a clip gain, lets you set a clip to approximately the correct level, whereas the later adjustment, a volume adjustment (previously called “auto gain”) allows you to ride the levels within a clip, making the audio quieter in some parts of the clip and louder in others.
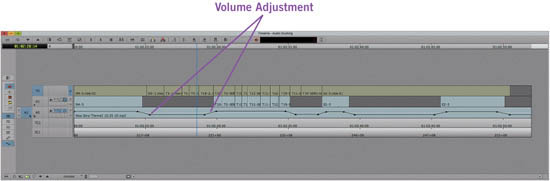
Volume adjustments are ideal for music tracks that back a voiceover, and for quick adjustments like diminishing the effect of quarter-second lip-smack by the voice-over talent prior to beginning a sentence, or for ducking music under voiceover, as shown in Figure 9.6.
Figure 9.6
Volume adjustment is used to reduce audio levels on A5 when audio also exists on A1.
Separate the Audio Tracks
Separating the audio tracks, sometimes called creating a checkerboard layout and shown in Figure 9.7, makes it easier to apply adjustments to an entire set of related clips. You use the Lift/Overwrite tool (red arrow) to vertically move the clips such that related clips are on the same track. For example, the voiceover is on A1, male character lead is on A2, female character lead is on A3, room tone is on A4, music is on A5 and A6, and sound effects are on A7-12, or some variation on that theme.
You make it easier to work with music clips if, instead of having them on two tracks such as A5 and A6, you convert the music clip to a stereo clip and use a stereo track instead. Stereo tracks allow you to use one track on the timeline to represent the left and right channels of an audio clip. Creating stereo tracks and modifying clips for stereo is covered in Lesson 8.
Tip: For consistency in placing your audio clips on specific tracks, consider renaming your audio tracks as discussed in Lesson 3, “Advanced Picture Editing.”
Figure 9.7
Checkerboarding places related clips on the same tracks.
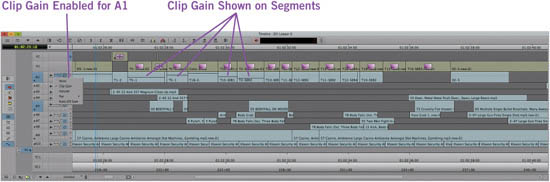
Adjusting Clip Gain
When adjusting clip gain, the overall level for a particular clip, ensure the Audio Mixer is set to Clip mode as shown in Figure 9.8. Clicking the button toggles the mixer among the Clip, Live, and Auto modes.
The Clip Gain adjustments can be reflected on the timeline, as shown in Figure 9.9, if the Clip Gain option is selected in the Track control panel.
Figure 9.8
Clip Mode uniformly adjusts the overall volume of the clip.

Figure 9.9
Clip gain on the audio clips and selected in the Track control panel.
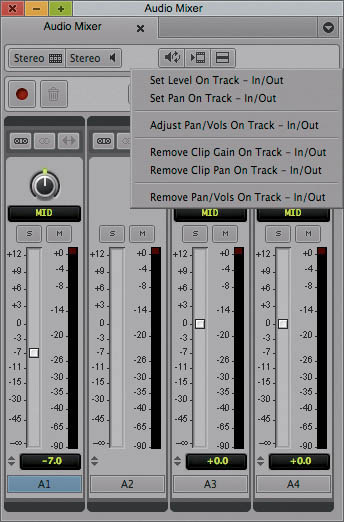
The Audio Mixer’s fast menu is aware of IN and OUT marks in the timeline. By removing the IN and OUT marks, the fast menu commands affect all clips on all enabled tracks, as shown in Figure 9.10. If an IN and OUT mark are present on the timeline, the Audio Mixer’s fast menu updates to apply the adjustments only to the clips that fall from IN to OUT, as shown in Figure 9.11. The IN and OUT marks do not have to encompass the entire clip, because clip adjustments are applied to the entire clip, not to a portion of it.
Note: For information on adjusting clip pan, see Lesson 8.
Figure 9.10
Audio Mixer’s fast menu: commands will be applied to all clips on the selected tracks.
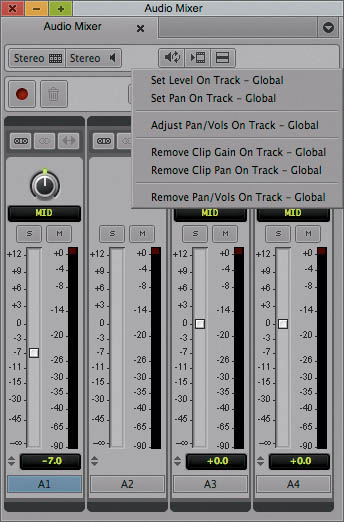
Figure 9.11
Audio Mixer’s fast menu: commands will be applied from IN to OUT.
Set Level on Track Global/IN - OUT
Start your audio mix by setting the clips on a track to an appropriate level. Since you have previously separated the clips onto related tracks, this step can quickly be performed by:
1. Removing the IN and OUT marks from the timeline.
2. Enabling all tracks that you intend to adjust.
3. Parking the CURRENT POSITION INDICATOR over a section of the timeline where there are clips present on each track that you want to adjust (without a clip under the Position indicator, the sliders do not appear in the Audio Mixer).
4. Using the AUDIO MIXER to set the level for each clip to a proper reference level.
5. Choosing AUDIO MIXER > FAST MENU > APPLY TO TRACK GLOBAL.
After this step has been performed, background sound should be quieter than voiceover and foreground sounds. If needed, you can perform this step on a per-scene or per-section basis by using IN and OUT marks to define the beginning and end of the section you want to set.
Set Levels for Specific Clips
The next step is to play the sequence and make individual clip adjustments on a per-clip basis. Two adjacent clips may have different audio levels even if they are from the same performer. The different audio levels are often the result of reconstructing the narrative by re-ordering the shots or editing out words and phrases.
Figure 9.12 shows audio clips with individual adjustments. Although the adjustments were made using the Audio Mixer, they are visible in the timeline because the tracks are set to display Clip Gain.
Figure 9.12
Audio clips with individually adjusted clip levels.
Adjust Levels on Track
After you’ve adjusted the levels in the series of shots, attenuating some, applying gain to others, in order to have a consistent level, you may find that the overall scene is too loud or too quiet.
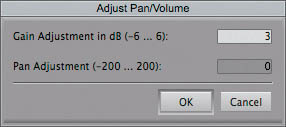
Media Composer allows you to perform an adjustment on all clips on a track, or just from IN to OUT. The Audio Mixer > Fast Menu > Adjust Pan/Vols on Track/Global command adds or subtracts the current clip level of each clip. The key feature of Adjust Pan/Vols is that it allows you to preserve the relative differences to each clip that you made in the previous two sections.
After selecting Adjust Pan/Vols on Track, the dialog box shown in Figure 9.13 appears.
Figure 9.13
An adjustment of +3dB will be applied to all clips affected by this adjustment.
You may not always need to use adjust levels, but it’s handy to know that it’s there when you do.
Adjusting Clip Volume by Adding Keyframes
Clip volume adjustments affect the levels within a clip over time. Sometimes called rubberbanding, you can add keyframes and set the levels at particular points. When you adjust clip volume on a music track, in order to keep levels low during the voiceover, and to increase the levels when the voiceover has finished, you perform audio ducking. The volume levels are ducking below the voiceover and coming up after.
When adjusting clip volume, you should consider making your audio tracks large enough that you can see the relative dB overlay that appears after the first keyframe has been applied to the clip, as shown in Figure 9.14.
Figure 9.14
Audio volume with relative dB adjustment overlay.
To enable the overlay in the timeline, choose Volume from the Track Panel.
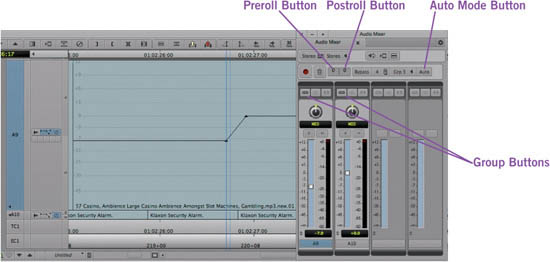
Media Composer 6 introduces the ability to add volume keyframes by using the sliders of the Audio Mixer, provided that the Audio Mixer is in Auto mode, shown in Figure 9.15. Auto Mode is the default mode of the Audio Mixer. The Add Keyframe command is mapped to the apostrophe key (’) by default. Until you add a keyframe, you will not see the overlay nor the black line that represents the audio adjustment.
Figure 9.15
Audio Mixer set to Auto: adjusting the sliders will add volume keyframes for variable level adjustments within a clip.
Adjusting Clip Volume Dynamically
You may also make adjustments during playback by pressing the Record button in the Audio Mixer when it is set to Auto mode. In that situation, you are recording the changes you make to the sliders. You are not recording sound through a microphone or any of the audio inputs on the system. After the recording, keyframes are added to the clips in the timeline.
To adjust clip volume dynamically:
1. Set the AUDIO MIXER to AUTO mode.
2. (Optional) Mark a region of the timeline using IN and OUT marks.
If you don’t specify IN and OUT marks, Media Composer will begin recording from the location of the Current Position indicator.
3. (Optional) Specify a preroll amount, in frames, as shown in Figure 9.15.
A preroll amount instructs Media Composer to begin playing prior to recording your changes to the audio sliders. You might set this to 48 (two seconds in a 24fps project) to give yourself a couple seconds to get ready after you press RECORD.
4. Click the RECORD button.
5. Drag the sliders to attenuate or apply gain to the clips on the timeline.
Adjusting volume dynamically is often used for music beds. You’ll watch the video and look at the clips coming up on the timeline, lowering the slider when narration occurs, and raising it when there is no narration. Using a mouse, you can only drag one slider at a time. That makes it hard to ride the sliders for music, if the music is stereo and spread onto two separate mono tracks. All the more reason to set the audio track format to stereo for the clip: You get a single slider that’s easy to adjust and only takes the space of one strip in the audio mixer.
Alternatively, if there are a few tracks that must be adjusted together, you can group them together using the Group button, as shown in Figure 9.15. For a group to be effective, there has to be more than one member (otherwise it’s just kind of sad, a group of one!), so be sure to enable the Group button for all tracks that should be adjusted together.
Tip: Having problems moving that one mouse around for 16 sliders? It’s a rather tough job to move all the sliders independently with one mouse. Avid has a solution for that: control surfaces. There are a variety of control surfaces manufactured by Avid that have physical mixing control strips, just like in a recording booth.
Tip: As Media Composer plays, you can ride the sliders with 10 fingers instead of one mouse. Avid’s Artist Control series allows you to mix and match control surfaces. You can have 16 sliders, a set of color correction trackballs, and a transport mechanism for a physical shuttle/jog control. Each control surface has buttons that you can remap using the same technique you use to remap the buttons on your keyboard.
Some third-party external mixers from companies such as Yamaha and JL Cooper are also supported by Media Composer. Check Avid.com/support for a list of supported third-party external mixers.
After recording dynamic volume adjustments, you may find that there are a lot of keyframes in the timeline. In fact, while making an adjustment to the slider, you could have one keyframe per video frame, such as 24 or 30 per second. If you then try to adjust the curve by manipulating the automatically recorded volume keyframes, you’ll find it very tough. You have two choices:
![]() You can group the keyframes within IN and OUT marks, which will adjust all of them while keeping their relative differences.
You can group the keyframes within IN and OUT marks, which will adjust all of them while keeping their relative differences.
![]() You can select the Audio Mixer > Fast Menu > Filter Automation Gain on Track/Global. This reduces the number of keyframes while preserving the overall shape of the curve. You may have to run it a couple times to reduce the number of keyframes sufficiently.
You can select the Audio Mixer > Fast Menu > Filter Automation Gain on Track/Global. This reduces the number of keyframes while preserving the overall shape of the curve. You may have to run it a couple times to reduce the number of keyframes sufficiently.
Add Audio Dissolves (Crossfades)
Adding audio crossfades is as simple as adding a quick transition. Regardless of which transition you select, Media Composer will apply a dissolve to the audio transitions, which will either crossfade one audio clip into another, or fade a clip in or out, depending if the transition is at the beginning or end of the clip, respectively.
Note: You can also use keyframes and a volume adjustment to fade a clip in or out, but you can’t use keyframes to crossfade two clips on the same track.
You might find that in some scenarios when you create a DVD, the audio at a cut has a “pop” sound or a slight tick. You can eliminate those pops by introducing a short two- or four-frame audio dissolve onto the problematic cut.
EXERCISE Take a moment to complete Exercise 9, Part 2.
Understanding Avid Pro Tools Interoperability
It’s a rare person who can master both the video and the audio realms. Often the role of picture editor is separated from the role of sound editor, and the extent of your job as a video editor is to get the audio to a good place before sending it to a sound editor, who will make it fantastic.
Media Composer excels at picture editing and has a robust set of audio editing tools, but Avid Pro Tools has a more powerful, focused set of audio tools. This part of the lesson is about how the two applications work together.
Note: Avid changed the names of some features of Media Composer in order to make them align with the names of similar features in Pro Tools. This common vocabulary makes it easier for editors of both systems to communicate, and just makes sense since Avid is one company. Examples are “volume automation” and “markers” instead of the term “automation gain” and “locators,” respectively, from Media Composer 5.
Metadata Goes to Pro Tools
The most basic way to send audio from Media Composer to Pro Tools is to export a mixed-down WAV or AIFF file and import that into Pro Tools. But then the Pro Tools editor would have a couple tracks of waveform with no metadata.
A better way is to export in a format like AAF that includes the rich metadata that you’ve already created within Media Composer.
Some of the metadata that goes from Media Composer 6 to Pro Tools 10 includes:
![]() Clip definitions, including track layout
Clip definitions, including track layout
![]() Clip names
Clip names
![]() Broadcast WAV metadata
Broadcast WAV metadata
![]() Markers, including marker colors
Markers, including marker colors
Using an AAF file, you can begin an audio edit in Media Composer and work with Media Composer’s audio tools, while being assured that the mix you’ve created will carry over to Pro Tools, where the sound editor can use it as a starting point.
The following audio features can be adjusted in Media Composer and then can be further adjusted in Pro Tools:
![]() Clip gain
Clip gain
![]() Volume and pan automation
Volume and pan automation
![]() Clip pan
Clip pan
![]() Crossfades (including location and duration)
Crossfades (including location and duration)
![]() AudioSuite plug-ins and RTAS effects
AudioSuite plug-ins and RTAS effects
The important thing to note in this list is that those items are no longer pre-rendered in Media Composer during an export, forcing the audio editor to accept them or discard the rendered version. The metadata that is included in the AAF and is sent to Pro Tools allows them to be re-created in Pro Tools as they were in Media Composer.
Sending Sound from Media Composer to Pro Tools
The best way to send your sequence to Pro Tools is to perform an AAF export. You can choose a range by setting IN and OUT marks, or export the entire sequence. You can include links to the media files or you can embed them. In the end, you have an AAF that contains all the metadata described in “Metadata Goes to Pro Tools” and either embedded media or linked media.
It’s also possible to perform a copy or consolidation of the media to a separate folder, and have the AAF link to the media in that folder.
To send to Pro Tools:
1. Choose FILE > EXPORT. The EXPORT AS dialog box appears.
2. Click OPTIONS, which is part of the EXPORT AS dialog box
By clicking OPTIONS, you can configure an EXPORT SETTING, which determines how Media Composer will export the sound’s metadata and media files.
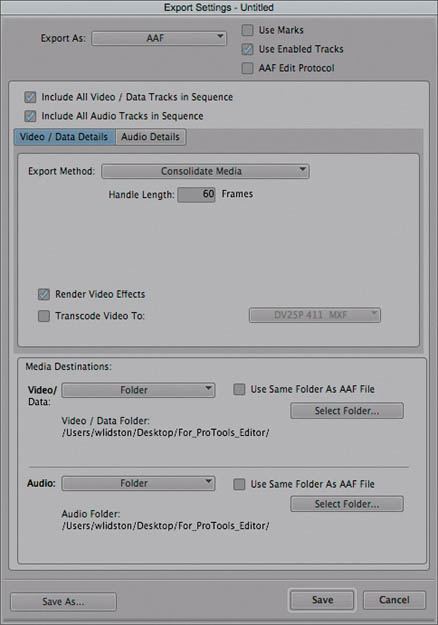
3. Choose to export as an AAF, as shown in Figure 9.16.
4. Select EXPORT METHOD > CONSOLIDATE TO FOLDER.
5. Select RENDER VIDEO EFFECTS (Remember: Pro Tools can’t render video effects so they would not show up in the guide track otherwise).
6. Select a MEDIA DESTINATION folder.
7. Select SAVE to save the export setting and return to the EXPORT AS dialog box.
8. Select SAVE again, this time from the EXPORT AS dialog box, to begin exporting the sound using the export setting.
Figure 9.16
AAF export from Media Composer.
The Pro Tools editor will then import the AAF. When that occurs, Pro Tools might alter some of the original audio if bit rates or sample rates were mixed in the Media Composer sequence.
Sample Rates and Bit Depths Don’t Mix
Pro Tools 10 supports mixed bit depths in the same session; however, mixed sample rates are still not supported. For best results, you’ll need to convert a Media Composer sequence containing mixed sample rate audio to a single sample rate in MC before you export to Pro Tools. Sample rates of 44.1kHz or greater are required. The 32kHz sample rate is not supported in Pro Tools.
Sending Finished Sound from Pro Tools to Media Composer
After the Pro Tools editor has finished the sound mix, the audio must come back to Media Composer for insertion into the sequence.
Two common techniques for sending audio from Pro Tools to Media Composer are AAF and Bouncing.
Export Tracks as AAF/OMF
The audio can be either linked (associated) or embedded into the AAF/OMF.
Upon import, Media Composer will create an audio sequence (no video) with the associated clips in the bin. You can then integrate that audio sequence into your sequence with the finished video.
Tip: If you’re using an Avid Unity or centralized file server, linking will create a smaller file that references the original media, but it requires that both the Pro Tools workstation and the Media Composer workstation have access to the same file share using the same UNC (Universal Naming Convention) paths. If you’re running Media Composer and Pro Tools on the same system, this is an ideal choice.
Bounce to Disk
Pro Tools can export the session (audio sequence) to a WAV file, which is referred to as bouncing the session to disk.
Media Composer will import the WAV and you edit it back into the sequence.
Tip: When you overwrite the WAV file back into the sequence, consider either using a duplicate of the original sequence, or overwriting the bounced WAV audio into new tracks. Then disabling monitoring of the original tracks. This lets you see the positioning of the original clips and lets you easily export the audio again from Media Composer, if required, while also allowing the bounced audio from Pro Tools to be in the same sequence.
Co-Installation with Avid Pro Tools
Media Composer 6 and Pro Tools 10 can be installed on the same computer at the same time. Not only does co-installation make it easier to flip between the two applications, but it also allows Media Composer and Pro Tools to use each other’s hardware.
Note: It’s imperative that you check the README file that ships with Media Composer to ensure that your specific system and software releases are compatible for co-existence. Media Composer and Pro Tools both have specific version numbers, like 6.0.2 and 10.0.1. The README file will indicate which versions are compatible and you should never assume that you can upgrade one application without possibly having to upgrade the other to a compatible version.
Failure to confirm the compatibility of the specific versions of the applications could result in metadata not moving correctly between them. Or worse, it could impede one application’s (Media Composer or Pro Tools) ability to launch or operate correctly.
Pro Tools HD Native and Pro Tools HDX hardware is supported for Media Composer audio playback. Pro Tools HD (TDM) cards are not. Pro Tools software can only use the original analog Mojo or Mojo SDI for video playback. Adrenaline, Nitris, Mojo DX, and Nitris DX hardware are not supported in any version of Pro Tools software.
EXERCISE Take a moment to complete Exercise 9, Part 3.
Review/Discussion Questions
1. Why should video editors care about sound mixing? (See “Sound Mixing Is Important” on page 328.)
2. What are some of the goals of sound mixing? (See “Goals of Sound Mixing” on page 328.)
3. What does it mean to “achieve balance” in a sound mix? (See “Achieving Balance” on page 328.)
4. How do you know what to use as the reference level? (See “Broadcast Delivery Requirements” on page 329.)
5. With –20dBFS as a reference level, give an example of a quiet sound, a loud sound, and an excessively loud sound. (See “dBFS: Decibels Full Scale” on page 330.)
6. What’s the difference between the audio meters in the Audio tool and the auto meters on the timeline? (See “The Audio Tool” on page 331.)
7. How do you generate test tone using the Audio tool? (See “The Audio Tool” on page 331.)
8. How do you determine the peak value after playing a sequence? (See “Using the Console Window to Check Audio Levels” on page 331.)
9. What’s the difference in the behavior of the Audio Mixer when the Source monitor is active in contrast to when the Record monitor is active? (See “Source-Side versus Record-Side Audio Mixer” on page 335.)
10. Describe the mixing workflow. (See “Understanding the Mixing Workflow” on page 336.)
11. What metadata will move from Media Composer to Pro Tools when a WAV file is exported from Media Composer? (See “Metadata Goes to Pro Tools” on page 345.)
12. What metadata will move from Media Composer to Pro Tools when an AAF file is exported from Media Composer? (See “Metadata Goes to Pro Tools” on page 345.)
13. How does Pro Tools handle AAF files with mixed sample rates or bit depths? (See “Sample Rates and Bit Depths Don’t Mix” on page 347.)
14. How does Media Composer benefit from being installed on a Pro Tools HD system? (See “Co-Installation with Avid Pro Tools” on page 348.)
15. How can a Pro Tools editor send the revised audio back to Media Composer? (See “Sending Finished Sound from Pro Tools to Media Composer.” on page 347.)