CHAPTER
20 java.util Part 2: More Utility Classes
This chapter continues our discussion of java.util by examining those classes and interfaces that are not part of the Collections Framework. These include classes that tokenize strings, work with dates, compute random numbers, and bundle resources. Also covered are the Formatter and Scanner classes which make it easy to write and read formatted data, and the Optional class, which simplifies handling situations in which a value may be absent. Finally, the subpackages of java.util are summarized at the end of this chapter. Of particular interest is java.util.function, which defines several standard functional interfaces. One last point: the Observer interface and the Observable class packaged in java.util. have been deprecated by JDK 9. For this reason they are not discussed here.
StringTokenizer
The processing of text often consists of parsing a formatted input string. Parsing is the division of text into a set of discrete parts, or tokens, which in a certain sequence can convey a semantic meaning. The StringTokenizer class provides the first step in this parsing process, often called the lexer (lexical analyzer) or scanner. StringTokenizer implements the Enumeration interface. Therefore, given an input string, you can enumerate the individual tokens contained in it using StringTokenizer. Before we begin, it is important to point out that StringTokenizer is described here primarily for the benefit of those programmers working with legacy code. For new code, regular expressions, discussed in Chapter 30, offer a more modern alternative.
To use StringTokenizer, you specify an input string and a string that contains delimiters. Delimiters are characters that separate tokens. Each character in the delimiters string is considered a valid delimiter—for example, ",;:" sets the delimiters to a comma, semicolon, and colon. The default set of delimiters consists of the whitespace characters: space, tab, form feed, newline, and carriage return.
The StringTokenizer constructors are shown here:
StringTokenizer(String str)
StringTokenizer(String str, String delimiters)
StringTokenizer(String str, String delimiters, boolean delimAsToken)
In all versions, str is the string that will be tokenized. In the first version, the default delimiters are used. In the second and third versions, delimiters is a string that specifies the delimiters. In the third version, if delimAsToken is true, then the delimiters are also returned as tokens when the string is parsed. Otherwise, the delimiters are not returned. Delimiters are not returned as tokens by the first two forms.
Once you have created a StringTokenizer object, the nextToken( ) method is used to extract consecutive tokens. The hasMoreTokens( ) method returns true while there are more tokens to be extracted. Since StringTokenizer implements Enumeration, the hasMoreElements( ) and nextElement( ) methods are also implemented, and they act the same as hasMoreTokens( ) and nextToken( ), respectively. The StringTokenizer methods are shown in Table 20-1.

Table 20-1 The Methods Defined by StringTokenizer
Here is an example that creates a StringTokenizer to parse "key=value" pairs. Consecutive sets of "key=value" pairs are separated by a semicolon.

The output from this program is shown here:

BitSet
A BitSet class creates a special type of array that holds bit values in the form of boolean values. This array can increase in size as needed. This makes it similar to a vector of bits. The BitSet constructors are shown here:
BitSet( )
BitSet(int size)
The first version creates a default object. The second version allows you to specify its initial size (that is, the number of bits that it can hold). All bits are initialized to false.
BitSet defines the methods listed in Table 20-2.

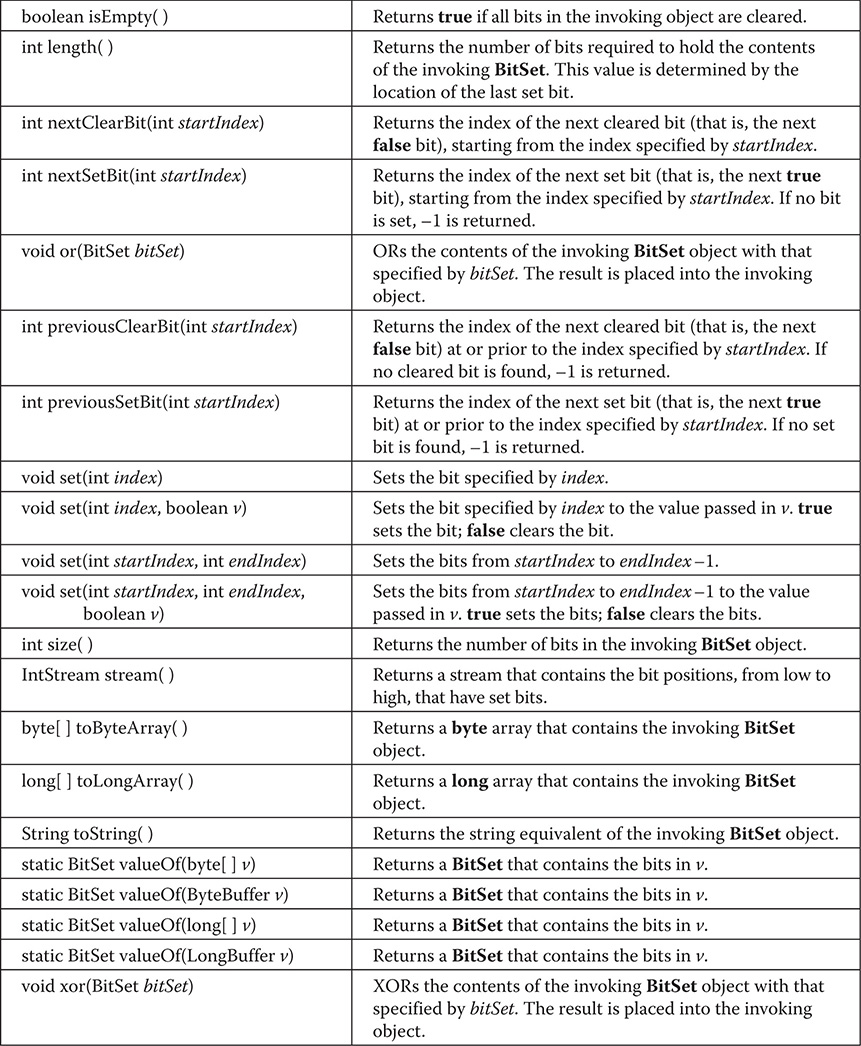
Table 20-2 The Methods Defined by BitSet
Here is an example that demonstrates BitSet:
The output from this program is shown here. When toString( ) converts a BitSet object to its string equivalent, each set bit is represented by its bit position. Cleared bits are not shown.

Optional, OptionalDouble, OptionalInt, and OptionalLong
Beginning with JDK 8, the classes called Optional, OptionalDouble, OptionalInt, and OptionalLong offer a way to handle situations in which a value may or may not be present. In the past, you would normally use the value null to indicate that no value is present. However, this can lead to null pointer exceptions if an attempt is made to dereference a null reference. As a result, frequent checks for a null value were necessary to avoid generating an exception. These classes provide a better way to handle such situations. One other point: These classes are value-based; as such they are immutable and various restrictions apply, such as not using instances for synchronization and avoiding any use of reference equality. Consult the Oracle documentation for the latest details on value-based classes.
The first and most general of these classes is Optional. For this reason, it is the primary focus of this discussion. It is shown here:
class Optional<T>
Here, T specifies the type of value stored. It is important to understand that an Optional instance can either contain a value of type T or be empty. In other words, an Optional object does not necessarily contain a value. Optional does not define any constructors, but it does define several methods that let you work with Optional objects. For example, you can determine if a value is present, obtain the value if it is present, obtain a default value when no value is present, and construct an Optional value. The Optional methods are shown in Table 20-3.


Table 20-3 The Methods Defined by Optional
The best way to understand Optional is to work through an example that uses its core methods. At the foundation of Optional are isPresent( ) and get( ). You can determine if a value is present by calling isPresent( ). If a value is available, it will return true. Otherwise, false is returned. If a value is present in an Optional instance, you can obtain it by calling get( ). However, if you call get( ) on an object that does not contain a value, NoSuchElementException is thrown. For this reason, you should always first confirm that a value is present before calling get( ) on an Optional object.
Of course, having to call two methods to retrieve a value adds overhead to each access. Fortunately, Optional defines methods that combine the check for a value with the retrieval of the value. One such method is orElse( ). If the object on which it is called contains a value, the value is returned. Otherwise, a default value is returned.
Optional does not define any constructors. Instead, you will use one of its methods to create an instance. For example, you can create an Optional instance with a specified value by using of( ). You can create an instance of Optional that does not contain a value by using empty( ).
The following program demonstrates these methods:

The output is shown here:

As the output shows, a value can be obtained from an Optional object only if one is present. This basic mechanism enables Optional to prevent null pointer exceptions.
The OptionalDouble, OptionalInt, and OptionalLong classes work much like Optional, except that they are designed expressly for use on double, int, and long values, respectively. As such, they specify the methods getAsDouble( ), getAsInt( ), and getAsLong( ), respectively, rather than get( ). Also, they do not support the filter( ), ofNullable( ), map( ), flatMap( ), and or( ) methods.
Date
The Date class encapsulates the current date and time. Before beginning our examination of Date, it is important to point out that it has changed substantially from its original version defined by Java 1.0. When Java 1.1 was released, many of the functions carried out by the original Date class were moved into the Calendar and DateFormat classes, and as a result, many of the original 1.0 Date methods were deprecated. Since the deprecated 1.0 methods should not be used for new code, they are not described here.
Date supports the following non-deprecated constructors:
Date( )
Date(long millisec)
The first constructor initializes the object with the current date and time. The second constructor accepts one argument that equals the number of milliseconds that have elapsed since midnight, January 1, 1970. The non-deprecated methods defined by Date are shown in Table 20-4. Date also implements the Comparable interface.

Table 20-4 The Nondeprecated Methods Defined by Date
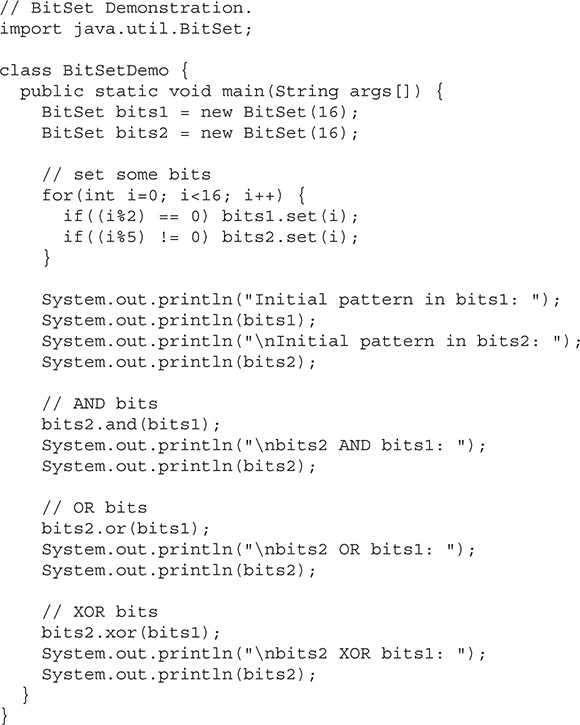
As you can see by examining Table 20-4, the non-deprecated Date features do not allow you to obtain the individual components of the date or time. As the following program demonstrates, you can only obtain the date and time in terms of milliseconds, in its default string representation as returned by toString( ), or as an Instant object. To obtain more-detailed information about the date and time, you will use the Calendar class.
Sample output is shown here:
![]()
Calendar
The abstract Calendar class provides a set of methods that allows you to convert a time in milliseconds to a number of useful components. Some examples of the type of information that can be provided are year, month, day, hour, minute, and second. It is intended that subclasses of Calendar will provide the specific functionality to interpret time information according to their own rules. This is one aspect of the Java class library that enables you to write programs that can operate in international environments. An example of such a subclass is GregorianCalendar.
NOTE JDK 8 defined a new date and time API in java.time, which new applications may want to employ. See Chapter 30.
Calendar provides no public constructors. Calendar defines several protected instance variables. areFieldsSet is a boolean that indicates if the time components have been set. fields is an array of ints that holds the components of the time. isSet is a boolean array that indicates if a specific time component has been set. time is a long that holds the current time for this object. isTimeSet is a boolean that indicates if the current time has been set.
A sampling of methods defined by Calendar are shown in Table 20-5.


Table 20-5 A Sampling of the Methods Defined by Calendar
Calendar defines the following int constants, which are used when you get or set components of the calendar.

The following program demonstrates several Calendar methods:


Sample output is shown here:

GregorianCalendar
GregorianCalendar is a concrete implementation of a Calendar that implements the normal Gregorian calendar with which you are familiar. The getInstance( ) method of Calendar will typically return a GregorianCalendar initialized with the current date and time in the default locale and time zone.
GregorianCalendar defines two fields: AD and BC. These represent the two eras defined by the Gregorian calendar.
There are also several constructors for GregorianCalendar objects. The default, GregorianCalendar( ), initializes the object with the current date and time in the default locale and time zone. Three more constructors offer increasing levels of specificity:
GregorianCalendar(int year, int month, int dayOfMonth)
GregorianCalendar(int year, int month, int dayOfMonth, int hours,
int minutes)
GregorianCalendar(int year, int month, int dayOfMonth, int hours,
int minutes, int seconds)
All three versions set the day, month, and year. Here, year specifies the year. The month is specified by month, with zero indicating January. The day of the month is specified by dayOfMonth. The first version sets the time to midnight. The second version also sets the hours and the minutes. The third version adds seconds.
You can also construct a GregorianCalendar object by specifying the locale and/or time zone. The following constructors create objects initialized with the current date and time using the specified time zone and/or locale:
GregorianCalendar(Locale locale)
GregorianCalendar(TimeZone timeZone)
GregorianCalendar(TimeZone timeZone, Locale locale)
GregorianCalendar provides an implementation of all the abstract methods in Calendar. It also provides some additional methods. Perhaps the most interesting is isLeapYear( ), which tests if the year is a leap year. Its form is
boolean isLeapYear(int year)
This method returns true if year is a leap year and false otherwise. Two other methods of interest are from( ) and toZonedDateTime( ), which support the date and time API added by JDK 8.
The following program demonstrates GregorianCalendar:


Sample output is shown here:

TimeZone
Another time-related class is TimeZone. The abstract TimeZone class allows you to work with time zone offsets from Greenwich mean time (GMT), also referred to as Coordinated Universal Time (UTC). It also computes daylight saving time. TimeZone only supplies the default constructor.
A sampling of methods defined by TimeZone is given in Table 20-6.


Table 20-6 A Sampling of the Methods Defined by TimeZone
SimpleTimeZone
The SimpleTimeZone class is a convenient subclass of TimeZone. It implements TimeZone's abstract methods and allows you to work with time zones for a Gregorian calendar. It also computes daylight saving time.
SimpleTimeZone defines four constructors. One is
SimpleTimeZone(int timeDelta, String tzName)
This constructor creates a SimpleTimeZone object. The offset relative to Greenwich mean time (GMT) is timeDelta. The time zone is named tzName.
The second SimpleTimeZone constructor is
SimpleTimeZone(int timeDelta, String tzId, int dstMonth0,
int dstDayInMonth0, int dstDay0, int time0,
int dstMonth1, int dstDayInMonth1, int dstDay1,
int time1)
Here, the offset relative to GMT is specified in timeDelta. The time zone name is passed in tzId. The start of daylight saving time is indicated by the parameters dstMonth0, dstDayInMonth0, dstDay0, and time0. The end of daylight saving time is indicated by the parameters dstMonth1, dstDayInMonth1, dstDay1, and time1.
The third SimpleTimeZone constructor is
SimpleTimeZone(int timeDelta, String tzId, int dstMonth0,
int dstDayInMonth0, int dstDay0, int time0,
int dstMonth1, int dstDayInMonth1,
int dstDay1, int time1, int dstDelta)
Here, dstDelta is the number of milliseconds saved during daylight saving time.
The fourth SimpleTimeZone constructor is:
SimpleTimeZone(int timeDelta, String tzId, int dstMonth0,
int dstDayInMonth0, int dstDay0, int time0,
int time0mode, int dstMonth1, int dstDayInMonth1,
int dstDay1, int time1, int time1mode, int dstDelta)
Here, time0mode specifies the mode of the starting time, and time1mode specifies the mode of the ending time. Valid mode values include:
![]()
The time mode indicates how the time values are interpreted. The default mode used by the other constructors is WALL_TIME.
Locale
The Locale class is instantiated to produce objects that describe a geographical or cultural region. It is one of several classes that provide you with the ability to write programs that can execute in different international environments. For example, the formats used to display dates, times, and numbers are different in various regions.
Internationalization is a large topic that is beyond the scope of this book. However, many programs will only need to deal with its basics, which include setting the current locale.
The Locale class defines the following constants that are useful for dealing with several common locales:

For example, the expression Locale.CANADA represents the Locale object for Canada.
The constructors for Locale are
Locale(String language)
Locale(String language, String country)
Locale(String language, String country, String variant)
These constructors build a Locale object to represent a specific language and in the case of the last two, country. These values must contain standard language and country codes. Auxiliary variant information can be provided in variant.
Locale defines several methods. One of the most important is setDefault( ), shown here:
static void setDefault(Locale localeObj)
This sets the default locale used by the JVM to that specified by localeObj.
Some other interesting methods are the following:
final String getDisplayCountry( )
final String getDisplayLanguage( )
final String getDisplayName( )
These return human-readable strings that can be used to display the name of the country, the name of the language, and the complete description of the locale.
The default locale can be obtained using getDefault( ), shown here:
static Locale getDefault( )
JDK 7 added significant upgrades to the Locale class that support Internet Engineering Task Force (IETF) BCP 47, which defines tags for identifying languages, and Unicode Technical Standard (UTS) 35, which defines the Locale Data Markup Language (LDML). Support for BCP 47 and UTS 35 caused several features to be added to Locale, including several new methods and the Locale.Builder class. Among others, new methods include getScript( ), which obtains the locale’s script, and toLanguageTag( ), which obtains a string that contains the locale’s language tag. The Locale.Builder class constructs Locale instances. It ensures that a locale specification is well-formed as defined by BCP 47. (The Locale constructors do not provide such a check.) Several new methods were also added to Locale by JDK 8. Among these are methods that support filtering, extensions, and lookups. JDK 9 adds a method called getISOCountries( ), which returns a collection of country codes for a given Locale.IsoCountryCode enumeration value.
Calendar and GregorianCalendar are examples of classes that operate in a locale-sensitive manner. DateFormat and SimpleDateFormat also depend on the locale.
Random
The Random class is a generator of pseudorandom numbers. These are called pseudorandom numbers because they are simply uniformly distributed sequences. Random defines the following constructors:
Random( )
Random(long seed)
The first version creates a number generator that uses a reasonably unique seed. The second form allows you to specify a seed value manually.
If you initialize a Random object with a seed, you define the starting point for the random sequence. If you use the same seed to initialize another Random object, you will extract the same random sequence. If you want to generate different sequences, specify different seed values. One way to do this is to use the current time to seed a Random object. This approach reduces the possibility of getting repeated sequences.
The core public methods defined by Random are shown in Table 20-7. These are the methods that have been available in Random for several years (many since Java 1.0) and are widely used.

Table 20-7 The Core Methods Defined by Random
As you can see, there are seven types of random numbers that you can extract from a Random object. Random Boolean values are available from nextBoolean( ). Random bytes can be obtained by calling nextBytes( ). Integers can be extracted via the nextInt( ) method. Long integers can be obtained with nextLong( ). The nextFloat( ) and nextDouble( ) methods return float and double values, respectively, between 0.0 and 1.0. Finally, nextGaussian( ) returns a double value centered at 0.0 with a standard deviation of 1.0. This is what is known as a bell curve.
Here is an example that demonstrates the sequence produced by nextGaussian( ). It obtains 100 random Gaussian values and averages these values. The program also counts the number of values that fall within two standard deviations, plus or minus, using increments of 0.5 for each category. The result is graphically displayed sideways on the screen.

Here is a sample program run. As you can see, a bell-like distribution of numbers is obtained.

JDK 8 added three methods to Random that support the stream API (see Chapter 29). They are called doubles( ), ints( ), and longs( ), and each returns a reference to a stream that contains a sequence of pseudorandom values of the specified type. Each method defines several overloads. Here are their simplest forms:
DoubleStream doubles( )
IntStream ints( )
LongStream longs( )
The doubles( ) method returns a stream that contains pseudorandom double values. (The range of these values will be less than 1.0 but greater than or equal to 0.0.) The ints( ) method returns a stream that contains pseudorandom int values. The longs( ) method returns a stream that contains pseudorandom long values. For these three methods, the stream returned is effectively infinite. Several overloads of each method are provided that let you specify the size of the stream, an origin, and an upper bound.
Timer and TimerTask
An interesting and useful feature offered by java.util is the ability to schedule a task for execution at some future time. The classes that support this are Timer and TimerTask. Using these classes, you can create a thread that runs in the background, waiting for a specific time. When the time arrives, the task linked to that thread is executed. Various options allow you to schedule a task for repeated execution, and to schedule a task to run on a specific date. Although it was always possible to manually create a task that would be executed at a specific time using the Thread class, Timer and TimerTask greatly simplify this process.
Timer and TimerTask work together. Timer is the class that you will use to schedule a task for execution. The task being scheduled must be an instance of TimerTask. Thus, to schedule a task, you will first create a TimerTask object and then schedule it for execution using an instance of Timer.
TimerTask implements the Runnable interface; thus, it can be used to create a thread of execution. Its constructor is shown here:
protected TimerTask( )

Table 20-8 The Methods Defined by TimerTask
TimerTask defines the methods shown in Table 20-8. Notice that run( ) is abstract, which means that it must be overridden. The run( ) method, defined by the Runnable interface, contains the code that will be executed. Thus, the easiest way to create a timer task is to extend TimerTask and override run( ).
Once a task has been created, it is scheduled for execution by an object of type Timer. The constructors for Timer are shown here:
Timer( )
Timer(boolean DThread)
Timer(String tName)
Timer(String tName, boolean DThread)
The first version creates a Timer object that runs as a normal thread. The second uses a daemon thread if DThread is true. A daemon thread will execute only as long as the rest of the program continues to execute. The third and fourth constructors allow you to specify a name for the Timer thread. The methods defined by Timer are shown in Table 20-9.

Table 20-9 The Methods Defined by Timer
Once a Timer has been created, you will schedule a task by calling schedule( ) on the Timer that you created. As Table 20-9 shows, there are several forms of schedule( ) which allow you to schedule tasks in a variety of ways.
If you create a non-daemon task, then you will want to call cancel( ) to end the task when your program ends. If you don’t do this, then your program may "hang" for a period of time.
The following program demonstrates Timer and TimerTask. It defines a timer task whose run( ) method displays the message "Timer task executed." This task is scheduled to run once every half second after an initial delay of one second.


Currency
The Currency class encapsulates information about a currency. It defines no constructors. The methods supported by Currency are shown in Table 20-10. The following program demonstrates Currency:

Table 20-10 The Methods Defined by Currency

The output is shown here:
![]()
Formatter
At the core of Java’s support for creating formatted output is the Formatter class. It provides format conversions that let you display numbers, strings, and time and date in virtually any format you like. It operates in a manner similar to the C/C++ printf( ) function, which means that if you are familiar with C/C++, then learning to use Formatter will be very easy. It also further streamlines the conversion of C/C++ code to Java. If you are not familiar with C/C++, it is still quite easy to format data.
NOTE Although Java’s Formatter class operates in a manner very similar to the C/C++ printf( ) function, there are some differences, and some new features. Therefore, if you have a C/C++ background, a careful reading is advised.
The Formatter Constructors
Before you can use Formatter to format output, you must create a Formatter object. In general, Formatter works by converting the binary form of data used by a program into formatted text. It stores the formatted text in a buffer, the contents of which can be obtained by your program whenever they are needed. It is possible to let Formatter supply this buffer automatically, or you can specify the buffer explicitly when a Formatter object is created. It is also possible to have Formatter output its buffer to a file.
The Formatter class defines many constructors, which enable you to construct a Formatter in a variety of ways. Here is a sampling:
Formatter( )
Formatter(Appendable buf)
Formatter(Appendable buf, Locale loc)
Formatter(String filename)
throws FileNotFoundException
Formatter(String filename, String charset)
throws FileNotFoundException, UnsupportedEncodingException
Formatter(File outF)
throws FileNotFoundException
Formatter(OutputStream outStrm)
Here, buf specifies a buffer for the formatted output. If buf is null, then Formatter automatically allocates a StringBuilder to hold the formatted output. The loc parameter specifies a locale. If no locale is specified, the default locale is used. The filename parameter specifies the name of a file that will receive the formatted output. The charset parameter specifies the character set. If no character set is specified, then the default character set is used. The outF parameter specifies a reference to an open file that will receive output. The outStrm parameter specifies a reference to an output stream that will receive output. When using a file, output is also written to the file.
Perhaps the most widely used constructor is the first, which has no parameters. It automatically uses the default locale and allocates a StringBuilder to hold the formatted output.
The Formatter Methods
Formatter defines the methods shown in Table 20-11.
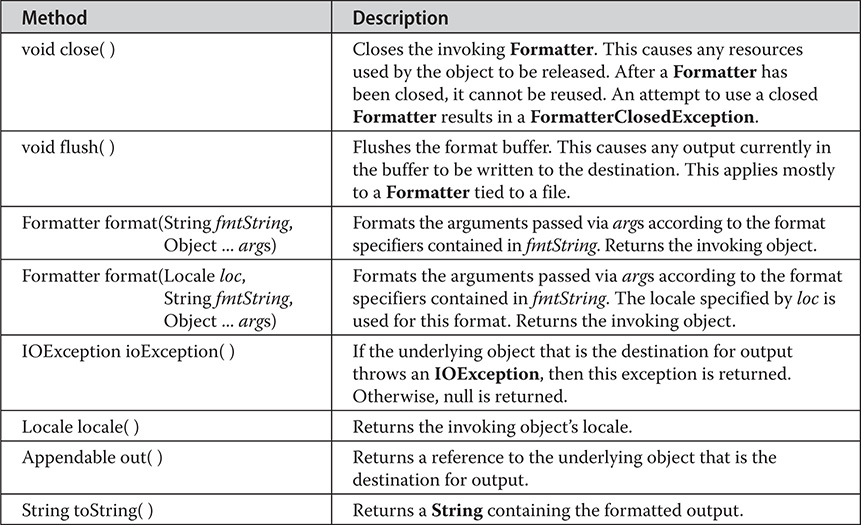
Table 20-11 The Methods Defined by Formatter
Formatting Basics
After you have created a Formatter, you can use it to create a formatted string. To do so, use the format( ) method. The version we will use is shown here:
Formatter format(String fmtString, Object … args)
The fmtSring consists of two types of items. The first type is composed of characters that are simply copied to the output buffer. The second type contains format specifiers that define the way the subsequent arguments are displayed.
In its simplest form, a format specifier begins with a percent sign followed by the format conversion specifier. All format conversion specifiers consist of a single character. For example, the format specifier for floating-point data is %f. In general, there must be the same number of arguments as there are format specifiers, and the format specifiers and the arguments are matched in order from left to right. For example, consider this fragment:
![]()
This sequence creates a Formatter that contains the following string:
![]()
In this example, the format specifiers, %s, %d, and %f, are replaced with the arguments that follow the format string. Thus, %s is replaced by “with Java”, %d is replaced by 10, and %f is replaced by 98.6. All other characters are simply used as-is. As you might guess, the format specifier %s specifies a string, and %d specifies an integer value. As mentioned earlier, the %f specifies a floating-point value.
The format( ) method accepts a wide variety of format specifiers, which are shown in Table 20-12. Notice that many specifiers have both upper- and lowercase forms. When an uppercase specifier is used, then letters are shown in uppercase. Otherwise, the upper- and lowercase specifiers perform the same conversion. It is important to understand that Java type-checks each format specifier against its corresponding argument. If the argument doesn’t match, an IllegalFormatException is thrown.

Table 20-12 The Format Specifiers
Once you have formatted a string, you can obtain it by calling toString( ). For example, continuing with the preceding example, the following statement obtains the formatted string contained in fmt:
![]()
Of course, if you simply want to display the formatted string, there is no reason to first assign it to a String object. When a Formatter object is passed to println( ), for example, its toString( ) method is automatically called.
Here is a short program that puts together all of the pieces, showing how to create and display a formatted string:

One other point: You can obtain a reference to the underlying output buffer by calling out( ). It returns a reference to an Appendable object.
Now that you know the general mechanism used to create a formatted string, the remainder of this section discusses in detail each conversion. It also describes various options, such as justification, minimum field width, and precision.
Formatting Strings and Characters
To format an individual character, use %c. This causes the matching character argument to be output, unmodified. To format a string, use %s.
Formatting Numbers
To format an integer in decimal format, use %d. To format a floating-point value in decimal format, use %f. To format a floating-point value in scientific notation, use %e. Numbers represented in scientific notation take this general form:
x.dddddde+/–yy
The %g format specifier causes Formatter to use either %f or %e, based on the value being formatted and the precision, which is 6 by default. The following program demonstrates the effect of the %f and %e format specifiers:

It produces the following output:

You can display integers in octal or hexadecimal format by using %o and %x, respectively. For example, this fragment:
![]()
produces this output:
![]()
You can display floating-point values in hexadecimal format by using %a. The format produced by %a appears a bit strange at first glance. This is because its representation uses a form similar to scientific notation that consists of a hexadecimal significand and a decimal exponent of powers of 2. Here is the general format:
0x1.sigpexp
Here, sig contains the fractional portion of the significand and exp contains the exponent. The p indicates the start of the exponent. For example, this call:
![]()
produces this output:
![]()
Formatting Time and Date
One of the more powerful conversion specifiers is %t. It lets you format time and date information. The %t specifier works a bit differently than the others because it requires the use of a suffix to describe the portion and precise format of the time or date desired. The suffixes are shown in Table 20-13. For example, to display minutes, you would use %tM, where M indicates minutes in a two-character field. The argument corresponding to the %t specifier must be of type Calendar, Date, Long, long, or TemporalAccessor.


Table 20-13 The Time and Date Format Suffixes
Here is a program that demonstrates several of the formats:

Sample output is shown here:

The %n and %% Specifiers
The %n and%% format specifiers differ from the others in that they do not match an argument. Instead, they are simply escape sequences that insert a character into the output sequence. The %n inserts a newline. The %% inserts a percent sign. Neither of these characters can be entered directly into the format string. Of course, you can also use the standard escape sequence to embed a newline character.
Here is an example that demonstrates the %n and %% format specifiers:

It displays the following output:
![]()
Specifying a Minimum Field Width
An integer placed between the % sign and the format conversion code acts as a minimum field-width specifier. This pads the output with spaces to ensure that it reaches a certain minimum length. If the string or number is longer than that minimum, it will still be printed in full. The default padding is done with spaces. If you want to pad with 0’s, place a 0 before the field-width specifier. For example, %05d will pad a number of less than five digits with 0’s so that its total length is five. The field-width specifier can be used with all format specifiers except %n.
The following program demonstrates the minimum field-width specifier by applying it to the %f conversion:

This program produces the following output:

The first line displays the number 10.12345 in its default width. The second line displays that value in a 12-character field. The third line displays the value in a 12-character field, padded with leading zeros.
The minimum field-width modifier is often used to produce tables in which the columns line up. For example, the next program produces a table of squares and cubes for the numbers between 1 and 10:

Its output is shown here:

Specifying Precision
A precision specifier can be applied to the %f, %e, %g, and %s format specifiers, among others. It follows the minimum field-width specifier (if there is one) and consists of a period followed by an integer. Its exact meaning depends upon the type of data to which it is applied.
When you apply the precision specifier to floating-point data using the %f or %e specifiers, it determines the number of decimal places displayed. For example, %10.4f displays a number at least ten characters wide with four decimal places. When using %g, the precision determines the number of significant digits. The default precision is 6.
Applied to strings, the precision specifier specifies the maximum field length. For example, %5.7s displays a string of at least five and not exceeding seven characters long. If the string is longer than the maximum field width, the end characters will be truncated.
The following program illustrates the precision specifier:

It produces the following output:

Using the Format Flags
Formatter recognizes a set of format flags that lets you control various aspects of a conversion. All format flags are single characters, and a format flag follows the % in a format specification. The flags are shown here:

Not all flags apply to all format specifiers. The following sections explain each in detail.
Justifying Output
By default, all output is right-justified. That is, if the field width is larger than the data printed, the data will be placed on the right edge of the field. You can force output to be left-justified by placing a minus sign directly after the %. For instance, %–10.2f left-justifies a floating-point number with two decimal places in a 10-character field. For example, consider this program:

It produces the following output:
![]()
As you can see, the second line is left-justified within a 10-character field.
The Space, +, 0, and ( Flags
To cause a + sign to be shown before positive numeric values, add the + flag. For example,
![]()
creates this string:
![]()
When creating columns of numbers, it is sometimes useful to output a space before positive values so that positive and negative values line up. To do this, add the space flag. For example,

The output is shown here:
![]()
Notice that the positive values have a leading space, which causes the digits in the column to line up properly.
To show negative numeric output inside parentheses, rather than with a leading –, use the ( flag. For example,
![]()
creates this string:
![]()
The 0 flag causes output to be padded with zeros rather than spaces.
The Comma Flag
When displaying large numbers, it is often useful to add grouping separators, which in English are commas. For example, the value 1234567 is more easily read when formatted as 1,234,567. To add grouping specifiers, use the comma (,) flag. For example,
![]()
creates this string:
![]()
The # Flag
The # can be applied to %o, %x, %e, and %f. For %e, and %f, the # ensures that there will be a decimal point even if there are no decimal digits. If you precede the %x format specifier with a #, the hexadecimal number will be printed with a 0x prefix. Preceding the %o specifier with # causes the number to be printed with a leading zero.
The Uppercase Option
As mentioned earlier, several of the format specifiers have uppercase versions that cause the conversion to use uppercase where appropriate. The following table describes the effect.

For example, this call:
![]()
creates this string:
![]()
This call:
![]()
creates this string:
![]()
Using an Argument Index
Formatter includes a very useful feature that lets you specify the argument to which a format specifier applies. Normally, format specifiers and arguments are matched in order, from left to right. That is, the first format specifier matches the first argument, the second format specifier matches the second argument, and so on. However, by using an argument index, you can explicitly control which argument a format specifier matches.
An argument index immediately follows the % in a format specifier. It has the following format:
n$
where n is the index of the desired argument, beginning with 1. For example, consider this example:
![]()
It produces this string:
![]()
In this example, the first format specifier matches 30, the second matches 10, and the third matches 20. Thus, the arguments are used in an order other than strictly left to right.
One advantage of argument indexes is that they enable you to reuse an argument without having to specify it twice. For example, consider this line:
![]()
It produces the following string:
![]()
As you can see, the argument 255 is used by both format specifiers.
There is a convenient shorthand called a relative index that enables you to reuse the argument matched by the preceding format specifier. Simply specify < for the argument index. For example, the following call to format( ) produces the same results as the previous example:
![]()
Relative indexes are especially useful when creating custom time and date formats. Consider the following example:

Here is sample output:
![]()
Because of relative indexing, the argument cal need only be passed once, rather than three times.
Closing a Formatter
In general, you should close a Formatter when you are done using it. Doing so frees any resources that it was using. This is especially important when formatting to a file, but it can be important in other cases, too. As the previous examples have shown, one way to close a Formatter is to explicitly call close( ). However, Formatter also implements the AutoCloseable interface. This means that it supports the try-with-resources statement. Using this approach, the Formatter is automatically closed when it is no longer needed.
The try-with-resources statement is described in Chapter 13, in connection with files, because files are some of the most commonly used resources that must be closed. However, the same basic techniques apply here. For example, here is the first Formatter example reworked to use automatic resource management:

The output is the same as before.
The Java printf( ) Connection
Although there is nothing technically wrong with using Formatter directly (as the preceding examples have done) when creating output that will be displayed on the console, there is a more convenient alternative: the printf( ) method. The printf( ) method automatically uses Formatter to create a formatted string. It then displays that string on System.out, which is the console by default. The printf( ) method is defined by both PrintStream and PrintWriter. The printf( ) method is described in Chapter 21.
Scanner
Scanner is the complement of Formatter. It reads formatted input and converts it into its binary form. Scanner can be used to read input from the console, a file, a string, or any source that implements the Readable interface or ReadableByteChannel. For example, you can use Scanner to read a number from the keyboard and assign its value to a variable. As you will see, given its power, Scanner is surprisingly easy to use.
The Scanner Constructors
Scanner defines the constructors shown in Table 20-14. In general, a Scanner can be created for a String, an InputStream, a File, or any object that implements the Readable or ReadableByteChannel interfaces. Here are some examples.

Table 20-14 The Scanner Constructors
The following sequence creates a Scanner that reads the file Test.txt:
![]()
This works because FileReader implements the Readable interface. Thus, the call to the constructor resolves to Scanner(Readable).
This next line creates a Scanner that reads from standard input, which is the keyboard by default:
![]()
This works because System.in is an object of type InputStream. Thus, the call to the constructor maps to Scanner(InputStream).
The next sequence creates a Scanner that reads from a string.
![]()
Scanning Basics
Once you have created a Scanner, it is a simple matter to use it to read formatted input. In general, a Scanner reads tokens from the underlying source that you specified when the Scanner was created. As it relates to Scanner, a token is a portion of input that is delineated by a set of delimiters, which is whitespace by default. A token is read by matching it with a particular regular expression, which defines the format of the data. Although Scanner allows you to define the specific type of expression that its next input operation will match, it includes many predefined patterns, which match the primitive types, such as int and double, and strings. Thus, often you won’t need to specify a pattern to match.
In general, to use Scanner, follow this procedure:
1. Determine if a specific type of input is available by calling one of Scanner’s hasNextX methods, where X is the type of data desired.
2. If input is available, read it by calling one of Scanner’s nextX methods.
3. Repeat the process until input is exhausted.
4. Close the Scanner by calling close( ).
As the preceding indicates, Scanner defines two sets of methods that enable you to read input. The first are the hasNextX methods, which are shown in Table 20-15. These methods determine if the specified type of input is available. For example, calling hasNextInt( ) returns true only if the next token to be read is an integer. If the desired data is available, then you read it by calling one of Scanner’s nextX methods, which are shown in Table 20-16. For example, to read the next integer, call nextInt( ). The following sequence shows how to read a list of integers from the keyboard.

Table 20-15 The Scanner hasNext Methods

Table 20-16 The Scanner next Methods

The while loop stops as soon as the next token is not an integer. Thus, the loop stops reading integers as soon as a non-integer is encountered in the input stream.
If a next method cannot find the type of data it is looking for, it throws an InputMismatchException. A NoSuchElementException is thrown if no more input is available. For this reason, it is best to first confirm that the desired type of data is available by calling a hasNext method before calling its corresponding next method.
Some Scanner Examples
Scanner makes what could be a tedious task into an easy one. To understand why, let’s look at some examples. The following program averages a list of numbers entered at the keyboard:
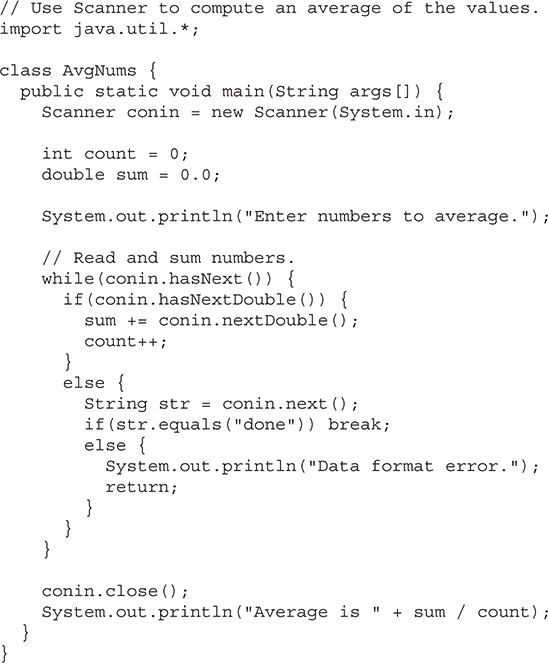
The program reads numbers from the keyboard, summing them in the process, until the user enters the string "done". It then stops input and displays the average of the numbers. Here is a sample run:

The program reads numbers until it encounters a token that does not represent a valid double value. When this occurs, it confirms that the token is the string "done". If it is, the program terminates normally. Otherwise, it displays an error.
Notice that the numbers are read by calling nextDouble( ). This method reads any number that can be converted into a double value, including an integer value, such as 2, and a floating-point value like 3.4. Thus, a number read by nextDouble( ) need not specify a decimal point. This same general principle applies to all next methods. They will match and read any data format that can represent the type of value being requested.
One thing that is especially nice about Scanner is that the same technique used to read from one source can be used to read from another. For example, here is the preceding program reworked to average a list of numbers contained in a text file:

Here is the output:
![]()
The preceding program illustrates another important feature of Scanner. Notice that the file reader referred to by fin is not closed directly. Rather, it is closed automatically when src calls close( ). When you close a Scanner, the Readable associated with it is also closed (if that Readable implements the Closeable interface). Therefore, in this case, the file referred to by fin is automatically closed when src is closed.
Scanner also implements the AutoCloseable interface. This means that it can be managed by a try-with-resources block. As explained in Chapter 13, when try-with-resources is used, the scanner is automatically closed when the block ends. For example, src in the preceding program could have been managed like this:

To clearly demonstrate the closing of a Scanner, the following examples will call close( ) explicitly, but you should feel free to use try-with-resources in your own code when appropriate.
One other point: To keep this and the other examples in this section compact, I/O exceptions are simply thrown out of main( ). However, your real-world code will normally handle I/O exceptions itself.
You can use Scanner to read input that contains several different types of data—even if the order of that data is unknown in advance. You must simply check what type of data is available before reading it. For example, consider this program:

Here is the output:

When reading mixed data types, as the preceding program does, you need to be a bit careful about the order in which you call the next methods. For example, if the loop reversed the order of the calls to nextInt( ) and nextDouble( ), both numeric values would have been read as doubles, because nextDouble( ) matches any numeric string that can be represented as a double.
Setting Delimiters
Scanner defines where a token starts and ends based on a set of delimiters. The default delimiters are the whitespace characters, and this is the delimiter set that the preceding examples have used. However, it is possible to change the delimiters by calling the useDelimiter( ) method, shown here:
Scanner useDelimiter(String pattern)
Scanner useDelimiter(Pattern pattern)
Here, pattern is a regular expression that specifies the delimiter set.
Here is the program that reworks the average program shown earlier so that it reads a list of numbers that are separated by commas, and any number of spaces:


In this version, the numbers written to test.txt are separated by commas and spaces. The use of the delimiter pattern ", * " tells Scanner to match a comma and zero or more spaces as delimiters. The output is the same as before.
You can obtain the current delimiter pattern by calling delimiter( ), shown here:
Pattern delimiter( )
Other Scanner Features
Scanner defines several other methods in addition to those already discussed. One that is particularly useful in some circumstances is findInLine( ). Its general forms are shown here:
String findInLine(Pattern pattern)
String findInLine(String pattern)
This method searches for the specified pattern within the next line of text. If the pattern is found, the matching token is consumed and returned. Otherwise, null is returned. It operates independently of any delimiter set. This method is useful if you want to locate a specific pattern. For example, the following program locates the Age field in the input string and then displays the age:

The output is 28. In the program, findInLine( ) is used to find an occurrence of the pattern "Age". Once found, the next token is read, which is the age.
Related to findInLine( ) is findWithinHorizon( ). It is shown here:
String findWithinHorizon(Pattern pattern, int count)
String findWithinHorizon(String pattern, int count)
This method attempts to find an occurrence of the specified pattern within the next count characters. If successful, it returns the matching pattern. Otherwise, it returns null. If count is zero, then all input is searched until either a match is found or the end of input is encountered.
You can bypass a pattern using skip( ), shown here:
Scanner skip(Pattern pattern)
Scanner skip(String pattern)
If pattern is matched, skip( ) simply advances beyond it and returns a reference to the invoking object. If pattern is not found, skip( ) throws NoSuchElementException.
Other Scanner methods include radix( ), which returns the default radix used by the Scanner; useRadix( ), which sets the radix; reset( ), which resets the scanner; and close( ), which closes the scanner. JDK 9 adds the methods tokens( ), which returns all tokens in the form of a Stream<String>, and findAll( ), which returns tokens that match the specified pattern in the form of a Stream<MatchResult>.
The ResourceBundle, ListResourceBundle, and PropertyResourceBundle Classes
The java.util package includes three classes that aid in the internationalization of your program. The first is the abstract class ResourceBundle. It defines methods that enable you to manage a collection of locale-sensitive resources, such as the strings that are used to label the user interface elements in your program. You can define two or more sets of translated strings that support various languages, such as English, German, or Chinese, with each translation set residing in its own bundle. You can then load the bundle appropriate to the current locale and use the strings to construct the program’s user interface.
Resource bundles are identified by their family name (also called their base name). To the family name can be added a two-character lowercase language code which specifies the language. In this case, if a requested locale matches the language code, then that version of the resource bundle is used. For example, a resource bundle with a family name of SampleRB could have a German version called SampleRB_de and a Russian version called SampleRB_ru. (Notice that an underscore links the family name to the language code.) Therefore, if the locale is Locale.GERMAN, SampleRB_de will be used.
It is also possible to indicate specific variants of a language that relate to a specific country by specifying a country code after the language code. A country code is a two-character uppercase identifier, such as AU for Australia or IN for India. A country code is also preceded by an underscore when linked to the resource bundle name. Other variations are also supported. A resource bundle that has only the family name is the default bundle. It is used when no language-specific bundles are applicable.
NOTE The language codes are defined by ISO standard 639 and the country codes by ISO standard 3166.
The methods defined by ResourceBundle are summarized in Table 20-17. One important point: null keys are not allowed and several of the methods will throw a NullPointerException if null is passed as the key. Notice the nested class ResourceBundle.Control. It is used to control the resource-bundle loading process.

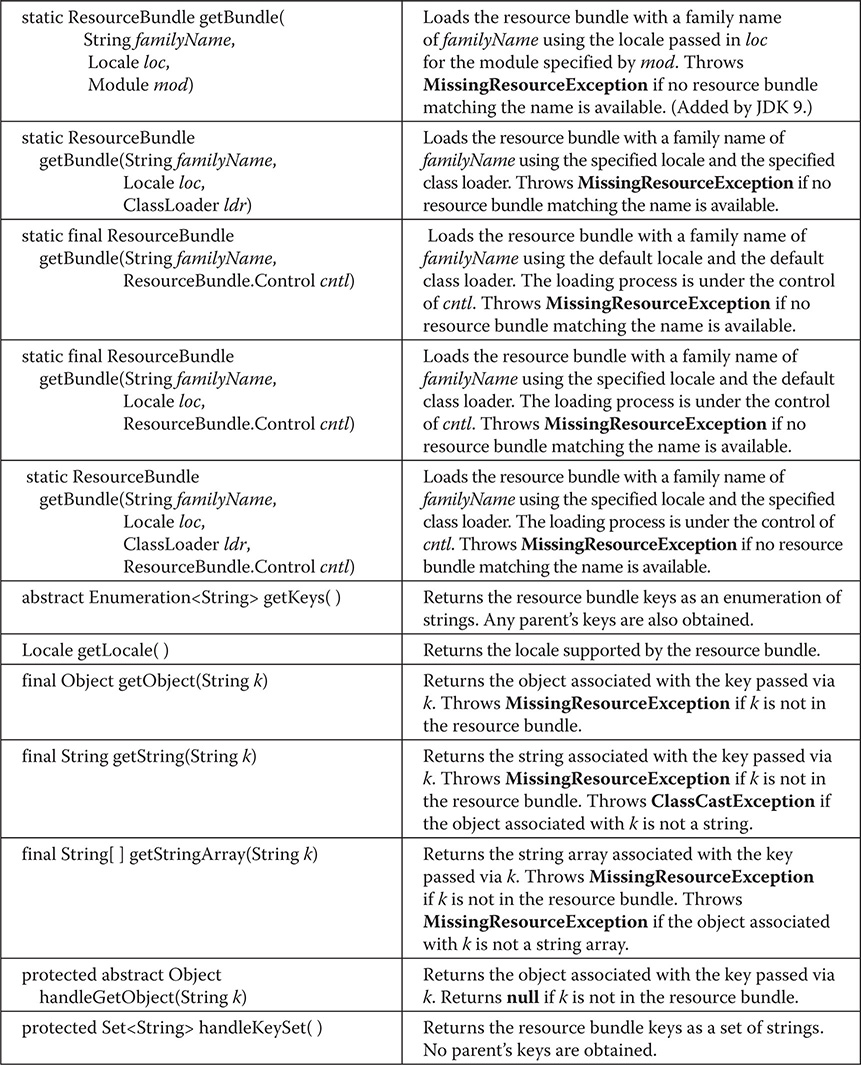

Table 20-17 The Methods Defined by ResourceBundle
NOTE Notice that JDK 9 adds methods to ResourceBundle that support the new modules feature. Furthermore, the addition of modules raises several issues related to the use of resource bundles that are beyond the scope of this discussion. Consult the API documentation for details on how modules affect the use of ResourceBundle.
There are two subclasses of ResourceBundle. The first is PropertyResourceBundle, which manages resources by using property files. PropertyResourceBundle adds no methods of its own. The second is the abstract class ListResourceBundle, which manages resources in an array of key/value pairs. ListResourceBundle adds the method getContents( ), which all subclasses must implement. It is shown here:
protected abstract Object[ ][ ] getContents( )
It returns a two-dimensional array that contains key/value pairs that represent resources. The keys must be strings. The values are typically strings, but can be other types of objects.
Here is an example that demonstrates using a resource bundle in an unnamed module. The resource bundle has the family name SampleRB. Two resource bundle classes of this family are created by extending ListResourceBundle. The first is called SampleRB, and it is the default bundle (which uses English). It is shown here:

The second resource bundle, shown next, is called SampleRB_de. It contains the German translation.
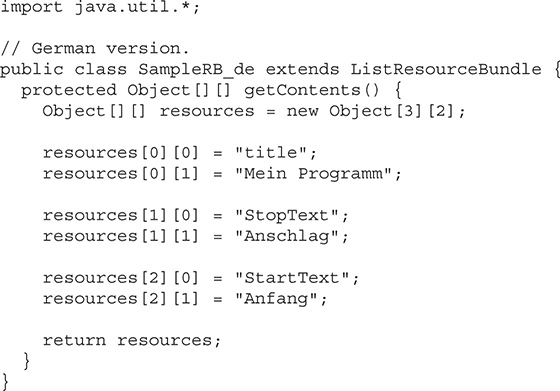
The following program demonstrates these two resource bundles by displaying the string associated with each key for both the default (English) version and the German version:

The output from the program is shown here:

Miscellaneous Utility Classes and Interfaces
In addition to the classes already discussed, java.util includes the following classes:

The following interfaces are also packaged in java.util:

The java.util Subpackages
Java defines the following subpackages of java.util:
• java.util.concurrent
• java.util.concurrent.atomic
• java.util.concurrent.locks
• java.util.function
• java.util.jar
• java.util.logging
• java.util.prefs
• java.util.regex
• java.util.spi
• java.util.stream
• java.util.zip
Except as otherwise noted, all are part of the java.base module. Each is briefly examined here.
java.util.concurrent, java.util.concurrent.atomic, and java.util.concurrent.locks
The java.util.concurrent package along with its two subpackages, java.util.concurrent.atomic and java.util.concurrent.locks, support concurrent programming. These packages provide a high-performance alternative to using Java’s built-in synchronization features when thread-safe operation is required. Beginning with JDK 7, java.util.concurrent also provides the Fork/Join Framework. These packages are examined in detail in Chapter 28.
java.util.function
The java.util.function package defines several predefined functional interfaces that you can use when creating lambda expressions or method references. They are also widely used throughout the Java API. The functional interfaces defined by java.util.function are shown in Table 20-18 along with a synopsis of their abstract methods. Be aware that some of these interfaces also define default or static methods that supply additional functionality. You will want to explore them fully on your own. (For a discussion of the use of functional interfaces, see Chapter 15.)


Table 20-18 Functional Interfaces Defined by java.util.function and Their Abstract Methods
java.util.jar
The java.util.jar package provides the ability to read and write Java Archive (JAR) files.
java.util.logging
The java.util.logging package provides support for program activity logs, which can be used to record program actions, and to help find and debug problems. Beginning with JDK 9, this package is in the java.logging module.
java.util.prefs
The java.util.prefs package provides support for user preferences. It is typically used to support program configuration. Beginning with JDK 9, this package is in the java.prefs module.
java.util.regex
The java.util.regex package provides support for regular expression handling. It is described in detail in Chapter 30.
java.util.spi
The java.util.spi package provides support for service providers.
java.util.stream
The java.util.stream package contains Java’s stream API. A discussion of the stream API is found in Chapter 29.
java.util.zip
The java.util.zip package provides the ability to read and write files in the popular ZIP and GZIP formats. Both ZIP and GZIP input and output streams are available.