CHAPTER
25 Introducing the AWT: Working with Windows, Graphics, and Text
The Abstract Window Toolkit (AWT) was Java’s first GUI framework, and it has been part of Java since version 1.0. It contains numerous classes and methods that allow you to create windows and simple controls. The AWT was introduced in Chapter 24, where it was used in several short examples that demonstrated event handling. This chapter begins a more detailed examination. Here, you will learn how to manage windows, work with fonts, output text, and utilize graphics. Chapter 26 describes various AWT controls, layout managers, and menus. It also explains further aspects of Java’s event handling mechanism. Chapter 27 introduces the AWT’s imaging subsystem.
It is important to state at the outset that you will seldom create GUIs based solely on the AWT because more powerful GUI frameworks (Swing and JavaFX) have been developed for Java. Despite this fact, the AWT remains an important part of Java. To understand why, consider the following.
At the time of this writing, the framework that is most widely used is Swing. Because Swing provides a richer, more flexible GUI framework than does the AWT, it is easy to jump to the conclusion that the AWT is no longer relevant—that it has been fully superseded by Swing. This assumption is, however, false. Instead, an understanding of the AWT is still important because the AWT underpins Swing, with many AWT classes being used either directly or indirectly by Swing. As a result, a solid knowledge of the AWT is still required to use Swing effectively.
Java’s newest GUI framework is JavaFX. It is anticipated that, at some point in the future, JavaFX will replace Swing as Java’s most popular GUI. Even when this occurs, however, much legacy code that relies on Swing (and thus, the AWT) will still need to be maintained for some time to come. Finally, for some types of small programs that make only minimal use of a GUI, using the AWT may still be appropriate. Therefore, even though the AWT constitutes Java’s oldest GUI framework, a basic working knowledge of its fundamentals is still important today.
One last point before beginning: The AWT is quite large and a full description would easily fill an entire book. Therefore, it is not possible to describe in detail every AWT class, method, or instance variable. However, this and the following chapters explain the basic techniques needed to use the AWT. From there, you will be able to explore other parts of the AWT on your own. You will also be ready to move on to Swing.
NOTE If you have not yet read Chapter 24, please do so now. It provides an overview of event handling, which is used by many of the examples in this chapter.
AWT Classes
The AWT classes are contained in the java.awt package. It is one of Java’s largest packages. Fortunately, because it is logically organized in a top-down, hierarchical fashion, it is easier to understand and use than you might at first believe. Beginning with JDK 9, java.awt is part of the java.desktop module. Table 25-1 lists some of the many AWT classes.


Table 25-1 A Sampling of AWT Classes
Although the basic structure of the AWT has been the same since Java 1.0, some of the original methods were deprecated and replaced by new ones. For backward-compatibility, Java still supports all the original 1.0 methods. However, because these methods are not for use with new code, this book does not describe them.
Window Fundamentals
The AWT defines windows according to a class hierarchy that adds functionality and specificity with each level. Arguably the two most important window-related classes are Frame and Panel. Frame encapsulates a top-level window and it is typically used to create what would be thought of as a standard application window. Panel provides a container to which other components can be added. Panel is also a superclass for Applet (deprecated as of JDK 9). Much of the functionality of Frame and Panel is derived from their parent classes. Thus, a description of the class hierarchies relating to these two classes is fundamental to their understanding. Figure 25-1 shows the class hierarchy for Panel and Frame. Let’s look at each of these classes now.

Figure 25-1 The class hierarchy for Panel and Frame
Component
At the top of the AWT hierarchy is the Component class. Component is an abstract class that encapsulates all of the attributes of a visual component. Except for menus, all user interface elements that are displayed on the screen and that interact with the user are subclasses of Component. It defines over a hundred public methods that are responsible for managing events, such as mouse and keyboard input, positioning and sizing the window, and repainting. A Component object is responsible for remembering the current foreground and background colors and the currently selected text font.
Container
The Container class is a subclass of Component. It has additional methods that allow other Component objects to be nested within it. Other Container objects can be stored inside of a Container (since they are themselves instances of Component). This makes for a multileveled containment system. A container is responsible for laying out (that is, positioning) any components that it contains. It does this through the use of various layout managers, which you will learn about in Chapter 26.
Panel
The Panel class is a concrete subclass of Container. A Panel may be thought of as a recursively nestable, concrete screen component. Other components can be added to a Panel object by its add( ) method (inherited from Container). Once these components have been added, you can position and resize them manually using the setLocation( ), setSize( ), setPreferredSize( ), or setBounds( ) methods defined by Component.
Window
The Window class creates a top-level window. A top-level window is not contained within any other object; it sits directly on the desktop. Generally, you won’t create Window objects directly. Instead, you will use a subclass of Window called Frame, described next.
Frame
Frame encapsulates what is commonly thought of as a “window.” It is a subclass of Window and has a title bar, menu bar, borders, and resizing corners. The precise look of a Frame will differ among environments.
Canvas
Although it is not part of the hierarchy for Panel or Frame, there is one other class that you will find valuable: Canvas. Derived from Component, Canvas encapsulates a blank window upon which you can draw. You will see an example of Canvas later in this book.
Working with Frame Windows
Typically, the type of AWT-based application window you will most often create is derived from Frame. As mentioned, it creates a standard-style, top-level window that has all of the features normally associated with an application window, such as a close box and title.
Here are two of Frame’s constructors:
Frame( ) throws HeadlessException
Frame(String title) throws HeadlessException
The first form creates a standard window that does not contain a title. The second form creates a window with the title specified by title. Notice that you cannot specify the dimensions of the window. Instead, you must set the size of the window after it has been created. A HeadlessException is thrown if an attempt is made to create a Frame instance in an environment that does not support user interaction.
There are several key methods you will use when working with Frame windows. They are examined here.
Setting the Window’s Dimensions
The setSize( ) method is used to set the dimensions of the window. It is shown here:
void setSize(int newWidth, int newHeight)
void setSize(Dimension newSize)
The new size of the window is specified by newWidth and newHeight, or by the width and height fields of the Dimension object passed in newSize. The dimensions are specified in terms of pixels.
The getSize( ) method is used to obtain the current size of a window. One of its forms is shown here:
Dimension getSize( )
This method returns the current size of the window contained within the width and height fields of a Dimension object.
Hiding and Showing a Window
After a frame window has been created, it will not be visible until you call setVisible( ). Its signature is shown here:
void setVisible(boolean visibleFlag)
The component is visible if the argument to this method is true. Otherwise, it is hidden.
Setting a Window’s Title
You can change the title in a frame window using setTitle( ), which has this general form:
void setTitle(String newTitle)
Here, newTitle is the new title for the window.
Closing a Frame Window
When using a frame window, your program must remove that window from the screen when it is closed. If it is not the top-level window of your application, this is done by calling setVisible(false). For the main application window, you can simply terminate the program by calling System.exit( ) as the examples in Chapter 24 did. To intercept a window-close event, you must implement the windowClosing( ) method of the WindowListener interface. (See Chapter 24 for details on the WindowListener interface.)
The paint( ) Method
As you saw in Chapter 24, output to a window typically occurs when the paint( ) method is called by the run-time system. This method is defined by Component and overridden by Container and Window. Thus, it is available to instances of Frame.
The paint( ) method is called each time an AWT-based application’s output must be redrawn. This situation can occur for several reasons. For example, the program’s window may be overwritten by another window and then uncovered. Or the window may be minimized and then restored. paint( ) is also called when the window is first displayed. Whatever the cause, whenever the window must redraw its output, paint( ) is called. This implies that your program must have some way to retain its output so that it can be redisplayed each time paint( ) executes.
The paint( ) method is shown here:
void paint(Graphics context)
The paint( ) method has one parameter of type Graphics. This parameter will contain the graphics context, which describes the graphics environment in which the program is running. This context is used whenever output to the window is required.
Displaying a String
To output a string to a Frame, use drawString( ), which is a member of the Graphics class. It was introduced in Chapter 24, and we will be making extensive use of it here and in the next chapter. This is the form we will use:
void drawString(String message, int x, int y)
Here, message is the string to be output beginning at x,y. In a Java window, the upper-left corner is location 0,0. The drawString( ) method will not recognize newline characters. If you want to start a line of text on another line, you must do so manually, specifying the precise X,Y location where you want the line to begin. (As you will see in the next chapter, there are techniques that make this process easy.)
Setting the Foreground and Background Colors
You can set both the foreground and background colors used by a Frame. To set the background color, use setBackground( ). To set the foreground color (the color in which text is shown, for example), use setForeground( ). These methods are defined by Component, and they have the following general forms:
void setBackground(Color newColor)
void setForeground(Color newColor)
Here, newColor specifies the new color. The class Color defines the constants shown here that can be used to specify colors. (Uppercase versions of these constants are also provided.)

For example, the following sets the background color to green and the foreground color to red:
![]()
You can also create custom colors. A good place to initially set the foreground and background colors is in the constructor for the frame. Of course, you can change these colors as often as necessary during the execution of your program.
You can obtain the current settings for the background and foreground colors by calling getBackground( ) and getForeground( ), respectively. They are also defined by Component and are shown here:
Color getBackground( )
Color getForeground( )
Requesting Repainting
As a general rule, an application writes to its window only when its paint( ) method is called by the AWT. This raises an interesting question: How can the program itself cause its window to be updated to display new output? For example, if a program displays a moving banner, what mechanism does it use to update the window each time the banner scrolls? Remember, one of the fundamental architectural constraints imposed on a GUI program is that it must quickly return control to the run-time system. It cannot create a loop inside paint( ) that repeatedly scrolls the banner, for example. This would prevent control from passing back to the AWT. Given this constraint, it may seem that output to your window will be difficult at best. Fortunately, this is not the case. Whenever your program needs to update the information displayed in its window, it simply calls repaint( ).
The repaint( ) method is defined by Component. As it relates to Frame, this method causes the AWT run-time system to execute a call to the update( ) method (also defined by Component). However, the default implementation of update( ) calls paint( ). Thus, to output to a window, simply store the output and then call repaint( ). The AWT will then execute a call to paint( ), which can display the stored information. For example, if part of your program needs to output a string, it can store this string in a String variable and then call repaint( ). Inside paint( ), you will output the string using drawString( ).
The repaint( ) method has four forms. Let’s look at each one in turn. The simplest version of repaint( ) is shown here:
void repaint( )
This version causes the entire window to be repainted. The following version specifies a region that will be repainted:
void repaint(int left, int top, int width, int height)
Here, the coordinates of the upper-left corner of the region are specified by left and top, and the width and height of the region are passed in width and height. These dimensions are specified in pixels. You save time by specifying a region to repaint. Window updates are costly in terms of time. If you need to update only a small portion of the window, it is more efficient to repaint only that region.
Calling repaint( ) is essentially a request that a window be repainted sometime soon. However, if your system is slow or busy, update( ) might not be called immediately. Multiple requests for repainting that occur within a short time can be collapsed by the AWT in a manner such that update( ) is only called sporadically. This can be a problem in many situations, including animation, in which a consistent update time is necessary. One solution to this problem is to use the following forms of repaint( ):
void repaint(long maxDelay)
void repaint(long maxDelay, int x, int y, int width, int height)
Here, maxDelay specifies the maximum number of milliseconds that can elapse before update( ) is called.
NOTE It is possible for a method other than paint( ) or update( ) to output to a window. To do so, it must obtain a graphics context by calling getGraphics( ) (defined by Component) and then use this context to output to the window. However, for most applications, it is better and easier to route window output through paint( ) and to call repaint( ) when the contents of the window change.
Creating a Frame-Based Application
While it is possible to simply create a window by creating an instance of Frame, you will seldom do so, because you would not be able to do much with it. For example, you would not be able to receive or process events that occur within it or easily output information to it. Therefore, to create a Frame-based application, you will normally create a subclass of Frame. Among other reasons, doing so lets you override paint( ) and provide event handling.
As the event handling examples in Chapter 24 illustrated, creating a new Frame-based application is actually quite easy. In general, you create a subclass of Frame, override paint( ) to supply your output to the window, and implement the necessary event listeners. In all cases, you will need to implement the windowClosing( ) method of the WindowListener interface. In a top-level frame, you will typically call System.exit( ) to terminate the program. To simply remove a secondary frame from the screen, you can call setVisible(false) when the window is closed.
Once you have defined a Frame subclass, you can create an instance of that class. This causes a frame window to come into existence, but it will not be initially visible. You make it visible by calling setVisible(true). When created, the window is given a default height and width. You can set the size of the window explicitly by calling the setSize( ) method. For a top-level frame, you will want to define its title.
Introducing Graphics
The AWT includes several methods that support graphics. All graphics are drawn relative to a window. This can be the main window of an application or a child window. (These methods are also supported by Swing-based windows.) The origin of each window is at the top-left corner and is 0,0. Coordinates are specified in pixels. All output to a window takes place through a graphics context.
A graphics context is encapsulated by the Graphics class. Here are two ways in which a graphics context can be obtained:
• It is passed to a method, such as paint( ) or update( ), as an argument.
• It is returned by the getGraphics( ) method of Component.
Among other things, the Graphics class defines a number of methods that draw various types of objects, such as lines, rectangles, and arcs. In several cases, objects can be drawn edge-only or filled. Objects are drawn and filled in the currently selected color, which is black by default. When a graphics object is drawn that exceeds the dimensions of the window, output is automatically clipped. A sampling of the drawing methods supported by Graphics is presented here.
NOTE With the release of version 1.2, the graphics capabilities of Java were expanded by the inclusion of several new classes. One of these is Graphics2D, which extends Graphics. Graphics2D supports several enhancements to the basic capabilities provided by Graphics. To gain access to this extended functionality, you must cast the graphics context obtained from a method such as paint( ), to Graphics2D. Although the basic graphics functions supported by Graphics are adequate for the purposes of this book, Graphics2D is a class that you may want to explore fully on your own.
Drawing Lines
Lines are drawn by means of the drawLine( ) method, shown here:
void drawLine(int startX, int startY, int endX, int endY)
drawLine( ) displays a line in the current drawing color that begins at startX, startY and ends at endX, endY.
Drawing Rectangles
The drawRect( ) and fillRect( ) methods display an outlined and filled rectangle, respectively. They are shown here:
void drawRect(int left, int top, int width, int height)
void fillRect(int left, int top, int width, int height)
The upper-left corner of the rectangle is at left, top. The dimensions of the rectangle are specified by width and height.
To draw a rounded rectangle, use drawRoundRect( ) or fillRoundRect( ), both shown here:
void drawRoundRect(int left, int top, int width, int height,
int xDiam, int yDiam)
void fillRoundRect(int left, int top, int width, int height,
int xDiam, int yDiam)
A rounded rectangle has rounded corners. The upper-left corner of the rectangle is at left, top. The dimensions of the rectangle are specified by width and height. The diameter of the rounding arc along the X axis is specified by xDiam. The diameter of the rounding arc along the Y axis is specified by yDiam.
Drawing Ellipses and Circles
To draw an ellipse, use drawOval( ). To fill an ellipse, use fillOval( ). These methods are shown here:
void drawOval(int left, int top, int width, int height)
void fillOval(int left, int top, int width, int height)
The ellipse is drawn within a bounding rectangle whose upper-left corner is specified by left, top and whose width and height are specified by width and height. To draw a circle, specify a square as the bounding rectangle.
Drawing Arcs
Arcs can be drawn with drawArc( ) and fillArc( ), shown here:
void drawArc(int left, int top, int width, int height, int startAngle, int sweepAngle)
void fillArc(int left, int top, int width, int height, int startAngle, int sweepAngle)
The arc is bounded by the rectangle whose upper-left corner is specified by left, top and whose width and height are specified by width and height. The arc is drawn from startAngle through the angular distance specified by sweepAngle. Angles are specified in degrees. Zero degrees is on the horizontal, at the three o’clock position. The arc is drawn counterclockwise if sweepAngle is positive, and clockwise if sweepAngle is negative. Therefore, to draw an arc from twelve o’clock to six o’clock, the start angle would be 90 and the sweep angle 180.
Drawing Polygons
It is possible to draw arbitrarily shaped figures using drawPolygon( ) and fillPolygon( ), shown here:
void drawPolygon(int x[ ], int y[ ], int numPoints)
void fillPolygon(int x[ ], int y[ ], int numPoints)
The polygon’s endpoints are specified by the coordinate pairs contained within the x and y arrays. The number of points defined by these arrays is specified by numPoints. There are alternative forms of these methods in which the polygon is specified by a Polygon object.
Demonstrating the Drawing Methods
The following program demonstrates the drawing methods just described.


Sample output is shown in Figure 25-1.

Figure 25-1 Sample output from the GraphicsDemo program
Sizing Graphics
Often, you will want to size a graphics object to fit the current size of the frame in which it is drawn. To do so, first obtain the current dimensions of the frame by calling getSize( ). It returns the dimensions as integer values stored in the width and height fields of a Dimension instance. However, the dimensions returned by getSize( ) reflect the overall size of the frame, including border and title bar. To obtain the dimensions of the paintable area, you will need to reduce the size obtained from getSize( ) by the dimensions of the border/title bar. The values that describe the size of the border/title region are called insets. The inset values are obtained by calling getInsets( ), shown here:
Insets getInsets( )
It returns an Insets object that encapsulates the insets dimensions as four int values called left, right, top, and bottom. Therefore, the coordinate of the top-left corner of the paintable area is left, top. The coordinate of the bottom-right corner is width−right, height−bottom. Once you have both the size and insets, you can scale your graphical output accordingly.
To demonstrate this technique, here is a program whose frame starts with dimensions 200Í200 pixels. It grows by 25 in both width and height each time the mouse is clicked until the size is larger than 500Í500. At that point, the next click will return it to 200Í200, and the process starts over. Within the paintable area, an X is drawn so that it fills the region.


Working with Color
Java supports color in a portable, device-independent fashion. The AWT color system allows you to specify any color you want. It then finds the best match for that color, given the limits of the display hardware currently executing your program. Thus, your code does not need to be concerned with the differences in the way color is supported by various hardware devices. Color is encapsulated by the Color class.
As you saw earlier, Color defines several constants (for example, Color.black) to specify a number of common colors. You can also create your own colors, using one of the Color constructors. Three commonly used forms are shown here:
Color(int red, int green, int blue)
Color(int rgbValue)
Color(float red, float green, float blue)
The first constructor takes three integers that specify the color as a mix of red, green, and blue. These values must be between 0 and 255, as in this example:
![]()
The second color constructor takes a single integer that contains the mix of red, green, and blue packed into an integer. The integer is organized with red in bits 16 to 23, green in bits 8 to 15, and blue in bits 0 to 7. Here is an example of this constructor:
![]()
The third constructor, Color(float, float, float), takes three float values (between 0.0 and 1.0) that specify the relative mix of red, green, and blue.
Once you have created a color, you can use it to set the foreground and/or background color by using the setForeground( ) and setBackground( ) methods as mentioned earlier. You can also select it as the current drawing color.
Color Methods
The Color class defines several methods that help manipulate colors. Several are examined here.
Using Hue, Saturation, and Brightness
The hue-saturation-brightness (HSB) color model is an alternative to red-green-blue (RGB) for specifying particular colors. Figuratively, hue is a wheel of color. The hue can be specified with a number between 0.0 and 1.0, which is used to obtain an angle into the color wheel. (The principal colors are approximately red, orange, yellow, green, blue, indigo, and violet.) Saturation is another scale ranging from 0.0 to 1.0, representing light pastels to intense hues. Brightness values also range from 0.0 to 1.0, where 1 is bright white and 0 is black. Color supplies two methods that let you convert between RGB and HSB. They are shown here:
static int HSBtoRGB(float hue, float saturation, float brightness)
static float[ ] RGBtoHSB(int red, int green, int blue, float values[ ])
HSBtoRGB( ) returns a packed RGB value compatible with the Color(int) constructor. RGBtoHSB( ) returns a float array of HSB values corresponding to RGB integers. If values is not null, then this array is given the HSB values and returned. Otherwise, a new array is created and the HSB values are returned in it. In either case, the array contains the hue at index 0, saturation at index 1, and brightness at index 2.
getRed( ), getGreen( ), getBlue( )
You can obtain the red, green, and blue components of a color independently using getRed( ), getGreen( ), and getBlue( ), shown here:
int getRed( )
int getGreen( )
int getBlue( )
Each of these methods returns the RGB color component found in the invoking Color object in the lower 8 bits of an integer.
getRGB( )
To obtain a packed, RGB representation of a color, use getRGB( ), shown here:
int getRGB( )
The return value is organized as described earlier.
Setting the Current Graphics Color
By default, graphics objects are drawn in the current foreground color. You can change this color by calling the Graphics method setColor( ) :
void setColor(Color newColor)
Here, newColor specifies the new drawing color.
You can obtain the current color by calling getColor( ), shown here:
Color getColor( )
A Color Demonstration Program
The following program constructs several colors and draws various objects using these colors:


Setting the Paint Mode
The paint mode determines how objects are drawn in a window. By default, new output to a window overwrites any preexisting contents. However, it is possible to have new objects XORed onto the window by using setXORMode( ), as follows:
void setXORMode(Color xorColor)
Here, xorColor specifies the color that will be XORed to the window when an object is drawn. The advantage of XOR mode is that the new object is always guaranteed to be visible no matter what color the object is drawn over.
To return to overwrite mode, call setPaintMode( ), shown here:
void setPaintMode( )
In general, you will want to use overwrite mode for normal output, and XOR mode for special purposes. For example, the following program displays cross hairs that track the mouse pointer. The cross hairs are XORed onto the window and are always visible, no matter what the underlying color is.

Sample output from this program is shown here:

Working with Fonts
The AWT supports multiple type fonts. Years ago, fonts emerged from the domain of traditional typesetting to become an important part of computer-generated documents and displays. The AWT provides flexibility by abstracting font-manipulation operations and allowing for dynamic selection of fonts.
Fonts have a family name, a logical font name, and a face name. The family name is the general name of the font, such as Courier. The logical name specifies a name, such as Monospaced, that is linked to an actual font at runtime. The face name specifies a specific font, such as Courier Italic.
Fonts are encapsulated by the Font class. Several of the methods defined by Font are listed in Table 25-2.

Table 25-2 A Sampling of Methods Defined by Font
The Font class defines these protected variables:

Several static fields are also defined.
Determining the Available Fonts
When working with fonts, often you need to know which fonts are available on your machine. To obtain this information, you can use the getAvailableFontFamilyNames( ) method defined by the GraphicsEnvironment class. It is shown here:
String[ ] getAvailableFontFamilyNames( )
This method returns an array of strings that contains the names of the available font families.
In addition, the getAllFonts( ) method is defined by the GraphicsEnvironment class. It is shown here:
Font[ ] getAllFonts( )
This method returns an array of Font objects for all of the available fonts.
Since these methods are members of GraphicsEnvironment, you need a GraphicsEnvironment reference to call them. You can obtain this reference by using the getLocalGraphicsEnvironment( ) static method, which is defined by GraphicsEnvironment. It is shown here:
static GraphicsEnvironment getLocalGraphicsEnvironment( )
Here is a program that shows how to obtain the names of the available font families:


Sample output from this program is shown next. However, when you run this program, you may see a different set of fonts than the one shown in this illustration.

Creating and Selecting a Font
To create a new font, construct a Font object that describes that font. One Font constructor has this general form:
Font(String fontName, int fontStyle, int pointSize)
Here, fontName specifies the name of the desired font. The name can be specified using either the family or face name. All Java environments will support the following fonts: Dialog, DialogInput, SansSerif, Serif, and Monospaced. Dialog is the font used by your system’s dialog boxes. Dialog is also the default if you don’t explicitly set a font. You can also use any other fonts supported by your particular environment, but be careful—these other fonts may not be universally available.
The style of the font is specified by fontStyle. It may consist of one or more of these three constants: Font.PLAIN, Font.BOLD, and Font.ITALIC. To combine styles, OR them together. For example, Font.BOLD | Font.ITALIC specifies a bold, italics style.
The size, in points, of the font is specified by pointSize.
To use a font that you have created, you must select it using setFont( ), which is defined by Component. It has this general form:
void setFont(Font fontObj)
Here, fontObj is the object that contains the desired font.
The following program outputs a sample of each standard font. Each time you click the mouse within its window, a new font is selected and its name is displayed.


Sample output from this program is shown here:
Obtaining Font Information
Suppose you want to obtain information about the currently selected font. To do this, you must first get the current font by calling getFont( ). This method is defined by the Graphics class, as shown here:
Font getFont( )
Once you have obtained the currently selected font, you can retrieve information about it using various methods defined by Font. For example, this program displays the name, family, size, and style of the currently selected font:


Managing Text Output Using FontMetrics
As just explained, Java supports a number of fonts. For most fonts, characters are not all the same dimension—most fonts are proportional. Also, the height of each character, the length of descenders (the hanging parts of letters, such as y), and the amount of space between horizontal lines vary from font to font. Further, the point size of a font can be changed. That these (and other) attributes are variable would not be of too much consequence except that Java demands that you, the programmer, manually manage virtually all text output.
Given that the size of each font may differ and that fonts may be changed while your program is executing, there must be some way to determine the dimensions and various other attributes of the currently selected font. For example, to write one line of text after another implies that you have some way of knowing how tall the font is and how many pixels are needed between lines. To fill this need, the AWT includes the FontMetrics class, which encapsulates various information about a font. Let’s begin by defining the common terminology used when describing fonts:

As you know, we have used the drawString( ) method in many of the previous examples. It paints a string in the current font and color, beginning at a specified location. However, this location is at the left edge of the baseline of the characters, not at the upper-left corner as is usual with other drawing methods. It is a common error to draw a string at the same coordinate that you would draw a box. For example, if you were to draw a rectangle at the top, left location, you would see a full rectangle. If you were to draw the string “Typesetting” at this location, you would only see the tails (or descenders) of the y, p, and g. As you will see, by using font metrics, you can determine the proper placement of each string that you display.
FontMetrics defines several methods that help you manage text output. A number of commonly used ones are listed in Table 25-3. These methods help you properly display text in a window.

Table 25-3 A Sampling of Methods Defined by FontMetrics
Perhaps the most common use of FontMetrics is to determine the spacing between lines of text. The second most common use is to determine the length of a string that is being displayed. Here, you will see how to accomplish these tasks.
In general, to display multiple lines of text, your program must manually keep track of the current output position. Each time a newline is desired, the Y coordinate must be advanced to the beginning of the next line. Each time a string is displayed, the X coordinate must be set to the point at which the string ends. This allows the next string to be written so that it begins at the end of the preceding one.
To determine the spacing between lines, you can use the value returned by getLeading( ). To determine the total height of the font, add the value returned by getAscent( ) to the value returned by getDescent( ). You can then use these values to position each line of text you output. However, in many cases, you will not need to use these individual values. Often, all that you will need to know is the total height of a line, which is the sum of the leading space and the font’s ascent and descent values. The easiest way to obtain this value is to call getHeight( ). In many cases, you can simply increment the Y coordinate by this value each time you want to advance to the next line when outputting text.
To start output at the end of previous output on the same line, you must know the length, in pixels, of each string that you display. To obtain this value, call stringWidth( ). You can use this value to advance the X coordinate each time you display a line.
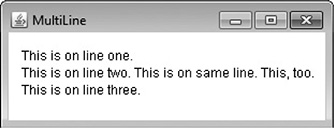
The following program shows how to output multiple lines of text in a window. It also displays multiple sentences on the same line. Notice the variables curX and curY. They keep track of the current text output position.


Sample output from this program is shown here: