CHAPTER
31 Introducing Swing
In Part II, you saw how to build very simple user interfaces with the AWT classes. Although the AWT is still a crucial part of Java, its component set is no longer widely used to create graphical user interfaces. Today, most programmers use Swing or JavaFX for this purpose. JavaFX is discussed in Part IV. Here, Swing is introduced. Swing is a framework that provides more powerful and flexible GUI components than does the AWT. As a result, it is the GUI that has been widely used by Java programmers for more than a decade.
Coverage of Swing is divided between three chapters. This chapter introduces Swing. It begins by describing Swing’s core concepts. It then presents a simple example that shows the general form of a Swing program. This is followed by an example that uses event handling. The chapter concludes by explaining how painting is accomplished in Swing. The next chapter presents several commonly used Swing components. The third chapter introduces Swing-based menus. It is important to understand that the number of classes and interfaces in the Swing packages is quite large, and they can’t all be covered in this book. (In fact, full coverage of Swing requires an entire book of its own.) However, these three chapters will give you a basic understanding of this important topic.
NOTE For a comprehensive introduction to Swing, see my book Swing: A Beginner{{#}}0039;s Guide published by McGraw-Hill Professional (2007).
The Origins of Swing
Swing did not exist in the early days of Java. Rather, it was a response to deficiencies present in Java’s original GUI subsystem: the Abstract Window Toolkit. The AWT defines a basic set of controls, windows, and dialog boxes that support a usable, but limited graphical interface. One reason for the limited nature of the AWT is that it translates its various visual components into their corresponding, platform-specific equivalents, or peers. This means that the look and feel of a component is defined by the platform, not by Java. Because the AWT components use native code resources, they are referred to as heavyweight.
The use of native peers led to several problems. First, because of variations between operating systems, a component might look, or even act, differently on different platforms. This potential variability threatened the overarching philosophy of Java: write once, run anywhere. Second, the look and feel of each component was fixed (because it is defined by the platform) and could not be (easily) changed. Third, the use of heavyweight components caused some frustrating restrictions. For example, a heavyweight component was always opaque.
Not long after Java’s original release, it became apparent that the limitations and restrictions present in the AWT were sufficiently serious that a better approach was needed. The solution was Swing. Introduced in 1997, Swing was included as part of the Java Foundation Classes (JFC). Swing was initially available for use with Java 1.1 as a separate library. However, beginning with Java 1.2, Swing (and the rest of the JFC) was fully integrated into Java.
Swing Is Built on the AWT
Before moving on, it is necessary to make one important point: although Swing eliminates a number of the limitations inherent in the AWT, Swing does not replace it. Instead, Swing is built on the foundation of the AWT. This is why the AWT is still a crucial part of Java. Swing also uses the same event handling mechanism as the AWT. Therefore, a basic understanding of the AWT and of event handling is required to use Swing. (The AWT is covered in Chapters 25 and 26. Event handling is described in Chapter 24.)
Two Key Swing Features
As just explained, Swing was created to address the limitations present in the AWT. It does this through two key features: lightweight components and a pluggable look and feel. Together they provide an elegant, yet easy-to-use solution to the problems of the AWT. More than anything else, it is these two features that define the essence of Swing. Each is examined here.
Swing Components Are Lightweight
With very few exceptions, Swing components are lightweight. This means that they are written entirely in Java and do not map directly to platform-specific peers. Thus, lightweight components are more efficient and more flexible. Furthermore, because lightweight components do not translate into native peers, the look and feel of each component is determined by Swing, not by the underlying operating system. As a result, each component will work in a consistent manner across all platforms.
Swing Supports a Pluggable Look and Feel
Swing supports a pluggable look and feel (PLAF). Because each Swing component is rendered by Java code rather than by native peers, the look and feel of a component is under the control of Swing. This fact means that it is possible to separate the look and feel of a component from the logic of the component, and this is what Swing does. Separating out the look and feel provides a significant advantage: it becomes possible to change the way that a component is rendered without affecting any of its other aspects. In other words, it is possible to “plug in” a new look and feel for any given component without creating any side effects in the code that uses that component. Moreover, it becomes possible to define entire sets of look-and-feels that represent different GUI styles. To use a specific style, its look and feel is simply “plugged in.” Once this is done, all components are automatically rendered using that style.
Pluggable look-and-feels offer several important advantages. It is possible to define a look and feel that is consistent across all platforms. Conversely, it is possible to create a look and feel that acts like a specific platform. For example, if you know that an application will be running only in a Windows environment, it is possible to specify the Windows look and feel. It is also possible to design a custom look and feel. Finally, the look and feel can be changed dynamically at run time.
Java provides look-and-feels, such as metal and Nimbus, that are available to all Swing users. The metal look and feel is also called the Java look and feel. It is platform-independent and available in all Java execution environments. It is also the default look and feel. Windows environments also have access to the Windows look and feel. This book uses the default Java look and feel (metal) because it is platform independent.
The MVC Connection
In general, a visual component is a composite of three distinct aspects:
• The way that the component looks when rendered on the screen
• The way that the component reacts to the user
• The state information associated with the component
No matter what architecture is used to implement a component, it must implicitly contain these three parts. Over the years, one component architecture has proven itself to be exceptionally effective: Model-View-Controller, or MVC for short.
The MVC architecture is successful because each piece of the design corresponds to an aspect of a component. In MVC terminology, the model corresponds to the state information associated with the component. For example, in the case of a check box, the model contains a field that indicates if the box is checked or unchecked. The view determines how the component is displayed on the screen, including any aspects of the view that are affected by the current state of the model. The controller determines how the component reacts to the user. For example, when the user clicks a check box, the controller reacts by changing the model to reflect the user’s choice (checked or unchecked). This then results in the view being updated. By separating a component into a model, a view, and a controller, the specific implementation of each can be changed without affecting the other two. For instance, different view implementations can render the same component in different ways without affecting the model or the controller.
Although the MVC architecture and the principles behind it are conceptually sound, the high level of separation between the view and the controller is not beneficial for Swing components. Instead, Swing uses a modified version of MVC that combines the view and the controller into a single logical entity called the UI delegate. For this reason, Swing’s approach is called either the Model-Delegate architecture or the Separable Model architecture. Therefore, although Swing’s component architecture is based on MVC, it does not use a classical implementation of it.
Swing’s pluggable look and feel is made possible by its Model-Delegate architecture. Because the view (look) and controller (feel) are separate from the model, the look and feel can be changed without affecting how the component is used within a program. Conversely, it is possible to customize the model without affecting the way that the component appears on the screen or responds to user input.
To support the Model-Delegate architecture, most Swing components contain two objects. The first represents the model. The second represents the UI delegate. Models are defined by interfaces. For example, the model for a button is defined by the ButtonModel interface. UI delegates are classes that inherit ComponentUI. For example, the UI delegate for a button is ButtonUI. Normally, your programs will not interact directly with the UI delegate.
Components and Containers
A Swing GUI consists of two key items: components and containers. However, this distinction is mostly conceptual because all containers are also components. The difference between the two is found in their intended purpose: As the term is commonly used, a component is an independent visual control, such as a push button or slider. A container holds a group of components. Thus, a container is a special type of component that is designed to hold other components. Furthermore, in order for a component to be displayed, it must be held within a container. Thus, all Swing GUIs will have at least one container. Because containers are components, a container can also hold other containers. This enables Swing to define what is called a containment hierarchy, at the top of which must be a top-level container.
Let’s look a bit more closely at components and containers.
Components
In general, Swing components are derived from the JComponent class. (The only exceptions to this are the four top-level containers, described in the next section.) JComponent provides the functionality that is common to all components. For example, JComponent supports the pluggable look and feel. JComponent inherits the AWT classes Container and Component. Thus, a Swing component is built on and compatible with an AWT component.
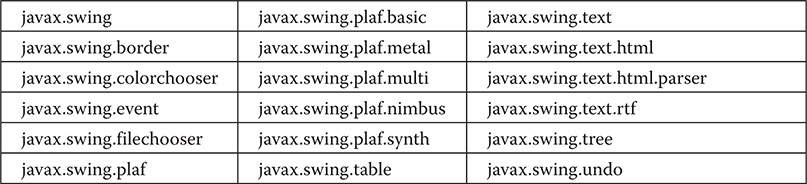
All of Swing’s components are represented by classes defined within the package javax.swing. The following table shows the class names for Swing components (including those used as containers).

Notice that all component classes begin with the letter J. For example, the class for a label is JLabel; the class for a push button is JButton; and the class for a scroll bar is JScrollBar.
Containers
Swing defines two types of containers. The first are top-level containers: JFrame, JApplet, JWindow, and JDialog. These containers do not inherit JComponent. They do, however, inherit the AWT classes Component and Container. Unlike Swing’s other components, which are lightweight, the top-level containers are heavyweight. This makes the top-level containers a special case in the Swing component library.
As the name implies, a top-level container must be at the top of a containment hierarchy. A top-level container is not contained within any other container. Furthermore, every containment hierarchy must begin with a top-level container. The one most commonly used for applications is JFrame. The one used for applets is JApplet. As explained in Chapter 1, beginning with JDK 9 applets have been deprecated and are not recommended for new code.
The second type of containers supported by Swing are lightweight containers. Lightweight containers do inherit JComponent. An example of a lightweight container is JPanel, which is a general-purpose container. Lightweight containers are often used to organize and manage groups of related components because a lightweight container can be contained within another container. Thus, you can use lightweight containers such as JPanel to create subgroups of related controls that are contained within an outer container.
The Top-Level Container Panes
Each top-level container defines a set of panes. At the top of the hierarchy is an instance of JRootPane. JRootPane is a lightweight container whose purpose is to manage the other panes. It also helps manage the optional menu bar. The panes that comprise the root pane are called the glass pane, the content pane, and the layered pane.
The glass pane is the top-level pane. It sits above and completely covers all other panes. By default, it is a transparent instance of JPanel. The glass pane enables you to manage mouse events that affect the entire container (rather than an individual control) or to paint over any other component, for example. In most cases, you won’t need to use the glass pane directly, but it is there if you need it.
The layered pane is an instance of JLayeredPane. The layered pane allows components to be given a depth value. This value determines which component overlays another. (Thus, the layered pane lets you specify a Z-order for a component, although this is not something that you will usually need to do.) The layered pane holds the content pane and the (optional) menu bar.
Although the glass pane and the layered panes are integral to the operation of a top-level container and serve important purposes, much of what they provide occurs behind the scene. The pane with which your application will interact the most is the content pane, because this is the pane to which you will add visual components. In other words, when you add a component, such as a button, to a top-level container, you will add it to the content pane. By default, the content pane is an opaque instance of JPanel.
The Swing Packages
Swing is a very large subsystem and makes use of many packages. At the time of this writing, these are the packages defined by Swing.
Beginning the JDK 9, the Swing packages are part of the java.desktop module.
The main package is javax.swing. This package must be imported into any program that uses Swing. It contains the classes that implement the basic Swing components, such as push buttons, labels, and check boxes.
A Simple Swing Application
Swing programs differ from both the console-based programs and the AWT-based programs shown earlier in this book. For example, they use a different set of components and a different container hierarchy than does the AWT. Swing programs also have special requirements that relate to threading. The best way to understand the structure of a Swing program is to work through an example. Before we begin, it is necessary to point out that there are two types of Java programs in which Swing was typically used. The first is a desktop application, and that is the type of Swing program described here. The second is the applet. Because applets are now deprecated and not recommended for new code, they are not discussed in this chapter. Instead, a brief overview of applets, including Swing applets, is given in Appendix D, primarily for the benefit of programmers working with legacy code.
Although quite short, the following program shows one way to write a Swing application. In the process, it demonstrates several key features of Swing. It uses two Swing components: JFrame and JLabel. JFrame is the top-level container that is commonly used for Swing applications. JLabel is the Swing component that creates a label, which is a component that displays information. The label is Swing’s simplest component because it is passive. That is, a label does not respond to user input. It just displays output. The program uses a JFrame container to hold an instance of a JLabel. The label displays a short text message.

Swing programs are compiled and run in the same way as other Java applications. Thus, to compile this program, you can use this command line:
![]()
To run the program, use this command line:
![]()
When the program is run, it will produce a window similar to that shown in Figure 31-1.

Figure 31-1 The window produced by the SwingDemo program
Because the SwingDemo program illustrates several core Swing concepts, we will examine it carefully, line by line. The program begins by importing javax.swing. As mentioned, this package contains the components and models defined by Swing. For example, javax.swing defines classes that implement labels, buttons, text controls, and menus. It will be included in all programs that use Swing.
Next, the program declares the SwingDemo class and a constructor for that class. The constructor is where most of the action of the program occurs. It begins by creating a JFrame, using this line of code:
![]()
This creates a container called jfrm that defines a rectangular window complete with a title bar; close, minimize, maximize, and restore buttons; and a system menu. Thus, it creates a standard, top-level window. The title of the window is passed to the constructor.
Next, the window is sized using this statement:
![]()
The setSize( ) method (which is inherited by JFrame from the AWT class Component) sets the dimensions of the window, which are specified in pixels. Its general form is shown here:
void setSize(int width, int height)
In this example, the width of the window is set to 275 and the height is set to 100.
By default, when a top-level window is closed (such as when the user clicks the close box), the window is removed from the screen, but the application is not terminated. While this default behavior is useful in some situations, it is not what is needed for most applications. Instead, you will usually want the entire application to terminate when its top-level window is closed. There are a couple of ways to achieve this. The easiest way is to call setDefaultCloseOperation( ), as the program does:
![]()
After this call executes, closing the window causes the entire application to terminate. The general form of setDefaultCloseOperation( ) is shown here:
void setDefaultCloseOperation(int what)
The value passed in what determines what happens when the window is closed. There are several other options in addition to JFrame.EXIT_ON_CLOSE. They are shown here:
DISPOSE_ON_CLOSE
HIDE_ON_CLOSE
DO_NOTHING_ON_CLOSE
Their names reflect their actions. These constants are declared in WindowConstants, which is an interface declared in javax.swing that is implemented by JFrame.
The next line of code creates a Swing JLabel component:
![]()
JLabel is the simplest and easiest-to-use component because it does not accept user input. It simply displays information, which can consist of text, an icon, or a combination of the two. The label created by the program contains only text, which is passed to its constructor.
The next line of code adds the label to the content pane of the frame:
![]()
As explained earlier, all top-level containers have a content pane in which components are stored. Thus, to add a component to a frame, you must add it to the frame’s content pane. This is accomplished by calling add( ) on the JFrame reference (jfrm in this case). The general form of add( ) is shown here:
Component add(Component comp)
The add( ) method is inherited by JFrame from the AWT class Container.
By default, the content pane associated with a JFrame uses border layout. The version of add( ) just shown adds the label to the center location. Other versions of add( ) enable you to specify one of the border regions. When a component is added to the center, its size is adjusted automatically to fit the size of the center.
Before continuing, an important historical point needs to be made. Prior to JDK 5, when adding a component to the content pane, you could not invoke the add( ) method directly on a JFrame instance. Instead, you needed to call add( ) on the content pane of the JFrame object. The content pane can be obtained by calling getContentPane( ) on a JFrame instance. The getContentPane( ) method is shown here:
Container getContentPane( )
It returns a Container reference to the content pane. The add( ) method was then called on that reference to add a component to a content pane. Thus, in the past, you had to use the following statement to add jlab to jfrm:
![]()
Here, getContentPane( ) first obtains a reference to content pane, and then add( ) adds the component to the container linked to this pane. This same procedure was also required to invoke remove( ) to remove a component and setLayout( ) to set the layout manager for the content pane. This is why you will see explicit calls to getContentPane( ) frequently throughout pre-5.0 legacy code. Today, the use of getContentPane( ) is no longer necessary. You can simply call add( ), remove( ), and setLayout( ) directly on JFrame because these methods have been changed so that they operate on the content pane automatically.
The last statement in the SwingDemo constructor causes the window to become visible:
![]()
The setVisible( ) method is inherited from the AWT Component class. If its argument is true, the window will be displayed. Otherwise, it will be hidden. By default, a JFrame is invisible, so setVisible(true) must be called to show it.
Inside main( ), a SwingDemo object is created, which causes the window and the label to be displayed. Notice that the SwingDemo constructor is invoked using these lines of code:

This sequence causes a SwingDemo object to be created on the event dispatching thread rather than on the main thread of the application. Here’s why. In general, Swing programs are event-driven. For example, when a user interacts with a component, an event is generated. An event is passed to the application by calling an event handler defined by the application. However, the handler is executed on the event dispatching thread provided by Swing and not on the main thread of the application. Thus, although event handlers are defined by your program, they are called on a thread that was not created by your program.
To avoid problems (including the potential for deadlock), all Swing GUI components must be created and updated from the event dispatching thread, not the main thread of the application. However, main( ) is executed on the main thread. Thus, main( ) cannot directly instantiate a SwingDemo object. Instead, it must create a Runnable object that executes on the event dispatching thread and have this object create the GUI.
To enable the GUI code to be created on the event dispatching thread, you must use one of two methods that are defined by the SwingUtilities class. These methods are invokeLater( ) and invokeAndWait( ). They are shown here:
static void invokeLater(Runnable obj)
static void invokeAndWait(Runnable obj) throws InterruptedException, InvocationTargetException
Here, obj is a Runnable object that will have its run( ) method called by the event dispatching thread. The difference between the two methods is that invokeLater( ) returns immediately, but invokeAndWait( ) waits until obj.run( ) returns. You can use one of these methods to call a method that constructs the GUI for your Swing application, or whenever you need to modify the state of the GUI from code not executed by the event dispatching thread. You will normally want to use invokeLater( ), as the preceding program does. However, when the initial GUI for an applet is constructed, invokeAndWait( ) is required. Thus, you will see its use in legacy applet code.
Event Handling
The preceding example showed the basic form of a Swing program, but it left out one important part: event handling. Because JLabel does not take input from the user, it does not generate events, so no event handling was needed. However, the other Swing components do respond to user input and the events generated by those interactions need to be handled. Events can also be generated in ways not directly related to user input. For example, an event is generated when a timer goes off. Whatever the case, event handling is a large part of any Swing-based application.
The event handling mechanism used by Swing is the same as that used by the AWT. This approach is called the delegation event model, and it is described in Chapter 24. In many cases, Swing uses the same events as does the AWT, and these events are packaged in java.awt.event. Events specific to Swing are stored in javax.swing.event.
Although events are handled in Swing in the same way as they are with the AWT, it is still useful to work through a simple example. The following program handles the event generated by a Swing push button. Sample output is shown in Figure 31-2.

Figure 31-2 Output from the EventDemo program


First, notice that the program now imports both the java.awt and java.awt.event packages. The java.awt package is needed because it contains the FlowLayout class, which supports the standard flow layout manager used to lay out components in a frame. (See Chapter 26 for coverage of layout managers.) The java.awt.event package is needed because it defines the ActionListener interface and the ActionEvent class.
The EventDemo constructor begins by creating a JFrame called jfrm. It then sets the layout manager for the content pane of jfrm to FlowLayout. By default, the content pane uses BorderLayout as its layout manager. However, for this example, FlowLayout is more convenient.
After setting the size and default close operation, EventDemo( ) creates two push buttons, as shown here:
![]()
The first button will contain the text "Alpha" and the second will contain the text "Beta". Swing push buttons are instances of JButton. JButton supplies several constructors. The one used here is
JButton(String msg)
The msg parameter specifies the string that will be displayed inside the button.
When a push button is pressed, it generates an ActionEvent. Thus, JButton provides the addActionListener( ) method, which is used to add an action listener. (JButton also provides removeActionListener( ) to remove a listener, but this method is not used by the program.) As explained in Chapter 24, the ActionListener interface defines only one method: actionPerformed( ). It is shown again here for your convenience:
void actionPerformed(ActionEvent ae)
This method is called when a button is pressed. In other words, it is the event handler that is called when a button press event has occurred.
Next, event listeners for the button’s action events are added by the code shown here:

Here, anonymous inner classes are used to provide the event handlers for the two buttons. Each time a button is pressed, the string displayed in jlab is changed to reflect which button was pressed.
Beginning with JDK 8, lambda expressions can also be used to implement some types of event handlers. For example, the event handler for the Alpha button could be written like this:
![]()
As you can see, this code is shorter. Of course, the approach you choose will be determined by the situation and your own preferences.
Next, the buttons are added to the content pane of jfrm:
![]()
Finally, jlab is added to the content pane and window is made visible. When you run the program, each time you press a button, a message is displayed in the label that indicates which button was pressed.
One last point: Remember that all event handlers, such as actionPerformed( ), are called on the event dispatching thread. Therefore, an event handler must return quickly in order to avoid slowing down the application. If your application needs to do something time consuming as the result of an event, it must use a separate thread.
Painting in Swing
Although the Swing component set is quite powerful, you are not limited to using it because Swing also lets you write directly into the display area of a frame, panel, or one of Swing’s other components, such as JLabel. Although many (perhaps most) uses of Swing will not involve drawing directly to the surface of a component, it is available for those applications that need this capability. To write output directly to the surface of a component, you will use one or more drawing methods defined by the AWT, such as drawLine( ) or drawRect( ). Thus, most of the techniques and methods described in Chapter 25 also apply to Swing. However, there are also some very important differences, and the process is discussed in detail in this section.
Painting Fundamentals
Swing’s approach to painting is built on the original AWT-based mechanism, but Swing’s implementation offers more finally grained control. Before examining the specifics of Swing-based painting, it is useful to review the AWT-based mechanism that underlies it.
The AWT class Component defines a method called paint( ) that is used to draw output directly to the surface of a component. For the most part, paint( ) is not called by your program. (In fact, only in the most unusual cases should it ever be called by your program.) Rather, paint( ) is called by the run-time system whenever a component must be rendered. This situation can occur for several reasons. For example, the window in which the component is displayed can be overwritten by another window and then uncovered. Or, the window might be minimized and then restored. The paint( ) method is also called when a program begins running. When writing AWT-based code, an application will override paint( ) when it needs to write output directly to the surface of the component.
Because JComponent inherits Component, all Swing’s lightweight components inherit the paint( ) method. However, you will not override it to paint directly to the surface of a component. The reason is that Swing uses a bit more sophisticated approach to painting that involves three distinct methods: paintComponent( ), paintBorder( ), and paintChildren( ). These methods paint the indicated portion of a component and divide the painting process into its three distinct, logical actions. In a lightweight component, the original AWT method paint( ) simply executes calls to these methods, in the order just shown.
To paint to the surface of a Swing component, you will create a subclass of the component and then override its paintComponent( ) method. This is the method that paints the interior of the component. You will not normally override the other two painting methods. When overriding paintComponent( ), the first thing you must do is call super.paintComponent( ), so that the superclass portion of the painting process takes place. (The only time this is not required is when you are taking complete, manual control over how a component is displayed.) After that, write the output that you want to display. The paintComponent( ) method is shown here:
protected void paintComponent(Graphics g)
The parameter g is the graphics context to which output is written.
To cause a component to be painted under program control, call repaint( ). It works in Swing just as it does for the AWT. The repaint( ) method is defined by Component. Calling it causes the system to call paint( ) as soon as it is possible to do so. Because painting is a time-consuming operation, this mechanism allows the run-time system to defer painting momentarily until some higher-priority task has completed, for example. Of course, in Swing the call to paint( ) results in a call to paintComponent( ). Therefore, to output to the surface of a component, your program will store the output until paintComponent( ) is called. Inside the overridden paintComponent( ), you will draw the stored output.
Compute the Paintable Area
When drawing to the surface of a component, you must be careful to restrict your output to the area that is inside the border. Although Swing automatically clips any output that will exceed the boundaries of a component, it is still possible to paint into the border, which will then get overwritten when the border is drawn. To avoid this, you must compute the paintable area of the component. This is the area defined by the current size of the component minus the space used by the border. Therefore, before you paint to a component, you must obtain the width of the border and then adjust your drawing accordingly.
To obtain the border width, call getInsets( ), shown here:
Insets getInsets( )
This method is defined by Container and overridden by JComponent. It returns an Insets object that contains the dimensions of the border. The inset values can be obtained by using these fields:
int top;
int bottom;
int left;
int right;
These values are then used to compute the drawing area given the width and the height of the component. You can obtain the width and height of the component by calling getWidth( ) and getHeight( ) on the component. They are shown here:
int getWidth( )
int getHeight( )
By subtracting the value of the insets, you can compute the usable width and height of the component.
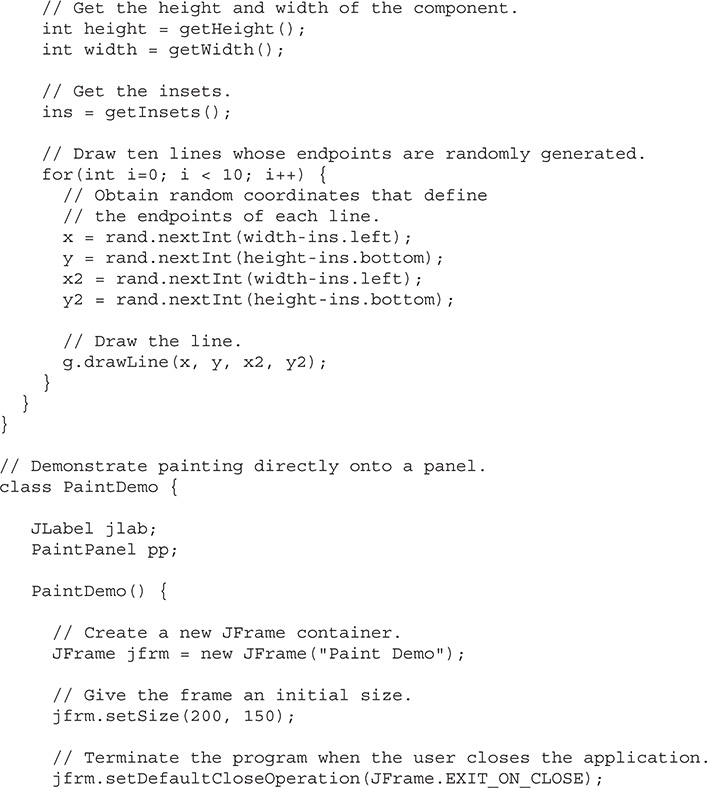
A Paint Example
Here is a program that puts into action the preceding discussion. It creates a class called PaintPanel that extends JPanel. The program then uses an object of that class to display lines whose endpoints have been generated randomly. Sample output is shown in Figure 31-3.
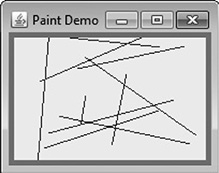
Figure 31-3 Sample output from the PaintPanel program


Let’s examine this program closely. The PaintPanel class extends JPanel. JPanel is one of Swing’s lightweight containers, which means that it is a component that can be added to the content pane of a JFrame. To handle painting, PaintPanel overrides the paintComponent( ) method. This enables PaintPanel to write directly to the surface of the component when painting takes place. The size of the panel is not specified because the program uses the default border layout and the panel is added to the center. This results in the panel being sized to fill the center. If you change the size of the window, the size of the panel will be adjusted accordingly.
Notice that the constructor also specifies a 5-pixel wide, red border. This is accomplished by setting the border by using the setBorder( ) method, shown here:
void setBorder(Border border)
Border is the Swing interface that encapsulates a border. You can obtain a border by calling one of the factory methods defined by the BorderFactory class. The one used in the program is createLineBorder( ), which creates a simple line border. It is shown here:
static Border createLineBorder(Color clr, int width)
Here, clr specifies the color of the border and width specifies its width in pixels.
Inside the override of paintComponent( ), notice that it first calls super.paintComponent( ). As explained, this is necessary to ensure that the component is properly drawn. Next, the width and height of the panel are obtained along with the insets. These values are used to ensure the lines lie within the drawing area of the panel. The drawing area is the overall width and height of a component less the border width. The computations are designed to work with differently sized PaintPanels and borders. To prove this, try changing the size of the window. The lines will still all lie within the borders of the panel.
The PaintDemo class creates a PaintPanel and then adds the panel to the content pane. When the application is first displayed, the overridden paintComponent( ) method is called, and the lines are drawn. Each time you resize or hide and restore the window, a new set of lines are drawn. In all cases, the lines fall within the paintable area.