CHAPTER
34 Introducing JavaFX GUI Programming
Like all successful languages, Java continues to evolve and improve. This also applies to its libraries. One of the most important examples of this evolutionary process is found in its GUI frameworks. As explained earlier in the book, the original GUI framework was the AWT. Because of its several limitations, it was soon followed by Swing, which offered a far superior approach to creating GUIs. Swing was so successful that it has remained the primary Java GUI framework for nearly two decades. However, Swing was designed when the enterprise application dominated software development. Today, consumer applications, and especially mobile apps, have risen in importance, and such applications often demand a GUI that has “visual sparkle.” Furthermore, no matter the type of application, the trend is toward more exciting visual effects. To better handle these types of GUIs, a new approach was needed, and this lead to the creation of JavaFX. JavaFX is Java’s next-generation client platform and GUI framework.
JavaFX provides a powerful, streamlined, flexible framework that simplifies the creation of modern, visually exciting GUIs. As such, it is a very large system, and, as was the case with Swing discussed in Part III, it is not possible to describe it fully in this book. Instead, the purpose of this and the next two chapters is to introduce several of its key features and techniques. Once you understand the fundamentals, you will find it easy to explore other aspects of JavaFX on your own.
One question that naturally arises relating to JavaFX is this: Is JavaFX designed as a replacement for Swing? The answer is a qualified Yes. However, given the large amount of Swing legacy code and the legions of programmers who know how to program for Swing, Swing will be in use for a very long time. This is especially true for enterprise applications. Nevertheless, JavaFX has clearly been positioned as the platform of the future. It is expected that, over the next few years, JavaFX will supplant Swing for new projects. JavaFX is something that no Java programmer can afford to ignore.
Before continuing, it is important to mention that the development of JavaFX occurred in two main phases. The original JavaFX was based on a scripting language called JavaFX Script. However, JavaFX Script has been discontinued. Beginning with the release of JavaFX 2.0, JavaFX has been programmed in Java itself and provides a comprehensive API. JavaFX also supports FXML, which can be (but is not required to be) used to specify the user interface. JavaFX has been bundled with Java since JDK 7, update 4. At the time of this writing, the latest version of JavaFX is JavaFX 9, which is bundled with JDK 9. As such, it is the version of JavaFX discussed here.
NOTE This and the following two chapters assume that you have a basic understanding of event handling as introduced in Chapter 24, and Swing fundamentals, as described by the preceding three chapters.
JavaFX Basic Concepts
In general, the JavaFX framework has all of the good features of Swing. For example, JavaFX is lightweight. It can also support an MVC architecture. Much of what you already know about creating GUIs using Swing is conceptually applicable to JavaFX. That said, there are significant differences between the two.
From a programmer’s point of view, the first differences you notice between JavaFX and Swing are the organization of the framework and the relationship of the main components. Simply put, JavaFX offers a more streamlined, easier-to-use, updated approach. JavaFX also greatly simplifies the rendering of objects because it handles repainting automatically. It is no longer necessary for your program to handle this task manually. The preceding is not intended to imply that Swing is poorly designed. It is not. It is just that the art and science of programming has moved forward, and JavaFX has received the benefits of that evolution. Simply put, JavaFX facilitates a more visually dynamic approach to GUIs.
The JavaFX Packages
The JavaFX elements are contained in packages that begin with the javafx prefix. At the time of this writing, there are more than 30 JavaFX packages in its API library. Here are four examples: javafx.application, javafx.stage, javafx.scene, and javafx.scene.layout. Although we will only use a few of these packages in this chapter, you will want to spend some time browsing their capabilities. JavaFX offers a wide array of functionality. Beginning with JDK 9, the JavaFX packages are organized into modules, such as javafx.base, javafx.graphics, and javafx.controls.
The Stage and Scene Classes
The central metaphor implemented by JavaFX is the stage. As in the case of an actual stage play, a stage contains a scene. Thus, loosely speaking, a stage defines a space and a scene defines what goes in that space. Or, put another way, a stage is a container for scenes and a scene is a container for the items that comprise the scene. As a result, all JavaFX applications have at least one stage and one scene. These elements are encapsulated in the JavaFX API by the Stage and Scene classes. To create a JavaFX application, you will, at minimum, add at least one Scene object to a Stage. Let’s look a bit more closely at these two classes.
Stage is a top-level container. All JavaFX applications automatically have access to one Stage, called the primary stage. The primary stage is supplied by the run-time system when a JavaFX application is started. Although you can create other stages, for many applications, the primary stage will be the only one required.
As mentioned, Scene is a container for the items that comprise the scene. These can consist of controls, such as push buttons and check boxes, text, and graphics. To create a scene, you will add those elements to an instance of Scene.
Nodes and Scene Graphs
The individual elements of a scene are called nodes. For example, a push button control is a node. However, nodes can also consist of groups of nodes. Furthermore, a node can have a child node. In this case, a node with a child is called a parent node or branch node. Nodes without children are terminal nodes and are called leaves. The collection of all nodes in a scene creates what is referred to as a scene graph, which comprises a tree.
There is one special type of node in the scene graph, called the root node. This is the top-level node and is the only node in the scene graph that does not have a parent. Thus, with the exception of the root node, all other nodes have parents, and all nodes either directly or indirectly descend from the root node.
The base class for all nodes is Node. There are several other classes that are, either directly or indirectly, subclasses of Node. These include Parent, Group, Region, and Control, to name a few.
Layouts
JavaFX provides several layout panes that manage the process of placing elements in a scene. For example, the FlowPane class provides a flow layout and the GridPane class supports a row/column grid-based layout. Several other layouts, such as BorderPane (which is similar to the AWT’s BorderLayout), are available. The layout panes are packaged in javafx.scene.layout.
The Application Class and the Life-cycle Methods
A JavaFX application must be a subclass of the Application class, which is packaged in javafx.application. Thus, your application class will extend Application. The Application class defines three life-cycle methods that your application can override. These are called init( ), start( ), and stop( ), and are shown here, in the order in which they are called:
void init( )
abstract void start(Stage primaryStage)
void stop( )
The init( ) method is called when the application begins execution. It is used to perform various initializations. As will be explained, however, it cannot be used to create a stage or build a scene. If no initializations are required, this method need not be overridden because an empty, default version is provided.
The start( ) method is called after init( ). This is where your application begins and it can be used to construct and set the scene. Notice that it is passed a reference to a Stage object. This is the stage provided by the run-time system and is the primary stage. (You can also create other stages, but you won’t need to for simple applications.) Notice that this method is abstract. Thus, it must be overridden by your application.
When your application is terminated, the stop( ) method is called. It is here that you can handle any cleanup or shutdown chores. In cases in which no such actions are needed, an empty, default version is provided.
One other point: For a modular JavaFX application, the package that contains your main application class (that is, your subclass of Application) must be exported by its module so that it can be found by the javafx.graphics module.
Launching a JavaFX Application
To start a free-standing JavaFX application, you must call the launch( ) method defined by Application. It has two forms. Here is the one used in this chapter:
public static void launch(String … args)
Here, args is a possibly empty list of strings that typically specify command-line arguments. When called, launch( ) causes the application to be constructed, followed by calls to init( ) and start( ). The launch( ) method will not return until after the application has terminated. This version of launch( ) starts the subclass of Application from which launch( ) is called. The second form of launch( ) lets you specify a class other than the enclosing class to start.
Before moving on, it is necessary to make an important point: JavaFX applications that have been packaged by using the javafxpackager tool (or its equivalent in an IDE) do not need to include a call to launch( ). However, its inclusion often simplifies the test/debug cycle, and it lets the program be used without the creation of a JAR file. Thus, it is included in all of the JavaFX programs in this book.
A JavaFX Application Skeleton
All JavaFX applications share the same basic skeleton. Therefore, before looking at any more JavaFX features, it will be useful to see what that skeleton looks like. In addition to showing the general form of a JavaFX application, the skeleton also illustrates how to launch the application and demonstrates when the life-cycle methods are called. A message noting when each life-cycle method is called is displayed on the console. The complete skeleton is shown here:


Although the skeleton is quite short, it can be compiled and run. It produces the empty window shown here. (The precise look of the frame may vary slightly, based on your execution environment.)

It also produces the following output on the console:

When you close the window, this message is displayed on the console:
![]()
Of course, in a real program, the life-cycle methods would not normally output anything to System.out. They do so here simply to illustrate when each method is called. Furthermore, as explained earlier, you will need to override the init( ) and stop( ) methods only if your application must perform special startup or shutdown actions. Otherwise, you can use the default implementations of these methods provided by the Application class.
Let’s examine this program in detail. It begins by importing four packages. The first is javafx.application, which contains the Application class. The Scene class is packaged in javafx.scene, and Stage is packaged in javafx.stage. The javafx.scene.layout package provides several layout panes. The one used by the program is FlowPane.
Next, the application class JavaFXSkel is created. Notice that it extends Application. As explained, Application is the class from which all JavaFX applications are derived. JavaFXSkel contains two methods. The first is main( ). It is used to launch the application via a call to launch( ). Notice that the args parameter to main( ) is passed to the launch( ) method. Although this is a common approach, you can pass a different set of parameters to launch( ), or none at all. One other point: As explained earlier, launch( ) is required by a free-standing application, but not in other cases. When it is not needed, main( ) is also not needed. However, for reasons already explained, both main( ) and launch( ) are included in the JavaFX programs in this book.
When the application begins, the init( ) method is called first by the JavaFX run-time system. For the sake of illustration, it simply displays a message on System.out, but it would normally be used to initialize some aspect of the application. Of course, if no initialization is required, it is not necessary to override init( ) because an empty, default implementation is provided. It is important to emphasize that init( ) cannot be used to create the stage or scene portions of a GUI. Rather, these items should be constructed and displayed by the start( ) method.
After init( ) finishes, the start( ) method executes. It is here that the initial scene is created and set to the primary stage. Let’s look at this method line-by-line. First, notice that start( ) has a parameter of type Stage. When start( ) is called, this parameter will receive a reference to the primary stage of the application. It is to this stage that you will set a scene for the application.
After displaying a message on the console that start( ) has begun execution, it sets the title of the stage using this call to setTitle( ):
![]()
Although this step is not necessarily required, it is customary for stand-alone applications. This title becomes the name of the main application window.
Next, a root node for a scene is created. The root node is the only node in a scene graph that does not have a parent. In this case, a FlowPane is used for the root node, but there are several other classes that can be used for the root.
![]()
As mentioned, a FlowPane uses a flow layout. This is a layout in which elements are positioned line-by-line, with lines wrapping as needed. (Thus, it works much like the FlowLayout class used by the AWT and Swing.) In this case, a horizontal flow is used, but it is possible to specify a vertical flow. Although not needed by this skeletal application, it is also possible to specify other layout properties, such as a vertical and horizontal gap between elements, and an alignment. You will see an example of this later in this chapter.
The following line uses the root node to construct a Scene:
![]()
Scene provides several versions of its constructor. The one used here creates a scene that has the specified root with the specified width and height. It is shown here:
Scene(Parent rootnode, double width, double height)
Notice that the type of rootnode is Parent. It is a subclass of Node and encapsulates nodes that can have children. Also notice that the width and the height are double values. This lets you pass fractional values, if needed. In the skeleton, the root is rootNode, the width is 300 and the height is 200.
The next line in the program sets myScene as the scene for myStage:
![]()
Here, setScene( ) is a method defined by Stage that sets the scene to that specified by its argument.
In cases in which you don’t make further use of the scene, you can combine the previous two steps, as shown here:
![]()
Because of its compactness, this form will be used by most of the subsequent examples.
The last line in start( ) displays the stage and its scene:
![]()
In essence, show( ) shows the window that was created by the stage and scene.
When you close the application, its window is removed from the screen and the stop( ) method is called by the JavaFX run-time system. In this case, stop( ) simply displays a message on the console, illustrating when it is called. However, stop( ) would not normally display anything. Furthermore, if your application does not need to handle any shutdown actions, there is no reason to override stop( ) because an empty, default implementation is provided.
Compiling and Running a JavaFX Program
One important advantage of JavaFX is that the same program can be run in a variety of different execution environments. For example, you can run a JavaFX program as a stand-alone desktop application or as a Java Web Start application. However, different ancillary files may be needed in some cases, for example, an HTML file or a Java Network Launch Protocol (JNLP) file.
In general, a JavaFX program is compiled like any other Java program. However, because of the need for additional support for various execution environments, the easiest way to compile a JavaFX application is to use an Integrated Development Environment (IDE) that fully supports JavaFX programming, such as NetBeans. Just follow the instructions for the IDE you are using.
Alternatively, if you want to compile and test a JavaFX application using the command-line tools, you can easily do so. Just compile and run the application in the normal way, using javac and java. Be aware that using the command-line compiler neither creates any HTML or JNLP files that would be needed if you want to run the application in a way other than as a stand-alone application, nor does it create a JAR file for the program. To create these files, you need to use a tool such as javafxpackager.
The Application Thread
In the preceding discussion, it was mentioned that you cannot use the init( ) method to construct a stage or scene. You also cannot create these items inside the application’s constructor. The reason is that a stage or scene must be constructed on the application thread. However, the application’s constructor and the init( ) method are called on the main thread, also called the launcher thread. Thus, they can’t be used to construct a stage or scene. Instead, you must use the start( ) method, as the skeleton demonstrates, to create the initial GUI because start( ) is called on the application thread.
Furthermore, any changes to the GUI currently displayed must be made from the application thread. Fortunately, in JavaFX, events are sent to your program on the application thread. Therefore, event handlers can be used to interact with the GUI. The stop( ) method is also called on the application thread.
A Simple JavaFX Control: Label
The primary ingredient in most user interfaces is the control because a control enables the user to interact with the application. As you would expect, JavaFX supplies a rich assortment of controls. The simplest control is the label because it just displays a message, which, in this example, is text. Although quite easy to use, the label is a good way to introduce the techniques needed to begin building a scene graph.
The JavaFX label is an instance of the Label class, which is packaged in javafx.scene.control. Label inherits Labeled and Control, among other classes. The Labeled class defines several features that are common to all labeled elements (that is, those that can contain text), and Control defines features related to all controls.
Label defines three constructors. The one we will use here is
Label(String str)
Here, str is the string that is displayed.
Once you have created a label (or any other control), it must be added to the scene’s content, which means adding it to the scene graph. To do this, you will first call getChildren( ) on the root node of the scene graph. It returns a list of the child nodes in the form of an ObservableList<Node>. ObservableList is packaged in javafx.collections, and it inherits java.util.List, which means that it supports all of the features available to a list as defined by the Collections Framework. Using the returned list of child nodes, you can add the label to the list by calling add( ), passing in a reference to the label.
The following program puts the preceding discussion into action by creating a simple JavaFX application that displays a label:

This program produces the following window:

In the program, pay special attention to this line:
![]()
It adds the label to the list of children for which rootNode is the parent. Although this line could be separated into its individual pieces if necessary, you will often see it as shown here.
Before moving on, it is useful to point out that ObservableList provides a method called addAll( ) that can be used to add two or more children to the scene graph in a single call. (You will see an example of this shortly.) To remove a control from the scene graph, call remove( ) on the ObservableList. For example,
![]()
removes myLabel from the scene.
Using Buttons and Events
Although the program in the preceding section presents a simple example of using a JavaFX control and constructing a scene graph, it does not show how to handle events. As you know, most GUI controls generate events that are handled by your program. For example, buttons, check boxes, and lists all generate events when they are used. In many ways, event handling in JavaFX is similar to event handling in Swing or the AWT, but it’s more streamlined. Therefore, if you already are proficient at handling events for these other two GUIs, you will have no trouble using the event handling system provided by JavaFX.
One commonly used control is the button. This makes button events one of the most frequently handled. Therefore, a button is a good way to demonstrate the fundamentals of event handling in JavaFX. For this reason, the fundamentals of event handling and the button are introduced together.
Event Basics
The base class for JavaFX events is the Event class, which is packaged in javafx.event. Event inherits java.util.EventObject, which means that JavaFX events share the same basic functionality as other Java events. Several subclasses of Event are defined. The one that we will use here is ActionEvent. It handles action events generated by a button.
In general, JavaFX uses what is, in essence, the delegation event model approach to event handling. To handle an event, you must first register the handler that acts as a listener for the event. When the event occurs, the listener is called. It must then respond to the event and return. In this regard, JavaFX events are managed much like Swing events, for example.
Events are handled by implementing the EventHandler interface, which is also in javafx.event. It is a generic interface with the following form:
interface EventHandler<T extends Event>
Here, T specifies the type of event that the handler will handle. It defines one method, called handle( ), which receives the event object as a parameter. It is shown here:
void handle(T eventObj)
Here, eventObj is the event that was generated. Typically, event handlers are implemented through anonymous inner classes or lambda expressions, but you can use stand-alone classes for this purpose if it is more appropriate to your application (for example, if one event handler will handle events from more than one source).
Although not required by the examples in this chapter, it is sometimes useful to know the source of an event. This is especially true if you are using one handler to handle events from different sources. You can obtain the source of the event by calling getSource( ), which is inherited from java.util.EventObject. It is shown here:
Object getSource( )
Other methods in Event let you obtain the event type, determine if the event has been consumed, consume an event, fire an event, and obtain the target of the event. When an event is consumed, it stops the event from being passed to a parent handler.
One last point: In JavaFX, events are processed via an event dispatch chain. When an event is generated, it is passed to the root node of the chain. The event is then passed down the chain to the target of the event. After the target node processes the event, the event is passed back up the chain, thus allowing parent nodes a chance to process the event, if necessary. This is called event bubbling. It is possible for a node in the chain to consume an event, which prevents it from being further processed.
NOTE Although not used in this introduction to JavaFX, an application can also implement an event filter, which can be used to manage events. A filter is added to a node by calling addEventFilter( ), which is defined by Node. A filter can consume an event, thus preventing further processing.
Introducing the Button Control
In JavaFX, the push button control is provided by the Button class, which is in javafx.scene.control. Button inherits a fairly long list of base classes that include ButtonBase, Labeled, Region, Control, Parent, and Node. If you examine the API documentation for Button, you will see that much of its functionality comes from its base classes. Furthermore, it supports a wide array of options. However, here we will use its default form. Buttons can contain text, graphics, or both. In this chapter, we will use text-based buttons. An example of a graphics-based button is shown in the next chapter.
Button defines three constructors. The one we will use is shown here:
Button(String str)
In this case, str is the message that is displayed in the button.
When a button is pressed, an ActionEvent is generated. ActionEvent is packaged in javafx.event. You can register a listener for this event by using setOnAction( ), which has this general form:
final void setOnAction(EventHandler<ActionEvent> handler)
Here, handler is the handler being registered. As mentioned, often you will use an anonymous inner class or lambda expression for the handler. The setOnAction( ) method sets the property onAction, which stores a reference to the handler. As with all other Java event handling, your handler must respond to the event as fast as possible and then return. If your handler consumes too much time, it will noticeably slow down the application. For lengthy operations, you must use a separate thread of execution.
Demonstrating Event Handling and the Button
The following program demonstrates event handling. It uses two buttons and a label. Each time a button is pressed, the label is set to display which button was pressed.


Sample output from this program is shown here:

Let’s examine a few key portions of this program. First, notice how buttons are created by these two lines:
![]()
This creates two text-based buttons. The first displays the string Alpha; the second displays Beta.
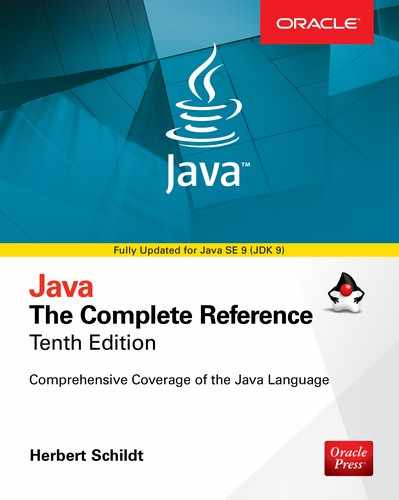
Next, an action event handler is set for each of these buttons. The sequence for the Alpha button is shown here:
As explained, buttons respond to events of type ActionEvent. To register a handler for these events, the setOnAction( ) method is called on the button. It uses an anonymous inner class to implement the EventHandler interface. (Recall that EventHandler defines only the handle( ) method.) Inside handle( ), the text in the response label is set to reflect the fact that the Alpha button was pressed. Notice that this is done by calling the setText( ) method on the label. Events are handled by the Beta button in the same way.
After the event handlers have been set, the response label and the buttons btnAlpha and btnBeta are added to the scene graph by using a call to addAll( ):
![]()
The addAll( ) method adds a list of nodes to the invoking parent node. Of course, these nodes could have been added by three separate calls to add( ), but the addAll( ) method is more convenient to use in this situation.
There are two other things of interest in this program that relate to the way the controls are displayed in the window. First, when the root node is created, this statement is used:
![]()
Here, the FlowPane constructor is passed two values. These specify the horizontal and vertical gap that will be left around elements in the scene. If these gaps are not specified, then two elements (such as two buttons) would be positioned in such a way that no space is between them. Thus, the controls would run together, creating a very unappealing user interface. Specifying gaps prevents this.
The second point of interest is the following line, which sets the alignment of the elements in the FlowPane:
![]()
Here, the alignment of the elements is centered. This is done by calling setAlignment( ) on the FlowPane. The value Pos.CENTER specifies that both a vertical and horizontal center will be used. Other alignments are possible. Pos is an enumeration that specifies alignment constants. It is packaged in javafx.geometry.
Before moving on, one more point needs to be made. The preceding program used anonymous inner classes to handle button events. However, because the EventHandler interface defines only one abstract method, handle( ), a lambda expression could have passed to setOnAction( ), instead. In this case, the parameter type of setOnAction( ) would supply the target context for the lambda expression. For example, here is the handler for the Alpha button, rewritten to use a lambda:

Notice that the lambda expression is more compact than the anonymous inner class. Because lambda expressions are a relatively new feature but the anonymous inner class is a widely used construct, readily understood by nearly all Java programmers, the event handlers in subsequent examples will use anonymous inner classes. This will also allow the examples to be compiled by readers using JDK 7 (which does not support lambdas). However, on your own, you might want to experiment with converting them to lambda expressions. It is a good way to gain experience using lambdas in your own code.
Drawing Directly on a Canvas
As mentioned early on, JavaFX handles rendering tasks for you automatically, rather than you handling them manually. This is one of the most important ways that JavaFX improves on Swing. As you may know, in Swing or the AWT, you must call the repaint( ) method to cause a window to be repainted. Furthermore, your application needs to store the window contents, redrawing them when painting is requested. JavaFX eliminates this tedious mechanism because it keeps track of what you display in a scene and redisplays that scene as needed. This is called retained mode. With this approach, there is no need to call a method like repaint( ). Rendering is automatic.
One place that JavaFX’s approach to rendering is especially helpful is when displaying graphics objects, such as lines, circles, and rectangles. JavaFX’s graphics methods are found in the GraphicsContext class, which is part of javafx.scene.canvas. These methods can be used to draw directly on the surface of a canvas, which is encapsulated by the Canvas class in javafx.scene.canvas. When you draw something, such as a line, on a canvas, JavaFX automatically renders it whenever it needs to be redisplayed.
Before you can draw on a canvas, you must perform two steps. First, you must create a Canvas instance. Second, you must obtain a GraphicsContext object that refers to that canvas. You can then use the GraphicsContext to draw output on the canvas.
The Canvas class is derived from Node; thus it can be used as a node in a scene graph. Canvas defines two constructors. One is the default constructor, and the other is the one shown here:
Canvas(double width, double height)
Here, width and height specify the dimensions of the canvas.
To obtain a GraphicsContext that refers to a canvas, call getGraphicsContext2D( ). Here is its general form:
GraphicsContext getGraphicsContext2D( )
The graphics context for the canvas is returned.
GraphicsContext defines a large number of methods that draw shapes, text, and images, and support effects and transforms. If sophisticated graphics programming is in your future, you will definitely want to study its capabilities closely. For our purposes, we will use only a few of its methods, but they will give you a sense of its power. They are described here.
You can draw a line using strokeLine( ), shown here:
void strokeLine(double startX, double startY, double endX, double endY)
It draws a line from startX,startY to endX,endY, using the current stroke, which can be a solid color or some more complex style.
To draw a rectangle, use either strokeRect( ) or fillRect( ), shown here:
void strokeRect(double topX, double topY, double width, double height)
void fillRect(double topX, double topY, double width, double height)
The upper-left corner of the rectangle is at topX,topY. The width and height parameters specify its width and height. The strokeRect( ) method draws the outline of a rectangle using the current stroke, and fillRect( ) fills the rectangle with the current fill. The current fill can be as simple as a solid color or something more complex.
To draw an ellipse, use either strokeOval( ) or fillOval( ), shown next:
void strokeOval(double topX, double topY, double width, double height)
void fillOval(double topX, double topY, double width, double height)
The upper-left corner of the rectangle that bounds the ellipse is at topX,topY. The width and height parameters specify its width and height. The strokeOval( ) method draws the outline of an ellipse using the current stroke, and fillOval( ) fills the oval with the current fill. To draw a circle, pass the same value for width and height.
You can draw text on a canvas by using the strokeText( ) and fillText( ) methods. We will use this version of fillText( ):
void fillText(String str, double topX, double topY)
It displays str starting at the location specified by topX,topY, filling the text with the current fill.
You can set the font and font size of the text being displayed by using setFont( ). You can obtain the font used by the canvas by calling getFont( ). By default, the system font is used. You can create a new font by constructing a Font object. Font is packaged in javafx.scene.text. For example, you can create a default font of a specified size by using this constructor:
Font(double fontSize)
Here, fontSize specifies the size of the font.
You can specify the fill and stroke using these two methods defined by GrahpicsContext:
void setFill(Paint newFill)
void setStroke(Paint newStroke)
Notice that the parameter of both methods is of type Paint. This is an abstract class packaged in javafx.scene.paint. Its subclasses define fills and strokes. The one we will use is Color, which simply describes a solid color. Color defines several static fields that specify a wide array of colors, such as Color.BLUE, Color.RED, Color.GREEN, and so on.
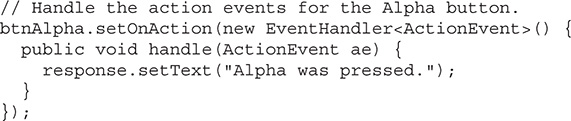
The following program uses the aforementioned methods to demonstrate drawing on a canvas. It first displays a few graphic objects on the canvas. Then, each time the Change Color button is pressed, the color of three of the objects changes color. If you run the program, you will see that the shapes whose color is not changed are unaffected by the change in color of the other objects. Furthermore, if you try covering and then uncovering the window, you will see that the canvas is automatically repainted, without any other actions on the part of your program. Sample output is shown here:


It is important to emphasize that GraphicsContext supports many more operations than those demonstrated by the preceding program. For example, you can apply various transforms, rotations, and effects. Despite its power, its various features are easy to master and use. One other point: A canvas is transparent. Therefore, if you stack canvases, the contents of both will show. This may be useful in some situations.
NOTE javafx.scene.shape contains several classes that can also be used to draw various types of graphical shapes, such as circles, arcs, and lines. These are represented by nodes and can, therefore, be directly part of the scene graph. You will want to explore these on your own.