
CHAPTER
19
Creating Virtual
Machines Manually
The counterpart to the process of creating a guest VM using a template is the process of creating a guest VM manually. Consider this: the only difference between creating a host machine running a choice-flavored operating system on a bare-metal host versus a guest virtual machine host is the preparation before installing and configuring the host operating system software. If you are creating a host machine on bare metal, your preparation includes installing the CPU, memory, and storage on a motherboard with a power supply, a fan, and a beverage-cooled chassis. By contrast, if creating the host machine in an Oracle VM infrastructure, preparation involves allocating the storage from the SAN and/or file server, choosing the number of processors to assign, and deciding how much memory to use of what’s available. Other than that, the guest VM will be created from an ISO file or from a PXE server (named Tinkerbell) or cloned from another machine (physical or virtual). In short, there literally is no difference between operating system installation steps after the environment has been prepared.
Creating a Virtual Machine Manually: Process Overview
The process of creating a virtual machine manually in an Oracle VM environment is basically the same as installing an operating system on a bare-metal host machine. Assuming the operating system installation source is available (for example, the ISO file has been staged in the repository of the target Oracle VM environment or the PXE server has been configured on the network with the machine image source and so on), then the virtualization configuration items associated appear in the first few screens of the process. Namely, the boot source is specified (as being either an ISO file or the network location of the PXE server) and then the virtual machine is started while watching the Tiger VMC terminal, much like the process of inserting a disk in a machine (in the bare-metal “real-world” example) and watching the monitor while the machine is “powered up” and engaging in the dance of keystroke combinations to force boot-up from a CD or thumb drive device. In fact, in the event the VM guest to be manually created is one of an ancient operating system such as Microsoft Windows 98, then be prepared to recall the fond memory of pressing f6 during the boot process—which only further illustrates the point that manual creation of the guest VM is very similar to manual creation of a bare-metal host.
The following summarizes the manual creation process (note many of these steps are also covered in the previous chapter where we discussed creating guest virtual machines using templates):
1. Determine the basic resource requirements.
![]() Storage If the machine to be generated is to be used for production support of an Oracle RAC database, the storage must be defined as physical (if the disks are used for the ASM grid infrastructure of a RAC database usage). Otherwise, the storage may be defined with virtual disks carved out of the repository storage.
Storage If the machine to be generated is to be used for production support of an Oracle RAC database, the storage must be defined as physical (if the disks are used for the ASM grid infrastructure of a RAC database usage). Otherwise, the storage may be defined with virtual disks carved out of the repository storage.
![]() Allocate at least one disk device for the root file system. Production considerations should include separate disks for performance engineering and capacity planning excellence (that is, temp storage, home storage, or software-specific storage such as the Oracle home and so on). Again, just like in the real world, it is much easier to segregate these specific file systems onto separate disks at the time of machine creation rather than go through the painful process of separating the storage later.
Allocate at least one disk device for the root file system. Production considerations should include separate disks for performance engineering and capacity planning excellence (that is, temp storage, home storage, or software-specific storage such as the Oracle home and so on). Again, just like in the real world, it is much easier to segregate these specific file systems onto separate disks at the time of machine creation rather than go through the painful process of separating the storage later.
![]() Allocate additional disk devices if the requirements are known; otherwise, disk devices can be added later at any time.
Allocate additional disk devices if the requirements are known; otherwise, disk devices can be added later at any time.
![]() Network In most cases, the virtual machine network has already been defined, and generating a new vNIC will not cause problems. However, in the event 254 virtual network interface cards have already been defined, an additional virtual machine network may be required (but again, it is highly unlikely). This limitation is platform specific.
Network In most cases, the virtual machine network has already been defined, and generating a new vNIC will not cause problems. However, in the event 254 virtual network interface cards have already been defined, an additional virtual machine network may be required (but again, it is highly unlikely). This limitation is platform specific.
2. Estimate the initial CPU and memory requirements.
3. Import the installation ISO into an Oracle VM storage repository.
4. Start the create virtual machine process.
5. Enter details and add storage and networking.
6. Launch the terminal console and start the guest VM.
7. Execute the installation process normally.
8. Remove the installation media from the guest VM.
Creating a Virtual Machine Manually: Process Details
Regardless of the source media, you must allocate and assign the resources for the guest VM prior to starting it, although it is possible to create a guest VM with no target resources allocated. Just like when using a template, however, you must allocate a network and storage to the target guest virtual machine.
Storage Management
Prior to starting the new guest VM, allocate and configure the storage for use. The details of storage management are found elsewhere in this book, but for the purposes of this chapter, just know that the storage management process is the same regardless of the guest VM source media.
As shown in Figure 19-1, the resources for the target guest virtual machine have been allocated and configured.

FIGURE 19-1. Storage management screen
Beginning with the storage management screen, the target storage in this example has been allocated as a physical disk. Recall that only physical disk-based storage is supported for production virtual machines. Although virtual disks may be carved out of repository-based storage, physical disk definitions are based on LUNs carved out of network-attached storage or a storage area network (SAN) resource.
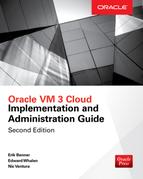
The storage device needs to be refreshed so that the storage can be detected. The naming convention, by default, is cryptic and will be based on the SAN device if a physical disk is used as the system or boot disk. It is a best practice to edit the physical device and change the simple name of the target storage to something appropriate for the guest virtual machine and to include a brief description.
Figures 19-2, 19-3, and 19-4 show the process before and after modifying the name and including a brief description.

FIGURE 19-2. The Edit Physical Disk dialog
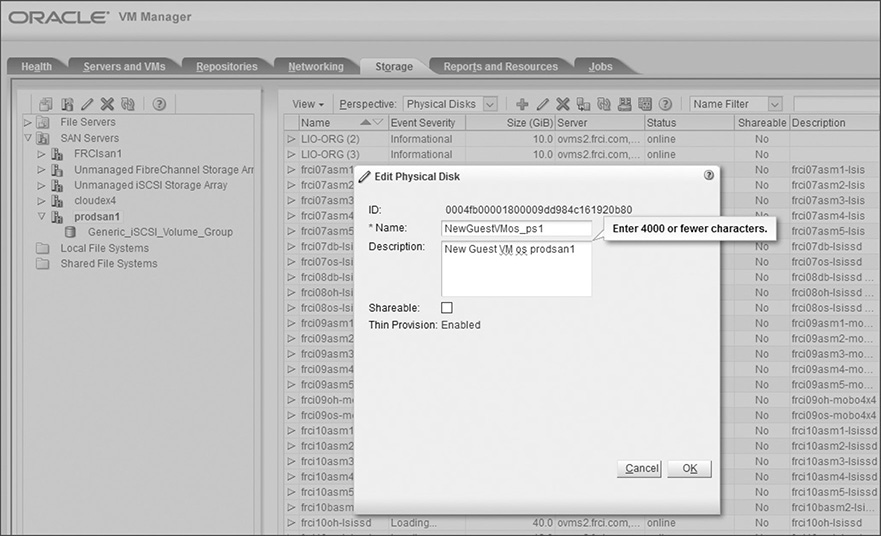
FIGURE 19-3. The Edit Physical Disk dialog modified

FIGURE 19-4. Physical disk screen showing the naming modification
It is a good idea to include some meaningful information about the guest virtual machine and the storage device for quick reference, especially during triage and performance-tuning exercises.
Critical to the process of manually creating a guest VM is staging the media that will be used for creating the guest VM. In this example, a Microsoft Windows Server 2012 guest VM will be created. The source ISO, shown in Figure 19-5, must have been imported to an accessible repository. Details of this process are found throughout this book and include staging the ISO media and using the import facility of the VM Manager repository.

FIGURE 19-5. Repository-based ISO screen
Creating the Virtual Machine
To initiate the guest VM creation process, select the Create Virtual Machine icon from the Servers and VMs tab.
Manually Building the Oracle VM
The first screen of the process presents the choices related to “how” the Oracle VM is to be built (see Figure 19-6). Depending on the choices, the source must have been staged or configured, as is the case with a PXE server-based installation.

FIGURE 19-6. The first screen of the Create Virtual Machine dialog
Selecting the Create a New Virtual Machine option displays a general information dialog for the VM (see Figure 19-7). Although some of the information is optional (for example, the operating system type), during the creation process it is extremely helpful to populate these fields with meaningful information. This comes in handy later when scanning multiple virtual machines in the Servers and VMs tab.

FIGURE 19-7. General info dialog
After entering the needed information and clicking Next, the Set Up Networks dialog is displayed (see Figure 19-8).

FIGURE 19-8. Set Up Networks dialog
Choose a network and add the virtual network interface card by clicking the Add button. Multiple network interface cards may be added, or this task can be deferred until a later time. Figure 19-9 shows an example of this screen with a virtual machine network (defined in the Network Channels section of the Oracle VM Manager GUI).

FIGURE 19-9. Set Up Networks dialog modified
After the appropriate networks are added, the Arrange Disks dialog appears. This is where the boot media and installation target storage are added to the target guest VM. Figures 19-10 through 19-13 show the process of adding the boot media as well as the target storage for the operating system.

FIGURE 19-10. Arrange Disks dialog
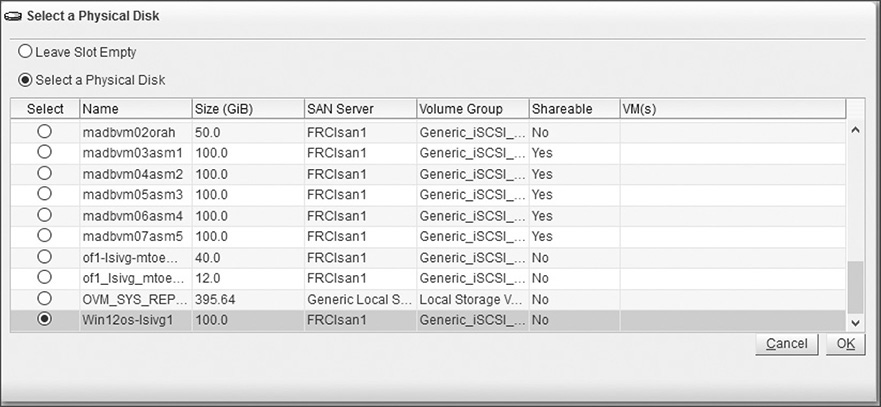
FIGURE 19-11. Select a Physical Disk dialog

FIGURE 19-12. Choosing the CD and guest VM OS disks

FIGURE 19-13. Choosing the boot disk
It should be noted here that choosing the CD-ROM as the first disk is optional. If the target CD-ROM is listed second or later, then by default it will not be selected as the boot device. However, just as with a bare-metal installation, the BIOS may be used to indicate which disk to use as the boot device. There may be an order to the boot device used to start the machine based on the presence of an operating system. In other words, if the physical disk is selected first and the CD-ROM is selected second, then the boot process will look to the physical disk for an operating system. If no OS is found, the boot process will automatically look to the CD-ROM. Hence, it is equally important during the configuration of a target guest VM to indicate the proper boot device order.
The order of the disks will determine the boot device if the boot order is not specifically defined in the Boot Options dialog. If this is left blank, the boot device order will be determined by the order of the disks in the Arrange Disks dialog. Regardless of the position of the CD, after the guest VM is installed, the virtualized boot order will behave just like the BIOS on a bare-metal platform.
As stated, regardless of the order of the disks, a boot device may be selected. Be careful, though, because slot order is significant. Most OS systems administrators expect /dev/xvda to be the boot disk. The device name is based on which slot each device is allocated to. Although any disk may be selected as the boot device, the slots will be used by Oracle VM to name the devices in the OS being deployed. In the example shown in Figure 19-14, the target OS being deployed is a Windows 2012 Server.

FIGURE 19-14. New guest VM Win12op
Starting the New Guest VM
After you have gone through the set of screens in the Create Virtual Machine dialog, the new virtual machine resource assignments are made, but the creation process has not yet been started. To start the virtual machine creation process, select the virtual machine and click the Start icon in the menu. However, because the actual operating system has not yet been installed, a virtual console must be launched to manually participate in the installation and configuration process of the target operating system. Figures 19-15 and 19-16 show an example of launching the virtual terminal console.
FIGURE 19-15. Launching the terminal console

FIGURE 19-16. Terminal console view
After selecting the virtual machine and launching the terminal console, start the virtual machine by selecting the Start icon, as shown in Figure 19-17. The terminal console view presents a dialog for configuration tasks. The manual interaction process is illustrated in Figure 19-17.

FIGURE 19-17. Starting a guest VM
After you start the virtual machine for the first time, the boot device will be accessed based on the boot device configuration or the order of the disks in the Arrange Disks dialog. You can also monitoring the OS installation process through the virtual console, as shown in Figure 19-18, and the level of detail and amount of information is dependent on the OS vendor.

FIGURE 19-18. Monitoring the guest VM in the console
Just as if you were sitting in front of the terminal connected to a bare-metal machine, the virtual terminal console will display the installation process from the boot installation media. Figure 19-19 shows an example of this interaction. Proceed with the dialog as normal when installing the target guest operating system.

FIGURE 19-19. Initial OS installation screen
Post–Guest VM Creation
After you have installed the guest operating system, either the installation media used as the boot device will need to be removed or the boot device (for subsequent machine startup) will need to be specified in the Oracle VM configuration (in case the target operating system was not specified as the first disk). If, however, the first disk was specified as the operating system disk and the boot device screen was left blank, then the new guest virtual machine will boot from the operating system disk.
Figures 19-20, 19-21, and 19-22 illustrate the process of editing the guest VM and removing the installation ISO. As can be seen in Figure 19-21, removing the installation media can be accomplished by either removing the CD-ROM drive altogether or by simply ejecting the media but leaving the CD-ROM drive as part of the VM. It is your choice; either operation achieves the desired result.

FIGURE 19-20. Editing the guest VM

FIGURE 19-21. Removing the guest VM installation ISO

FIGURE 19-22. Removing the guest VM CD drive
Assuming the installation source media was based on a CD-ROM, and the guest Oracle VM used the ISO via a virtual CD-ROM device, the virtual device may be removed after the Oracle VM has been created. An example of removing the CD-ROM device altogether is shown in Figure 19-22.
Summary
Creating an Oracle guest virtual machine manually is an extremely forgiving process in that the guest VM structure can be created prior to your allocating any resources. The guest VM creation process is based on a “source,” which may be a template, a pixie server (PXE), or another guest VM. In actual practice, you can create a guest “object” while managing a given object. In other words, while managing a current guest VM, you can request a “clone,” in which case that is simply another entry point into the guest VM manual creation process.