
CHAPTER
23
Basic Cloud Control
Installation
Although the default management interface for Oracle VM provides a feature-rich interface for administrators, it does not enable some key parts required for a true self-service
Infrastructure as a Service (IaaS) platform. To enable an enterprise-grade IaaS private cloud system, Enterprise Manager Cloud Control 13c is required. As discussed in previous chapters, Enterprise Manager Cloud Control can enable more than just IaaS: it also is the foundation for almost any XaaS feature, including Database as a Service (DBaaS) and Middleware as a Service (MWaaS), which both fall under Platform as a Service (PaaS). This chapter covers how to connect an Enterprise Manager 13c system to Oracle VM Manager, covering steps 1 and 2 of the workflow for setting up a cloud infrastructure (see Figure 23-1). Chapter 25 will cover Steps 3–6 as part of setting up the IaaS self-service portal.

FIGURE 23-1. EM13c IaaS workflow
Enterprise Manager IaaS Best Practices
Although this chapter will not cover how to install Enterprise Manager 13c, we need to discuss a few points that should be covered to better prepare the Enterprise Manager 13c environment:
![]() Software Library When you’re using Enterprise Manager 13c to manage private clouds, the Software Library can grow quite large. If possible, locate the Software Library on a NAS device, such as a ZFS storage array to simplify growing the filesystem in the future. Oracle VM virtual appliances allow the cloud administrator to model an entire application platform, define all dependencies and deployment constraints, and deliver the entire multitier software stack in a single file. This file can then be stored in the Software Library and be made available to users as a cloud service. For example, administrators may offer an application service that includes a VM with a Database 12.2 instance, a VM with WebLogic 12c, a web server running Apache, and a Windows server running a .NET component. Therefore, virtual appliances can by their very nature take a considerable amount of disk space. As a note, although images are stored in the Software Library, a copy is also stored in the Oracle VM repository when the image is made available to that server pool.
Software Library When you’re using Enterprise Manager 13c to manage private clouds, the Software Library can grow quite large. If possible, locate the Software Library on a NAS device, such as a ZFS storage array to simplify growing the filesystem in the future. Oracle VM virtual appliances allow the cloud administrator to model an entire application platform, define all dependencies and deployment constraints, and deliver the entire multitier software stack in a single file. This file can then be stored in the Software Library and be made available to users as a cloud service. For example, administrators may offer an application service that includes a VM with a Database 12.2 instance, a VM with WebLogic 12c, a web server running Apache, and a Windows server running a .NET component. Therefore, virtual appliances can by their very nature take a considerable amount of disk space. As a note, although images are stored in the Software Library, a copy is also stored in the Oracle VM repository when the image is made available to that server pool.
![]() Target counts When sizing Enterprise Manager 13c, do not forget to include the IaaS VMs as targets. When sizing an Enterprise Manager Cloud Control implementation, pay attention to the number of targets, as that will impact the CPU and memory requirements as well as how the system is tuned. For more information, see the Cloud Control Administrators Guide at http://docs.oracle.com.
Target counts When sizing Enterprise Manager 13c, do not forget to include the IaaS VMs as targets. When sizing an Enterprise Manager Cloud Control implementation, pay attention to the number of targets, as that will impact the CPU and memory requirements as well as how the system is tuned. For more information, see the Cloud Control Administrators Guide at http://docs.oracle.com.
![]() OMS heap size When large numbers of users utilize Enterprise Manager, the Enterprise Manager administrator might need to increase the Java virtual machine (JVM) heap size for the Oracle Management Server (OMS).
OMS heap size When large numbers of users utilize Enterprise Manager, the Enterprise Manager administrator might need to increase the Java virtual machine (JVM) heap size for the Oracle Management Server (OMS).
Enterprise Manager Required Plug-Ins
Enterprise Manager 13c functionality is enhanced using plug-ins. These plug-ins extend the functionality of Enterprise Manager 13c and are managed by the Enterprise Manager 13c administrator. The features that collectively comprise the Enterprise Manager 13c IaaS solution are provided via several plug-ins, which must be deployed to the Enterprise Manager 13c Oracle Management Server.
By default, a new Enterprise Manager 13c installation includes the following plug-ins:
![]() Oracle Database
Oracle Database
![]() Oracle Fusion Middleware
Oracle Fusion Middleware
![]() Oracle Cloud Framework
Oracle Cloud Framework
Additional plug-ins are required to support managing IaaS. The following plug-ins must be installed (in order) prior to your configuring the Enterprise Manager 13c IaaS service:
1. Oracle Virtualization plug-in
2. Oracle Cloud Application plug-in
3. Oracle Virtual Infrastructure plug-in
4. Oracle Consolidation Planning and Chargeback plug-in
When you are upgrading the plug-ins, use the following order; upgrading them in the incorrect order could potentially cause problems with the system. Each plug-in has several internal dependencies.
1. Oracle Cloud Framework plug-in
2. Oracle Database plug-in
3. Oracle Fusion Middleware plug-in
4. Oracle Virtualization plug-in
5. Oracle Cloud Application plug-in
Deploying the Enterprise Manager Agent to Oracle VM Manager 3.4
Before the Oracle VM Manager (OVMM) system can be discovered as the manager for an Oracle VM system, the OM13c agent must be deployed to the server. This uses the normal process to push an agent to a server. In addition, if the system is running on OVMM 3.4 or later, then Oracle Virtualization plug-in version 13.2.1.0 or later must be deployed on both Oracle Enterprise Manager Server and the management agent running on the OVMM. If you are deploying against a version of Oracle VM prior to 3.4, you should follow a different process, as detailed in the documentation specific to the version of Oracle VM, which can be found at http://docs.oracle.com.
Once the agent is deployed, you need to make a change to add in the SSL key from OVMM to the agent. This allows the Enterprise Manager 13c agent to talk to OVMM using a secure method.
The first step is to show the current SSL keystore location using the command /u01/app/oracle/ovm-manager-3/ovm_upgrade/bin/ovmkeytool.sh show. The location of the WebLogic installation is also needed, which by default is /u01/app/oracle/ovm-manager-3/domains/ovm_domain for Oracle VM 3.4. The WebLogic user password is required as well. By default, it is the same password as the admin user in OVMM. When running the command, enter in the WebLogic domain directory when prompted, and use the WebLogic server name and username. The following is an example of running the command:

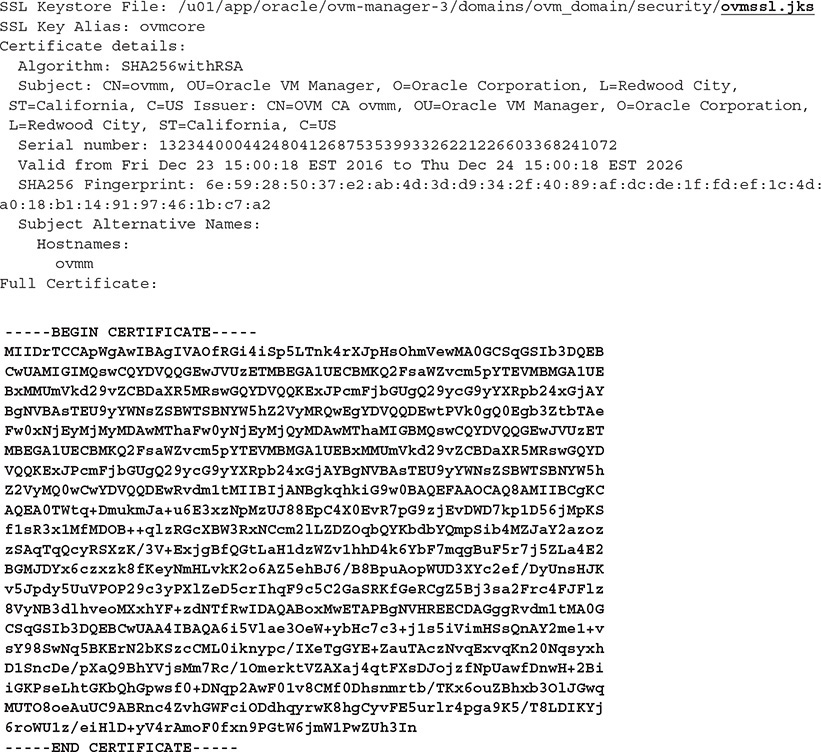

Save the output from the command because the entire SSL certificate section (in bold in the example) will need to be imported into the Enterprise Manager 13c agent. Note that there are two different keystore files:
![]() The CA keystore /u01/app/oracle/ovm-manager-3/domains/ovm_domain/security/ovmca.jks)
The CA keystore /u01/app/oracle/ovm-manager-3/domains/ovm_domain/security/ovmca.jks)
![]() The WebLogic keystore /u01/app/oracle/ovm-manager-3/domains/ovm_domain/security/ovmssl.jks
The WebLogic keystore /u01/app/oracle/ovm-manager-3/domains/ovm_domain/security/ovmssl.jks
Therefore, two certificates will be shown.
It is important to only use the certificate from the ovmssl.jks file. Copy the lines from
![]()
to
![]()
and place them into a temporary file. In the example, /tmp/ovmm_ssl.txt is used and will look like this:
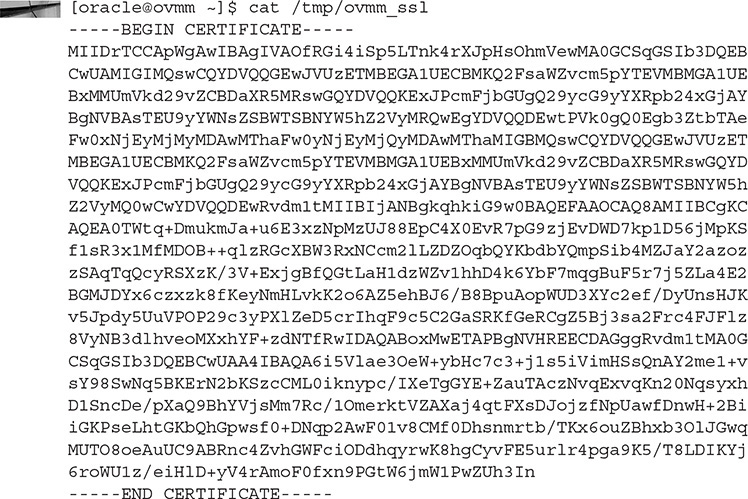
Next, this SSL key will need to be imported into the Enterprise Manager 13c agent. When prompted for a password, use “welcome” (the default password for the keystore).

Once the key is successfully imported into the keystore, the OVMM can be discovered in Enterprise Manager 13c.
Discovering the OVMM in Enterprise Manager 13c
Discovery in Enterprise Manager 13c is a straightforward task: log into Enterprise Manager 13c and navigate to Enterprise | Cloud | Oracle VM Infrastructure Home, as shown in Figure 23-2.

FIGURE 23-2. Navigating in Enterprise Manager 13c to the infrastructure home
This will show the Infrastructure Cloud home page, which will be fairly sparse of information until the OVMM is registered. To register the OVMM, select the menu option Register OVM Manager under Infrastructure Cloud, as shown in Figure 23-3.

FIGURE 23-3. Starting OVMM registration
This will start the registration process, where you will input the following information:
![]() Name This is the name you give to this OVMM system.
Name This is the name you give to this OVMM system.
![]() Monitoring AgentUse the magnifying glass icon to select the Enterprise Manager 13c agent deployed on the OVMM.
Monitoring AgentUse the magnifying glass icon to select the Enterprise Manager 13c agent deployed on the OVMM.
![]() Oracle VM Manager URL This is the secure TCP URL for the OVM Manager core (in the example, tcps://ovmm.m57.local:54322 is used).
Oracle VM Manager URL This is the secure TCP URL for the OVM Manager core (in the example, tcps://ovmm.m57.local:54322 is used).
![]() Oracle VM Manager Console URL This is the management URL for the OVMM (in the example, https://ovmm.m57.local:7002 is used). Depending on the Oracle VM version, the tcps setup is not required.
Oracle VM Manager Console URL This is the management URL for the OVMM (in the example, https://ovmm.m57.local:7002 is used). Depending on the Oracle VM version, the tcps setup is not required.
![]() Monitoring Credentials Use the admin user and password for logging into the OVMM web interface.
Monitoring Credentials Use the admin user and password for logging into the OVMM web interface.
![]() Administration Credentials Nothing is required here, unless a second account was created in OVMM.
Administration Credentials Nothing is required here, unless a second account was created in OVMM.
![]() Automatic Synchronization with Oracle VM Manager Check this to keep Enterprise Manager 13c in sync with the OVMM.
Automatic Synchronization with Oracle VM Manager Check this to keep Enterprise Manager 13c in sync with the OVMM.
A completed example is shown in Figure 23-4.

FIGURE 23-4. OVMM registration
Once everything is filled out, click Submit, and an Enterprise Manager 13c job will be submitted to register the OVMM. Once registration is complete, navigate back to the Infrastructure Cloud home page. Initially, there will not be much information, as shown in Figure 23-5. If there are existing VMs in the Oracle VM pool, you can expect to see several new targets in the Target Flux section. Enterprise Manager 13c will report these as new when they are first discovered.

FIGURE 23-5. New Infrastructure Cloud page
Over time, though, the page will show more historical information, as shown in Figure 23-6, including Charge Trend if the Chargeback feature is configured. Target Flux will also show retired VMs, which are VMs that have been deleted.

FIGURE 23-6. Infrastructure Cloud page with historial information
Summary
This chapter covered how to prepare the OVMM to be discovered by an Enterprise Manager 13c system. We discussed how to export the SSL key from OVMM and import it into the Enterprise Manager 13c agent. In addition, we covered the discovery process of the OVMM, and you learned how to add the OVMM system to Enterprise Manager 13c. In the next chapter, you will learn how to use Enterprise Manager 13c to perform several common tasks on the OVMM system.