

CHAPTER
2
Creating the Database
In Chapter 1 we introduced the new Oracle 12c Database Multitenant option. It is interesting that we still reference this as new—the fact is, even though it was introduced in 2013, many DBAs and organizations have not started using this technology yet. In learning new technologies, many DBA’s most effective approaches include starting simple. The acronym KISS—Keep It Simple Stupid—is still in many cases the best approach. In this chapter, we will follow such an approach to help you lay a good foundation for the world of Oracle Database 12c Multitenant, which, as you will see, scales in complexity rather quickly.
As with earlier versions, there are many ways to create an Oracle Database, and some might expect that experienced, hardcore DBA would naturally favor the command line. But you might be surprised to learn that many of them actually make use of graphical interfaces, whether it is the well-known Database Configuration Assistant (DBCA) or Oracle Database Express, and Cloud Control for the larger configurations. In this chapter, we will cover two key topics:
![]() Creation of the container database (CDB)
Creation of the container database (CDB)
![]() Creation of pluggable databases (PDBs)
Creation of pluggable databases (PDBs)
Creating a Container Database (CDB)
Before we dive into the CDB creation steps, we need to discuss a few crucial introductory topics that will assist you in gaining a better understanding of what happens when you create a CDB database with one or more PDBs. As detailed in Chapter 1, when you create a CDB, you end up with at least two containers: the root container (CDB$ROOT) and the seed container (PDB$SEED).
In most Oracle configurations nowadays, two main storage options are used for database files: Automatic Storage Management (ASM), which is highly recommended, or the traditional file system–based storage. In earlier versions of the Oracle Database, many system administrators were kind of scared to use ASM; because database files were not easily viewable, they felt they had no control over them. However, times have changed, and with ASM’s improvements and its excellent feature set, it has now been widely adopted. In this chapter, therefore, both options will be discussed in conjunction with creating a CDB and PDBs. For more detail on the use and configuration of ASM, review the Oracle documentation.
What About OMF?
Oracle Managed Files (OMF) is an option that charges Oracle with the responsibility for database file naming, and in a multitenant environment it is highly recommended. For those unfamiliar with OMF, this may sound dangerous, but there is no need for alarm, because it is an easy-to-use and proven option that can make a DBA’s life a lot easier.
Imagine creating a tablespace. Traditionally, you would have to specify the full path and name of the datafile you are creating. But with OMF, you can simply state that you want a file of a specific size for the tablespace, and the naming of the file will be taken care of for you. An example of the file structure and naming in an OMF-enabled environment is shown in Figure 2-1.

FIGURE 2-1. Example OMF directory structure
To the uninitiated, this might take some getting used to. Note especially the subdirectory naming for the PDB. When you’re working with OMF, a long hash is used as a subdirectory name for the PDB datafiles, which in this example is 2B11F0C3A0262FF6E053E902000A0D8A.
Where does this come from, and what does it mean? If you review V$CONTAINER from the CDB$ROOT, you will notice that the value used for this directory name is in fact the GUID value for the pluggable database. In short, the OMF directory structure takes the following format:
![]()
![]()
Again, when using ASM, it is recommended that you use OMF. This brings us to the next step—the creation of the CDB.
CDB Creation Options
A number of different methods are available for creating the CDB, but the most popular—and the recommended—method is to use the DBCA. For those interested, it is possible to create the CDB manually by running a number of SQL statements, and this option will be outlined in the next section.
The DBCA is an extremely powerful tool for creating databases, both via its GUI and with its lesser known command line (CLI) option. First, let’s take a look at creating a CDB using the GUI.
Using the DBCA GUI
Over the years, the DBCA has become a much more reliable and stable tool, and it is a widely accepted and trusted method for creating new Oracle databases. A number of options are available that would require a book of their own to document, so we will focus instead on those key aspects related to the Multitenant option.

NOTE
It is recommended that you have a default listener already configured on the database server where you will be running the DBCA.
The first step is to start the DBCA by issuing the dbca command to invoke the executable located in the $ORACLE_HOME/bin directory. Once DBCA starts, you will see the GUI, as shown in Figure 2-2.

FIGURE 2-2. DBCA step 1: Create a database
NOTE
A number of the DBCA options (such as Delete Database) will be available only if DBCA detects at startup that the system is already running at least one other Oracle Database.
Typical Configuration To create a new database, select the Create A Database option, and click Next.
The next screen presents more detail (Figure 2-3) and two options: Typical Configuration or Advanced Configuration. In most cases choosing Typical Configuration is sufficient, but if you are more familiar with the Oracle Database and need to configure advanced options, such as memory allocations, choose Advanced Configuration.

FIGURE 2-3. DBCA—Typical Configuration steps
The first example discussed will show the Typical Configuration steps.
Seven steps are highlighted in Figure 2-2:
1. Provide the default Global Database Name—in this example, CDB2.orademo.net.
2. For Storage Type, specify whether you want to use filesystem-based storage or ASM. Here, we chose ASM.
3. The default Database Files Location is ASM disk group +DATA (note that these disk groups must exist prior to running the DBCA).
4. The Fast Recovery Area (FRA) is updated to point to the +FRA disk group.
5. The Administrative Passwords in this configuration will be used for all administrative users, such as SYS, SYSTEM, and PDBADMIN (the local administrator user for the PDB).
6. For multitenancy this is an important step: select the Create As Container Database option, and provide a name for the single default PDB that will be created for you.
7. Click Next to continue.
From here, the summary screen is displayed, providing an opportunity to review the options. Click Finish to start the database creation process. You will be presented with a progress page that updates on the stages of the database creation process steps until complete.
You probably noticed references to the PDBADMIN user. This is the local admin user created during PDB creation. This user will be assigned the PDB_DBA role by default. The PDBADMIN user and PDB_DBA role by default have no assigned privileges.
Later in the chapter, when we create PDBs using SQL*Plus, the ROLES clause is provided as part of the PDB creation statement. This clause is used to specify the roles you want to assign to the PDB_DBA role locally in the PDB. The PDBADMIN user does not have to be called PDBADMIN, but in most cases this is the default name. For more detail on LOCAL and COMMON users, see Chapter 6.
Advanced Configuration If you selected Advanced Configuration in Step 2, you’ll see additional options, and the number of steps increases from 5 to 14. These are easy to follow, but we want to highlight Step 4, where you will be presented with a screen similar to that shown in Figure 2-4.
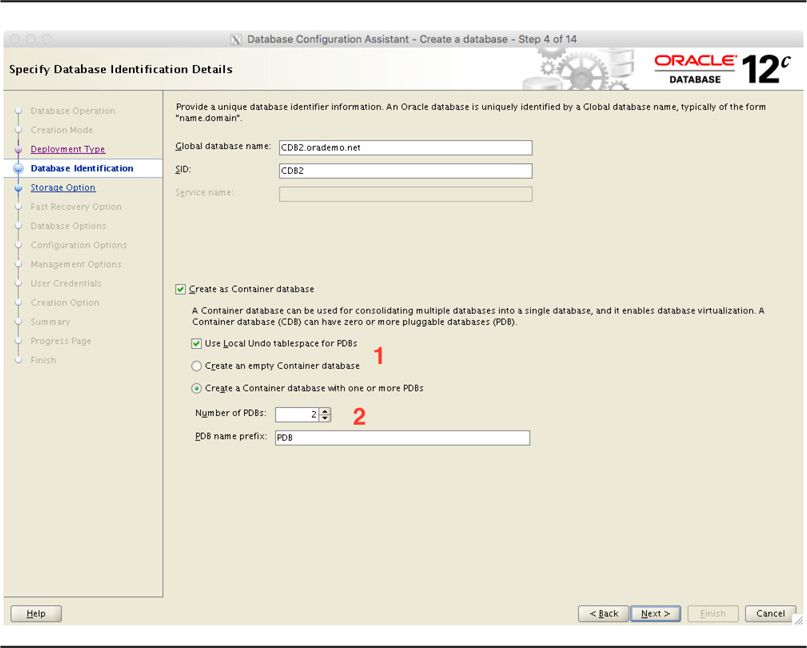
FIGURE 2-4. DBCA—Advanced Configuration
Here you can specify the Global Database Name as well as the option to create a CDB and any PDBs, as highlighted by 1 and 2. Note that you can specify the number of PDBs to be created, and a prefix will be used if more than one PDB will be created. You will also have the option from 12.2 to specify if you want to use Local UNDO tablespaces for the PDBs. This is a new feature introduced in 12.2 allowing PDBs to store their undo records in a local UNDO tablespace. For more detail please see Chapter 8.
NOTE
In 12.1.0.x, the maximum PDBs per CDB is 253 (including the PDB$SEED). In 12.2.0.x, the limit was increased to a maximum of 4K (4096) per CDB.
The end result is that we have a CDB called CDB1, which includes the CDB$ROOT, PDB$SEED, and two additional PDBs, PDB1 and PDB2, which will be based on the seed pluggable database.
NOTE
The default templates used during the creation of a database are located in: $ORACLE_HOME/assistants/dbca/templates.
Using the DBCA CLI
Sometimes working with a GUI isn’t possible, such as when you need to perform an installation and database creation via a remote connection and the network bandwidth is inadequate, or the connection is extremely slow. Don’t be alarmed, because there are options available to you. One is to perform a silent, or unattended, installation using a response file, and a similar approach can be followed when creating a database. Another is to use the DBCA CLI and the -silent parameter, which invokes the same executable as the GUI via the -silent parameter, but presents the command line alternative. This is not a black box operation, because output is pushed to screen, and if you are interested in the details, you can interrogate the log files generated by this process.
The default character set (AL32UTF8) should be sufficient for most database implementations, but this can be adjusted, as required.
Response File Format Change There are some small differences between Oracle 12.1.0.x and 12.2.0.x with respect to the DBCA utility, including the use of response files. The latter actually features a new response file format, which will be a change welcomed by many.
On review of the sample response files, you will notice that the 12.1.0.x version of the response file makes use of grouping or sections, noted in square brackets—for example, [CREATEDATABASE]. These are used to identify the command being executed. This was improved in 12.2.0.x so that the response file contains only key-value pairs, and the command to be executed is passed to the dbca utility as an additional argument, such as dbca -createDatabase -responseFile.
Following is an example of a response file that can be used in 12.1.0.x. It will create a new CDB database called CDB1 with one PDB called PDB1, using the General Purpose template. The database uses ASM as the default storage type:
![]()

If you do not specify values for at least one of the key commands (createDatabase, createTemplateFromDB, or createCloneTemplate) in the 12.1.0.x release response file (such as [CREATEDATABASE] as shown on line 4 of the preceding example), you will receive an error when running the dbca command—as per the following output, which indicates that at least one of these key commands must be configured:
![]()

DBCA, Response Files, and 12.2.0.x Using the silent option of the DBCA—that is, running it from the command line without starting the GUI—can be a big time-saver and is finding increased favor. And, as mentioned earlier, the CLI for the DBCA makes use of the same dbca executable. A substantial amount of detail is provided when executing the dbca command with the -help argument, and in 12.2.0.x the output is better structured and easier to read, compared to the initial 12.1.0.x release. You can add the -help flag to provide a detailed listing for the specific command you are interested in. For example, running dbca -createDatabase -help triggers a full and detailed listing of the available options for this command.
Using Response Files There are two ways to use the CLI. The first is with a response file, which is similar to using a response file for the database software installation.
NOTE
A sample response file that can be customized and used with the DBCA utility to create databases is provided as part of the database software installation at $ORACLE_HOME/assistants/dbca/ and is called dbca.rsp. Focusing on the uncommented lines is a good starting point.
Alternatively, you can create, or save, your own response file based on the steps you perform in the DBCA interface. You may have noticed at the end of the configuration process an option to generate a response file based on all your selections and input. This is a quick-and-easy way to create one of these files to meet your requirements.
NOTE
When using a response file, you do not have to assign values to all parameters. Most parameters have default values, which will suit most configurations and can be used without modifications.
Let’s look at two examples of using response files to create two CDB databases.
Example 1: Create CDB with two PDBs (ASM and OMF)
Here, we’ll create a container database called CDB1 with two PDBs: PDB1 and PDB2. The Oracle-supplied template General_Purpose.dbc is used, and the database will be located in ASM with OMF enabled, using disk groups +DATA and +FRA. The key parameters specified in the response file are
![]() createAsContainerDatabase = true
createAsContainerDatabase = true
![]() numberOfPDBs = 2
numberOfPDBs = 2
![]() pdbAdminPassword = Password12345
pdbAdminPassword = Password12345
![]() pdbName = PDB
pdbName = PDB
It is recommended that the passwords for the SYS, SYSTEM, and PDBADMIN accounts conform to Oracle standards. If you do not specify these in the response file, the user will be prompted for them on execution of the dbca command, because they are mandatory. The values specified in the response file are summarized as follows (in alphabetical order):
![]()

The command to execute the DBCA using the response file in silent mode is
![]()
![]()
![]()
![]()
Example 2: Create CDB with one PDB (FS and non-OMF)
Now let’s create a container database, CDB1, with one PDB called PDB. The Oracle supplied template General_Purpose.dbc is used. The database uses normal file system–based storage, without OMF. The database files will be located in /u01/app/oracle/oradata with a FRA (recovery area destination) located at /u01/app/oracle/fast_recovery_area. The values specified in the response file are summarized as follows (in alphabetical order):
![]()

If the numberOfPDBs=1, then the pdbName parameter will be taken as the actual name of the PDB. So in example 2, the PDB name would be PDB. However, if the numberOfPDBs is greater than 1, the pdbName parameter is used as a prefix for the PDBs that will be created. For example, if numberOfPDBs=3, the end result will be PDB1, PDB2, and PDB3, which will be created from the default PDB$SEED. The command used to execute the DBCA, using the response file cdb2.rsp in silent mode is shown here:
![]()
![]()
The end result of the command is a CDB database with one PDB, located on file system–based storage with archive logging enabled. For more details, you can always review the log files generated under the cfgtoollogs/dbca subdirectory located in the $ORACLE_BASE location.
To remove a running database, such as CDB1, dbca can be used: dbca -deleteDatabase -sourceDB CDB1 -silent. But be careful when invoking this command on a running instance, because it will shut it down and remove all datafiles. But the most important part: it will remove all the datafiles and it will remove any known backups. This might not be your desired outcome when executing this command.
Using the DBCA CLI Without Response Files Instead of using a response file, which contains all the options, you can specify the key-value pairs as arguments to the dbca executable. Let’s take the first example from earlier to see how this works. Using the values in the response file, we can rewrite this as follows. (To make it easier to read, the format with the line delimiter is used.)
![]()
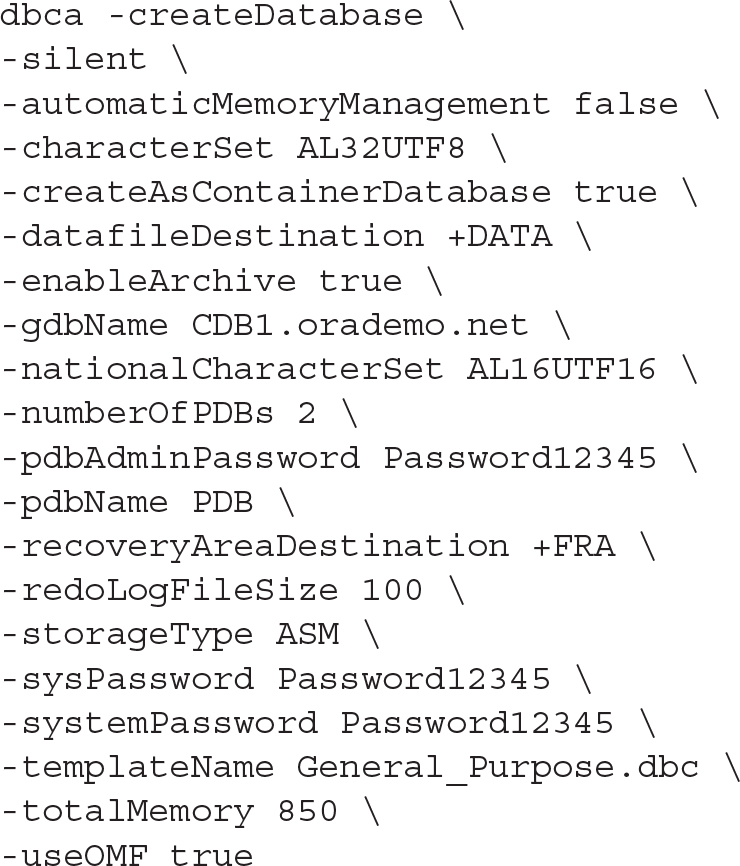
This method of creating a CDB database works in both 12.1.0.x and 12.2.0.x; however, a small number of options such as -enableArchive and -useOMF are not available in 12.1.0.x. This method is a quick-and-easy way to establish container databases along with a number of required pluggable databases.
Using SQL*Plus
If you are looking at creating customized configurations, particularly when certain database options are not required in the database, using SQL*Plus might be a good option. However, before doing this, you should first take note of the options provided by the DBCA—and this is where the DBCA CLI can be extremely useful. You can actually use the -generateScripts option to let the DBCA create scripts for you, and then review and update them before executing them manually. If we take the earlier CDB1 database creation example, you would add -generateScripts and scriptDest to the command, which will result in the database creation scripts being created in the /u01/app/oracle/admin/CDB1/scripts directory:
![]()

You can then review or update these settings and remove options, for example, if needed. Then simply execute the CDB1.sh master script created in the designated scripts folder to invoke the process. This is an easy way to prepare the database creations scripts, but let’s review some of the manual processes at a high level.
The steps to create a CDB database using SQL*Plus may look similar to what you would have performed for non-CDB databases, but a closer look at the details reveals a number of new options—or steps—to be performed when creating a CDB. At a high level these are as follows:
![]() Create a password file -
Create a password file - orapw<SID>.
![]() Create a parameter file - init<SID>.ora.
Create a parameter file - init<SID>.ora.
![]() Set the parameter enable_pluggable_database=TRUE.
Set the parameter enable_pluggable_database=TRUE.
![]() Start the new instance using the parameter file.
Start the new instance using the parameter file.
![]() Execute the CREATE DATABASE statement.
Execute the CREATE DATABASE statement.
![]() Include the ENABLE PLUGGABLE DATABASE clause.
Include the ENABLE PLUGGABLE DATABASE clause.
![]() Create the database catalog and options required.
Create the database catalog and options required.
The following example will take you through the high-level steps to create a CDB manually using SQL*Plus.
Example: Creating a CDB Using SQL*Plus In this example, a CDB database called CDB2 will be created using SQL*Plus. The database will be using Oracle ASM as default storage with disk group +DATA as the primary location for the database files and disk group +FRA for the recovery area.
Step 1: Prerequisite steps
If you are using role separation when installing your Oracle Database software, which means the Grid Infrastructure (GI) is installed as a different user, such as grid, and the database software is installed as the oracle user, for example, and if you have not created any databases yet, ensure that you set the correct permission on the Oracle executable inside the Oracle Database software home to allow access to ASM storage. In most cases, the ASM disks would be owned by the grid user with the default group set as asmadmin.
Oracle has made this easier for you by introducing the setasmgidwrap in 11g, and it is still available and used in Oracle Database 12c. This utility is located in the GI home and should be executed while logged in as the grid user. An example of the command to be executed is shown next:
![]()

As part of the prerequisite steps, make sure you create the required directories, as follows:
![]()

If you are using ASM storage create the required base directory for the database in the ASM disk groups. This can be done in a number of ways, one of which is to run these two SQL statements while connected to the ASM instance:
![]()

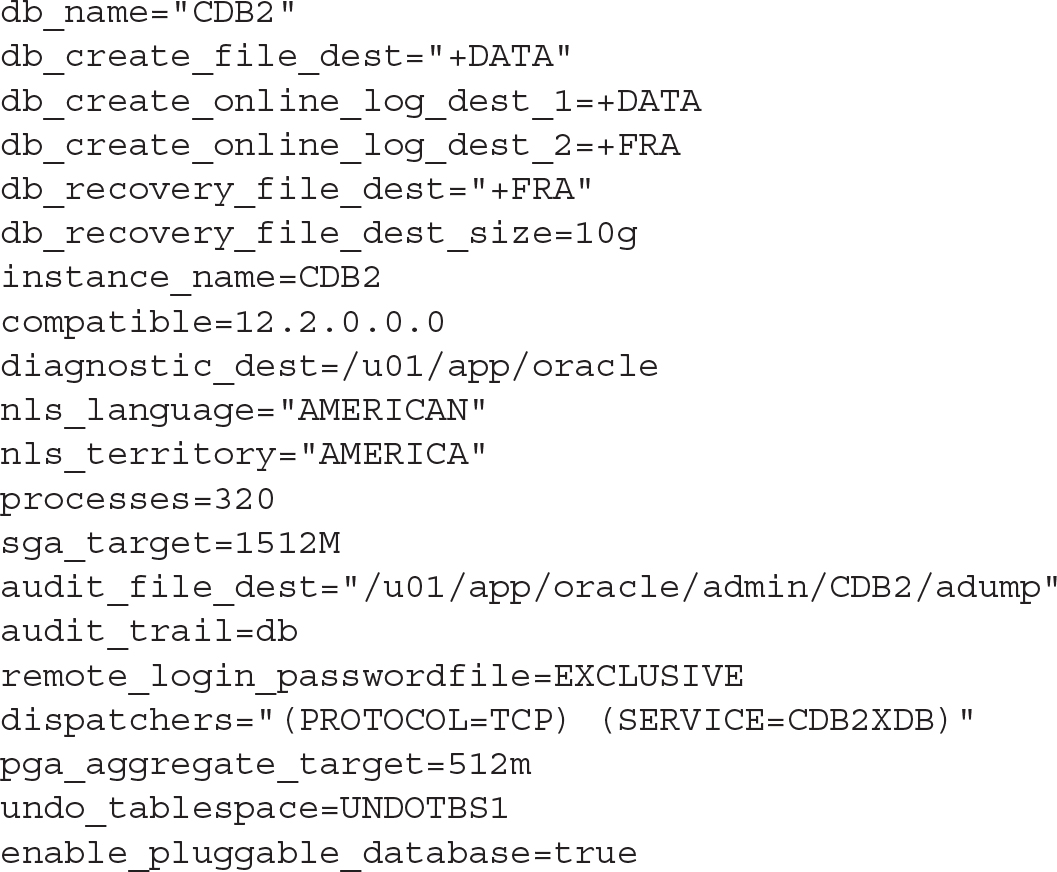
Step 2: Create a basic parameter file
Remember that some values can easily be adjusted following the creation of the CDB, and therefore in most cases it is recommended that you start with a basic parameter file. Then, once you have the database up and running, you can adjust the values as required.
Because we are creating a CDB database, it is important to ensure that the enable_pluggable_database=TRUE is specified in the parameter file. As mentioned earlier, this database will be making use of ASM. Note that the control file parameter values will be added once the database is created. The parameter file initCDB2.ora is created with the options that follow and saved in the $ORACLE_BASE/admin/CDB2/pfile/ directory.
![]()

![]()
Step 3: Update /etc/oratab file
This step is optional, but if you are using UNIX-based systems, updating the oratab file is highly recommended. This will make it easy for you to switch between database environments, especially if you have multiple Oracle Database software installations on the same system.
On Oracle Linux, the oratab file is located at /etc/oratab. The following entry is added for the CDB2 database:
![]()
![]()
Once you have added the entry, you can make use of the oraenv utility to set the correct environment. Run the command . oraenv, and when asked to provide the ORACLE_SID, specify CDB2. You will notice that the required environment variables such as ORACLE_HOME will now be set. Here’s an example:
![]()

Step 4: Set the correct environment for the catcon.pl script execution
This brings us to an interesting point: the catcon.pl script. This script will be discussed in more detail at the end of this chapter.
As of 12.2.0.x, the default Perl version that is shipped with the Oracle Database software is 5.22.
The following commands are executed to set the correct PATH and PERL5LIB environment variable values:
![]()

Step 5: Create a password file
There are a few new options introduced in Oracle Database 12c, including a new password file format:
![]()
![]()
Step 6: Start the Database instance in nomount state with pfile
Start the database using the parameter file created in Step 2 in a nomount state:
![]()

We now get to the CREATE DATABASE statement, and because we are using OMF, there is no need to specify datafile names and locations. The key words to notice are ENABLE PLUGGABLE DATABASE.
![]()

If you’re using non-OMF, the SEED FILE_NAME_CONVERT parameter can be used to specify a location for the PDB$SEED datafiles—here’s an example:
![]()

NOTE
When you’re creating a CDB database, always make sure you specify high enough value for MAXDATAFILES.
When executing the CREATE DATABASE statement, you can ignore the following error: “ORA-06553: PLS-213: package STANDARD not accessible.” This occurs because catalog objects have not been created yet.
Notice the control files created after the CREATE DATABASE statement. You will need to update the parameter file to include their location and names. Use show parameter control_files to obtain the created control file names. In this example, the control files were
![]()
![]()
and
![]()
![]()
The following can be used to add the control file names to the parameter file:
![]()

NOTE
The SEED pluggable database (PDB$SEED) is created as part of the CREATE DATABASE statement. The sql.bsq is executed, which will run dcore.bsq twice—once for the root container and once for the SEED container. This was noted when we reviewed the alert log during database creation and reviewed the dcore.bsq script.
Step 7: Add default USERS tablespace
Here’s how to add a default USERS tablespace to the CDB$ROOT:
![]()

Step 8: Open the PDB$SEED pluggable database
We are now getting to one of the interesting parts—the SEED database. To enable you to open or close the SEED database, you have to alter the session and set _oracle_script=true;. Once this is done, you will be able to close and then open the SEED database:
![]()

Once this is done, both the ROOT and SEED containers will be open read/write, allowing you to continue creating the database catalog and loading the required options.
Step 9: Create catalog and load options—catcdb.sql
The next step is to run the catcdb.sql script located in $ORACLE_HOME/rdbms/admin. This script will make use of the catcon.pl script and will create the catalog and load the default options.
NOTE
The catcdb.sql script was missing in the initial 12.1.0.1 release and was later added as part of the pat set updates—12.1.0.1.4 DB PSU and higher.
The catcdb.sql script can be run as follows (using the SYS user):
![]()
![]()
This script can take a long time to run. It will ask for the SYS and SYSTEM users’ passwords and run the required scripts to create the catalog and load the default options. If you do require or want to customize the CDB options loaded, you can use the catcon.pl script to create the catalog and load the required options. The bare minimum recommended (options) for a CDB environment is to run the catalog.sql, catproc.sql, and catoctk.sql scripts. An example execution of one of these scripts is shown here:
![]()

These are the minimum recommended options, but for most configurations, it is highly recommended that you use the catcdb.sql script and load all the default options such as Oracle JVM and Oracle Text.
If you want more information on loading only certain options, review MOS note 2001512.1
Step 10: Lock/expire all unused accounts (optional)
From a security point of view, it is recommended that at this stage you lock all accounts that will not be used. This should be done in the CDB$ROOT as well as the PDB$SEED. To perform these tasks on the PDB$SEED, follow these high level steps:
![]()

Next, run the required commands to lock unused users in the CDB$ROOT, followed by locking the required users in the PDB$SEED as well. This can be done by first setting the container to PDB$SEED:
![]()
![]()
Once the required commands to lock unused users in the PDB$SEED were executed sucessfully, you can set the container back to CDB$ROOT:
![]()
![]()
You can also close the PDB$SEED at this stage if required:
![]()

This gives you some insight into how you can customize the PDB$SEED pluggable database.
Step 11: Create a spfile from the pfile created in Step 2
One of the final steps is to create a server parameter file (spfile) from the parameter file you created in step 2. This is the command:
![]()

The spfile can also be created inside ASM:
![]()

In this example, the end result is a spfile being created in +DATA/CDB2/PARAMETERFILE/ spfile.268.903390805.
Step 12: Recompile all invalid objects
This is a highly recommended option and should be a well-known step to most DBAs. This script we are referring to is utrlp.sql. It is recommended that you make use of the catcon.pl script to ensure that you run this against the CDB$ROOT as well as the PDB$SEED, which at this stage is the only pluggable database in the CDB2 database.
Step 13: Optional—Add the database to Oracle Restart
This last step is optional. If GI is installed, you can make use of Oracle Restart. This enables the option to start or stop the database as part of a system restart. If offers a number of other advantages, but these are probably the most well-known reasons for using Oracle Restart.
The srvctl command is used to perform these tasks:
![]()

Step 14: Create a pluggable database
At this stage, we haven’t created a CDB database, which includes the root and the SEED pluggable database. Before getting into the details in the next section, we can list the basic CREATE PLUGGABLE DATABASE statement here for completeness of the example:
![]()

This will create the PDB called PDB1 based on the PDB$SEED PDB. Once created, the PDB will be in a mounted state. To open it, execute the following:
![]()
![]()
The next section continues with the options for creating the PDB. Note that if you were following the DBCA options discussed earlier, you can create PDBs as part of the CDB creation. This is one reason why using the DBCA is highly recommended and used by most DBAs: it takes away most of the complexities and helps keep it simple.
Creating a Pluggable Database
Instead of jumping straight into the PDB creation process, let’s take a look at the surroundings and context before diving into the details.
In a minimal Oracle PDB creation, you end up with only the CDB$ROOT and PDB$SEED PDBs. This is probably the best way to start. Why? Imagine, for example, that you are planning to create 50 PDBs and want them all to look exactly the same. You could create a simple golden image first, and then, when you need more databases, simply clone the golden image to create any new ones.
You can create new pluggable databases using a variety of tools:
![]() SQL*Plus
SQL*Plus
![]() Database Configuration Assistant (DBCA)
Database Configuration Assistant (DBCA)
![]() SQL Developer
SQL Developer
![]() Oracle Enterprise Manager Database Express
Oracle Enterprise Manager Database Express
![]() Oracle Enterprise Manager Cloud Control
Oracle Enterprise Manager Cloud Control
In Chapter 9, we will cover plug-in and plug-out, conversions from non-CDB to PDB, cloning, and a number of other options used to create pluggable databases. We will also discuss the new proxy PDB option introduced in release 12.2. In this chapter, the focus will be on helping you get started in creating PDBs using two basic methods:
![]() Create a new PDB from the CDB SEED (PDB$SEED) This is used mainly for new configurations. A PDB is created based on the template SEED database called PDB$SEED, which resides inside the same CDB. This method is fast, easy, and seems almost instantaneous.
Create a new PDB from the CDB SEED (PDB$SEED) This is used mainly for new configurations. A PDB is created based on the template SEED database called PDB$SEED, which resides inside the same CDB. This method is fast, easy, and seems almost instantaneous.
![]() Clone a PDB within the same CDB (also known as the local clone method) This can be extremely useful in many scenarios, such as cloning an application PDB to create a secondary PDB on which you can test upgrade scripts prior to executing them the production PDB. There are a number of requirements when using this method, including that the cloned PDB name must be unique within the same CDB.
Clone a PDB within the same CDB (also known as the local clone method) This can be extremely useful in many scenarios, such as cloning an application PDB to create a secondary PDB on which you can test upgrade scripts prior to executing them the production PDB. There are a number of requirements when using this method, including that the cloned PDB name must be unique within the same CDB.
Create a New PDB from PDB$SEED
This method, as illustrated in Figure 2-5, is a quick and easy way to create a PDB based on PDB$SEED. During this process, the new PDB is generated by creating a copy of the PDB$SEEED, which should be in read-only mode.

FIGURE 2-5. Create A PDB from PDB$SEED
When using OMF, the process is simplified, and a basic CREATE PLUGGABLE DATABASE command like the following can be used to create a PDB from the CDB SEED:
![]()

The end result of this statement is the creation of PDB1, a copy of the CDB SEED—PDB$SEED. The default PDB administrator is created as PDB1ADMIN, and the default role, assigned locally to the PDB_DBA role, is CONNECT. A number of additional clauses can be used with the CREATE PLUGGABLE DATABASE statement and provide the ability to specify a number of customization options for the newly created PDB. Some of the key clauses include these:
![]()
AS APPLICATION CONTAINER
![]()
AS CLONE
![]()
AS SEED
![]()
CREATE_FILE_DEST
![]()
DEFAULT TABLESPACE
![]()
FILE_NAME_CONVERT
![]()
HOST
![]()
PORT
![]()
NOCOPY, COPY, MOVE
![]()
NO DATA
![]()
PARALLEL
![]()
ROLES
![]()
SNAPSHOT COPY
![]()
SOURCE_FILE_DIRECTORY
![]()
STANDBYS
![]()
STORAGE
![]()
TEMPFILE REUSE
![]()
USER_TABLESPACES
NOTE
Throughout this book we will reference a number of these clauses, but for full details on each, refer to the “Oracle Database SQL Language Reference” for Oracle Database 12c Releases 1 and 2.
The CREATE_FILE_DEST clause can be specified as part of the create statement if you want to overwrite the default OMF location, which is specified by the CDB’s DB_CREATE_FILE_DEST instance parameter. For example, if the requirement is to place the PDB on a different ASM disk group called +PDBDATA, the CREATE PLUGGABLE DATABASE statement can be adjusted as follows:
![]()

The end result will be that an OMF file structure will be created in the disk group +PDBDATA. So, for example, after the command is executed, PDB1 was created with CON_ID=4:
![]()

If OMF is not used, the FILE_NAME_CONVERT parameter must be included when creating a new PDB from the CDB SEED. Creating a new PDB1 in a CDB, which does not make use of OMF, is illustrated next:
![]()

The end result here is that the new PDB is created as a copy of the PDB$SEED, and its files are located in the directory /u01/app/oracle/oradata/CDB2/pdb1.
Before moving on to the next section, let’s have a look at a slightly more complex case using a number of the clauses available in the create statement:
![]()

Breaking down the example, observe the following:
![]() We are creating a new PDB called PDB2.
We are creating a new PDB called PDB2.
![]() The PDB admin user is called PDB2ADMIN and a password is supplied.
The PDB admin user is called PDB2ADMIN and a password is supplied.
![]() The CONNECT role is assigned to the local PDB_DBA role.
The CONNECT role is assigned to the local PDB_DBA role.
![]() The
The FILE_NAME_CONVERT clause is specified to ensure that the new PDB subfolder pdb2 is used.
![]() A new default permanent tablespace is created for the new PDB, the data file name is specified, and the size of this file is 10M with the option to grow to 20G.
A new default permanent tablespace is created for the new PDB, the data file name is specified, and the size of this file is 10M with the option to grow to 20G.
![]() The STORAGE clause is used to limit the size of the PDB to a maximum size of 100G, and only a maximum of 5G shared temporary space can be used by this PDB.
The STORAGE clause is used to limit the size of the PDB to a maximum size of 100G, and only a maximum of 5G shared temporary space can be used by this PDB.
Create a New PDB Using the Local Clone Method
The second method is creating a new PDB using the clone option (see Figure 2-6) from a local PDB located in the same CDB. This method is also referred to as creating a local clone.

FIGURE 2-6. Create PDB2 from PDB1 (clone PDB1)
When using this approach, take note of the following:
![]() If using version 12.1.0.x, the source PDB must be in a read-only state. (As of 12.2.0.x, the source PDB can be open, as long as the CDB is in ARCHIVELOG mode with local UNDO enabled.)
If using version 12.1.0.x, the source PDB must be in a read-only state. (As of 12.2.0.x, the source PDB can be open, as long as the CDB is in ARCHIVELOG mode with local UNDO enabled.)
![]() Each PDB in a CDB must be uniquely identifiable.
Each PDB in a CDB must be uniquely identifiable.
![]() Once the clone is complete, the new PDB must be opened read-write at least once to allow further operations.
Once the clone is complete, the new PDB must be opened read-write at least once to allow further operations.
When using the local cloning process, the datafiles of a source PDB (which is in a read-only state in 12.1.0.x) are read and then copied to a new uniquely identifiable PDB.
Performing a local clone in an OMF environment is easy and can be done without any additional clauses being specified. For example, to create a new PDB5 database as a clone from PDB1 in CDB1, we can execute the following two statements, cloning and then opening the new PDB in read-write mode:
![]()

When using a non-OMF environment, the create statement needs to include the additional FILE_NAME_CONVERT clause, as follows:
![]()

Create a PDB Using SQL Developer
As mentioned in a previous section, a number of tools can be used to create PDBs. One of the utilities that is growing rapidly in popularity, and we highly recommend it if you have not tried it, is Oracle SQL Developer (Figure 2-7).

FIGURE 2-7. Oracle SQL Developer
This example will use SQL Developer to create a PDB called PDB1 from the CDB1 SEED.
1. Log into the CDB (CDB1) as the SYS user by establishing a connection to the database under the DBA option on the bottom right of the main SQL Developer screen. Once connected, various administration options and areas will be listed, with the first one being Container Database. In this example, as shown in Figure 2-7, no PDBs have been created, so the CDB1 database contains only CDB$ROOT and PDB$SEED.
2. Right-click Container Database, and you will be presented with a number of options, as shown in Figure 2-8. Select Create Pluggable Database.

FIGURE 2-8. Create the PDB.
3. In the next screen, add a new PDB name, Admin Name, and Password, and specify any storage requirements. As shown in Figure 2-9, a number of options are available with regard to the storage configuration. In the example, we will leave them set to the defaults, supplying only the new PDB name PDB1, and the admin username and password. As OMF is used in this configuration, the File Name Conversions are set at the default, None.

FIGURE 2-9. Create PDB properties.
4. Optionally, review the SQL tab shown in Figure 2-10.

FIGURE 2-10. Review the SQL statement.
5. Click Apply and the new PDB will be created. If you now refresh the screen you will see that the new PDB1 is displayed under the Container Database folder. As shown in Figure 2-11, when you select PDB1, more information about the PDB is displayed on the right side of the screen. We can see that the PDB is currently MOUNTED and not yet open read-write.

FIGURE 2-11. Review the PDB status.
6. Open the newly created PDB read-write by selecting and right-clicking the PDB. Choose Modify State, and a new screen will enable you to set the PDB to a specific open mode (state)—see Figure 2-12.

FIGURE 2-12. Modify the PDB state.
7. Choose the required state from the State Option drop-down list (READ WRITE, READ ONLY, RESTRICTED), and click Apply.
Create a PDB Using the DBCA
You can also use the DBCA to create new PDBs. As with the creation of CDBs, there are two options for doing this: the GUI or the CLI.
When using the DBCA GUI, you are presented with the option of creating a PDB, along with other options. Figure 2-13 shows these options on the DBCA opening screen.

FIGURE 2-13. DBCA—Manage Pluggable Database
Choose Manage Pluggable Databases and you will be guided through a eight-step process to create a new PDB.
Using the DBCA is a straightforward method in which you click through a number of screens and provide basic input required to create a new PDB. But if you are looking at creating a new PDB from the CDB SEED, using SQL*Plus, SQL Developer, or the DBCA CLI (shown next) might be a much faster way to achieve this.
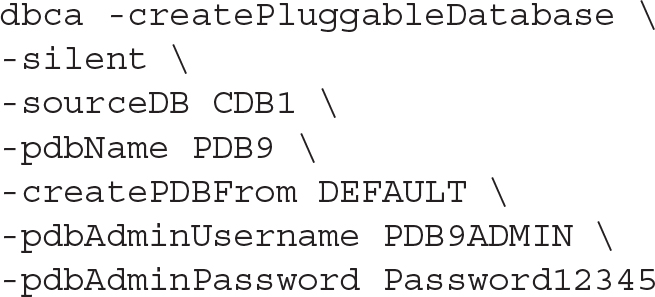
When using the DBCA CLI, you can use the -createPluggableDatabase command option. As mentioned earlier, using the -help keyword with this option will display all the available arguments. Following is a basic example that demonstrates the creation of a PDB database called PDB9 in a CDB called CDB1, which uses ASM and OMF:
![]()
Create a PDB Using Cloud Control
Another option for creating ODBs is Enterprise Manager Cloud Control. Using this method is straightforward, because the tool will guide you through the process. From the Oracle Database drop-down menu path, navigate to Provisioning, and then select the Provision Pluggable Databases option. This will start the process of creating a PDB. Figures 2-14 and 2-15 show the start of the wizard-driven process that assists in creating a PDB.

FIGURE 2-14. Choose Provision Pluggable Databases

FIGURE 2-15. Creating a new PDB
For more information on using Cloud Control, refer to the online documentation for EM Cloud Control 13c.
Using the catcon.pl Script
Imagine that you have a CDB with 100 PDBs, and each database is used for the same application, but by 100 different customers, so that each has its own copy of the data. These might be production customers, or perhaps the end customer is 100 developers, again each with his or her own copy of the application database (PDB). The application vendor issues an update script to be executed against every PDB to upgrade to the latest application version.
This entails running a single script, which could be either basic or complex, on each of these PDBs. Needless to say, this can be a time-consuming job, perhaps alleviated only by writing some clever additional scripts to assist with the process. But before you launch into such efforts, the good news is that this is no longer necessary, because Oracle Database 12c provides a Perl-based script that can assist with precisely these types of operations!
It is to be expected that some DBAs may be reluctant to use this script, but you can be confident that this is a well-tested method and piece of code. Furthermore, if you look closely at the DBCA and the scripts it invokes against a CDB, you will notice that Oracle has actually implemented the use of the catcon.pl script in its own processes. This is now a critical component under the hood of the DBCA, and it is key in the process of creating and upgrading Oracle databases.
Before we look at some examples, let’s first highlight some of the key requirements, along with a summary of the commands and arguments, used by the catcon.pl script. Perhaps most importantly, before executing this script, ensure that you update the PERL5LIB and PATH environment variables, and both of these should include the $ORACLE_BASE/rdbms/admin path. Here’s an example:
![]()

Once these are set, you are ready to begin using the catcon.pl script. The next consideration is the key input flags used by this script. You need to be aware, first of all, that there are two mandatory argument requirements:
![]()
-b log-file-name-base The first option -b takes a parameter that specifies the base name that will be used for the log files that will be generated when the catcon.pl script is executed.
![]()
--<sqlplus-script> The second option is the name of a SQL*Plus script that should be executed.
Or
![]()
--x<sql-statement> The second option can be a standalone SQL statement.
Other key arguments for the catcon.pl script include these:
![]()
-d Directory where script to be executed is located
![]()
-l Directory to be used for spool files
![]()
-c Container(s) in which scripts/SQL are to be executed
![]()
-C Container(s) in which scripts/SQL are not to be executed
![]()
-u Username/password (optional) to run user-supplied scripts (defaults to / as sysdba)
![]()
-w Environment variable that will hold the user password for user specified with -u
![]()
-U Username/password (optional) to run internal tasks (defaults to / as sysdba)
![]()
-W Environment variable that will hold the user password for user specified with -U
![]()
-e Sets echo on while running SQL*Plus scripts
For more detail on the options available, execute the catcon.pl script without any options specified to generate a full usage listing and description of each.
So, for example, to run a script called xyz.sql in all PDBs except CDB$ROOT and PDB$SEED, you would enter the following:
![]()

Summary
This chapter covered the basics to get you started with Oracle Database 12c Multitenant. It detailed the creation of the CDB as well as one or several PDBs. However, there is a lot more to multitenant. What is clear is that some of the benefits and advantages of using multitenant are becoming apparent—especially the ability to create a PDB in a few seconds and the flexibility it can bring to provisioning.
But at this stage you probably have more questions. Should you stay with the old architecture, or move to multitenant? You may not be sure that you can even move to multitenant, but, if possible, how is it done? And what if you are using Standard Edition (SE, SE1 or SE2)—is multitenant even an option? Or perhaps you are using Enterprise Edition and cannot wait to get your hands on the new technology—did you know it is an additional licensed option? The next chapter will assist you in answering these questions, and much more.
