

CHAPTER
4
Day-to-Day Management
In the first part of the book, you became familiar with the concepts and promises this new multitenant world brings to the table. Now it’s time to get your head out of the clouds, plant your feet firmly on the ground, and begin using it in earnest.
In this chapter, we will focus on a number of common tasks that DBAs perform, concentrating specifically on those that are transformed in the move away from old-fashioned noncontainer databases (non-CDBs).
Choosing a Container to Work With
In a non-CDB, an object is identified by schema name and object name—for example, SCOTT.EMP. These two component labels, plus the object type (which is a table in this example), are sufficient to identify the object uniquely in the database.

NOTE
Specifying the schema name is not always required, because it is implied in the user session itself. Within a session, the current schema is most often the user we connected as, but this can be changed by running the ALTER SESSION SET CURRENT_SCHEMA command within a connected session.
In a pluggable database (PDB) environment, three pieces of information are required to identify an object: PDB, schema, and object name. However, unlike with schema selection, there is no way to specify the PDB explicitly, because it is always derived from the session. This means that a session always has a PDB container set and, similar to schema, this is implicitly set when the session is initiated. It can also be changed later in an existing session with proper privileges.
We will discuss this in Chapter 5, but let’s look at a simple description of the process here. Each PDB offers a service and we connect to the database specifying SERVICE_NAME. This implies the container we connect to: the CDB root or a PDB.
If the user account for a connection is a common one and has the appropriate privileges (see Chapter 6), we can change the current container simply with
![]()

To query the container currently selected, we can either use these SQL*Plus commands,
![]()

Or, should we need to get this information in a query or program, we can use the following:
![]()

Data Manipulation Language (DML) operations, that is those that actually access data, are limited to the current container only, unless we apply some of the special options (as outlined in Chapter 12) and the objects accessed are resolved using the implied container, as just described. And although we can change the current container on the fly, a transaction can modify a single container only. You will see, however, that some DDL commands can work on more than one container at a time, while others allow us to specify the PDB explicitly.
Managing the CDB
From the DBA’s point of view, a CDB as a whole is very similar to a non-CDB. If we want to use it, we must start an instance; if there is no running instance, it is unavailable to users. Apart from the datafiles, all the files associated with the database are owned by the CDB—this means the SPFILE, control files, password file, alert log, trace files, wallet, and other files.
One major difference, however, is that you cannot connect to a CDB per se, because a connection is always to a container. So, for example, if we want to connect to the CDB, we connect to the root container; this makes the root container a very special type of container, which represents both the database as a whole and the root container itself. This can create confusion, as some of the commands issued in this context affect the database as a whole, while others affect the root CDB$ROOT container only—and, with enough permissions, they can also affect other PDBs.
This implies that many tasks are performed in similar ways in the root and in PDBs; it is the context that is different.
Create the Database
Creating the database, either with the CREATE DATABASE command or with the Database Configuration Assistant (DBCA), generates a CDB with the root container and the SEED PDB. The database does not have any PDBs when created, although DBCA offers the option to create some immediately. The CDB$ROOT root container, however, is mandatory because it contains information for the entire database, along with PDB$SEED, which serves as the template on which new PDBs will be based.
Creating a CDB versus a non-CDB involves a single click, which we described in detail in Chapter 2.
Database Startup and Shutdown
Starting up a CDB is no different from starting any other database:
![]()

And a shutdown stops the database:
![]()

These operations also look the same in the Enterprise Manager Cloud Control, as shown in Figure 4-1.

FIGURE 4-1. Startup/shutdown in Enterprise Manager Cloud Control
Drop the Database
Version 10g introduced the DROP DATABASE command, which completely deletes the database. This command has no notion of PDBs, so it deletes all datafiles and all PDBs. To delete a PDB, use the DROP PLUGGABLE DATABASE command.
Modify the Entire CDB
Objects and functionality shared by all the containers, including CDB$ROOT, are managed at the CDB level. And although we are connected to the root for this, we are in reality changing the configuration for the whole database, including every PDB.
First of all, the redo logs are global and they contain changes made by all PDBs. Essentially there is no difference between managing redo logs of a CDB and those of a non-CDB, except that with a CDB, we have to size the logs according to the combined load of all the PDBs plugged into the database.
Consequently, the archivelog or noarchivelog mode is set for the entire CDB, as well as parameters such as archived log destinations, Recovery Manager (RMAN) retention policies, standby databases, and so on. We discuss backups in more detail in Chapter 7 and Data Guard in Chapter 11.
Another database-global file type is the control file. The control files describe the complete structure of the database—that is, all database files and all PDBs. Their content is thus updated by many DDL commands, issued when connected to the root and when connected to a PDB. Commands that work with the control file directly need to be issued at the root container; these include creating standby control files as well backing these up to a file or to trace.
Several important parameters have similar database-wide scope, and a couple of the key ones include global database name (and thus default domain for PDBs) and block change tracking for RMAN incremental backups.
In fact, all database parameters are still set by default at the CDB level, and only a subset can actually be set at the PDB level, in which their specified value overrides that implied by the CDB. With some of these there are additional rules—for example, the SESSIONS parameter value in a PDB cannot be higher than the CDB value. In this case, the CDB value determines the hard limit and memory allocations, and the PDB sets only a logical limit.
Modify the Root
Some parameters are set in the root container and determine the default values for the PDBs as well. However, the PDBs are free to set their own value, if required.
One of the simple settings of this sort is the database time zone, which Oracle uses for storing TIMESTAMP WITH LOCAL TIME ZONE. A similar trivial setting is whether new tablespaces are created as SMALLFILE or BIGFILE by default.
Two considerably more complex settings with broader ramifications are undo management (creation of undo tablespaces in the root and/or PDBs) and the flashback logs configuration. Both of these are covered in more detail in Chapter 8.
Temporary Tablespaces
Every Oracle database can have multiple temporary tablespaces, and 10g introduced temporary tablespace groups to assist in their administration. In short, we can use a default temporary tablespace (group) for the database, and we can assign every user a different tablespace.
This is logically expanded in a multitenant database. There is a default set for the whole CDB (set at the root container), and every PDB can override it to use a temporary tablespace created in that PDB; an ALTER USER command can override both to set it at the user level.
Managing PDBs
At the broad operational level, the whole CDB resembles a non-CDB for a DBA, and the PDB looks almost indistinguishable from a non-CDB for the ordinary user or the local PDB administrator. But this leaves an administrative gap: management of the PDB by the DBA. It is in this area that we find a number of new tasks and associated commands to invoke them.
Create a New PDB
A PDB first has to be created (see Chapter 1) or copied from another (see Chapter 9). Both approaches are faster and simpler than creating an entire CDB and, after all, this agility is one of the key selling points of the multitenant architecture. With Oracle 12c, it is now easy to provision one or more databases, whether it is for testing, development, or production, or because a user has requested a new database in his or her Oracle Public Cloud dashboard.
Open and Close a PDB
Starting a CDB does not imply that all of its member PDBs are opened automatically, as Oracle actually leaves the decision to us. A PDB can be in one of four states, as listed next; notice that there is no NOMOUNT state. Only the CDB as a whole can be started in NOMOUNT state, and in that case there is no control file opened, so the instance does not know which PDBs are in the database.
![]() MOUNTED Data is not accessible, and only an administrator can modify the structure, including files, tablespaces, and so on
MOUNTED Data is not accessible, and only an administrator can modify the structure, including files, tablespaces, and so on
![]() MIGRATE Used during various Oracle maintenance operations (such as running scripts for patching)
MIGRATE Used during various Oracle maintenance operations (such as running scripts for patching)
![]() READ ONLY Accessible to users, in read only
READ ONLY Accessible to users, in read only
![]() READ WRITE Fully accessible to users for both read and write operations
READ WRITE Fully accessible to users for both read and write operations
All three open states can be further constrained to enable only those users with the RESTRICTED SESSION privilege access.
Alter Pluggable Database Statement
The most obvious way to change the open state is by using ALTER PLUGGABLE DATABASE statement. The syntax is very similar to ALTER DATABASE for the CDB as a whole:
![]()

In this basic form, it affects only the currently selected container. It would be a lot of typing to switch to a container, open it, and to repeat this for each and every one. Instead, we can directly specify which container to modify.
So, for example, when in the root we can execute this:
![]()

This syntax is permitted even if the current container is a PDB; however, the specified PDB must be the current container, or we get an error:
![]()

Startup Pluggable Database Statement
For those DBAs who like the SQL*Plus STARTUP command, this has been enhanced in 12c and now also supports PDBs. This is not an SQL command, per se, which constrains it to the SQL*Plus console, and the list of supported options is also limited.
When the current container is the root, you will also notice that the command is often longer than its ALTER counterpart:
![]()

The FORCE keyword is also available in this context; it closes the database first, before opening it again:
![]()
![]()
When the current container is a PDB, and working within that PDB, the startup and shutdown commands imitate the syntax of a non-CDB. This is part of Oracle’s pledge to have “all things work like before” with the move to 12c’s multitenant architecture. So the PDB admin can simply connect to the database and issue the old, trusted, and proven startup/shutdown commands and receive the expected results.
![]()

Note that even the shutdown abort and transactional keywords are accepted in these commands, but, functionally speaking, they are ignored.
Use Enterprise Manager
With Enterprise Manager Cloud Control it is also possible to open and close PDBs, as shown in Figure 4-2.

FIGURE 4-2. Close a pluggable database
Save the PDB Open State
When 12.1.0.1 was first released, starting up a CDB left all PDBs mounted and inaccessible, and the DBA had to open them manually or write system triggers to do it automatically. However, since 12.1.0.2, there is now a provision to have Oracle do this for us automatically, every time the CDB is started and opened again. We can set the desired state using the SAVE STATE command.
We need to put the PDB into the desired state, and then set this as the requested after-restart mode using this command:
![]()

The command stores the current state of the PDB in the DBA_PDB_SAVED_STATES view:
![]()

In this example, whatever state the PDB is in, upon restart it will be opened read-only again.
The DBA_PDB_SAVED_STATES view contains records in all the databases for which we have issued save states, provided the current state is not MOUNTED. To clear this setting and remove the row for a PDB, either execute save state when it is MOUNTED or use DISCARD STATE. With no record, the PDB will not be opened after CDB restart, and instead remains in the MOUNTED state.
Open the PDB in a Cluster Database
A PDB does not have to be open on all instances, and we can actually pick and choose where we open it. Where it has been opened, though, the mode must be the same among all instances, though we can mix only one open mode and the mounted mode. This is, after all, the same as for an entire CDB or non-CDB.
The ALTER PLUGGABLE DATABASE OPEN and ALTER PLUGGABLE DATABASE CLOSE commands can specify which instances to affect:
![]()

One interesting option in this context is the RELOCATE command. This is shorthand syntax for “close here, open somewhere else.” The CLOSE statement closes the PDB on the current instance (specifying relocation is mutually exclusive with listing instances to affect) and the RELOCATE keyword instructs Oracle to open the PDB on an instance either specified by us or chosen by Oracle:
![]()

Saving the state is also a per-instance operation, so we must issue the ALTER PLUGGABLE DATABASE SAVE STATE on each of the instances. However, this may not be needed if we use grid infrastructure to manage database services—for example, in a RAC environment. Starting a service on an instance automatically opens that PDB (see Chapter 5).
View the State of PDBs
We can query the current state of all PDBs easily with the V$PDBS view:
![]()

View PDB Operation History
The simplest journey of events over the lifetime of a PDB would see it starting and ending with its creation. However, as you will see in Chapter 9, things can get decidedly more complicated than this. The CDB_PDB_HISTORY view provides a way of reviewing this, and even for a simple PDB, it’s a handy way to see its inception date:
![]()

You might wonder where the first four records come from. These refer to when the DBCA template was created and then when DBCA created the database from that template.
Run SQL on Multiple PDBs
There are some restrictions to keep in view when an SQL statement, which is usually intended for a single PDB, needs to be run on more than one PDB. First, user management and privilege grants behave differently for a PDB than for a non-CDB, as you will see later in this chapter. Second, Chapter 12 shows some examples of PDBs working together in tandem, sharing the data structures and data.
Aside from these options, it is possible to implement a simple workaround. If we log in to the root, we can change the current container on the fly, privileges permitting. So it follows that we can execute the desired SQL in various containers, one by one, by selecting the container in the session, running the SQL, and repeating. This can be done by using an SQL script or with dynamic SQL; execute immediate or DBMS_SQL.
We don’t even have to code the container switch ourselves, because DBMS_SQL.PARSE has a new parameter, CONTAINER, that allows us to specify where the statement should be run.
Note that the rule that a transaction cannot span multiple containers is still in effect, so we have to commit the changes before running SQL in a different container.
![]()

Modify the PDB
The datafiles are owned by the PDBs and the usual SQL statements still apply, so there is no change in creating tablespaces, adding datafiles, or taking them online or offline.
As discussed, in the PDB we can override some of the default parameters set at the CDB level: database time zone, default temporary tablespace, and the choice of BIGFILE/SMALLFILE datafile default, for example.
What is set only at the PDB level is the default tablespace. Because permanent tablespaces are private to PDBs, there is no CDB-level setting. Similarly, the default PL/SQL edition is also set at the PDB level only.
All of these features are present in a non-CDB so, for SQL compatibility, they can also be issued using the ALTER DATABASE command when connected to a PDB. Again, this means that the PDB administrator can use the existing trusted and proven commands, which are useful especially if the admin has built up a library of favorite SQL scripts over time.
A unique feature for multitenant PDBs is storage limit. This parameter enables us to determine the maximum allowed size of all tablespaces as well as the maximum space occupied in a CDB-level temporary tablespace:
![]()

It is also possible to specify FORCE LOGGING mode in a PDB. Normally this is done at the CDB level to ensure that any NOLOGGING operations are actually logged, and thus the integrity and completeness of a standby database, for one, is ensured. But in some cases, we may want to change this setting at the PDB level, possibly disabling the FORCE LOGGING mode for that particular PDB (it’s a temporary testing database or is not included in any standby, for example). Alternatively, we can set a specific PDB to force logging, while keeping CDB level force logging disabled. (Note that the usual options for setting FORCE LOGGING at tablespace level and NOLOGGING at table level still apply. In other words, it is possible to create a messy, multilayered setup, although we would advise against this and recommend keeping things simple instead.)
The database must be in restricted mode to run these commands, and then we can invoke the desired setting:
![]()
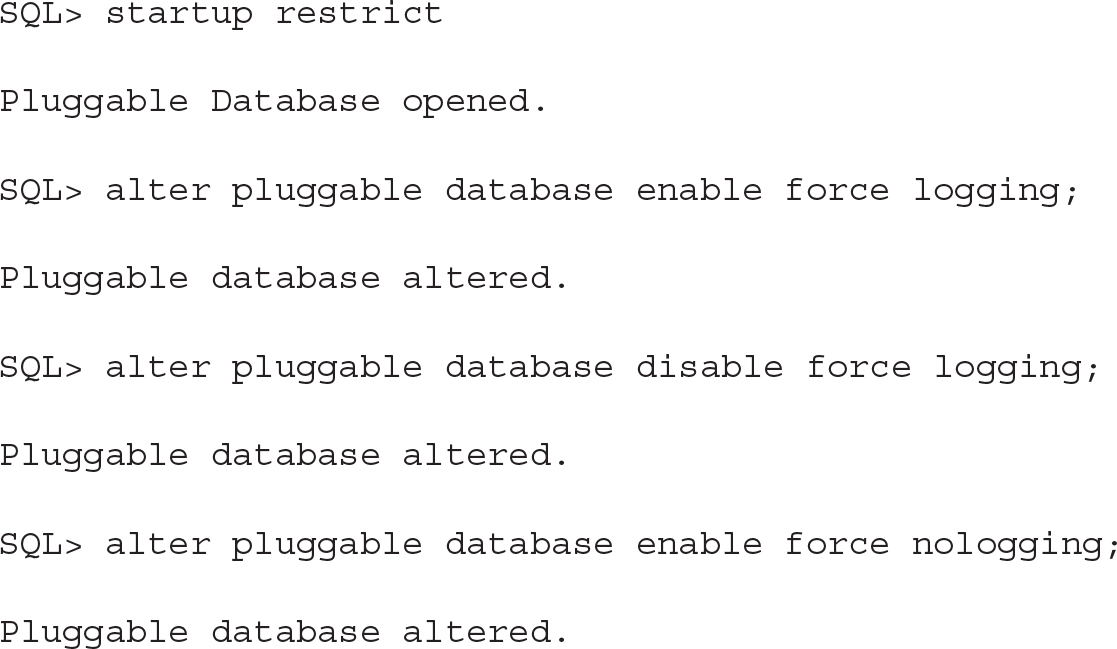
Note that there is also a LOGGING and NOLOGGING clause for a PDB, and this establishes the default mode for any new tablespace created in it. As these clauses set only the default setting for tablespaces created in the future, they do not have an immediate effect on the database, unlike the FORCE LOGGING clauses.
![]()

Drop a PDB
The life of a PDB ends with a drop operation. It requires a SYSDBA connection, but it is one of the simplest operations to enact. The syntax suggests that the only additional input we have in this decision is whether to keep the datafiles on disk or not. In reality, however, only an unplugged database can keep its datafiles, while others have to drop them. (See Chapter 9 for a detailed description on unplugging a PDB.)
To effect this operation, the PDB has to be closed (or unplugged), and this must be performed from the root container.
The default option is to keep the datafiles, and Oracle apparently assumes that moving a database by virtue of unplugging and plugging is a more frequent operation than outright dropping.
![]()

Patching and Upgrades
Each Oracle software major version (such as 12c) has a number of additional releases (for example, the 12c first release is 12.1, and the second release, 12.2, is also called 12cR2). Between these releases, patch sets are released. For example, the 11gR2 final patchset is 11.2.0.4. The patch sets, despite the name, are actually distributed as full, standalone software installations. All these levels of software distribution (edition, release, patch set) provide new features and bug fixes. Additionally, on top of patch sets, you can (and should) apply the Patch Set Updates (PSUs, or bundle patches in Windows, which include the patch sets).
NOTE
Upgrading and patching are inherently dynamic processes, but to understand the features available for their administration, you should refer to the Oracle documentation. Information about upgrades is constantly evolving as bugs and issues are encountered, so, for this reason, the standard documentation is not always sufficient, and you must also review the My Oracle Support (MOS) notes about them. For a friendly and helpful read in light of this, we recommend you bookmark and regularly monitor the excellent upgrade blog from Mike Dietrich, the Master Product Manager for Upgrades and Migrations at Oracle: https://blogs.oracle.com/UPGRADE/.
You can upgrade to 12.2 directly from 11.2.0.3, 11.2.0.4, 12.1.0.1, and 12.1.0.2. If you are using a previous version of the Oracle Database, you can upgrade in several steps, or choose a logical migration approach with a utility such as Data Pump. In this chapter, we discuss physical upgrades, in which data in the actual datafiles remains unchanged.
Upgrade CDB
In the same way that you can upgrade a database, you can upgrade a CDB. This is the simplest way to upgrade all PDBs at the same time, provided you have a maintenance window in which you can stop all their services at the same time.
To upgrade all PDBs, they must first be opened:
![]()

If you want one or more PDBs to remain closed to postpone their upgrade, they will need to be explicitly excluded within the catcon.pl and catctl.pl utility commands, using the -C argument.
Pre-Upgrade
In Oracle Database 11gR2 you used the utlu112i.sql script to check the database you wanted to upgrade. Oracle Database 12c comes with a new pre-upgrade script that installs a package and runs it, detailing suggestions for manual or automatic actions to perform before and after the upgrade. The script is preupgrd.sql, and it calls utluppkg.sql, which installs the package.
There are two important points to note about this script. First, it is shipped in the rdbms/admin directory of the ORACLE_HOME of the new version of the Oracle software, but remember that it will be run in the database that you want to upgrade, with its older ORACLE_HOME. If both ORACLE_HOME directories are located on the same server, you can call the scripts from the new directory. But you can also copy the preupgrd.sql and utluppkg.sql files.
NOTE
The upgrade files shipped in an ORACLE_HOME are actually useless for the databases running from this ORACLE_HOME. Those files are to be used for a database from a previous version ORACLE_HOME.
The second important point is that the shipped upgrade files come from the release of the patch set, but those scripts may evolve over time. You can, and should, always download the latest version from My Oracle Support MOS ID 884522.1 at support.oracle.com/epmos/faces/DocContentDisplay?id=884522.1.
When you run preupgrd.sql, it installs the dbms_preup package and generates a log file and fixup scripts in the following directory: $ORACLE_BASE/cfgtoollogs/<db_unique_name>/preupgrade/.
NOTE
If ORACLE_BASE is not set, it will be replaced by ORACLE_HOME.
Remember that you are in a multitenant environment, so running the script from SQL*Plus will execute it only on CDB$ROOT. You must use the catcon.pl utility introduced in Chapter 2 to enact this at the PDB level. Here is an example in which we run the preupgrd.sql from the future ORACLE_HOME:
![]()
![]()
First we create the log directory that we will specify with the -l argument:
![]()
![]()
Then we run the preupgrd.sql script located in rdbms/admin of the future ORACLE_HOME, specified with the -d argument with an absolute path to the current directory:
![]()

The output of catcon.pl goes into the directory and files defined with -l and -b, but the pre-upgrade package still writes its output in $ORACLE_BASE/cfgtoollogs. Here is an example of the files generated from a two PDB, CDB upgrade:
![]()

You have a set of logs, pre-upgrade fixes, and post-upgrade fixes for the CDB, and in the pdbfiles subdirectory, one for each PDB.
Note that preupgrade_fixups.sql and postupgrade_fixups.sql contain the code for all containers (CDB$ROOT and all those in the pdbfiles subdirectory), so you can run those scripts with catcon.pl on all containers.
preupgrade.jar In 12.2, the pre-upgrade process received a further enhancement, being bundled into a Java utility, and the previous versions were deprecated. Making use of the same environment as before, where ORACLE_HOME is set to the current environment and the new one is installed in the 12202EE at the same level, we can run this:
![]()

NOTE
Use the -help flag to show the options for changing the output directories.
At the time of writing, the Java solution does not automatically generate a master script to run with catcon.pl, but you can achieve this by concatenating the per-container scripts:
![]()

Then, as with the previous method, you end up with one file with “if con_name” conditions that you can run for each container.
Backup or Restore Point
Invoking an upgrade process is a simple operation and is fully automated when you use the Database Upgrade Assistant (DBUA). But problems may occur at any time during the upgrade process. Imagine, for example, that you plan one hour of downtime to upgrade a 10TB database, and there’s no problem with that because the time to upgrade does not depend on the size of the database per se. But what do you do if the upgrade fails in the middle—perhaps due to a bug, server crash, remote connection unexpectedly closed, and so on? Did you count the fallback scenario within the one-hour outage? How long will it take to restore 10TB and recover all the redo generated since the time of this backup?
What is critical is that, before starting an upgrade, you must plan out the fallback scenario. The easiest method for doing this, if you are using Enterprise Edition, is to create a guaranteed restore point:
![]()
![]()
Then, in case of failure, you can flashback the database quickly to revert to this pre-upgrade point:
![]()

Of course, this assumes that your database is in archivelog mode and that you have enough space allocated for the flashback logs. Helpfully, the required size for the fast recovery area (FRA) is one of the precheck activities performed by the preupgrd.sql script.
You may choose other means by which to back up the database, such as taking a storage snapshot when the database is closed. If your database is in noarchivelog mode, and you want to do a cold backup before the upgrade, keep in mind that the upgrade will not update anything in your user data. Then you can put your user tablespaces in read-only mode and don’t need to back them up. Only the system tablespaces remain open (SYSTEM, SYSAUX, UNDO, and all those that have system components objects) and so require backup. This means that you don’t need to back up the user tablespaces, which reduces the time to restore if you do need to perform a point-in-time recovery before the upgrade. This can also be automatically achieved with the upgrade utilities: the -T option of catctl.pl or -changeUserTablespacesReadOnly of the DBUA.
Pre-Upgrade Script
The pre-upgrade scripts generated by preupgrd.sql in the cfgtoollogs/<db_unique_name>/preupgrade directory can be run on each container with catcon.pl, as follows:
![]()

You also have to fix any manual recommendations, but don’t hesitate to invoke the pre-upgrade script again to check and confirm that the recommended actions have been completed.
Here is a quick check of the manual tasks that were recommended in one test example we ran:
![]()
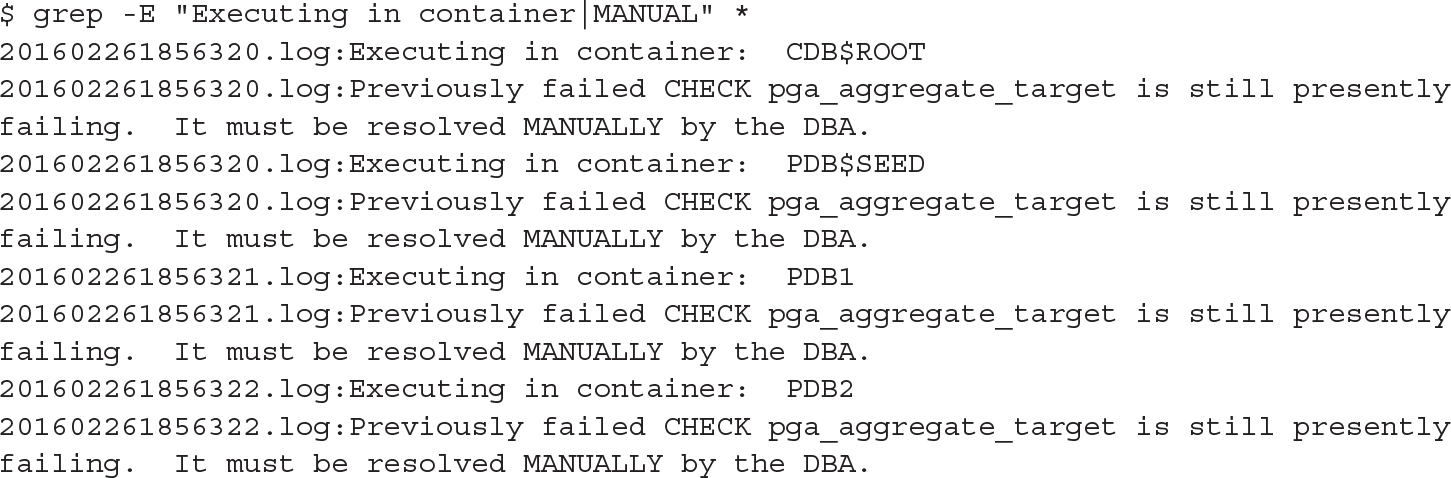
These fixes required manual intervention. In this example, we had to increase PGA_AGGREGATE_TARGET. Note that we did it manually, and only at CDB level, because the CDB value is the default for the PDB. More detail about parameters will follow later in this chapter in the section “CDB SPFILE.”
Upgrade with catupgrd.sql
Now, to upgrade, you must shut down the CDB. The downtime begins. Prior to this, check to ensure that the COMPATIBLE parameter is set. You can set this parameter to the current value in case you need to downgrade later. If you have created a restore point, this is actually mandatory; otherwise you will get an ORA-38880 error when mounting from the new ORACLE_HOME.
From here, you can copy the SPFILE to the new ORACLE_HOME, and then change the /etc/oratab file. Then you can start the database from the new ORACLE_HOME in upgrade mode, ensuring that all PDBs are in the required upgrade mode:
![]()
![]()
Change /etc/oratab to
![]()
![]()
And set the environment like so:
![]()
![]()
Then you are ready to startup upgrade:
![]()

Note that the OPEN_MODE displayed by show pdbs is MIGRATE here:.
![]()

Time to run the upgrade. The utility to run the catupgrd.sql script is not SQL*Plus but catctl.pl, the parallel upgrade utility optimized to minimize the time the process takes by parallelizing and reducing the number of restarts. In 12.2, running catupgrd.sql directly is not supported.
![]()

In this example we have added the -n 4 to parallelize with four processes in total, and -N 2 to use two processes per container, which means that the upgrade of PDBs will take place on two PDBs at a time. One additional point worth noting: Parallel operations are usually unavailable in the Standard Edition (SE), but this is not the case with upgrades. They work the same in SE as in Enterprise Edition (EE), meaning that you can perform parallel upgrades in SE.
You will also see that we have added another parameter, -M. By default, once the CDB$ROOT has been upgraded, the instance that was in upgrade mode is restarted to normal mode before the PDBs are upgraded. This is good if you need to open PDBs as soon as they are upgraded, without waiting for the others to complete. Here, with the –M flag, the CDB$ROOT stays in upgrade mode until the end. It’s faster, but we will have to wait until all of the PDB upgrades finish for them to be open and accessible.
You may choose to have the PDBs open as soon as they are upgraded, and in 12.2 you can even prioritize the way they are processed by using the -L argument.
The main log file for the upgrade process is upg_summary.log, which details the elapsed time of the upgrade per container and per component. You can also review the results again like this:
![]()
![]()
At the time of writing, the PDBs upgrade process takes the same time as the CDB$ROOT upgrade process, or even longer, but this will be improved in the future. Actually, thanks to metadata links, a large part of the upgrade DDL does not need to be run on PDBs, but this optimization is implemented only partially now.
Let’s review an example of time taken by an upgrade. The following is the CDSB$ROOT part of the upg_summary.log from 12.1 to 12.2. You can see that the Oracle Server section is only 21 minutes within an overall elapsed period of 92 minutes:
![]()

Our recommendation, in view of this, is not to install any components that you don’t need. With the multitenant option, you will likely create lots of PDBs, so perhaps you will choose to install all components in case you need them in the future. But that will make upgrades take longer. Note that without the multitenant option, in single-tenant, it’s always better to choose only what is actually needed.
Taking our previous example as a test case, you may choose to upgrade Oracle Application Express (APEX) in advance. Or even better, remove it from CDB$ROOT completely with $ORACLE_HOME/apex/apxremov_con.sql, because it’s not a good idea to have APEX in the root container or the APEX version will be tied to the database version.
Open Normally
At the end of the upgrade process, when everything has completed successfully, we can open the CDB and the PDBs:
![]()

Upgrade Resume
In 12.2, if the upgrade fails, look at the PHASE_TIME number. Then, if you are able to fix the problem, you can continue the upgrade with the -p option. You can also use the -c option to choose (and prioritize) the containers.
For example, let’s imagine our upgrade has been interrupted. The catresult.sql shows that the post-upgrade step has not been performed. The log for PDB phases PDBSOracle_Server.log shows nothing after Phase 105 for PDB:
![]()

And the log file for PDB shows that it started the PHASE_TIME number 106 but didn’t finish:
![]()

To resume, we can run it again from this specific phase—that is, only for the PDB container and starting at PHASE_TIME 105:
![]()

Without the -P flag, which specifies an end phase, it will run all the remaining phases until the end—and in our example the output shows that this will be Phase 108:
![]()

If you encounter an issue with this process, you can obtain a detailed debug trace with the –Z option, but that is beyond the scope of this book.
Post-upgrade Script
The post-upgrade scripts that have been generated by the preupgrd.sql in the cfgtoollogs/<db_unique_name>/preupgrade directory can be run with catcon.pl:
![]()

And then you can recompile all invalid objects with utlrp:
![]()

Test and Open the Service
From here you can test the application(s) and open the service. Don’t forget to drop any guaranteed restore points, if any were used.
Database Upgrade Assistant
We have described the manual procedure, which hopefully helps you understand the phases of the upgrade process. However, as in previous versions, the procedure outlined is fully automated with the DBUA, available from the Oracle Home of the new version. There, you can choose the database to upgrade, along with the different upgrade options.
If you don’t have the graphical environment set up, or you want to script the upgrade, you can also run DBUA in silent mode. There is no response file, but all options are available from the command line. You can also run the pre-upgrade step only from the new Oracle Home, as per the following:
![]()
![]()
The output directory created under $ORACLE_BASE/cfgtoollogs/dbua is displayed and you will find all log, pre-upgrade, and fixup scripts directed there.
For the upgrade, you can see all options from the inline help:
![]()
![]()
An example of a useful additional option is to create a restore point automatically with the -createGRP argument.
We will not offer any preference here to the manual or DBUA upgrade, because this depends on a number of factors, such as your experience, the requirements, and the complexity of the database. In short, you can have more control with the manual procedure, but everything is possible with DBUA, graphically or in a scripted way.
Plugging In
Upgrading the CDB is fastest when you have a large maintenance window to upgrade all the PDBs at the same time. But in real life, you probably don’t want to upgrade all at the same time because PDBs are for multiple applications or “tenants.” And here the multitenant architecture can help. Several ways to move PDBs across containers will be covered in Chapter 9, and those movements do not require that you work in the same version. In addition, a very interesting way to upgrade a PDB is to move it to a CDB that is in a higher version. This is an option with plug-in and remote cloning, and it is even possible without the multitenant option, where you have only one PDB per CDB.
The data movement process is described in Chapter 9, but it’s important to note that once you’ve plugged in or cloned from a previous version, you need to bring your PDBs to the new version. Remember that most of the PDB dictionary objects are links to the CDB$ROOT, so they are usable only when those metadata and object links are upgraded to the CDB version. The same catupgrd.sql script performs this action, and it is run in a specific container with the catctl.pl script, using the -c option.
NOTE
If you choose to unplug/plug in, remember that you always need to have the PDB protected by a backup. Drop it from the source only when it is upgraded and backed up in the target.
Basically, upgrading a plugged PDB is the same as upgrading a PDB in a CDB. You specify the container with the -c option of the catctl.pl script. Verification of the need to upgrade can be checked from PDB_PLUG_IN_VIOLATIONS:
![]()

Remote Clone from Previous Version
Remote cloning uses the remote file server (RFS) process, which may return an error if the client uses a higher version:
![]()

For example, when cloning into 12.2 from a remote 12.1.0.2 database, you receive the following error, with the remote alert.log showing:
![]()
![]()
The solution is to apply patch18633374: COPYING ACROSS REMOTE SERVERS on the source (https://updates.oracle.com/download/18633374.html) to allow file transfers to a higher version.
The cloning procedure will be described in Chapter 9, and the dictionary upgrade is performed by running catupgrd.sql on the container.
Patching
Upgrades to new releases (such as from 11.2.0.4 [11gR2 Patch set 3] to 12.1.0.1 [12cR1]) or to a new patch set (such as 12.1.0.1 [12cR1] to 12.1.0.2 [12cR1 Patch set 1]) are provided by installing a new Oracle Home and then, from that new Oracle Home, executing startup upgrade and catuprgd, as shown earlier. New versions, releases, and even patch sets provide large numbers of bug fixes and new features, and thus change significant amounts of dictionary structure and data.
Between these Oracle releases, partial patches are released, which contain only important fixes and changes in a few libraries in the Oracle Home. These have minimal impact on the dictionary:
![]() Security Patch Update (SPU) Previously referred to as CPU (Critical Patch Update), these updates provide the quarterly cumulative security fixes.
Security Patch Update (SPU) Previously referred to as CPU (Critical Patch Update), these updates provide the quarterly cumulative security fixes.
![]() Patch Set Update (PSU) Provides SPU and additional important fixes. Their goal is to stabilize—that is, to fix critical issues without the risk of regressions.
Patch Set Update (PSU) Provides SPU and additional important fixes. Their goal is to stabilize—that is, to fix critical issues without the risk of regressions.
![]() Bundle Patch Update (BPU) Contains a bunch of patches related to a particular component. For example, CBO patches are not in PSU but can be provided in the Proactive Bundle Patch.
Bundle Patch Update (BPU) Contains a bunch of patches related to a particular component. For example, CBO patches are not in PSU but can be provided in the Proactive Bundle Patch.
Those include only the libraries or files that are changed and are applied by the OPatch utility. In 12c, the changes to the dictionary are done through the datapatch utility provided in the OPatch. Datapatch checks all containers to know which ones have to be patched. However, only open PDBs are verified, so those that are closed will be in restricted mode when they are opened, and datapatch will need to be run again for them.
Here is an example in which we have plugged the PDB2 PDB to a CDB that has a patch set additional to the CDB of origin:
![]()
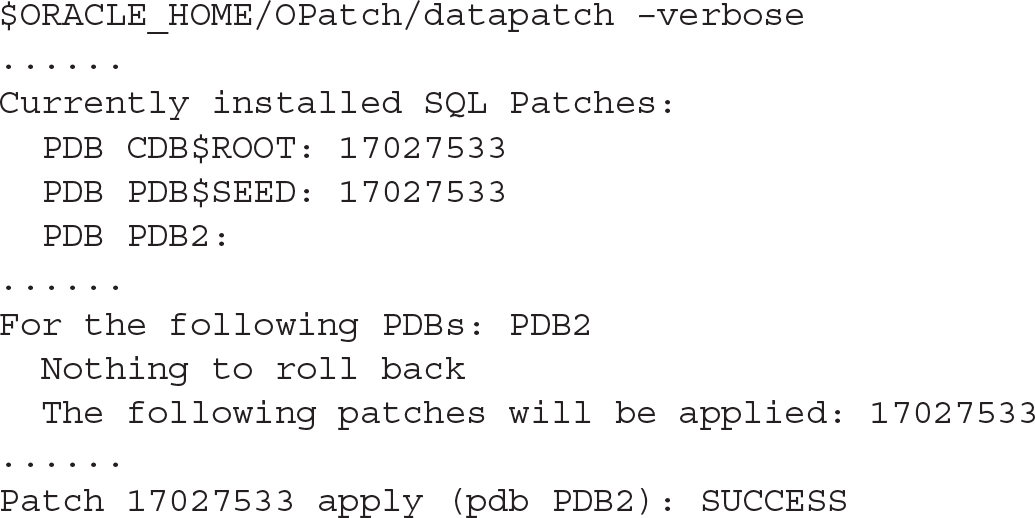
Only the PDB2 has to be patched.
In this example, the multitenant architecture brings significant benefit even when you have only one PDB (the single-tenant that you can use without the multitenant option). If you want to upgrade or patch the entire CDB, it will take longer, because there are three container dictionaries to update. But if you create a new CDB with a new version, you can simply unplug/plug in. There is no file movement needed, because it is on the same server; then run catupgrd or datapatch. This is faster because there are only relatively few metadata links to check and update.
Using CDB-Level vs. PDB-Level Parameters
Initialization parameters control the instance behavior. Their first utilization is at instance startup, which is why they are called “initialization parameters.” These parameters are also used later, however, and can control the session behavior. Note that each session actually inherits settings from the instance, and some of these can be changed by the session. It’s also possible to use different parameters at the statement level, with the OPT_PARAM hint.
The parameters are not stored within the database itself, because a large number of them are needed before opening the database. In older versions of Oracle Database, they were stored in a text file, which Oracle calls the PFILE (the parameter file), and that many DBAs referred to as the init.ora. This file was read by the session running the startup command, but in current versions of Oracle, the parameters are stored in a server parameter file (SPFILE), which is managed by the instance. We can change parameters in the SPFILE with the ALTER SYSTEM command, or we can re-create the SPFILE from a PFILE if we are unable to start the instance.
This does not change in multitenant, except that we have a new level between the instance and the session: the PDB.
CDB SPFILE
The CDB SPFILE is the same as the SPFILE you are familiar with in the non-CDB context. It stores all parameters that are set by ALTER SYSTEM SET … SCOPE=SPFILE when this command is run at CDB$ROOT level. Those parameters are read when the instance is started, are used by CDB$ROOT, are the defaults for sessions in CDB$ROOT, and also serve as the default for the PDBs when they do not have their own setting.
PDB SPFILE Equivalent
PDBs offer the same Oracle Database functionality, so you are able to set your initialization parameters with the ALTER SYSTEM statement. As an example, when connected to PDB1 we set the following:
![]()

And we can query it with SHOW SPPARAMETER:
![]()

This is similar to what we know in non-CDBs, but here the settings are not stored in the instance SPFILE. In multitenant, we have the CDB$ROOT to store information about the containers, and this resides in the PDB_SPFILE$ system table:
![]()

You don’t see the CON_ID here, but only the PDB_UID, which we can use to match to our PDB name with V$PDBS:
![]()

In this example, our SPFILE parameter for optimizer_dynamic_sampling in PDB1 is actually stored in the root.
When you are connected to a PDB, you can query the SPFILE parameters with show spparameter or with a query on V$SPPARAMETER. You can also dump all parameters defined into a text file, because the CREATE PFILE syntax is supported:
![]()

Keep in mind, however, that this text file cannot be used to start the instance, and the name PFILE is there only for syntax compatibility. This is because we are connected to a PDB, and an instance is not at that level.
Another possibility is to generate the describe file, the same XML file that is used by the unplug/plug in operations we will cover in Chapter 9, because it houses information (parameters) about the container that are not stored within the container itself.
![]()

These are persisted across operations such as PDB close, instance startup, unplug/plug in, and cloning. The PDB_SPFILE$ in PDBs is usually empty, except when the PDB is unplugged, in which case it serves as a backup for the XML file.
Both the CDB SPFILE file and the PDB SPFILE table can store a comment. It is highly recommended to add the COMMENT clause to any parameter changed permanently; you have 255 characters to document the date and the reason for the change.
SCOPE=MEMORY
Setting a parameter with SCOPE=SPFILE changes the persistent setting, the value that is displayed by show spparameter, for future startup only. The SCOPE=MEMORY clause, on the other hand, changes the current value of the parameter until the next startup. Without the SCOPE clause the parameter is set both in MEMORY and in the SPFILE. This behavior is the same in root and in PDBs, except that shutdown/startup means close/open in the PDB context.
Alter System Reset
You can use ALTER SYSTEM RESET to remove the persistent setting for a parameter, which means that when the database is next opened it will take the CDB memory value as the default. Unfortunately there is no reset with the SCOPE=MEMORY option, so either you set the value or you reset it in the SPFILE and close/open the PDB.
ISPDB_MODIFIABLE
The V$PARAMETER shows all parameters with their names, descriptions, and the current values for your session. There are flags that identify the parameters that can be changed only by restarting the CDB instance (ISSYS_MODIFIABLE=FALSE), that can be changed for the instance without restart for future sessions (ISSYS_MODIFIABLE=IMMEDIATE), and that can be changed for current sessions as well (ISSYS_MODIFIABLE=DEFERRED). In 12.2, there is also a flag to identify the parameters that can be changed in a PDB without close/open (ISPDB_MODIFIABLE=YES), and these are a subset of the ISSYS_MODIFIABLE group.
In short, parameters relating to the instance itself, such as all memory sizing options, are not PDB-modifiable. However, a large number of parameters can be set by the session, and they are PDB-modifiable, with this value adopted as the default for new sessions. In addition, some parameters require an instance restart, which necessitates closing all PDBs.
Container=ALL
By default, a parameter is set for your current container (CONTAINER=CURRENT). However, when you are in the CDB$ROOT, you can change a parameter for all PDBs by adding the CONTAINER=ALL clause. The goal is not to enact a parameter change, one by one, in every PDB. Instead, when you want to use the same parameter for all containers, you can set it in CDB$ROOT and let it unset within the PDBs. This command can be used to change the value for all containers immediately, without restarting them, as well as to modify the CDB$ROOT SPFILE for future startup. Note that when the command is combined with SCOPE=SPFILE, this makes the parameter’s value the default for the whole instance. For example, from CDB$ROOT, we set the temporary undo to true:
![]()

Because of the scope=both, it is changed in memory and also in the SPFILE:
![]()

Then in all PDBs, it is changed in memory, but not actually stored in PDB_SPFILE$:
![]()

On reflection, this actually makes sense, because there is no need to store a parameter for all containers when the default inherited from the CDB is correct.
DB_UNIQUE_NAME
In our query on PDB_SPFILE$, we saw a DB_UNIQUE_NAME column with value CDB_GVA, which is the database unique name for our CDB. The parameters that are set in a PDB with SCOPE=SPFILE are valid only for one CDB database unique name. We will cover Data Guard in Chapter 11, but you should already know that the DB_UNIQUE_NAME is the correct way to distinguish a primary from its standby database(s). Having the parameter identified by the CDB unique name means that a parameter changed for a PDB in the primary will not be used on the standby database. This makes sense, especially in the context of Active Data Guard, where the standby can be used for reporting, and you may also want to define different optimizer parameters for the online transaction processing (OLTP) on the primary, and the reporting on the standby. In our preceding example, we set the dynamic sampling to 8, but now we want the default value on the primary CDB_GVA (so we reset it) and the level 8 on the standby CDB_BSL. This can be achieved with the DB_UNIQUE_NAME clause:
![]()

At the time of writing, there are some limitations with this feature. For example, we cannot reset a parameter with the DB_UNIQUE_NAME clause. A workaround for now is probably to remove the row from pdb_spfile$. Another point is that the DB_UNIQUE_NAME provided is case-sensitive, though we have opened enhancement requests for this.
CAUTION
The SPFILE parameters are related to a site and not to a service. In case of switchover or failover, some services will run on another site. For example, the OLTP will failover to the site where the optimizer parameter is defined for reporting. In view of this, particularly when it comes to maintaining different optimizer parameters, it’s probably a good idea to set these from a logon trigger that depends on the service name, rather than to a per-site setting.
Summary
In this chapter we covered the basic administration of PDBs after you have a CDB. You can create PDBs, patch them, upgrade them, parameterize them, and drop them. Most of these operations are the same ones that every DBA performs daily, but they are adapted to incorporate two levels in multitenant: CDB and PDB. You will see that a number of new operations are made possible with the multitenant architecture, mostly in Part III, where we delve into recovery and data movement. You need to know and understand the basic operations, and all administration procedures and scripts that are adapted, to function in the new multitenant paradigm.
This chapter focused primarily on the DBA who operates at the CDB level, who is often connected to root, and who invokes SET CONTAINER when needed. In the next chapter, you will see how to make use of those PDBs, which provide a service to which you can connect directly.
