

CHAPTER
7
Backup and Recovery
Backup and recovery is an exciting topic. Creating backups is straightforward, but many DBAs do not spend much time digging into this area until an actual restore and recovery is required. Then all the books and notes are dusted off in search of the correct commands or processes to follow. Although this might not be optimal, it does highlight something of utmost importance when talking about backup and recovery: documentation. And this brings us to the goal of this chapter—to document the key concepts and areas relative to backup and recovery when using the Oracle Database 12c Multitenant option.
In this chapter we will first review the basics to highlight a number of key aspects that will help you quickly establish effective backup and recovery procedures in your multitenant environment. What you will notice as we progress is that, in many cases, it does not make a difference whether you are using a container database (CDB) or a non-CDB; overall, the principles are similar, if not identical, for both.
Back to Basics
Our encouragement is this: Do not be afraid of backup and recovery. In fact, the more time you spend on planning and testing your backups, the easier the second part—restore and recovery—will become. But before we dive into the detail, let’s consider two key areas:
![]() Hot versus cold backups
Hot versus cold backups
![]() ARCHIVELOG mode versus NOARCHIVELOG mode
ARCHIVELOG mode versus NOARCHIVELOG mode

NOTE
In this chapter a number of examples will make use of the RMAN TAG option. Strictly speaking, this is not necessary, but it is a recommended option in certain scenarios because it makes it easier for you to identify specific backups. For more detail on the use of the TAG option, refer to the Oracle online documentation.
Hot vs. Cold Backups
Nowadays, there are few references to cold backups. So what is this and why would you use it? In short, cold backups (also called consistent backups) are created when a database is not open for transactions—that is, it has been shut down with the IMMEDIATE, TRANSACTIONAL, or NORMAL option. The effect of one of these clean shutdowns is that when the database is restored following this type of backup, no additional recovery is required to bring it to a consistent state, because it was in this state when the backup was performed.
In this day and age, most companies simply cannot afford downtime on their primary systems, so the cold backup is not the ideal backup method, because it requires an outage (planned downtime) on your primary database. You may ask, why have downtime when creating backups at all, if this is not required? The answer depends on an organization’s requirements, but a cold backup is still an option for the modern DBA, even when using the multitenant option.
Performing a cold backup is simple: the database is closed when backups are being performed. If RMAN is not used to perform cold backups, the database must be completely shut down. When RMAN is used, the database must be in a mounted state. Here’s an example of creating a cold backup of a CDB:
![]()

In this example, a consistent backup of the CDB is performed and the backup is stored on disk in the /backups folder. By default, RMAN backup sets are used with the backup command. If required, you can also perform a cold backup using image copies; to do so, you would replace the fifth line in the preceding code with this:
![]()
![]()
As you can see, creating consistent cold backups is easy. The database can be in NOARCHIVELOG mode when you performing them. But the downtime required that renders these types of backups is not acceptable for most.
This brings us to hot, or online/inconsistent, backups. In contrast, when creating these backups, the database may be online—open read/write. However, there is one key requirement when you are performing hot backups: the database must be in ARCHIVELOG mode. For most DBAs, this is likely to be the default option when creating a new database in any case. Enabling ARCHIVELOG mode is easy and brings with it the advantage of enabling you to perform backups while the database is in full use. Yes, backups created in this fashion are considered inconsistent, but by using the archive logs that are generated during the process, the backup can be restored and recovered to a consistent state so that the database can be opened again.
Archive logs assist in resolving Oracle split blocks, which may occur during hot backups. Oracle data blocks, the smallest units of data used by a database (which is made up of multiple operating system blocks), include identifying start and end markers. The start and end markers of blocks are compared during recovery, and if they do not match, the block is considered inconsistent and the redo copy of the block is required to recover (reconstruct) the block to a consistent state.
NOTE
For more detail on split blocks, refer to Oracle Support Note 1048310.6 and the Oracle Database 12c documentation regarding the LOG_BLOCKS_DURING_BACKUP initialization parameter.
Enabling ARCHIVELOG mode in a CDB is no different from doing it in a non-CDB configuration:
![]()

You can use the SQL command archive log list to confirm whether a database has ARCHIVELOG mode enabled, or by reviewing the V$DATABASE.LOG_MODE value.
NOTE
When you enable ARCHIVELOG mode in a CDB, an outage is required, because the database needs to be restarted in a mount state. Also note that ARCHIVELOG mode can be set only at the CDB level.
To perform a basic backup on a CDB database that is open and has ARCHIVELOG mode enabled, run the following commands:
![]()

With the fundamentals of hot and cold backups now covered, let’s review some of the default RMAN configuration options before we get into the details of backup and recovery concepts in a container database environment.
RMAN: The Default Configuration
By default, to back up a database using RMAN, the simplest command is backup database. It doesn’t get any easier than that! For most purposes, however, this simple command is not really adequate; to get the most from your backups and to provide more options, you have to go a bit further than this. But before we launch into this, we need to discuss the default RMAN configuration options.
When you run the backup database command, a number of default options are invoked behind the scenes. Many of them are perfectly acceptable and may never need changing, but by adjusting a key few, you can make backup and recovery of your Oracle 12c database even easier.
Use NLS_DATE_FORMAT
The NLS_DATE_FORMAT environment variable is highly recommended. In case you hadn’t noticed, when running RMAN commands, the default date format is limited to displaying only the day, month, and year:
![]()

Notice that there is no time option in the output. For many, this might not be an issue, but having additional date/time output in the log files and on the screen when running RMAN commands is extremely useful:
![]()

To enable better display of date and time when using RMAN, simply set the NLS_DATE_FORMAT environment variable prior to starting your RMAN session:
![]()
![]()
List and Adjust Default Configuration
The default RMAN configuration can be reviewed in two ways: you can use the RMAN show all command, or you can review the details in V$RMAN_CONFIGURATION.
NOTE
V$RMAN_CONFIGURATION will show only the nondefault values. If you have not changed the default configuration, no rows will be returned.
For example, to adjust the default configuration to allow the autobackup of the control file (a recommended setting) to a specified location, including the enabling of compressed backup sets for the disk type backups, you can execute the following at the RMAN prompt:
![]()

Once this has been executed, you can review the settings with the following:
![]()
![]()
In this state, you can run the backup database command and RMAN will take your default settings into account.
RMAN Backup Redundancy
Backups are important, and to help you protect this resource, RMAN enables you to duplicate your backups—up to four of them in fact. You can take this additional measure to ensure that your backups are protected from media failure or human error. The COPIES clause can be used with the backup command to specify how many backup copies should be created, or, if you prefer, you can update the default configuration and specify the COPIES clause as part of your default configuration. The command that follows demonstrates how this can be done with the RMAN backup command:
![]()

In this example, while connected to CDB$ROOT, the pluggable database (PDB) XPDB1 is backed up to /backups, and the backup is then duplicated to /backups2 as well. To enable the duplicate option in the default configuration, using two copies for both the datafile and archive log backups, for example, you can use the following commands while connected to the CDB$ROOT:
![]()

The SYSBACKUP Privilege
In Oracle Database 12c, separation of administration duties has been extended from the few basic options in earlier versions. One of the new system privileges introduced is SYSBACKUP, which can be granted to users who need to perform backup and recovery operations. A user with the SYSBACKUP privilege will be restricted to allow only backup and recovery operations. This permission can also be granted to a local user account in a PDB, equipping the user with backup and recovery permissions on a specific PDB. Let’s review the different connection options available with this role.
Connecting as the SYS user with SYSDBA permission:
![]()
![]()
Connecting as a common user with SYSBACKUP permission:
![]()
![]()
Using RMAN to connect to the CDB root:
![]()
![]()
Using a local PDB account with SYSBACKUP permission:
![]()
![]()
For more detail on the new administrative privileges and user security when using Oracle Database 12c Multitenant, see Chapter 6.
CDB and PDB Backups
There are two key aspects to backups in an Oracle Database 12c Multitenant environment: backups at the CDB level, and then those at the PDB level. You can connect to a PDB and perform backup and recovery operations, albeit with a few restrictions, which we will get to later in this chapter. You can use RMAN to perform backups on a CDB or PDB, and later we will cover two additional options: Oracle Cloud Control and Oracle SQL Developer. But first let’s focus on using RMAN via the command line interface.
Before jumping in, note an important change introduced in Oracle Database 12c. When connected to CDB$ROOT, if we specify only the key word DATABASE in our backup, restore, or recover command, it applies to the whole database (CDB root and all its PDBs). Here’s an example:
![]()
![]()
However, if you are connected to a PDB, the commands apply specifically to the PDB you are connected to. In Oracle Database 12c, Oracle introduced a new RMAN clause, PLUGGABLE DATABASE, which enables you to perform tasks on specific PDBs, as follows, while connected to the CDB$ROOT:
![]()
![]()
In the next sections, we will outline additional syntax changes that have been introduced.
CDB Backups
In most cases you will find that backups will be scheduled and performed at the CDB level, so that CDB$ROOT and PDB$SEED, as well as all the other PDBs associated with a CDB, will be backed up. But this does not mean you cannot be more specific, and in this section we will show you, by way of example, how easy it is to perform backups while connected to the CDB root as target.
Full CDB Backups
When you perform a full (whole) CDB backup, the following files should be included:
![]() The control file
The control file
![]() All datafiles (CDB$ROOT, PDB$SEED, and all PDBs)
All datafiles (CDB$ROOT, PDB$SEED, and all PDBs)
![]() All archived logs
All archived logs
Backing up the SPFILE is recommended, but in most cases it can easily be rebuilt, so this is not mandatory. If you do have autobackup of the control file enabled (which is highly recommended), the SPFILE will automatically be backed up together with the control file when any structural changes are made in the database.
Multiple options are available to you when backing up the whole CDB database. Backup sets are common and the default, but using image copies can be useful, and if kept locally—in the fast recovery area (FRA), for example—they can be switched rapidly for fast recovery. This is especially the case if the image copies are kept up-to-date with incremental backups applied regularly. Backing up the entire CDB is perhaps the most common method and is demonstrated in the following examples, which assume that the RMAN environment is configured with the settings outlined earlier, and the autobackup of the control file is enabled.
This first example uses the most basic form for backing up the whole CDB. The command is executed while connected to CDB$ROOT:
![]()
![]()
In the next example, while connected to CDB$ROOT, we take this a little further and explicitly specify the use of compressed backup set output, along with the location for this output, specified in the FORMAT option. In addition, we include a TAG, which can be extremely useful to identify particular backups:
![]()

Next, we make use of image copies. Here we assume that sufficient redundant storage is available, and a disk group called +DBBACKUP exists, which will be used to store the image copies. Archived logs not yet backed up will be written to the /backups folder on the file system. The database can then be backed up as follows (while connected to the root container):
![]()

The end result is that a backup copy of the CDB database, including all PDBs, can be located in the +DBBACKUP disk group. If something were to happen to any of the primary files in this example on the +DATA disk group, we could switch to an image copy quickly, followed by recovery of the image copy, which in some cases can be much faster than restoring from a backup set. This method of backup can be extremely useful, but note that sufficient storage is required to keep the copy of the database. It is also possible to adjust the FORMAT specification and write the image copies to a file system location.
TIP
To identify your RMAN backup sessions easily in V$SESSION, you can use the RMAN command to set the command ID for the session: RMAN> set command id to "FULLCDBBKP";. In the end, you will be able to use the CLIENT_INFO and look for the value id=FULLCDBBKP.
At this stage, you can use the LIST command to view the backup details, including listing the image copies that have been created; by using the PLUGGABLE DATABASE flag, you can specify a specific PDB to provide listings for. So to detail the image copies for PDB1, created in the third example in the preceding examples, use the LIST COPY command as follows:
![]()

These examples demonstrate how easy it can be to back up an entire CDB.
Partial CDB Backups
In some cases, you might not want to back up the full CDB, but only a subset. This is where the PLUGGABLE DATABASE keywords are invoked to get the task done. The examples in this section are executed while connected to the root container. In this first example, we will back up only CDB$ROOT, PDB$SEED, and PDB1:
![]()
![]()
As illustrated, you can selectively specify the PDBs to include in the backup. Note that when performing a partial CDB backup, CDB$ROOT should be included.
In the second example, only the CDB root is backed up. Both possible command options for this are listed:
![]()
![]()
or
![]()
![]()
It is also possible to take a more fine-grained approach and back up only a specific tablespace. In this example the command will back up the USERS tablespace located in PDB1; it is executed while RMAN is connected to CDB root:
![]()
![]()
Note that the USERS tablespace needs to be prefixed with its PDB name of origin; if the name is omitted, RMAN will attempt to back up this tablespace from CDB$ROOT since we are connected to CDB$ROOT.
The final example demonstrates how we can back up the USERS tablespaces in CDB$ROOT, as well as in PDB1:
![]()
![]()
CDB Reporting Using RMAN
When connected to the CDB as target, the report schema command will list details for the CDB$ROOT, PDB$SEED, and all the PDBs associated with this CDB. The next example shows the RMAN report schema command output on a CDB using Automatic Storage Management (ASM) and Oracle Managed Files (OMF), with one PDB called PDB1. A closer look at the Tablespace column also reveals that the CDB$ROOT tablespaces do not have a prefix, whereas all other PDBs, including those in PDB$SEED’s tablespaces, have this defined.
![]()

To display additional details of backups and image copies that have been created, you can run the LIST command. It is easy to use and can help you quickly identify backup sets and image copies. The commands detailed next are a small subset of those that you may find helpful:
![]()

PDB Backups
Now that you have seen how you can back up an entire CDB, let’s focus on PDBs, which can be backed up while connected to the CDB root as the target in RMAN, or you can connect directly to a PDB to perform a full or partial backup. In this section we will review both of these methods.
Full PDB Backups
You can perform full backups of a PDB in a number of ways. You can back up the PDB while connected to the CDB$ROOT as target, as shown in the following example. First, the entire PDB, PDB1, is backed up with a single command:
![]()
![]()
If you are looking at using image copies, you can also specify this as follows:
![]()
![]()
This command can be extended to include more than just one PDB in the backup. Simply specify the PDBs in a comma-delimited list, provided that you are connected to the CDB root as the target. Here’s an example:
![]()
![]()
The next option is to connect directly to a specific PDB as the target, and perform a full backup of the connected PDB. Here’s an example:
![]()

Or, here’s an example using a local account with SYSBACKUP permission:
![]()

Once you are connected to the specified PDB, you can execute the backup database commands without the PLUGGABLE keyword, because all backup commands in this context will apply only to the specified PDB. If you try to use the PLUGGABLE DATABASE syntax instead of only DATABASE, the following error will be generated:
![]()

Several key options are available when creating a backup of a specific PDB while connected directly to it, as shown with PDB1 here:
![]()

When connected to a PDB as a target, you can use the LIST or REPORT command to display information specific to this PDB. In terms of the archived logs, you can show them with the LIST command, but other operations, such as backup, restore, or delete, are not permitted while connected to the PDB as a target.
Partial PDB Backups
While connected to a specific PDB as a target, you are allowed to perform only operations that are specific to that PDB—so you cannot, for example, perform backups of other PDBs in this context.
Once connected to a PDB, you can perform backups of datafiles or tablespaces as per normal:
![]()

If you then connect to the CDB root and list the backups with TAG=PDB1_USERSTS, you will see the following output, noting the highlighted line showing the container ID and PDB name.
![]()

It is possible to perform partial PDB backups from the CDB root. This enables you to back up specific PDBs or specific tablespaces from them. Following are two such examples, run while connected to the CDB root as target. In the first, we back up the USERS tablespace in the CDB$ROOT, as well as the USERS tablespace from PDB1 and PDB2:
![]()
![]()
NOTE
The datafile number within a CDB is unique.
The second example illustrates backing up specific datafiles from various PDBs. Note that you do not have to specify the PDB names, but you must know its datafile number within the CDB.
![]()

PDB Reporting
As noted earlier, when connected to a PDB as the target, you can view only details relating to that particular PDB—for example, using the report schema command.
Restrictions
When you are connected to a PDB as your target, some restrictions are placed on backups, including the following:
![]() You are not permitted to back up, restore, or delete archived logs while connected to a PDB as target. Tasks related to archive logs must be managed from the CDB$ROOT. Note that during the recovery process (if connected to a PDB as target), if required, RMAN will restore any archived logs needed.
You are not permitted to back up, restore, or delete archived logs while connected to a PDB as target. Tasks related to archive logs must be managed from the CDB$ROOT. Note that during the recovery process (if connected to a PDB as target), if required, RMAN will restore any archived logs needed.
![]() You cannot update the default RMAN configuration using the
You cannot update the default RMAN configuration using the CONFIGURE command, because this is managed from the CDB level.
Do Not Forget Archive Logs!
As a rule, when performing backups, you should always be sure to include the archive logs in the backup schedule. In Oracle Database 12c, you back up the archive logs from CDB$ROOT. Following are a number of basic variations that can be used for this.
Here’s how to back up all available archive logs:
![]()
![]()
Adding an additional step, you can purge the archive logs once they are backed up:
![]()
![]()
Here’s how to back up all archived logs not backed up at least twice:
![]()
![]()
It is also possible to update the archive log deletion policy for the default RMAN configuration. For more detail on managing archive logs with RMAN, see the Oracle Database 12c online documentation.
Recovery Scenarios
Several levels of recovery are possible in a CDB environment. For example, media recovery can be performed for the entire CDB, or for just one or multiple PDBs. As with non-CDB configurations, you can perform media recovery on database files, tablespaces, and even at the block level.
Instance Recovery
Instance recovery is specific to a CDB as a whole. There is only one instance for the entire CDB, rather than instances allocated on a per-PDB basis. This means that there is a single redo stream, and during crash recovery the redo information is used to recover the instance when the CDB root is opened. This process requires that the datafiles be consistent with the control file, so the redo information is used to roll back any uncommitted transactions at the time of the instance failure. And once the CDB root is opened, all PDBs will be in a mount state.
When reviewing the alert log during system startup, you will notice messages similar to the following, indicating instance crash recovery:
![]()

The next section will focus on restore and recovery of an entire (whole) CDB, and will also explore the full restore of a PDB. Point-in-time recovery (PITR), including the use of Flashback Database, will be covered in more detail in Chapter 8.
Restore and Recover a CDB
The restore and recovery of the CDB database includes all contained PDBs, assuming that you followed the steps outlined in the previous section to perform the backups. If backups are performed correctly, executing restore and recovery procedures becomes a much easier task.
Restore a CDB Using a Cold Backup
As mentioned, you can back up a full CDB using a cold backup, in which it is possible for the database to run in NOARCHIVELOG mode.
The following steps can be used to perform a full restore. In this example, the autobackup of the control file is used (in this case the file was called cfc-CDB3-c-603345334-20160309-01’) to restore the SPFILE and control file. However, if you already have the SPFILE, you can skip the step of restoring the SPFILE and continue with the next:
![]()

Perform a Complete Recovery of a CDB
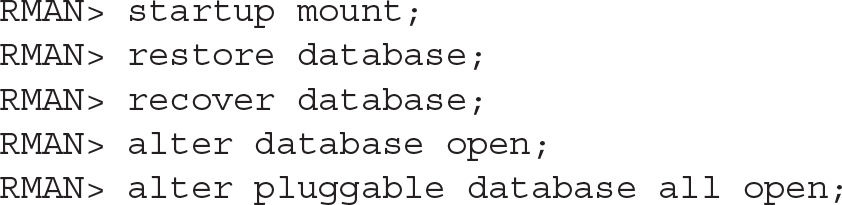
Performing a full restore and complete recovery of a CDB is almost as easy as performing a full backup. Again, the assumption is that you have followed the steps from earlier in this chapter to perform the full backup of the CDB, and that these backups are available. In this scenario, note that all required archive logs are available to perform the recovery. The archive logs may still be available on disk, or perhaps they are part of the backup as well.
The RMAN connection is initiated to the CDB$ROOT as target:
![]()
Perform a Complete Recovery of CDB$ROOT
The process required to restore the CDB$ROOT container alone, when all other PDBs are intact without any issues, is similar to the previous steps:
![]()

Recover from a Lost CDB$ROOT Tablespace
The steps required to perform a full restore and recovery of a CDB$ROOT tablespace should be executed while connected to the CDB$ROOT as target. It is not necessary to have the CDB in a mounted state, or even to have the PDBs closed, as long as the tablespace in question is not the CDB$ROOT SYSTEM or UNDO tablespace. The tablespace must be offline when the restore is performed.
The steps to follow to restore and recover the USERS tablespace in this context are shown here:
![]()

If a restore or recovery is required for the SYSTEM or UNDO tablespace, the CDB root must be in a mounted state before the restore and recover commands are executed.
Recover from a Lost CDB$ROOT Datafile
Recovery from a lost datafile in the root container can be accomplished without restarting the CDB in a mounted state, as long as the datafiles do not belong to a SYSTEM or UNDO tablespace (which otherwise would necessitate a restart into a mounted state, prior to executing restore or recovery). The following commands demonstrate restore and recovery of a lost datafile from the USERS tablespace (datafile 6 in this case) located in the CDB$ROOT. The connection here is with the CDB root as the target:
![]()

Recover from Loss of Tempfiles
If you have lost a tempfile due to media failure, you have two possible options to resolve this. The first is simply to add a new tempfile to the temporary tablespace and drop the old file. The second option will take effect on the next restart of the CDB. The tempfile will be re-created on the next restart of the CDB root, and if it belongs to a PDB, on the next open of the PDB the tempfile will be created. Following is an extract from the alert log showing this:
![]()

Restore and Recover a PDB
In this section we will cover the recovery steps with specific focus at the PDB level, and the key scenarios will be addressed.
Restore and Recover a PDB
If a PDB is lost, you can restore and recover it without having the root container in a mounted state, although the restore and recovery process is managed via the root container as the target connection. If the PDB is still open, you must close it before executing the restore and recovery commands:
![]()

What if your backups included image copies of the PDB? Using image copies may be very effective in reducing any downtime, rather than waiting for a restore of the full PDB from backup. When performing restore and recovery operations, time is of the essence, and the faster a database can be restored and brought back online for users the better. So if image copies are available for a PDB, why not use them? You can switch to use the image copies, create a new backup of the PDB as an image copy in the original location, and then schedule a switch back during a quiet period.
Here are the steps to follow:
![]()

Recover a Lost PDB System Datafile
If a datafile from a PDB’s SYSTEM or UNDO tablespace (when using local undo) is lost, the recovery process must be performed from the root container. The root container, including all other PDBs, can be open read-write, but the affected PDB must be in a mounted state.
The steps to perform a restore of datafile 8, which is the SYSTEM datafile for PDB1 in this particular example, can be restored from the CDB$ROOT as follows:
![]()

Recover a Lost PDB Nonsystem Datafile
If the lost datafile in a PDB is not part of the SYSTEM or UNDO (if using local undo) tablespace, the restore and recovery process can occur from either the CDB$ROOT or the PDB. The PDB does not have to be in a mounted state, but the datafile must be taken offline, if it’s not already down, prior to performing the restore and recovery.
In the following example, the restore and recovery is performed while connected to the PDB. The report schema command is used to confirm the datafile number, which, in this case, is datafile 10 (one of the USERS tablespace datafiles):
![]()

As with our earlier example, if image copies are available, the option also exists to switch to using this. Note that if you do so, the location of the image copy will most likely differ from the current file location. You can replace the restore datafile 10 command with the following if a copy is available (use the list copy command to identify datafile copies):
![]()
![]()
Recover a Lost PDB Tablespace
If a tablespace needs to be restored and recovered in a PDB, two options are available. This can be done within the PDB (as long as this is not a SYSTEM or UNDO tablespace), or it can be done from the CDB$ROOT. The tablespace must be taken offline prior to starting the restore, and this should be done from within the PDB:
![]()

Then you can restore the tablespace from within the PDB with the following commands:
![]()

Alternatively, you can perform the restore and recover commands from the CDB$ROOT:
![]()

We’ve covered a number of the key areas you should be familiar with when performing complete recovery operations in an Oracle Database 12c Multitenant environment. In the next chapter we will look at using PITR and the Flashback Database options.
RMAN Optimization Considerations
Working with large databases is a prevalent trend today, and it is less common to find the need to purge old data. Data is retained for longer periods, and often it will never be removed. This increase in overall database sizes affects backup and recovery, and optimizing backup and recovery operations is becoming more and more important. Furthermore, backup windows are shrinking, while additional load on production systems needs to be kept to a minimum. To assist with this issue, Oracle introduced a number of options, including the following:
![]() Incremental backups
Incremental backups
![]() Block change tracking
Block change tracking
![]() Multiple channel backups (parallel backup and recovery)
Multiple channel backups (parallel backup and recovery)
![]() Multisection backups
Multisection backups
![]() RMAN backup optimization
RMAN backup optimization
In this section we will review the first four of these five options, which are highly recommended when using multitenant.
Incremental Backups
Two key options are available for incremental backups: differential and cumulative backups. By default, the differential option is selected, and when using this method all database blocks changed since the previous backup will be included. Table 7-1 illustrates a schedule that employs differential backups; first an incremental level 0—a full backup—is performed on Monday, followed by a differential backup each day thereafter.

TABLE 7-1. Differential Incremental Backup
If you need to perform a restore on Thursday, the full backup from Monday, as well as the incremental backups from Tuesday and Wednesday, will be required. One of the potential risks when relying on incremental differential backups is that if you were to lose one of the incremental backups, you might not be able to restore and recover to the required point in time. This risk can be reduced by ensuring that archive logs are backed up at least twice, so that if one day’s worth of backups is lost, it may still be possible to use archive logs to recover past this point. For example, to back up PDB1 using differential incremental backups, we’d follow these steps.
1. Create the base incremental level 0 backup:
RMAN> backup incremental level 0 pluggable database PDB1;
2. Create the differential incremental level 1 backup:
RMAN> backup incremental level 1 pluggable database PDB1;
With the cumulative incremental backup, as with the differential incremental backup, only changed blocks are backed up; in this instance, however, the backup includes the data since the last base incremental level 0 backup. Table 7-2 illustrates this.

TABLE 7-2. Cumulative Incremental Backup
First an incremental level 0 backup is created, and every cumulative incremental backup following this will back up all the changed blocks since the last full level 0 backup. This method does extra work in backing up blocks more than once and requires additional storage, but the overall risk is less. When using this approach, the keyword CUMULATIVE must be used—so, for example, if we want to back up PDB1 using this method, the following commands can be run.
1. Create the base incremental level 0 backup:
![]()
2. Create the differential incremental level 1 backup:
![]()
Incremental backups can be extremely useful, especially in large database environments. But this brings us to our next point, which is that during an incremental backup, the datafile blocks are scanned to identify changed blocks in need of backup. This process can take time, perhaps even as long as a full backup itself. To make this faster, Oracle introduced block change tracking.
Block Change Tracking
When you’re working with incremental backups, the use of block change tracking is highly recommended. Note, however, that this is an Enterprise Edition feature and cannot be used in Standard Edition. This feature cannot be enabled within a PDB, but instead should be enabled while connected to the CDB$ROOT. If you do attempt to enable block change tracking while connected to a PDB, an ORA-65040 error will be generated, as shown in the following example:
![]()
![]()
Enabling or disabling this option is easy, especially when using OMF. The block change-tracking file is created and will grow in 10MB chunks as needed; the default location when using OMF is DB_CREATE_FILE_DEST. If you are not using OMF, the filename and location should be specified manually. The file will track all the changed blocks in the database and can be enabled with the following command:
![]()

Block change tracking can be disabled with the following command:
![]()
![]()
Using this option together with incremental backups is recommended for multitenant environments, especially for larger configurations, because it will assist in creating faster backups and reducing resource consumption.
Multiple Channel Backup
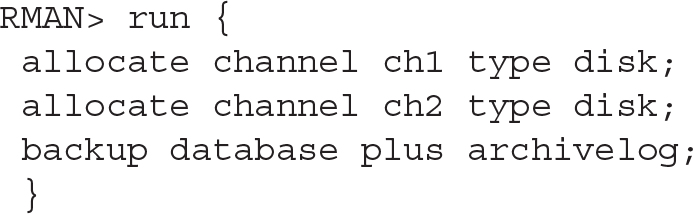
Using multiple channels may also lead to faster backup and recovery times. However, having sufficient CPU and I/O capability to accommodate this is equally important; otherwise, you may slow down operations when using multiple channels. If you want to use this option by default, you can update the default configuration and specify the parallelism parameter as shown here:
![]()
![]()
You may also allocate multiple channels as part of your backup and recovery commands:
![]()
Multisection Backups
Combining incremental backups with multiple channels can help speed backup and recovery operations. Prior to 12c, with large files, this did not always provide significant benefit, but since 12c, parallel incremental backups can be taken one step further. As of Oracle Database 12c Release 1 (12.1), RMAN now also supports multisection incremental backups, as well as the use of multisection with image copy backups. The COMPATIBLE parameter must be set to 12.0.0 or higher to allow for this. Note that using this option forces the FILESPERSET option to be set to 1 for backup sets. The following syntax can be used to back up a PDB database called XPDB2 with large datafiles using multisection backups, and the command is executed from the CDB$ROOT:
![]()

As mentioned, the use of multisection can now also be used with image copy backups. In the following example, an image copy backup is taken of the XPDB PDB with the SECTION SIZE clause specified as follows:
![]()

If the section size specified is larger than the file to be backed up, multisection backups will be ignored for the file and not be used.
The Data Recovery Advisor
Backup and recovery can become incredibly complex, especially when diagnosing and deciding on the correct repair options. To assist with this, Oracle introduced the Data Recovery Advisor in 11g, and it has been extended and improved in Oracle Database 12c. The Data Recovery Advisor can help list potential corrective actions, and, if you want, even perform these tasks for you. You can use either RMAN or Oracle Enterprise Manager Cloud Control to obtain information provided by the Data Recovery Advisor and execute the required tasks.
At the time of writing, the Data Recovery Advisor could be used in a non-CDB as well as in a single-instance (non-Oracle RAC) CDB. The Data Recovery Advisor is not supported in Oracle RAC configurations. It may be run only from the CDB$ROOT, not from within a PDB, and if this is attempted an RMAN-07536 error will be displayed.
The standard Data Recovery Advisor commands to be invoked from within the CDB$ROOT include these:
![]()

Block Corruption
Block corruption is a nightmare for DBAs, and only the most fortunate avoid coming across it in their careers. Fortunately, Oracle provides tools that can be used to ensure your databases are valid and that block corruption is not hiding under the covers. Running these health checks on a regular basis is, therefore, highly recommended.
The VALIDATE command is very easy to use to perform these checks. When the command is run from RMAN, a detected problem will trigger a failure assessment. This will then be recorded in the Automatic Diagnostic Repository (ADR), where it can be accessed by the previously discussed Data Recovery Advisor.
The VALIDATE command can be executed against a running database (CDB, non-CDB, and PDBs) and also on backups, including RMAN backup sets and image copies.
The following is a short listing of some of the options available with the VALIDATE command; for more detail see the Oracle 12c Database documentation.
![]()

Using Cloud Control for Backups
Backup and recovery operations can also be performed from within Oracle Enterprise Manager Cloud Control. Figure 7-1 and Figure 7-2 illustrate some of the options available.

Figure 7-1. Backup and recovery options in Cloud Control 13c

Figure 7-2. Backup options in Cloud Control 13c
For example, if Availability | Backup & Recovery (Figure 7-1) is selected, you will see a number of options to help guide you through creating and scheduling backups, along with performing restores and recoveries. Selecting the Schedule Backup option presents the options shown in Figure 7-2, including the ability to back up a specific PDB.
Back Up to the Cloud
With the growing interest in using cloud-based solutions, a number of options are available for backing up Oracle Databases to the cloud. Two key players present such offerings: Amazon Web Services (AWS) and the Oracle Cloud Services.
NOTE
If you sign up for Oracle Cloud Services to perform RMAN backups to the Oracle Cloud, you can use the required RMAN encryption free of charge. This is even the case when using Oracle Standard Edition, although a specific patch will need to be applied to a Standard Edition environment to allow this.
To configure the Oracle Database Backup Service, you first need to create an Oracle Cloud account, and then sign up for both the Backup Service and the Oracle Storage Cloud Service. Here is a summary, at a high level, of the steps required to back up to the Oracle Cloud:
1. Create an Oracle Cloud account and sign up for the backup and storage services.
2. Download the Oracle Database Backup Cloud Module.
3. Install the module. See readme.txt file for parameter details (run as oracle software owner):

Once the module is configured, three files are created: the wallet with your cloud account details loaded, a parameter file, and the module library.
4. When allocating the SBT_TAPE channel, options need to be supplied to indicate the use of the library and your configuration:

5. You must use encryption when using the Oracle Database Backup Service with the cloud module configured here. The backup encryption can be enabled using three possible options: password encryption, Transparent Data Encryption (TDE), or a combination of both. The quick and easy method is to use the password option, which is enabled by running the following command:
![]()
6. Run your RMAN backup commands:

For more detail on using the Oracle Cloud, and how to work with advanced configurations in the Cloud backup module, see the Oracle Database Backup Service documentation.
Summary
Oracle Database backup and recovery can be one of those areas that busy DBAs may not spend a lot of time on yet, but, as we have shown, it is one of the most critical areas in managing a multitenant environment. The emergence of this new multitenant paradigm (CDBs and PDBs) has generated a number of explanatory analogies, and one that seems apt is having all your eggs in one basket. It is clear that you need to look after this basket, because if something goes wrong, you could end up with a difficult cleanup situation.
The same can be said of using Oracle Database 12c Multitenant: you are creating a container that houses multiple PDBs, and if you do not have adequate backups (both at the container and pluggable database levels), you may end up with a very difficult scenario should disaster strike.
This chapter demonstrated that performing backup and recovery in a multitenant environment is not particularly complex or onerous, and getting a handle on the basics means you can perform complete recovery with just a few easy commands. The next chapter will take this one step further to discuss point-in-time recovery and Flashback Database.
