

CHAPTER
11
Data Guard
An old adage says that a DBA can get many things wrong but must never fail in one single competency: database recovery. It holds that if there is a way to restore the database to the time before the error happened, then any error is potentially reversible. This saying was coined many years ago, and the boom in overall database sizes and increased dependence of modern organizations on databases as foundational to their business operations have made it all the more true!
Over time, one additional requirement has emerged—we need fast database recovery. Restoring a multi-terabyte database from tapes is not something the business wants to wait for. This does not mean, however, that the good-old tape backup is a relic of a bygone era; in fact, it is still a necessary part of a sound backup plan, and we covered it in detail in Chapter 7. It just happens to be the last line of defense, reserved for massive natural disasters. In the milieu of day-to-day operations, littered with faulty disks, human errors, server crashes, and building fires, we need a faster way to recover.
Since 8i, Oracle Database has supported the standby database functionality; improved and enhanced through the versions, it eventually evolved into the Data Guard feature. Conceptually speaking, however, a physical standby database is merely an exact copy of the production, or primary, database. This copy, or standby, is kept constantly in recovery mode, applying archived redo from the primary, in the same way that a media recovery would happen.
This basic level of functionality was introduced in Oracle Database 8i, and if the database is not running on Enterprise Edition, this is all that is available. It is a proven and solid foundation but lacks facilities such as automatic redo transfer and adequate monitoring. Fortunately, third-party tools are available to help automate this process and manage these environments, such as Dbvisit Standby.
With an Oracle Database Enterprise Edition, the full Data Guard functionality is available, which includes, at the very least, automatic redo transfer, the ability to apply online redo as it is shipped, the availability of the Data Guard broker and Data Guard command line interface (DGMGRL), and the administration options included in Cloud Control and Enterprise Manager Express. In this chapter, we will cover the Enterprise Edition functionality; after all, only EE supports the multitenant option.
Data Guard supports multitenant databases, and most of the management is identical to that of a non-container database (non-CDB). In this chapter, we walk through a simple setup of a physical standby database and will then look at some of the differences that multitenant brings.
Active Data Guard Option
With the standard physical standby functionality, the standby database runs in recovery mode and is unavailable for any end user operations. However, the Active Data Guard option enables the database to be opened read-only while the recovery occurs, simultaneously, in the background, enabling users to utilize the hardware and licenses dedicated to the standby database to support various loads such as reporting or local caches.

CAUTION
There is no direct initialization parameter or setting that we can use to enable or disable Active Data Guard. It is always available to be used, irrespective of whether the server is licensed for it or not, and the Oracle Database is overly “enthusiastic” about enabling this option. So it falls to us, the DBA, as our responsibility to mitigate against enabling it unintentionally and never open the database when redo apply is active; this includes not starting the database with startup, but always with startup mount instead. We might well be wise to go the extra mile and create an automated task to verify that the database is not opened with redo apply active.
We can, however, consider using the undocumented (and thus unsupported parameter) _query_on_physical=no to prevent from using the Active Data Guard option. Our hope is that Oracle will eventually make the parameter documented and supported.
All of this is true for any Oracle 11g or 12c database, whether multitenant is in use or not. We’ll see later in this chapter the impact of Active Data Guard on multitenant when we discuss the various scenarios for creating, copying, and moving pluggable databases (PDBs) and how they affect the standby.
Creating a Physical Standby
As mentioned, a standby database is essentially an identical binary copy of the source database, with some configuration differences and perhaps only a subset of the source data. As such, it’s essentially a backup, so using backups and backup tools to create it is an obvious choice. From the command line, this means Recovery Manager (RMAN), and in terms of GUI options, it means Oracle’s Cloud Control, which, incidentally, also uses RMAN in the background.
Over the course of the database versions, this process has been streamlined and enhanced, and nowadays very few steps are necessary. Oracle can help us generate the required configuration files, and it can create the standby both from an existing backup and from a running database.
After the standby is created, the next steps are to set up the Data Guard configuration, set the desired level of protection, and monitor the configuration. Again, both command line (DGMGRL) and Cloud Control options are available for this purpose.
In this chapter, we go through a basic scenario, focusing on differences brought by the multitenant database.
Duplicate with RMAN
As creating a standby database is a fundamental step in a Data Guard setup, it is obviously described in depth in the Data Guard Concepts and Administration part of the Oracle Database documentation. However, for whatever reason, for a long time this information has been split between two locations: one regular chapter that describes the process in quite vague terms, and an appendix (Appendix E) detailing the RMAN-focused steps. In both places, Data Guard Broker is not mentioned, but it is covered in another book in the Oracle Database documentation, Data Guard Broker. This is quite unfortunate, because the easiest way to create a nicely working Data Guard configuration is to combine these three pieces. Multitenant brings yet another element and an additional set of documentation to consider, but we hope this chapter will serve to orient the reader.
NOTE
For the examples listed in this chapter, the current database is called USPROD and the standby is NZPROD. The source database is already in ARCHIVELOG mode, force logging is set, and STANDBY_FILE_MANAGEMENT is set to AUTO. The servers are two distinct machines, and the databases will be placed in the same locations on both of them.
Set Up Static Network Services
The first step is to configure static service definitions for both the primary and standby container databases. There is a single purpose in this: to enable the Data Guard console to start the database instances, as necessary, during switchover and failover operations.
We edit the listener.ora on the servers and add the static service definition. Note the addition of _DGMGRL to the database unique name, so it becomes, for example, USPROD_DGMGRL and NZPROD_DGMGRL.
![]()

Although not strictly necessary, but beneficial for administration purposes, we also add an entry to /etc/oratab for the databases to be created:
![]()
![]()
Back Up the Source Database
If we want to create the standby database from backup, we must first back up the database or ensure that a recent backup is available. Note that the backup itself must be accessible from the standby server. How this is done depends on the environment, and often the tape library will actually do this for us, or we can mount the disks/SAN volumes manually as necessary.
The last option is, of course, to copy the backup files to the target server. Although this option often doesn’t make much sense in a production environment, because we can use duplication from an active primary directly, it’s a good idea during testing and learning; any failures and retries during the process will, therefore, not force the transfer of the entire database again and again over the network.
Set Up the Network
During the setup and management of the configuration, the Data Guard Broker establishes a connection to the primary and standby databases. We therefore need to set up USPROD and NZPROD connection strings in the tnsnames.ora on both servers. Also, when we do the initial duplication using RMAN, it needs to connect to the not-yet-created NZPROD database, so a connection to a statically defined service is required. And because we might need such connections in the future, again for either of these possibilities, we add connection strings for USPROD_DGMGRL and NZPROD_DGMGRL services to tnsnames.ora, too, on both nodes.
Copy Password File and Create a Temporary Parameter File
The standby needs an exact copy of the primary password file, so we need to be aware that a newly created file will not work, even if the SYS password is identical. Note also that the name is based on DB_UNIQUE_NAME; thus, the new name of this file is orapwNZPROD.
For a backup-based process, we manually copy the password file from the primary to the standby server. Although an active database–based duplication process will perform this copy automatically, it still needs a password file present to log in in the first place, so we still must provide it.
Next we need to create a temporary parameter file for NZPROD. The duplication will copy over the correct primary (binary) SPFILE, but for now, we just need the minimum of parameters to start up an instance. The only required entry is the DB_NAME:
![]()
![]()
We could also add DB_DOMAIN if applicable for our environment. If we are creating the standby on the same server as the primary—not a good use case for a production database, but perhaps convenient for testing—we need to specify DB_UNIQUE_NAME. This ensures that the new instance name does not clash with the source, before RMAN has the chance to set DB_UNIQUE_NAME in the SPFILE.
There are, in fact, two paths we can take with respect to generating the SPFILE for the new database. The first is to create the PFILE from the source database SPFILE (using the CREATE PFILE command) and then manually change the file as necessary. The second is to have RMAN create a copy of the SPFILE automatically, specifying the necessary changes in the duplicate command.
The first option is more manual and time-consuming; however, during the process we actually read the parameter file and have a chance to review the settings. We can also use the parameter file to start the instance before the duplication, and thus any incorrect paths or options are brought to our attention immediately and can be amended.
On the other hand, we can let RMAN do the magic for us, but it is very possible that some parameter will turn round and bite us, so to speak, during the duplication process. This means that we will have to clean up any files already created and restart the duplication.
One such example is LOCAL_LISTENER; this parameter might be set to a value other than the LISTENER default, and in that case, we must either create such a listener on the target and update tnsnames.ora as well, or adjust this to the correct value in the RMAN duplicate command.
Also note that the target database will want some directories to be precreated for the instance startup and for the duplication to succeed. Usually this is the audit file directory, and, for non-OMF installations, also the paths to the datafiles and online REDO:
![]()

In a multitenant database, the datafiles are scattered among multiple subdirectories, and we have to create all of them on the target.
Run the Duplicate Process
Let’s run the duplication now. As mentioned, we are not changing the file locations, so there is no need to specify DB_FILE_NAME_CONVERT and PARAMETER_VALUE_CONVERT values, but we do have to specify NOFILENAMECHECK.
![]()

This example uses the active database–based duplication functionality, in which RMAN essentially performs an image COPY of the database datafiles. Since the release of Oracle 12c, we can request that RMAN take a backup of the source database during the DUPLICATE command and make use of these backups.
And, of course, the least sophisticated means of getting started is simply to use backups available to RMAN and created earlier. The major advantage here is minimal impact on the primary database, because the new database’s files are created from the backups. As for syntax, we simply omit the FROM ACTIVE DATABASE clause.
Choosing a Subset of the Source Database
Ever since the standby database feature was made available, there has been an option to have only a subset of the source database protected by the standby. The idea is very simple: we can offline any file we don’t want to have at the target and the recovery will ignore this.
Subsetting is a feature used for specific use cases only. With a regular standby, we want to protect the primary from disasters, which implies that we want a full copy in this secondary location. However, sometimes a PDB may only be temporary (similar to a nologging table in a data load process), or perhaps we are just using snapshot standby for testing, so we don’t need all of the PDBs for the tests. In such cases, the subsetting option makes good sense.
Oracle Database 12c Multitenant provides a new syntax that achieves similar results to tablespace offline, but with a superior usage. First of all, the new syntax works at the PDB level, and, second, it has dedicated syntax for recovering from such subsetting, should we later decide we actually want the PDBs.
Unfortunately, one major aspect remains unchanged: although RMAN has the [SKIP] TABLESPACE clause (and now with 12c it also has a [SKIP] PLUGGABLE DATABASE, too) these are not valid for DUPLICATE FOR STANDBY, though they are valid for the other DUPLICATE option that creates an independent database copy. According to Oracle (MOS note 1174944.1), this is an intentional limitation, because “a physical standby must match the primary.”
In other words, Oracle forces us to create the standby as a full copy, and only then can we remove the unnecessary pieces:
![]()

Following this command, the PDB is still known to the target database, but its recovery flag is set to disabled, meaning that no redo is applied.
![]()

Thanks to all this metadata still present at the standby, it’s easy to add the database back again. Later in this chapter, in the section “Enabling the PDB Recovery,” you’ll learn more about this.
Start Data Guard Broker Processes and Set Up the Configuration
Let’s now quickly go over the steps necessary to finish the standby creation. The first step in properly establishing a Data Guard environment is to configure the database to run the DMON processes that act as background agents for the Data Guard configuration. To do so, on each of the databases, we set the parameter as a common user:
![]()

Now with the brokers running, we can actually create a configuration specifying the primary and the standby databases.
As a rule, when using DGMGRL, we always connect using a connection string, never locally. Although most operations work fine with a local connection (that is, by relying on ORACLE_SID of the CDB), switchovers and failovers don’t. Note also that DGMGRL converts all identifiers to lowercase by default, but we can use double quotes to retain case. However, we would then have to double-quote them in all other places, as well.
![]()

Next we add the standby database:
![]()

Now comes the moment of truth: enabling the configuration. In this process, Oracle sets the log shipping parameters and a few others, so this step is anything but trivial and can fail for many different reasons. In such cases, the error description is usually helpful, and we can also use the oerr utility or look it up in the Error Messages documentation book.
![]()

Here we can see that NZPROD has more than one warning, so let’s review the list by using show database:
![]()

To remove the ORA-16854 and ORA-16857 warnings, we can simply issue a log switch on the primary to force a redo log to be shipped. This will update the lag and satisfy Data Guard, and, of course, once we create the standby redo logs in the next section, the changes will be applied in real time.
![]()

Verify the Configuration and Fill In the Missing Pieces
The next step is to fill in the missing pieces—enabling flashback and adding standby redo logs. We can do this immediately, but let’s have a look at a new diagnostic command first, which outlines the steps we need to perform.
In Oracle 12c, the VALIDATE DATABASE command has been introduced in DGMGRL. Upon execution of the command, Oracle checks various settings, along with the status of the database, and prints a comprehensive summary. It’s useful during an initial setup, to remind us of steps we still have to do, as well as during the course of normal processing.
![]()

There is still room for improvement of the VALIDATE command, and perhaps this will come in future versions; nevertheless, it’s a good tool. From its output, we can see it complains about standby redo logs and Flashback Database not being enabled.
So let’s now create the standby redo logs. The steps are simple: use the same size as for the redo logs and create one more than the number of online redo log groups.
![]()

On the primary, add the standby logfiles and enable flashback. The naïve approach is to add the standby redo logs with the minimal syntax required on both source and target:
![]()
![]()
Unfortunately, in using the simple syntax for adding standby redo, the logs were created but unassigned to any thread. This is not such an issue for the standby itself, because the logs will be assigned to threads as required; however, the VALIDATE command ignores such unassigned redo logs and complains that there are insufficient logs for the thread(s).
The SQL command for creating the standby redo logs enables us to specify the actual thread to assign. Using this, the assignment is preset at the time of standby log creation, fulfilling the VALIDATE command criteria and, at the same time, preventing any possible surprises should the autoallocation go awry.
![]()

the VALIDATE command would be satisfied with the standby redo log allocation:
![]()

We should also enable Flashback Database (see Chapter 8), so we don’t need to rebuild the entire previous primary database on a failover.
Finally, we can verify the validity of the configuration with the following command, although we may need to wait a minute or so for the broker configuration to be updated:
![]()

We can also use a new option for the SHOW CONFIGURATION command to understand what the configuration would look like if we were to switch the database roles:
![]()

Test the Configuration
The last, and perhaps most important, step is to verify that the standby database can be used in case of a disaster or to facilitate a planned maintenance window.
NOTE
You should always start your experimentation with and learning of this functionality on a test database. Disaster recovery is a business-critical function and you need to become very familiar with all the tasks it entails, and the administration of these environments, before you depend on it for the protection of a production database.
A basic test simply consists of doing a switchover back and forth. This verifies that the redo logs are being shipped and applied, and that DGMGRL can actually connect to the databases even if they are down, using the _DGMGRL static connection strings we created earlier.
If this is a nonproduction database, we can perform the test immediately; if it’s a production database, we should schedule a maintenance window to run the test. This is important as a core foundation of a thorough, planned backup, recovery, and DR strategy is to verify periodically that backups can be restored, and that applications and databases can be switched over and successfully run, from the backup data center.
In our example, we want to verify in both directions, keeping the primary in its original location once concluded, so we perform two switchovers:
![]()

TIP
To deepen your knowledge and familiarity with Data Guard, we recommend doing more tests, although most of them are likely to be limited to test databases. Give special attention to the multitenant scenarios described in this chapter, which are also new to us and quite often require manual intervention.
Further Configuration
Now it’s time to review additional settings available in Data Guard. We might want to change the protection mode, set up an observer, and configure fast start failover. Or perhaps we want to change the RMAN retention policy to account for the standby when considering archive logs eligible for deletion. These are but a few of the many useful options available to explore. However, these are beyond the scope of this book, so we recommend again reviewing the Data Guard documentation for this material.
Create a Standby with Cloud Control
Creation of the standby using RMAN is a well-tested and proven process, but Enterprise Manager Cloud Control also has powerful capabilities, including a nice step-by-step wizard. We can get to the wizard by choosing the Availability menu (see Figure 11-1), in which both MAA Advisor and Add Standby Database options have links to the wizard.

FIGURE 11-1. The database home page
The wizard covers both physical and logical standbys. It can also register an existing standby—for example, one that we created manually using the steps we outlined earlier, as shown in Figure 11-2.

FIGURE 11-2. The Add Standby Database wizard start page
A general grievance with Cloud Control is the time it takes EM developers to catch up with the features that the database itself offers. One such example is shown in Figure 11-3, where there is no option for using backup set for the duplication from an active database.

FIGURE 11-3. Selecting a backup type page
Figure 11-4 shows various options for the backup, and as we have selected active database duplication, there is really not much to configure. A nice touch is that EM will create the standby redo logs for us.

FIGURE 11-4. Selecting backup options
In the end (Figure 11-5), a job is created that performs the actual work of creating the standby database and setting up the Data Guard configuration, including the broker. Note that both EM and DGMGRL use the same DG Broker configuration, so it is possible to monitor and manage the configuration using either tool.

FIGURE 11-5. Reviewing the job
After the standby is created, the Availability menu contains new options. The Data Guard Administration page shown in Figure 11-6 displays a overview of the configuration status.

FIGURE 11-6. The Data Guard status page
Managing a Physical Standby in a Multitenant Environment
At the basic level, a container database is still a single database, and physical standby works at the whole CDB level. That means that all the components we were used to managing in a non-CDB environment still apply and are done at the root level.
To begin with, this means that both DGMGRL and Cloud Control need to connect to the root container and issue all the commands there. This also includes parameters and options such as protection mode, standby redo logs, transport mode, real-time apply, read-only open mode, observer, and observer thresholds—and many others. It is a similar case with monitoring; the new Oracle Database 12c VALIDATE command works at the root level, and the lag is displayed for the CDB as whole.
However, the creation, movement, and disposal of PDBs does inject new elements, and issues, into the world of the standby database. New PDBs, and related tablespaces and datafiles, should “appear” on the standby side—but how does this happen, and how can they get there?
Creating a New PDB on the Source
There are multiple ways in which we can create a new PDB on the source, including from scratch, as well as by using the different clone options discussed in Chapter 9.
Note that in all the examples, we use the (thoroughly recommended) parameter, STANDBY_FILE_MANAGEMENT=AUTO. Setting this to MANUAL would introduce extra steps in the resolutions, meaning that we would first need to set the desired names for all the files involved, and that can get tedious.
Deciding Whether the PDB Should Be on the Standby
When a new PDB is created, we can specify whether we want it to be present on the standby. In version 12.1.0.2, you didn’t have much of a choice, because the PDB was available on all standbys or on none, but with Oracle Database 12.2, we can now specify the standbys by name.
![]()

This standbys clause is valid for all the create pluggable database varieties—from seed, plug-in, and clone.
From Seed
The basic database creation, or creation of a fresh, empty PDB or application in an application container, is from the seed PDB or application container seed PDB. In this case, the standby database will create the PDB, too, as it has the seed readily available.
Local Clone
A local clone, or a clone from the same PDB, copies files from an existing PDB into a new one that is part of the same CDB. The standby databases can perform a similar operation; however, this feature requires Active Data Guard to be enabled at the time.
If Active Data Guard is not in use, the standby will stop applying the redo and wait for a resolution:
![]()

At this time, we have to decide whether or not to include the database in the standby. If not, we can simply issue the following:
![]()

Of course, if we don’t want to have the PDB at the standby, its easier to specify that directly in the statement creating the PDB, as shown in the previous section. However, if we decide that we want to include the PDB, we need to provide the missing files. Provided that we still have available a consistent version of the files (the clone was from a closed PDB and the PDB is still closed), it is sufficient to copy them to the expected path and restart the recovery (that is, alter database recover managed standby database disconnect from session). For other cases, see the section “Enabling the PDB Recovery” later in this chapter.
Note that if working with a clone from a closed PDB, and the filenames on standby are known in advance (for example, they don’t use OMF, which includes GUID, which is unknown before the clone happens), then the easiest way is to copy the files beforehand. Doing so means that the redo apply won’t even have to stop.
Remote Clone
The remote clone option is, in fact, very similar to a local one. In this case, Active Data Guard does not have access to the source files and thus it cannot perform the copy automatically. All the other options are valid here, though, including both skipping the PDB as well as providing the files to the standby.
Plug-in
For a plug-in operation, we have the files on hand before the operation, so it is easy to copy them to the standby and place them in the correct location. If we plug in a PDB archive, we must unpack the files manually on the standby. The documentation gives the impression that making such a copy beforehand is always enough.
Although this operation works for basic scenarios, in real life, we may encounter additional complexity, including various situations in which the datafiles are modified during the plug-in, such as when the database is plugged in as a clone. In such cases, the standby will reject the files, meaning that we will have to copy the files again from the source, after the plug-in has occurred.
Proxy, Relocate
All the other clone operations are variations of the basic cloning option and must be treated as such—that is, copy the files after the operation is done, or use RMAN to add the PDB back.
Removing PDB from Source
Obviously, sometimes we want to get rid of a PDB, too. As removing does not need any new datafiles to be created, it is generally an easier task to do on with a standby database in place.
And let’s look at how a rename happens, too.
Drop
The DROP PLUGGABLE DATABASE command affects all configured standby databases, meaning that the specified PDB will be dropped from all of them.
For this command to succeed, the PDB must be closed on all standbys. This obviously applies only to Active Data Guard configurations, as otherwise none of the PDBs can be open. If they are not closed, the redo apply stops and must be restarted again after the PDB is closed before proceeding.
Unplug
An unplug operation on a primary is also honored by all standbys. On the standbys, there is no XML or PDB archive created; instead, the PDB is simply marked as UNPLUGGED. As with the drop operation, the PDB must be closed on all the standbys for this to succeed.
Rename
A rename of PDB is, again, honored by all standbys. The operation requires the source to be in open restricted mode and closed on the standbys.
Changing the Subset
We can also change the list of included PDBs later on the fly. Let’s see how to handle these scenarios.
Remove an Existing PDB
The standby database must be open in order to be modified. Furthermore, the actual statement must be run with the selected PDB:
![]()

In this example, the alert log confirms that the datafiles have just been taken offline:
![]()

After this, no redo is applied to the PDB, and the PDB is no longer usable.
The pre-12c method would be to alter the datafiles offline. This is, of course, more cumbersome and does not set the recovery column of v$pdbs. However, it’s the only option in version 12.1.0.1, and more importantly, it’s still a valid way to remove only selected tablespaces from the standby.
Once these commands have been run, we can delete the physical files because they are no longer needed if the removal is a permanent one.
Enabling the PDB Recovery
There are multiple reasons why we might want to have a PDB made available again on the standby—the most important being in those instances where the database never made it to the standby in the first place, such as during remote cloning. Other cases include various testing scenarios, human errors, and many others that only the real-world experience of a DBA will reveal.
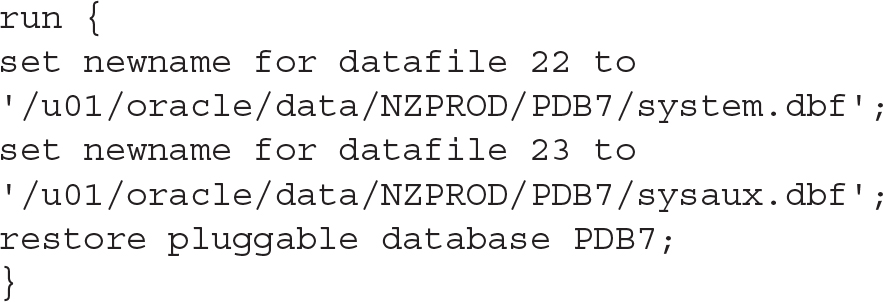
If the files are still present on the standby, we can try enabling the recovery:
![]()

Oracle will attempt to recover the database using the redo available on the standby. Note that this command requires redo apply to be stopped and might also necessitate a restart of the standby to mount mode. If this fails or the files are not available, we can use RMAN to restore the files to the standby.
First of all, we need to determine whether Oracle knows where the missing files should be located. In some cases, such as with the STANDBYS clause, Oracle generates a name such as UNNAMED00178. In others, it carries over the name from the source, modifying it according to DB_FILE_NAME_CONVERT settings if those are configured. These new names are listed in the alert.log as well in v$datafile.
![]()

Or
![]()

For the next step, we must decide whether we want RMAN to access the primary to retrieve the datafiles, or whether we want to use backups. In the latter case, these must be accessible from the standby. Recovery catalog, or simply the catalog command in RMAN, can be a great help here.
If the database knows the target filenames and we are happy with these, we can issue the restore command:
![]()
![]()
Or copy from the primary:
![]()
![]()
If we want new filenames, we have to detail them. Note also that we can specify NEW to let the standby generate OMF filenames, as an alternative:
![]()
This second example uses OMF:
![]()

Now we can enable the recovery and restart the redo apply.
![]()

Cloud Control
Unfortunately, PDB management in EM has no provision for standby databases. It does not offer to specify the STANDBYS clause and is not helpful in the resolution of any issues.
The Data Guard administration page shown in Figure 11-7 displays the status after a clone, and we now have to resolve the situation manually, with little or no help from EM.

FIGURE 11-7. Standby redo apply failure after clone operation
Standby in the Cloud
As with RMAN backups, the cloud provides a cost-effective option for disaster recovery. The reasons for using it for this purpose are even more compelling than those for its use for primary production databases.
Two main points stand out: First, it’s much cheaper and easier to run a standby in the cloud than to build a whole new data center—a backup site in case of a disaster—that might not ever be fully used. Second, the cloud usage charges are determined by allocated capacity, and a standby database, which only applies redo changes, needs much less processing power than the primary database. At the same time, if a switch to the cloud backup database is required, cloud technology means that it is easy to scale up the capacity as required.
Numerous cloud provider options are available, and many can run an Oracle database. After all, it’s just an application running on a commodity operating system, usually Windows or Linux on Intel.
Oracle Public Cloud provided by the Oracle Corporation, however, promises tighter integration and added value, given that it’s the same company behind this cloud as well as the database software. That is particularly true in the case of the RMAN cloud backup, as the Public Cloud provides a media management library for the cloud backup and direct integration with RMAN.
The database part of the Oracle Public Cloud is a recently introduced product and is thus evolving rapidly as an offering. As of the time of writing, Oracle started proving a one-click creation of standby database. After selecting Database as a Service (as shown in Figure 11-8), just select “Standby Database with Data Guard” and you end up with two nodes, primary and standby, instead of just one. The standby can be then managed using the Cloud Service Console or the dbaascli utility.

FIGURE 11-8. The list of Database Offerings for Oracle Cloud
Or you can use the old and proven dgmgrl because it’s still just an ordinary Data Guard physical standby. And you can even skip that magic option and select a more hands-on approach, creating the standby as we described in this chapter, giving you all the flexibility and choices.
You should be aware that the cloud virtual machine comes with a license included in the price. For multitenant, we need to select at least the High Performance Service, and for Active Data Guard, only the Extreme Performance Service fits the requirement (this is true both for manually created standby and for the automatically provisioned, too).
If we already back up our on-premise database to the cloud, we can use these backups to create the standby. Again, the steps are identical to those within a local environment: install the Oracle Database Cloud Backup Module using opc_install.jar, and then instruct RMAN to use the library:
![]()

In RMAN, set SBT_LIBRARY to use this module, either in the run block, before there is a control file available,
![]()

or permanently in the control file:
![]()

Again, the process is exactly the same when using RMAN on-premise, backing up/restoring from the cloud. The notable difference is that, in this case, the data remains in the cloud, so the restore is not limited by the bandwidth of our Internet connection.
In summary, there is very little multitenant-specific functionality in terms of cloud disaster recovery. We must carefully select the machine type to have the multitenant option included in the license, and from there the further handling of PDBs is similar to that for an on-premise standby database.
Summary
In this chapter, we covered one of the less glamorous, yet very important, features of Oracle Database and the cornerstone of the Maximum Availability Architecture: Data Guard.
You’ve seen that it is not difficult to create a standby database, although working with one effectively requires experience that comes from trying things over and over. We emphasized that the Oracle documentation related to this is strewn across multiple locations. On the other hand, disaster recovery is such a critical topic that digging, experimentation, and practice are beneficial in the long run.
To conclude, multitenant itself does not change how a standby database works; however, in enabling cloning and plug-in/unplug operations, such features have the potential for major impact, and many of them break that “setup standby once and then forget it” attitude we may have once held.
