Chapter 9
Managing Your Investments
In This Chapter:
• Understanding your portfolio
• Creating investing accounts
• Setting up transaction downloads
• Understanding the Investment Transaction list
• Exploring the Account Overview window
• Using the investment transaction dialog
• Entering common transactions
• Viewing the Security List
• Downloading online quotes
• Creating a Watch List
• Exporting your portfolio
• Utilizing Quote Lookup
• Using online research
Many people find that investing in stocks, bonds, mutual funds, or other types of assets are ways to save for future goals or retirement. Although this type of investing can be more risky than deposits made to an FDIC-insured bank, certain investments have the potential to earn more and make money grow faster. In this chapter, you are introduced to investment transactions management and then you will learn how to use Quicken Personal Finance Software to keep track of the money you invest and learn how to obtain information about other investment opportunities.
 Quicken Investment Basics
An investment is a security or asset that you expect to increase in value and/or generate income. But what, exactly, are securities? In Quicken, a security is a single investment that has value based on share price. Examples of securities include stock shares for a specific company, bonds for a specific company, and mutual funds offered by investment firms. Normally, when you own a security, you own a certain number of shares. To calculate the total value of the security, you multiply the number of shares you own by the most recent per-share price.
In addition to investments that contain securities, there are other types of investments. This chapter concentrates on the investments you can track with the features in Quicken’s Investing tab. Before you learn how to use Quicken to track your investments, here’s a review of Quicken’s investment accounts and a more detailed explanation of why investment tracking is so important.
Understanding Your Portfolio
The term portfolio refers to the total of all of your investments. For example, if you have 50 shares of one company’s stock, shares in a mutual fund, and a 401(k) plan account at work, these items make up your portfolio.
Types of Investment Accounts
Your Quicken portfolio can include four types of investment accounts. You can have as many investment accounts as you need to represent the investments that make up your portfolio.
• A Quicken brokerage account is for tracking a wide variety of investments handled through a brokerage firm, including stocks, bonds, mutual funds, and annuities. Like the account at your brokerage firm, it can track income, capital gains, performance, market values, shares, and cash balances for multiple securities.
• A 401(k) or 403(b) account is for tracking 401(k), 403(b), or 457 plans, in which you make regularly scheduled, pretax contributions toward investments for your retirement. This type of account can track performance, market value, and distribution among investment choices. If you (and your spouse) have more than one plan, you should set up a separate account for each.
• An IRA or a Keogh account is for tracking a variety of retirement accounts, including standard IRA, Roth IRA, Coverdell Education Savings Account (formerly known as Education IRA), SEP-IRA, SIMPLE-IRA, and Keogh plans.
• A 529 plan account is for tracking 529 Educational Savings Plans. These plans enable multiple family members to make pretax contributions to invest money for a family member’s college education. This type of account enables you to track cash, money market, and securities activity and balances.

There are two distinct account types in Quicken for 529s. One is a 529 plan you can find under Investing & Retirement in the Add Account dialog. The second is under IRA or Keogh Plan in the same dialog. This second type is the account type referred to as Coverdell ESA in the IRA dialog and as Education IRA in Quicken Help.
The various types of Investing & Retirement accounts help you track your investments in Quicken as follows:
• Quicken uses the brokerage accounts to track stocks you have in your possession, brokerage accounts holding one or more securities, employee stock options, Employee Stock Purchase Plans (ESPPs), Dividend Reinvestment Programs (DRIPs), bonds (including U.S. savings bonds), real estate investment trust (REIT) accounts or partnerships, variable or fixed annuities, and Treasury bills. As you can see, brokerage accounts handle pretty much anything that doesn’t fall into one of the other types listed here.
• Single mutual funds with no cash balance are tracked either in a standard brokerage account or as a single mutual fund account.
• 401(k) or 403(b) plans are tracked in an account specifically for them.
• Quicken tracks IRA, Keogh, SEP-IRA, and/or SIMPLE-IRA plans with an account type tailored just for these plans.
• 529 plan accounts are tracked in another special account type for these plans.
• Quicken tracks certificates of deposit (CDs) and money market funds as either a savings account or a standard brokerage account.
• Real estate holdings, including your primary residence, are tracked as asset accounts.
Choosing the Right Type of Account
Keep in mind that you can also track many types of investments in asset accounts. But Quicken’s investment accounts enable you to better track and report on the income, capital gains, and performance of your investments. While this chapter concentrates on investment accounts tracked in standard brokerage, IRA or Keogh, 401(k) or 403(b), and 529 plan accounts, it is important that you consider what type of account your financial institution requires for downloading transactions as you decide which account type to use.
If you want to track the maturity dates of your CDs, you may need to use the brokerage account, as Quicken considers CDs to be investment instruments.
Managing Your Portfolio
You may be wondering why you should bother including investment information in your Quicken data file. After all, you get quarterly (or even monthly) statements from your broker or investment firm. Brokerages only keep records for so long, so if you have had dividend-paying stocks where you have reinvested the dividends for many years, Quicken will handily keep track of every lot even if your brokerage’s history does not go back that far. Consider the benefits when you manage your portfolio with Quicken’s tools:
• Centralizing your investment records
• Knowing your portfolio’s value on any day
• Easily calculating capital gains
Brokerage statements tell you the value of your investments on the statement’s ending date, but not what they’re worth today—or what they were worth on July 20, 1994. Quicken, however, can tell you what your portfolio is worth on any day for which you have entered, or better yet, downloaded, security prices, and it can estimate values for dates without exact pricing information.
Manually compiling a complete pricing and performance history for an investment is no small task, especially for periods spanning multiple statements. If you consistently enter (or download) investment information into your Quicken data file, however, preparing performance charts and reports is as easy as choosing a menu command or clicking a button.
Additional Enhancements in Quicken Premier
Those using Quicken Premier or higher can opt to update stock quotes every 15 minutes, although those quotes may be delayed up to 20 minutes. Other features found in the Premier and higher versions are the ability to create snapshots of your portfolio value versus its cost basis, a “Growth of 10K” chart, and average annual return. And the Portfolio X-Ray feature (found in Quicken Deluxe and higher versions) connects you directly with Morningstar for in-depth information about your portfolio. Learn more about Portfolio X-Ray in Chapter 11. Consider using Quicken to track your investments if:
• You change brokerages or your brokerage is acquired by another brokerage firm, often your cost basis information is not retained by either financial institution. When your investments are in Quicken, you can easily transfer the cost basis information from the old account to the new account.
• Any of your securities have gone through an acquisition or merger, the tax treatment and associated changes to your cost basis are not always tracked, or tracked correctly, by your brokerage firm. Use Quicken to accurately track these events.
• You are keeping custodial accounts for a minor, when that minor is old enough to take over handling of the account, you can give them a complete buy/sell/cost basis history.
• When you use Quicken to track your investments, the data integrates seamlessly with the Lifetime Planner as discussed in Chapter 12. This way, you can see the impact of investment value changes on your retirement plan at a glance.
EXPERIENCED USERS RECOMMEND
Many brokerage and investment firms support the downloading of transactions. If you set up your investing account as a manual account using Advanced Setup, consider changing to online services. Most brokerages offer these services. Downloading transactions saves time and effort, and ensures that your Quicken records match those of your broker. However, your broker’s records, or at least the records your broker might download, may not be accurate or complete, especially in the case of corporate mergers, ESPP buys and sells, and other complex investment transactions. You’ll want to ensure what gets downloaded makes sense.
Creating Investing Accounts
Before you can begin tracking your investments with Quicken, you must set up the investment accounts you’ll need. As you’ll see on the following pages, when you create an investment account, Quicken not only prompts you for basic account information, but also gathers information about your security holdings. When you’re finished creating an account, it’s all ready to use for entering new transactions and creating reports.
Applying for Transaction Downloads
Before you can download transactions into your investment accounts, you may need to apply for download access. Normally, all it takes is a phone call, although many brokerage and investment firms allow you to apply online through the company website. If you do need to apply for online access to your account, it may take up to a week for the application to be processed. You’ll know that you’re ready to go online when you have your password and other setup information.
Choosing the Type of Investing Account
Begin by clicking the plus sign from the Account Bar to add an account, or selecting Tools | Add Account. In the Add Account dialog that appears, click the type of investing or retirement account you want to create. See “Types of Investment Accounts” earlier in this chapter for help in deciding. The option you select will determine certain settings for the account. For example, if you choose an IRA or Keogh plan, as shown next, Quicken will set tax-deferred options that are not set if you select a brokerage account. After you choose a brokerage (or the name of your 529 plan) from the list that appears, you may see a message that Quicken is updating.
Using Simple Setup to Create an Investment Account
Quicken’s extensive online account access features make it possible to automate data entry for accounts held in participating financial institutions, including many brokerage firms. To take advantage of these features, Quicken starts the account creation process for standard brokerage, IRA or Keogh Plan, 401(k) or 403(b), or 529 Plan accounts by prompting you to enter the name of your brokerage firm or choosing one from the provided list.
Whether you choose the default Simple Setup or the Advanced Setup to create your account, you may be prompted for your Quicken ID. If so, enter it and continue entering the information for your investment account. (Chapters 1, 2, and 4 also discuss account setup.) When you have typed or clicked the name of your broker, you are prompted for the user ID and password given to you by your broker. (Quicken may display dialogs that prompt you for additional information about the account. The dialogs that appear and the order in which they appear vary, depending on your financial institution.)
Once you have entered your login information, click Connect to proceed with the account setup. After you have proceeded through any dialogs prompting for additional information, Quicken retrieves the account information and transactions, creates the account, and displays a screen from which you can add this account.
As explained in earlier chapters, it is not uncommon to set up accounts in Quicken and decide later to activate online services for these accounts. The first time you download transactions into a Quicken file with online access, Quicken prompts you to create a new account for these downloaded transactions or to link them to an existing account. If you are linking to an existing account, ensure it is the correct one for these downloaded transactions. (If you do not see an offer to link to an existing account that has already been set up for downloading, you may need to back out of the setup and deactivate downloading from the existing account before Quicken offers to link to your account.)
Using Advanced Setup If your institution’s name is not on the Simple Setup list, has other connection methods, or you just prefer not to download, you can set up your account manually. After you have chosen the type of investing account you want to set up, at the dialog where you are prompted for your institution’s name, click Advanced Setup at the bottom of the window. From this dialog, you have two options:
• I Want To Select The Connection Method Used To Download My Transactions Select this option if your institution offers more than one online service or if you have been given specific instructions how to connect to their website.
• I Want To Enter My Transactions Manually Select this option if your account is held by an entity that does not offer online services, or you just prefer to enter your transactions by hand. Also, use this option if the account you are creating is not held at a financial institution—for example, an account to track the value of securities in your safe deposit box.
Account Name and Other Basic Information Depending on the type of account you are adding, Quicken displays dialogs that prompt you for other basic information, including the account name, statement ending date, and cash and money market balances.
• For IRAs and Keoghs you need to indicate
• Who owns the IRA
• The type of IRA, such as traditional, Roth, Keogh, and so on
• If you have not entered a cash value or more than one mutual fund, you may be asked whether this is a single mutual fund account
• 401(k) or 403(b) accounts require
• Statement ending date
• Employer name (either current or previous employer)
• Who owns the account
• Whether you have loans (and how many) against the account
• What securities you have in the account
Although you will be prompted to list the securities in the account during account creation, it is not required to list the securities at that time. You can create the account and then go back and add the securities at a later time.
• Whether you want to set up your paycheck information
• If the account tracks the number of shares, whether the statement lists the number of shares of each security
For 401(k) or 403(b) accounts, Quicken displays a dialog that asks whether you want to track loans against the account. If you have any loans against the account, be sure to indicate how many you have. Quicken will then display one or more dialogs prompting you for information about your loan(s).
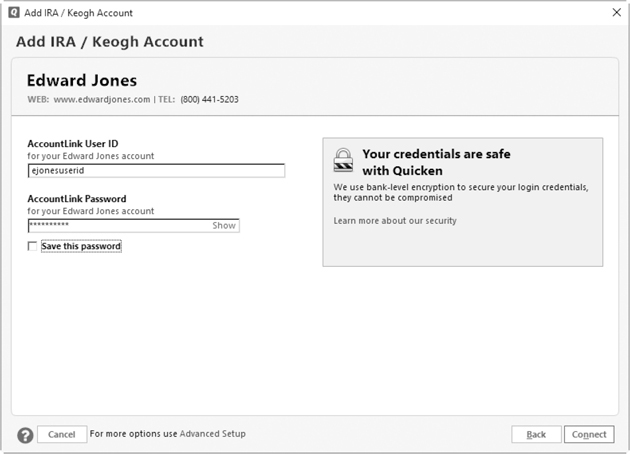
Securities Held For securities held in a brokerage account, a dialog (seen next) prompts you to enter security ticker symbols and names. Enter one security per line, using the TAB key to move from one box to the next. If you don’t know the ticker symbol for a security, click the Ticker Symbol Lookup button to look it up online. Don’t enter bonds in this dialog; you add them later. You may only see this dialog when you are doing a manual account setup. You can enter ten securities before you need to click the Add More button. After you have entered the information for the first five securities, just use the scroll bar at the right of the screen to scroll down and fill out the next five securities.
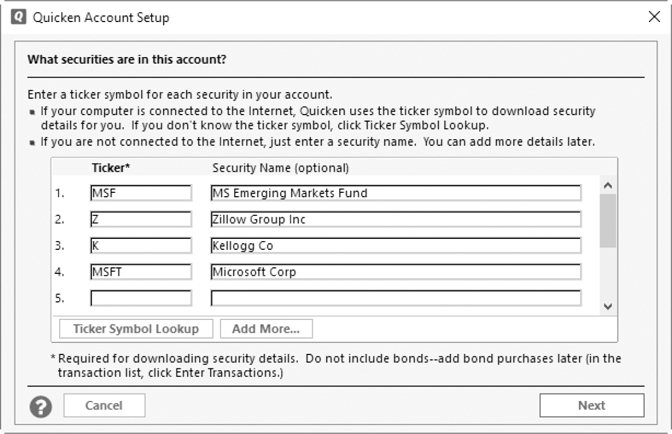
Current Holdings After you have entered the ticker symbols for your securities, click Next. With your Internet connection, Quicken updates and verifies the symbols and displays a dialog like the one shown next. Enter the total number of shares for each security. For a 401(k) account, you may see a Total Market Value column. If the type of security—Stock, Mutual Fund, or Other—is incorrect, select the correct option.
When you click Next, Quicken displays a summary dialog confirming your entries and encouraging you to enter the complete transaction history for each of your holdings. To do so, click Done and then follow the directions on the window that appears.
You may see a message asking if this is a single mutual fund account if you have not entered a cash balance and have entered only one mutual fund security. If you are creating this type of account, click Yes. Otherwise, select No and click Next again. Quicken displays an Account Added window. Click Finish to close the window.
Paycheck Setup When you create a 401(k) or 403(b) account, Quicken displays a dialog, asking whether you want to set up your paycheck. (If you have already set up a paycheck in Quicken, you will not see this message.) Quicken’s Paycheck Setup feature is great for automatically entering 401(k) contributions and loan payments. Learn about setting up your paycheck in Quicken in Chapter 7. Click Yes to set up your paycheck. Click No to continue, and then in the Account Added dialog, click Finish.
Working with Placeholder Entries
Quicken automatically creates special transactions, called placeholder entries, in investment accounts when you enter, either manually or via Online Account Access, currently held securities as part of the account setup process. These transactions make it possible to get up and running quickly with Quicken’s investment tracking features, but they often lack the information Quicken needs to create accurate investment reports.
Here’s how it works. When you create an investment account, you tell Quicken what securities are in the account and how many shares of each security you currently own. However, Quicken doesn’t know when you bought those shares or what you paid for them. Without this historical cost information, Quicken can’t calculate your return on investment or your capital gains (or losses) when you sell the security.
Although you can work with a Quicken investment account as soon as it’s created, to get the most out of Quicken’s investment tracking features, you should replace the placeholder entries it creates with investment cost information. This section explains how.
The placeholder “locks” the number of shares and cash balance for the given date to the number specified in the placeholder. If you enter transactions before the placeholder date, the cash balance will not be affected. This can be a good thing, as you don’t have to account for where the cash came from for securities purchased long before you started tracking in Quicken, but it can also be a bad thing if you don’t understand how the placeholder works. Many Quicken users wonder why cash is not subtracted from the account when they enter a “buy” transaction. Thus, many users don’t use placeholders to avoid these sorts of complications.
You can find an account’s placeholder entries with the rest of the transactions for that account. Choose the account from the Account Bar to open its Transaction List (register). You can also click the Portfolio button after clicking the Investing tab and click the name of the account you want. You will see the placeholder transaction on the Transaction List, as well as in a Placeholder Entries tab at the bottom of the Investment Transaction list, along with the Downloaded Transactions tab and the Bill and Income Reminders tab.
You may see a little calculator icon in the Clr column for each placeholder transaction. You may also notice another calculator icon at the bottom left of the Transaction List just above the Download Transactions tab, as well as a legend explaining what the placeholder transactions are and how to work with them.
If placeholder entries are not visible, you may need to set the preference for viewing hidden investment transactions. Select Edit | Preferences. Click Investment Transactions, and then select the Show Hidden Transactions check box. Click OK to save the preference and close the dialog.
Entering Cost Information for Placeholder Entries
To enter security cost information, begin by selecting the placeholder entry you want to work with. Click the Enter Cost link to display the Enter Missing Transactions dialog, which may take several seconds. See the next illustration for an example.
Transactions entered in the investment account before the date of the placeholder entry will not affect the cash balance of the investment account. It is often better to delete the placeholder and then enter all the historical transactions. You’re going to have to enter the same data whether you enter your investment buys/adds via placeholder or using the Enter Transactions dialog. You might as well do it right and use the Enter Transactions dialog.
Two buttons at the bottom of the dialog offer methods for entering historical cost information for a security: Enter Missing Transaction and Estimate Average Cost.

Enter Missing Transaction Click the Enter Missing Transaction button to open the appropriate correcting dialog. From here, you can enter the individual transactions that make up the total number of shares you hold. In many cases, these transactions include purchases, stock dividends, and stock splits. This option gives you the most accurate records, but if you have many transactions, entering them all can be time consuming. (If the account is a 401(k) account, you may see an extra button labeled Cash Source.) See how to enter new transactions, such as purchases and stock dividends, later in this chapter, in the section “Entering Common Transactions.” It is better to delete the placeholder and enter transactions directly into the Investment Transaction list.
For this dialog, complete the transaction information by moving through the fields with your TAB key. The transaction date should already be filled in. If you get a prompt about it, enter the correct date. If you need to change a date for a placeholder transaction, that date must be before the date you have entered for the placeholder when you set up the account, as shown here.

• The Account and Security Name fields are prefilled, and you cannot change the information.
• Enter the number of shares you purchased on the date of the placeholder transaction. If this placeholder contains more than one lot, enter the oldest lot first. You will have to enter each lot separately to ensure your investment account is correct.
• Enter the price you paid for each share in the Price Paid field.
• Enter the amount of any commission you paid for this transaction. Quicken calculates your total cost.
• If you have made any errors, click the Clear button. If you want to start over, click the Cancel button. Otherwise, click Enter/Done.
A warning message appears telling you that you are attempting to record a transaction on the same date as a placeholder transaction, that your share balance will not be affected, and are you sure you want to do this. Click Yes to close the message and return to the Enter Missing Transactions dialog. If you have entered all the transactions to account for all the shares in the placeholder, you will have the option to click Done to close the Enter Missing Transactions dialog. Otherwise, you will see a button labeled Finish Later.
Estimate Average Cost This option enables you to enter an average estimated cost for all of the shares you hold. Although this method is less accurate than entering individual transactions, it’s a lot quicker and may be sufficient if you don’t need detailed records of stock costs. You can always go back later and use the Enter Missing Transaction button to record more accurate acquisition details. If needed, click the Enter Cost link in the placeholder transaction, and then click the Estimate Average Cost button at the bottom of the dialog. This opens the Enter Missing Transactions dialog from which you can enter either the total cost or price per share:
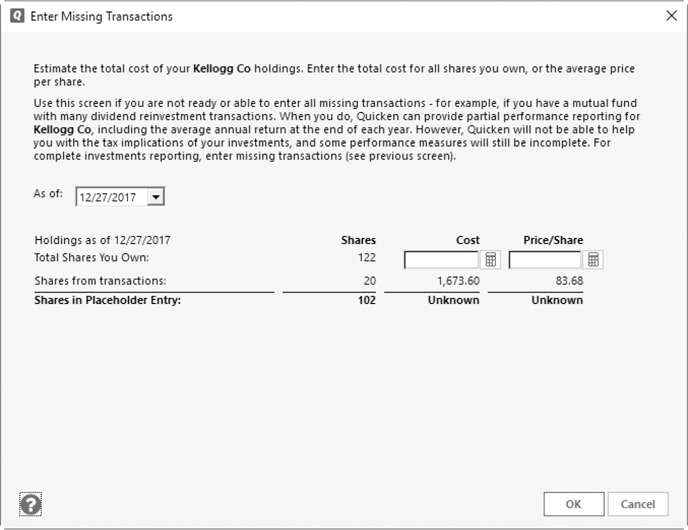
When you click the Estimate Average Cost button, you can enter either the total cost of the shares in the Cost box or the average price per share in the Price/Share box. Quicken makes any necessary calculations. Click OK to save the entry and return to the register. The item then shows as a placeholder entry in the Investment Transaction list. If you enter the cost first, then decide to enter price/share, once you have entered your desired price/share you will need to click in the Cost field to see the updated cost value.
Setting Up Transaction Downloads
After you have created your investment accounts and downloaded for the first time, you can download current account information using One Step Update, as detailed in Chapter 1, or from the Online Center, as explained in Chapter 6.
Using the Online Center Window
You can use the Online Center to download account information and compare it to data in your Quicken file. From the menu bar, choose Tools | Online Center. If necessary, choose the name of your brokerage firm from the Financial Institution drop-down list near the top of the window.
Unusual in Quicken, there is no Help button or icon in the Online Center. However, you can always press the F1 key from within Quicken to open Quicken Help.
EXPERIENCED USERS RECOMMEND
As our world becomes smaller, some investors are finding they need to use multiple currencies with their transactions. Quicken supports this need in several ways.
To set up multicurrency usage, click Edit | Preferences | Calendar And Currency, and click the Multicurrency Support check box. The Portfolio view in the Investing tab will now include a field for the currency to be used. While the default is the U.S. dollar, you do have a number of other choices. Click OK to save the Preferences change.
When you have enabled multicurrency usage, your One Step Update downloads will automatically include currency exchange rates. If you do not want to include the exchange rates, clear the Get Currency Exchange Rates check box in the One Step Update Settings dialog.
Downloading Transactions
To download transactions, make sure the brokerage firm is selected in the Online Center window, and then click the Update/Send button. Depending on the type of connection offered by your financial institution, you may see the One Step Update Settings dialog or be connected directly to your financial institution’s webpage. You may be prompted for your Quicken ID during the process.
Enter any user names and/or passwords as required. If you are using One Step Update Settings, click Update Now. Wait while Quicken connects to your financial institution. When Quicken is finished exchanging information, a One Step Update Summary window appears to summarize the activity that took place while you waited. (Depending on your preference settings, you may not see the One Step Update Summary dialog unless there is an error.) Click Close. If you have downloaded the information from a Web Connect website, sign off, if required, and close the connection to your institution’s website.
If you display the Online Center window again, any transactions you downloaded show in the bottom half of the window’s Transactions subtab for the selected financial institution.
Reviewing and Accepting Transactions
After you download, the One Step Update Summary appears showing that the account has been updated successfully. A small red flag to the left of your account in the Account Bar indicates that there are transactions to review. Click the account to review the transactions.
Depending on your preference settings, you may not see the One Step Update Summary unless there is an error.
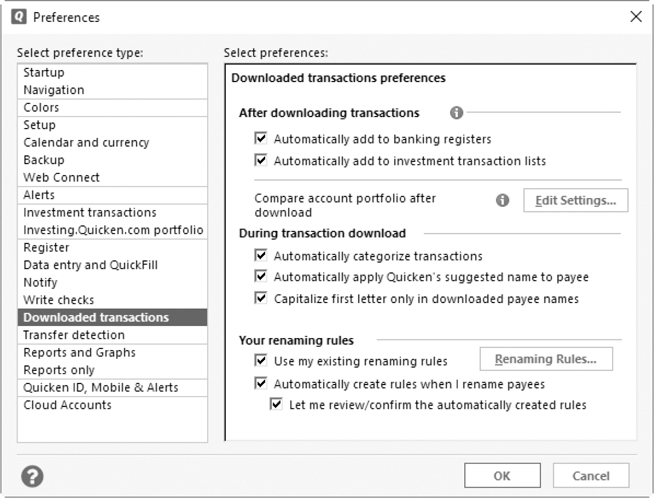
Automatic Transaction Entry
Quicken has the ability to accept and enter your downloaded transactions automatically. To enable this action, click Edit | Preferences | Downloaded Transactions | Downloaded Transaction Preferences | After Downloading Transactions, and click the Automatically Add To Investment Transaction Lists check box.
Many Quicken users do not enable the automatic transaction entry. Instead, they review the downloaded transactions and accept the individual transactions one by one, or they click Accept All after they have reviewed the download.
You can also tell Quicken which accounts to use for this automatic entry:
• Right-click the account’s name in the Account Bar, and choose Edit/Delete Account to open the Account Details dialog for that account.
• Click the Online Services tab.
• Click the Automatic Entry Is: On (or Off) link. The Automatic Transaction Entry dialog appears, as shown next.
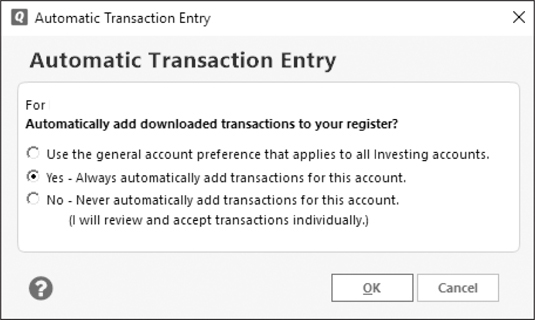
Choose one of the three choices:
• Use The General Account Preference That Applies To All Investing Accounts if you want to have the option you chose in Preferences apply to this account.
• Yes – Always Automatically Add Transactions For This Account if you want Quicken to enter all downloaded transactions without your acceptance.
• No – Never Automatically Add Transactions For This Account. (I Will Review And Accept Transactions Individually.) This is your choice if you want to review each transaction before it is entered into the account’s Transaction List.
Click OK to close the Automatic Transaction Entry dialog. After clicking OK, you may see a warning dialog explaining more about your selection. Click OK or Cancel to dismiss this warning, and then click OK to close the Account Details dialog.
When you are in the account’s Transaction List, click Downloaded Transactions to review and accept the items that have been downloaded. You may handle your downloaded transactions in two different ways:
• Review Each Transaction Use this method if your account information is currently up to date. It allows you to look at each of the downloaded transactions before deciding to accept them into your “official” Transaction List. Usually, you’ll simply select a new or matched transaction and click the Accept button to accept it. Once you have accepted the transaction, it appears in your Transaction List (register) with a small “c” in the Clr column, indicating that the transaction has been processed by your financial institution.
• Accept All This choice may be best the first time you download transactions because it is the fastest, but not necessarily the safest or most accurate. When you click this, all of the transactions are transferred to the Transaction List and the Cash Amt and Cash Bal fields are updated. The Downloaded Transactions pane disappears. You can use a hybrid approach by reviewing each downloaded transaction and changing any transaction that needs special handling. Then, click Accept All to accept the rest.
Remember that unaccepted downloaded transactions are not entered in your Investment Transaction list. Thus, your Transaction List and portfolio balances may be misstated until you accept all downloaded transactions.
If your account balance as downloaded does not match your Quicken balance, Quicken adds an adjusting transaction.
EXPERIENCED USERS RECOMMEND
Many Quicken users seldom, if ever, use Accept All for any type of downloaded transactions. If they do, they will often perform a backup first from which they can restore their original data. At a minimum, users have recommended that after doing a backup, you take the time to review all of the downloaded transactions thoroughly before you click that Accept All button.
When you click Accept All, if there are sold or removed transactions in the download, you may need to follow prompts so you can enter additional required information. However, after the first time you download, be sure to back up before you accept all the transactions. If you have been entering transactions manually, the download may be slightly different, causing duplication and incorrect balances.
Renaming Transactions
Renaming rules are not very helpful in investment accounts. The rules only affect payee names, and only cash transactions have payees. However, you may want to rename some transactions in order to make them consistent with your naming conventions, or to avoid cluttering your Transaction List with a variety of names that don’t give you the information needed. In this case, you can create rules telling Quicken how to change the names of downloaded transactions. You can “rename” securities in downloaded transactions by matching the downloaded security to a security in your Security List. Once the Matched With Online Security link is established, the security will be renamed to the name from the Security List. For example, TD Ameritrade downloads GE as GENERAL ELECTRIC CO COM, but you may prefer your Security List to use “General Electric,” so transactions for GE are renamed to General Electric.
Quicken generally matches to an online security automatically, but if you find the wrong security is matched, you can edit the security and clear the Matched With Online Security option. Then, at the next download, Quicken should prompt you to match the security. Editing the security and changing the name changes the security name displayed in the Transaction List. This process is useful after your first download to change the security names to the name you want displayed.
To rename transactions, click the Renaming Rules button in the Downloaded Transactions tab, or choose Tools | Renaming Rules. The Renaming Rules dialog displays. It shows the list of existing rules. If you have not yet established any Renaming Rules for downloaded transactions, there will be text in light gray font stating that no rules have been defined.
Adjusting the Cash Balance
If the cash balance in your Quicken account doesn’t match the cash balance at your brokerage firm, you can adjust the cash balance with the Update Cash Balance dialog. From the Account Bar, click the account you want to adjust. The account’s Transaction List appears. From the account’s Transaction List, click the Action gear icon | Update Cash Balance. Enter the correct cash balance and the date, and click Done. Quicken adjusts the account accordingly.
In the same way, use the Update Share Balance option to make any corrections to the number of shares in an account.
Reconciling Your Investment Account
To keep your electronic investing accounts reconciled to your statement, you can perform a periodic reconciliation. If your account does not match your statement, you can adjust it with the Reconcile dialog. Select the account in the Account Bar to open the Transaction List. From the Action gear icon’s menu, select Reconcile. The Reconcile dialog appears. Enter the starting and ending cash balance amounts and the statement ending date, and click OK.
If the brokerage account has a linked checking account, you will see a warning message telling you the account can only be reconciled from the linked checking account. Click OK to dismiss the warning. For the accounts with linked checking accounts, you’ll need to perform the reconciliation in the linked cash account instead. In this case, Quicken will not display the list of transactions in your brokerage account.
A list of the transactions displays. On the left are those transactions that decrease the cash balance, and on the right are those that increase it. As you click each transaction, the difference in the lower-right area of the dialog reflects the increase or decrease. Your account is successfully reconciled when the difference is equal to zero. If you want to start by marking all of the transactions, click Mark All. This is particularly helpful when you have many transactions. When you have marked all and are finished, click Done. If you want to return to this later, click Finish Later.
When you have reconciled your account, a message will be displayed offering you the opportunity to create a reconciliation report. Click Yes or No.
• If you choose Yes, the Reconciliation Report Setup dialog appears. Enter a title name.
• Enter a date in the Show To Bank Balance As Of field.
• Choose to create a report including All Transactions or Summary And Uncleared, which shows only the uncleared transactions and a summary of the cleared items.
• Select Show Savings Goal Transactions if you choose to include them.
• Click OK to open the Print dialog. You may choose to print the report to a paper printer or to the Quicken PDF printer. You can also print to a file using the Export To option.
• If you choose No, you are returned to your account’s Transaction List.
EXPERIENCED USERS RECOMMEND
As with banking and credit card statements, Quicken does not keep prior period reconciliation reports. To keep your reports, you must either print them or use the Quicken PDF printer to create a “digitally” printed file that you can view with the free Adobe Reader program. (If your operating system is Windows 10, you also have the option of using the Microsoft Print to PDF utility.)
1. In the Print dialog, click the Printer drop-down list and choose Quicken PDF Printer.
2. Click Print. A Save To PDF File dialog box appears.
3. In the Save In field, enter the name of the folder into which the report should be saved, or choose one using the drop-down arrow.
4. Name your file. Use a name that will mean something, perhaps something like Retirement Acct Reconciliation 06-30-2018. If you want the reconciliation files to sort by date of the reconcile, you should use YYYY-MM-DD instead of MM-DD-YYYY as the date format in the filename.
5. Click Save. Your report is “printed” and saved to your selected folder and you are returned to the account’s register or Transaction List.
If you click the Don’t Show Me This Screen Again check box in the Reconciliation Complete dialog and want to be prompted to print a reconciliation report when completing future reconciliations, you will have to reset the warning in Preferences. From the Quicken Toolbar, click Edit | Preferences | Alerts | Warnings | Reset Quicken Warnings. Click OK to close the Preferences dialog.
Adjusting Holdings
If the holdings amounts in Quicken don’t match what you’ve downloaded, the Enter Transactions dialog can be used to adjust your holdings. Select the account you want to adjust from the Account Bar to open the account’s Transaction List. Click the Enter Transactions button located under the name of the account.
From the Enter Transaction drop-down list, select the type of transaction you want. Fill in the information needed, and when you are finished, click Enter/Done. For additional information see the “Entering Common Transactions” section later in this chapter.
If you enter a transaction to correct an account that has a date more than one year from today’s date, you may see a warning message. If you are sure the information you are entering is correct, click Yes.
Working with Investment Accounts
To view an account’s information, select the account name from the Account Bar. This opens the register (or Transaction List) for this account, which looks similar to a spending account’s register. From this Transaction List you can enter transactions and perform other activities.
The most important part of properly tracking investments is recording all investment transactions. This includes purchases, sales, dividends, and other activity affecting your portfolio’s cost basis and value. This will make life much easier when you are ready to sell the security.
Before you enter a transaction, you must have all of its details. In most cases, you can find the information you need on the monthly statement, confirmation form, or receipt you receive from your broker or investment firm. The information varies, depending on the transaction, but it generally should include the security name, transaction date, number of shares, price per share, and any commissions or fees.
For income tax purposes, it is better to record total cost rather than price per share, as that is the value you enter on Schedule D of your federal income tax return. Quicken will then calculate the price per share for you.
This section provides some information and advice for understanding the Investment Transaction list and entering the most common transactions into investment accounts.
Understanding the Investment Transaction List
The Investment Transaction list looks very much like the check registers. However, instead of the familiar Date, Check Number, and Payee fields, the Investment Transaction list has fields that pertain to your investing activities. See Figure 9-1 for an example.

Figure 9-1 · The Investment Transaction list in Quicken is similar to a spending account’s account register.
The Investment Transaction list includes the following:
• Attachment Icon (the small paper clip) When you attach a receipt or other item to this transaction, this icon appears in this column. See Chapter 5 for more information on attachments.
• Clr When you reconcile your investment account, this column shows the cleared status of transactions.
• Date The date of the transaction. Click the small arrow to sort transactions by date.
• Action What this transaction represents. See “Investment Actions” later in this chapter for more information. Click the column to display the small arrow that allows you to sort by this column. It sorts in alphabetical order by action.
• Security This column shows the name of the security. Since a single investment account can contain a wide variety of securities, each security is named.
The five columns beginning with Description in your Investment Transaction list are sort fields. There are four bolded columns and the paper clip (attachments) column that can be sorted. Click in the column name you want to use to sort by that column.
• Description What action is represented. For example, if the Action column says “Bought,” the number of shares of the named security and the price paid show in this column.
• Share Bal This is the balance of the cumulative number of shares for all the transactions pertaining to that security in the account. This is not the amount of shares for the individual transaction unless the transaction is the first or only transaction in the account for that security.
• Inv Amt Shows the amount of the investment in dollars. For example, if you purchased 50 shares of stock at $10.00 per share with a $35.00 commission/fee, this amount would be $535.00.
• Cash Amt This column displays the cash amount for transactions for this account where cash is received or spent; for example, for a dividend, you receive cash, so the amount of the dividend would show in the Cash Amt column.
• Cash Bal This column displays any cash balance in the account after the transaction on this line of the register.
Share Balance is the cumulative total of shares for that security on the date of the transaction. If you have three transactions for a security, each buying 10 shares, the Share Balance will show 10, 20, and 30 for the corresponding three “buy” transactions. You need to select the transaction to see how many shares were involved in that particular transaction. The number of shares involved in a transaction also appears in the Description column.
If your account has a linked checking account, the Cash Amt and Cash Bal columns do not appear in the Investment Transaction list. In an investment account with a linked checking account, you will see a column for investment amount labeled Inv Amt.
Working with the Buttons
In addition to the register lines, at the top of the Transaction List are the Enter Transactions and the Holdings buttons, each with several options:
• Enter Transactions Clicking the Enter Transactions button opens the investment transaction dialog. See “Using the Investment Transaction Dialog” later in this chapter.
• Holdings Click the Holdings button to open an Account Overview window for this account. Similar to the Portfolio view in the Investing tab, you can see the current value, recent and historical performances, and the tax implications of the transactions in this account, as explained in “Exploring the Account Overview Window” later in this chapter.
Account Actions Click the Action gear icon at the right of the Investment Transaction list to open the menu, shown next. This menu gives you access to several investment-related activities. The menu is divided into three sections: Transactions, Reporting, and Global Preferences (All Registers). Each is described next:

• Update Transactions opens the One Step Update Settings dialog. Enter your password and click Update Now to update your accounts.
• Set Up Download (not shown) appears when you have not yet activated this investing account for online services. If your financial institution offers online services, click Set Up Download to start the process.
• Update 401(k) Holdings (not shown) starts the Update 401(k) Holdings Wizard.
• Update Quotes Only prompts Quicken to use your Internet connection to download the latest quotes on your holdings and Watch List. Learn more about the Watch List later in this chapter.
• Edit Account Details displays the General Information tab of the Account Details dialog, which you can use to enter or edit basic information about the account, including its name, tax-deferred status, account number, and contact information. From this dialog you can also enter information about fees and commission charges for this account. Click Fees to open the Transaction Fees dialog. After you have entered the information, as either a dollar amount or a percentage, click OK to close the Fees dialog and again to close the Account Details dialog.
• Enter Transaction opens the investment transaction dialog as described later in this chapter.
• Reconcile opens the Reconcile dialog.
• Update Cash/Share Balance works as described in “Adjusting the Cash Balance” earlier in this chapter.
• Security List opens the Security List. See “Viewing the Security List” later in this chapter.
You will see a Checking Account entry here only if the investment account has a linked checking account.
• Account Attachments opens the Account Attachment dialog. See Chapter 5 to learn how to work with attachments.
• Account Overview opens the Account Overview window. See “Exploring the Account Overview Window” later in this chapter.
• Investing Activity opens a report about your investing activity for time ranges you can set.
• Print Transactions gives you the opportunity to print your Transaction List.
• Register Row Height Spacing opens a small menu from which you can set the height of each row in the register as discussed in Chapter 1.
• Register Preferences opens the Preferences dialog to the Investment Transactions section. See Appendix B for more information about preferences.
• Customize Action Bar opens the Customize Action Bar dialog. From this dialog, you can select additional actions to display on this investment account’s action bar, which will display the icons for the items you select in the Customize Action Bar dialog. This customization affects only this investment account.
Exploring the Account Overview Window
When you download transactions from your financial institution, you also receive detailed account balance information. To review this information, select the account in the Account Bar to open the Transaction List. From the Action gear icon’s menu, select Account Overview.
The Account Overview window for this account appears as seen in Figure 9-2. Or, you can click the Holdings button next to the Enter Transactions button. You can also add the Account Overview icon to the account’s action bar for quick access each time you use the account’s Transaction List.
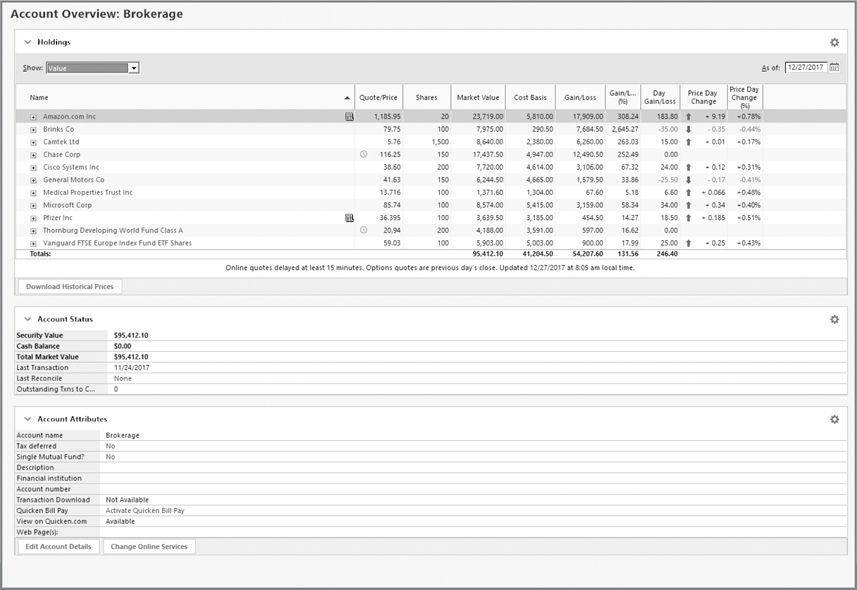
Figure 9-2 · The Account Overview window contains detailed information about an investment account.
You can review this information in the Account Overview window and compare it to the information in your account statement. You can choose several ways of viewing your holdings. Click the Show menu to see the options listed on the following page.
Many Quicken users prefer using the Portfolio view of the Investing tab to review their holdings. This is because the Portfolio view will do things like remember your column widths and views, whereas the Account Overview’s column widths and views have to be set each time you view the Account Overview.
• Value displays the following:
• Currency displays if you have enabled multiple currencies.
• Quote/Price shows the quote or price as of the last time you downloaded.
• Shares shows the number of shares you currently hold.
• Market Value displays today’s value of these shares.
• Cost Basis shows what you paid for these shares when you bought them, plus or minus any cost-basis–related adjustments, like dividend reinvestments, sales, or corporate actions.
• Gain/Loss & Gain/Loss % display your unrealized gain or loss as of the last time you downloaded in both dollars and percentages.
• Day Gain/Loss indicates the overall gain or loss based on the latest download prices in dollars.
• Price Day Change shows the trend for today for each security and the dollar amount of the change.
• Price Day Change % displays the change in price since the previous day’s closing price as a percentage.
• Recent Performance shows the following:
• Market Value shows the market value as of the last download.
• Gain/Loss and Gain/Loss % show the gain or loss in dollars and/or percentage over time.
• Gain/Loss 1-Month shows the gain or loss in dollars for the past month.
• Gain/Loss 1-Month % shows the percentage of the gain or loss percentage for the past month.
• Gain/Loss for % 3-Month and 12-Month shows the gain or loss percentage for these time periods.
• Historic Performance indicates the average annual return for each security compared with the average annual return in its industry or category for the past one, three, and five years as a percentage. It also displays the industry and/or category of each holding, expressed as percentages. If you have not held the shares for the entire one-, three-, or five-year period, N/A will display instead of a percent value.
• Tax Implications displays tax information about each security. You may need to expand the security lot information by clicking the plus sign in the small square at the left of the security’s name to see the tax implications for each lot. However, check with your tax professional for more information.
If you want to adjust your holdings, refer to the section “Adjusting Holdings” elsewhere in this chapter.
Checking Your Account’s Status
The current status of your account is displayed in the center of the Account Overview window in the Account Status snapshot. It includes all of the following:
• The Security Value of this entire account
• The Cash Balance held in this account
• The Total Market Value
You will also see the Linked Cash Balance if the account has a linked checking account.
This snapshot also includes the Last Transaction, Last Reconcile, and Last Statement Download dates. You can also see any transactions that need to be compared, as well as any e-mails to the account’s financial institution that you need to send or read from the Online Center. Click the blue date shown to the right of Last Statement Download to go to the Online Center for this account.
Seeing the Options
In the Holdings snapshot of the Account Overview, the Options gear menu allows you to do the following:
• Preferences opens the Portfolio View Options dialog.
• Show Closed Lots tells Quicken to show transactions that have been closed.
• Get Online Quotes uses your Internet connection to update your holdings.
• Go To Full Portfolio takes you to the Investing tab’s Portfolio view.
If you are using Quicken Premier or higher edition and have chosen to update your quotes every 15 minutes, your holdings are automatically updated while Quicken is the active application. To turn on this useful feature, select Edit | Preferences | Investment Transactions, and select the Automatically Update Quotes Every 15 Minutes check box. Click OK or Close to close the Preferences dialog.
The Options menu in the Account Status snapshot offers the following:
• Reconcile This Account opens the Account Reconciliation dialog.
• View All My Accounts opens the Account List.
Reviewing the Account’s Attributes
The bottom snapshot of the Account Overview window displays the account name, its tax-deferment status, and other information about your account. This includes your account number and user name, so be careful if you view this information in a public setting.
From the Option gear’s menu in this section, you can do the following:
• Create a New Account Click this to open the Add Account dialog.
• View/Edit Comments This option opens a dialog box in which you can add or edit comments about this account.
• Set Tax Attributes This option opens the Tax Schedule Information dialog.
• Set Web Pages You can enter the Home Page, Activity Page, and one additional webpage address for this account in this dialog.
• Browse Web Pages After you have entered webpage addresses for this account, the option displays a link to those pages.
• Transaction Fee This dialog allows you to enter any fees associated with this account. You may enter both fixed costs and percentages.
• Create New Loan If you are viewing a 401(k) or 403(b) account, you may see an additional option from which you can create a loan that you have taken against this account.
The Edit Account Details button at the bottom of the Account Overview screen opens the Account Details dialog at the General tab. The Change Online Services button opens the Account Details dialog at the Online Services tab.
Click Close to close the Account Overview screen.
Using the Investment Transaction Dialog
You enter transactions into an investment account with the investment transaction dialog. This dialog, which is named for the type of transaction you are entering, is a fill-in form with all of the fields you need to enter transaction details.
To open the investment transaction dialog, click the Enter Transactions button in the Transaction List for the account in which you want to enter the transaction (refer to Figure 9-1). It looks like the dialog shown next. (If the account is a 401(k) account, you may see a Cash Source button in the dialog.)
Investment Actions
To use the investment transaction dialog, you must begin by choosing a transaction type (or action) from the Enter Transaction drop-down list. There are dozens of action types organized into two categories: investment transactions and cash transactions.
Investment Transactions Investment transactions directly affect your security or investment account balances, unless you have placeholders. See “Working with Placeholder Entries” earlier in this chapter.
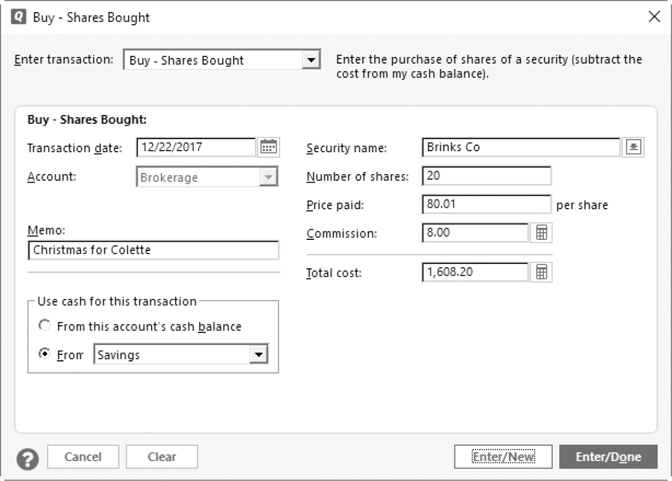
• Buy – Shares Bought (shown earlier) enables you to add shares to an investment account. The cost of the shares (plus any commissions) is deducted from the account’s cash balance (or another account’s cash balance).
• Sell – Shares Sold enables you to remove shares from an investment account. The proceeds from the sale (net of any commissions) are added to the account’s cash balance (or another account’s cash balance).
• Div – Stock Dividend (Non-Cash) enables you to add shares of a security paid as a dividend.
• Reinvest – Income Reinvested enables you to account for investment income (such as dividends) that is reinvested in the security. This is common with dividend reinvestment plans and mutual funds.
• Inc – Income (Div, Int, Etc.) enables you to record income from interest, dividends, and capital gain distributions. It also enables you to record miscellaneous income that you can categorize as you wish.
• Add – Shares Added enables you to add shares to an investment account without an exchange of cash. You might use this option to add shares received as a gift.
• Remove – Shares Removed enables you to remove shares from an investment account without an exchange of cash. You might use this option to remove shares you have given to someone else as a gift.
Each of these options has a keyboard shortcut with which you can access the transaction type. Keyboard shortcuts can save some time when entering common transactions. You can also press the first letter of the transaction type; for example, pressing B successively selects Buy – Shares Bought, Bonds Bought, Bonds Sold, and Bought ESPP Shares.
• Adjust Share Balance enables you to create a placeholder entry transaction to make your share balance agree with your brokerage statement. You can enter cost information later, as discussed earlier in this chapter, in the section “Working with Placeholder Entries.”
• Stock Split enables you to record additional shares received as a result of a stock split.
• Return Of Capital enables you to record the return of part of your investment capital.
• Miscellaneous Expense enables you to record investment expenses other than commissions. Unlike most other actions, you can assign a category to miscellaneous expense transactions.
• Margin Interest Expense enables you to record the amount of interest paid as a result of purchasing securities on margin.
• Bonds Bought/Sold enables you to record the purchase and sale of bonds.
• Grant Employee Stock Option enables you to record the receipt of an employee stock option.
• Exercise Employee Stock Option enables you to use an employee stock option to buy stock.
• Reprice Employee Stock Option enables you to change pricing information for stock options.
• Bought ESPP Shares is used to enter transactions for shares you have purchased through an Employee Stock Purchase Plan.
• Sold ESPP Shares allows you to enter shares you have sold through an Employee Stock Purchase Plan.
• Short Sale enables you to record a short sale of a security.
• Cover Short Sale enables you to record the purchase of stock to cover a short sale.
• Corporate Name Change enables you to record the change of the name of a company for which you own stock. This preserves the old name information; simply editing the security name in the Edit Security dialog does not.
• Corporate Securities Spin-Off enables you to record securities obtained through a spin-off of a smaller company from one of the companies in which you own securities.
• Corporate Acquisition (Stock For Stock) enables you to record securities obtained in exchange for other securities you own, normally as a result of a corporate acquisition.
• Mutual Fund Conversion lets you record the information for a mutual fund that you currently hold that is being replaced by another fund. Here you record the price per share after the conversion is complete.
• Cash Transferred Into Account enables you to record the transfer of cash into the investment account.
• Cash Transferred Out Of Account enables you to record the transfer of cash out of the investment account.
If the investment account has a linked checking account, you will not see the Cash Transferred options.
• Shares Transferred Between Accounts enables you to move shares from one Quicken investment account to another.
• Reminder Transaction enables you to enter an investment reminder. If the Reminder Transaction has a future date, the reminder will not appear in the alert list until that future date. This reminder will appear as text in your Quicken investment alerts the next time you open Quicken.
Cash Transactions Cash transactions affect the cash balance in an investment account. These actions make it possible to track an investment account’s cash balance without using a linked cash account.
• Write Check enables you to record a check written from an investment account.
• Deposit enables you to record a cash deposit to an investment account.
• Withdraw enables you to record the withdrawal of cash from an investment account.
• Online Payment enables you to record an online payment from the investment account’s cash balance. To use this feature, the account must be enabled for Online Payment or Online Bill Pay. Chapter 7 discusses Online Payment.
• Other Cash Transaction enables you to record any type of transaction that affects the investment account’s cash balance.
Completing the Transaction
Investment transaction dialogs and forms are generally self-explanatory and easy to use. Simply fill out the fields in the form, and click one of the Enter buttons. Enter/New enters the current transaction and redisplays the investment transaction dialog so you can enter another transaction. Enter/Done enters the current transaction and dismisses the investment transaction dialog.
Entering Common Transactions
Although page-count limitations make it impossible to review every kind of investment transaction in this book, here’s a look at a few common transactions. They should give you a solid understanding of how the investment transaction dialogs work so you can enter your transactions.
Buying Shares
A security purchase normally involves the exchange of cash for security shares. In some cases, you may already own shares of the security or have it listed on your Watch List. In other cases, the security may not already exist in your Quicken data file, so you’ll need to set up the security when you make the purchase.
Start by selecting the investing account with which you want to work. Click Enter Transactions to display the Buy – Shares Bought dialog shown earlier. Enter information about the shares you have purchased:
• Transaction Date is the date you purchased the shares.
• Account is the name of the account you selected. You cannot change the option chosen from this drop-down list. If the account name is incorrect, click Cancel, open the correct investing account, and start over.
• Security Name is the name of the security. If you enter the name of a security that doesn’t already exist in Quicken, the Add Security To Quicken dialog, which is discussed later in the section “Adding a New Security,” appears so you can add the security to Quicken. There is now a search field at the top of the Security List, similar to the search field at the top of the Category List.
• Number Of Shares is the number of shares purchased.
• Price Paid is the per-share price.
• Commission is the amount of commissions you paid to your brokerage or investment firm.
• Total Cost is calculated by Quicken.
Enter the total cost and number of shares, and let Quicken calculate the price paid. The total cost and number of shares is what gets reported on IRS Schedule D when you sell the shares. The total cost and number of shares should match exactly what your brokerage reports, and the price per share can be off by a few pennies. It’s better to record the information so you can correctly report your transactions at tax time and be confident if you are audited.
• Memo lets you enter any comments about this transaction.
• Use Cash For This Transaction enables you to specify an account from which the total cost should be deducted. By default, this option is set to use cash from the same investment account. If the brokerage account has a linked checking account, the cash source will default to the linked checking account; this cannot be changed.
When you’re finished entering information about the transaction, click one of the Enter buttons. The transaction appears in the Transactions list for the account.
If you want to add security shares to an account without an exchange of cash, use the Add – Shares Added action. Its form asks for most of the same information but does not affect any cash balances. In addition to not affecting the cash balance, Add Shares lets you specify a different acquisition date from the transaction date. This can be helpful if you received the shares as a gift or inheritance so you can track both the date you received the shares and the date the shares were originally acquired.
Selling Shares
A security sale also involves the exchange of cash for security shares. Normally, you dispose of shares you already own, but in some instances, you may sell shares you don’t own. This is called selling short, and it is a risky investment technique sometimes used by experienced investors. (To record short sale transactions, use the Short Sale or Cover Short Sale action.)
To sell shares, choose Sell – Shares Sold in the investment transaction dialog to display the Sell – Shares Sold dialog. Enter information about the shares you have sold:
• Transaction Date is the date you sold the shares.
• Account is the name of the account in which the transaction should be recorded. You cannot change the option chosen from this drop-down list if you are entering a transaction from within the account’s Transaction window; if it’s wrong, click Cancel, open the correct account register, and start over.
• Security Name is the name of the security. You can choose an option from the drop-down list, or if you have many securities, start typing the security name anywhere in the security name or symbol fields, and Quicken will show securities that begin with those letters.
• Sell All Shares In This Account tells Quicken to automatically enter the total number of shares you own in the Number Of Shares box.
• Number Of Shares is the number of shares sold.
• Price Received is the per-share price.
• Commission is the amount of commissions you paid to your brokerage or investment firm.
• Specify Lots enables you to specify which shares you are selling when you have multiple purchase lots.
You need to be able to instruct your brokerage which lots you are selling. Not all brokerages allow tax lot–specific transactions. The Specify Lots button will be grayed out if you do not have any shares of the selected security in the account where you are entering the sell data. It will also be grayed out if the security uses average cost, like a mutual fund.
EXPERIENCED USERS RECOMMEND
When working in your investing accounts, always ensure you are in the correct investment account and double-check the security name to be sure the security you wish to sell is in that account. Even experienced Quicken users report issues when they try to sell a security that is not in the account or the security name is similar. This is also where entering the correct number of shares, including all necessary decimal places for transactions, becomes critical. If you rounded the numbers or entered any incorrect numbers, you may not be able to record the sale of the number of shares you wish. The Share Balance column in the Investment Transaction list can be useful in troubleshooting this issue, as it shows the exact number of shares you have for each security.
• Total Sale is determined by multiplying the per-share price by the number of shares and deducting the commission. These are the proceeds from the sale. You can enter any three of the four fields (shares, price per share, commission, and total) and Quicken will calculate the fourth field.
The technique Quicken uses is determined by the data you enter. However, your broker reports the total sale amount on the 1099B form he or she sends at the end of each year. This is the number you report on Schedule D of your annual income tax report. Therefore, the total sale amount is more critical than the price per share.
• Memo lets you enter any comments about this transaction.
• Record Proceeds? enables you to specify an account to which the net proceeds should be added. If the investment account has a linked checking account, all proceeds go to the linked checking account. From that linked checking account, you can transfer proceeds to any account in Quicken.
When you click one of the Enter buttons, Quicken records the transaction.
Dividend Payments and Other Income
Many investments pay dividends, interest, or other income in cash. (That’s why they’re so attractive to an investor!) Recording this activity in the appropriate Transaction List enables Quicken to calculate performance accurately while keeping account balances up to date, as well as helping you at tax time.
Keep in mind that many mutual funds are set up to reinvest income rather than pay it in cash. Do not use the steps in this section to record a reinvestment of income. Instead, use the Reinvest Income action to enter transaction information.
EXPERIENCED USERS RECOMMEND
Use the Specify Lots option when selling your shares for additional control over capital gains. For example, if you want to take advantage of long-term capital gains tax breaks, you could sell shares that have been in your possession for more than 12 months. If you want to record a loss, you could sell shares that cost more than the selling price. Obviously, your options will vary, depending on the lots, their acquisition prices, and your selling price. If you select this option, click the Specify Lots button to display a dialog. (This dialog may include an Enter Missing Transactions button if placeholder entries exist for the security.) Use the dialog to enter shares in each lot you are selling, or select one of the Auto Select options and click OK. If you don’t use the Specify Lots button to select lots, Quicken automatically sells the oldest shares (First In, First Out, or FIFO, method). As always, consult your tax professional if you want to select lots other than FIFO to determine what the IRS limitations might be.
To record dividend or interest income, choose Inc – Income (Div, Int, Etc.) from the drop-down list in the investment transaction dialog to display the Income dialog. Enter information about a cash payment on an investment:
• Transaction Date is the date of the income event.
• Account is the name of the account in which the transaction is to be recorded. You cannot change the option chosen from this drop-down list if you are entering a transaction; if it’s wrong, click Cancel, open the correct Transaction List, and start over.
• Transfer Account enables you to specify an account into which the income is deposited. Leave this blank if the cash is deposited directly into the investment account. If the investment account has a linked checking account, the linked checking account will be designated as the transfer account and cannot be changed.
• Memo enables you to enter a brief note about the transaction.
• Security Name is the name of the security. You can choose an option from the drop-down list. If the transaction isn’t related to a specific security—for example, interest paid on a cash balance in a brokerage account—you can leave this field blank.
• Dividend, Interest, Short-Term Cap Gain Dist, Mid-Term Cap Gain Dist, Long-Term Cap Gain Dist, and Miscellaneous are fields for entering various types of income. In most cases, you’ll use only one or two of these boxes.
• Total Proceeds is the total of all income amounts calculated by Quicken.
• Category For Miscellaneous is the category you want to use to record miscellaneous income. This field is available only if you enter a value in the Miscellaneous field.
When you click one of the Enter buttons to record the transaction, it appears in the Transaction List.
Other Transactions
Other transactions are just as easy to enter as purchases, sales, and income. Simply choose the appropriate option from the drop-down list in the investment transaction dialog, and enter the transaction information in the form that appears. If you have the transaction confirmation or brokerage statement in front of you when you enter the transaction, you have all the information you need to record it.
You may wonder what the BoughtX and XIn/XOut items in your register’s Action column mean. The X simply indicates that the action had no impact on the cash balance of the account and the transaction was a transfer between accounts.
If you need additional guidance while entering a transaction, click the Help button (question mark icon) in the Enter Transaction dialog to learn more about the options that must be entered.
To quickly recalculate transactions in an account, use the keyboard shortcut CTRL-Z.
Entering Transactions in the Transaction List
You can also enter investment transactions directly into the Transaction List window. This feature makes entering transactions quicker for experienced Quicken users.
To begin, scroll down to the blank line at the bottom of the register. Click the line to activate it, and enter the transaction date in the Date column. Then choose an action from the pop-up menu in the Action column and press TAB. The two lines for the transactions fill in with italicized reminders of the information you should enter into each field. Fill in the fields with transaction details, and click Enter. Be aware that not all transaction types can be entered directly in the Investment Transaction list. If the form is required, it will pop up automatically.
Editing Transactions
You can quickly edit transactions from your Investment Transaction list. In the register for the account, select the transaction you want to edit. Click in the field you want to modify, and make the desired change. When you’re finished, click Enter.
You can also select the transaction and select the Edit action button. The Edit dialog appears. You can also double-click the transaction you wish to edit. Change any of the fields and click Enter/Done.
You can also right-click the transaction to open the context menu. Choose Edit to open the Edit dialog.
A few transaction types cannot be edited: Exercise Employee Stock Option and Sold ESPP Shares. These transactions must be deleted and re-entered if a change is needed. Additional information on entering uncommon transactions can be found on the Quicken Community site. You can find the Quicken Community site using the Help menu and selecting Help | Quicken Community.
Working with the Security List
This part of the chapter explains how you can use the Security List to add a new security, choose market indexes, download quotes, edit security details, and more.
Viewing the Security List
The Security List window (see Figure 9-3) simply lists the securities in Quicken’s data file. You can use this window to add, edit, delete, or hide securities, including Watch List securities—securities you don’t own but want to monitor. To open this window, press CTRL-Y. You can also access the list from the Action gear icon menu in an Investment Transaction list or from the Investing tab’s Tools menu. In the latest Quicken update, there are two new additions to the Security List: the CUSIP column and the security search field. CUSIP refers to Committee on Uniform Security Procedures and nine-digit numbers that identify securities.
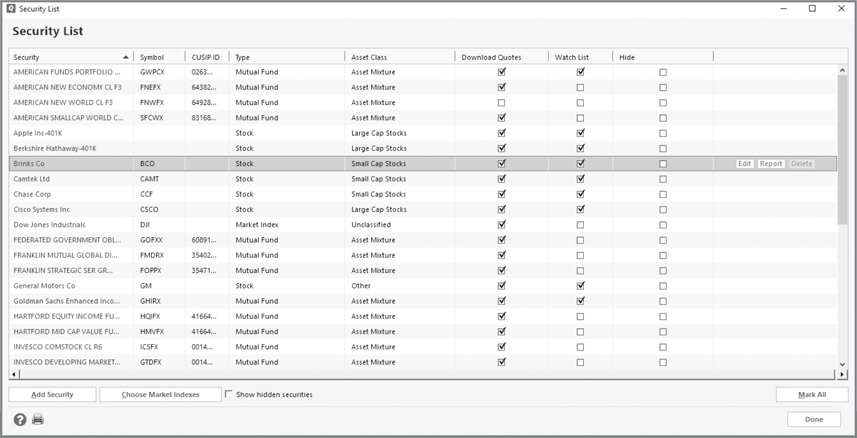
Figure 9-3 · The Security List window provides many ways in which you can work with your investments.
Adding a New Security
To add a new security to your Quicken data file as either a holding or a Watch List item, click the New Security button at the bottom of the Security List window (refer to Figure 9-3). The Add Security To Quicken dialog appears, displaying screens that prompt you for information about a security.
When you click Next, you may be prompted to enter your Quicken ID. Quicken connects to the Internet to obtain information about the security based on its ticker symbol. If it finds the ticker symbol, it displays the information it has downloaded in the Add Security To Quicken dialog. Entering the correct ticker symbol automates much of the security setup process. You can also look up the symbol. For example, if you type X, as shown here, you will see a number of other company ticker symbols that start with X. Click Done to add the security to the Security List.
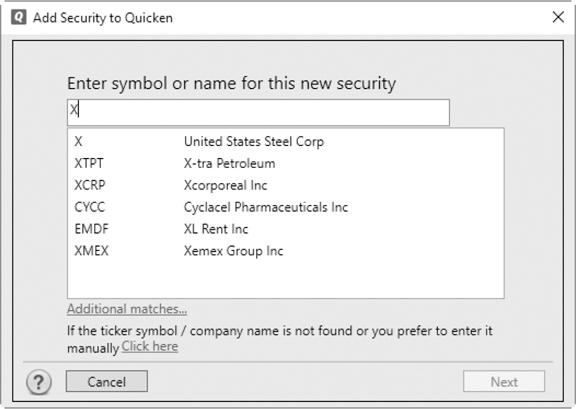
If Quicken can’t find information about the security on the Internet, it displays a dialog enabling you to correct the ticker symbol, or add the security manually and click Next to try looking it up on the Internet again. This security is automatically included in your Quicken Watch List when you add it in this manner. If you made an error when entering the ticker symbol, you can enter the correct symbol in the Ticker Symbol text box.
If you select the Add Manually option, select a security type—Bond, CD, Emp. Stock Option, ESPP, Market Index, Mutual Fund, Other, Stock, or U.S. Savings Bond—and click Next. Another dialog appears, prompting you for additional information about the security, such as its asset class (for a stock), asset class mixture (for a mutual fund), and bond type and maturity and call dates (for a bond). Enter whatever information you have for the security, and click Done to add the security to the Security List.
EXPERIENCED USERS RECOMMEND
Quicken users often ask the Quicken Community just how Quicken defines “asset class.” Strictly speaking, an asset class is a group of similar securities, such as equity instruments or stocks, income instruments such as bonds, and cash equivalents such as money market accounts. Within each asset class are categories. Quicken uses the shorthand name of “asset classes” to define types or categories of securities. When you enter “asset class” information in Quicken, you are categorizing the asset as one of several different asset “types”:
• Domestic Bonds These bonds are issued and traded in the currency of the country in which they are traded. That means they are not subject to fluctuations in currency exchange rates.
• Global Bonds These bonds are traded in any international market, either foreign or domestic. The same bond issue may be offered in several countries at the same time.
• Large Cap Stocks These securities are offered by large, publicly traded companies with a “market capitalization” of at least $10 billion. (Market capitalization is simply a generally accepted value of a company.) In Quicken, the cutoff between small cap and large cap is $4 billion.
• Small Cap Stocks These are often described as securities offered by a publicly traded firm with a market capitalization of between $200 to 300 million and $2 to 3 billion. However, in Quicken, small cap stocks are any stocks with a market capitalization below $4 billion. Even though the generally accepted definitions for large cap stocks and small cap stocks may be different from the Quicken definition, Quicken uses $4 billion as the delineation. If the market cap is above $4 billion, the asset class is Large Cap. If the market cap is below $4 billion, the asset class is Small Cap.
• A fairly frequent question on the Quicken Community is why there aren’t more asset classes in Quicken, like Mid Cap. To date, Quicken offers only Large Cap and Small Cap options.
• International Stock These are securities sold by a company outside of the United States.
• Cash/Other/Unclassified Assets that do not fit one of the other classifications.
If you select Employee Stock Option or ESPP, you start the wizards for those security types.
The security type market index is not the same as an index fund. The term market index is only intended for true indexes like the Dow Jones Industrials index. Selecting market index for an index fund will prevent you from using the security as you normally would. For example, if you try to sell a security you have retyped to market index, the security will not show in the security drop-down list in the Sell – Shares Sold form, even if you are in the correct account.
Choosing a Market Index
Within the Security List, you will see a Choose Market Indexes button. This option enables you to add common market indexes, such as the Dow Jones Industrial Average and the S&P 500 Index, as shown here, to the Security List. This lets you download quotes for these indexes at the same time you download security prices. Click Done to close the Select Market Indexes To Display In Quicken dialog and return to the Security List.
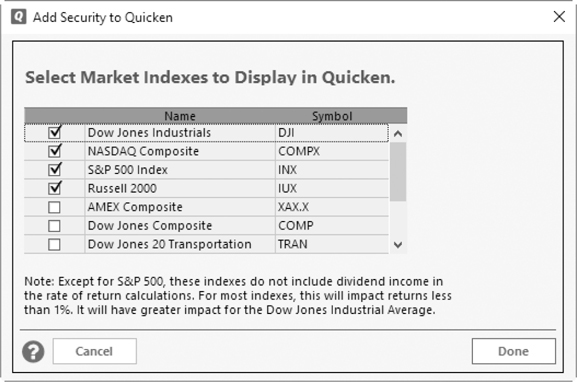
• Show Hidden Securities This option will display any securities you’ve hidden on the Security List.
• Mark All The Mark All button selects Download Quotes for each security and index in the Security List.
To the chagrin of some Quicken users, there is no corresponding Clear All button available.
Working with Individual Securities
Each security on the list has several options. You can tell Quicken to download quotes, put the security on your Watch List, or hide the security in the Security List. When you select a specific security, you will see three option buttons. It is with these buttons that you can edit or delete a security as well as run a report. You can also access these actions by right-clicking the security name.

Editing a Security You can edit a security to correct or clarify information you previously entered for it. Select the security’s name in the Security List window (refer to Figure 9-3), and click the Edit button. The Edit Security Details dialog, as seen here, shows what it looks like for a stock. Enter or edit information in the dialog, and click OK to save your changes.
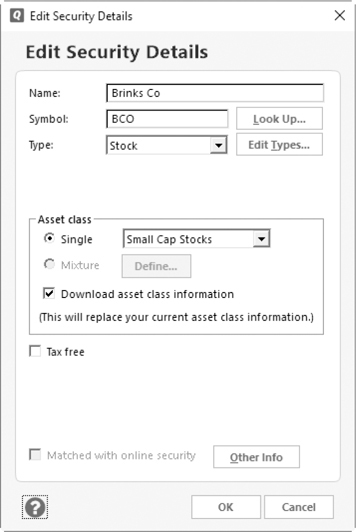
Quicken gets its asset information from Value Line. As shown in the Asset Allocation Guide, Value Line uses $4.0 billion as the market capitalization value to delineate between large-cap and small-cap domestic stocks. If you download the asset class for a mid-cap stock, it will be assigned Large Cap or Small Cap as its asset class, depending on whether its market cap is above or below $4.0 billion. To access the Asset Allocation Guide, click Investing | Tools | Asset Allocation Guide. To see the information about Value Line, click How Do I Update Asset Classes on the left of the Asset Allocation Guide. Select Common Questions About Downloading Asset Classes | What Asset Classes Are Assigned And Where Does the Information Come From.
Deleting a Security Delete removes the currently selected security from your Quicken data file. If this option is grayed out, it has been used in a transaction and therefore cannot be deleted.
Creating a Report When you select a security and click the Report button at the right of the selected row, you will see a Security Report, which summarizes all activity for the security. From the report window, you can print, export, save, customize, find, or replace information in the report. See more about working with reports in Chapter 15.
Security Type List Each security in the Security List must be assigned a security type. To see the Security Type List, open your Security List and select any security. Choose the Edit action button to open the Edit Security Details dialog. Click the Edit Types button to open the Security Type List, as shown here, to display a list of security types.
You can use buttons to modify the list:
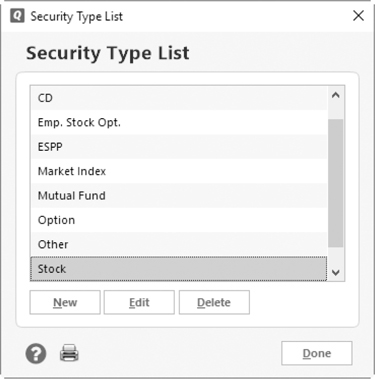
• New enables you to create a new security type. Clicking this button displays the Set Up Security Type dialog, which you can use to enter a name for the security type.
• Edit enables you to change the name of the currently selected security type.
• Delete enables you to remove the currently selected security type from the list, although you cannot delete predefined security types assigned to an existing security.
Be cautious about editing or deleting security types. You can cause yourself some serious headaches by doing so.
• The Help icon displays the Quicken Personal Finances Software Help window with instructions for working with the Security Types. If another help topic appears, type Security Types in the search field to open that Help section.
• Print icon prints the Security Type List.
Click Done to return to the Edit Security Details dialog, and OK to return to the Security List.
Investing Goal List Many Quicken users invest for specific goals, such as a college fund or retirement. Quicken provides a list of investment goals you can customize for your own investing needs. You may find investment goals useful for organizing your investments based on what you expect them to do for you. To see the Investing Goal List, open your Security List and select any security.
• Choose the Edit action button to open the Edit Security Details dialog.
• Click the Other Info button in the Edit Security Details dialog.
The Additional Security Information dialog appears. Click Edit Goals to open the Investing Goal List:
• New enables you to create a new investment goal. Click this button to open the Set Up Investing Goal dialog in which you can enter a name for the goal. Make the goal name short, as you have only 15 characters.
• Edit enables you to change the name of the currently selected investment goal.
• Delete enables you to remove the currently selected investment goal from the list.
If the goal is assigned to any securities, you’ll see a prompt asking if you’re sure. If you answer yes, your goal is deleted. The securities using that goal will be assigned the first goal in the Investing Goal List.
• The Help icon displays the Quicken Personal Finances Software Help window with instructions for working with the Investing Goal List.
• Print icon prints the Investing Goal List.
Click Done to close the Investing Goal List, then click OK to close the Additional Security Information dialog, then OK to close the Edit Security Details dialog and return to the Security List.
Downloading Quotes and Investment Information
Quicken enables you to download up-to-date stock quotes, news headlines, and alerts for the securities in your portfolio and on your Watch List. You set up this feature once and then update the information as often as desired. You can even download historical price information so you can review price trends for a security that recently caught your attention.
Because the quote and investment information feature is built into Quicken, it doesn’t rely on your brokerage firm for information. That means you can download quotes, headlines, and alerts even if your brokerage firm doesn’t offer the downloading of transactions. All you need is an Internet connection and your Quicken ID.
Downloading Online Quotes
Before you can get quotes online, you must tell Quicken which securities you want to include in the downloaded information. To download information, click the One Step Update symbol (the right-curling arrow) on either the Account Bar or the Toolbar to open the One Step Update Settings dialog. Click the Download Quotes And Investment Information check box. Click the Select Quotes link to open the Security List, as seen in Figure 9-3. You can also open the Security List using the keyboard shortcut CTRL-Y.
You can view details about your securities in the Portfolio window, which is covered in greater detail in Chapter 11. This window displays quotes and news headlines for all securities you own or watch. To display this window, choose Investing | Portfolio. Right-click any security and choose Security View, or double-click the security name to open the Security Detail View window, seen in Figure 9-4, to see information about individual securities or market indexes. See “Using the Security Detail View” next in this chapter.
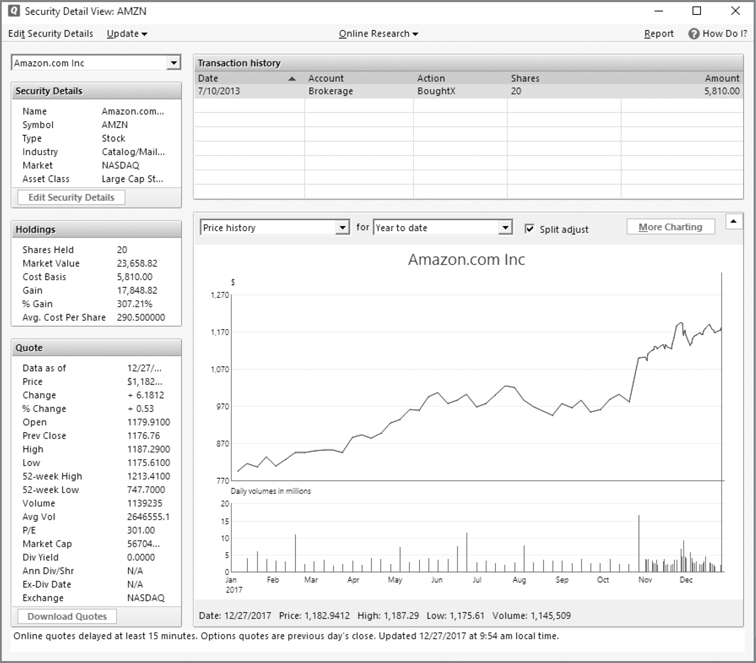
Figure 9-4 · The Security Detail View provides a wide range of information about each security in your portfolio.
To open the Security Detail View, from the Investing tab, click Portfolio and click the name of the security or index you want to view from the list that displays. If the name does not show, click the right-facing arrow to open the account, Watch List, or Indexes and click the name of the item you want to see. You can also access the Security Detail View window from the Security List, which sorts the securities by name. You may also be able to hover your mouse over a security’s name to see the small options menu shown here.
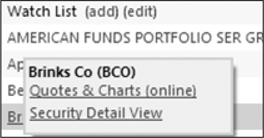
You can open the Security Detail View from the Security List by clicking the name of the security or the index.
Using the Security Detail View
The Security Detail View window (see Figure 9-4) offers the most detailed quote information. If you have been faithfully downloading quotes for your securities (or you have downloaded historical quotes, as discussed in the section “Downloading Historical Quote Information” later in this chapter), a chart of the price history appears in the body of the window. You can use the drop-down list in the top-left corner of the window to switch from one security to another. The left side of the window discusses the details about the security, your holdings, and the latest quotes. From this window you can edit the details of your security, download quotes, create additional charts, and do online research. (See “Using Online Research” later in this chapter for more information.)
Working with the Security View Detail Menu Bar The Security View Detail menu bar has five items from which you can learn more about the selected security:
• Edit Security Details opens the Edit Security Details dialog. Use this dialog to make any changes in the security, including its ticker symbol, asset class, and security type. See “Downloading Asset Class Information” later in this chapter for additional information about that topic. You can tell Quicken if this is a tax-free security. Click Other Info to open the Additional Security Information dialog in which you can indicate how much income you expect from this security, your goal for this security, your broker’s name and phone number, its rating, and any other comments.
Be cautious about editing the security’s type or investment goal. These changes can have unintended consequences.
Click OK to close the Additional Security Information dialog; then click OK to close the Edit Security Details dialog and return to the Security Detail View. There are several options at the top of the Security Detail View screen with which you can find additional information:
• Update opens a menu from which you can download quotes, send information to Investing.Quicken.com, download both asset classes and historical prices, and, if necessary, edit the price history of this security.
• Online Research offers several tools, as discussed in “Using Online Research” later in this chapter.
• Report creates a security report that you can customize to fit your needs.
• How Do I? opens the Quicken Help window that discusses securities and security prices.
Click Close to close the Security Detail View.
Viewing Price Information in the Portfolio View In the Investing tab’s Portfolio view, downloaded quotes appear beside the security name or ticker symbol. Stock quotes are delayed 20 minutes or more during the trading day. Quotes for mutual funds are updated once a day by around 6:00 P.M. Eastern Standard Time. Prior to that, you’ll see the previous day’s prices with a small clock symbol icon beside the price, indicating that the price has not been updated since the previous trading day. Right-click the security in the Portfolio view and select Price History from the context menu. If you do go from the Portfolio view to the Security Detail View window, you only need to single-click the security.
Downloading Historical Quote Information
Use Quicken to download up to five years of historical quotes for any security you own or watch. Choose Investing | Update | Historical Prices. Quicken displays the Get Historical Prices dialog.
If you happen to own a security that is not publicly traded, you won’t be able to download historical quote information for it. If you have a source of price data for the security, you can import a price history file.
Choose a time period from the drop-down list at the top of the dialog. Your choices are Five Days, Month, Year, Two Years, and Five Years. Make sure check marks appear beside all securities for which you want to get historical quotes. (Click Mark All to get prices for all securities on the list.)
Some Quicken users have reported trouble when selecting five years of prices for many securities at the same time. Several have suggested that you request data for five years for a single security or one month for several securities.
Then click the Update Now button. Quicken retrieves the information you requested. When it’s done, it displays the One Step Update Summary window. Click Close to dismiss the window. Depending on your preference setting, you may not see the One Step Update Summary window unless there is an error.
Downloading Asset Class Information
For each publicly traded security you own or watch, you can include asset class information. This enables you to create accurate asset allocation reports and graphs. Chapter 11 explains how you can use this information to diversify your portfolio to meet your investment goals.
The trouble is that most mutual funds consist of many investments in a variety of asset classes. Manually looking up and entering this information is time consuming and tedious. Fortunately, Quicken automatically downloads this information for you, including your mutual funds.
However, you can change the information at any time. To do so, choose the Investing tab and click Tools | Security List. Click the security you want, and then click the Edit action button. This opens the Security Detail View dialog seen earlier in this chapter. Make sure the Download Asset Class Information check box is selected, and click OK to close the dialog. The next time you update, asset classes are automatically updated.
Making Selections on the Security List
Using check boxes on the Security List, you may select the information you want to download or actions you want to perform for each of your securities. You may choose to:
• Download quotes for each security.
• Include the security on your Watch List.
• Hide the security. However, even if you hide the security, Quicken does not uncheck the Download Quotes or Watch List check boxes.
The Add Security button opens an Add Security To Quicken dialog with which you can enter a new security to the list.
Creating a Watch List
To set up a group of securities you don’t own but want to track, create a Watch List. Click the Investing tab and Portfolio. Click Customize, select the Accounts tab, and ensure Watch List is checked in the list of accounts. Click OK to save the change and return to the Portfolio view.
You can designate which securities in your Security List you want to watch by selecting the Watch List check box. From any of the Portfolio views that you chose to display a Watch List, you can click the Add or Edit link to change the securities you are watching. You can also select one or more Portfolio views in which you want to display your Watch List.
Click the right-facing arrow to the left of Watch List, if necessary, to open your current list. All of the securities you have chosen to display on the Watch List will appear. You may change the securities to include in the Watch List in the Security List, as discussed in “Making Selections on the Security List” earlier in this chapter.
You may see a small newspaper icon to the right of a security name or symbol. This is a link. Click it to display a link to the latest information about that security. Click More to open the Investing.Quicken.com page for additional information about the security. (However, you will not see this unless you have set up alerts on Quicken.com.)
Using Investing.Quicken.com for Updates
Using Investing.Quicken.com enables you to track your portfolio’s value on the Internet. Although you can do this without Quicken by manually customizing and updating the default portfolio webpage at Investing.Quicken.com, it’s a lot easier to have Quicken automatically send updated portfolio information to the page for you.
During the registration process when you installed Quicken and created your Quicken ID and password, the process set up a private Investing.Quicken.com account for you to store your portfolio data.
Exporting Your Portfolio
In Quicken, choose Investing | Update | Update Portfolio On Investing.Quicken
.com. The Preferences dialog appears:
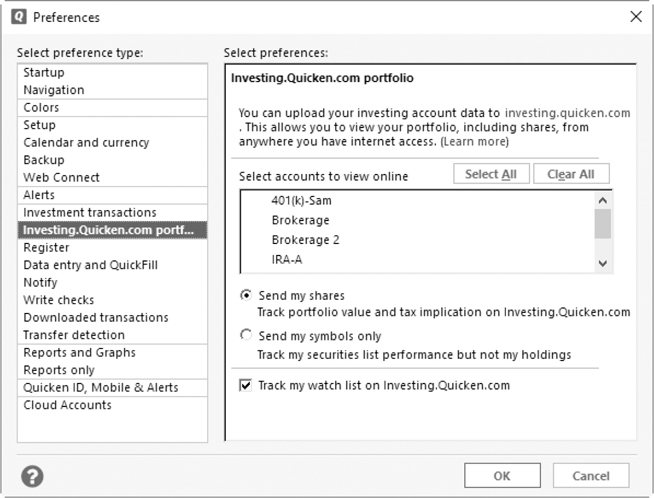
Click to place green check marks beside each account that you want to track on the Web. If you also want to track Watch List items on the Web, select the Track My Watch List On Investing.Quicken.com check box. Finally, select one of the following upload options:
• Send My Shares exports the ticker symbols and the number of shares of each security you own for your portfolio. This enables you to track both prices and portfolio values.
• Send My Symbols Only exports just the ticker symbols for your portfolio. This enables you to track prices but not portfolio values.
When you’ve completed your selections, click OK. The next time you run One Step Update, your account will be updated.
To access your Investing.Quicken.com account, go to the Internet from any location. In the address bar of your browser, type https://Investing.Quicken.com. You are prompted for your Quicken.com ID and password. Type the information and click Sign In and your Investing Home page appears, as seen in Figure 9-5. If you are signing in from a computer other than the one you usually use, Quicken may ask you to complete another step for security. This might be a text sent to your cell phone or a message sent to your e-mail.

Figure 9-5 · The Quicken Investing page has a wide variety of ways to work with your investments.
Utilizing Quote Lookup
Use the Quote Lookup feature in the Investing Home tab at Investing.Quicken
.com to look up stock ticker symbols. These symbols are required to use Quicken’s Online Research feature for getting quotes and obtaining information about securities on the Web.
In the Quote field, type the ticker symbol for your security. If you don’t know the symbol, just start typing the name in the Quote field. Quicken organizes the results by security type: Stocks, Mutual Funds, ETFs, and Indices. Click the tab of the security type you want, and examine the securities it found that matched the criteria you entered.
Since the Lookup feature opens another browser window, once you are done looking up symbols, close the new browser window to return to the browser window displaying your Investing.Quicken.com information. You can also click the security name that matches the symbol you entered. This will close the second browser window and display the quote information for the security you selected.
Using Online Research
The Investing.Quicken.com site has a number of useful research tools. You can use these tools to find and learn about securities before you invest. This part of the chapter tells you a little about Quicken’s online research tools so you can explore them. Many Quicken users find them valuable resources for making wise investment decisions. You can access online research information for a specific security from the Security Detail View window. Press CTRL-Y to open the Security List. Double-click a security, and from the Security Detail View menu bar, select Online Research to open a menu.
• Get Full Quote and Quotes And Research Both of these menu choices take you to the Investing.Quicken.com sign-in site. Sign in to see a wide variety of information about your security.
• News This option opens to the latest news about the security you selected. It can be information ranging from the company’s board of directors announcement about a dividend or the latest press release from the company’s media department.
• One-Click Scorecard This option displays reports to help you evaluate your security before you invest, using a variety of well-known analysis techniques and strategies.
• Set Up Alerts When you export your portfolio to Investing.Quicken.com you can set online alerts for price changes, volume movement, and any other news that might affect your portfolio.
• Stock Evaluator The Stock Evaluator command opens Investing.Quicken.com to the Evaluator section. From this section, both growth trends and the financial health of your chosen security are graphed and explained. Another useful section of the Evaluator is the Management Performance assessment. This section includes price to earnings, price to sales, and price to earnings growth ratios.
• Multiple Security Charting Use this option to chart the closing prices of up to five securities and include up to three indexes in your chart. To do so:
• Click Multiple Security Charting to open the Multiple Security Charting dialog.
• Select the period of time you want to cover from the For What Period? drop-down list. The default is three months, but you can choose from seven more options.
• Choose the securities you want to chart. To do so, click the name of the first security and hold down your CTRL key while choosing up to four more.
• Select any indexes you want to include. However, you may choose no more than a total of five selections, including both securities and indexes.
• Click Go Online To Chart to complete your chart. Using your Internet connection and the Yahoo! Finance page, the chart displays information using the first security name (alphabetically) as its base.
You can access these tools as well from the Classic menu. Click View | Classic Menus to display the extended menu list. Choose Investing | Online Portfolio to open the Investing.Quicken.com login page. Sign in to open the site.