Chapter 10
Working with Your Assets
In This Chapter:
• Understanding assets and debts
• Creating property and debt accounts
• Creating a loan account
• Viewing loan information
• Making loan payments
• Modifying loan information
• Adding and disposing of assets
• Updating asset values
• Exploring the Net Worth view
• Using the Property view
• Opening the Debt view
• Accessing Property and Debt account registers
• Creating alerts for Property and Debt accounts
• Working with Property and Debt alerts
Once you have entered your account transactions into Quicken, as discussed in the previous chapters, Quicken summarizes your entries and calculates their balances. The information displays in a number of places: the Account Bar, the Property & Debt tab, account registers, reports, and graphs. You can consult Quicken’s calculated balances and totals at any time to learn about your equity and the expenses associated with your debts.
Assets and debts (or liabilities) make up your net worth. Bank and investment accounts, as discussed in earlier chapters, are examples of assets. Credit card accounts are examples of debts or liabilities. However, you may want to use Quicken Personal Finance Software to track other assets and debts, including your house or family car, as well as any loans related to those assets. By including these items in your Quicken data file, you can quickly and accurately calculate your net worth and financial fitness. This chapter further explains how to set up asset and debt accounts to track your possessions and any outstanding loans you used to purchase them. As you’ll learn in these pages, a wealth of information about your net worth is just a mouse click (or two) away.
 The Basics
Before you begin, it’s a good idea to have a clear understanding of what assets, debts, and loans are, and how they work together in your Quicken data file.
Understanding Assets and Debts
An asset is something you own, such as your house, car, computer, smart phone, television set, and furniture. Most assets have value—you can sell them for cash or trade them for another asset.
A debt is something you owe—often to buy one of your assets! For example, if you buy a house, chances are you’ll use a mortgage to finance it. The mortgage, which is a loan secured by your home, is a debt. You can use Quicken to track all of your debts so you know exactly how much you owe at any given time.
Reviewing Loans
Debts are often loans, which is simply a promise to pay money. Loans are commonly used to buy assets, although some folks often turn to debt consolidation loans to pay off other debts. You can learn more about paying off current debt in Chapter 13. And while people think of a loan as something you owe (a debt), a loan can also be something you own (an asset). For example, say you borrow money from your brother to buy a car. In your Quicken data file, the loan is related to a debt—money that you owe your brother. In your brother’s Quicken data file, the loan is related to an asset—money that is due to him from you.
There are several types of loans, some of which are designed for specific purposes.
• Mortgage is a long-term loan secured by real estate. A special type of short-term mortgage is a Balloon Mortgage. Rather than make monthly payments over the full (typical) mortgage term, you pay the balance of the mortgage in one big “balloon” payment. And, if you have substantial equity in your home, you can obtain a home equity loan or second mortgage. This is a line of credit secured by the equity in your home—the difference between the home’s market value and the amount of outstanding debt.
• Reverse equity loan (sometimes called a reverse mortgage) provides people over age 62 who own their homes with a regular monthly income. The loan is due when the home is sold, usually after the death of the homeowner.
• Auto loans are loans secured by a vehicle, such as a car, truck, or motor home.
• Personal loans are unsecured loans that require no collateral. Monthly payments are based on the term of the loan and the interest rate applied to the principal.

“Payable” is an accounting term that means you have an obligation to pay the amount in this account to someone.
When applying for a loan, a number of variables have a direct impact on what the loan costs you, now and in the future. Ask about all of these things before applying for any loan.
Interest Rate
The rate of interest you pay for borrowing someone else’s money is the annual percentage applied to the loan principal. Several factors affect the interest rate you may be offered, such as your credit record, the type of loan, the term of the loan, and even your location affect the interest rate offered. Generally speaking, personal loans have the highest interest rates, while mortgage rates are usually the lowest.
Other factors that can affect the interest rate that you pay include the amount of the down payment and even the lender as rates vary from one lender to another. Two kinds of interest rates can apply to a loan, a fixed rate which applies the same rate to the principal throughout the loan term and a variable rate that applies different interest rates throughout the term of the loan. Loan terms vary depending on the type of loan.
• Mortgage loan and home equity reserve loan terms are typically 10, 15, 20, or 30 years. Home equity reserve loans are also known as home equity lines of credit (HELOC) or second mortgages.
• Balloon mortgage loan terms are typically 5, 7, or 10 years.
• Vehicle loan terms vary from 3 to 7 years.
Tips for Minimizing Loan Expenses
Borrowing money costs money. It’s as simple as that. However, you can do some things to minimize the cost of a loan.
• Shop for the lowest rate.
• Minimize the length of the loan.
• Maximize the down payment.
• Make extra loan payments.
• Ensure your credit history is cleaned up.
• Monitor your credit score with Quicken’s Credit Score utility as discussed in Chapter 5.
When evaluating the dollar impact of different loan deals, use Quicken’s financial calculators, as discussed in Chapter 12. To access these calculators, click the Planning tab and then the Planning Tools button.
Creating Property and Debt Accounts
To track an asset or debt with Quicken, you must set up an appropriate account. All transactions related to the asset or debt are recorded in the account’s register. In this section, you’ll learn about the types of accounts you can use to track your assets and debts, and how to set up each type of account. As you see here, Quicken offers the following Property & Debt account types for tracking assets and debts.
• House A house account is used for recording the value of a house, condominium, or other real estate. When you create a house account, Quicken asks whether there is a mortgage on the property. Quicken can create a related debt account for you or associate the house account with an existing debt account so that both your house asset account and mortgage debt accounts can be established at the same time. And, if you are not sure of the value of your home today, use the Zillow connection to get your home’s latest value. For more information, see the next “Experienced Users Recommend” sidebar in this chapter.
• Vehicle A vehicle account is similar to a house account, but is designed for vehicles, including cars, trucks, and recreational vehicles. You can create a related debt account or link to an existing debt account.
• Other Asset An asset account is for recording the value of other assets, such as personal property. For example, a Quicken data file might include asset accounts for your workshop and its related equipment, your antique china collection, or other personal possessions.
• Loan A loan account is for recording money you owe to others. As mentioned earlier, when you create a house or vehicle account, Quicken can automatically create a corresponding loan account for you. You may also create a loan account for money you lend to others. See “Creating a Lender Loan” later in this chapter.
• Home Equity Line of Credit (HELOC) This type of loan uses the borrower’s real property as collateral.
• Other Liability (not a credit card) You can create a debt account to record other debts that are not related to the purchase of a specific asset. Debt accounts show in the Account List as liabilities.
Earlier chapters explained how to use the Quicken Add Account dialog to create new Quicken banking and credit card accounts. To add a new asset or debt account, you need to tell Quicken the type of account you want to create and what name you choose to identify that account. It is always best to give the account a name that clearly identifies the asset or debt. Be descriptive. “Kia Soul” and “Toyota Corolla” do a better job identifying the cars than “Car 1” and “Car 2.”
When creating a debt account, you may want to include the word “mortgage,” “loan,” or “payable” in the account name so you don’t confuse it with a related asset.
Creating a House Account
You create a house account with the same Add Account dialog you used to set up your banking accounts. Quicken offers a number of ways to open this dialog for an asset or debt account, as well as several types of assets, loans, and debts. In the following example, we are adding a new house asset. The specific steps are as follows:
1. From the Account Bar, click the plus sign at the top of the Account Bar or select Tools | Add Account.
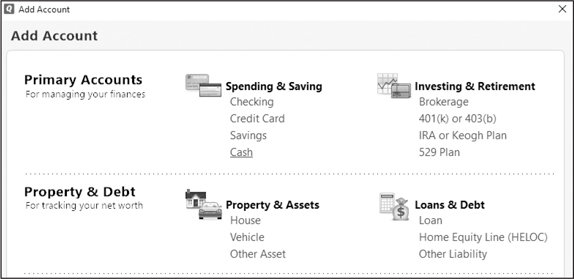
2. From the Add Account dialog, choose Property & Assets | House.
3. The Add House (Asset) Account dialog appears with the account name/nickname field highlighted and ready for you to enter a new name. Type a descriptive name and click Next.
4. Enter the date you acquired the house or use the small calendar to the right of that field to select the date.
5. Enter the purchase price of the house, as shown here:
You see two options for entering the current value of this house. If you choose to enter an estimate manually, select Enter Estimate to open a field where you can enter this amount, as shown. If you choose to connect with Zillow to see how it values this house, see the “Experienced Users Recommend” sidebar next in this chapter.
EXPERIENCED USERS RECOMMEND
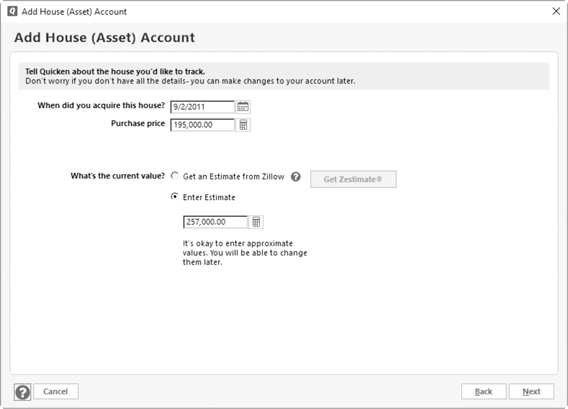
Quicken has partnered with the online real estate company Zillow. Using this service, you can obtain the current value of your main or vacation home whenever you choose simply by clicking a couple of buttons. To use this service when adding a new house account, select Get An Estimate From Zillow and select the Get Zestimate® button to open this window.
Enter the address of the house for which you want the estimate and click the Next button to see the results. If there is more than one address showing, select the proper item and click Next. The description of the house at the address you entered appears:
You can adjust the value you want to display in Quicken. However, at this writing, you may not be able to add commas to separate thousands in the valuation shown in the Zillow screen, but if you choose to update your property value, the amount will appear correctly in the Quicken window.
Note that you have the option to set up a reminder to update the valuation of this house. Using the drop-down menu, you will see update options Monthly, Quarterly, Twice a Year, or Yearly. Should you choose to do so, you can update as often as daily from within Quicken.
Once you have told Quicken what valuation to use, select Update Your Property Value to return to the Add House (Asset) Account window. Your valuation appears in the What Is The Current Value box. Then click Next to continue.
When you have entered the purchase date, purchase price, and current value, click Next to continue. Quicken asks if you have a mortgage on this asset.
• If there is no mortgage associated with this house, click No.
• If you are already tracking this mortgage in Quicken, select Yes | I’m Already Tracking The Mortgage In Quicken and select the debt account from the drop-down list and click Next. You’ll then see the Account Added screen with the green check mark near the new account’s name. Quicken links the asset and debt accounts for you. See how to set up a loan later in this chapter, in the section “Creating a Loan Account.”
• If there is a mortgage but you do not want to track it in Quicken, click Yes and then choose the I Do Not Want To Track The Mortgage In Quicken option.
• If you select No or I Do Not Want To Track the Mortgage in Quicken, click Next to continue and the Account Added dialog appears with the name of your new asset shown with a green check mark. Click Finish.
• If you select I’d Like to Track This Mortgage in Quicken, click Next to see the Add Loan Account dialog with a list of financial institutions. Select the lender name if it is on the list, or select the Manual Loan Account option and click Next. A Loan Details window appears, as shown in Figure 10-1.
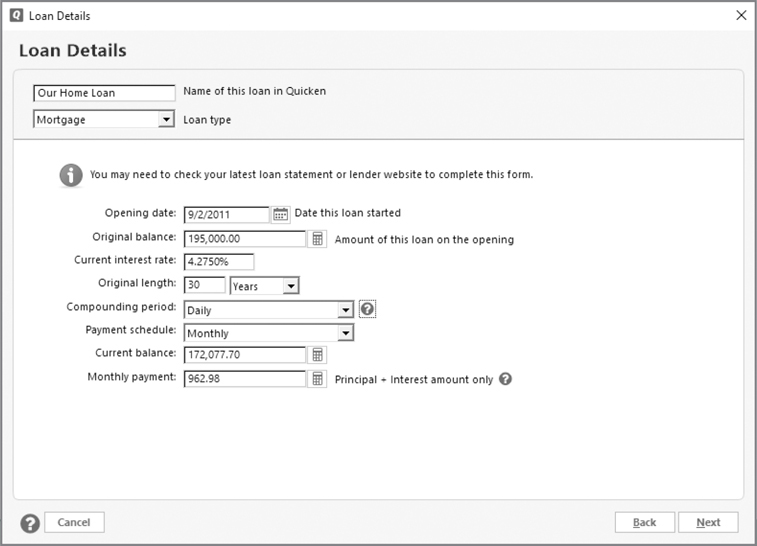
Figure 10-1 · Use the Loan Details window to track your mortgage in Quicken.
Loan Information
If you indicated that Quicken should track a loan for a house, the Loan Details dialog appears where you can enter information about the loan. The name of the loan is the same as the asset you created in the steps earlier. Select the loan type from the drop-down list. As you can see in Figure 10-1, we chose Mortgage. See “Loan Accounts in Quicken” for further information.
Be sure to select the appropriate type for your loan so the appropriate interest category is associated with it. Quicken allows you to change this interest category at any time.
Loan Accounts in Quicken
Quicken makes it easy to track the principal, interest, and payments for a loan. Once you set up a loan and corresponding debt or asset accounts, you can make payments with Quicken using QuickFill, Scheduled Transactions (transaction reminders), or Online Payments (see Chapter 6). The Loan feature keeps track of all the details for you. A loan in Quicken is not the same as an asset or debt account. Quicken uses the loan information to calculate the amount of interest and principal due for each payment of an amortized loan, such as a mortgage or car loan. A loan must be associated with an asset account (if you are a lender) or a debt account (if you are a borrower), as well as an income or expense category to record either interest income or expense.
A mortgage or loan is actually a debt account that has special Quicken features attached to it. Use this option to set up a debt associated with a compounding interest loan, like a mortgage or standard car loan, as explained later in this chapter.
Creating a Loan Account
You can set up a loan in the following ways:
• Create a house, vehicle, or debt account with a related mortgage or loan, Quicken automatically prompts you for loan information.
• From the Account Bar, click the plus sign to add an account. Choose Property & Debt | Loans & Debt | Loan.
• From the menu bar, click Tools | Add Account | Property & Debt | Loans & Debt | Loan.
• From the Property & Debt tab, click Debt | Loan And Debt Options | Add A New Loan.
• Also from the Property & Debt tab, click Property, click Property Options, and select Add A New Loan.
Regardless of the location from which you start, Quicken displays the Add Loan Account dialog.
Choose one of the loan providers listed, or if you choose to create a loan account for which you will enter the information manually, click the Manual Loan Account link at the bottom of the dialog. The illustrations that follow are for a manual account.
Be aware! If you choose to download your loan transactions, your loan account register will be read-only and if so, not be accessible to review and make corrections. Don’t do it! Downloading one possibly incorrect transaction per month that cannot be corrected is just not worth it. Set up your loan manually—you will be much happier!
You can use Quicken’s Attachment feature (covered in Chapter 5) and your scanner to save images of an asset’s paperwork, such as the receipt, the warranty, or delivery verification you received, to store as a digital image with your Quicken data file.
Loan Details
The Loan Details dialog starts by prompting you for the name of the loan, as seen in Figure 10-1. After you have entered a name for this loan, your next choice is the type of loan for which you are creating an account. Click the downward arrow to choose from a list. Choose wisely—you cannot change the loan type later!
You have the following loan types from which to choose, as shown here:

• Mortgage is a loan for some type of real property such as a house.
• Loan is for any type of loan not included in the other options. This loan type may be used for loans from individuals rather than financial institutions, such as borrowing $5,000 from your sister toward some vacation property you will both share.
• Auto loan is for vehicle loans, including trucks and travel trailers.
• Consumer loans are funds borrowed by a person rather than a business. Lenders for this type of loan are usually financial institutions.
• Commercial loans are normally loans to a business from a financial institution. Such loans are often for large purchases, working capital, or real property.
• Student loans are used for financing education.
• Military loans are designed specifically for those in the service of our country.
• Business loans are usually for the day-to-day operating costs of a business, rather than for large real property or equipment purchases.
• Construction loans are used when you build a house. These loans are often turned into mortgage loans when construction is completed.
• Home equity loans are loans against the equity you hold in your home. Many people use home equity loans to pay for major remodeling, although some home equity loans are taken to pay off other, higher cost debt.
You are asked for information about the opening date, the original balance, the current interest rate, the original contract length, payment schedule, and so on, as seen in Figure 10-1. It’s important to be accurate; get the dates and numbers directly from your loan statement or agreement if possible. Quicken calculates the amount of payment and the interest based on the entries you make, as well as the extra principal, any balloon payment, and the number of remaining payments.
While Quicken’s default compounding period is Monthly, most financial institutions compound interest daily and post it to your account every month. Use the Compounding Period drop-down list to choose Daily if your lender compounds interest daily.
Click Next to continue. The Loan Details dialog continues with the name of the loan at the top. It displays the next payment due date for this loan, based on the opening date you entered in the first screen of the dialog. You may change this date if necessary; however, this date cannot be in the past. Enter any additional information.
• Other is used for additional payment on the loan such as escrow funds.
• Extra Principal Paid Monthly amounts are those additional principal payments you enter to reduce the total amount of the interest you will pay on the loan, as shown here.
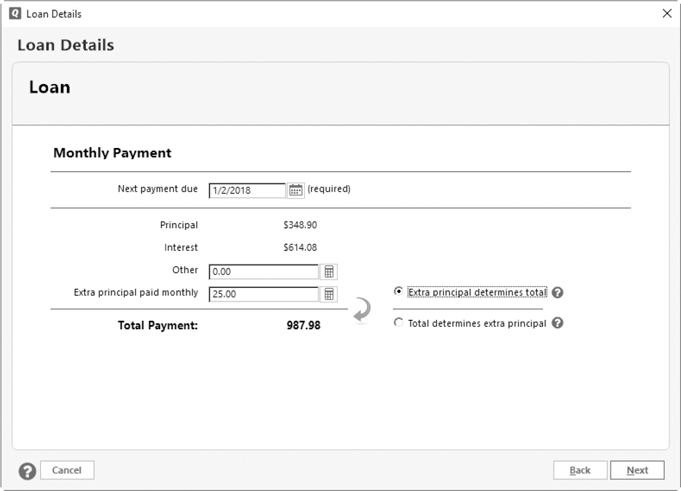
• Select Total Determines Extra Principal if you want to set the total payment each month and let Quicken determine how much extra principal will be paid as seen in the following illustration.
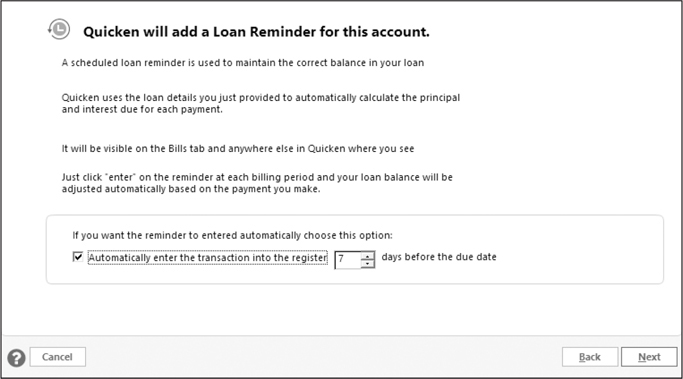
Click Next to continue. The Loan Reminder dialog appears as discussed next.

Loan Reminder
When you set up a loan, Quicken can create a reminder, shown here. From this dialog, you can tell Quicken to enter the reminder into the register automatically and choose the number of days before the due date that you want the transaction entered. If you do not want Quicken to enter the transaction automatically, leave that check box clear and click Next.
The Loan Payment Reminder dialog appears. You may edit each field as explained here:
• The Pay To field shows the name of the loan if you have indicated that you will enter transactions manually to this loan account. Otherwise, it displays the name of the financial institution from which you borrowed the money. Edit this field by highlighting what appears and typing over the highlighted area.
• The Due Next On date can be changed by typing in a new due date.
• The Amount Due field originally shows the information you entered in the previous Loan Details dialog. Click Edit to see a split transaction dialog. You can make changes as necessary. Click Cancel or OK to close the Split Transaction dialog. Learn more about split transactions in Chapter 5.
• The From Account field indicates the account from which the payment will be paid. Click the downward arrow to change to another account.
• You can change or add to three areas in the Details section.
• Click anywhere in the Details section to open the dialog shown here. From this one dialog, you can change the split categories, add a tag to the loan payment split, and create a memo for each payment. Note that you have to click the Split symbol in this dialog to make changes to either the Category or the Tag field.
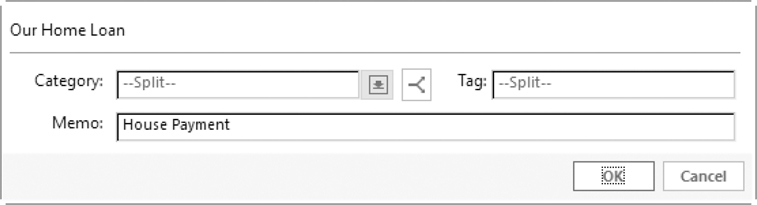
If necessary, you can create or edit a tag from this dialog, although it is intended to be used to add a tag or tags to entries in the loan payment split. Learn more about tags in Chapters 4 and 5.
• When you have made your changes, click OK to return to the Loan Payment Reminder dialog.
• Click Optional Settings to set how many days in advance of the payment’s due date Quicken should remind you of the payment. The default is 7 days. Click Change to set another time.
• Click Related Website to enter a website. This might be the website of your financial institution or any other website that pertains to this loan. This is not required, but can be useful. If you have not yet entered a website, the link will be labeled Add. If you have entered a website, the link will be labeled Change.
• Click the Sync To Outlook check box to synchronize your payment date in your Outlook calendar.
• Click Print Check With Quicken to let Quicken know you will be paying this payment with a Quicken check.
Click Done to close the Loan Payment Reminder dialog. If you have not entered this loan directly when adding a new house or other asset, a message may appear asking if this loan is to be associated with an asset. Click Add Linked Asset Account if you want to create an asset account for this loan. From the menu that appears, you can choose from a Home, an Auto, Other, or click Existing Account to link this loan to an existing asset.
If you choose to add a new asset account, the Add Account dialog appears. If you choose an existing asset, you will see a small icon and the information that this loan is linked to the asset you chose. The link icon depends on the type of asset. For example, for a house loan, the icon is a house. Click Done to close the dialog.
Creating a Lender Loan
From time to time, you may be in a position to lend money to someone else. Quicken calls this type of loan a Lender Loan. You create this type of account in a slightly different way.
Once you have completed all the necessary paperwork, checked with both legal and tax professionals, and everything is signed and notarized, you are ready to set up the account. Quicken treats this type of loan as an asset, with the value of the asset equal to the amount of money you are lending.
1. Click the plus sign from the Account Bar. Choose Property & Debt | Property & Assets | Other Asset to open the Add Asset Account dialog.
2. Enter a name for the account. Depending on the Quicken edition you use, you may have to choose the purpose for the account, such as Personal or Business. Click Next.
3. Enter the date on which you want Quicken to start tracking this loan, which is usually the opening date of the loan.
4. Enter the asset value, usually the total amount you are lending.
5. If the loan has tax implications, click the Tax button to enter any pertinent information. Otherwise, click Next to continue.
6. The Is There A Loan On This Asset? dialog appears. Select No, as selecting Yes will create a loan that you owe, not a loan that is owed to you. Then, click Next and in the final dialog, click Finish.
7. Your new loan account appears in the Account Bar. Click the account’s name in the Account Bar to open the register for this account.
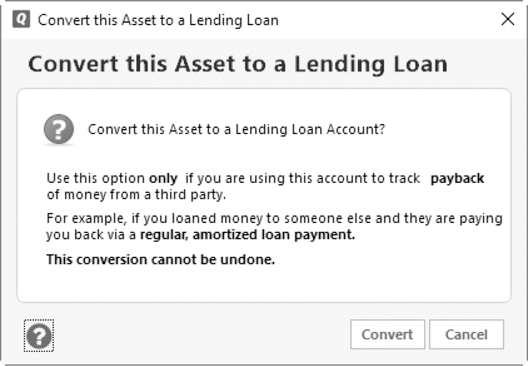
8. At the upper right of the account register, click the Account Action gear icon and select Convert To A Lending Loan from the drop-down menu. A warning appears that this action cannot be undone. Select Convert to make this a lending loan.
9. The Loan Details dialog appears as discussed in the “Creating a Loan Account” section, earlier in this chapter. Complete the information, including the current interest rate, loan type, original loan length, and payment schedule. Click Next.
10. Make any additions or changes to the monthly payment in the dialog that appears and click Next again.
11. Make your choices in the Reminder dialog and click Next. At the final Reminder dialog, make any necessary changes and click Done. Your new asset account appears with loan information rather than a register. To see the transactions, click Payment Details.
Even if you are lending money to a relative, it is important that paperwork be created and signed by all parties, and in most cases, reviewed by a legal and/or an accounting professional.
Viewing the Asset or Debt Account Register
When you’re finished setting up an asset or debt account (and related loans and loan payments, if applicable), Quicken automatically displays the account’s register. Figure 10-2 shows what a house account might look like. (Here, the register has a two-line display. To change your display from the default one-line display, press CTRL-2, which is a toggle between Quicken’s default one-line register display and the two-line display shown.) The first transaction, dated 9/2/2011, shows the opening balance, which was the amount paid for the house. The next transaction, dated 12/3/2017, shows an adjustment created when the asset was added into Quicken. If you have entered a house for which you used a manual estimate rather than a Zillow valuation, you will see a link to Zillow as seen in Figure 10-2. To close the link, click the X in the upper-right corner of the Zillow area. Some users report having to click the X twice to get the Zillow section to close.
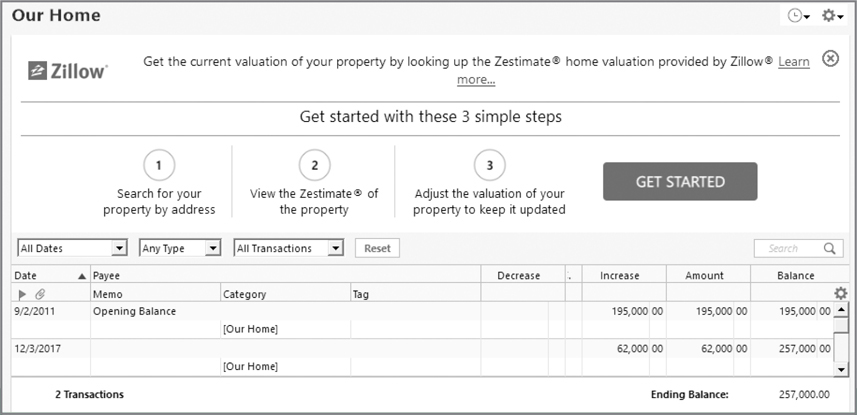
Figure 10-2 · Assets and debts have their own account register just like other accounts in Quicken.
After you have entered more than one asset account, you’ll note that the new accounts are listed alphabetically. In earlier versions of Quicken, the new accounts went to the bottom of the appropriate section in the Account List. Many Quicken users prefer to see their accounts in alphabetical order in the Account List, and this is in response to those requests. This auto-sorting only works if you have never rearranged your account order. Quicken, like most computer programs, sorts account names that have numbers first, then files with text names.
All transactions that affect an asset or debt account’s balance appear in the account register. Learn more about using account registers for asset and debt accounts later in this chapter, in the section “Other Asset Transactions.”
Optional Tax Information
For asset and debt accounts, click the Tax Schedule button on the Account Details dialog to enter tax schedule information for transfers in and out of the account. While this information is optional, check with your tax professional to see if this information will benefit your tax position. Chapter 14 explains how to set up Quicken accounts and categories to simplify tax preparation.
You can get to the Account Details dialog in two ways:
1. Press CTRL-A and select the Edit button for the account with which you wish to work.
2. Right-click the account name in the Account Bar and select Edit/Delete from the context menu.
Viewing Loan Information
All loans are associated with asset and/or debt accounts. To view a loan, it must first be set up in Quicken. After you have set it up, you can access the loan information in two ways:
• Click on the loan name in the Account Bar.
• Click Tools | Account List and select the name of the account with which you want to work. The loan information window appears, as seen in Figure 10-3.
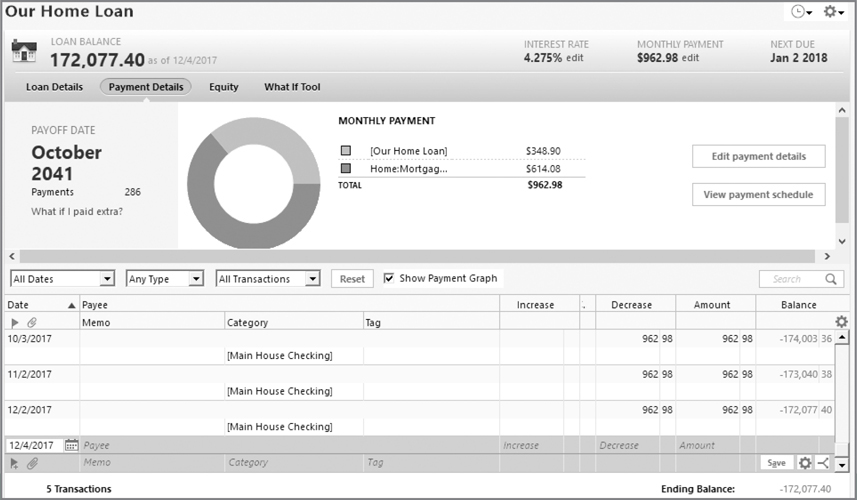
Figure 10-3 · The loan information window with the Payment Details tab selected.
Making Loan Payments
When you first set up your loan, you told Quicken to create either a loan reminder or a memorized payee, or in some cases, both. Each time you make a payment on a loan, Quicken keeps track of the current loan balance in that loan account. If you have linked an asset to your loan, Quicken tracks your current equity as well. You can make a loan payment in several different ways, each of which is explained here:
• Use A Loan Reminder If you instructed Quicken to set up a reminder for your loan payment each month (or other payment schedule), Quicken will display a reminder in the Bills section of the Bills & Income tab. As Quicken often issues updates to provide users with the best program possible, these items may be changed in the future and this option might no longer be available in this section.
• Enter the Loan Payment Directly You can quickly enter any loan payment into your register by simply typing the payee name, and the information from your special loan payment memorized payee will appear. To create the special memorized payee:
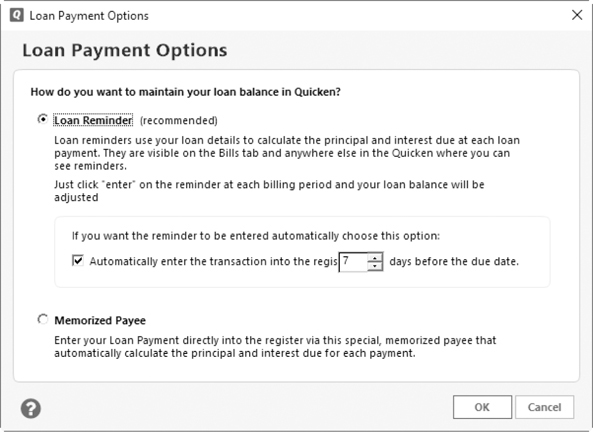
1. Click the Edit link at the right of the Monthly Payment amount shown at the upper right of the loan account screen. Choose Payment Options and click Memorized Payee, as shown next. If you choose to use the special memorized payee rather than a reminder, you will not be able to use the Enter Loan Payment account action described next. You can use the Quicken Toolbar button Use Specific Memorized Payee instead.
2. Click OK to close the dialog.
• Use the Enter Loan Payment Option To enter a payment, click the loan account name in the Account Bar to open the loan. Select the Account Actions gear icon, and from the menu choose Enter Loan Payment. The Enter Expense Transaction dialog appears, as shown here. You can also use the Customize Action Bar to add the Enter Loan Payment button to your account action bar.

Create A Quicken Toolbar Button
Use the special memorized payee to create a customized Quicken Toolbar button to make your payment.
1. Right-click the Quicken Toolbar and choose Customize Toolbar.
2. From the Customize Toolbar dialog, select the Show All Toolbar Choices check box.
3. In the Available Toolbar Buttons list, select Use A Specific Memorized Payee.
4. Click Add to open the Assigned Memorized Payee To Action dialog.
5. Choose the appropriate payee from the Memorized Item drop-down list. Enter the account from which this payment will be made and select the Automatically Record Item check box if desired.
6. Click OK to close the dialog and click Done to close the Customize Toolbar dialog. Your new memorized transaction button appears on the Quicken Toolbar.
When it’s time to enter the payment, click your new toolbar button. The Confirm Principal And Interest dialog appears. Make any changes necessary and click OK. Your payment is posted into your register. Be sure to save the transaction.
This payment will default to the current date. If you want to specify a different date, open the account register where you will be making the payment and in the blank transaction at the bottom of the account register, set the date to the desired date for the payment. Then click the special memorized payee toolbar button.
Modifying Loan Information
Once you’ve created a loan, you can modify it as necessary to record corrections, changes in the interest rate, or changes in payment methods. You can do all these things by clicking the account name in the Account Bar and choosing the Loan Details or Payment Details tab.
You can also open a loan account window by choosing Tools | Account List and selecting the appropriate account. At the top of the account window, you see the current balance, interest rate, monthly payment, and the next due date as seen earlier in Figure 10-3. Should you want to make changes to either the interest rate or the monthly payment, click the Edit button to the right of that item. You also have four tabs from which you can view both loan and payment details, the current equity, and a What If Tool to help you make decisions about this loan. (See “The What If Tool” later in this chapter.)
Changing Loan Information
Should you need to make changes to other parts of the loan information, use the Loan Details window, as seen in Figure 10-4, to compare the data with the information found on statements or loan agreement papers. You can then make any necessary changes to other parts of the loan information, such as the original balance or payment schedule.
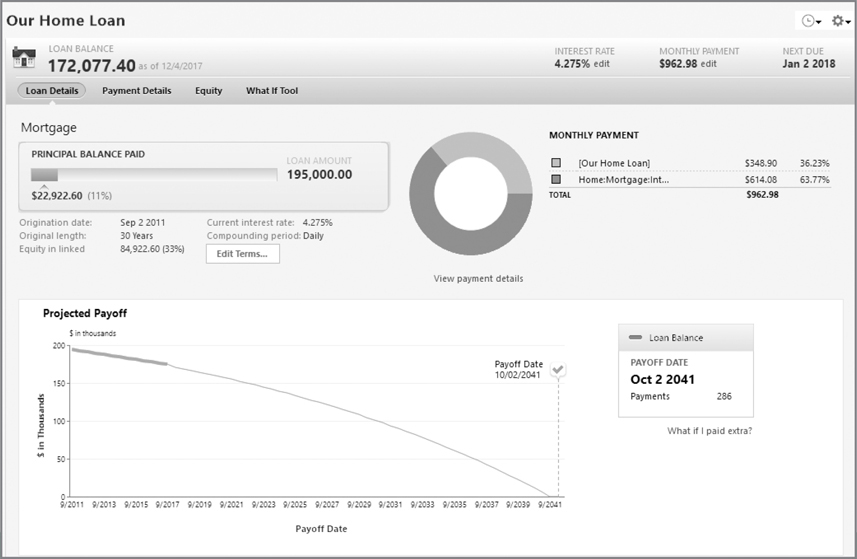
Figure 10-4 · Much of the information about your loan is displayed in the Loan Details tab.
• Origination Date Usually, this is the date the loan started. In the Payment Details tab, this is called the Opening Date.
• Original Length Use your loan statement papers to find this balance if you didn’t enter it when you set up the account.
• Equity in Linked This amount calculates the amount of equity you have in the assets to which this loan is linked.
• Current Interest Rate This can vary, depending on your loan.
• Compounding Period While Quicken defaults to Monthly, normally banks and other lending institutions compound interest daily. Change this to Daily if that is true for this loan.
• Edit Terms In the Loan Details tab, this link opens the Loan Details window so you can make any necessary changes.
• Monthly Payment This is the total of principal and interest and does not include any other fees.
• View Payment Details Selecting this option in the Loan Details tab opens the Payment Details tab.
Viewing Payment Details
The second tab in the loan account window is Payment Details. Select this tab to review or modify the payment details for this loan account. The Payment Details window appears as seen in Figure 10-3. Note that the tab will not display a register if you have enabled online payments for this account.
The snapshot at the top of the Payment Details tab is a graph that shows the current monthly payment for this loan, broken down by interest and principal. Click the Edit Payment Details button to open the Loan Details window and make any changes to the monthly payment. Click OK or Cancel to close the Loan Details dialog and return to the Payment Details tab.
At the upper left of the Payment Details tab is the current payoff date for the loan, as well as the number of payments remaining to be paid. Underneath the number of payments is a link to the What If Tool, entitled What If I Paid Extra. See “The What If Tool” later in this chapter for more information.
The current payoff date, number of payments remaining to be paid, and the What If I Paid Extra link are on the left side of the Payment Graph. If you have not selected the Show Payment Graph check box, you will not see any of this data.
The Payment Schedule Click the View Payment Schedule button at the top-right area of the graph in the Payment Details tab when the Show Payment Graph box is checked. This information is based on your current Loan Details and Loan Payment. You can also see the schedule for this loan by selecting the Account Action gear icon and clicking Full Payment Schedule.
EXPERIENCED USERS RECOMMEND
If you are on a laptop or just have your monitor resolution set to the Quicken minimum, you may see only one transaction line at a time. You can see more transaction lines by toggling to a one-line display (CTRL-2), maximizing the register (F11), or setting your preferences to use pop-up registers (Edit | Preferences | Register | Register Appearance | Use Pop-up Registers).
You can gain more register space by setting the register row height preference to Compact. To do so, select Edit | Preferences | Register | Register Row Spacing | Row Height.
Click the printer icon to print the report to your default printer or to a file. Click Done to close the Loan Schedule dialog.
Payment Detail Register The register at the bottom half of the Payment Details window shows each principal payment that was made on this account since the loan began. The payments that show on this register are only the principal amounts. To see the entire payment, go to the account register from which the payment was made. You can change what shows in this register by choosing the filter drop-down lists at the top of the register.
You can clear the graph to show more payments in the register. Click the check box to the left of Show Payment Graph to toggle the graph on and off.
• The Dates drop-down list allows you to select the date range you want to see in the register.
• The Types and Transactions lists let you tailor the register to your needs.
• The Reset button returns the filters to their default settings.
Retaining the filters for future Quicken sessions is a preference. Click Edit | Preferences | Register | Register Appearance | Remember Register Filters After Quicken Closes.
The Equity Button
Click the Equity button to see information about this loan and its associated asset as well as the current net value or equity in the asset, as shown next. If there is more than one loan associated with this asset, both will be displayed.
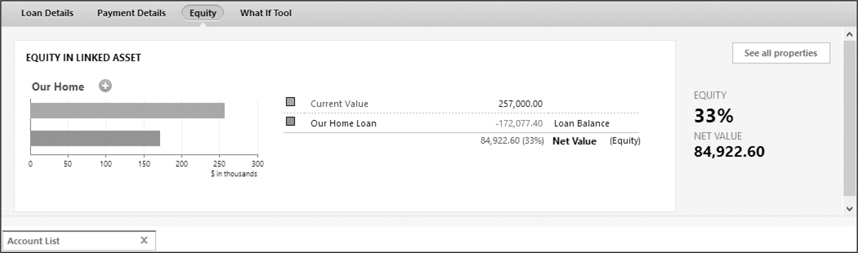
The amount of your equity in this asset is shown as both a percentage and a net value. If you click on the link to the left of Net Value, a small graph appears showing the change in your equity over the last year.
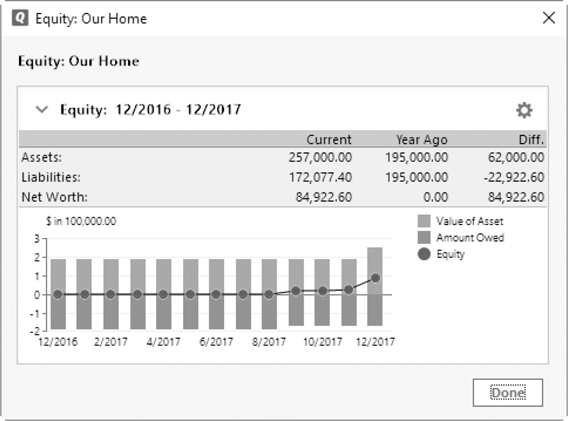
• Click the Options gear icon at the right of the Equity graph to customize the graph. Although you can customize this Equity graph, the changes are not saved. You can also click the Help Reduce My Debt link to be taken to the Debt Reduction dialogs. See Chapter 13 to learn about budgets and debt reduction in Quicken.
• Click Done to close this equity dialog.
• Click the See All Properties button to see the Property view of the Property & Debt tab.
The What If Tool
The What If Tool tab at the top of your loan account window opens a worksheet that allows you to see the effects if you made some different financial choices for this account. When the window opens, you see the What If Payoff Schedule at the right side of the window as seen in Figure 10-5. This schedule, based on the current terms, shows the projected payoff date, total interest paid this year, total interest paid to today’s date, and the projected total interest that will be paid using your choices for paying off the loan. If you have not yet experimented with the What If Tool, you will not see the What If Payoff Schedule. Instead, you will see only the Current Payoff Schedule.
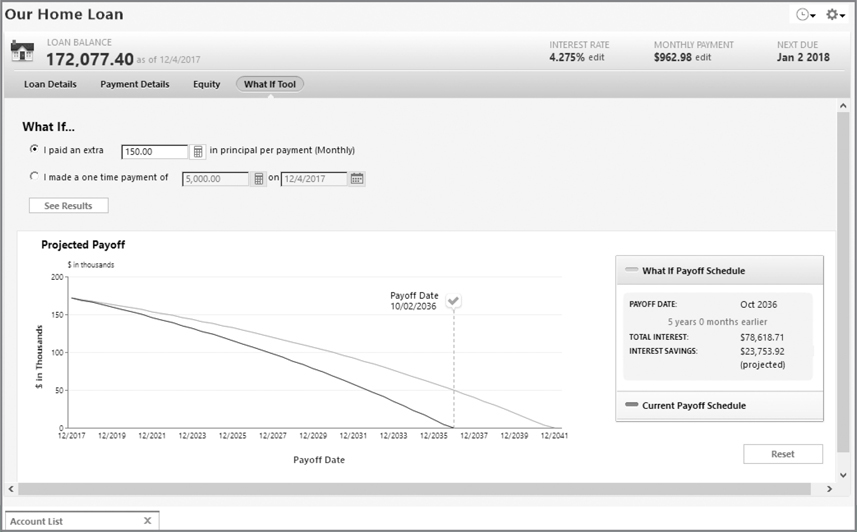
Figure 10-5 · Use the What If Tool in any loan account to see the effect of additional loan payments.
Within the tool itself, you can see projected changes if you make additional payments each month or a one-time payment. In the example shown in Figure 10-5, we have chosen to pay an extra $150.00 per month on the home loan. After we click the See Results button, notice the change in both the graph and the What If Payoff Schedule. By adding this $150.00, we will pay off this loan more than five years early and save a projected $23,753.92 in interest.
You can click Current Payoff Schedule to review that information once more. Then, to see the differences again, click What If Payoff Schedule.
When you have finished working with the What If Tool, click the Reset button at the lower right of the What If Tool window to return to the current information. The What If changes are not saved.
Action Gear Options
At the upper right of the loan account window is the Action gear icon from which you can choose the following options, most of which are links:
• Edit Account Details Click this link to open the Account Details dialog you saw when setting up the account.
• Enter Loan Payment This link opens the Enter Expense Transaction dialog from which you can enter a payment into the appropriate banking (or credit union) register. However, if you are using a memorized payee instead of the reminder, you will not see this dialog.
• Update Balance This option opens the Update Balance dialog, which allows you to enter a new balance for the loan and the effective date of that change.
• Transfer Money Select this option to open the Transfer Money Within Quicken dialog, which is discussed in Chapter 6.
• Full Payment Schedule This report is the same report shown when you click the View Payment Schedule button.
• Account Attachments See Chapter 5 to learn more about adding attachments to accounts. This process is useful for adding statements from your lender.
• Account Overview This link opens a customizable graph showing the last twelve months of this loan.
• Print Transactions With the dialog that opens when you select this option, you can print transactions in the register for time periods you choose.
• Export to Excel Compatible File This option allows you to send the loan information to Microsoft Excel (or compatible programs). The information is readable in Excel but is not in Excel format.
• Reminders To Show In Register This option shows the entire payment amount rather than just the principal amount.
• Two-Line Display With this option selected, each transaction in the register shows in two lines. Clear the check box to have each transaction show on only one line.
• Show Payment Graph This check box lets you show or hide the Payment Graph in the Payment Details tab’s view.
• Sorting Options This link lets you sort by several additional alternatives in addition to the default Date sort.
• Register Columns Use this link to tell Quicken what columns you want to see in your register.
• Register Row Height Spacing Use the options shown here to adjust the height of the rows in your register.

• Register Preferences This option opens the Quicken Preference dialog to the Register Preferences section. See Appendix B for more information about setting Preferences.
• Customize Action Bar From this dialog, you can set the icons you wish to see in the action bar, next to the Action gear icon. These icons are in addition to the Show Reminders icon, which is the Quicken default.
Other Asset Transactions
Part of tracking assets is keeping track of their current values and modifying account balances when necessary. Like bank or investment accounts, which are discussed in earlier chapters, activity for an asset account appears in its account register.
The best way to open an asset’s register is to click the name of the account in the Account Bar. The asset account’s register appears. If you do not see your account listed in the Account Bar, you may need to change the account’s display. Press CTRL-A to open the Account List and check the Show Hidden Accounts check box to show all of your accounts. If you have not hidden any accounts, you will not see the Show Hidden Accounts check box.
In this section, you’ll see how you can record changes in asset values due to acquisitions and disposals, improvements, market values, and depreciation.
Adding and Disposing of Assets
The most obvious change in an asset’s value occurs when you add or remove all or part of the asset. For example, you may have a single asset account in which you record the value of all of your sports-related equipment. When you buy a set of golf clubs, it increases the value of the account. Similarly, if you sell your small outboard motor, it decreases the value of the account.
In many instances, when you add or dispose of an asset, money is exchanged. In that case, recording the transaction is easy: simply use the appropriate bank account register to record the purchase or sale, and use the asset account in the Category field. Make sure you use the category enclosed in square brackets [ ].
If the asset was acquired without an exchange of cash, you can enter the transaction directly into the asset account using the Gift Received category (or a similar category of your choice) to categorize the income. Similarly, if the asset was disposed of without an exchange of cash, you can enter the transaction into the asset account register using the Gifts Given or Charity category (or other category) to categorize the write-off.
You can also just record the transaction as an internal transfer in the asset account. If the asset account name is Sports Equipment, an internal transfer in the Sports Equipment account would use the category [Sports Equipment]. You may see a prompt warning you that you are recording a transfer back into the same account. Click Yes to save the transaction.
If you have completely disposed of the asset and no longer need the account, don’t delete the account! Doing so will remove all income and expense category transactions and un-categorize all transfer transactions related to the account. Instead, consider hiding the account to get it off account lists. In addition, while you are working with hiding your accounts, be very cautious about using the Close Account feature. Closing an account in Quicken is permanent.
EXPERIENCED USERS RECOMMEND
One of the most useful features of Quicken is the Account Attachments feature. This feature allows you to digitally attach copies of property tax statements, home improvement receipts, and other paper items that may add to the basis of your property. You can scan any of these documents and save the scanned copy in the same file with your Quicken data. See Chapter 5 for a full explanation of the process.
Updating Asset Values
A variety of situations can change the value of a single asset. The type of situation will determine how the value is adjusted. Here are three common examples.
Recording Improvements
Certain home-related expenditures are sometimes considered improvements that increase the value of your home. It’s important that you keep track of improvements, because they raise the property’s tax basis, thus reducing the amount of capital gains you may have to record (and pay tax on) when you sell the house. Your tax advisor can help you determine which expenditures can be capitalized as home improvements.
Since most home improvements involve expenditures, use the appropriate spending account register to record the transaction. Be sure to enter the appropriate asset account (House, Condo, Land, and so on) in the Category field, and enclose the account name in square brackets [ ].
Adjusting for Market Value
Real estate, vehicles, and other large-ticket-item assets are also affected by market values. Generally speaking, real estate values go up, vehicle values go down, and other item values can vary either way depending on what they are.
To adjust for market value, click the Action gear icon and choose Update My Account Balance. The Update Account Balance dialog appears. Use this dialog to enter the market value in the New Balance field and then enter the date of this new value in the Date field. Be careful, as the default date of the change is today’s date. Click OK to close the dialog.
When you click OK, the entry is added to the account register as a reconciled transaction. The category for this transaction defaults to a blank. You add a category by clicking in the Category field and entering the category you want to use.
If you don’t want the adjustment to affect any category or account other than the asset, choose the same asset account as a transfer account. When you click OK, a dialog will warn you that you are trying to record a transfer into the same account. Click OK again.
Recording Depreciation
Depreciation is a calculated reduction in the value of an asset. Depreciation expense can be calculated using a variety of acceptable methods, including straight line, sum of the year’s digits, and declining balance. Normally, it reduces the asset’s value regularly, with monthly, quarterly, or annual adjustments.
Depreciation is commonly applied to property used for business purposes, since depreciation expense on those assets may be tax-deductible. If you think depreciation on an asset you own may be tax-deductible, use Quicken to track the depreciation expense. Otherwise, depreciation probably isn’t worth the extra effort it requires to track. As always, consult with your tax professional to be sure.
To record depreciation, create an entry in the asset account that reduces the value by the amount of the depreciation. Use a Depreciation Expense category to record the expense.
Keep in mind that you can set up monthly, quarterly, or annual depreciation transactions as scheduled reminders in the Bill & Income reminders. This automates the process of recording them when they are due. See more about scheduled transactions in Chapter 6.
The Property & Debt Tab
Asset and debt account information, as well as an overview of your financial standing (net worth), are part of Quicken’s Property & Debt tab. Open the Property & Debt section by clicking its tab. Within the Property & Debt tab are three views with which you can view your financial standing in useful graphic format. You access these views with three buttons: Net Worth, Property, and Debt.
Depending on your monitor’s size, some of the tabs may be shortened. For example, instead of the Property & Debt tab, the tab is labeled Property on my laptop screen.
Each of these views displays graphs and report snapshots to help you understand your true financial position. An example is the two graphs you see when you click the Net Worth button, as shown in Figure 10-6. Click either the Net Worth Summary Report or the Account Balances Report button to display additional information about your net worth accounts. Together, these snapshots paint a picture of your overall financial situation. You can see the Account Balances Report button at the lower left of the Net Worth By Account Type snapshot.
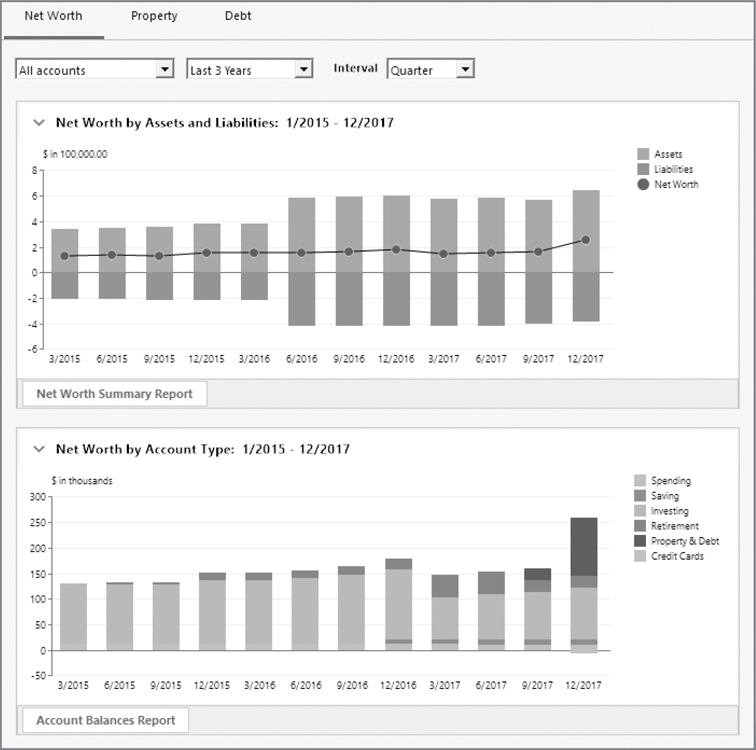
Figure 10-6 · Net Worth by Assets and Liabilities and Net Worth by Account Type are examples of the graphs available in the Net Worth view of the Property & Debt tab.
In this part of the chapter, we’ll take a closer look at the snapshots in the Property & Debt tab sections so you know both what you can find and how you can customize the information for your use.
Exploring the Net Worth View
As you click the button to open the Net Worth view, you’ll see both the Net Worth by Assets and Liabilities graph and the Net Worth by Account Type graph, as shown in Figure 10-6. You can customize the information shown in this view, but you cannot customize the information for each graph separately.
There is much more information available within the Net Worth view than first meets the eye. At the top of the section are three drop-down lists with which you can customize information to meet your requirements.
Accounts Drop-Down List
The first drop-down list displays the accounts you want to use for your graphs. The default is All Accounts. Click the downward arrow and choose Custom… to open the Customize dialog. From this dialog you may
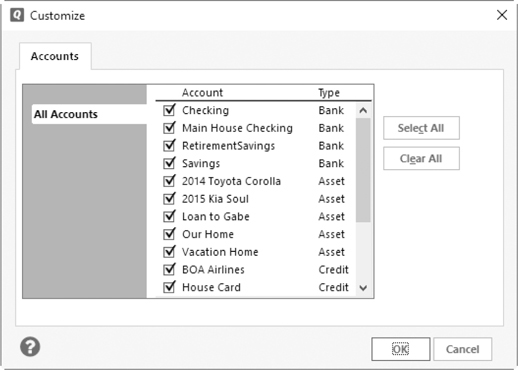
• Click the Select All button to include all of your accounts in the graph.
• Click the Clear All button to deselect all of your accounts.
• Select or clear the check box displayed by each account name to include it in the graph.
• Click the Show (Hidden Accounts) check box to display the accounts you have chosen to hide so you can opt to include them as well. If you do not see the check box, you have not chosen Keep This Account separate to have it considered hidden from the net worth reports.
In the Account List, you need to have one or more accounts marked as Hidden In The Account Bar Or Account List to see the Show Hidden Accounts check box, but you need to have one or more accounts marked as Keep This Account Separate to see the Show (Hidden Accounts) check box in the report selections.
When you have completed your selections, click OK to close the dialog.
Time Period Drop-Down List
The second drop-down list in the Net Worth button’s view allows you to set the time period for your graphs. You can choose from the Last 12 Months, the Last Year, the Last 3 Years, the Last 5 Years, the Last 10 Years, or the default time period, which is the Earliest to Date. This time period starts from the date you first entered transactions into Quicken.
Use the Custom Date option to set the calendar period to display in the graph.
Set the Interval to Display
The three choices on the Interval drop-down list are Months, Quarter, and Year. For example, if you want to see what your financial position has been for the last three years, you might choose to display the information by quarter instead of months to see the general trend as we have done in Figure 10-6.
Net Worth by Assets and Liabilities
The first snapshot in the Net Worth view is Net Worth by Assets and Liabilities, as shown earlier in Figure 10-6. This graph uses a stacked column to indicate your net worth for the period you choose. In our example, we have chosen to display all of the accounts for the last three years. We chose quarterly intervals to get an idea of how our savings and investment plan has worked for that time period. The period covered by the graph shows above the display. We can change the information displayed on the graph by changing the options in any of the drop-down lists.
The green bar represents your assets, the red bar represents your debt, and the red circle represents your net worth. Ideally, the green bars should get taller while the red bars get shorter. The net effect is a rise in the net worth line, as seen in Figure 10-6. If the net worth line is below the baseline of the graph, you’re in some serious financial trouble because your debts exceed your assets.
How you perceive the colors may depend on your monitor’s settings.
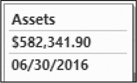
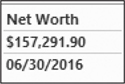
When you position your mouse on a green area, a report appears showing exactly what your assets were worth as of that date, as shown next. When you position your mouse over the net worth dot on this graph, you see your net worth as of that date, as shown here. Similarly, put your mouse in the debt area to see how much you owed at that date. Double-click any bar location to open another chart that displays your assets and liabilities in donut charts. Click Done to close the chart.
Depending on your selections and accounts you have set up in Quicken, you may see one or two charts. If you have both asset and liability accounts selected, you will see two charts: one for assets and a second chart for liabilities. If you have only asset or only liability accounts selected, you will see only one chart.
The size of the “donut” in the donut chart may vary depending on the number of accounts you have chosen to display. The charts are sized by the number of account-type legend entries. Therefore, if you have more account types for assets, the assets chart may be smaller than the liabilities chart. This can be a bit disconcerting to see your assets looking smaller than your debts. If you have chosen only one or two asset and liability accounts, the charts may appear to be the same size.
Keep in mind that, by default, this graph represents all of your accounts in Quicken—including your banking and investment accounts. It’s a true view of your net worth trend for the accounts and time period you choose to display.
Net Worth Summary Report
Below the Net Worth by Assets and Liabilities graph, you’ll see a button labeled Net Worth Summary Report. The report that appears when you click this button displays your information in both graphic and report format, as seen in Figure 10-7. (This report can also be displayed by selecting Reports | Net Worth & Balances | Net Worth.) As with any report or graph, the information is fully customizable. Click the X to close the report and return to the Net Worth view. See Chapter 15 to review your many options when customizing reports.
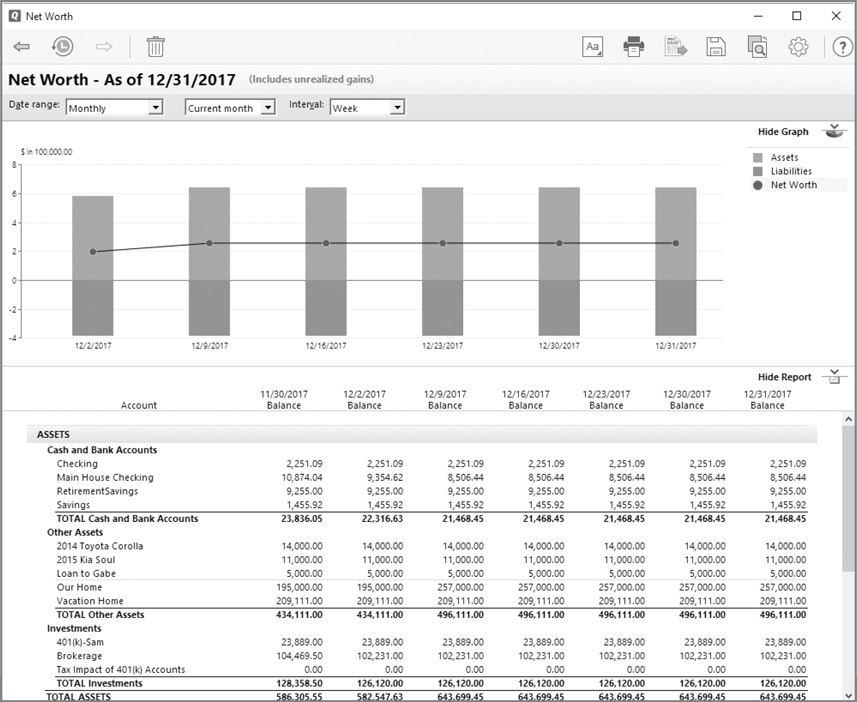
Figure 10-7 · The Net Worth report and graph shows how your financial plans are working.
Any accounts you have hidden in Quicken are not included in your Net Worth reports unless you choose to include them by customizing the report. Remember, Hidden In The Account Bar Or Account List ties to the Show Hidden Accounts check box, whereas accounts marked as Keep This Account Separate tie to the Show (Hidden Accounts) check box in the report selections.
Net Worth by Account Type
By default, the Net Worth by Account Type graph appears in the lower portion of the screen when you select the Net Worth button in the Property & Debt tab. This graph shows the percentage of your net worth represented by each of your account types. This is also a stacked bar graph with each account type represented by a different color. The legend to the right of the graph shows what color indicates which type of accounts.
Account Balances Report
The Account Balances Report button, at the bottom of the Net Worth by Account Type graph, opens the Account Balances report with the date range settings you have entered at the top of the Net Worth views. This report can also be opened by choosing Reports | Net Worth & Balances | Account Balances. However, the default settings for the report you see using that method show your balances from the earliest date entered in your Quicken account with no interval (such as monthly, weekly, and so on) set. Click the X to close the report. If you have made any customizations to the report, you may see a message asking if you want to save the report. If the answer is no, click Don’t Save to return to the Net Worth view.
Using the Property View
To open the Property view, click the Property button in the Property & Debt tab. Each of your assets and any associated liability show in a horizontal bar graph, as seen in Figure 10-8. (If you have two current liabilities associated with one asset, each liability is displayed with a different color.) At the right of each asset, the total equity you currently hold in this asset displays. The equity that shows is the current value of the asset less the current loan balance. If you have refinanced an asset, such as your house, zeroed-out mortgages may be included in the total equity value with a zero balance.
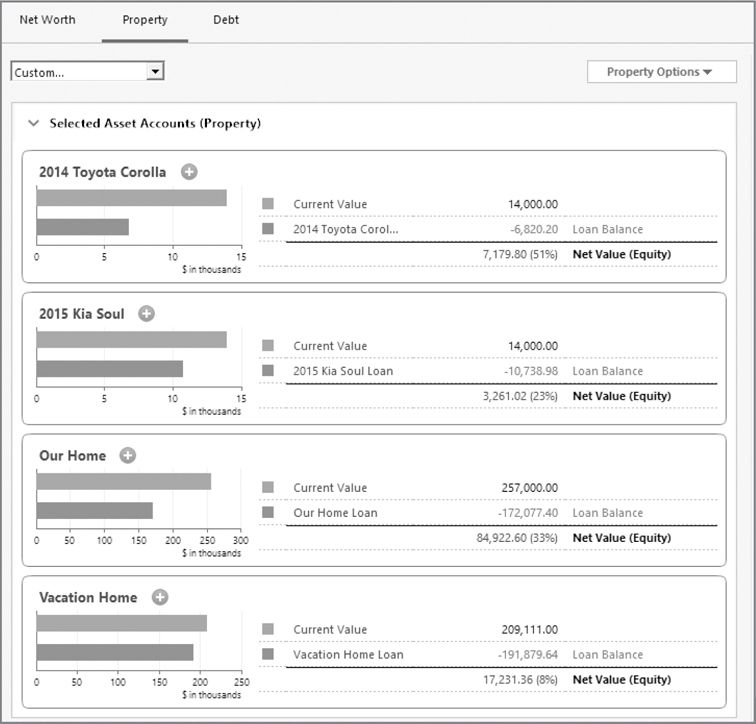
Figure 10-8 · Bar graphs in the Property view display both assets and any associated debt.
Depending on your screen or monitor, you may not see the different colors because the color differences are subtle.
The drop-down list box at the top of the screen lets you select which of your accounts you want displayed in this graph. While All Accounts is the default choice, you may choose from several options:
• Personal Accounts Only, which is only shown in the Home, Business & Rental Property edition.
• One specific account (each shows by the account name)
• Custom (which opens a list of all of your asset accounts so you may choose two or more)
Click the Property Options button at the right side of the screen to open a menu from which you can choose among the following:
• Add A House Asset Account
• Add A Vehicle Asset Account
• Add Other Asset Account
• Add A New Loan
Each item on the Property Options menu has a small white plus sign in a green circle to its left. You open the appropriate Add Account screen when you click that green circle icon or click the adjacent text.
Creating a new account from the Property Options menu saves a step or two when adding a new account, as the Add Account dialog opens directly to the type of account you are creating.
Within the graph itself are similar icons to the right of each asset name. Use these green circle icons to open a menu with which you can perform the following actions:
Link Existing Loan To This Property This option opens a list of existing loans from which you can choose the loan to link to this property (asset). If you have not created any loan accounts, you will not see this option.
Link Existing Line Of Credit To This Property Choosing this option opens another list menu that displays all your current credit accounts from which you can choose. Again, you will not see this option if you have not created any lines of credit or credit card accounts.
Unlink Existing Liability From This Property When you choose this option from the list, any current loans that have been associated with this asset are displayed. Click the one you want to unlink from this asset. If no liability (loan or line of credit) is currently linked with the property (asset), you will not see this option.
New Loan Selecting this option opens the Add Loan Account dialog. If you have not downloaded yet today, when you select New Loan, Quicken will connect to the Internet and download an updated list of financial institutions.
EXPERIENCED USERS RECOMMEND
The ability to link credit accounts with assets can be valuable. However, unless you have set up a line of credit as a “credit” account instead of a loan, Quicken does not make this information available as an “existing line of credit.” Since you cannot change the account “type” after you have entered it, be cautious when creating your new accounts.
Opening the Debt View
Clicking the Debt button opens the Debt view, which by default displays two graphs that show your current debt position, as seen in Figure 10-9. Each graph portrays your liability information in a slightly different format. At the top of the graphs are several drop-down lists that let you select the accounts with which you want to work, the time period to cover, and the intervals to be displayed. A legend appears at the right telling you what color the graph uses for each debt listed.
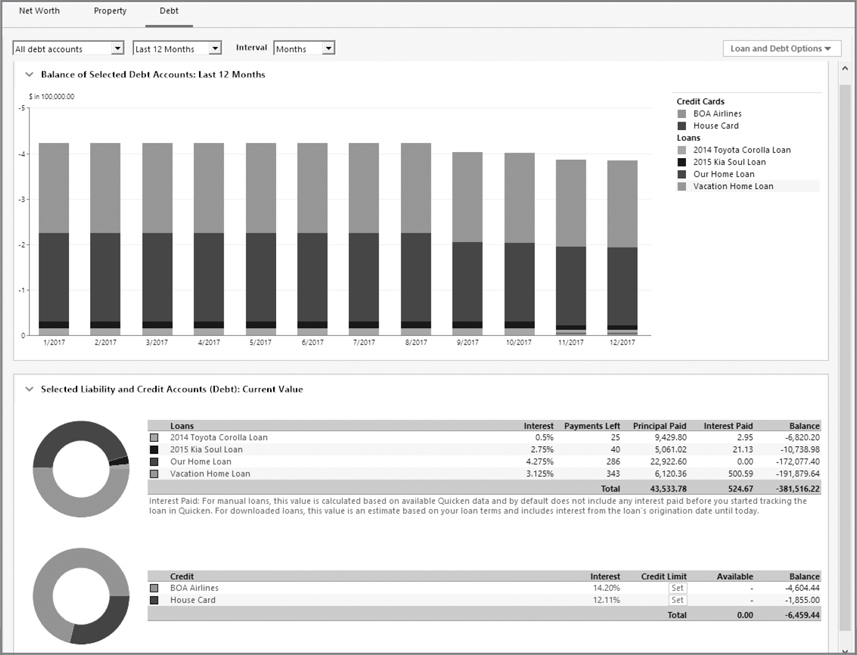
Figure 10-9 · Click the Debt button in the Property & Debt tab to view your financial obligations in several ways.
The first drop-down list lets you choose which accounts you want to use in the graphs. You have your choice of the following:
• All Debt Accounts sets the graph to display all of your debts. This is the default setting.
• Credit Cards Only displays just the amounts you owe to credit card companies.
• Loans Only shows all of your current loans, including any mortgages. If you move your mouse cursor over any section of the stacked bar graph, a small message appears that displays the balance of that loan at that point in time.
If you have designated a liability as “Other Liability” in the Add Account dialog, you may see an option for “Other Liabilities Only,” which displays all items of this account type.
• Custom opens a Customize dialog that lets you choose which accounts to display. Click Select All to display all of your debts. Click Clear All and choose only the debts you want to display in your graph. Clicking the Show (Hidden Accounts) check box will enable you to include those debts that you have hidden in Quicken for selection in the graphs. Click OK to close the dialog and return to your graph.
Specific debt account names let you create a graph that shows only one of your debt accounts.
The second drop-down list offers a variety of dates for which you can set your graphs. Most of the options are self-explanatory; however, when you click Custom Date, a dialog appears that you can use to set the period for which you want each graph to display. Be aware that in this dialog, unlike most dialog boxes in Quicken, you have to click in the To field to change the date instead of using the TAB key to move to it. In this dialog, pressing the TAB key when you enter a date in the From field moves your cursor to the To date field. Click OK to save your date selection and return to the Debt view.
The third drop-down list lets you choose between three interval options for your graph’s display: Months, Quarter, and Year.
Loan and Debt Options
At the top right of the Debt view is a drop-down list, labeled Loan and Debt Options, offering additional options, as discussed next:
• Add A New Loan
• Refinance Calculator
• Loan Calculator
• Add A Credit Card
Both of the “Add” choices open the Add Loan/Credit Card Account dialog with which you can quickly create a new account of the type you selected. Again, if this is the first time you have done any online activity for the day, Quicken will retrieve the list of financial institutions when you click the Add A New Loan or Add A Credit Card drop-down item. The Calculator options open either the Refinance or the Loan Calculator for your use. Learn more about Quicken’s useful financial calculators in Chapter 12.
Balance of Selected Debt Accounts Graph
As seen in Figure 10-9, the first graph you see in the Debt view of the Property & Debt tab is a stacked bar graph that shows your total debt by year for a period you designate. This graph includes a legend explaining the color used for each debt item account included in the graph.
Using the drop-down lists at the top of the screen, you can tell Quicken to show a wide variety of accounts, dates, and intervals to make the information meaningful to you.
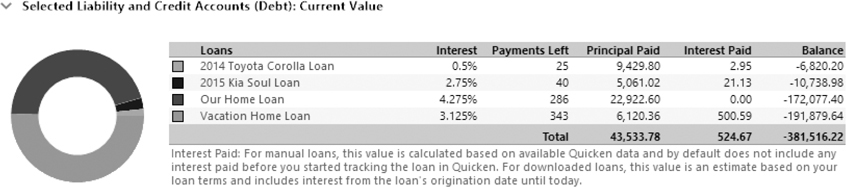
Current Value Graph
The second graph in the Debt view of the Property & Debt tab displays the current value of the debts you selected in the first drop-down list at the top of the page, as seen in Figure 10-9. Each drop-down list selection you make displays the information in a slightly different way and includes somewhat different information. As you can see, the Selected Liability and Credit Accounts (Debt): Current Value graph displays information both as a donut chart and with columns of information. How you have chosen to display your debt accounts in the Debt view’s first drop-down box will affect what shows on the Current Value graph. Depending on your choices, the information about the (non-hidden) debt accounts is shown in two sections: Loans and Credit. If you have other debt accounts that are not credit or loan, you will see a third debt type: Other Liabilities.
If you only have one debt account with a balance for a particular debt type, a chart may not be displayed for that debt type. No chart is displayed if the balance of the debt account is positive instead of negative. This can happen when you have a balance due you on a credit card account.
An interesting bit of trivia for this chart. The charts use 10 different colors. If you happen to have 11 accounts displayed, the first and eleventh account will use the same color and their sections will be adjacent to each other, which makes the two sections look like a single section.
Loans If you have selected All Debt Accounts or Loans Only in the first drop-down list, you will see the following:
• Interest displays the rate of interest for each loan.
• Payments Left shows you how many more payments you have through the life of the loan or debt.
• Principal Paid shows the amount of principal you have paid on this loan since its inception.
• Interest Paid totals the interest you have paid to date. Remember, interest is the amount you pay to rent someone else’s money.
• Balance shows what you still owe on this debt. It shows as a minus because it subtracts from your net worth.
Credit This section displays the credit cards you have entered into Quicken. If you do not have any credit card accounts set up in Quicken, you will not see this section in the Debt view. The information displays in chart form for the options you chose in the drop-down boxes. You see the following:

• Interest displays the interest rate being charged on each card. If it does not show, click the Set button to open the Interest Rate dialog. Enter the interest rate for the card as shown on your monthly statement, and click OK to close the dialog. You may also use this dialog to change the interest rate for the credit card. Click the current rate to open the Interest Rate dialog and enter the new rate.
• Credit Limit displays the credit limit of the card. The amount does not show if you have not entered the limit. Click the Set button to open the Credit Limit dialog. Type the amount of this card’s credit limit, and click OK to return to the graph.
You can also change the credit limit by clicking the existing value and entering a new amount.
• Available displays the amount you can still charge on this card. It is your credit limit minus the current balance.
• Balance displays the amount you owe on this card to the credit card company as of the date you set. The date set only pertains to the first snapshot, Balance of Selected Debt Accounts. The balance in the second snapshot, Selected Liability and Credit Accounts (Debt): Current Value, is today’s balance.
If you have not set the interest rate or the credit card limit on any of your credit accounts, two Set buttons appear, as seen in Figure 10-9. If you have set the interest rate but not the card limit, only one Set button appears. You may adjust the interest rate and credit limits with the appropriate Set button.
1. Locate the account you wish to adjust and, in the proper column, click the Set button.
2. From the dialog that appears, you may set an interest rate or a credit limit. Type in the information and click OK.
You may also adjust any number that appears in blue in the graph. For example, when our credit card company complies with our request to lower our credit limit, we do the following:
• Click the amount shown in blue in the credit limit column for the appropriate account.
• In the Credit Limit dialog that appears, type the new amount.
• Click OK to close the dialog and return to the Debt snapshots in the Property & Debt tab.
Accessing Property and Debt Account Registers
To learn more about the transactions and balances for a specific account, you can view the account’s register.
• Click the name of an account in the Property view in the Property & Debt tab’s screen.
• Click the name of the account from the Account Bar.
• Click the account’s name from the Current Value graph in the Debt view of the Property & Debt tab.
With any of the three methods, the account’s register will open. The register lists all transactions entered into that account, as well as the ending balance. As with all of the Quicken registers, you can enter transactions directly into the register. Quicken automatically calculates and enters other transactions such as principal payments for a mortgage or other loans.
Viewing the transactions and entering or editing the transactions will work in all loan registers, except online loan registers. You cannot edit the transactions in those registers.
Creating Alerts for Property and Debt Accounts
Although Chapter 7 introduced you to Quicken Alerts, there are some special alerts that relate directly to your property.
Setting Up Property and Debt Alerts
To set up an alert, begin by opening the Tools menu and clicking Alerts Center. Click the Setup tab and choose General, as shown here. Click the name of the alert you want to set from the options on the left side of the window to display its options on the right. Of the several options available, two alerts apply specifically to your property; the Reminders alerts are discussed at length in Chapter 7.

• Insurance Reappraisal notifies you before an insurance policy expires so you can either reevaluate coverage or shop for a new policy.
• Mortgage Reappraisal notifies you before a mortgage changes from variable to fixed (or fixed to variable) so you can consider refinancing. Even if your mortgage doesn’t convert, you can use this alert to remind you periodically to check for better mortgage deals.
Both alerts work in much the same way. For each alert, enter a name and date in the right side of the window. For example, to set insurance policy expiration dates, click in the Policy Name field that contains the name of the policy holder with which you want to work. The name field for both alerts is limited to 32 characters. You can change the name or add a new policy holder (the insurance company). You’ll see that your text appears on the right side of the box. Use your TAB key to move to the Exp. (Expiration) Date field. Enter the expiration date.
The Lender Name or Policy Name field (depending on the alert you have chosen to work with) is right justified when entering the text. That can appear odd if you are expecting the text to appear at the left side of the field.
Select one of the options at the bottom of the window to indicate how you want the alert to appear: as text in the alert list or as a pop-up dialog that appears when you start Quicken. Finally, use the drop-down list to specify the length of time the alert should remain in the list. When you have finished entering all the alerts you want to set up, click OK.
Repeat this process for each alert you want to set. When you’re finished, click OK.
Working with Property and Debt Alerts
Once you have established property and debt alerts, you can manage them in several ways:
• Open the Alerts Center’s Show All tab by clicking Tools and choosing Alerts Center. Select an alert and click the Delete button to remove an alert.
• In the Alerts Center’s Setup tab, you can uncheck an alert category to prevent all the alerts in that category from being displayed in any way.
• If you have made changes in the Alerts Center’s Setup tab, click OK to save your changes and close the Alerts Center window.