Chapter 12
Using Quicken Tools for Future Planning
In This Chapter:
• Planning your steps
• Setting plan assumptions
• Viewing plan results
• Setting “What If” options
• Using “What If” Results
• Finding more planning tools
• Learning about financial calculators
• Accessing the financial calculators
• Working with the Retirement Calculator
• Running the College Calculator
• Evaluating the Refinance Calculator
• Planning with the Savings Calculator
• Using the Loan Calculator
Quicken can help you with all of your financial decisions and give you direction regarding how much you may need to save for the future. To most of us, the future is an unknown, a mystery. After all, who can say what will happen tomorrow, next year, or ten years from now? However, when you think about your future, you can usually come up with a few events for which you can plan: marriage, the purchase of a home, the birth of children (and their future education), and a comfortable retirement. (These are just examples—everyone’s life runs a different course.) These events, as well as many unforeseen events, all have one thing in common: they affect your finances. In this chapter, you’ll learn how Quicken’s tools can help you plan for many of life’s milestones.
 Planning for Retirement
It may seem strange to start planning for what may happen 20 or more years from now. Throughout your life, you work and earn money to pay your bills, buy the things you and your family need or want, and help your kids get started with their own lives. However, there comes a day you may choose to retire from going to work every day. Regular paychecks stop coming, and you find yourself relying on the money you’ve been saving for those many years.
Retirement planning may be one of the most important financial planning jobs facing individuals and couples. Since this “job” requires long-term planning and, in many cases, sacrificing something today to create a secure tomorrow, we start with some planning steps and suggestions.
Most retired people live on fixed incomes. That’s not a problem, as long as the income is fixed high enough to support a comfortable lifestyle. You can help ensure that there is enough money to finance your retirement years by planning and saving now. As longevity increases, planning is even more important today. In our country, people are living longer than ever. Your retirement dollars may need to support you for 25 years or more, at a time when the cost of living will likely be even higher than it is today.
With proper planning, it’s possible to finance your retirement years without putting a strain on your working years. Tracking your current expenses and finding ways to reduce current spending so you can save more are important as well. By closely monitoring the status of your retirement funds, periodically adjusting your plan, and acting accordingly, your retirement years can be the golden years.
Planning Your Steps
Retirement planning is much more than deciding to put $5,500 in an IRA every year. It requires careful consideration of what you have, what you’ll need, and how you can make those two numbers the same.
Assess What You Have
Take a good look at your current financial situation. What tax-deferred retirement savings do you already have? A 401(k)? An IRA? Something else? What regular savings do you have? What taxable investments do you have? The numbers you come up with form the basis of your final retirement funds.
Be sure to consider property that you can sell to contribute to retirement savings. For example, if you currently live in a large home to accommodate your family, you may eventually want to live in a smaller home. The proceeds from the sale of your current home may exceed the cost of your retirement home. Consider any income-generating property that may continue to generate income in your retirement years or could be sold to contribute to retirement savings.
Determine What You’ll Need
What you’ll need depends on many things. One calculation suggests you’ll need 80 percent of your current gross income to maintain your current lifestyle in your retirement years.
Time is an important factor in calculating the total amount you should have saved by retirement day. Ask yourself two questions:
• How long do I have to save? Take your current age and subtract it from the age at which you hope to retire. That’s the number of years you have left to save.
• How long will I be in retirement? Take the age at which you plan to retire and subtract it from the current life expectancy for someone of your age and gender. That’s the number of years you have to save for. No need to pull out your calculator—Quicken will do the math for you as you enter your information in the Lifetime Planner.
Develop an Action Plan and Stay with It
Once you know how much you need, it’s time to think seriously about how you can save it. This requires putting money away in one or more savings or investment accounts. Use the Lifetime Planner in Quicken to get you started. See “Getting Started with the Quicken Lifetime Planner” next in this chapter. After you have created the plan, stick to the plan!
The most important part of any long-term plan is consistency. For example, if you plan to save $5,000 a year, don’t think you can just save $2,000 this year and make up the $3,000 next year. There are two reasons: first, you can’t “make up” the interest lost on the $3,000 you didn’t save this year, and second, you’re kidding yourself if you think you’ll manage to put away $8,000 next year. If you consider deviating from your plan, just think about the alternative: making ends meet with a job bagging groceries or waiting tables when you’re 73 years old.
Getting Started with the Quicken Lifetime Planner
To help you prepare for many of life’s financial goals, Quicken includes several comprehensive planning tools. From the Planning tab, you have access to all of Quicken’s built-in planning features, including the Quicken Lifetime Planner’s main plan assumptions and the various plan assumption dialogs (refer to Figure 12-1). Once you have set up your plan, simply view the Lifetime Planner to see an up-to-date view of how well your plan is working.

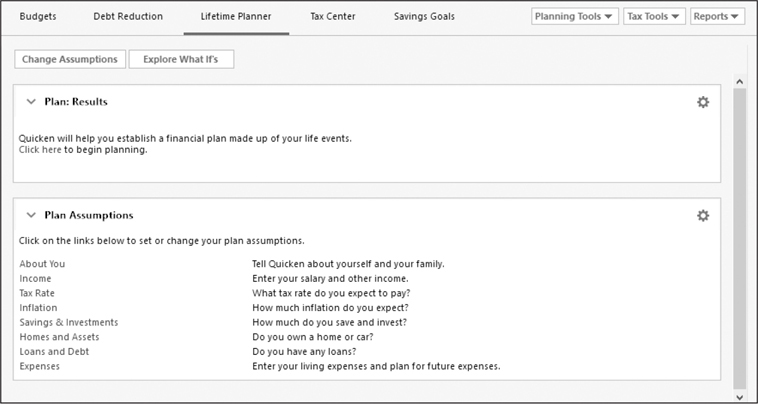
Figure 12-1 · The Lifetime Planner view displays the results of your plan.
Here’s how it works. You start by entering plan assumptions, which include information about you, your current finances, and your tax rate. Quicken makes calculations based on what you entered to display plan results. As you continue working and entering transactions that affect your finances, Quicken updates the result of the plan.
Setting up Quicken Lifetime Planner assumptions does take a bit of time. However, the benefits of using this feature far outweigh the time it takes to enter the information. If you don’t have the time to set up the Quicken Lifetime Planner today, schedule time in the near future. This can even be a family project on a rainy Saturday afternoon. If you are raising a family, helping them see how to plan and save can be a very valuable lesson.

You can enter information into the Lifetime Planner all at once or over time. Once you have entered information into the planner, Quicken retains the information for you and you can continue where you last were working.
This section explains how to set assumptions for the various topics within the Quicken Lifetime Planner and how to view the results of your plan in the Planning tab.
Setting Plan Assumptions
The easiest way to see what plan assumptions you will need to make is to view the Plan Assumptions area of the Lifetime Planner. Click Planning | Lifetime Planner. When you first see the planner, the Plan: Results area is blank, waiting for your input, as seen here. Select About You to begin your plan.
EXPERIENCED USERS RECOMMEND
As you work with the Lifetime Planner, if you have not entered information in a specific area to allow Quicken to perform the required calculations, Quicken may remind you with the message “You have not entered enough information for Quicken to analyze your life plan. Check to see the information you still need to provide.” Select the Check link to enter the required data. Each area that needs additional information will display a check mark, as shown here.

To begin, start by entering information in the Plan Assumptions. To set details for an assumption category, click its link. Each link opens a dialog you can use to enter information. Here’s a look at each category.
About You
Clicking the About You link displays the About You dialog, as shown next. Its fields are pretty self-explanatory: your name and date of birth. When you’re finished entering information in the dialog, click Done to save it.

Here are some other items to consider when entering data into the About You dialog.
Include Spouse (or Partner) If you select the Include Spouse check box, you can enter information about your spouse or partner into the Spouse column of the dialog. If you don’t wish to include anyone else in your plan, leave those boxes blank.
If you choose not to include your spouse, all the other plan assumption dialogs will show the spouse options grayed out and inactive. If, in working through the other plan assumption dialogs, you change your mind and want to include your spouse, you will need to return to the About You assumption dialog and enter the information about your spouse.
Life Expectancy You can either enter what you think might be your life expectancy or enter your birthdate and click the Calculate button to display the Calculate Life Expectancy dialog. Set options in the dialog, and Quicken tells you how long you may live. Of course, this is an estimate based on current research into life expectancy; you may or may not live to reach the age Quicken suggests, or you may live even longer. Click OK to dismiss the Calculate Life Expectancy dialog.
Many Quicken users set a life expectancy as 95 or longer to ensure their savings will last throughout their lives.
Children and Dependents To enter information about children or other dependents, click the New button at the bottom of the dialog. This displays the Add Child/Dependent dialog, as shown here, in which you can enter the name and date of birth for a dependent. Once you click OK, the person’s name and age are added to the list. Repeat this process for each child or dependent you need to add. Once a child or dependent has been added, you can select his or her name and click the Edit button to change information about him or her, or click the Delete button to remove him or her permanently from the plan, or turn on the Exclude From Plan check box so Quicken doesn’t use him or her in its calculations. Click Done to close the About You dialog.
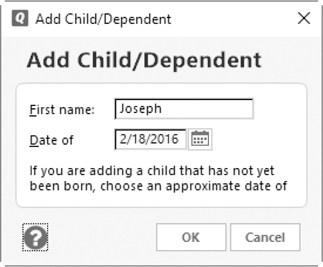
The focus, or location, of your cursor may not automatically go to the first name field, so you may have to click in the field to begin entering information.
Income
The Income link displays the Income dialog. This section has three separate tabs of information. Select the appropriate tab to enter salary, retirement benefits, and other income information for you (and your spouse or partner, if you choose).
Salary The Salary tab enables you to record information about current and future salary and self-employment income.
To add an income item into your Plan Assumptions section, click Income to open the Quicken Planner: Income dialog. In the Salary tab, click the New button to display the Add Salary dialog. Then set options to enter information about the income item. The Add Salary dialog is extremely flexible, enabling you to enter start and end dates for a salary—which is useful for income from seasonal employment. If you don’t need to enter specific dates, choose Already Started from the When Does This Salary Start? drop-down list and one of the retirement options from the When Does This Salary End? drop-down list. When you click OK, the salary item is added to your income.
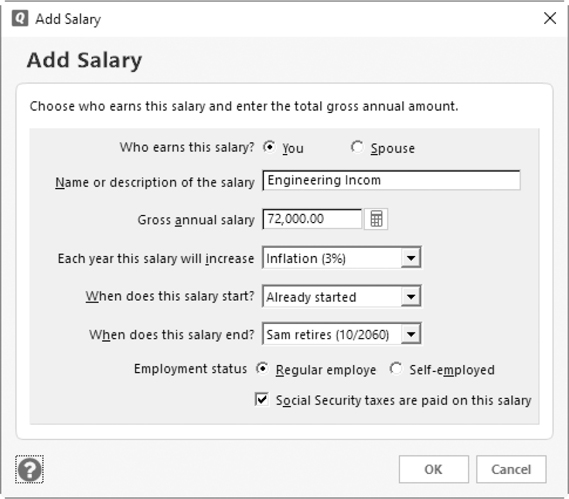
For each item you add, Quicken automatically includes adjustments that specify when the item begins and ends. You can add other adjustments if you know about changes that will occur in the future. Select the item in the top half of the dialog, and then click the New button in the Adjustments to [item name] in the bottom half of the dialog. Enter information in the Add Salary Adjustment dialog. Click OK to close the dialog. The information is added to the bottom half of the Salary tab of the Income dialog.
After you have completed the entries in the Salary tab, you can select any of the salary or adjustment items and click the Edit or Delete button to change or remove them, respectively. You can also select an item and select the Exclude From Plan check box to exclude its information from the Quicken Planner.
Retirement Benefits The Retirement Benefits tab enables you to enter information about Social Security or pension benefits you are currently receiving or to estimate future benefits.
To estimate future Social Security benefits, enter the age at which you expect to begin collecting benefits and click the Estimate button. The Estimate Social Security Benefits dialog appears, as seen next. You have two options:
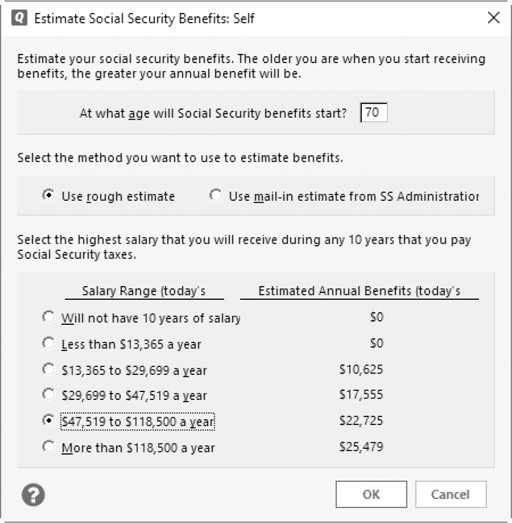
• Use Rough Estimate enables you to select a salary range option to estimate benefits.
• Use Mail-In Estimate From SS Administration enables you to enter the amount provided by the Social Security Administration on your annual Social Security statement.
When you click OK, the amount appears in the Retirement Benefits tab.
Currently, the Social Security retirement age for those born between 1943 and 1959 is 66 while those born in 1960 or later may receive full Social Security benefits at age 67. There has been some talk about raising the retirement age for those born after 1978 to 70, although as of the date of this manuscript, that has not been enacted.
To add a pension, click the New button at the bottom of the Retirement Benefits tab of the Income dialog. This displays the Add Pension dialog. Enter information about the pension, and click OK to add it to the Retirement Benefits tab. In that tab, you can select the pension and click Edit or Delete to change or remove it, or select the Exclude From Plan check box to exclude it from the Quicken Planner’s calculations.
Other Income The Other Income tab of the Quicken Planner: Income dialog enables you to enter income from other sources, such as gifts, child support, and inheritances. Don’t use this tab to enter income from investments or rental properties; the Quicken Lifetime Planner provides specific locations for that data.
Click the New button in the Other Income tab to enter an income item. An interesting option in this dialog is the ability to specify how you plan to use the funds: either for savings and investing or to pay expenses. The option you select determines how this income is used in the plan. If you’re not sure what to select, leave it set to the default Use It To Pay Expenses option. When you click OK, the item is added to the Other Income tab’s list. You can edit, delete, or exclude the item from the plan as desired.
EXPERIENCED USERS RECOMMEND
The Social Security Administration mails annual notices to those age 60 and older who are not receiving benefits or who have not yet signed up for a personal account online. You can create a personal account at the Social Security Administration’s website and view your benefit estimates at any time. Go online to ssa.gov. From there, select Online Services and choose the Get Your Social Security Statement link. Once you sign up on the website, you get an annual reminder via e-mail rather than an annual postal mailing.
When you have entered all the income items, click Done to close the Quicken Planner: Income dialog.
Tax Rate
Clicking the Tax Rate link in the Plan Assumptions snapshot displays the Average Tax Rate dialog. You have two options:
• Demographic Average enables you to estimate your tax rate based on where you live and what your income is.
• Tax Returns enables you to estimate your tax rate based on the total income, total federal taxes, and total state taxes from your most recent tax returns.
You can also enter an estimate of your post-retirement tax rate, which may be lower. Click Done to close the Quicken Planner: Average Tax Rate dialog.
Inflation
Selecting the Inflation link displays the Estimated Inflation dialog, which includes a field you can use to enter the inflation rate you want to use for your plan. Quicken suggests an inflation rate of 3 percent, which is the average inflation rate since 1927, but you can enter any rate you think is correct in the text box. Instead of using “Done” as shown on the other dialogs, this dialog uses “OK” to save your estimate.
Quicken users who want to plan more conservatively may want to enter a higher inflation rate.
Savings & Investments
Clicking the Savings & Investments link in the Plan Assumptions snapshot displays the Savings And Investments dialog, which is organized into three tabs, as seen next. Use these dialogs to enter information about current bank and investment accounts, as well as contributions you make to bank or investment accounts. To enter a contribution that either you or your partner makes to an account, select an account from the list above and click New below to add a contribution. Use the Return tab to enter the return you expect to earn on your investments.

Savings
Click the Savings tab to list all of the bank accounts you have set up in Quicken, along with their ending balances.
If you have omitted any accounts from Quicken, now is a good time to add them if you want them to be part of your plan. Click the New button at the upper half of the dialog to display the Add Account dialog, as you learned in earlier chapters.
Quicken automatically assumes that each bank account will be used for general expenses. You can change this assumption by selecting an account and clicking the Details button. Choose a new purpose from the drop-down list in the Account Details dialog that appears and click OK. Until you use Quicken’s calculators and planners, general expenses is the only offered option. However, if you have entered information into one of the Quicken plan assumption topics, such as college expenses in the Expenses topic, an option for that expense appears in the drop-down list.
If you or your partner makes regular contributions to one of your bank accounts, you can enter information about that contribution in the Savings dialog. In the top half of the dialog, select the account that receives the contribution. Then click the New button at the bottom of the dialog. Use the Add Contribution dialog that appears to indicate how much you contribute. The dialog walks you through the process of entering information based on whether the contribution is a percentage of a salary or a base amount that increases each year. Click Done to close the Add Contribution dialog.
Investments
The Investments tab lists all of the investment accounts you have set up in Quicken, along with their current market values. Remember, since market value is determined by security prices, the market value is only as up to date as the security price information in Quicken that you have most recently entered or downloaded.
This tab works just like the Savings tab. You can click the New button in the top half of the dialog to open the Add Account dialog to enter a new investment account. Choose an existing account, and click the New button in the bottom half of the dialog to enter regular contribution information for any selected investment account. You can also specify the intended use for any account by selecting the account name and clicking the Details button.
Return
The Return tab enables you to specify your expected rates of return for pre-retirement and post-retirement investments. If you select the separate rate of return check box near the top of the dialog, additional text boxes appear, enabling you to enter different rates of return for taxable and tax-deferred investments. At the bottom of the dialog, you can enter the percentage of the taxable return that is subject to taxes. This is normally 100 percent, but for your situation, the percentage may be different. Click Done to close the Quicken Planner: Savings And Investments dialog.
Homes And Assets
Clicking the Homes And Assets link displays the Homes And Assets dialog, which is organized into two tabs. This is where you can enter information about currently owned assets and assets you plan to purchase in the future.
EXPERIENCED USERS RECOMMEND
Check with your tax professional for the current limits of contributions to any retirement plan such as a 401(k) or an IRA, whether Traditional or Roth. Current limits for the calendar year 2018 are
• 401(k) = $18,500
• 401(k) Catch-up for those 50 and older = $6,000
• IRA = $5,500
• IRA = Catch-up for those 50 and older = $1,000 (for a total of $6,500)
Homes and Asset Accounts When you select the Homes And Assets link in the Plan Assumptions snapshot and choose the Asset Accounts tab, seen next, lists all of the asset accounts you have created in Quicken, including accounts for your home, vehicle, and other assets. If you have additional assets that have not yet been entered in Quicken and you want to include them in your plan, click the New button and use the Add Account dialog that appears to create the new account. Review how to add a new asset account in Chapter 10.
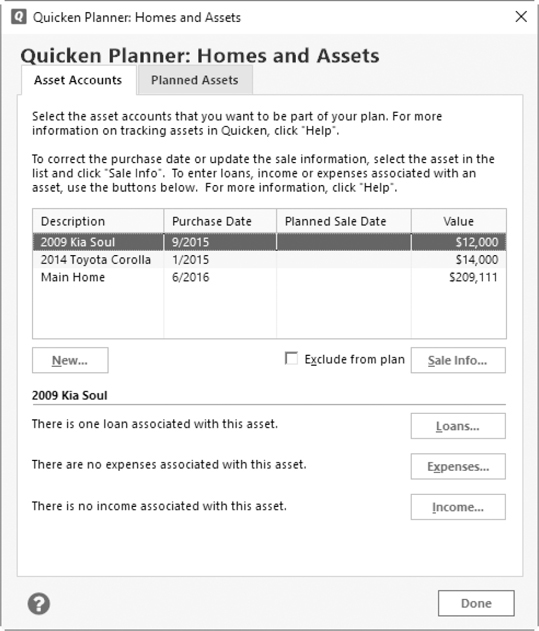
If you plan to sell an asset, you can enter information for that sale. Select the asset in the top half of the dialog, and then click the Sale Info button. A series of dialogs prompts you for information about the asset’s purchase and sale date and price, as well as other information that affects how much money you can expect to receive and pay taxes on. Quicken adds this information to your plan. Click Done to close the Sale Information dialog. If you change your mind about selling the asset, click Sale Info again and select I Do Not Plan To Sell This Asset in the second screen of the dialog.
Three buttons at the bottom of the Homes and Assets dialog enable you to associate loans, expenses, and income with a selected asset. This is especially important when working with assets you plan to sell, since the sale of the asset should also end associated debt, expenses, and income.
• Loans enables you to link existing loans to the asset or add new loans, including home equity loans. It also enables you to enter information about planned loans—for example, if you plan to use a home equity loan to build an addition on your house sometime next year. You can also enter information about planned payoffs—perhaps you’re settling an estate and will be getting an inheritance and plan to use it to pay down your house mortgage. Review entering loan information in Chapter 10.
When you click New to add a loan, the dialog is titled Add Loan Account instead of just Add Account.
• Expenses enables you to enter property tax information as well as other expenses related to the asset. For a home, this might include association fees, homeowner’s insurance, and estimated maintenance and utility costs. For a car, this might include registration, fuel, service, and insurance. For each expense you add, Quicken prompts you for information about the expense, including how you expect to pay for it—with money in a specific bank account or with a loan. It even enables you to set up a monthly savings target to pay for the item. Remember not to enter these same expenses in the Expenses dialog.
• Income enables you to enter information about income you expect to earn from the asset. This is especially useful if you own rental property. The dialog that appears when you add an income item is almost the same as the Add Other Income dialog. It even allows you to specify how you plan to use the income: for investment or to pay expenses. Click Done to close the Loans, Asset Expenses, or Other Income dialogs.
Planned Assets The Planned Assets tab lets you enter information about any assets you plan to purchase in the future. For example, suppose you indicated in the Asset Accounts tab that you plan to sell your home or car on a specific date. If you plan to replace it with another home or car, this is where you will enter information about the replacement. Quicken uses dialogs that walk you through the process of entering details about the future purchase. Once you’ve entered planned asset information, you can select the asset in the list and add loans, expenses, and income for it, as well as choose the accounts you plan to use to pay for it. Click Done to close the Quicken Planner: Homes And Assets dialog.
Loans And Debt
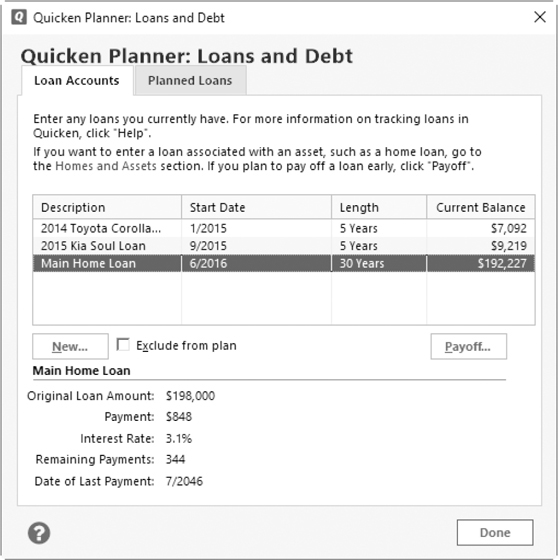
Clicking the Loans And Debt link in the Plan Assumptions snapshot displays the Loans And Debt dialog, which is organized into three tabs: Loan Accounts, Planned Loans, and after you have set up your debt reduction plan, Existing Debt Plan. Use these dialogs to enter information about current and planned loans, as well as information from your debt reduction plan.
The Existing Debt Plan tab does not appear until you have set up a debt reduction plan. This sometimes prevents the debt reduction plan from being identified for inclusion in the Lifetime Planner.
Loan Accounts The Loan Accounts tab, shown next, displays information about current loans. This information comes from loans you have set up within Quicken. To add another loan that isn’t already recorded in Quicken, click the New button to display the Add Loan Account dialog, which is covered in Chapter 10. If you plan to pay off a loan before its last payment date, you can click the Payoff button to enter future payoff information. By using Quicken you can improve your credit rating so you can get a better rate or to help reduce your spending so you can save more to have cash available for large purchases like a new vehicle.
Planned Loans The Planned Loans tab enables you to enter information about loans you plan to make in the future. This does not include any loans you may have already entered in the Homes And Assets dialog discussed earlier in this chapter. Instead, this is for loans that are not associated with any particular asset, such as a personal loan you plan to use for an anniversary cruise.
Existing Debt Plan The Existing Debt Plan tab includes information from the Debt Reduction Planner, which is covered in Chapter 13. If you have credit card and other debt, it’s a good idea to create a debt reduction plan as part of your overall planning strategy. Click Done to close the Quicken Planner: Loans And Debt dialog.
If you include your debt reduction plan here, you should exclude the included loan and credit accounts/expenses in the Loan Accounts tab/Expenses tab, as applicable, so as to not double-count the expenses.
Expenses
Open the Expenses dialog, as seen here, by clicking the Expenses link. This section is organized into four tabs. Use these tabs to enter information about your living expenses, as well as any adjustments to expenses and the expenses for college or other special events.

Living Expenses The Living Expenses tab uses two techniques to help you enter your estimated living expenses.
• Rough Estimate enables you to enter an estimate of your annual living expenses. Using this technique is quicker, but it may not be as accurate as using the Category Detail option.
• Category Detail enables you to have Quicken calculate an estimate of your annual living expenses based on transactions already entered in your Quicken data file. This technique is more accurate than Rough Estimate, especially if you have been using Quicken for some time and have a good history of transactions. If you select this method, you can click the Details button that appears in the middle of the dialog to display the Living Expenses Category Detail dialog. Toggle check marks in the list of categories to include or exclude specific categories and enter monthly amounts as desired. When you click OK, Quicken annualizes the amounts and enters them in the Living Expenses tab. A trick to be able to keep seeing the estimated amount for the category, but not have it counted against the plan’s expenses is to set the Monthly Amount to $0 and leave the category checked.
One thing to keep in mind here: don’t include expenses that you may have already included for an asset. For example, if you included car insurance expenses in the Homes And Assets dialog as an expense associated with an automobile, don’t include them again here. Doing so would duplicate the expense and overstate your annual expenses. In addition to expenses you may have already associated with an asset, don’t include expenses that are otherwise accounted for in other topics of the Lifetime Planner, such as taxes or retirement contributions.
At the bottom of the dialog, you can enter a percentage of surplus cash—any cash left over after paying living expenses—that you want to put into savings. Don’t skip this last box—it can make a big difference on your plan outcome. If you don’t elect to sweep some percentage of your surplus cash to savings, it’s assumed the surplus is spent, which can reduce your plan balances drastically.
Ensure you do not duplicate expenses by adding them in the Expense section as well as in the Homes And Assets dialog.
Adjustments The Adjustments tab enables you to enter any adjustments to your expenses that are related to intended changes in your life. For example, perhaps you plan to hire a nanny to take care of your child while you go back to work. You can add this planned expense as an adjustment for a predefined period. When you click the New button in the Adjustments tab, the Add Living Expense Adjustment dialog appears. When you are done adding information, click OK to close the Add Living Expense Adjustment dialog.
College Expenses The College Expenses tab enables you to plan for the education of your children—or yourself! Clicking the New button in this tab displays the Add College Expense dialog, which walks you through the process of entering expected college expenses for a plan member. You’ll have to do a little homework to come up with realistic estimates of college costs, including tuition, room, board, books, and supplies. Remember, if you underestimate expenses, your plan won’t be accurate. The dialog also prompts you for information about expected financial aid, student loans, and student contributions to cover all sources of financing. If you have a college fund—such as an educational IRA—already set up for the college expense, you can associate it with the expense to indicate how it will be paid for. Click Next to advance through the dialogs and click Done to close the Add College Expenses dialog. Accounts marked “Separate” will not be available for inclusion in the Lifetime Planner. So, if you have set your children’s 529 accounts to be “Separate,” you will not be able to include them in the Lifetime Planner.
Be aware that some of the dialogs in the Add College Expenses dialog may use a very small font.
Special Expenses The Special Expenses tab includes any expenses you may have already added in the Homes And Assets dialog and enables you to enter other one-time or annual expenses you expect to incur. Use this for items like a vacation, special anniversary, or large purchase. When you click the New button, Quicken prompts you for information about the expense, including the amount and how you expect to finance it. Click Next to advance through the Add Special Expense dialogs. Click Done to close the Quicken Planner: Expenses dialog. Close the Add Special Expense dialog and click Done to close the Quicken Planner: Expenses dialog.
EXPERIENCED USERS RECOMMEND
Quicken even gives you help in finding outside funding for college expenses. Once you have created a plan that includes college expenses, follow these steps for some Internet links to help you or your student find college funding.
1. From the Planning tab, click the Lifetime Planner button.
2. In the Plan: Results | Event List, choose the appropriate college event.
3. The College Event summary dialog appears for that event. Click Internet Resources in the left-hand column of the College Expense Plan that appears. With your Internet connection, open one of the resource links listed for additional discussions of funding college costs.
4. Click the X to close the plan.
Reviewing and Changing Assumptions
You can review and modify your plan assumptions at any time. Quicken offers a number of ways to do this.
The Plan Assumptions Snapshot
Once you enter assumptions into the Quicken Planners, a brief summary of your entries appears in the Plan Assumptions snapshot in the Planning tab (refer to Figure 12-1), shown next. To open this window, choose Planning | Lifetime Planner.
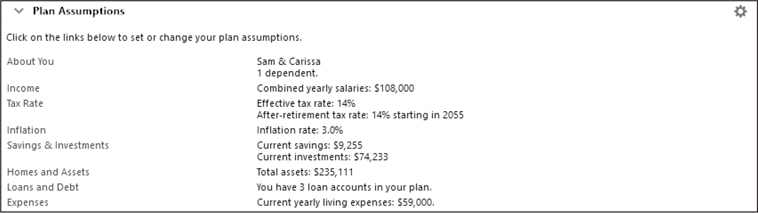
You can click links in the Plan Assumptions snapshot to open the same dialogs discussed earlier in this chapter. Review and change plan assumptions as desired, and click Done or OK, depending on the dialog, to save your changes.
The Planning Assumptions Window
Another way to review plan assumptions is in the Planning Assumptions window, as seen in Figure 12-2. This method shows more detail than the Plan Assumptions snapshot. To open this window, choose Planning | Lifetime Planner. (You can access the Planning Assumptions window from the gear icon in any of the four sections of the Lifetime Planner. From the menu shown when you click the gear icon, select Review Or Change Plan Assumptions.)
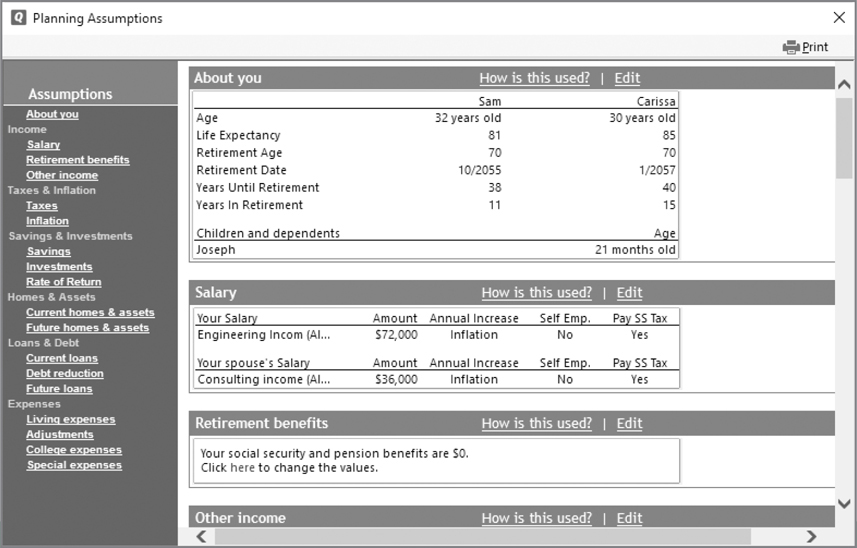
Figure 12-2 · Use the Planning Assumptions dialog to change information in your Lifetime Planner.
Use links on the left side of the Planning Assumptions window to navigate quickly from one category to another. The details appear in the main part of the window. Each assumption category offers two links:
• How Is This Used? explains how the information in that category of assumption is used in the plan.
• Edit enables you to edit the assumptions for that category, using the same dialogs discussed earlier in this chapter.
Viewing Plan Results
When you have entered all of your information, the results of your saved plan, the plan assumptions, the status of any planned events, and your monthly savings targets can be viewed as shown in Figure 12-1, earlier in this chapter. You can use this screen to review your savings plans and change them if you need or want to. Click a link to open the associated planner and change data as desired.
As with the information displayed in the other Quicken tabs, you can print the Plan Results, Assumptions, Event Status, and Monthly Savings Targets by clicking File | Print Lifetime Planner. Sadly, the Plan Results graph itself does not print.
You are not able to adjust the size of the Planning Assumptions snapshot as the size is determined automatically by the program.
The top of the Plan: Results area tells you whether your plan is working and how much you should have in investments at retirement. Amounts are in today’s dollar values; to view them in future dollar values, choose Show Amounts In Future Value from the gear icon pop-up menu at the top-right corner of the Plan: Results snapshot. You can toggle the graph back to today’s dollar values by selecting the gear icon and selecting Show Amounts In Today’s Values.
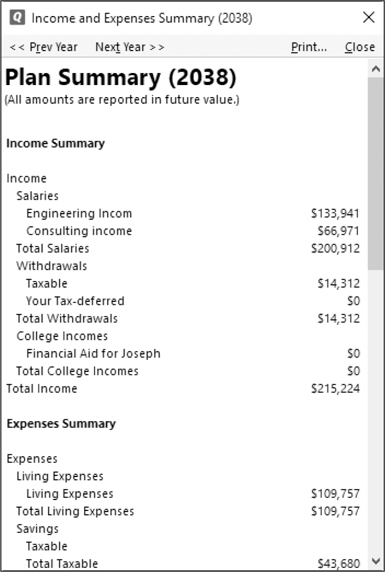
The graph beneath this summary shows your taxable and any tax-deferred savings. The shape of this graph often shows a steady increase until the year you retire and then a gradual decrease. Many of us would prefer to see a continuing increase or, at least, no change after retirement. Clicking any column opens a Plan Summary dialog for that year showing income and expenses, as shown here. You can use the <<Prev Year and Next Year>> buttons in the dialog to scroll through the years in the graph. This enables you to see the detailed numbers that make up the graph columns—very helpful! Plan results change automatically based on a variety of changes within your Quicken data file:
• When the account balances referred to in the plan change, the plan changes accordingly.
• When you change plan assumptions, the plan changes accordingly.
• When you use Quicken’s planners to plan for major purchases, college, retirement, and other events that affect your finances, the plan changes to include these events.
• When you play “what if” with assumptions and save the changes as your plan, the plan changes accordingly. You’ll see how to enter “what ifs” a little later in this chapter, in the section “The ‘What If’ Alternatives.”
Viewing Event Status Items
Quicken also keeps track of your progress toward certain events and savings targets. It displays this information in the Planning tab of the Lifetime Planner. (Refer to Figure 12-1.)
The Event Status snapshot displays information about events in your plan that are funded with specific accounts. From this section, click Your Retirement Plan to open the My Retirement Plan window, which looks a lot like the Plan Assumptions window. Click the X in the upper-right corner to close and return to the Lifetime Planner.
Viewing Monthly Savings Targets
The Monthly Savings Targets snapshot of your Lifetime Planner displays information about your savings toward events in your plan.
Clicking any link for an expense displays the summary area for that expense in the Plan Assumptions window. You can review and modify event information in that window. When you are done reviewing the event, click Done or OK to return to the Lifetime Planner.
The “What If” Alternatives
Once you’ve entered assumptions, created plans for specific events, and viewed your plan results, you might wonder how a change in one or more assumptions would affect the plan. You can use the “What If” Event Scenarios feature to see how the changes would affect the plan without changing the plan itself.
As an example: you’ve been offered a job in another state. The job pays about the same salary that you make now, but you can move to a town where your living expenses would be greatly reduced. You can see how the job change would affect your financial plans for the future by playing “what if” to modify existing assumptions, and then see the old and new plan results side by side.
EXPERIENCED USERS RECOMMEND
When working with the Plan Comparison chart you may notice a slow response when applying the What If changes. Also, if you make a change that is too subtle, it may be hard to distinguish the lines.
Setting “What If” Options
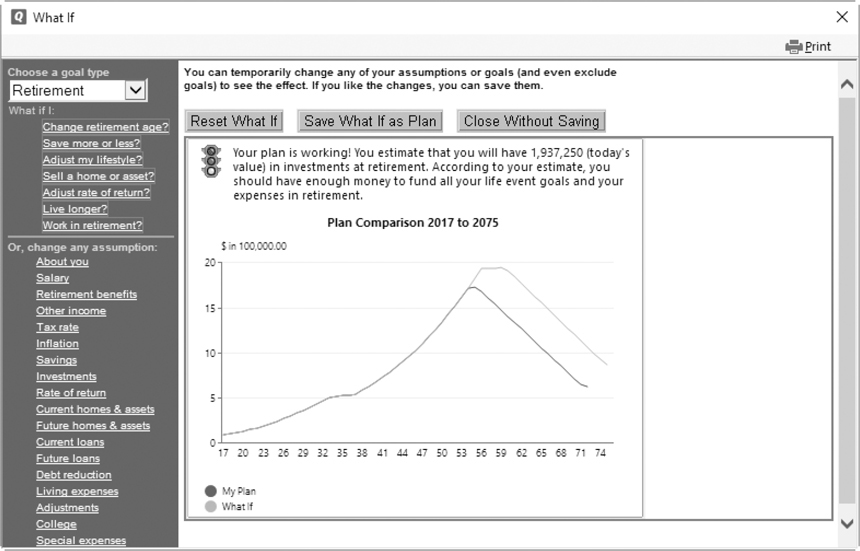
Each of the snapshots of the Lifetime Planner in the Planning tab has a gear icon from which you can play What If. From the gear icon menu, select What If I Did Something Different? to open the What If window. The first time you use it, the window displays the account balances shown in your plan results.
Choose a goal option from the drop-down list at the top-left corner of the window. Then click appropriate links on the left side of the window to open dialogs to change assumptions.
Each time you make a change, the Plan Comparison chart changes. The original plan shows as a green line and the change as a purple line. (Depending on your monitor’s settings, the colors may look slightly different.)
Using “What If” Results
When you’ve finished changing assumptions and viewing results, you can click one of the three buttons at the top of the What If window, as seen above.
• Reset What If clears all of the assumptions you changed while playing “what if.” This enables you to start over.
• Save What If As Plan saves the assumptions you changed while playing “what if” as your actual financial plan. When the window closes, you’ll see the results in the Planning tab change accordingly.
• Close Without Saving simply closes the window so you can continue working with Quicken. Your settings are not saved.
Finding More Planning Tools
Quicken offers additional tools found in the Planning tab: Budgets, which are covered extensively in Chapter 13, and financial calculation tools, which are found in the Planning Tools drop-down list. These tools are discussed at length next in this chapter.
A Look at Quicken’s Financial Calculators
Quicken includes five financial calculators you can use to make quick financial calculations: the Retirement Calculator, the College Calculator, the Refinance Calculator, the Savings Calculator, and the Loan Calculator. These calculators make complex calculations simple. Each calculator can help you enter more complete information into the Lifetime Planner and greatly assist you when looking at your financial options.
Learning About Financial Calculators
All five of the financial calculators share the same basic interface. Although they are similar in appearance, each has a specific purpose. It’s important that you use the correct calculator to get the job done.
In most instances, you begin by telling the calculator what part of the formula you want to calculate. For example, when calculating a loan, you can calculate the loan amount or the periodic payment. Then you enter values and set other options in the calculator’s dialog to give Quicken the information it needs to make its calculations. Clicking a Calculate button completes the process. Quicken is fast; the results appear as soon as you click Calculate—if not sooner.
Accessing the Financial Calculators
To view the financial calculators, click the Planning tab and choose the Planning Tools button. The five calculators appear at the bottom of the menu, as shown here. If you don’t see the Planning tab, click View | Tabs To Show | Planning to display it.

Projected Balances, the first item on the Planning Tools menu, is covered in Chapter 7.
Using the Financial Calculators
When you are ready to try Quicken’s financial calculators, the rest of this chapter provides some detailed instructions for using each of them. All of the calculators open with one or more fields showing the text “CALCULATED” or “calculated.” (Some financial calculators use upper case and others lower case.) Click the Calculate button to change that text to the calculated number.
Working with the Retirement Calculator
The Retirement Calculator can help you calculate some of the numbers you need to plan for your retirement. To open it, choose Planning | Planning Tools | Retirement Calculator. The Retirement Calculator appears as seen in Figure 12-3.

Figure 12-3 · Use the Retirement Calculator to estimate your retirement income.
As you will note at the top of the calculator, you may calculate for three different values:
• Annual Retirement Income calculates the annual amount of retirement income you’ll have based on the values you enter.
• Annual Contribution calculates the minimum amount you should contribute to a retirement account to achieve the values you enter.
• Current Savings calculates the amount of money you should currently have saved to achieve the values you want when you retire.
Select an option, and then enter or select values and options throughout the dialog. Most options are pretty straightforward and easy to understand. When you’re finished, click the Calculate button to see the results. Click Done when you’re finished.
Here’s a closer look at the options in the Retirement Calculator.
Retirement Information
Retirement Information options enable you to enter the values Quicken should use in its calculations. The values you must enter vary depending on the Calculate option you select. For example, if you are 32 years old, plan on retiring at age 70, and want to know how much to save each year to achieve an annual income at retirement of about $25,309.31 in today’s dollars, calculate for the annual retirement income, as seen in Figure 12-3.
Current, Retirement, and Withdrawal Until Age Use these fields to enter your age today, the age at which you plan to retire, and your estimation of how long you will need to withdraw from this retirement fund.
Current Savings and Annual Yield These fields are used to calculate how much you should have saved to meet the goals you set up. Enter the interest rate you are receiving to calculate the annual yield from those savings.
Inflation Rate Inflation options make complex calculations to account for the effect of inflation on your savings dollars. Use this field to enter your best guess as to the future inflation rate, or use Quicken’s default of 4 percent.
What you put in this field influences two other options in the Retirement Calculator:
• Increase Based On Inflation Rate makes calculations assuming that the annual contributions will rise with the inflation rate.
• Show In Today’s $ makes calculations assuming that the Annual Retirement Income After Taxes entry is in today’s dollars and not inflated.
Tax Assumptions Tax Assumptions options enable you to indicate whether your retirement savings are in a tax-sheltered investment or a non-sheltered investment. If you select the Non-Sheltered Investment option, you can enter your current tax rate, and Quicken will automatically calculate the effect of taxes on your retirement income. By experimenting with this feature, you will see why it’s a good idea to use tax-sheltered or tax-deferred investments whenever possible.
Calculate
Depending on the option you choose at the top of the Retirement Calculator, clicking the Calculate button does the computation for you. If you change any amounts, click Calculate a second time to see the results of your change.
View Schedule
Clicking the View Schedule button displays a printable list of deposits made and income withdrawn, with a running balance total. Use the vertical scroll bar to view the theoretical balance in the retirement account as our subject reaches each age.
• Use the question mark to open Quicken’s Help screen to answer questions about financial calculators.
• Select the printer icon to print a complete schedule by year.
• Click Done to close the Deposit Schedule window.
• Click Done to close the Retirement Calculator.
Running the College Calculator
The College Calculator enables you to calculate savings for the cost of a college education. Choose Planning | Planning Tools | College Calculator. The assumption in this calculator is that you will continue to save the entire time the student is in school.
Select a Calculate option from these choices at the top of the Calculator:
• Annual College Costs calculates the annual tuition you’ll be able to afford based on the values you enter.
• Current College Savings calculates the amount of money you should currently have saved based on the values you enter.
• Annual Contribution calculates the minimum amount you should contribute to college savings based on the values you enter.
Then enter values and options throughout the dialog. As with the other calculators, the available options are straightforward. When you click Calculate, Quicken calculates the results. When you are finished, click Done.
Annual College Costs Use this field to enter your best guess at the cost of college per year when the person for whom you are saving enrolls in school.
Years Both the Years Until Enrollment and Number Of Years Enrolled fields will influence the outcome of the calculations. If you have a 2-year-old who, you assume, will be attending college in 17 years and plans on attending for only 4 years, enter that information.
Current College Savings This field shows either what you have already saved for this person’s education or, when used as the calculate field, what you should have saved to date to meet the other college goal requirements. Entering the yield you currently receive and your best guess at the inflation rate helps Quicken show you more realistic numbers.
Although the calculator is named the “College Calculator,” many Quicken users find that their students want to attend vocational training rather than a four-year school. Consider the current costs for specialized technical training, and use the College Calculator to determine how much you will need to save for that specialized training.
Calculate
The Calculate button computes the requested value.
Schedule
Clicking the Schedule button displays the College Savings Plan, a printable list of deposits made and money withdrawn for tuition, with a running balance total. The schedule will show the withdrawals for the period you defined in number of years enrolled, which may or may not be four years. The last X years of the schedule will show the withdrawals, where X is the number of years enrolled. Click Done to close the College Savings Plan dialog, and click Done once again to close the Calculator.
Evaluating the Refinance Calculator
With housing values increasing, many of us think about refinancing our home. Quicken provides a handy tool to help determine whether refinancing will really save money and, if so, how much. Choose Planning | Planning Tools | Refinance Calculator. The Refinance Calculator appears, as shown next.
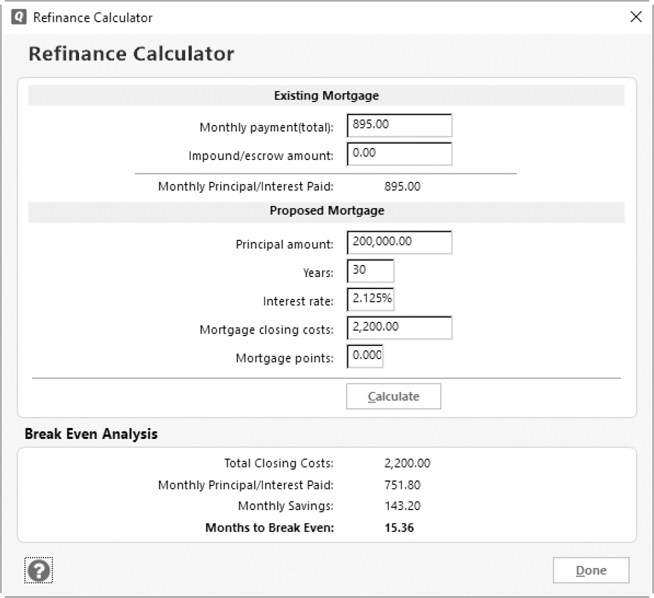
Enter values for your current mortgage and proposed mortgage in the various fields to calculate your monthly savings with the new mortgage. When you are finished, click Done.
Existing Mortgage
Existing Mortgage options enable you to enter your current total monthly mortgage payment and the amount of that payment that is applied to property taxes and other escrow items. Quicken automatically calculates the amount of principal and interest for each payment. If you already know the principal and interest amount, you can enter that in the Monthly Payment box and leave the Impound/Escrow Amount box empty. The result is the same.
Proposed Mortgage
Proposed Mortgage options enable you to enter information about the mortgage that you are considering to replace your current mortgage. The Principal Amount may be the balance on your current mortgage, but it could be more or less, depending on whether you want to refinance for more or less money. (Refinancing often offers a good opportunity to exchange equity for cash or to use cash to build equity.)
If you would have to pay closing costs or points to complete the refinancing, enter them in the appropriate fields. This will help Quicken compute a more accurate break-even point.
Break Even Analysis Break Even Analysis options are optional. If you enter the closing costs and points for the proposed mortgage, Quicken will automatically calculate how long it will take to cover those costs based on your monthly savings. If there are no savings, the calculations show as a negative number. Click Done to close the Calculator.
Planning with the Savings Calculator
The Savings Calculator lets you calculate savings annuities, that is, periodic payments to a savings account or an investment. Choose Planning | Planning Tools | Savings Calculator to open the Savings Calculator.
As with the other calculators, this calculator offers three options:
• Ending Savings Balance calculates the total amount saved at the end of the savings period based on the values you enter.
• Regular Contribution calculates the minimum amount you should regularly contribute to savings based on the values you enter.
• Starting Savings Balance calculates the amount of money you should currently have saved based on the values you enter.
Save For
The Save For drop-down box offers several options in which to enter values for Quicken to use in its calculations. Enter what you have today, the interest rate you are receiving, and the period of time you want to save. The drop-down list offers four options from which Quicken will calculate:
• Years
• Quarters
• Months
• Weeks
Inflation
Inflation options make complex calculations to account for the effect of inflation on your savings dollars. Enter your best estimate at the future inflation rate. Quicken will use this entry to determine the result of the option you chose at the top of the Savings Calculator screen.
When you have entered all of the information, click Calculate to show the outcome. As with other calculators, use the View Schedule button to see the result of the calculations.
Like the Retirement Calculator Schedule, this schedule can be printed. To print this schedule, click the printer icon at the lower-left corner of the schedule.
After you have completed your calculations, click Done to close the Deposit Schedule dialog, and click Done again to close the Savings Calculator.
Using the Loan Calculator
Perhaps the most used calculator is the Quicken Loan Calculator. With this tool you can quickly calculate the principal or periodic payment for a loan. Choose Planning | Planning Tools | Loan Calculator to open the Loan Calculator.
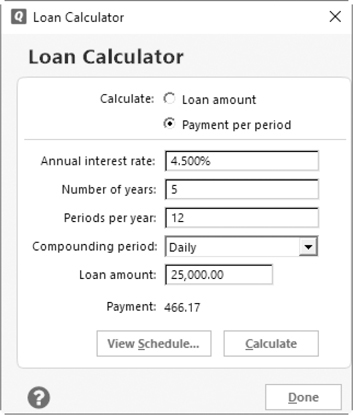
This handy tool will calculate the total loan amount if you enter the payments, interest, and other requested information. Its most common use is to calculate the total payment per period—usually a monthly payment, as shown here.
Select one of the options, enter information in the remainder of the dialog, and click Calculate. Getting the answer is a lot quicker and easier with Quicken’s Loan Calculator than using one of those loan books or creating formulas in an Excel spreadsheet to do the job. When you’re finished, click Done.
You may calculate for two different options:
• Loan Amount calculates the amount of the total loan, given the interest rate, number of years, how many payments per year, and the interest rate on the loan.
• Payment Per Period calculates how much your payment would be each month (or other period) to pay off the loan amount you enter, given the interest rate, number of years you would have to pay back the loan, and how many times a year you would make payments.
Loan Information
Loan Information options enable you to enter values for Quicken to use in its calculations. The information you must enter varies depending on the Calculate option you select.
Annual Interest Rate Enter the interest rate for this loan in the Annual Interest Rate field.
Number of Years, Periods Per Year, and Compounding Period This tells Quicken how many years the loan is for and the number of times per year you will be paying on this loan. While 12 payments per year is the norm, you may choose any number. The number you choose influences the calculator’s computations, so choose wisely. Although the default entry in the Compounding Period is Monthly, most financial institutions compound daily and enter the total to your account at the end of each month.
EXPERIENCED USERS RECOMMEND
If you have young people in your life, use the calculators as a teaching tool. Perhaps your teen wants to buy a car. He (or she) has saved nearly $5,000 from yard work and other neighborhood jobs. Grandpa and grandma have an older, well-maintained car worth about $7,800 and are willing to sell it and finance the balance for your teen. However, the teen must pay interest. Show him or her the cost per month for just the balance on the car, which does not include insurance, gas, oil, or other maintenance. This might convince him (or her) to find a regular yard maintenance job or jobs in the neighborhood.
View Schedule
Clicking the View Schedule button displays a printable amortization table that lists the payment number, the amount of the principal and interest paid at each payment, and the ending balance for the loan. Click the Print button at the top of the schedule to open the Print dialog and choose a printer. Click Print from the Print dialog to create your paper copy. Click Close to close the dialog.
Calculate
The Calculate button at the bottom of the calculator performs the calculation based on your choices and the information you have entered.