Chapter 5
Cryptography
Lab Exercises
5.01 Symmetric Key Encryption
5.02 Asymmetric Key Encryption
5.03 Hashing
5.04 Diffie-Hellman Key Exchange
Lab Analysis
Key Term Quiz
Cryptography is the practice and science of secure communication and coding techniques. Cryptography provides confidentiality, so that only the sender and the intended recipient of a message understand it. Confidentiality of files at rest means that only users with the proper authorization can see the files in their intended format. Those without proper authorization can still see the files on the hard drive and even open the files in a hex editor (the files are not hidden), but they won’t be able to open the file in the program it was designed to be opened in and see it as anything meaningful.
Cryptography provides integrity, which ensures that no part of a message changes in transit, either accidentally or maliciously. The message sent should be the exact message received. Integrity of files at rest ensures that the files aren’t changed accidentally, maliciously, or when unauthorized. An unauthorized change, for example, may involve a file changed by an authorized employee that is not in accordance with a change-management policy.
Indirectly, through confidentiality and integrity, cryptography provides availability. With all your cybersecurity measures in place—dealing with hardware, software, people, processes, and more—users who are authorized to do their jobs should be able to do so, and the resources they need should be available to them. The concept of availability also looks to ensure that you don’t fall victim to a distributed denial-of-service (DDoS) attack and that you have fault tolerance and load balancing in the event of a cybersecurity incident or disaster.
Cryptography provides for authentication, where someone can prove that they are who they claim to be, and nonrepudiation, where the sender of a message can’t deny having sent it.
Often used in the context of cryptography are two related terms: cryptanalysis and cryptology. Cryptanalysis is the science of breaking cryptographic systems, codes, and algorithms. The bad guys do it, but so do the good guys, because before cryptosystems, codes, and algorithms are declared secure, they’ve got to be analyzed thoroughly by researchers, who check to see if they can be broken. Cryptology refers to the scientific and mathematical study of both cryptography and cryptanalysis.
A message or file in plaintext is in human-readable form. Plaintext also refers to any data, including binary files, in a form that can be viewed or used without having to turn it into a different representation. When a message is sent as plaintext across an insecure channel, an attacker can get a copy and understand the message, just as the intended recipient could. The insecure channel can be wired or wireless, and it can be limited to a Wi-Fi infrastructure or include the interconnections of the Internet.
Plaintext and a key, a string of 1s and 0s, are inserted into a cipher, which is an encryption algorithm that converts the plaintext into unreadable output known as ciphertext. When a message is sent as ciphertext across an insecure channel, an attacker can get a copy, but the ciphertext will look like random bits and bytes and will contain no information that is useful or meaningful for the attacker. Unlike the attacker, the intended recipient has the key, and enters the key with the ciphertext into the cipher to transform the ciphertext back into the original plaintext.
An algorithm by itself is not sufficient; plaintext fed into an algorithm produces ciphertext as the output. Algorithms are well-known and are never kept secret. They’re available for study and analysis by anyone. So what’s to stop anyone from simply putting the ciphertext back into the algorithm to produce the original plaintext? Nothing. The secrecy, the confidentiality, lies in the key, which is a second input to the algorithm, in addition to the plaintext. There are always two inputs to the algorithm: the plaintext and the key.
Ciphertext is produced as output, however, without the key needed for decryption, an attacker can’t simply feed the ciphertext back into the algorithm to produce the plaintext. The lack of the key is what limits unauthorized decryption of ciphertext. As such, it’s vital to protect the key at all times. The confidentiality lies entirely with the key.
Kerckhoffs’s Principle states that the secrecy of the key determines security, while everything else about a system can be publicly known. Shannon’s Maxim states that the enemy knows the system. To that regard, it’s impossible to keep the details of a popular algorithm secret. Relying on the secrecy of the design and the implementation of a system as your security in the belief that you’re achieving security is called security through obscurity. There could be many vulnerabilities in a system, but if no one knows about a system or its flaws, you may believe that attacks can be prevented. Security through obscurity, unfortunately, is like an ostrich sticking his head in the sand because it’s only a matter of time before the system and its flaws will be discovered.
To make a robust encryption algorithm, you’ve got to throw it out into the public and let lots of cryptanalysts try to find flaws in it. Keeping it secret and doing all that work yourself is not the best course. Now, by pure logic, if the only way to make an algorithm secure is to let people poke and prod at it, it can’t be secret. What if the algorithm was compromised? Every single location in which the algorithm was implemented would need to be changed, and that’s hard to do. It’s easier to replace a key than an algorithm. If you suspect that a key is compromised, you can just select a different key. In fact, you can even switch keys over specific time intervals to limit the impact of any potential leak. Switching encryption algorithms every year, on the other hand, is not as practical. Furthermore, if the algorithm were to be protected, it would have to exist as source code somewhere. What if that location got hacked? Now all of those systems that implemented the algorithm and depended on the secrecy of the algorithm would need to be quickly changed. That’s just not practical.
![]() 60 MINUTES
60 MINUTES
Lab Exercise 5.01: Symmetric Key Encryption
Symmetric key encryption, also known as symmetric key cryptography and private key cryptography, is used for ensuring the confidentiality of messages and files. In symmetric key encryption, the same key is used both to encrypt and decrypt, as shown in Figure 5-1.
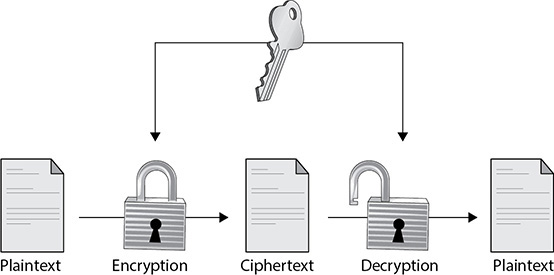
FIGURE 5-1 Symmetric key encryption
Symmetric key encryption is very fast, especially compared to asymmetric key encryption, which uses two keys—one for the encryption and one for the decryption. Because of their speed, symmetric key algorithms are used for bulk data encryption. The biggest con of symmetric key encryption is the key distribution problem, which is transmitting a secret key to the other party over an insecure medium. If a man-in-the-middle (MITM) intercepts both the ciphertext and the key (this is an example of a man-in-the-middle attack), that MITM can decrypt everything, just like the intended recipient. How do you securely transmit the key over an insecure infrastructure? That will be answered and demonstrated in Chapter 6.
Obsolete symmetric key encryption algorithms that were once popular include DES (Data Encryption Standard), 3DES (Triple DES), and RC4 (Rivest Cipher 4). Today’s standard algorithm for symmetric key encryption is AES (Advanced Encryption Standard). However, a symmetric key algorithm commonly found in malware is the simple XOR cipher.
Symmetric key encryption algorithms can fit into one of two categories: stream ciphers or block ciphers. Stream ciphers encrypt and decrypt a single bit at a time, whereas block ciphers encrypt and decrypt groups of bits (known as blocks) at a time. Although block ciphers are slower than stream ciphers because of additional overhead, the large majority of symmetric key encryption algorithms used today are, in fact, block ciphers.
A5/1 is a stream cipher used by the Global System for Mobile Communications (GSM) standard for cellular communications. ChaCha is a stream cipher that Google uses on Android devices in a mode known as Adiantum.
Obsolete DES and 3DES fall into the block cipher category. AES is a block cipher that’s actually very efficient in software.
Simple ciphers, such as XOR, are very advantageous for malware authors for multiple reasons. First, the size of the instructions needed for an XOR cipher is significantly smaller than that of other ciphers. This makes the XOR cipher good to use on devices with size limitations, like embedded devices, and environments with limitations of space, like exploit shellcode. Second, they’re actually more difficult to detect in a malware binary than more sophisticated ciphers like AES, which leaves lots of artifacts of its usage. Finally, they don’t require high overhead, and this enables them to run with efficiency. Malware authors who use simple ciphers, such as XOR, know that their binaries will be detected as containing encryption and even possibly reversed and decrypted by malware analysts. However, these adversaries just want a quick way to foil basic analysis to identify the actions of the malware, aiding the malware to evade detection by a firewall, intrusion detection system (IDS), or intrusion prevention system (IPS). Furthermore, the XOR cipher is very commonly used as a part of larger, more sophisticated cryptographic algorithms like AES.
Learning Objectives
In this activity, you will learn to use the XOR cipher to encrypt plaintext into ciphertext and decrypt ciphertext into plaintext. At the end of this lab exercise, you’ll be able to
• Encrypt and decrypt with the XOR cipher
• Understand how symmetric key encryption works
Lab Materials and Setup
The materials you need for this lab are
• The Principles of Computer Security: CompTIA Security+ and Beyond textbook
• A web browser with an Internet connection
Let’s Do This!
Let’s say I wanted to transmit the character J securely. The ASCII (American Standard Code for Information Interchange)/Unicode character J is 4A in base 16 (hexadecimal), which is 01001010 in base 2 (binary). (See www.asciitable.com for a complete ASCII table and www.rapidtables.com/convert/number/hex-to-binary.html for a hexadecimal to binary conversion table.)
In this case, 01001010 would be considered the plaintext, one of the inputs to an encryption algorithm. However, I don’t want to transmit this original bitstream. I want to encrypt it and transmit the ciphertext instead. The key that I’ve randomly generated is 01100010. I now feed both the plaintext and the key into the encryption algorithm. The algorithm I’ve chosen is the XOR cipher.
Remember your Boolean logic and truth tables? If there are two inputs, and either the first or the second bit is a 1, a 1 is produced on the output, as shown in Table 5-1.

TABLE 5-1 Logical OR
Cryptography commonly uses a derivation of the Logical OR—the Logical XOR (exclusive OR, the second letter in the word exclusive is where the X in XOR comes from). Using XOR, a 1 is produced as the output if the first or the second bit is a 1, but not both, as shown in Table 5-2.

TABLE 5-2 Logical XOR
From this, we can see a pattern (as shown in Table 5-2):
• When the two input bits are the same (0, 0 or 1, 1), the result is a 0.
• When the two input bits are different (0, 1 or 1, 0), the result is a 1.
Another pattern, relating to bit flips, can be seen in Table 5-2:
• When you XOR with a 0 bit as the second bit, the first bit is unchanged.
• When you XOR with a 1 bit as the second bit, the first bit flips (0 to 1 or 1 to 0).
These patterns yield great odds. The XOR cipher presents a 50/50 chance of a 0 bit turning into a 0 or 1, and a 50/50 chance of a 1 bit turning into a 0 or 1.
When I apply the algorithm to the plaintext and key, the result produced is called ciphertext, the jumbled gobbledygook output that an MITM would see, but not be able to understand. Converting the J to ciphertext looks like this:

If I send someone both the ciphertext and key, they can apply the same algorithm to decrypt:

The result produced is the original bitstream, the plaintext.
![]() 1a, 1b
1a, 1b
Step 1 Now it’s your turn to practice decrypting ciphertext! Imagine someone just sent you these 9 bytes:
00111111 00001001 00001111 00011001 00011110 00000101 00011000 00010101 01000111
This person told you that the bytes are ASCII/Unicode characters, encrypted with the XOR cipher, using a single-byte key of 01101100, which repeats for each plaintext/ciphertext byte.
Use the XOR cipher to decrypt the plaintext.
a. What is the decrypted binary?
b. Using www.asciitable.com, what is the original plaintext?
![]() 2a, 2b
2a, 2b
Step 2 Now you’ll send and receive XOR encrypted messages and keys and then decrypt the encrypted message with the key that you received.
a. Pair up with a classmate. Select a word of three to five letters and find its ASCII/Unicode value. Come up with a symmetric single-byte XOR key. Encrypt your letters with the XOR cipher and the key you selected. Give your partner the ciphertext and key to decrypt.
b. Decrypt the ciphertext you received from your partner with the key received from your partner.
Step 3 For a general idea of how involved AES is, check out the official AES documentation at https://nvlpubs.nist.gov/nistpubs/FIPS/NIST.FIPS.197.pdf. You’ll see that XOR, as mentioned, is a part of AES.
![]() 4
4
Step 4 Encrypt some plaintext with an online AES tool: https://encode-decode.com/aes256-encrypt-online/. Notice in the tool that there are many modes for AES, which handle the influence one encrypted block has on the next block.
The following website has nice visuals of the different modes of operation: www.highgo.ca/2019/08/08/the-difference-in-five-modes-in-the-aes-encryption-algorithm/.
Note, as seen on the website, XOR is used in all modes except the first.
![]() 30 MINUTES
30 MINUTES
Lab Exercise 5.02: Asymmetric Key Encryption
Asymmetric key encryption, also known as asymmetric key cryptography and public key encryption, is used for confidentiality, like symmetric key encryption. Unlike symmetric key encryption, however, asymmetric encryption uses two different keys: a public key, which can (and should) be seen by anyone, and a private key, which should never be seen by anyone but the user or organization to whom the key belongs.
When a public key/private key pair is created, the keys are mathematically linked to each other. When you encrypt using one of them (doesn’t matter which one), the ciphertext can only be decrypted by the other. In Chapter 6, you’ll see that when you want to sign a message, you’ll encrypt a hash with your private key, and the user on the other side will verify your signature by decrypting with your public key. For now, though, we’ll focus on encryption and decryption for confidentiality.
If you want to encrypt a message to someone, you need that user’s public key. The plaintext and the other user’s public key are fed into the asymmetric key encryption algorithm to produce the ciphertext. To decrypt, the other user would put their private key and the ciphertext into the asymmetric key encryption algorithm to produce the plaintext. See Figure 5-2 for an illustration of this process.

FIGURE 5-2 Asymmetric key encryption
When the public key is transmitted over an insecure medium, anyone can see it. It’s not a secret. That’s why it’s called a public key. There’s no key distribution problem because the key that was transmitted is used only to encrypt, not to decrypt. Think of a mailbox: Anyone who knows the street address of the mailbox can drop a letter through the slot. That’s like a public key. However, only a postal employee with the physical key can open up the mailbox and take the letters out. That’s like a private key.
Asymmetric key encryption is very slow, and it’s not used for bulk data encryption. Asymmetric key encryption provides for key establishment, nonrepudiation, and identification, and is therefore really just used to encrypt
• Symmetric keys, which in turn encrypt bulk data, which is how PGP (Pretty Good Privacy) works for e-mail (coming up in Chapter 6)
• Shared secrets, like the premaster secret, used by TLS (Transport Layer Security) in the past, to generate master secrets, which generate session keys (coming up in Chapter 7)
• Hashes (coming up later in this chapter), which allow for integrity and nonrepudiation
Today’s standard asymmetric key encryption algorithm is RSA, named after its developers, (Ron) Rivest, (Adi) Shamir, and (Leonard) Adleman. RSA, however, will not survive quantum computing (on the horizon, but still many years away), which will destroy all math-based asymmetric key encryption algorithms including RSA, elliptic-curve cryptography (ECC), and algorithms that use the discrete logarithm problem.
Learning Objectives
In this activity, you will learn how the RSA algorithm works to encrypt plaintext into ciphertext and decrypt ciphertext into plaintext. At the end of this lab exercise, you’ll be able to
• Encrypt and decrypt with the RSA algorithm
• Understand how asymmetric key encryption works
Lab Materials and Setup
The materials you need for this lab are
• The Principles of Computer Security: CompTIA Security+ and Beyond textbook
• A web browser with an Internet connection
Let’s Do This!
To learn about RSA encryption, watch this great video that illustrates both how and why RSA works, as well as the history of the algorithm, which predates Rivest, Shamir, and Adleman: https://youtu.be/wXB-V_Keiu8. The video starts off explaining RSA with colors and then gets into modular arithmetic. If you don’t follow all the math, don’t worry. As long as you understand the color example, you’ll be fine! Keep the following fundamentals of RSA in mind:
• In RSA, to encrypt, the algorithm is simply xe mod n.
• In RSA, to decrypt, the algorithm is simply yd mod n.
• x is the plaintext.
• y is the ciphertext.
• (n, e) is the public key.
• d is the private key.
Step 1 Apply what you’ve learned so far by walking through an example of an RSA encryption algorithm.
a. For PGP encryption, let’s say that the symmetric key that will encrypt and decrypt the e-mail is 4.
b. To encrypt this symmetric key with RSA so it can be sent securely over an insecure channel, you need the public key of the person you’re sending the e-mail to. Let’s say the other person sends it to you, and it’s 33, 3 (as noted, the public key consists of two values).
c. To encrypt, the RSA algorithm takes x and raises it to the power of e, which is 3 in this case: 43 is 64. Then the RSA algorithm divides that 64 by n (the modulus), which in this case is 33. The quotient is 1, which we don’t care about. What we do care about is the remainder, which is 31. That is the ciphertext! Welcome to the world of modular arithmetic, which is a large part of cryptography.
Step 2 Put yourself now in the role of the e-mail recipient. You’ve just received the e-mail sent in the previous step. It’s time to go through the RSA decryption algorithm.
a. To decrypt, the RSA algorithm will take the 31, the ciphertext, and raise it to the power of the e-mail recipient’s private key. Let’s say it’s 7.
b. Then 317 will be divided by the modulus. The remainder is the plaintext, which in this case is 4.
c. Now PGP takes that 4 and decrypts the e-mail with that symmetric key, which was protected as it was transmitted with asymmetric encryption.
This example did use pretty small numbers, but as you might imagine, in practice, these values are usually at least 1024 bits long.
![]() 3a–3b
3a–3b
Step 3 Now it’s your turn to practice both RSA encryption and decryption.
a. You received someone’s public key as (55, 7) and you want to encrypt the plaintext value of 8. Using RSA encryption, what is the corresponding ciphertext? You may use any tool, including Google, to do the math.
b. What is the RSA decryption algorithm needed (using the required values) to decrypt the ciphertext back into the original plaintext with a private key of 23? You may use any tool, including Google, to verify the math.
![]() 45 MINUTES
45 MINUTES
Lab Exercise 5.03: Hashing
Hashing is used for integrity of messages, files, and certificates and confidentiality of password databases. It ensures that messages and files that are sent are the same messages and files that are received. Hashing makes sure that no bits have been changed, either accidentally or maliciously, in transit. It also verifies that files at rest haven’t changed, either by accidental or malicious means.
Hash functions, also known as hash algorithms, are given an input plaintext, then do some math on the input, and then output a message digest, also known simply as a hash.
Hash functions have five important characteristics:
1. The input is variable length, but the output is fixed length. You could input the Declaration of Independence into a hash function or you could input just your name. In each case, you’ll wind up with the same size output message digest.
2. If just one bit of the input changes, the output hash is completely different. This means an input of bob hashes to something completely different than an input of Bob.
3. Hashing is a one-way function. It shouldn’t be possible, when given a hash, to compute the original input that produced this hash. This is known as preimage resistance.
4. It should be very difficult when given an input to find a second input that, when fed into the same hash function, produces the same hash as the first input. This is known as second preimage resistance.
5. It should be very difficult to find two different inputs that produce the same hash. This is known as collision resistance. The difference between this characteristic and the previous characteristic is that in the previous characteristic, the first input was given. With this characteristic, you’re not given an input.
In a classic collision attack, two different inputs that produce the same hash are found. Attackers don’t have control over the messages’ content, as the hash function itself arbitrarily choses them. This happened to SHA-1 (Secure Hash Algorithm 1) in February 2017 in an appropriately named and case-sensitively-spelled attack called SHAttered.
You can read about that landmark event at the following links:
• https://www.zdnet.com/article/its-the-end-of-sha-1-and-i-feel-fine/
• https://security.googleblog.com/2017/02/announcing-first-sha1-collision.html
In a chosen-prefix collision attack, which is significantly more powerful, attackers can select two different inputs and append values to each, which results in each message producing the same hash. Then attackers can compromise the integrity of digital certificates for software updates from companies or for websites, get someone to confirm a document and claim that party confirmed a different one, trick users into believing they had a version of a file, and do much more damage. This happened to SHA-1 in May 2019, and was made public in a paper called “SHA-1 is a Shambles,” found at https://eprint.iacr.org/2020/014.pdf.
You can read about this landmark event at the following links:
• https://sha-mbles.github.io/
Learning Objectives
In this activity, you will learn how hash functions work to enable integrity and nonrepudiation. At the end of this lab exercise, you’ll be able to
• Hash plaintext into a message digest
• Understand how hashing works and why it’s used
• Understand how hashing is different than encryption
Lab Materials and Setup
The materials you need for this lab are
• The Principles of Computer Security: CompTIA Security+ and Beyond textbook
• A web browser with an Internet connection
• The Kali Linux VM you installed in Chapter 1
Let’s Do This!
Encryption is a two-way function. Take plaintext and a key, put them in an encryption algorithm, and ciphertext output is produced. Take ciphertext and a key, put them in the algorithm, and plaintext output is produced. Hashing is not encryption, nor does it work like encryption. Hashing is a one-way function. Take an input, put it in a hash function, and an output called a message digest, also known as a hash, is produced. You cannot reverse a hash by putting it back into the hash function to produce the original input.
![]() 1a–1j
1a–1j
Step 1 The first two hash function characteristics, listed at the beginning of this Lab Exercise, include variable-length input producing fixed-length output and the slightest change in the input yielding a completely different output. Let’s see both of those characteristics in action!
a. Go to www.fileformat.info/tool/hash.htm.
b. In the String Hash textbox type bob. Then click the Hash button.
c. Scroll down to see all of the message digests that were simultaneously calculated. The longer the output, the more secure the hash function, because with longer outputs it is harder to find a collision for multiple inputs.
d. Open Notepad by typing Notepad in the Windows search box. Then click the Notepad icon. Copy and paste the SHA-256 hash calculated in Step 1c into Notepad.
e. Go to any website and copy a bunch of text (highlight the text and press CTRL-C).
f. Paste (press CTRL-V) the text into the String Hash textbox from Step 1b and click the Hash button.
g. Copy and paste the SHA-256 hash into Notepad, below the first hash. As you can see, even though the first input was significantly shorter than the second output, the size of the message digests in the output of the hash function are exactly the same.
h. Back in the String Hash textbox, type Bob and click the Hash button. Scroll down to see all of the message digests that were simultaneously calculated.
i. Copy and paste the SHA-256 hash into Notepad, on the third line.
j. Compare the hash of bob to the hash of Bob. You can see that, just by changing the lowercase b to an uppercase B, the hashes are radically different. Also, notice that there is only a single bit difference in the binary representations of b and B:
b: 62 (hex), 01100010 (binary)
B: 42 (hex), 01000010 (binary)
![]() 2a–2b
2a–2b
Step 2 The third hash function characteristic, listed at the beginning of this Lab Exercise, is that hashing is a one-way function, which means you shouldn’t be able to go back to an input when provided the hash (preimage resistance).
Imagine blending a banana, some strawberries, milk, and vanilla syrup in a blender. While enjoying your smoothie, you think to yourself, “I wish I could have that banana back.” Sorry. You can’t get the banana back. You might know the process of taking a banana out of a smoothie and reconstructing it, but it doesn’t mean that could be done. This is how one-way functions can’t be reversed. Get it?
a. Think of two numbers that when multiplied together equal 100.
b. Pick a classmate and ask them to guess the factors you chose.
c. The odds are their guess would be wrong. 100 × 1? 50 × 2? 25 × 4? 20 × 5? 10 × 10? They wouldn’t know what two numbers you picked.
Hash functions involve doing some math and throwing away the inputs; then, doing some more math, and throwing away the subsequent inputs in the same way. Hashing is considered a one-way function because it’s not feasible to try all possible combinations in a realistic amount of time to go back the other way (in our example, starting with the product of 100) and wind up with the original numbers you started with (in our example, one of the pairs of factors of 100). Although it might be easy to go through all numbers that when multiplied equal 100, when multiple rounds of math are used and one output is at the end, how can you go back to the original numbers that came before many rounds of math? Trying all possible combinations is not feasible. Let’s say you multiplied that 100 by 8. Now you’ve got 800, and you have two rounds of inputs to get back to the original factors of 100. This example is using only multiplication. Hashing functions, of course, are much more mathematically intensive and use much larger numbers.
![]() 3a–3e
3a–3e
Step 3 Now it’s time to see how hashes can verify the integrity of files that you download from various websites. How do you know that file you’re downloading is the original and not an altered version laced with malware or spyware? We’ll see how that’s done. We’ll also see how hashing relates to password databases.
![]() Cross-Reference
Cross-Reference
In Chapter 7, we’ll see another great usage of hashes, verifying the public key of a server given to your client machine is actually the legitimate public key and not some attacker’s key that was swapped in an MITM attack.
a. Go to the Kali Linux Downloads page that you downloaded the Kali Linux ISO from in Chapter 1.
b. If you still have the ISO file from Chapter 1 and it’s the current release, you’re all set. Otherwise, download the ISO (not the torrent) of the current release. The developers at Offensive Security have posted the SHA-256 hashes for each ISO image. At the time of publication, you can see the hash by clicking the bottom-right section of the 64-bit Installer that says “sum.”
c. Go to http://onlinemd5.com. Click the SHA-256 radio button for Checksum type.
d. Click the Choose File button at the upper-right corner and then browse to and select your Kali Linux ISO. The File Checksum textbox will automatically populate with the hash after the Process percentage reaches 100%.
e. Copy and paste the SHA256sum of the image into the Compare with textbox. You should see a green checkmark that indicates that the calculated hash matches the hash that the Kali Linux developers have published on their site. This proves that no bits have been changed, either accidentally or maliciously, in transit to your machine. When the publisher site uses TLS, it reduces the likelihood of an MITM attack that modifies the file while in transit. You would also want to make sure that nobody has changed or replaced the file underneath the hood to give you something else.
However, an attacker who switches a file would certainly be smart enough to change the listed hash as well. If you download the file from the same source as the published hash, the hash can’t really prove that the file hasn’t been changed or replaced. If you get the hash from a reputable source, such as the publisher’s website, www.kali.org in this case, you can download the actual file from anywhere—for example, by using a torrent link.
If you mouse over the link for the ISO, you’ll notice that the direct ISO download here leads to a different server. The hash is stored at www.kali.org, while the file itself is stored at cdimage.kali.org. Now the attacker would have to hack into multiple locations—one to change the file and another to change the listed hash. While there are no guarantees that just didn’t happen, it’s less likely. What would be even better, and would offer more confidence in the integrity, is storing the file on a completely different domain. Still, the servers could have been hacked, and there exists the possibility of a DNS cache poisoning attack, where, for example, www.kali.org will now lead to a rogue site.
The ultimate level of confidence in the file’s integrity would be downloading a hash that’s signed, which means the hash is encrypted with the private key of the publisher. You’d decrypt the signed hash with the public key of the publisher. Then you’d hash the file and compare the decrypted hash with the computed hash. If the two hashes match, you’d know that you’d received the original file, since the only one in possession of the publisher’s private key should be the publisher. If the hashes didn’t match, you’d know that the file you downloaded had been accidentally or maliciously changed.
![]() 4b, 4d, 4e
4b, 4d, 4e
Step 4 Hashing is also used to protect the confidentiality of password databases from both system administrators with prying eyes and cybercriminals who steal password databases. Passwords should always be stored in hashed format. This means someone who looks at or steals a password database will see the password hash instead of the plaintext passwords.
When you log in to a local machine or a remote machine, you enter your password, which is subsequently hashed and compared to the stored hash on the authenticating system. The same thing happens when you enter your PIN at an ATM.
Recent data breaches have brought to light the fact that some entities were storing passwords as plaintext, a Security 101 no-no!
Storing the hashes provides confidentiality of the passwords, compared to storing the plaintext versions. Hashes are the outputs of one-way functions and cannot be reversed into their original inputs. However, stolen password hashes can be attacked to derive the plaintext passwords using multiple methods, including a brute force attack, a dictionary attack, and an attack involving a rainbow table. We’ll perform all of these in Chapter 11. We’ll also explore salt, which is random data that defeats attacks that use precomputed dictionaries and rainbow tables.
The SHA-2 family of hashing standards, which includes SHA-256 and SHA-512 (there is a SHA-3 family of hash functions too, but it doesn’t have much usage today), is not appropriate for passwords because cybercriminals can quickly overcome the functions using brute force attacks. PBKDF2 (Password-Based Key Derivation Function 2), bcrypt, and scrypt, which use SHA functions as part of their algorithms, as well as Argon2 and yescrypt, should be the only functions used for hashing passwords because these key-stretching functions are significantly slower with tens or hundreds of thousands additional rounds. The longer calculation time wouldn’t be noticed by a user logging in, but it will be great for reducing the rate of successful brute force attacks. Linux systems, however, do use SHA-2’s SHA-256 or SHA-512 for password hashing.
a. Fire up your Kali Linux VM and go to the terminal.
b. Type cat /etc/passwd and press ENTER.
c. Don’t get excited yet; passwords, contrary to the name of the file, are not stored in this file. This file contains a line for every account on the system. The fields, delimited by colons consist of the following:
• Username
• Password: Linux distributions of the past stored the hashed password at this location, but nowadays you should only see an x character in this position, which indicates that the hashed password is stored in the /etc/shadow file.
• UID (User ID)
• GID (Group ID)
• GECOS (General Electric Comprehensive Operating System): The name of this field comes from the original operating system to use it and contains metadata about the user, including full name, building and room number or contact person, office telephone number, home telephone number, and other contact information, such as external e-mail addresses.
• Home directory
• Login shell
d. Now type sudo cat /etc/shadow and press ENTER (followed by your password, if prompted). Back in the day, the password hashes were stored in the /etc/passwd file and everyone had read access to it. Why was this the case? Two reasons, actually. First, hardware back then wasn’t able to crack passwords like it can today, so that wasn’t too much of a concern. Second, back then there was the camaraderie of all Linux users sharing and working for the common good, without the slightest thought of stealing password hashes and cracking them. Oh, how times have changed! That’s why a file, /etc/shadow, readable only by users with sudo/root privileges, is where password hashes have been stored for quite a while, now.
Like the /etc/passwd file, the file contains a line for every account on the system. The fields, delimited by colons, consist of the following:
• Username
• Password hash: Here it is! The hashed version of each (non-system) account’s password. All user accounts will be listed below the system accounts in this file, except for the user account created with the installation. That user account is typically listed above one or more system accounts, before the subsequently created user accounts. On most distributions, the format is $id$salt$hash. The $id field represents the hash function and has the following values:
• $1$ MD5
• $2a$ Blowfish
• $2y$ Blowfish
• $5$ SHA-256
• $6$ SHA-512
• $y$ yescrypt
• Last password change: Days since January 1, 1970 (known as Unix time and Epoch time), that the password was last changed
• Minimum number of days between password changes
• Maximum number of days the password is valid for
• Number of days before a user will be warned that a password must be changed
• Number of days after the password expires before the account will be disabled
• Number of days from Unix time when the account will be disabled
Typically, accounts will have blanks for the last few fields.
e. Find your account and password hash. On Kali Linux, $y$ indicates that yescrypt is the hash function used for passwords.
We will see Windows password hashes in Chapter 11.
![]() 30 MINUTES
30 MINUTES
Lab Exercise 5.04: Diffie-Hellman Key Exchange
In 1976, Whitfield Diffie and Martin Hellman designed the first use of asymmetric cryptography. It wasn’t an asymmetric encryption algorithm, but rather a key exchange protocol.
Let’s say that two parties who have never met before want to use a symmetric/secret key between them for encrypting and decrypting. However, agreeing on this secret key, with communications flowing over an insecure medium, would compromise the integrity of the key (the key distribution problem). The Diffie-Hellman key exchange (DHKE) applies the discrete logarithm problem to enable this to happen, and it is found in protocols including SSH (Secure Shell), TLS (Transport Layer Security), and IPsec (Internet Protocol Security).
The DHKE is vulnerable to spoofing and MITM attacks because it doesn’t have a way to authenticate either party. However, DHKE will always be used in conjunction with an authentication method, in most cases, digital signatures.
Learning Objectives
In this activity, you will learn how the DHKE works. At the end of this lab exercise, you’ll be able to
• Use the DHKE to agree on and exchange public parameters
• Use the DHKE to generate a private number
• Use the DHKE to generate a shared secret, the equivalent of a symmetric key, which will be used to encrypt and decrypt
Lab Materials and Setup
The materials you need for this lab are
• The Principles of Computer Security: CompTIA Security+ and Beyond textbook
• A web browser with an Internet connection
Let’s Do This!
Watch this great video that illustrates both how and why the DHKE works: https://youtu.be/YEBfamv-_do. The video starts off, explains DHKE using colors, and then gets into modular arithmetic.
Step 1 Let’s first visualize the algorithm with colors (even though this is a black-and-white book, we’ll be fine). Two parties, let’s call them Bob and Alice, will exchange messages and come to an agreement of a public color to be used. Let’s say yellow. Eve, the attacker, will be able to see this public color.
Bob and Alice now pick a private color that will never be transmitted. Bob picks blue and Alice picks red. Now each party mixes their own private color with the public color. Bob’s blue and yellow mixture produces green. Alice’s red and yellow mixture produces orange.
Bob sends Alice his mixture, while Alice sends Bob her mixture. Eve, the attacker, gets both mixtures. Now each side takes the other’s mixture and adds their own private color to it. Bob adds his private blue to Alice’s mixture, while Alice adds her private red to Bob’s mixture. Both sides now have the same resultant color, brown, which is the shared secret they both are aware of. Eve, without having one of the private colors, can’t do anything. It’s easy to mix two colors together to get a third, but it’s very hard to figure out which two colors went into a mixture.
Step 2 It works the same with numbers. If Bob and Alice agree on a prime number of 29 and a generator of 2, that’s the equivalent of agreeing on a public color of yellow. Bob selects a private number of 12, the equivalent of his private blue color. Alice selects a private number of 5, the equivalent of her private color of red.
Bob takes the generator of 2 and raises it to the power of his private number of 12: so 2 raised to the power of 12 is 4096. Now 4096 is divided by the prime number, acting as the modulus: so 4096 divided by 29 is 141. In cryptography, we don’t care about the quotient, but rather, the remainder, which is 7 in this case. That 7 is the mixture that Bob sends to Alice.
Alice takes the generator of 2 and raises it to the power of her private number of 5: so 2 raised to the power of 5 is 32. Now 32 is divided by the prime number, acting as the modulus: so 32 divided by 29 is 1. In cryptography, we don’t care about the quotient, but rather, the remainder, which is 3 in this case. That 3 is the mixture that Alice sends to Bob.
Bob takes the 3 Alice sent him and raises it to the power of his private number, 12. The result, 531441, is now divided by the modulus of 29 to produce 18325 with a remainder of 16.
Alice takes the 7 Bob sent her and raises it to the power of her private number, 5. The result, 16807, is now divided by the modulus of 29 to produce 579 with a remainder of 16.
The remainder 16 is equivalent to the brown secret color that Bob and Alice both derived, which is now the shared secret/symmetric used for encryption and decryption.
Step 3 Why did that work?
• Bob did 312 ≡ 16 mod 29. The 3 he got from Alice was calculated as 3 ≡ 25 mod 29. So Bob really did 25(12) mod 29.
![]() Note
Note
The congruent symbol (≡) is used instead of the equals symbol with modular arithmetic because there are many numbers when divided by the modulus that will produce the same remainder.
• Alice did 75 ≡ 16 mod 29. The 7 she got from Bob was calculated as 7 ≡ 212 mod 29. So Alice really did 2(12)5 mod 29.
• You can see that 2 raised to the power of 5 raised to the power of 12 is the same as 2 raised to the power of 12 raised to the power of 5. In both cases, you multiply 12 by 5, to get 2 raised to the power of 60, and when that’s divided by 29, a remainder of 16 is produced.
![]() 4
4
Step 4 Now it’s your turn! If two sides agree on a prime number of 13 and a generator of 6, what’s the shared secret if one side has a private number of 5 and the other has a private number of 4? You may use any tool, including Google, to do the math.
![]() 5
5
Step 5 Try another one! If two sides agree on a prime number of 11 and a generator of 7, what’s the shared secret if one side has a private number of 3 and the other has a private number of 6? You may use any tool, including Google, to do the math.
Lab Analysis
1. Why do malware authors prefer a simple symmetric key encryption algorithm, such as XOR, as opposed to more sophisticated ones, such as AES?
![]()
2. What specifically is asymmetric key encryption used for?
![]()
3. Why is hashing considered a one-way function?
![]()
4. If an MITM can get the public values and each side’s mixture, why can’t the attacker come up with the same shared secret as the communicating parties?
![]()
Key Term Quiz
Use the terms from this list to complete the sentences that follow.
data
digest
prime
secret
1. Symmetric key encryption is used for encrypting bulk ____________.
2. Asymmetric key encryption is used for encrypting a shared ____________.
3. A hash is also known as a message ____________.
4. A ____________ number is used as the modulus for DHKE.