5.3 Defining the Database: SQL Data Definition Language (DDL)

The most used SQL data definition language (DDL) commands are the following:

CREATE DATABASE

CREATE SCHEMA

CREATE TABLE

CREATE INDEX

ALTER TABLE

RENAME TABLE

DROP TABLE

DROP INDEX

These statements are used to create, change, and destroy the structures that make up the logical model. These commands can be used at any time to make changes to the database structure. Additional commands are available to specify physical details of storage, but we will not discuss them here because they are specific to the system. There are also commands to create and destroy views, which we will discuss in Section 5.5.

5.3.1 CREATE DATABASE, CREATE SCHEMA

In SQL, the command to create a new database has the form

An illustration of the S Q L command to create a new database. The syntax is as follows. CREATE DATABASE d b name, semicolon.

For example, to create a database called University, we write

An illustration of the S Q L command to create a database labeled University. The syntax is as follows. CREATE DATABASE University, semicolon.

The new database should be immediately available for creating objects. It should open automatically after the creation in the current session, but if the user returns in a new session, he or she will have to open the database again, using a command such as

An illustration of the S Q L command to use a database labeled University. The syntax is as follows. USE University, semicolon.

For some systems, the word CONNECT is used instead of USE. It is also possible to create separate schemas within a database, using the command

An illustration of the S Q L command to create schemas within a database. The syntax is as follows. CREATE SCHEMA schema, underscore, name, open square bracket, AUTHORIZATION, user, underscore, name, close square bracket, semicolon.

If we wished to create different schemas within the same database, we would write commands such as

An example S Q L command to create separate schemas within the same database. The syntax is as follows. CREATE SCHEMA sample D B 1 AUTHORIZATION Joe Black, semicolon.

This command would permit user JoeBlack to use the SampleDB1 schema, provided he is an authorized user.

5.3.2 CREATE TABLE

The CREATE TABLE command is used to create the base tables that form the heart of a relational database. Because it can be used at any time during the life cycle of the system, the database developer can start with a small number of tables and add to them as additional applications are planned and developed.

A base table is close to the abstract notion of a relational table. It consists of one or more column headings, which give the column name and data type, and zero or more data rows, which contain one data value of the specified data type for each of the columns. As in the abstract relational model, the rows are considered unordered. However, the columns are ordered left to right, to match the order of column definitions in the CREATE TABLE command. A simple form of the command is

An illustration of the S Q L command to create table. The syntax is as follows.
Line 1. CREATE TABLE, open square bracket, schema hyphen name, close square bracket, base hyphen table hyphen name, open parentheses, col name data type.
Line 2. open square bracket. column constraints, close square bracket.
Line 3. Open square bracket, comma, col name datatype, open square bracket, column constraints, close square bracket, close square bracket.
Line 4. Dot, dot, dot.
Line 5. Open square bracket, table constraints, close square bracket.
Line 6. Open square bracket, storage specifications, close square bracket, close parentheses, semicolon.

Here, base-table-name is a user-supplied name (an identifier) for the table. No SQL keywords may be used as the table name, and the table name must be unique within the database. For each column, the user must specify a name that is unique within the table, and a data type. In Oracle, identifiers must be at most 128 bytes long, begin with an alphabetic character, and contain only alphanumeric characters or underscores. Either uppercase or lowercase letters may be used, but Oracle will always display them as uppercase. Although various character sets can be used for the database, it is wise to use the ASCII set for identifiers for platform portability. The maximum number of columns for an Oracle table is 1,000. Note that each line ends with a comma, except the last, which ends with a semicolon. The optional storage specifications section allows the DBA to name the tablespace where the table will be stored. If the tablespace is not specified, the DBMS will create a default space for the table.

FIGURE 5.2 shows the commands to create the base tables for a database for the University example and to insert records into each table. Oracle’s SQL*Plus facility can be used to execute these commands. They can be keyed in at the SQL*Plus prompt, or they can be written using a text editor such as Notepad and copied into SQL*Plus for execution. The schema is

An S Q L program that creates 4 tables and inserts values into the tables. The program listing is as follows.
Line 1. CREATE TABLE Student, open parentheses.
Line 2. s t u I d VAR CHAR 2, open parentheses, 6, close parentheses, PRIMARY KEY, comma.
Line 3. last Name VAR CHAR 2, open parentheses, 20, close parentheses, NOT NULL, comma.
Line 4. first Name VAR CHAR 2, open parentheses, 20, close parentheses, NOT NULL, comma.
Line 5. major VAR CHAR 2, open parentheses, 10, close parentheses, comma.
Line 6. credits NUMBER, open parentheses, 3, close parentheses, DEFAULT 0, comma.
Line 7. CONSTRAINT Student, underscore, credits, underscore, c c, CHECK, open parentheses, open parentheses, credits, greater than or equal to 0, close parentheses, AND, open parentheses, credits less than 150, close parentheses, close parentheses, close parentheses, semicolon.
Line 8. Blank.
Line 9. CREATE TABLE Faculty, open parentheses.
Line 10. f a c I d VAR CHAR 2, open parentheses, 6, close parentheses, comma.
Line 11. name VAR CHAR 2, open parentheses, 20, close parentheses, NOT NULL, comma.
Line 12. department VAR CHAR 2, open parentheses, 20, close parentheses, comma.
Line 13. rank VAR CHAR 2, open parentheses, 10, close parentheses, comma.
Line 14. CONSTRAINT Faculty, underscore, f a c I d, underscore, p k, PRIMARY KEY, open parentheses, f a c I d, close parentheses, close parentheses, semicolon.
Line 15. Blank.
Line 16. CREATE TABLE Class, open parentheses.
Line 17. class Number VAR CHAR 2, open parentheses, 8, close parentheses, comma.
Line 18. f a c I d, VAR CHAR 2, open parentheses, 6, close parentheses, REFERENCES Faculty, open parentheses, f a c I d, close parentheses, ON DELETE SET NULL, comma.
Line 19. schedule VAR CHAR 2, open parentheses, 8, close parentheses, comma.
Line 20. room VAR CHAR 2, open parentheses, 6, close parentheses, comma.
Line 21. CONSTRAINT Class, underscore, class Number, underscore, p k, PRIMARY KEY, open parentheses, class Number, close parentheses, comma.
Line 22. CONSTRAINT Class, underscore, schedule, underscore, room, u k, UNIQUE, open parentheses, schedule, comma, room, close parentheses, close parentheses, semicolon.
Line 23. Blank.
Line 24. CREATE TABLE Enroll, open parentheses.
Line 25. s t u I d VAR CHAR 2, open parentheses, 6, close parentheses, comma.
Line 26. class Number VAR CHAR 2, open parentheses, 8, close parentheses, comma.
Line 27. grade VAR CHAR 2, open parentheses, 2, close parentheses, comma.
Line 28. CONSTRAINT Enroll, underscore, class Number, underscore, s t u I d, underscore, p k, PRIMARY KEY, open parentheses, class Number, comma, s t d I d, close parentheses, comma.
Line 29. CONSTRAINT Enroll, underscore, class Number, underscore, f k, FOREIGN KEY, open parentheses, class Number, close parentheses, REFERENCES Class.
Line 30. Open parentheses, class Number, close parentheses, ON DELETE CASCADE, comma.
Line 31. CONSTRAINT Enroll, underscore, s t d I d, underscore, f k, FOREIGN KEY, open parentheses, s t u I d, close parentheses, REFERENCES Student, open parentheses, s t u I d, close parentheses, ON DELTE.
Line 32. CASCADE, close parentheses, semicolon.
Line 33. Blank.
Line 34. INSERT INTO STUDENT VALUES, open parentheses, open single quote, S 1001, close single quote, comma, open single quote, Smith, close single quote, comma, open single quote, Tom, close single quote, comma, open single quote, History, close single quote, comma, 90, close parentheses, semicolon.
Line 35. INSERT INTO STUDENT VALUES, open parentheses, open single quote, S 1002, close single quote, comma, open single quote, Chin, close single quote, comma, open single quote, Ann, close single quote, comma, open single quote, Math, close single quote, comma, 36, close parentheses, semicolon.
Line 36. INSERT INTO STUDENT VALUES, open parentheses, open single quote, S 1005, close single quote, comma, open single quote, Lee, close single quote, comma, open single quote, Perry, close single quote, comma, open single quote, History, close single quote, comma, 3, close parentheses, semicolon.
Line 37. INSERT INTO STUDENT VALUES, open parentheses, open single quote, S 1010, close single quote, comma, open single quote, Burns, close single quote, comma, open single quote, Edward, close single quote, comma, open single quote, Art, close single quote, comma, 63, close parentheses, semicolon.
Line 38. INSERT INTO STUDENT VALUES, open parentheses, open single quote, S 1013, close single quote, comma, open single quote, McCarthy, close single quote, comma, open single quote, Owen, close single quote, comma, open single quote, Math, close single quote, comma, 0, close parentheses, semicolon.
Line 39. INSERT INTO STUDENT VALUES, open parentheses, open single quote, S 1015, close single quote, comma, open single quote, Jones, close single quote, comma, open single quote, Mary, close single quote, comma, open single quote, Math, close single quote, comma, 42, close parentheses, semicolon.
Line 40. INSERT INTO STUDENT VALUES, open parentheses, open single quote, S 1020, close single quote, comma, open single quote, Rivera, close single quote, comma, open single quote, Jane, close single quote, comma, open single quote, C S C, close single quote, comma, 15, close parentheses, semicolon.
Line 41. INSERT INTO FACULTY VALUES, open parentheses, open quotes, F 101, close quotes, comma, open quotes, Adams, close quotes, comma, open quotes, Art, close quotes, comma, open quotes, Professor, close quotes, close parentheses, semicolon.
Line 42. INSERT INTO FACULTY VALUES, open parentheses, open quotes, F 105, close quotes, comma, open quotes, Tanaka, close quotes, comma, open quotes, C S C, close quotes, comma, open quotes, Instructor, close quotes, close parentheses, semicolon.
Line 43. INSERT INTO FACULTY VALUES, open parentheses, open quotes, F 110, close quotes, comma, open quotes, Byrne, close quotes, comma, open quotes, Math, close quotes, comma, open quotes, Assistant, close quotes, close parentheses, semicolon.
Line 44. INSERT INTO FACULTY VALUES, open parentheses, open quotes, F 115, close quotes, comma, open quotes, Smith, close quotes, comma, open quotes, History, close quotes, comma, open quotes, Associate, close quotes, close parentheses, semicolon.
Line 45. INSERT INTO FACULTY VALUES, open parentheses, open quotes, F 221, close quotes, comma, open quotes, Smith, close quotes, comma, open quotes, C S C, close quotes, comma, open quotes, Professor, close quotes, close parentheses, semicolon.
Line 46. INSERT INTO CLASS VALUES, open parentheses, open quotes, ART 103 A, close quotes, comma, open quotes, F 101, close quotes, comma, open quotes, M W F 9, close quotes, comma, open quotes, H 221, close quotes, close parentheses, semicolon.
Line 47. INSERT INTO CLASS VALUES, open parentheses, open quotes, C S C 201 A, close quotes, comma, open quotes, F 105, close quotes, comma, open quotes, T u T h F 10, close quotes, comma, open quotes, M 110, close quotes, close parentheses, semicolon.
Line 48. INSERT INTO CLASS VALUES, open parentheses, open quotes, C S C 203 A, close quotes, comma, open quotes, F 105, close quotes, comma, open quotes, M T h F 12, close quotes, comma, open quotes, M 110, close quotes, close parentheses, semicolon.
Line 49. INSERT INTO CLASS VALUES, open parentheses, open quotes, H S T 205 A, close quotes, comma, open quotes, F 115, close quotes, comma, open quotes, M W F 11, close quotes, comma, open quotes, H 221, close quotes, close parentheses, semicolon.
Line 50. INSERT INTO CLASS VALUES, open parentheses, open quotes, M T H 101 B, close quotes, comma, open quotes, F 110, close quotes, comma, open quotes, M T u T h 9, close quotes, comma, open quotes, H 225, close quotes, close parentheses, semicolon.
Line 51. INSERT INTO CLASS VALUES, open parentheses, open quotes, M T H 103 C, close quotes, comma, open quotes, F 110, close quotes, comma, open quotes, M W F 11, close quotes, comma, open quotes, H 225, close quotes, close parentheses, semicolon.
Line 52. INSERT INTO ENROLL VALUES, open parentheses, open quotes, S 1001, close quotes, comma, open quotes, ART 103 A, close quotes, comma, open quotes, A, close quotes, close parentheses, semicolon.
Line 53. INSERT INTO ENROLL VALUES, open parentheses, open quotes, S 1001, close quotes, comma, open quotes, H S T 205 A, close quotes, comma, open quotes, C, close quotes, close parentheses, semicolon.
Line 54. INSERT INTO ENROLL VALUES, open parentheses, open quotes, S 1002, close quotes, comma, open quotes, ART 103 A, close quotes, comma, open quotes, D, close quotes, close parentheses, semicolon.
Line 55. INSERT INTO ENROLL VALUES, open parentheses, open quotes, S 1002, close quotes, comma, open quotes, C S C 201 A, close quotes, comma, open quotes, F, close quotes, close parentheses, semicolon.
Line 56. INSERT INTO ENROLL VALUES, open parentheses, open quotes, S 1002, close quotes, comma, open quotes, M T H 103 C, close quotes, comma, open quotes, B, close quotes, close parentheses, semicolon.
Line 57. INSERT INTO ENROLL, open parentheses, s t u I d, comma, class Number, close parentheses, VALUES, open parentheses, open quotes, S 1010, close quotes, comma, open quotes, ART 103 A, close quotes, close parentheses, semicolon.
Line 58. INSERT INTO ENROLL, open parentheses, s t u I d, comma, class Number, close parentheses, VALUES, open parentheses, open quotes, S 1010, close quotes, comma, open quotes, M T H 103 C, close quotes, close parentheses, semicolon.
Line 59. INSERT INTO ENROLL VALUES, open parentheses, open quotes, S 1020, close quotes, comma, open quotes, C S C 201 A, close quotes, comma, open quotes, B, close quotes, close parentheses, semicolon.
Line 60. INSERT INTO ENROLL VALUES, open parentheses, open quotes, S 1020, close quotes, comma, open quotes, M T H 101 B, close quotes, comma, open quotes, A, close quotes, close parentheses, semicolon

A listing of 4 schemas for Faculty, Class, Student, and Enroll. The schema for Faculty is as follows. Faculty, open parentheses, f a c I d, comma, name, comma, department, comma, rank, close parentheses. The schema for Class is as follows. Class, open parentheses, class N o, comma, f a c I d, comma, schedule, room, close parentheses. The schema for Student is as follows. Student, open parentheses, s t u I d, comma, last Name, comma, first Name, comma, major, comma, credits, close parentheses. The schema for Enroll is as follows. Enroll, open parentheses, s t u I d, comma, class N o, comma, grade, close parentheses.

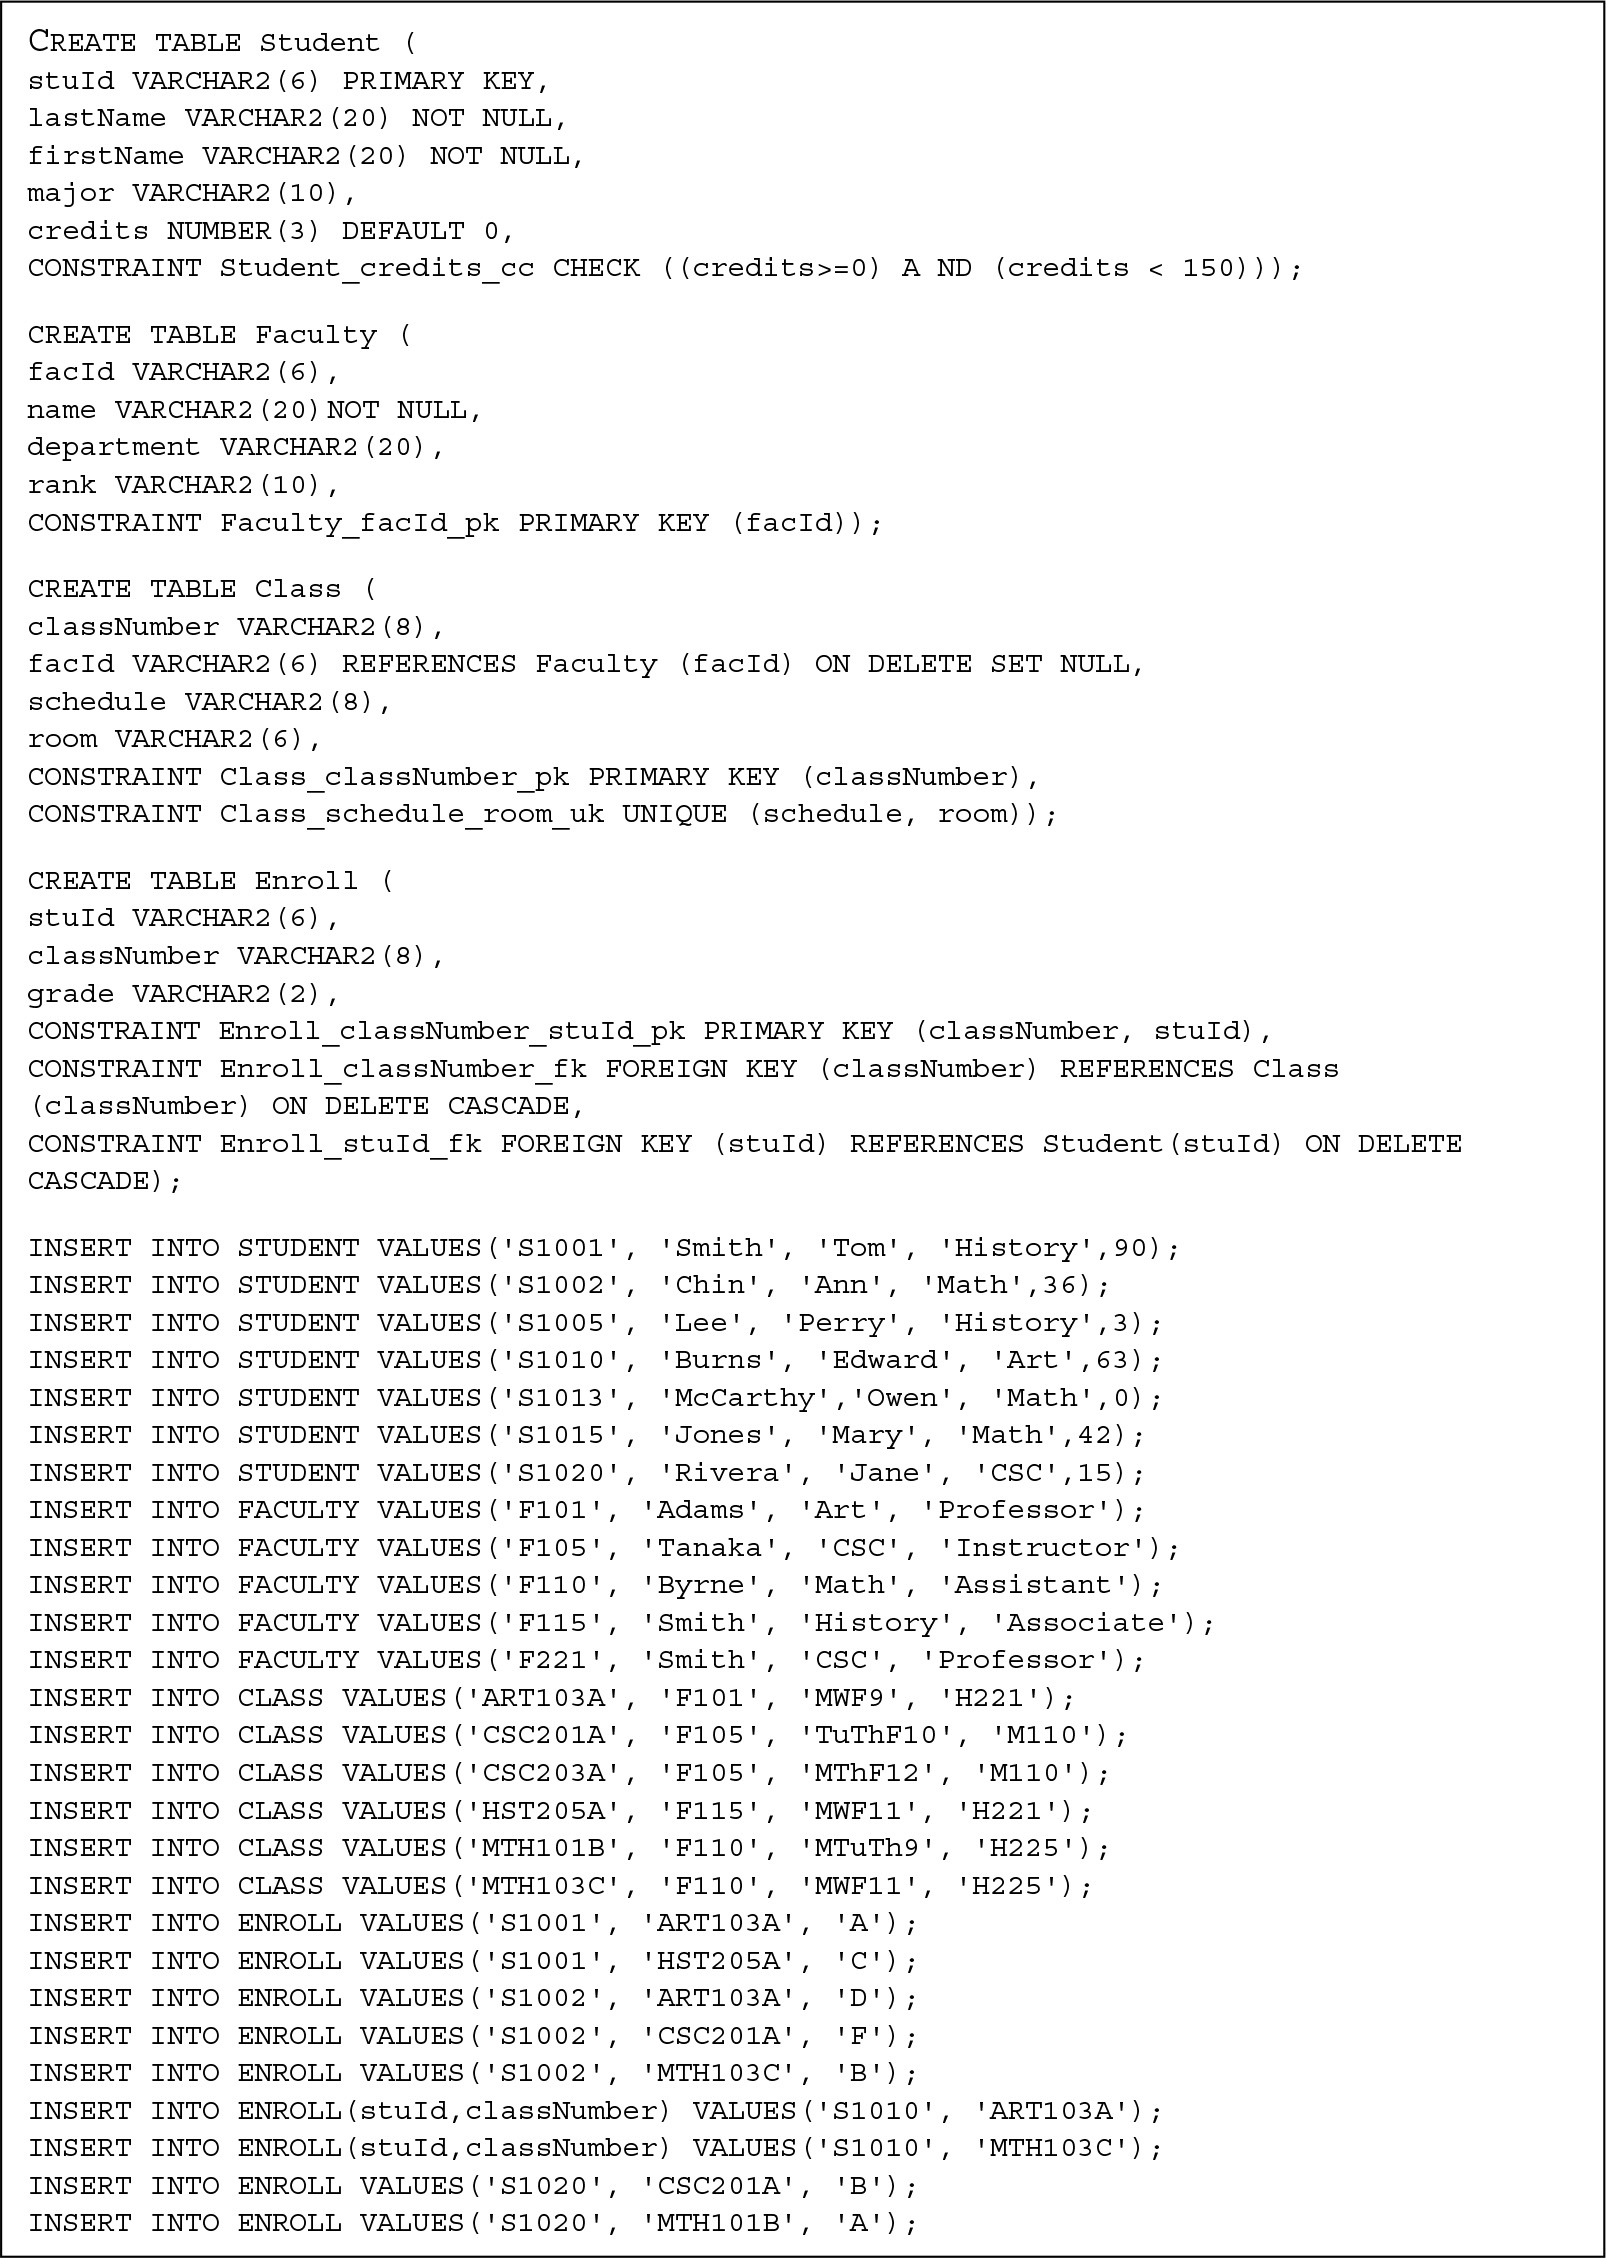
FIGURE 5.2 DDL and INSERTS for University Example

Data Types

The available data types vary from DBMS to DBMS. Built-in data types for strictly relational tables in Oracle include various numeric types, fixed-length and varying-length character strings, date-time and timestamp types, large object types, and others. One of the most common data types in a strictly relational Oracle database is VARCHAR2(n), which stores varying length strings of maximum size n bytes. The user must specify a size n up to 4,000 bytes. For fixed-length strings, the type CHAR(n) can be used, with the maximum allowable size of 2,000 bytes.

For fixed-point numbers, the data type NUMBER(p,s) is used, where p is the precision (the maximum number of significant digits) and s is the scale. In most cases, p is the total number of digits and s is the number of digits to the right of the decimal point, if any. For integers, the s is omitted. Floating-point numbers can also be specified as NUMBER, with no precision or scale specified, or as FLOAT(p), where p, which is optional, is the precision measured in binary digits.

The DATE type is used to store dates and times. In Oracle, values of dates can be entered using the default format 'dd-mon-yy', as in '02-DEC-22', where the month is represented using a three-letter abbreviation.

Microsoft Access supports several types of NUMBER, as well as TEXT, MEMO, DATE/TIME, HYPERLINK, YES/NO, and others. MySQL has several variations of INTEGER, NUMERIC, FLOAT, DATE/TIME, CHAR, VARCHAR, BLOB, and others.

Column and Table Constraints

The DBMS has facilities to enforce data correctness, which the DBA should make use of when creating tables. The relational model uses integrity constraints to protect the correctness of the database, allowing only legal instances to be created. These constraints protect the system from data entry errors that would create inconsistent data. Although the table name, column names, and data types are the only parts required in a CREATE TABLE command, optional constraints can and should be added, both at the column level and at the table level.

The column constraints (also called in-line constraints because they are defined on the same line as the column) include options to specify NULL/NOT NULL, UNIQUE, PRIMARY KEY, FOREIGN KEY, CHECK, DEFAULT, and REF for any column, immediately after the specification of the column name and data type.

If we do not specify NOT NULL, the system will allow the column to have null values, meaning the user can insert records that have no values for those columns. When a null value appears in a column of a record, the system distinguishes it from a blank string or zero value and treats it differently in computations and logical comparisons. It is desirable to be able to insert null values in certain situations; for example, when a college student has not yet declared a major, we might want to set the major column to NULL. However, the use of null values can create complications, especially in operations such as joins, so we should use NOT NULL when it is appropriate. In Figure 5.2, we specified the NOT NULL constraint for student and faculty names.

We can optionally specify that a given column is to have unique values by writing the UNIQUE constraint. In that case, the system will reject the insertion of a new record that has the same value in that column as a record that is already in the database.

If the primary key is not composite, it is also possible to specify PRIMARY KEY as a column constraint simply by adding the words PRIMARY KEY after the data type for the column. For example, for the stuId column specification in the Student table, we wrote

An S Q L statement illustrating specification of PRIMARY KEY. The statement is as follows. s t u I d VAR CHAR 2, open parentheses, 6, close parentheses, PRIMARY KEY, comma.

which is an in-line constraint.

Clearly, no duplicate values are permitted for the primary key. Neither are null values because we could not distinguish between two different records if they both had null key values, so the specification of PRIMARY KEY in SQL carries an implicit NOT NULL constraint as well as a UNIQUE constraint. However, we may wish to ensure uniqueness for candidate keys as well, and we should specify UNIQUE for them when we create the table. It is also desirable to specify a NOT NULL constraint for candidate keys when it is possible to ensure that values for these columns will always be available. For example, if we wanted to include Social Security numbers for all faculty members, we could ensure that all faculty records contain unique Social Security numbers by specifying in the Faculty table

An S Q L statements with UNIQUE, and NOT NULL keywords. The statement is as follows. s o c s e c N u m CHAR, open parentheses, 11, close parentheses, UNIQUE NOT NULL, comma.

Oracle provides IDENTITY-based columns to create system-generated numeric sequences that can be used as primary keys, or for other uses. The line

An S Q L statement for IDENTITY based columns. The statement is as follows. i d NUMBER GENERATED AS IDENTITY PRIMARY KEY, comma.

would create a primary key called id that starts at value 1 and is automatically incremented whenever a new row is inserted in the table. You can change both the starting value and the increment by adding START WITH m INCREMENT BY n, where both m and n are integers. An IDENTITY column is useful when you do not want to enter your own values for the primary key, but you want the system to supply a unique value whenever you enter a record. Only one such column is permitted per table. Note that the IDENTITY column is not automatically the primary key, so you must still add the primary key constraint.

Foreign keys that consist of a single column can also be defined by in-line constraints, as shown in the creation of the Class table, where facId is defined as a foreign key that references the Faculty table in the line

An S Q L statement. The statement is as follows. f a c I d VAR CHAR, open parentheses, 6, close parentheses, REFRENCES Faculty, open parentheses, f a c I d, close parentheses, ON DELETE SET NULL, comma.

The foreign key constraint requires that we identify the referenced table where the column appears as the primary key, and that we name the corresponding column in that table. This is necessary because it is possible the column has a different name in the home relation. The home table must be created prior to the creation of the table that references it.

The CHECK constraint can be used to specify a condition that the rows of the table are not permitted to violate to ensure that values provided for attributes are appropriate. The DEFAULT constraint allows us to provide a default value for the column. Every record that is inserted without a value for that column is then given the default value automatically. We can optionally provide a name for any constraint. If we do not specify a name, the system will automatically assign one. However, a user-defined name is preferable because it provides an opportunity to choose a meaningful name, which is useful if we wish to modify the constraint later. We precede the constraint name with the keyword CONSTRAINT.

For example, in defining the credits column in the Student table, we could specify a default value of 0 and a CHECK constraint called Student_credits_cc by writing directly in the column definition line

An S Q L statement for specifying default value and constraints in the credits column. The statement is as follows. credits NUMBER, open parentheses, 3, close parentheses, DEFAULT 0 CONSTRAINT Student, underscore, credits, underscore, c c, CHECK, open parentheses, open parentheses, credits greater than or equal to 0, close parentheses, AND, open parentheses, credits less than 150, close parentheses, close parentheses.

Here, we gave the CHECK constraint the name Student_credits_cc, using the form of identifying the table, the column(s), and the type of constraint (cc), The abbreviations pk (primary key), fk (foreign key), nn (not null), uk (unique), and cc (check constraint) are often used in constraint names to refer to the type of constraint defined.

Oracle also has an option to provide a default value whenever a null value is entered for a column. For example, if we had specified

An S Q L statement for specifying a default value whenever a null value is entered in a column. The statement is as follows. major VAR CHAR 2, open parentheses, 10, close parentheses, DEFAULT ON NULL, open quotes, Arts, close quotes, NOT NULL, comma.

then any student row entered without a major would be assigned an Arts major.

A REF constraint is used when a column references an object and is not a strictly relational feature, so we will defer discussion of it. We can also specify a default value for a column.

Table constraints, also called out-of-line constraints, appear after all the columns have been declared and can include the specification of a primary key, foreign keys, uniqueness, references, checks, and general constraints that can be expressed as conditions to be checked, with the exception of NOT NULL, which is always a column constraint. In an out-of-line constraint, we must use the keyword CONSTRAINT, which can be optionally followed by an identifier. Then we specify the type of constraint and the column or columns for the constraint. In Figure 5.2, we made the CHECK constraint on credits in the Student table an out-of-line constraint.

If the primary key is a composite key, it must be identified using a table constraint rather than a column constraint. For the Enroll table in Figure 5.2, we specified that the combination of stuId and classNumber is the primary key in the line

An S Q L statement using the CONSTRAINT and PRIMARY KEY keywords. The statement is as follows. CONSTRAINT Enroll, underscore, class Number, underscore, s t u d I d, underscore, p k, PRIMARY KEY, open parentheses, class Number, comma, s t u I d, close parentheses, comma.

We also used a table constraint to specify that stuId is a foreign key for which the Student table is the home table by writing

An S Q L statement using the CONSTRAINT, FOREIGN KEY, and REFERENCES keywords. The statement is as follows. CONSTRAINT Enroll, underscore, s t u I d, underscore, f k, FOREIGN KEY, open parentheses, s t u I d, close parentheses, REFERENCES Student, open parentheses, s t u I d, close parentheses.

If a foreign key is composite, we must use a table constraint to identify it. For example, if we had a Customer table with a composite primary key, and an Order table with a foreign key as in

S Q L statements for Customer and Order tables. The first statement is as follows. Customer, open parentheses, name, comma, address, comma, rating, close parentheses. The variables labeled name and address are underlined. The second statement is as follows. Order, open parentheses, order N o, comma, c u s t Name, comma, c u s t Address, comma, amount, close parentheses.

then in the Order table we would identify the composite foreign key using a table constraint, as in

An S Q L statement using the CONSTRAINT, FOREIGN KEY, and REFERENCES keywords. The statement is as follows. CONSTRAINT Order, underscore, name, underscore, add, underscore, f k, FOREIGN KEY, open parentheses, c u s t Name, comma, C u s t Address, close parentheses, REFERENCES Customer, open parentheses, name, comma, address, close parentheses.

SQL allows us to specify what is to be done with records containing foreign key values when the records they relate to are deleted in their home table. For the University example, what should happen to a Class record when the record of the faculty member assigned to teach the class is deleted? The DBMS could automatically do the following:

  • Delete all Class records for that faculty member, an action performed when we specify ON DELETE CASCADE in the foreign key specification in SQL.

  • Set the facId in the Class record to a null value, an action performed when we write ON DELETE SET NULL in SQL.

  • Not allow the deletion of a Faculty record if there is a Class record that refers to it, a default action performed when we do not explicitly specify an action. Some DBMSs use ON DELETE NO ACTION for this choice.

As shown in Figure 5.2, for the Class table we have chosen ON DELETE SET NULL. Also note the choices we made for the Enroll table for changes made to both classNumber and stuId.

The table uniqueness constraint mechanism can be used to specify that the values in a combination of columns must be unique. For example, to ensure that no two classes have the same schedule and room, we wrote

An S Q L statement using the CONSTRAINT and UNIQUE keywords. The statement is as follows. CONSTRAINT Class, underscore, schedule, underscore, room, underscore, u k, UNIQUE, open parentheses, schedule, comma, room, close parentheses.

There are SQL commands to disable, enable, defer checking, alter, or drop constraints, provided we know the constraint names.

5.3.3 CREATE INDEX

We can optionally create indexes for tables to facilitate fast retrieval of records with specific values in a column. An index keeps track of which values exist for the indexed column and which records have those values. For example, if we have an index on the lastName column of the Student table, and we write a query asking for all students with the last name of Smith, the system will not have to scan all Student records to pick out the desired ones. Instead, it will read the index, which will indicate the physical address of the records with the desired name.

A table can have any number of indexes, which are stored as B trees or B+ trees in separate index files, usually close to the tables they index. Indexes can be created on single columns or combinations of columns. However, because indexes must be updated by the system every time the underlying tables are updated, additional overhead is required. Aside from choosing which indexes will exist, users have no control over the use or maintenance of indexes. The system chooses which, if any, index to use in searching for records. A simple form of the command for creating an index is

An S Q L statement for creating an index. The syntax is as follows. CREATE , open square bracket, UNIQUE, close square bracket, INDEX, index name, ON, base table name, open parentheses, col name, open square bracket, order, close square bracket, open square bracket, comma, col name, open square bracket, order, close square bracket, close square bracket, dot, dot, dot, close parentheses, semicolon.

If the UNIQUE specification is used, uniqueness of the indexed column or combination of columns will be enforced by the system. Although indexes can be created at any time, we may have a problem if we try to create a unique index after the table has records stored in it because the values stored for the indexed column or columns may already contain duplicates. In this case, the system will not allow the unique index to be created.

To create an index on lastName for the Student table, we would write

An S Q L statement for creating an index. The statement is as follows. CREATE INDEX S t u, underscore, last Name, underscore, i x, ON Student, open parentheses, last Name, close parentheses, semicolon.

The name of the index should be chosen to indicate the table and the column(s) used in the index. Up to 32 columns, regardless of where they appear in the table, may be used in an index. The first column named determines major order, the second gives minor order, and so on. For each column, we may specify that the order is ascending, ASC, or descending, DESC. If we choose not to specify order, ASC is the default. If we write

An S Q L statement for sorting columns in ascending order. The statement is as follows. CREATE INDEX F a c, underscore, d e p t, underscore, name, underscore, i x, ON Faculty, open parentheses, department A S C, comma, name A S C, close parentheses, semicolon.

then an index file called Fac_dept_name_ix will be created for the Faculty table. Entries will be in alphabetical order by department. Within each department, entries will be in alphabetical order by faculty name.

By default, Oracle creates an index on the primary key of each table that is created. The user should create additional indexes on any column(s) that are often used in queries, to speed up execution of those queries. Foreign key columns, which are often used in joins, are good candidates for indexing. In addition to the usual type of indexes described here, Oracle allows more advanced indexes to be created.

5.3.4 Alter Table, Rename Table

Once a table has been created, users might find it more useful if the table contained an additional data item, did not have a particular column, had different data types, or had other constraints. The dynamic nature of a relational database structure makes it possible to change existing base tables. For example, to add a new column on the right of the table, we use a command of the form

An S Q L statement to add a new column to a table. The statement is as follows. ALTER TABLE base table name ADD column name data type constraints, semicolon.

An ALTER TABLE ...ADD command causes the new column to be added to all records already stored in the table, and null values to be assigned to that column in all existing records. Notice we cannot use the NOT NULL specification for the column unless we also specify a DEFAULT value.

If we want to add a new column, cTitle, to our Class table, we can do so by writing

An S Q L statement for adding a column labeled c Title to a table labeled Class. The statement is as follows. ALTER TABLE Class ADD c Title VARCHAR 2, open parentheses, 30, close parentheses, semicolon.

The schema of the Class table would then be

A schema for the table labeled Class. The statement is as follows. Class, open parentheses, class Number, comma, f a c I d, comma, schedule, comma, room, comma, c Title, close parentheses.

All old Class records would then have null values for cTitle, but we could provide a title for any new Class records we insert and update old Class records by adding titles to them.

We can also drop columns from existing tables with the command

An S Q L statement for dropping columns from tables. The syntax is as follows. ALTER TABLE base table name DROP COLUMN column name, semicolon.

To drop the cTitle column and return to our original structure for the Class table, we would write

An S Q L statement for dropping the column labeled c Title from the table labeled Class. The statement is as follows. ALTER TABLE Class DROP COLUMN c Title, semicolon.

We can also modify the properties of columns in a table, changing the data type, size, default value, or constraints, using the command

An S Q L statement for modifying the properties of columns in a table. The syntax is as follows. ALTER TABLE base table name MODIFY COLUMN col name, open square bracket, new specifications, close square bracket, semicolon.

The new specifications for the column use the same wording as they would in a CREATE TABLE command. The data type can be changed only if all rows of the table contain null values for the column being modified. The size or precision can always be increased even if there are non-null values stored, but they can be decreased only if no existing rows violate the new specifications.

If we want to add, drop, or change a constraint, we can use the same ALTER TABLE command, using the same wording for the constraint clause as in the CREATE TABLE command. For example, if we created the Class table and neglected to make facId a foreign key in Class, we could add the constraint at any time by writing

An S Q L statement for adding a FOREIGN KEY constraint in a table labeled Class. The statement is as follows. ALTER TABLE Class ADD CONSTRAINT Class, underscore, f a c I d, underscore, f k, FOREIGN KEY, open parentheses, f a c I d, close parentheses, REFERENCES Faculty, open parentheses, f a c I d, close parentheses, ON DELETE SET NULL, semicolon.

We could drop an existing named constraint using the ALTER TABLE command. For example, to drop the check condition on the credits attribute of Student that we created earlier, we could write

An S Q L statement for dropping a constraint from a table labeled, Student. The statement is as follows. ALTER TABLE Student DROP CONSTRAINT Student, underscore, credits, underscore, c c, semicolon.

We can change the name of an existing table easily by the command

An S Q L statement for renaming a table. The syntax is as follows. RENAME TABLE old, hyphen, table, hyphen, name, TO, new, hyphen, table, hyphen, name, semicolon.

To rename a column, use the ALTER TABLE command, as in

An S Q L statement for renaming a table. The statement is as follows. ALTER TABLE Student RENAME COLUMN s t u I d TO student N o, semicolon.

5.3.5 DROP Statements

Tables can be dropped at any time by the SQL command

An S Q L DROP statement. The statement is as follows. DROP TABLE base table name, semicolon.

When this statement is executed, the table itself and all records contained in it are removed. In addition, all indexes and, as we will see later, all views that depend on it are dropped. Naturally, the DBA confers with potential users of the table before taking such a drastic step. Note that if the table is referred to by foreign keys, it may not be possible to drop the table until the references to it have been resolved.

Any existing index can be destroyed by the command

An S Q L statement for destroying an index. The statement is as follows. DROP INDEX index name, semicolon.

When an index is dropped, any access plans for applications that depend on it are marked as invalid. When an application calls them, a new access plan is devised to replace the old one.

5.3.6 Additional SQL Data Definition Language (DDL) Example

FIGURE 5.3 shows the DDL to create a Workers and Projects database, as well as INSERT statements to add records. The relational schema is

An S Q L statement for destroying an index.

Line 1. CREATE TABLE Worker open parentheses
Line 2. e m p I d NUMBER open parentheses 6 close parentheses PRIMARY KEY comma
Line 3. last Name VARCHAR2 open parentheses 20 close parentheses NOT NULL comma
Line 4. first Name VARCHAR2 open parentheses 15 close parentheses NOT NULL comma
Line 5. dept Name VARCHAR2 open parentheses 15 close parentheses comma
Line 6. birth Date DATE comma
Line 7. hire Date DATE comma
Line 8. salary NUMBER open parentheses 8 comma 2 close parentheses close parentheses semicolon.
Line 9. CREATE TABLE Dept open parentheses
Line 10. d e p t Name VARCHAR2 open parentheses 15 close parentheses comma
Line 11. mg r I d NUMBER open parentheses 6 close parentheses comma
Line 12. CONSTRAINT Dept underscore d e p t Name underscore pk PRIMARY KEY open parentheses d e p t Name close parentheses comma
Line 13. CONSTRAINT Dept underscore m g r I d underscore f k FOREIGN KEY open parentheses m g r I d close parentheses REFERENCES Worker open parentheses e m p I d close parentheses ON DELETE SET NULL close parentheses semicolon.
Line 14. ALTER TABLE Worker ADD CONSTRAINT Worker underscore d e p t Name underscore f k FOREIGN KEY open parentheses d e p t Name close parentheses REFERENCES
Line 15. Dept open parentheses d e p t Name close parentheses ON DELETE SET NULL semicolon.
Line 16. CREATE TABLE Project open parentheses
Line 17. proj No NUMBER open parentheses 6 close parentheses comma
Line 18. proj Name VARCHAR2 open parentheses 20 close parentheses comma
Line 19. proj MgrId NUMBER open parentheses 6 close parentheses comma
Line 20. budget NUMBER open parentheses 8 comma 2 close parentheses comma
Line 21. start Date DATE comma
Line 22. expected Duration Weeks NUMBER open parentheses 4 close parentheses comma
Line 23. CONSTRAINT Project underscore proj No underscore pk PRIMARY KEY open parentheses proj No close parentheses comma
Line 24. CONSTRAINT Project underscore proj M g r I d underscore f k FOREIGN KEY open parentheses proj M g r I d close parentheses REFERENCES WORKER open parentheses e m p I d close parentheses ON
Line 25. DELETE SET NULL close parentheses semicolon.
Line 26. CREATE TABLE Assign open parentheses
Line 27. proj No NUMBER open parentheses 6 close parentheses comma
Line 28. emp Id NUMBER open parentheses 6 close parentheses comma
Line 29. hours Assigned NUMBER open parentheses 3 close parentheses comma
Line 30. rating NUMBER open parentheses 1 close parentheses comma
Line 31. CONSTRAINT Assign underscore proj No underscore emp I d underscore p k PRIMARY KEY open parentheses proj N o comma emp I d close parentheses comma
Line 32. CONSTRAINT Assign underscore proj N o underscore f k FOREIGN KEY open parentheses proj N o close parentheses REFERENCES Project open parentheses proj No close parentheses ON DELETE
Line 33. CASCADE comma
Line 34. CONSTRAINT Assign underscore e m p I d underscore f k FOREIGN KEY open parentheses e m p I d close parentheses REFERENCES Worker open parentheses e m p I d close parentheses ON DELETE CASCADE close parentheses semicolon.
Line 35. INSERT INTO Dept VALUES open parentheses single quote Accounting single quote comma null close parentheses semicolon.
Line 36. INSERT INTO Dept VALUES open parentheses single quote Research single quote comma null close parentheses semicolon.
Line 37. INSERT INTO Worker VALUES open parentheses 101 comma single quote Smith single quote comma single quote Tom single quote comma single quote Accounting single quote comma single quote 01 hyphen Feb hyphen 1970 single quote comma single quote 06 hyphen Jun hyphen
1993 single quote comma 50000 close parentheses semicolon.
Line 38. INSERT INTO Worker VALUES open parentheses 103 comma single quote Jones single quote comma single quote Mary single quote comma single quote Accounting single quote comma single quote 15 hyphen Jun hyphen 1975 single quote comma single quote 20 hyphen Sep hyphen
2005 single quote comma 48000 close parentheses semicolon.
Line 39. INSERT INTO Worker VALUES open parentheses 105 comma single quote Burns single quote comma single quote Jane single quote comma single quote Accounting single quote comma single quote 21 hyphen Sep hyphen 1980 single quote comma single quote 12 hyphen Jun hyphen
2000 single quote comma 39000 close parentheses semicolon.
Line 40. INSERT INTO Worker VALUES open parentheses 110 comma single quote Burns single quote comma single quote Michael single quote comma single quote Research single quote comma single quote 05 hyphen Apr hyphen 1977 single quote comma single quote 10 hyphen Sep hyphen
2010 single quote comma 70000 close parentheses semicolon.
Line 41. INSERT INTO Worker VALUES open parentheses 115 comma single quote Chin single quote comma single quote Amanda single quote comma single quote Research single quote comma single quote 22 hyphen Sep hyphen 1980 single quote comma single quote 19 hyphen Jun hyphen
2020 single quote comma 60000 close parentheses semicolon.
Line 42. UPDATE Dept SET m g r I d equals 101 WHERE dept Name equals single quote Accounting single quote semicolon.
Line 43. UPDATE Dept SET m g r I d equals 110 WHERE dept Name equals single quote Research single quote semicolon.
Line 44. INSERT INTO Project VALUES open parentheses 1001 comma single quote Jupiter single quote comma 101 comma 300000 comma single quote 01 hyphen Feb hyphen 2022 single quote comma 50 close parentheses semicolon.
Line 45. INSERT INTO Project VALUES open parentheses 1005 comma single quote Saturn single quote comma 101 comma 400000 comma single quote 01 hyphen Jun hyphen 2022 single quote comma 35 close parentheses semicolon.
Line 46. INSERT INTO Project VALUES open parentheses 1019 comma single quote Mercury single quote comma 110 comma 350000 comma single quote 15 hyphen Feb hyphen 2023 single quote comma 40 close parentheses semicolon.
Line 47. INSERT INTO Project VALUES open parentheses 1025 comma single quote Neptune single quote comma 110 comma 600000 comma single quote 01 hyphen Feb hyphen 2023 single quote comma 45 close parentheses semicolon.
Line 48. INSERT INTO Project VALUES open parentheses 1030 comma single quote Pluto single quote comma 110 comma 380000 comma single quote 15 hyphen Sep hyphen 2024 single quote comma 50 close parentheses semicolon.
Line 49. INSERT INTO Assign VALUES open parentheses 1001 comma 101 comma 30 comma null close parentheses semicolon.
Line 50. INSERT INTO Assign VALUES open parentheses 1001 comma 103 comma 20 comma 5 close parentheses semicolon.
Line 51. INSERT INTO Assign VALUES open parentheses 1005 comma 103 comma 20 comma null close parentheses semicolon.
Line 52. INSERT INTO Assign VALUES open parentheses 1001 comma 105 comma 30 comma null close parentheses semicolon.
Line 53. INSERT INTO Assign VALUES open parentheses 1001 comma 115 comma 20 comma 4 close parentheses semicolon.
Line 54. INSERT INTO Assign VALUES open parentheses 1019 comma 110 comma 20 comma 5 close parentheses semicolon.
Line 55. INSERT INTO Assign VALUES open parentheses 1019 comma 115 comma 10 comma 4 close parentheses semicolon.
Line 56. INSERT INTO Assign VALUES open parentheses 1025 comma 110 comma 10 comma null close parentheses semicolon.
Line 57. INSERT INTO Assign VALUES open parentheses 1030 comma 110 comma 10 comma null close parentheses semicolon.

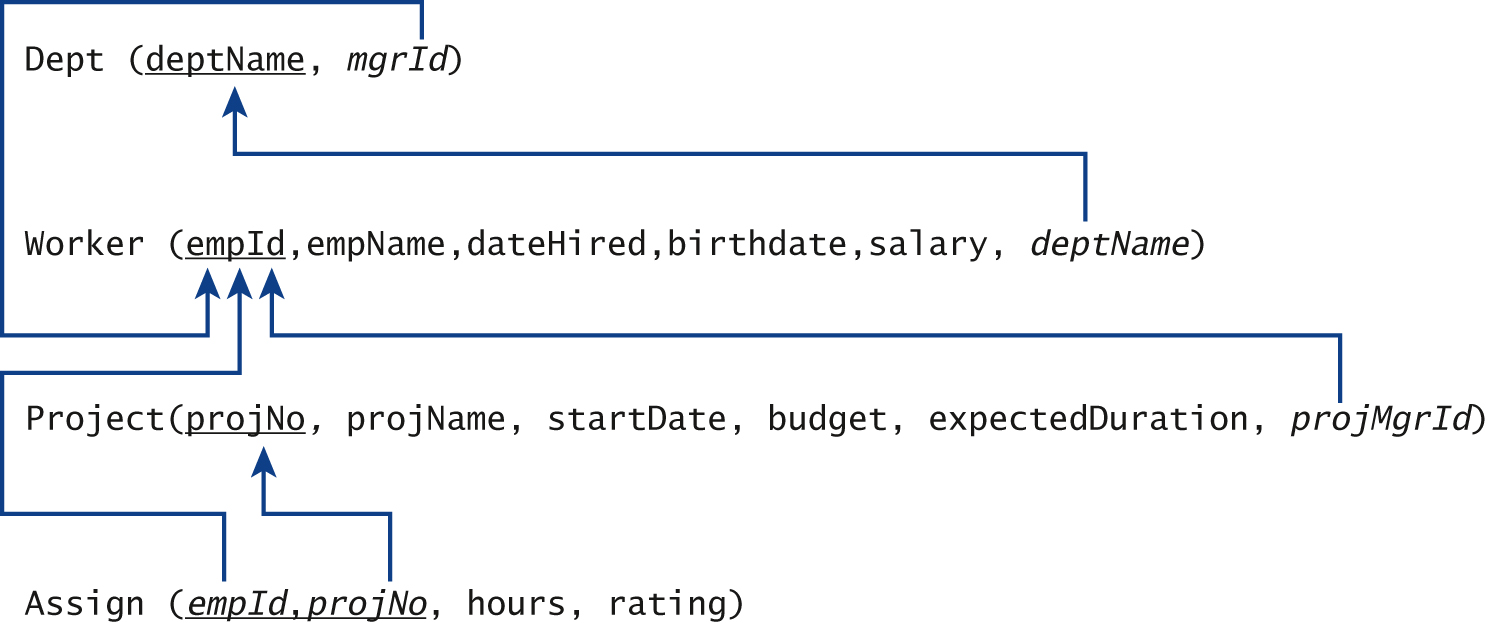
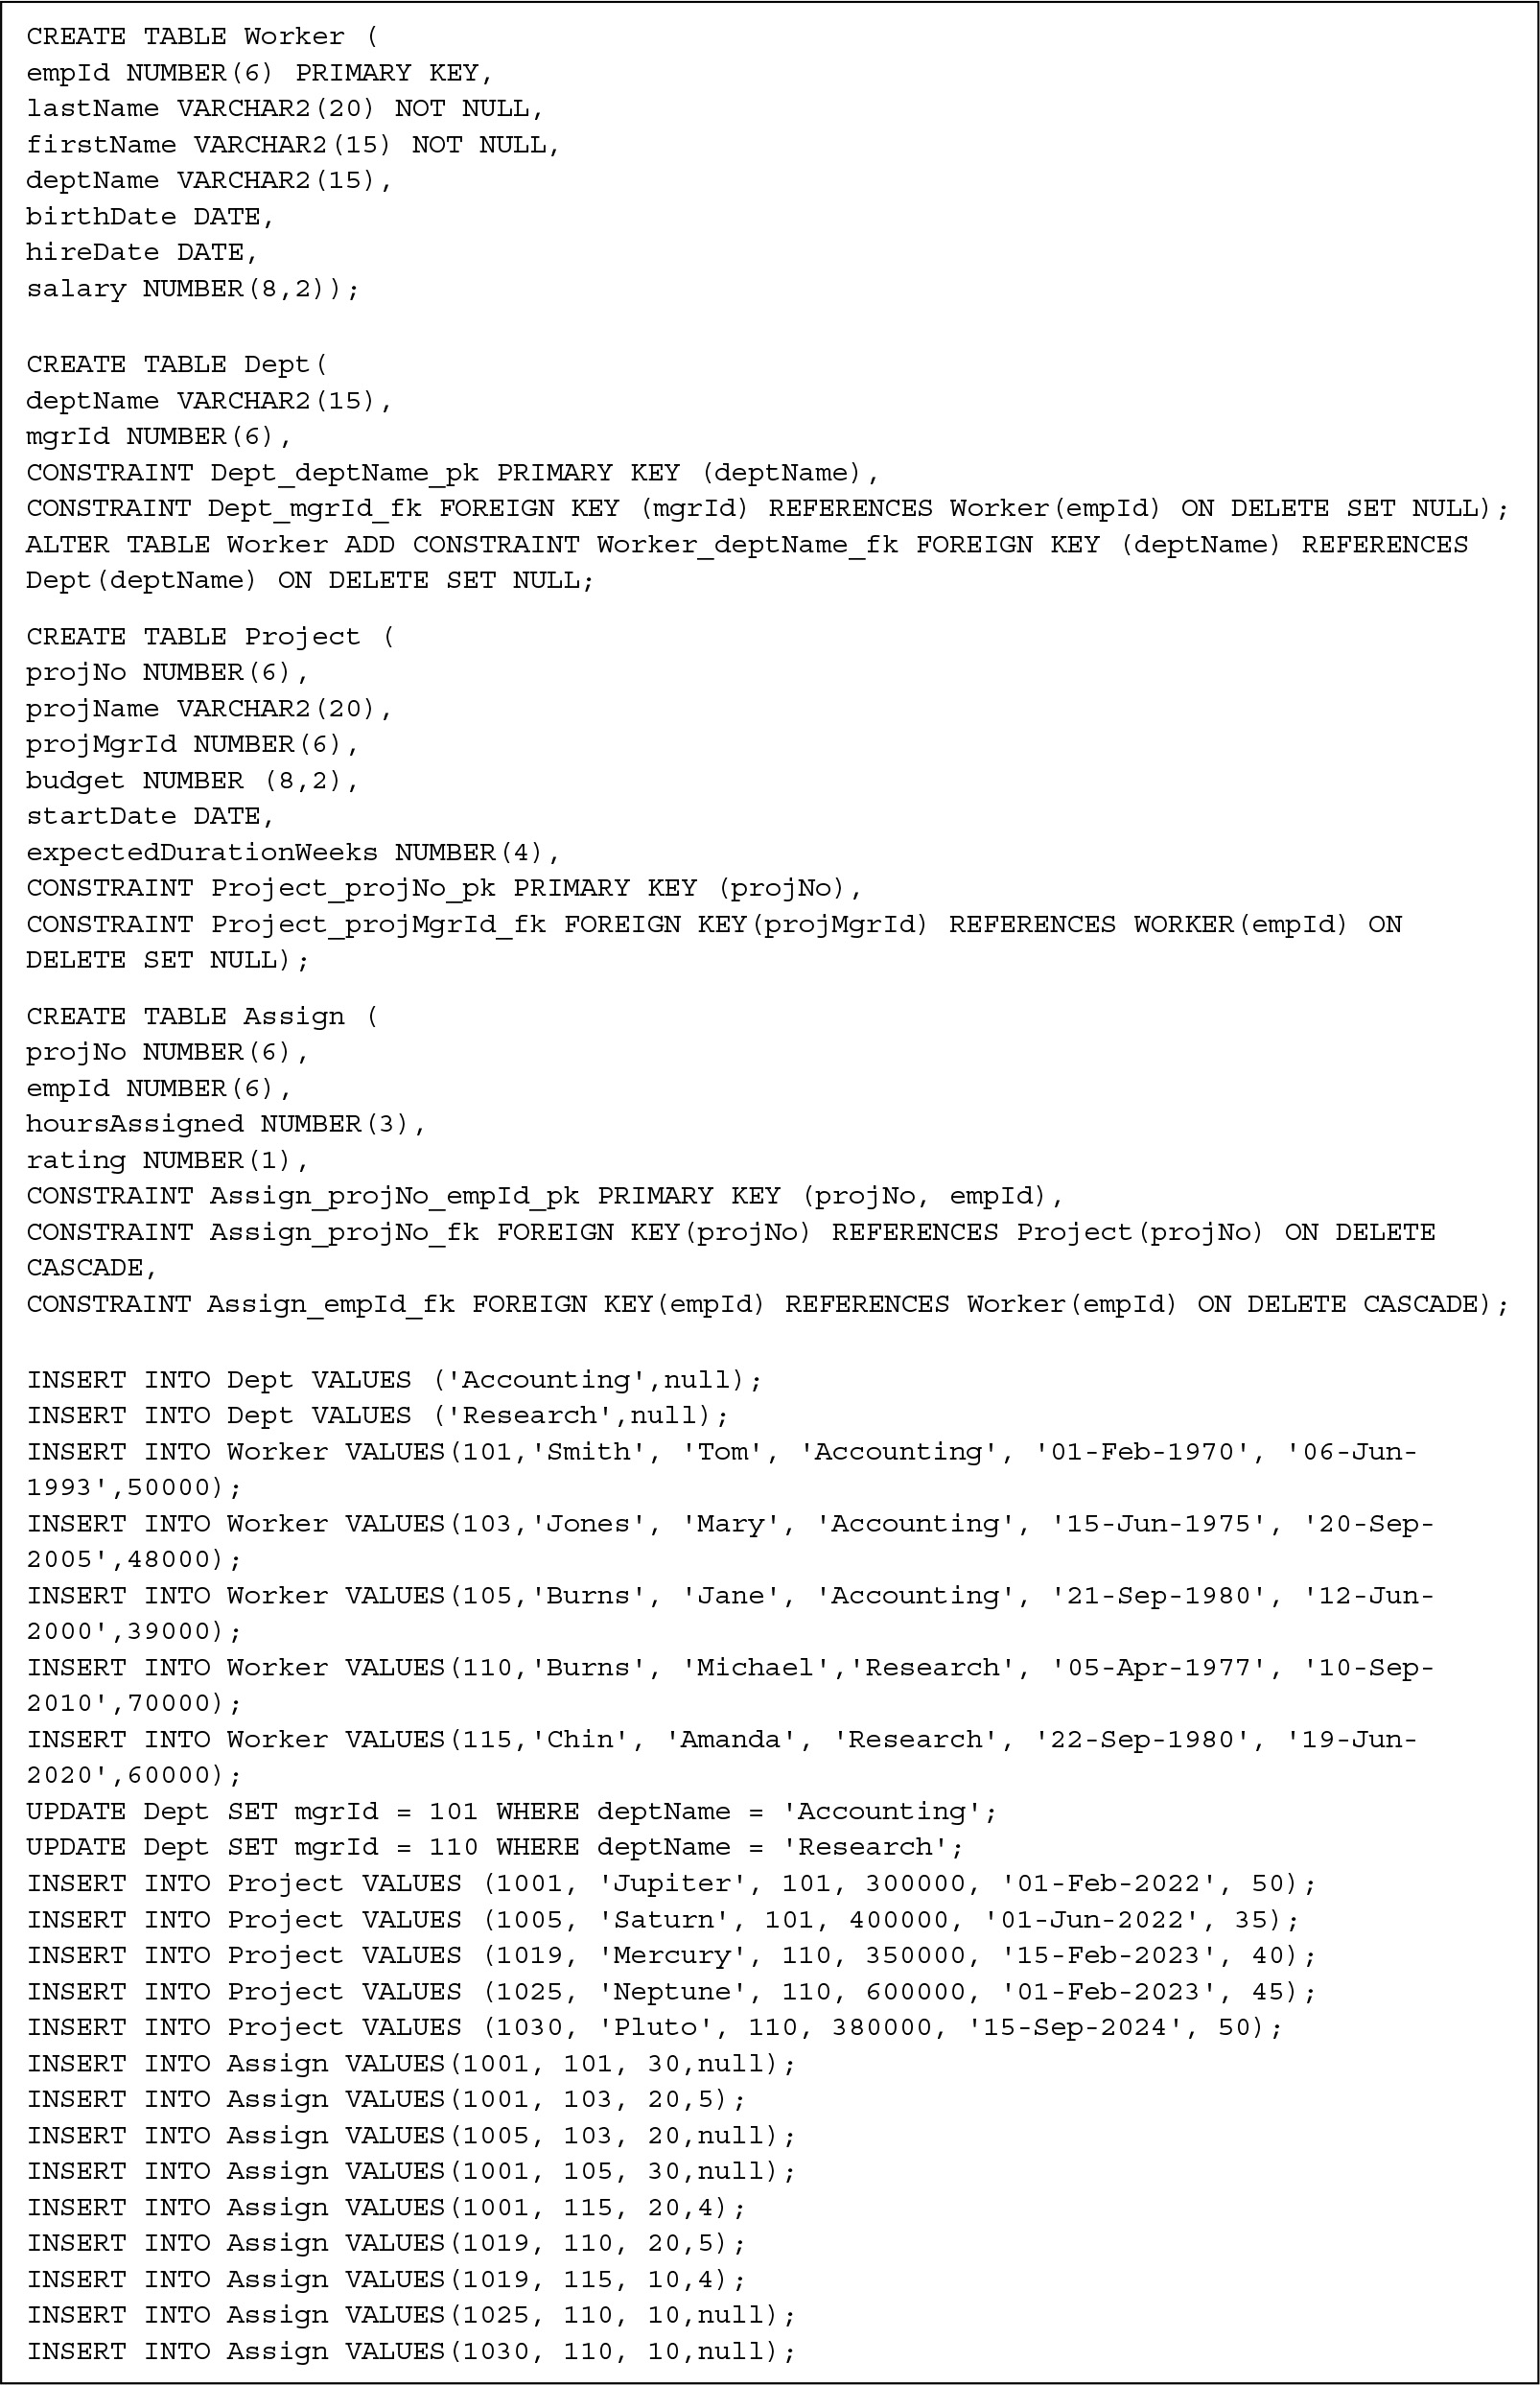
FIGURE 5.3 DDL and Inserts for Workers and Projects Example

In this schema, the foreign key mgrId in Dept references the Worker table, which in turn contains a foreign key, deptName, that refers to the Dept table. Because the home table for a foreign key must exist before the table that references it, it appears difficult to create both tables with their corresponding foreign keys because each requires that the home table referenced has been previously defined. One solution is to create the Worker table without the foreign key constraint, create the Dept table referencing the Worker table, and then use the ALTER TABLE command to add the foreign key constraint to the Worker table, as shown in Figure 5.3.

Examining the INSERT commands to enter records into the tables, we also see that care must be taken to avoid violating these foreign key constraints when we enter rows. The value of mgrId in a Dept record must refer to an actual manager’s record in the Worker table or be null, but the Worker record must contain a deptName value. We solve this problem by initially putting in a null value for the mgrId when inserting a Dept record, then inserting the manager’s Worker record, and finally updating the Dept record with the manager’s empId.

..................Content has been hidden....................

You can't read the all page of ebook, please click here login for view all page.
Reset
3.137.167.107