A
Nikon D800/D800E: Pre-Flight Checklist
Both Nikon D800 models appeal to more advanced users, including those who have previously owned full-frame Nikon cameras (especially the Nikon D700). However, I recognize that a significant number of serious photographers were inspired by the features and capabilities of the Nikon D800 to make the jump from a “cropped” sensor model to the full-frame (FX) world. Others are switching to Nikon from another brand of camera, and still others are brave souls who have decided to make the Nikon D800 their first digital SLR or even first digital camera.
The D800 has such broad appeal that I didn’t want to leave those of you who need some extra information behind in the lurch when it comes to initial setup of the camera. So, I’m providing the most basic setup information here, and tucking it away for easy access, yet out of the way of more experienced shooters who want to skip over this kind of information. You can absorb this Appendix easily, as each section has a brief summary that will help you decide if you want to skim over it, read it quickly, or study it.
This section helps get you oriented with all the things that come in the box with your Nikon D800, including what they do. I’ll also describe some optional equipment you might want to have. If you want to get started immediately, skim through this section and jump ahead to “Initial Setup” later in the appendix.
The Nikon D800 comes in an impressive gold box filled with stuff, including connecting cords, booklets, a CD, and lots of paperwork. The most important components are the camera and lens (if you purchased your D800 with a lens), battery, battery charger, and, if you’re the nervous type, the neck strap. You’ll also need a memory card as one is not included. If you purchased your D800 from a camera shop, as I did, the store personnel probably attached the neck strap for you, ran through some basic operational advice that you’ve already forgotten, tried to sell you a memory card, and then, after they’d given you all the help you could absorb, sent you on your way with a handshake.
Perhaps you purchased your D800 from one of those mass merchandisers that also sell washing machines and vacuum cleaners. In that case, you might have been sent on your way with only the handshake, or, maybe, not even that if you resisted the efforts to sell you an extended warranty. You save a few bucks at the big box stores, but you don’t get the personal service a professional photo retailer provides. It’s your choice. There’s a third alternative, of course. You might have purchased your camera from a mail order or Internet source, and your D800 arrived in a big brown (or purple/red) truck. Your only interaction when you took possession of your camera was to scrawl your signature on an electronic clipboard.
In all three cases, the first thing to do is to carefully unpack the camera and double-check the contents with the checklist on one end of the box, helpfully designated under a “This package includes” listing. While this level of setup detail may seem as superfluous as the instructions on a bottle of shampoo, checking the contents first is always a good idea. No matter who sells a camera, it’s common to open boxes, use a particular camera for a demonstration, and then repack the box without replacing all the pieces and parts afterwards. Someone might actually have helpfully checked out your camera on your behalf—and then mispacked the box. It’s better to know now that something is missing so you can seek redress immediately, rather than discover two months from now that the video cable you thought you’d never use (but now must have) was never in the box. I once purchased a brand-new Nikon dSLR kit that was supposed to include a second focusing screen; it wasn’t in the box, but because I discovered the deficiency right away, the dealer ordered a replacement for me post haste.
At a minimum, the box should have the following:
![]() Nikon D800 digital camera. It almost goes without saying that you should check out the camera immediately, making sure the back- and top-panel LCDs aren’t scratched or cracked, the memory and battery doors open properly, and, when a charged battery is inserted and lens mounted, the camera powers up and reports for duty. Out-of-the-box defects like these are rare, but they can happen. It’s probably more common that your dealer played with the camera or, perhaps, it was a customer return. That’s why it’s best to buy your D800 from a retailer you trust to supply a factory-fresh camera.
Nikon D800 digital camera. It almost goes without saying that you should check out the camera immediately, making sure the back- and top-panel LCDs aren’t scratched or cracked, the memory and battery doors open properly, and, when a charged battery is inserted and lens mounted, the camera powers up and reports for duty. Out-of-the-box defects like these are rare, but they can happen. It’s probably more common that your dealer played with the camera or, perhaps, it was a customer return. That’s why it’s best to buy your D800 from a retailer you trust to supply a factory-fresh camera.
![]() Rechargeable Li-ion battery EN-EL15. You’ll need to charge this 7.0V, 1900mAh (milliampere hour) battery before use, and then navigate immediately to the Setup menu’s Battery Info entry to make sure the battery accepted the juice and is showing a 100% charge. (You’ll find more on accessing this menu item in Chapter 13.) You’ll want a second EN-EL15 battery as a spare (trust me), so buy one as soon as possible.
Rechargeable Li-ion battery EN-EL15. You’ll need to charge this 7.0V, 1900mAh (milliampere hour) battery before use, and then navigate immediately to the Setup menu’s Battery Info entry to make sure the battery accepted the juice and is showing a 100% charge. (You’ll find more on accessing this menu item in Chapter 13.) You’ll want a second EN-EL15 battery as a spare (trust me), so buy one as soon as possible.
DANGER, WILL ROBINSON!
Shortly after the introduction of the D800, Nikon recalled two lots of the EN-EL15 battery that were defective and which could overheat. You should inspect your battery and examine the lot number, which is printed as the bottom line on the nameplate on the reverse side of the battery. If the ninth digit is E or F, then the battery must be replaced. If the ninth digit is A, B, C, D, or G (and above), the battery is safe. An E or F may appear in other locations in the lot number; only those in which E or F are the ninth digit are defective.
As the URL for instructions on obtaining a free replacement may change during the life of this book (and will certainly be different in various English-speaking—or other—countries), Google “Nikon EN-EL15 battery recall” to determine what to do next. Note that this model battery is also used in the Nikon D7000, Nikon V1, and (eventually) in other cameras, so it’s possible that you might have an affected battery in one of your other cameras, or have purchased one as a spare for any of these models.
![]() Quick charger MH-25. This charger comes with both a power cable and a power adapter that can be used instead of the cable to plug the charger directly into a wall outlet.
Quick charger MH-25. This charger comes with both a power cable and a power adapter that can be used instead of the cable to plug the charger directly into a wall outlet.
![]() USB cable UC-E14. You can use this cable to transfer photos from the camera to your computer (I don’t recommend that because direct transfer uses a lot of battery power), to upload and download settings between the camera and your computer (highly recommended), and to operate your camera remotely using Nikon Camera Control Pro software (not included in the box).
USB cable UC-E14. You can use this cable to transfer photos from the camera to your computer (I don’t recommend that because direct transfer uses a lot of battery power), to upload and download settings between the camera and your computer (highly recommended), and to operate your camera remotely using Nikon Camera Control Pro software (not included in the box).
Note: This cable has a special connector at the camera end, as it is a USB 3.0-compatible cable with a Micro-B connector. The computer end of the cable is compatible with USB 1.0, USB 2.0, and the latest USB 3.0 connections. Also in the box is a USB cable clip, which you can attach to prevent the cable from being disconnected.
![]() AN-DC6/AN-DC6E neck strap. Nikon provides you with a neck strap emblazoned with your camera model. It’s not very adjustable, and, while useful for showing off to your friends exactly which nifty new camera you bought, the Nikon strap also can serve to alert observant unsavory types that you’re sporting a higher-end model that’s worthy of their attention. I never attach the Nikon strap to my cameras, and instead opt for a more serviceable strap from UPstrap (www.upstrap-pro.com). An UPstrap is shown in Figure A.1, with its patented non-slip pad that keeps your D800 on your shoulder, and not crashing to the ground. If you order one of these, tell inventor-photographer Al Stegmeyer that I sent you.
AN-DC6/AN-DC6E neck strap. Nikon provides you with a neck strap emblazoned with your camera model. It’s not very adjustable, and, while useful for showing off to your friends exactly which nifty new camera you bought, the Nikon strap also can serve to alert observant unsavory types that you’re sporting a higher-end model that’s worthy of their attention. I never attach the Nikon strap to my cameras, and instead opt for a more serviceable strap from UPstrap (www.upstrap-pro.com). An UPstrap is shown in Figure A.1, with its patented non-slip pad that keeps your D800 on your shoulder, and not crashing to the ground. If you order one of these, tell inventor-photographer Al Stegmeyer that I sent you.
![]() BF-1B body cap. The body cap keeps dust from infiltrating your camera when a lens is not mounted. Always carry a body cap (and rear lens cap) in your camera bag for those times when you need to have the camera bare of optics for more than a minute or two. (That usually happens when repacking a bag efficiently for transport, or when you are carrying an extra body or two for backup.) The body cap/lens cap nest together for compact storage.
BF-1B body cap. The body cap keeps dust from infiltrating your camera when a lens is not mounted. Always carry a body cap (and rear lens cap) in your camera bag for those times when you need to have the camera bare of optics for more than a minute or two. (That usually happens when repacking a bag efficiently for transport, or when you are carrying an extra body or two for backup.) The body cap/lens cap nest together for compact storage.
Note
If you happen to have one of the earlier BF-1 body caps for older film cameras, do not use it, as they don’t accommodate the electronic contacts in newer lenses.
Figure A.1 Third-party neck straps like this UPstrap model are often preferable to the Nikon-supplied strap.

![]() BS-1 accessory shoe cover. This little piece of plastic protects the electrical contacts of the “hot” shoe on top of the D800. You can remove it when mounting an electronic flash, Nikon GP-1 GPS device, or other accessory, and then safely leave it off for the rest of your life. I’ve never had an accessory shoe receive damage in normal use, even when not protected. The paranoid among you who use accessories frequently can keep removing/mounting the shoe cover as required. Find a safe place to keep it between uses, or purchase replacements for this easily mislaid item. (Visit www.bocaphoto.com for many Nikon-related items.)
BS-1 accessory shoe cover. This little piece of plastic protects the electrical contacts of the “hot” shoe on top of the D800. You can remove it when mounting an electronic flash, Nikon GP-1 GPS device, or other accessory, and then safely leave it off for the rest of your life. I’ve never had an accessory shoe receive damage in normal use, even when not protected. The paranoid among you who use accessories frequently can keep removing/mounting the shoe cover as required. Find a safe place to keep it between uses, or purchase replacements for this easily mislaid item. (Visit www.bocaphoto.com for many Nikon-related items.)
![]() LCD monitor cover BM-12. The glass covering the D800’s big 3.2-inch LCD monitor is tough, but this plastic cover adds another layer of protection, and it can be replaced for a few dollars if scratched. If I were going to worry about shielding the LCD from damage, I’d use a less obtrusive acrylic cover from various vendors who sell GGS or Giottos glass protectors. Neither type are available as I write this, but it’s a safe bet that with the Nikon D800, Nikon D4, Canon EOS 5D Mark III, Canon EOS 1D X, and a growing number of other models all sporting 3.2-inch LCDs will be available soon.
LCD monitor cover BM-12. The glass covering the D800’s big 3.2-inch LCD monitor is tough, but this plastic cover adds another layer of protection, and it can be replaced for a few dollars if scratched. If I were going to worry about shielding the LCD from damage, I’d use a less obtrusive acrylic cover from various vendors who sell GGS or Giottos glass protectors. Neither type are available as I write this, but it’s a safe bet that with the Nikon D800, Nikon D4, Canon EOS 5D Mark III, Canon EOS 1D X, and a growing number of other models all sporting 3.2-inch LCDs will be available soon.
![]() User’s manuals. Even if you have this book, you’ll probably want to check the user’s guide that Nikon provides, if only to check the actual nomenclature for some obscure accessory, or to double-check an error code. Copy a PDF version to store on your laptop, a CD-ROM, or other media in case you want to access this reference when the paper version isn’t handy. If you have an old memory card that’s too small to be usable on a modern dSLR (I still have some 128MB and 256MB cards), you can store the PDF on that. But an even better choice is to put the manual on a low-capacity USB “thumb” drive, which you can buy for less than $10. You’ll then be able to access the reference anywhere you are, because you can always find someone with a computer that has a USB port and Adobe Acrobat Reader available. You might not be lucky enough to locate a computer with a memory reader.
User’s manuals. Even if you have this book, you’ll probably want to check the user’s guide that Nikon provides, if only to check the actual nomenclature for some obscure accessory, or to double-check an error code. Copy a PDF version to store on your laptop, a CD-ROM, or other media in case you want to access this reference when the paper version isn’t handy. If you have an old memory card that’s too small to be usable on a modern dSLR (I still have some 128MB and 256MB cards), you can store the PDF on that. But an even better choice is to put the manual on a low-capacity USB “thumb” drive, which you can buy for less than $10. You’ll then be able to access the reference anywhere you are, because you can always find someone with a computer that has a USB port and Adobe Acrobat Reader available. You might not be lucky enough to locate a computer with a memory reader.
![]() Quick Start guide. This little booklet tucked away in the camera’s paperwork offers a reasonable summary of the Nikon D800’s basic commands and settings, and can be stowed in your camera bag.
Quick Start guide. This little booklet tucked away in the camera’s paperwork offers a reasonable summary of the Nikon D800’s basic commands and settings, and can be stowed in your camera bag.
![]() Software CD-ROM. Here you’ll find the Nikon ViewNX 2 software, a useful image management program. I’ll cover a variety of other software offerings later in Appendix B.
Software CD-ROM. Here you’ll find the Nikon ViewNX 2 software, a useful image management program. I’ll cover a variety of other software offerings later in Appendix B.
![]() Warranty and registration card. Don’t lose these! You can register your Nikon D800 by mail or online (in the USA, the URL is www.nikonusa.com/register), and you may need the information in this paperwork (plus the purchase receipt/invoice from your retailer) should you require Nikon service support.
Warranty and registration card. Don’t lose these! You can register your Nikon D800 by mail or online (in the USA, the URL is www.nikonusa.com/register), and you may need the information in this paperwork (plus the purchase receipt/invoice from your retailer) should you require Nikon service support.
Don’t bother rooting around in the box for anything beyond what I’ve listed previously. There are a few things Nikon classifies as optional accessories, even though you (and I) might consider some of them essential. Here’s a list of what you don’t get in the box, but might want to think about as an impending purchase. I’ll list them roughly in the order of importance:
![]() Compact Flash and Secure Digital card. First-time digital camera buyers are sometimes shocked that their new tool doesn’t come with a memory card. Why should it? The manufacturer doesn’t have the slightest idea of what capacity or speed card you prefer, so why should they pack one (or even two) in the box and charge you for it? That’s especially true for the Nikon D800, which is likely to be purchased by photographers who have quite definite ideas about their ideal memory card. Perhaps you want to use tiny 4GB cards—and lots of them, as the D800 will store only 172 JPEG Fine images on a 4GB card, or just 38 RAW+JPEG Fine pairs. I’ve met many paranoid wedding photographers who like to work with a horde of smaller cards (and then watch over them very protectively), on the theory that they are reducing their chances of losing a significant chunk of the event or reception at one time (of course, that’s why you hire a second shooter as backup). Others, especially sports photographers, instead prefer 16GB or 32GB cards with room to spare. If you are shooting fast action at continuous frame rates, or transfer lots of photos to your computer with a speedy card reader, you might opt for the speediest possible memory card. I personally use 64GB 400X Compact Flash cards with my D800 (although 600X and 1000X are also available), paired with an SDXC with similar speed and capacity. Buy one (or two, or three) of your own and have your flash memory ready when you unpack your D800.
Compact Flash and Secure Digital card. First-time digital camera buyers are sometimes shocked that their new tool doesn’t come with a memory card. Why should it? The manufacturer doesn’t have the slightest idea of what capacity or speed card you prefer, so why should they pack one (or even two) in the box and charge you for it? That’s especially true for the Nikon D800, which is likely to be purchased by photographers who have quite definite ideas about their ideal memory card. Perhaps you want to use tiny 4GB cards—and lots of them, as the D800 will store only 172 JPEG Fine images on a 4GB card, or just 38 RAW+JPEG Fine pairs. I’ve met many paranoid wedding photographers who like to work with a horde of smaller cards (and then watch over them very protectively), on the theory that they are reducing their chances of losing a significant chunk of the event or reception at one time (of course, that’s why you hire a second shooter as backup). Others, especially sports photographers, instead prefer 16GB or 32GB cards with room to spare. If you are shooting fast action at continuous frame rates, or transfer lots of photos to your computer with a speedy card reader, you might opt for the speediest possible memory card. I personally use 64GB 400X Compact Flash cards with my D800 (although 600X and 1000X are also available), paired with an SDXC with similar speed and capacity. Buy one (or two, or three) of your own and have your flash memory ready when you unpack your D800.
![]() Extra EN-EL15 battery. Even though you might get 1,000 or more shots from a single battery, it’s easy to exceed that figure in a few hours of shooting sports. Batteries can unexpectedly fail, too, or simply lose their charge from sitting around unused for a week or two. If you’re using the MB-D12 battery/vertical grip offered for the D800, you’ll definitely want an additional EN-EL15 battery. Buy an extra (I own four, in total), keep it charged, and free your mind from worry. Just don’t buy one of the defective “exploding” batteries that are involved in the recall!
Extra EN-EL15 battery. Even though you might get 1,000 or more shots from a single battery, it’s easy to exceed that figure in a few hours of shooting sports. Batteries can unexpectedly fail, too, or simply lose their charge from sitting around unused for a week or two. If you’re using the MB-D12 battery/vertical grip offered for the D800, you’ll definitely want an additional EN-EL15 battery. Buy an extra (I own four, in total), keep it charged, and free your mind from worry. Just don’t buy one of the defective “exploding” batteries that are involved in the recall!
![]() Nikon Capture NX 2 software. You can download a free try-out copy of this software from Nikon’s website, but if you want to use it after the free period expires, you’ll need to buy it.
Nikon Capture NX 2 software. You can download a free try-out copy of this software from Nikon’s website, but if you want to use it after the free period expires, you’ll need to buy it.
![]() Camera Control Pro 2 software. This is the utility you’ll use to operate your camera remotely from your computer. Nikon charges extra for this software, but you’ll find it invaluable if you’re hiding near a tethered, tripod-mounted camera while shooting, say, close-ups of hummingbirds. There are lots of applications for remote shooting, and you’ll need Camera Control Pro to operate your camera. Buy a suitably longer USB cable, too, unless you plan to use the Nikon WT4a wireless transmitter (described below).
Camera Control Pro 2 software. This is the utility you’ll use to operate your camera remotely from your computer. Nikon charges extra for this software, but you’ll find it invaluable if you’re hiding near a tethered, tripod-mounted camera while shooting, say, close-ups of hummingbirds. There are lots of applications for remote shooting, and you’ll need Camera Control Pro to operate your camera. Buy a suitably longer USB cable, too, unless you plan to use the Nikon WT4a wireless transmitter (described below).
![]() Add-on speedlight. One of the best uses for your Nikon D800’s built-in electronic flash is as a remote trigger for an off-camera speedlight such as the Nikon SB-910. Your built-in flash can function as the main light, diffused and used for fill, or dialed down in power so it has virtually no effect on the finished photo at all (other than triggering your remote flash units). But, you’ll have to own one or two (or more) external flash units to gain that flexibility. If you do much flash photography at all, consider an add-on speedlight as an important accessory.
Add-on speedlight. One of the best uses for your Nikon D800’s built-in electronic flash is as a remote trigger for an off-camera speedlight such as the Nikon SB-910. Your built-in flash can function as the main light, diffused and used for fill, or dialed down in power so it has virtually no effect on the finished photo at all (other than triggering your remote flash units). But, you’ll have to own one or two (or more) external flash units to gain that flexibility. If you do much flash photography at all, consider an add-on speedlight as an important accessory.
![]() Nikon GP-1 global positioning system (GPS) device. This accessory attaches to the accessory shoe on top of the Nikon D800 and captures latitude, longitude, and altitude information, which is imprinted in a special data area of your image files. The “geotagging” data can be plotted on a map in Nikon ViewNX or other software programs.
Nikon GP-1 global positioning system (GPS) device. This accessory attaches to the accessory shoe on top of the Nikon D800 and captures latitude, longitude, and altitude information, which is imprinted in a special data area of your image files. The “geotagging” data can be plotted on a map in Nikon ViewNX or other software programs.
![]() Power connector EP-5b/AC adapter EH-5b. There are several typical situations where this AC adapter for your D800 can come in handy: when you’re cleaning the sensor manually and want to totally eliminate the possibility that a lack of juice will cause the fragile shutter and mirror to spring to life during the process; when in the studio shooting product photos, portraits, class pictures, and so forth for hours on end; when using your D800 for remote shooting as well as time-lapse photography; for extensive review of images on your standard-definition or high-definition television; or for file transfer to your computer. These all use prodigious amounts of power, which can be provided by this AC adapter. (Beware of power outages and blackouts when cleaning your sensor, however!)
Power connector EP-5b/AC adapter EH-5b. There are several typical situations where this AC adapter for your D800 can come in handy: when you’re cleaning the sensor manually and want to totally eliminate the possibility that a lack of juice will cause the fragile shutter and mirror to spring to life during the process; when in the studio shooting product photos, portraits, class pictures, and so forth for hours on end; when using your D800 for remote shooting as well as time-lapse photography; for extensive review of images on your standard-definition or high-definition television; or for file transfer to your computer. These all use prodigious amounts of power, which can be provided by this AC adapter. (Beware of power outages and blackouts when cleaning your sensor, however!)
The EP-5b is the connector that fits in the battery compartment of either the D800 or the MB-D12 multi-power battery pack. It’s then connected to the EH-5b AC adapter. Note: The Nikon EH-5 and EH-5a AC adapters can also be used.
![]() Multi-power battery pack MB-D12. Lots of photographers consider this battery pack/vertical grip to be an essential item (I’m going to cover it in detail later in this book), but you must buy it as an extra. Unfortunately, it is delivered “bare,” with no extra power sources at all. You’ll need to purchase AA batteries (alkalines or rechargeables) for the supplied AA battery tray, or have an extra EN-EL15 battery to use this accessory. (I told you that you’d need that extra battery.)
Multi-power battery pack MB-D12. Lots of photographers consider this battery pack/vertical grip to be an essential item (I’m going to cover it in detail later in this book), but you must buy it as an extra. Unfortunately, it is delivered “bare,” with no extra power sources at all. You’ll need to purchase AA batteries (alkalines or rechargeables) for the supplied AA battery tray, or have an extra EN-EL15 battery to use this accessory. (I told you that you’d need that extra battery.)
![]() DR-4/DR-5 right-angle viewers. Fasten in place of the standard rubber eyecup and it provides a 90-degree view for framing and composing your image at right angles to the original viewfinder, useful for low-level (or high-level) shooting. (Or, maybe, shooting around corners!)
DR-4/DR-5 right-angle viewers. Fasten in place of the standard rubber eyecup and it provides a 90-degree view for framing and composing your image at right angles to the original viewfinder, useful for low-level (or high-level) shooting. (Or, maybe, shooting around corners!)
![]() DK-17M magnifying eyepiece. Provides a 1.17X magnification factor of the entire viewing area (unlike the 2X DG-2 eyepiece, which enlarges the center of the image), making it easier to check focus. You might have to move your eye around a little to see all the indicators outside the image frame, but this magnifier is still suitable for everyday use.
DK-17M magnifying eyepiece. Provides a 1.17X magnification factor of the entire viewing area (unlike the 2X DG-2 eyepiece, which enlarges the center of the image), making it easier to check focus. You might have to move your eye around a little to see all the indicators outside the image frame, but this magnifier is still suitable for everyday use.
![]() Eyepiece Magnifier DG-2. This magnifies the center of the scene only, helping you to focus more accurately.
Eyepiece Magnifier DG-2. This magnifies the center of the scene only, helping you to focus more accurately.
![]() Eyepiece Adapter DK-18. This adapter is required to attach the DG-2 magnifier or DR-4 right angle viewer to the D800’s eyepiece.
Eyepiece Adapter DK-18. This adapter is required to attach the DG-2 magnifier or DR-4 right angle viewer to the D800’s eyepiece.
![]() SC-28 TTL flash cord. Allows using Nikon speedlights off-camera, while retaining all the automated features.
SC-28 TTL flash cord. Allows using Nikon speedlights off-camera, while retaining all the automated features.
![]() SC-29 TTL flash cord. Similar to the SC-28, this unit has its own AF-assist lamp, which can provide extra illumination for the D800’s autofocus system in dim light (which, not coincidentally, is when you’ll probably be using an electronic flash).
SC-29 TTL flash cord. Similar to the SC-28, this unit has its own AF-assist lamp, which can provide extra illumination for the D800’s autofocus system in dim light (which, not coincidentally, is when you’ll probably be using an electronic flash).
Initial Setup
This section helps you become familiar with the three important controls most used to make adjustments: the multi selector and the main and sub-command dials. You’ll also find information on charging the battery, setting the clock, mounting a lens, and making diopter vision adjustments. If you’re comfortable with all these things, you’re ready for my Quick Start in Chapter 1 of this book.
Once you’ve unpacked and inspected your camera, the initial setup of your Nikon D800 is fast and easy. Basically, you just need to charge the battery, attach a lens, and insert a memory card. I’ll address each of these steps separately, but if you already are confident you can manage these setup tasks without further instructions, feel free to skip this section entirely. While most buyers of a D800 tend to be experienced photographers, I realize that some readers are ambitious, if inexperienced, and should, at the minimum, skim the contents of the next section, because I’m going to list a few options that you might not be aware of.
Mastering the Multi Selector and Command Dials
You’ll find descriptions of most of the controls used with the Nikon D800 in Chapter 2, which provides a complete “roadmap” of the camera’s buttons and dials and switches. However, you may need to perform a few tasks during this initial setup process, and most of them will require the MENU button and the multi selector pad. The MENU button is easy to find: it’s located to the left of the LCD monitor, the first button in the series of four located to the left of the LCD. It requires almost no explanation; when you want to access a menu, press it. To exit most menus, press it again.
The multi selector pad may remind you of the similar control found on many point-and-shoot cameras, and other digital SLRs. It consists of a thumbpad-sized button with projections at the North, South, East, and West positions, plus a button in the center. It can also be pushed in diagonal directions to give you Northeast, Southeast, Southwest, and Northwest orientations. (See Figure A.2.)
The multi selector on the D800 functions slightly differently than its counterpart on some other cameras. For example, some point-and-shoot models assign a function, such as white balance or ISO setting, to one of the directional buttons (usually in conjunction with a function key of some sort). The use of the multi selector varies, even within the Nikon dSLR line up. For example, some early Nikon digital SLRs (such as the Nikon D50/D70/D80) had no center button in the multi selector at all. Advanced Nikon cameras (including the D800) allow assigning a function of your choice to the multi selector center button.
With the D800, the multi selector is used extensively for navigation—for example, to navigate among menus on the LCD monitor or to choose one of the 51 focus points, to advance or reverse display of a series of images during picture review, or to change the kind of photo information displayed on the screen. The center button is used to select a highlighted item from a menu.
Figure A.2 The multi selector pad has four directional positions for navigating up/down/left/right, and a center button to confirm your selection.
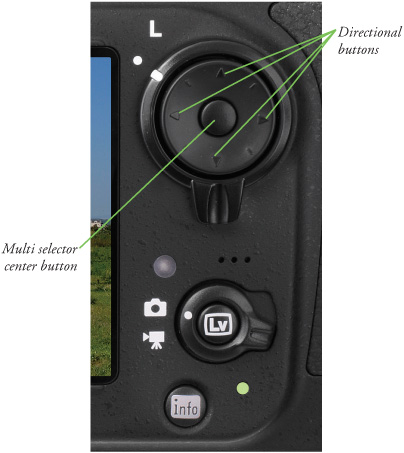
So, from time to time in this chapter (and throughout this book) I’ll be referring to the multi selector and its left/right/up/down buttons, and center button.
The main command dial and sub-command dial are located on the rear and front of the D800, respectively. The main command dial is used to change settings such as shutter speed, while the sub-command dial adjusts an alternate or secondary setting. For example, in Manual exposure mode, you’d use the sub-command dial to change the aperture, while the main command dial is used to change the shutter speed. (In both cases, the dial is “active” for these adjustments only when the D800’s exposure meter is On.) The meter will automatically go to sleep after an interval (you’ll learn how to specify the length of time in Chapter 12), and you must waken the camera (just tap the shutter release button) to switch the meter back on and activate the main and sub-command dials.
Setting the Clock
It’s likely that your Nikon D800’s internal clock hasn’t been set to your local time, so you may need to do that first. If so, the flashing CLOCK indicator on the top control panel LCD will be the giveaway. You’ll find complete instructions for setting the four options for the date/time (time zone, actual date and time, the date format, and whether you want the D800 to conform to Daylight Savings Time) in Chapter 13. However, if you think you can handle this step without instruction, press the MENU button, use the multi selector (that thumb-friendly button I just described, located to the immediate right of the back-panel color LCD monitor) to scroll down to the Setup menu, press the multi selector button to the right, and scroll down to Time Zone and Date choice, and press right again. The options will appear on the screen that appears next. Keep in mind that you’ll need to reset your camera’s internal clock from time to time, as it is not 100-percent accurate, unless you’re using the GP-1 GPS device and have specified Use GPS to Set Camera Clock to On in the Setup menu’s GPS entry.
Battery Included
Your Nikon D800 is a sophisticated hunk of machinery and electronics, but it needs a charged battery to function, so rejuvenating the EN-EL15 lithium-ion battery pack furnished with the camera should be your first step. A fully charged power source should be good for approximately 900 shots, based on standard tests defined by the Camera & Imaging Products Association (CIPA) document DC-002. Nikon’s own standards are quite a bit more optimistic (it predicts as many as 2,400 shots from a single charge). In the real world, of course, the life of the battery will depend on how much image review you do, how many shots you take with the built-in flash, and many other factors. You’ll want to keep track of how many pictures you are able to take in your own typical circumstances, and use that figure as a guideline, instead.
I always recommend purchasing Nikon brand batteries (for about $60) over less-expensive third-party packs, even though the $30 substitute batteries may offer more capacity at a lower price (some may even top the 1,900 mAh offered by the Nikon battery). My reasoning is that it doesn’t make sense to save $20 on a component for a $3,000-$3,300 camera, especially since batteries have been known to fail in potentially harmful ways. You need only look as far as Nikon’s own recall of these very batteries, which forced the company to ship out thousands of free replacement cells. You’re unlikely to get the same support from a third-party battery supplier that sells under a half-dozen or more different product labels and brands, and may not even have an easy way to get the word out that a recall has been issued.
If your pictures are important to you, always have at least one spare battery available, and make sure it is an authentic Nikon product.
All rechargeable batteries undergo some degree of self-discharge just sitting idle in the camera or in the original packaging. Lithium-ion power packs of this type typically lose a few percent of their charge every few days, even when the camera isn’t turned on. The small amount of juice used to provide the “shots remaining” figure on the top control panel when the D800 is turned off isn’t the culprit; Li-ion cells lose their power through a chemical reaction that continues when the camera is switched off. So, it’s very likely that the battery purchased with your camera is at least partially pooped out, so you’ll want to revive it before going out for some serious shooting.
Charging the Battery
When the battery is inserted into the MH-25 charger properly (it’s impossible to insert it incorrectly), a Charge light begins flashing, and remains flashing until the status lamp glows steadily indicating that charging is finished, in about 2.5 hours. You can use the supplied connector cable (at left in Figure A.3) or attach a handy plug adapter that allows connecting the charger directly to a wall outlet (as shown at right in Figure A.3). When the battery is charged, flip the lever on the bottom of the camera and slide the battery in, as shown in Figure A.4. Check the Setup menu’s Battery Info entry as I recommended earlier to make sure the battery is fully charged. If not, try putting it in the charger again. One of three things may be the culprit: a.) the actual charging cycle sometimes takes longer than you (or the charger) expected; b.) the battery is new and needs to be “seasoned” for a few charging cycles, after which it will accept a full charge and deliver more shots; c.) you’ve got a defective battery. The last is fairly rare, but before you start counting on getting a particular number of exposures from a battery, it’s best to make sure it’s fully charged, seasoned, and ready to deliver.
Figure A.3 Charge the battery before use.

Figure A.4 Insert the battery in the camera; it only fits one way.

Final Steps
Your Nikon D800 is almost ready to fire up and shoot. You’ll need to select and mount a lens, adjust the viewfinder for your vision, and insert a memory card. Each of these steps is easy, and if you’ve used any Nikon before, you already know exactly what to do. I’m going to provide a little extra detail for those of you who are new to the Nikon or SLR worlds.
Mounting the Lens
As you’ll see, my recommended lens mounting procedure emphasizes protecting your equipment from accidental damage and minimizing the intrusion of dust. If your D800 has no lens attached, select the lens you want to use and loosen (but do not remove) the rear lens cap. I generally place the lens I am planning to mount vertically in a slot in my camera bag, where it’s protected from mishaps, but ready to pick up quickly. By loosening the rear lens cap, you’ll be able to lift it off the back of the lens at the last instant, so the rear element of the lens is covered until then.
After that, remove the body cap by rotating the cap away from the release button. You should always mount the body cap when there is no lens on the camera, because it helps keep dust out of the interior of the camera, where it can settle on the mirror, focusing screen, interior mirror box, and potentially find its way past the shutter onto the sensor. (While the D800’s sensor cleaning mechanism works fine, the less dust it has to contend with, the better.) The body cap also protects the vulnerable mirror from damage caused by intruding objects (including your fingers, if you’re not cautious).
Once the body cap has been removed, remove the rear lens cap from the lens, set it aside, and then mount the lens on the camera by matching the alignment indicator on the lens barrel with the raised white bump on the camera’s lens mount. (See Figure A.5.) Rotate the lens toward the shutter release until it seats securely. Some lenses are trickier to mount than others, particularly telephotos and telephoto zooms with swiveling collars that allow the lens to be fastened to a tripod. You might need to rotate the collar so the tripod foot doesn’t bump into the front overhang of the D800’s prism.
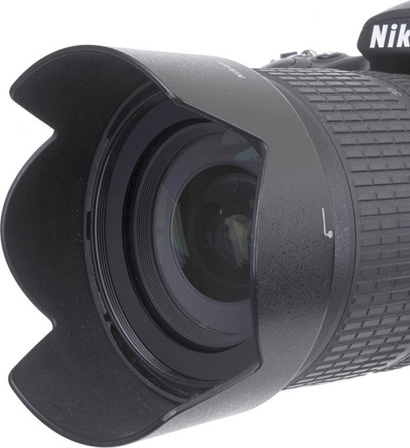
Set the focus mode switch on the lens to AF or M-AF (autofocus). If the lens hood is bayoneted on the lens in the reversed position (which makes the lens/hood combination more compact for transport), twist it off and remount with the “petals” (found on virtually all Nikon lens hoods) facing outward. (See Figure A.6.) A lens hood protects the front of the lens from accidental bumps, and reduces flare caused by extraneous light arriving at the front element of the lens from outside the picture area.
Figure A.5 Match the indicator on the lens with the white dot on the camera mount to properly align the lens with the bayonet mount.

Figure A.6 A lens hood protects the lens from extraneous light and accidental bumps.
DEALING WITH ERRORS
After you’ve mounted your lens properly (or think you have), you might find various error codes appearing on the control panel LCD, viewfinder, and back-panel color monitor. Here are the most common error codes, and what you should do next:
![]() FE E. This error code, with a smaller uppercase F followed by two Es indicates that you’ve mounted a lens that has an aperture ring, but haven’t set the lens to its smallest f/stop (usually f/22 or f/32). Nikon autofocus lenses with an aperture ring have a lock lever that allows you to set the minimum aperture and lock it there so that this problem doesn’t occur. However, you may have unlocked the aperture ring when you needed to set the aperture manually with the lens mounted on an older camera that didn’t allow setting the aperture electronically. Or, you might have mounted the lens on a non-autoaperture extension tube, bellows, or other accessory.
FE E. This error code, with a smaller uppercase F followed by two Es indicates that you’ve mounted a lens that has an aperture ring, but haven’t set the lens to its smallest f/stop (usually f/22 or f/32). Nikon autofocus lenses with an aperture ring have a lock lever that allows you to set the minimum aperture and lock it there so that this problem doesn’t occur. However, you may have unlocked the aperture ring when you needed to set the aperture manually with the lens mounted on an older camera that didn’t allow setting the aperture electronically. Or, you might have mounted the lens on a non-autoaperture extension tube, bellows, or other accessory.
![]() E r r. Some other error has taken place. Release the shutter, turn off the camera, remove the lens, and remount it. Try another lens. If the message persists, then there is a problem unrelated to your lens, and your D800 may need service.
E r r. Some other error has taken place. Release the shutter, turn off the camera, remove the lens, and remount it. Try another lens. If the message persists, then there is a problem unrelated to your lens, and your D800 may need service.
Adjusting Diopter Correction
Those of us with less than perfect eyesight can often benefit from a little optical correction in the viewfinder. Your contact lenses or glasses may provide all the correction you need, but if you are a glasses wearer and want to use the D800 without your glasses, you can take advantage of the camera’s built-in diopter adjustment, which can be varied from –3 to +1 correction. Press the shutter release halfway to illuminate the indicators in the viewfinder, then pull out and rotate the diopter adjustment dial next to the viewfinder (see Figure A.7) while looking through the viewfinder until the indicators appear sharp.
Figure A.7 Viewfinder diopter correction from –3 to +1 can be dialed in.
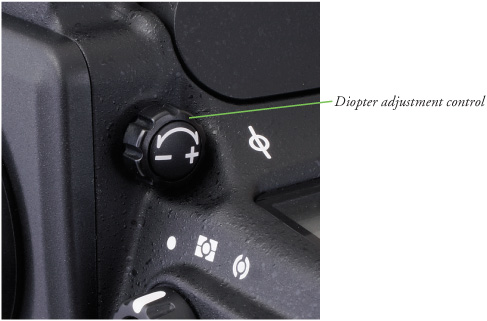
If more than one person uses your D800, and each requires a different diopter setting on the camera itself, you can save a little time by noting the number of clicks and direction (clockwise to increase the diopter power; counterclockwise to decrease the diopter value) required to change from one user to the other. Should the available correction be insufficient, Nikon offers Diopter-Adjustment Viewfinder Lens DK-17C for the viewfinder window, ranging from –3 to +2, at a cost of $15–$20 each.
Inserting a Memory Card
You’ve probably set up your D800 so you can’t take photos without a memory card inserted. (There is a Slot Empty Release Lock entry, Custom Setting f11 that enables/disables shutter release functions when a memory card is absent—learn about that in Chapter 12.) So, your final step will be to insert a memory card. Slide the door on the back right edge of the body toward the back of the camera to release the cover, and then open it. (You should only remove a memory card when the camera is switched off, or, at the very least, the yellow-green memory access light that indicates the camera is writing to the card is not illuminated.)
MORE ABOUT CSM OPTIONS IN CHAPTER 3
Chapter 3 suggests other “default” settings you might want to adjust before you get started. You’ll find a complete list of Custom Setting menu options and parameters in Chapter 12.
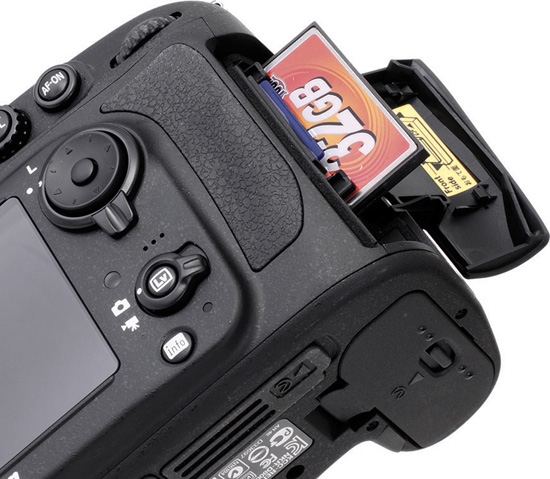
Inside, you’ll find a Compact Flash slot and an SD card slot. (See Figure A.8.) You can specify one of them as the Primary slot, and the other becomes the Secondary slot, with functions designated for each, as I’ll show you in Chapter 11. Insert either memory card with the label facing the back of the camera oriented so the edge with the contacts goes into the slot first. Close the door, and, if necessary, format the card. A Secure Digital card can be removed just by pressing it inward; it will pop out far enough that you can extract it. To remove the Compact Flash card, press the gray button at the bottom of the card chamber.
Figure A.8 The memory card in either slot is always inserted with the label facing the back of the camera.
Formatting a Memory Card
There are four ways to create a blank memory card for your D800, and two of them are wrong. Here are your options, both correct and incorrect:
![]() Transfer (move) files to your computer. When you transfer (rather than copy) all the image files to your computer from the memory card (either using a direct cable transfer or with a card reader, as described later in this chapter), the old image files are erased from the card, leaving the card blank. Theoretically. Unfortunately, this method does not remove files that you’ve labeled as Protected (by pressing the Protect button to the left of the LCD while viewing the image on the monitor), nor does it identify and lock out parts of your memory card that have become corrupted or unusable since the last time you formatted the card. Therefore, I recommend always formatting the card, rather than simply moving the image files, each time you want to make a blank card. The only exception is when you want to leave the protected/unerased images on the card for awhile longer, say, to share with friends, family, and colleagues.
Transfer (move) files to your computer. When you transfer (rather than copy) all the image files to your computer from the memory card (either using a direct cable transfer or with a card reader, as described later in this chapter), the old image files are erased from the card, leaving the card blank. Theoretically. Unfortunately, this method does not remove files that you’ve labeled as Protected (by pressing the Protect button to the left of the LCD while viewing the image on the monitor), nor does it identify and lock out parts of your memory card that have become corrupted or unusable since the last time you formatted the card. Therefore, I recommend always formatting the card, rather than simply moving the image files, each time you want to make a blank card. The only exception is when you want to leave the protected/unerased images on the card for awhile longer, say, to share with friends, family, and colleagues.
![]() (Don’t) Format in your computer. With the memory card inserted in a card reader or card slot in your computer, you can use Windows or Mac OS to reformat the memory card. Don’t! The operating system won’t necessarily install the correct file system. The only way to ensure that the card has been properly formatted for your camera is to perform the format in the camera itself. The only exception to this rule is when you have a seriously munged memory card that your camera refuses to format. Sometimes it is possible to revive such a corrupted card by allowing the operating system to reformat it first, then trying again in the camera.
(Don’t) Format in your computer. With the memory card inserted in a card reader or card slot in your computer, you can use Windows or Mac OS to reformat the memory card. Don’t! The operating system won’t necessarily install the correct file system. The only way to ensure that the card has been properly formatted for your camera is to perform the format in the camera itself. The only exception to this rule is when you have a seriously munged memory card that your camera refuses to format. Sometimes it is possible to revive such a corrupted card by allowing the operating system to reformat it first, then trying again in the camera.
![]() Setup menu format. To use one of the recommended methods to format a memory card, press the MENU button, use the up/down buttons of the multi selector (that thumb-pad-sized control to the right of the monitor) to choose the Setup menu (which is represented by a wrench icon), navigate to the Format Memory Card entry with the right button of the multi selector, choose which memory card to format (CF or SD), and select Yes from the screen that appears. Press OK to begin the format process.
Setup menu format. To use one of the recommended methods to format a memory card, press the MENU button, use the up/down buttons of the multi selector (that thumb-pad-sized control to the right of the monitor) to choose the Setup menu (which is represented by a wrench icon), navigate to the Format Memory Card entry with the right button of the multi selector, choose which memory card to format (CF or SD), and select Yes from the screen that appears. Press OK to begin the format process.
![]() Two-button format. The second recommended method requires no menus. Hold down the metering mode button (on top of the camera, just southwest of the shutter release button) and the trash can button (on the upper-left corner of the back) simultaneously for about two seconds. (A Format label [color-coded red] appears next to each button, as shown in the yellow boxes in Figure A.9.) The characters For and the exposures remaining displays will blink in the viewfinder and top control panel LCD. If you have memory cards inserted in both the Secure Digital card slots, Slot 1 will be selected. If you’d rather format the other card, rotate the main command dial to select that slot. Then press the pair of buttons again, and the D800 will format your card. To cancel the format, press any other button.
Two-button format. The second recommended method requires no menus. Hold down the metering mode button (on top of the camera, just southwest of the shutter release button) and the trash can button (on the upper-left corner of the back) simultaneously for about two seconds. (A Format label [color-coded red] appears next to each button, as shown in the yellow boxes in Figure A.9.) The characters For and the exposures remaining displays will blink in the viewfinder and top control panel LCD. If you have memory cards inserted in both the Secure Digital card slots, Slot 1 will be selected. If you’d rather format the other card, rotate the main command dial to select that slot. Then press the pair of buttons again, and the D800 will format your card. To cancel the format, press any other button.
Figure A.9 Hold down the buttons marked Format to initiate reformatting of a memory card.

The D800 provides a fairly accurate estimate of the number of shots remaining on the control panel at all times (even when the camera is turned off), as well as at the lower-right edge of the viewfinder display when the display is active. (Tap the shutter release button to activate it.)
It is only an estimate, because the actual number will vary, depending on the capacity of your memory card, the file format(s) you’ve selected, and the content of the image itself. (Some photos may contain large areas that can be more efficiently compressed to a smaller size.)
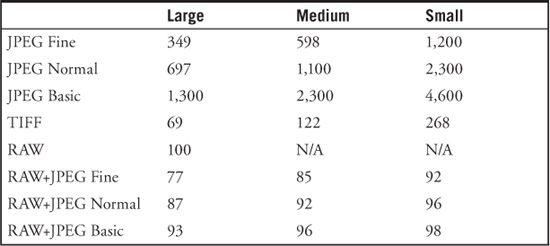
For example, an 8GB card can hold about 349 JPEG Fine shots in full resolution (Large) format; 697 shots using Normal JPEG compression; or 1,300 shots with Basic JPEG compression. When numbers exceed 1,000, the D800 displays a figure and decimal point, followed by a K superscript, so that 1,300 shots (or thereabouts) is represented by [1.3]K in the LCD and viewfinder. The D800 offers three different resolution settings that provide different numbers of exposures: Large (7360 × 4912; 24 megapixels), Medium (5520 × 3680; 20.3 megapixels), and Small (3680 × 2456; 9 megapixels). For example, JPEG Basic using the Small resolution setting yields 4.6K exposures on a single 8GB memory card!
Using RAW/NEF format (more on that later) reduces the number of shots. An 8GB card has enough room for about 100 RAW photos in Nikon’s NEF format (depending on the type of compression you choose, as described later) or just 77 pictures if you’re shooting RAW+JPEG Fine pairs. Table A.1 shows some typical capacities for an 8GB memory card. You should know that the D800 has various compression options for JPEG and RAW files, as well as 12-bit and 14-bit dynamic range settings for the RAW format; we looked into those options in more detail in Chapter 11.
Table A.1 shows the typical number of shots you can expect using 14-bit color depth and an 8GB memory card. (Hold down the QUAL button [the front button on the dial at the top-left edge of the camera] and rotate the main command dial to change the file/formats in column 1, and rotate the sub-command dial to change the image sizes in columns 2, 3, and 4). The current file format appears in the control panel along with the number of exposures possible with the current memory card.
At this point, your camera is set up and ready to shoot. You can move on to Chapter 1, where I show you how to make basic settings.
Table A.1 File Capacity of 8GB Card