
Key Terms
35mm
Angle of View
Aperture
APS-C (Advanced Photo System Type-C)
Camera RAW
Decisive Moment
Depth of Field
Digital Zoom
DSLR (Digital Single Lens Reflex)
EXIF (Exchangeable Image File Format)
Exposure
Exposure Modes
Exposure Triangle
F-Stop
Film Speed
Fisheye Lens
Flash
Focal Length
Focus Modes
Image Sensor
Image Stabilization
Imaging Chain
IPTC (International Press Telecommunications Council)
Iris
ISO
Landscape Mode
Lens
Macro Lens
Metadata
Metering Modes
Normal Lens
Optical Zoom
Photography
Portrait Mode
Prime Lens
Reciprocity Law
Red-Eye
Selective Focus
Shutter
Telephoto Lens
Tripod
White Balance
Wide-Angle Lens
Zoom Lens
There are always two people in every picture: the photographer and the viewer.
—Ansel Adams, photographer (1902–1984)
Chapter Highlights
This chapter examines:
- ■ How digital cameras are classified according to their operational features and intended uses
- ■ The imaging chain and each of its basic components
- ■ The variables affecting proper exposure of a digital image
- ■ The use of fully automatic, semi-automatic, and manual shooting modes
- ■ Strategies for storing, organizing, and managing digital image files
Photography
Photography is the process of fixing an image in time through the action of light. In traditional chemical processing, photographic images are created by exposing a light-sensitive emulsion on the surface of film to light in a controlled environment. While some people still shoot with film, the vast majority of the world has crossed over to digital photography, an electronic medium that renders pictures using a digital image sensor.
Digital photography offers instantaneous results, producing image files that are easily transferable, and adaptable, for a wide range of multimedia products (see Figure 10.1). The rapid adoption of digital cameras over the last decade can be attributed to many factors, including improvements in reliability and ease of use; better image resolution and print quality; higher-density storage solutions; and greater compatibility with computer hardware and software systems. Digital cameras come in three main varieties: consumer, prosumer, and professional. While the dividing line between each level is somewhat arbitrary, manufacturers use the terms to distinguish between low-, medium-, and high-quality equipment within a product line.

Figure 10.1
Photography is continuously evolving, both as an art and a science. While the traditional ways often seem archaic, they continue to provide high-quality images. Likewise, while contemporary ways may lack marginally in quality, they make up for it in alacrity and ease of postproduction. Pictured here (L–R), photojournalist Molly Bartles shoots with a professional-grade DSLR (digital single lens reflex) camera, as Chris Walker, a documentary photographer, is shown with his 80-year-old wooden 8 × 10. Each is a specific tool that, even in contemporary America, has its place.
Source: Chris Walker (left) and Josh Reuck (right).
Flashback
Kodak Corporation
Founded in 1880, Kodak Corporation pioneered the development of photographic film. Sadly, this legendary company filed for chapter 11 bankruptcy protection in January 2012 due to the rise in popularity of digital photography and the unavoidable demise of photographic film. The downward trend in film use culminated around 2005 when Kodak reported that digital sales accounted for 54% of annual revenue, exceeding film sales for the first time in company history. They have since stopped making digital cameras and now license their name to allow other companies to produce Kodak-branded cameras for the consumer marketplace. To survive, they sold off many of their patents to companies such as Adobe, Amazon, Apple, Google, Microsoft, and Samsung, just to name a few. While their film division currently lives on, it is a much smaller component of their corporate structure. Kodak emerged from bankruptcy a year and a half later in 2013, a much leaner company with a more narrowly defined focus on corporate printing and digital imaging solutions.
Consumer Cameras
At the lowest end of the consumer spectrum are point-and-shoot cameras designed for users with little to no background in photography. The point-and-shoot camera automatically determines the appropriate focus and exposure settings. Most of these cameras have a built-in flash and are largely menu-driven, with very few controls located on the camera body itself (see Figure 10.2).
Some consumers prefer the body style, features, and quality benefits of a digital single lens reflex (DSLR) camera over the scaled back point-and-shoot. In a DSLR, a mirror located behind the lens directs the image to an optical viewfinder, allowing the photographer to compose and focus a scene while viewing it through the lens (TTL). When the shutter is released, the mirror flips out of the way, allowing light entering through the lens to strike the image sensor. Experienced photographers prefer to compose through the lens because it’s more precise. Consumer-grade DSLR cameras normally have a permanently mounted lens, which, while usually much better than the lens on a point-and-shoot camera, may not be as good as that of a prosumer or professional lens. Regardless of the style, consumer cameras are designed for mass-market appeal and are engineered for size, portability, ease of use, and cost. They are not typically designed to give the user easy access to camera settings. The quality of these cameras has improved tremendously over the last decade. While one of the differences between consumer and prosumer digital cameras used to be the number of megapixels (the number of light-sensitive elements on the sensor, measured in millions), there is no longer as much difference, and it is not uncommon to find 10- and even 14-megapixel consumer-grade cameras. A high-resolution image from a 10-megapixel-camera will easily print up to an 11- by 14-inch image.

Figure 10.2
The Apple Store website ad from 2011 claimed that the iPhone 4S “just might be the only camera you’ll ever need.” While resolution is just one benchmark of picture quality, the fact that the iPhone iSight camera comes with an eight-megapixel image sensor is impressive. Why carry around a camera and a phone when one device now does the trick?
Source: http://www.apple.com.
Prosumer and Professional Cameras
The term prosumer is a blend of pro fessional consumer and refers to someone whose level of expertise and needs fall between that of the average consumer and the full-time professional. Prosumer cameras are typically DSLRs with interchangeable lenses, and they have larger and better quality image sensors than consumer cameras. They also allow the user greater and easier control of the camera, providing them with more versatility and greater control over image acquisition, particularly exposure control. Professional-grade cameras improve on these features, particularly lens quality and sensor size. In many cases the lenses and other accessories for professional and prosumer cameras by the same manufacturer are interchangeable, although as we’ll see in a bit, the lenses will behave differently when you switch from a prosumer’s smaller sensor to the larger full-frame sensor on a professional camera, which is roughly equivalent to 35mm film.
Video Cameras
While video technology will be discussed in more detail later on in chapter 13, it’s worth mentioning here that digital video cameras and digital still cameras share similarities in basic operation, including controls, shooting modes, and exposure settings. Because of this, many concepts in this chapter can be applied to the use and operation of video cameras. Given their innate similarities, it should come as no surprise that video cameras today often allow users to capture still images, while many still cameras allow photographers to shoot moving images and sound. As a general rule, however, it’s best to use a camera for the primary function it was designed for. Since a video camera is optimized for moving images and sound, it’s still image-processing capabilities and resolution options are generally not as good as a DSLR camera, though high-end video cameras such as the RED Digital Cinema Camera are an exception. Similarly, most still cameras are not ideal for capturing video, particularly from an audio perspective. As with many things, the best results come by choosing the right piece of equipment for the right job.
The Imaging Chain

The imaging chain of a digital camera is made up of four components: the lens, the iris, the shutter, and the image sensor (see Figure 10.3). The lens determines the field of view, or what the camera “sees.” The iris regulates the intensity of exposure. The shutter regulates the time of exposure, and the image sensor captures light and converts it into a digital signal. Photography is the art of manipulating these four components to achieve desired and intentional effects.
The Lens
In still cameras and video camcorders, the lens is an integrated optical system made up of one or more individual elements of ground glass or molded plastic. The lens is mounted on the front of the camera and is designed to capture and manipulate light reflected from objects in the camera’s line of sight. The lens controls the magnification of the subject being photographed and affects the sharpness and clarity of the image (see Figure 10.4).

Figure 10.4
One of the main features of a DSLR camera is interchangeable lenses, which come in many different sizes depending largely on their focal length.
Prime Lenses

Figure 10.5
Wide-angle lenses are often used to capture broad vistas, yielding images such as this one.
Source: Chris Walker.
Lenses with a single focal length are called prime or fixed focal-length lenses. With a fixed focal-length lens, the only way to affect angle of view is to physically change the distance between the camera and the subject. Serious photographers often own an assortment of prime lenses with a variety of focal lengths, enabling them to manipulate angle of view by simply swapping out the lens. Prime lenses are often classified into one of five main categories: wide-angle, telephoto, normal, novelty (macro and fisheye), and super-telephoto.
- ■ Wide-angle lenses have a relatively short focal length (18–35 mm for full frame, 12–24 mm for APS-C [Advanced Photo System Type-C]) resulting in the wide angle of view. Wide-angle lenses, or short lenses as they’re sometimes called, are often used for shooting landscape panoramas and vistas where the primary emphasis is on establishing a wide overview of the scene (see Figure 10.5).
- ■ Telephoto lenses have a long focal length (90–300 mm for full frame, 60–200 mm for APS-C) resulting in a very narrow angle of view. Telephoto lenses, or longlenses, can magnify distant objects, making them appear much closer than they really are (see Figure 10.6, left). These are the favorite lenses of bird watchers, sports photographers, and naturalists for obtaining close-up shots of a subject from a distance.
- ■ Normal lenses have a medium focal length (40–60 mm for full frame, 28–40 mm for APS-C) resulting in an angle of view that falls somewhere in between the extremes of wide-angle and telephoto. Normal lenses are a safe bet for general-purpose shooting activities that do not require extreme close-ups or wide shots of the subject matter.
- ■ Novelty lenses have descriptive names like macro and fisheye and feature unique optical characteristics designed for atypical shooting situations.
- ■ Macro lenses can acquire focus when positioned only a few inches away from the subject. Macro lenses produce high-quality images with low image distortion and are useful for shooting extreme close-ups of small objects like insects or flower blossoms (see Figure 10.6, right).
- ■ Fisheye lenses have an extremely short focal length (8–15 mm for full frame, 11 mm or less for APS-C), offering an angle of view as high as 180 degrees. However, because of the extreme curvature of glass, images acquired with a fisheye lens are significantly distorted, which results in an interesting hall of mirrors–type effect.
- ■ Super-telephoto lenses (400–600 mm for full frame) yield the narrowest angle of view while offering extremely high levels of image magnification.

Figure 10.6
Because of their magnification, telephotos and macros are more likely than other lenses to add camera shake to your image. To help avoid this, a good starting point is to convert the lens’ focal length into a fraction and use that as a shutter speed—a 200 mm lens would become 1/200th, so it should be handheld at 1/250th or faster.
Source: Chris Walker.
Zoom Lenses
A zoom, or variable focal-length lens, can be adjusted to any focal length within a set optical range. For example, using a zoom lens with a range of 28–300 mm, the focal length can be set to wide-angle (28 mm), telephoto (300 mm), or anywhere in between. Zoom lenses allow the photographer to quickly change the angle of view without having to swap out the lens. With this type of lens, the photographer zooms in to acquire a narrow angle of view and zooms out to compose a wide shot. The zoom ratio indicates the magnification capability of a variable focal-length lens. For example, a 3× or 3:1 zoom ratio means the size of the image at the longest focal length setting (telephoto) is three times greater than the size of the image at the shortest setting (wide-angle). High-quality zoom lenses are very expensive. While their optical quality is generally inferior to that of prime lenses, the speed and convenience of zooming can be a worthwhile tradeoff. Zoom lenses are included on most point-and-shoot still cameras as well as on all consumer, prosumer, and professional video cameras.
Optical versus Digital Zoom Digital cameras with built-in lenses are often equipped with both an optical zoom and a digital zoom. An optical zoom alters the angle of view internally by changing the actual focal length of the lens elements. Since the lens on most point-and-shoot cameras is relatively small, it’s often difficult to achieve a high level of image magnification optically. To compensate, manufacturers have an added feature called digital zoom. With digital zoom, the image sensor creates the zoom artificially, much like enlarging a digital image in a photo-editing program. The outer portion of the image is cropped (the pixels are thrown away) and the remaining pixels are enlarged and/or duplicated to simulate the effect of a narrower angle of view. Using a digital zoom can lead to a noticeable loss of image quality and detail.
Iris
The iris is an adjustable plastic or metal diaphragm that regulates the amount of light striking the image sensor (see Figure 10.7). The iris is typically located between the optical elements of the lens. When shooting images that are dimly lit, the iris can be opened up to allow more light to pass through to the image sensor. For brightly lit subjects, the iris can be constricted or “stopped down” to reduce the intensity of the light and keep the image from being overexposed. The term aperture is sometimes confused with the iris, but it refers to the actual hole or opening created by the iris and not to the device itself; when people talk about adjusting the aperture, they are usually talking about adjusting the iris to change the size of the aperture.

Figure 10.7
An iris is typically comprised of a series of metal blades that collapse or expand to form a circular opening inside the lens through which light passes. This hole in the iris is called the aperture.
Source: Chris Walker.
Shutter
The shutter is a movable curtain, plate, or other device that controls the amount of time the image sensor is exposed to light. When the shutter button is depressed, the shutter opens for an instant of time, allowing light to strike the surface of the image sensor. The amount of time the shutter remains open is referred to as shutter speed and can commonly range from 1/8,000th of a second to several full seconds. Fast shutter speeds in the neighborhood of 1/250th or 1/500th of a second are good for freezing action in a well-lit scene (see Figure 10.8). Much slower shutter speeds are required when shooting under low-light situations.
Image Sensor
A digital camera’s image sensor is a small electronic chip used to register the intensity and color of light. It is the digital equivalent of “film,” the light-sensitive recording medium used in a traditional analog camera. Light passes through the lens and aperture before striking the surface of the image sensor. The visual data obtained by the sensor is converted into binary form and stored on a flash memory card in the camera body. The image sensor eliminates the need for film and allows the digital photographer to electronically manipulate the size and appearance of a captured image by varying the control settings of the camera.

Figure 10.8
The exposure time for this image was approximately 1/1,000th of a second. Faster shutter speeds are available on all DSLRs, but it’s fairly rare to use them.
Source: Chris Walker.
Sensor Size
For years, 35 mm reigned as one of the most popular photographic film formats for SLR (single lens reflex) cameras, both for amateurs and professional photographers alike. The physical dimensions of a 35 mm film frame are 36 × 24 mm. As manufacturers began developing digital cameras, they adopted these dimensions as a baseline measure by which to conform and compare the physical size of electronic image sensors. A full-frame image sensor is so named because it perfectly mirrors the dimensions of 35 mm film (36 × 24 mm). Professional DSLRs almost always use a full-frame sensor or a variant of the Advanced Photo System Type-C format. APS-C sensors are considerably smaller than full-frame sensors and vary slightly in size by manufacturer and camera model. Cheaper DSLRs, compacts, and smartphone cameras are equipped with progressively smaller sensors. As a rule, the smaller the camera is, the smaller the image sensor will be. For example, the iPhone 6, released in 2014, uses a one-third-inch sensor that measures a mere 4.80 × 3.60 mm (see Figure 10.9).

Figure 10.9
The one-third-inch image sensor built into Apple’s iSight camera (iPhone 5/6) is extremely small in comparison to the full-frame sensor of a Nikon D3X and the APS-C sensor of the less expensive Canon 70D. Typically, the larger the image sensor the more expensive and higher quality the camera is likely to be.
Tech Talk
Focal Length Multiplier The size of the image sensor determines the angle of view that can be achieved with any particular lens. All things being equal, larger sensors offer a wider angle of view than smaller ones. If you attach a lens designed for 35 mm film to anything other than a full-frame DSLR, you will observe a noticeable difference in the angle of view when shooting with an equivalent focal length. How much of a difference? It depends on the focal length multiplier. The terms crop factor and focal length multiplier (FLM) are interchangeable terms and concepts that were developed to help photographers quantify the effects of using full-frame lenses with APS-C sensors.
Table 10.1 The Relationship of Focal Length to Angle of View
| Lens Type | Focal Length, Full Frame/APS-C | Angle of View |
| Fisheye | 8–15mm/less than 11mm | Up to 180° |
| Wide-Angle | 18–35mm/12–24mm | 90° to 54° |
| Normal | 40–60mm/28–40mm | 48° to 33° |
| Telephoto | 70–300mm/60–200mm | 28° to 7° |
| Super-Telephoto | Greater than 400mm/200mm | 6° to 4° |
If you were to use a full-frame lens on an APS-C format camera set to the same focal length, the resulting image would appear cropped, thus producing a narrower angle of view. As an example, a normal lens for a full-frame camera is usually a 50 mm, while a normal lens for an APS-C format DSLR is around a 35 mm. This difference in performance is the focal length multiplier (FLM). Most prosumer cameras have an FLM between 1.4 and 1.6. To use the FLM, multiply the lens’ actual focal length by the FLM to see what its full-frame equivalent would be. In the prior example, a 35 mm lens on a camera with a 1.4 FLM is the same as a 49 mm (essentially a 50 mm) lens on a full-frame camera.
By conforming the full-frame sensor dimensions to 35mm film, manufacturers saved professional photographers a considerable amount of angst. They would not be forced to retire their inventory of perfectly good lenses when transitioning to a digital camera body or have to modify their composition techniques because trusted lenses no longer performed as expected.

Figure 10.10
In this image, the lens used to make the original 4 × 5” version was a 90 mm, which translates to wide-angle on a large-format camera. But as the highlighted boxes illustrate, that same lens would render a “normal” angle of view when attached to a medium format camera and a close-up view when used on a DSLR.
Source: Chris Walker.
Image Resolution
The resolution of a digital camera or still image is determined by how many pixels the image sensor can produce. For example, the Canon PowerShot G16 is a 12-megapixel camera that, when set to its highest resolution, can produce a 4000 × 3000 pixel image. This is called native resolution because the camera is using all the pixels on the image sensor to produce the image. As the photographer, you can change the capture settings to a lower resolution such as 1600 × 1200 or 640 × 480. In response, the camera will use only a designated portion of the pixel array to form the image.
Image Encoding and Compression
On consumer cameras, images are recorded using the popular JPEG compression codec. JPEG compression reduces the amount of space required to record an image to the memory card as well as the time it takes for the camera to process sensory data once the picture is snapped. Prosumer and professional cameras also support JPEG encoding, but both usually also provide the option of saving images in uncompressed formats like TIFF or Camera RAW. While these formats produce files that are significantly larger, they offer the advantage of preserving most or all of the original sensor data.
The Camera RAW format records a completely unprocessed version of the image as obtained by the sensor at the point of exposure. Professional photographers prefer the RAW file format because it allows them to retain maximum control of image processing during editing. JPEG and TIFF formatted files are processed prior to encoding, limiting the type of adjustments that can be made in image editing. Camera RAW is a proprietary standard that requires special software or plug-ins from the camera manufacturer in order to edit the image. While Camera RAW is a technically superior format, TIFF and JPEG images are much easier to work with, and their quality is acceptable for the vast majority of multimedia applications.
While the number of options varies by model and manufacturer, most digital cameras allow you to specify the amount of compression you want to apply to a JPEG image. For example, Canon offers three choices called normal, fine, and superfine. As the name implies, superfine produces the highest quality image by applying the smallest amount of compression. There’s a dramatic difference between the file size of an image acquired at the smallest resolution and lowest quality JPEG setting and those at the highest quality setting. For example, if you take a picture with Canon EOS Rebel XS set to its lowest resolution (1936 × 1288) and JPEG setting, the resulting image file will be around 700 KB. The same image taken with the camera set to midrange resolution (2816 × 1880) and medium JPEG setting would yield a file of around 1.2 MB. If you were to use the highest resolution (3888 × 2592) and JPEG setting, the file would be around 3.8 MB. Switching the high-resolution setting to RAW bumps the file size up to almost 10 MB. As you can see, it’s important to pay attention to the settings you use. Keeping a camera set to the highest resolution and best JPEG setting is normally a good choice, although using RAW offers advanced users more flexibility. See Figure 9.14 in the “Graphics” chapter for another example of how changing the resolution and JPEG setting affects image file size and the total number of images a memory card can store.
Flashback
The Decisive Moment
For photographers who work on location, the two most important factors in image making are being there and knowing how to capitalize on the situation once you are. In terms of timing, Magnum photographer/founder Henri Cartier-Bresson (1908–2004), considered by many to be the father of photojournalism, believed in the latter with such conviction that he revived the term “the decisive moment” from the writings of a 17th-century French cardinal.
Photographically, the decisive moment is that instant when an action is at its peak, when it’s stronger than it was the moment before or will be the moment after; it’s that singular, perfect, narrow window of time in which the shutter should be released to best depict the emotion of an event. The strength of this moment can be seen through anticipation, through the alignment of compositional elements, or in peak action (see Figure 10.11).
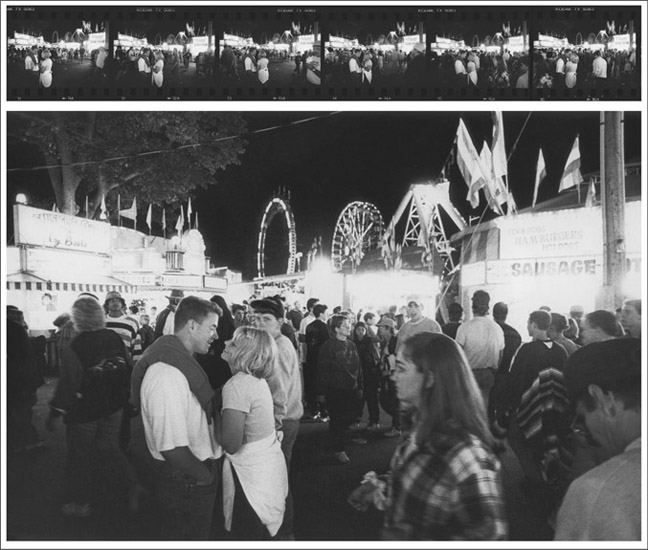
Figure 10.11
In this set of images, the photographer came upon a couple at a county fair who were arguing. In the first of the 10 photographs (not shown) the young man is yelling at his girlfriend, who’d disappeared for an hour. In the final frame, the couple kissed. The first images held more aggression than desired, and the final seemed overtly sappy, so the ninth image, which held the anticipation of making up, became the chosen photograph in the sequence.
Source: Chris Walker.
It took more than 100 years of photography for the term to be needed, but less than half that for it to become obsolete. In the early years of photography, images were exposed over a period of minutes—so timing was far less important than the photographer’s location and composition were. Today we find that technology—the force that, through faster shutter speeds, once created the need for Bresson’s statement—has brought us to a point in history where photographers no longer need to exercise such decisiveness in their timing.
Through the ability to extract still images from video, we will soon be freed from the necessity of precision timing, from the need to depress the shutter at the precise moment an action is at its zenith. Almost as retribution, though, we must now further challenge ourselves to be even more decisive in our selection of focal length, depth of field, and composition.
by Chris Walker
Exposure
A digital camera creates a picture by exposing the image sensor to light. Underex-posed images have a dark appearance and lack detail while overexposed images often contain bright spots and appear washed out. One of the most important tasks of the photographer is managing the exposure settings of the camera during image acquisition. Exposure is the product of two variables: the intensity of light (as controlled by the iris) and the duration of contact with the image sensor (as controlled by the speed of the shutter). This relationship, the reciprocity law, states that there is an inverse relationship between intensity and time and can be expressed mathematically as:
Exposure = Intensity × Time
For example, setting the shutter speed to 1/250th and the aperture to f/8 results in the same exposure level as a setting of 1/125th at f/11 or 1/500th at f/5.6. In this example, doubling time while reducing the aperture by one full stop has the same negligible effect on exposure as halving the time of exposure while increasing the aperture by one full stop. As long as a change to one of the two variables is matched by a reciprocal change in the other, exposure remains constant.

Figure 10.12
Light bending as it passes through a lens or small opening is nothing new. The Chinese philosopher Mo Ti first noted this phenomenon 7,000 years ago when viewing images of a solar eclipse being projected on the ground through leaf gaps in overhead trees. So whether it’s film, an image sensor, your hand, or a white card for viewing an eclipse, the only magic here lies in what we do with this fantastic medium.
Source: Chris Walker.

Figure 10.13
Left: This image was shot at 1/60th at f/22. Right: This one was shot at 1/1,000th at f/5.6. The overall amount of light striking the camera’s sensor was virtually the same in each image, but the slower exposure time resulted in the image with the blurred ball.
Source: Chris Walker.

Figure 10.14
Correct exposure can only be accomplished in the camera, but Photoshop and other programs allow for some adjustments to be made in postproduction. In the center frame, the Photoshop tool Curves was accessed and highlights and mid-tones were elevated. For the bottom image, the History Brush was used to return the area surrounding the lamp to its original tone, then Curves was again employed to add some magenta to the final color palate.
Source: Chris Walker.
Measuring Light Intensity
Digital cameras have a built-in exposure meter that measures incoming light as it’s reflected off objects in the camera’s field of view. An exposure meter is an electronic instrument with a light-sensitive cell that’s activated by partially depressing the camera’s shutter button. When the camera is in an automatic shooting mode, the shutter and aperture settings will be set by the camera based on the meter’s assessment of light intensity. The way a camera assesses the light intensity of a scene can vary. Most cameras offer a choice of three different metering methods in order to compensate for different lighting scenarios.
Evaluative Metering Mode
With evaluative metering, the camera samples the intensity of light at multiple points in the image matrix and then combines the results with other camera data to determine the best exposure setting. Evaluative metering is the default method used on most cameras because it produces the best overall results, especially for scenes that are unevenly lit.
Center-Weighted Metering Mode
Center-weighted metering is identical to the evaluative mode except that more weight is given to data from the center of the image when calculating the exposure settings. This method is recommended for scenes in which the main subject is backlit or surrounded by bright background objects.
Spot Metering Mode
With spot metering, the camera calculates exposure based on the light intensity of the main subject located in the center of the screen. Spot metering is best for high-contrast scenes with varying levels of brightness.
Great Ideas
Flash Control
Using the flash allows you to provide additional fill light for scenes where existing lighting is less than ideal. The range of a flash varies by manufacturer, but most are designed to work within 15 feet of the camera. Be careful when using a flash as it may wash out your image. Don’t use a flash unless you really need it. Many cameras allow you to change the output of a flash incrementally from 100% (full), to 75%, 50%, 25%, and off. This feature is helpful when you want to remain close to the subject without overexposing the image or momentarily blinding your subjects. With most cameras, you normally have the option of selecting from a number of different flash modes.
- ■ Fill flash (always on): In this mode, the camera fires the flash every time, even when the exposure meter indicates a sufficient level of natural light. Using a fill flash outdoors on a sunny day can help compensate for excessively bright sunlight, harsh shadows, and uneven backlighting (see Figure 10.15).
- ■ Auto flash: In this mode, the camera meters the available light and only fires the flash when needed. Limiting the use of the flash helps conserve battery power.
- ■ Red-eye reduction: In this mode, the red eyes caused by the reflection of the flash off the retina of the eye is reduced. When the flash is set to red-eye reduction mode, the camera fires a short burst of light followed by the actual flash. The short burst is intended to shut down the pupil of the eye, thus minimizing the kickback of reflected light. The closer the flash is to the lens, the more prone a camera is to producing red-eye. On professional cameras, the flash is farther away from the lens than on built-in systems and can often be detached and repositioned. In addition to controlling red-eye with the flash, you may also be able to reduce it by using a wide-angle lens, increasing the amount of existing lighting, or by moving the camera closer to the subject. In a worst-case scenario, you may be able to remove it using photo-editing software.

Figure 10.15
Images made in direct sunlight can often benefit from a little judicious fill flash. The objective of using fill flash is to “fill” in the shadowed areas that may be too dark without it. Using too much fill, though, can unnaturally set your subject apart from the background. A good starting point is to set your flash to −1. If you’re using a non-dedicated unit, try setting the ISO to a higher setting—either way, the flash will get the message that you desire less light on your scene than what it might want to give you.
Source: Chris Walker.
The Exposure Triangle
The term exposure triangle is widely used by photographers to refer to the three primary components of a camera system that a photographer adjusts to control exposure: 1) aperture, 2) ISO, or film speed, and 3) shutter speed (see Figure 10.16). These three settings interact with each other—so when you change one variable, you often have to change another to compensate. The combined values of all three parameters are represented numerically as the exposure value (EV). The larger the aperture, the more light strikes the image sensor and the greater potential there will be for acquiring shallow depth of field. Increasing the ISO increases the light sensitivity of the image sensor (an advantage in low-light situations), but the image becomes noisier or grainier. And finally, the more you increase shutter speed, the greater detail you can achieve when shooting fast action but the more light you will need for achieving proper exposure. Professional photographers know how to manually adjust these controls and often prefer to do so in order to obtain a desired look or effect when shooting. A photographer can also choose to relegate control of these settings to the camera’s exposure metering system by shooting in a completely automatic or semi-automatic mode.

Figure 10.16
This illustration of the exposure triangle shows the relationship between ISO, shutter speed, and aperture, and how all three variables interact to achieve the exposure value for each shot.
Source: http://www.exposureguide.com; illustrator: Vic Costello.
Aperture
On professional lenses, the aperture is adjusted by turning the innermost ring on the outside of the lens housing. A series of f-stop numbers are printed on the outside surface of the ring, indicating the size of the aperture. While shown as a whole number, an f-stop unit is actually a fraction used for calculating the physical diameter of the aperture. For example, an f-stop setting of f/16 means the diameter of the aperture is equal to 1/16th the focal length of the lens (see Table 10.2). To calculate the aperture of a 50 mm lens set to f/16, you would use the following formula:
focal length/f-stop number = aperture diameter
50 mm/16 = 3.125 mm
Typical f-stop positions include: f/32, f/22, f/16, f/11, f/8, f/5.6, f/4, f/2.8, f/2, and f/1.4, although you typically won’t find a single lens that covers the entire range. Because the f-stop number is a fraction, the size of the aperture actually decreases as the f-stop number increases.
Table 10.2 Diameter of the Aperture Obtained by Dividing the Focal Length of the Lens by the f-stop number
| Focal Length of the Lens | |||
| f-stop number | 18 mm | 50 mm | 300 mm |
| 2.8 | 6.429 mm | 17.857 mm | 107.143 mm |
| 4 | 4.500 mm | 12.500 mm | 75.000 mm |
| 5.6 | 3.214 mm | 8.929 mm | 53.571 mm |
| 8 | 2.250 mm | 6.250 mm | 37.500 mm |
| 11 | 1.636 mm | 4.545 mm | 27.273 mm |
| 16 | 1.125 mm | 3.125 mm | 18.750 mm |
| 22 | 0.818 mm | 2.273 mm | 13.636 mm |
Opening the aperture by one full f-stop (e.g., changing from f/11 to f/8) doubles the size of the aperture and the amount of light striking the image sensor. Likewise, closing the aperture by one full stop (e.g., changing from f/1.4 to f/2) reduces the size of the aperture and the amount of incoming light by half. Some lenses allow the aperture to be adjusted in half-stop or third-stop increments for even greater control of light exposure.
Aperture strongly influences the relative amount of depth of field in a shot. To achieve shallow depth of field, use a low f-stop setting (wide aperture requires less light). To achieve great depth of field in a shot, use a higher f-stop setting (smaller opening requires more light).
ISO
One of the challenges of digital photography is that much of the terminology is rooted in film. One of the best examples of this is the continued use of the ISO Film Speed system. Originally based on a film’s ability to respond to light, the ISO rating is now used to describe a sensor’s ability to respond to light. The ISO designation follows a logarithmic scale, which means that each jump to a higher ISO number results in a doubling of the film’s light sensitivity (see Table 10.3). This corresponds nicely to the f-stop scale, which works in precisely the same manner. All things being equal, increasing film speed by one ISO level has the same effect on exposure as opening the aperture by one full stop. As film speed increases, however, the sharpness and clarity of an image decreases, and your image will have a grainier, or “noisier,” appearance (see Figure 10.17). For the cleanest images, it’s best to shoot with the lowest possible film speed setting. Unless you choose to manually override the ISO setting of the camera, your camera will usually set your film speed automatically based on lighting conditions, flash settings, and other selected exposure settings.

Figure 10.17
Electronic and analog media share many characteristics, including the degradation of image quality at higher ISOs. As the enlarged view illustrates, the discrepancies between ISOs 200 and 3200 are quite apparent. As technological improvements continue to be made, the distance in quality between low and high ISOs continues to shorten.
Source: Chris Walker.
Table 10.3 A Comparison of ISO to Light Sensitivity, Image Contrast, and Graininess
| ISO Film Speed Rating | Light Sensitivity | Contrast | Image Grain |
| 50 ISO | low | very high | low |
| 100 ISO | medium | high | medium |
| 200 ISO | medium | medium | medium |
| 400 ISO | high | medium | high |
| 800 ISO | very high | low | very high |
Shutter Speed
Shutter speed influences how motion is captured by the image sensor. Use slower shutter speed when subject motion is minimal, the light level is low, or you purposely want to create a motion blur effect (see Figure 10.18). Use a faster shutter speed when shooting fast-moving subjects, in settings with plenty of light, or when purposely trying to freeze action without compromising image clarity.

Figure 10.18
A motion blur was achieved in this image by following the taxi cab in motion using a slow shutter speed.
White Balance
Our perception of colored objects in the natural world is affected by the type of light source used to illuminate them. Most light sources are not “true white” but rather an uneven mix of the primary color frequencies (red, blue, and green). For example, we know that under certain atmospheric conditions, the physical color of reflected sunlight can appear red, orange, white, yellow, or blue (see Figure 10.19). In the same way, there are many different types of artificial light sources (fluorescent, halogen, tungsten, etc.), each with its own unique color properties. Light sources are rated according to their color temperature on the Kelvin scale, so named for the British physicist William Thomson, 1st Baron Kelvin of Largs (1824–1907) (see Table 10.4).
While the human eye adjusts rather easily to variations in light, electronic image sensors must be calibrated to the color temperature of the light source they are exposed to in order to accurately capture the color of objects within the field of view. This process of calibration is called white balance. The white balance of a camera can be set manually by shooting a white object such as a blank sheet of paper while depressing the manual white balance button. Once a camera “sees” what white looks like under existing light, it can extrapolate the values of all of the other colors in the spectrum. Manual white balance is the most accurate way of calibrating the color space of a digital camera, especially when the source of light is mixed, such as an indoor scene with natural light pouring in from an open window. Keep in mind, though, that you must redo the white balance calibration each time the lighting condition in which you’re shooting changes.
Digital cameras often provide white balance presets for several of the most common lighting conditions, including daylight and cloudy for outdoor situations and tungsten and fluorescent for indoors. However, if you forget to change a white balance preset when moving from one light source to another, the color of your newly acquired images will not be true (see Figure 10.20). For this reason, many people take the easy way out and just leave the camera set to auto white balance (AWB).
By now, we’ve become used to the fact that digital cameras include automatic settings for just about every control. While AWB works reasonably well in most cases,

Figure 10.19
This scene was shot late in the day under clear skies. The blue could have been natural had the exposure been longer, but the longer exposure would have caused the drifting fog to blur, so a bluish filter was used to emphasize the blue light while allowing an exposure time that still showed individual wisps of fog.
Source: Chris Walker.
Table 10.4 The Color Temperature of Common Indoor and Outdoor Lighting Sources (Kelvin Units)
| Color Temperature | Light Source |
| 1600 K | sunrise and sunset |
| 1800 K | a candle |
| 2800 K | tungsten lamp (ordinary household incandescent bulb) |
| 3200 K | studio lamps, photofl oods |
| 4000 K | indoor fl uorescent |
| 5200 K | bright midday sun |
| 5500 K | average daylight, electronic flash |
| 6000 K | lightly overcast sky |
| 6500 K | heavily overcast sky |
| 7000 K | outdoor shade |
| 8000 K | hazy sky |
| 20000 K | deep blue clear sky |
Source: http://en.Wikipedia.org.

Figure 10.20
Quality lighting is vital to good photography. In this comparison, the sequence of three images on the left were made at different times of the day; note that the brickwork on the building is reddest during the noon exposure and shifts as the day goes on due to the amount of blue, ambient light coming from the sky. In the images on the right (top to bottom), the windsurfer was shot moments after dawn, during “the golden hour”; the woman at the wood rack was shot at dusk, where you can see the sky light (blue) mixing with a mercury-vapor light coming from the left (green) and tungsten light from her patio and home (orange); the street festival image was balanced for the fluorescent lights in the background, but it also contains “bug lights” within the corn booth (yellow) and high pressure sodium lights from overhead (amber).
Source: Chris Walker.
you can usually get better results by using a white balance preset based on the type of light you are working with or by manually white balancing your camera.
Focus
The focus control is used to define the sharpness of an object within the frame by changing the distance between the optical elements of a lens. A camera’s focus must be reset each time the distance between the camera and the subject physically changes. Holding the camera steady while depressing the shutter button will prevent unintentional blurring of the image upon capture.
Autofocus (AF)
When a camera is set to autofocus mode, it analyzes the area of a scene and then calculates the distance between the camera and the main subject. Point-and-shoot cameras normally use an active autofocus method in which an invisible infrared beam scans objects located within 25 feet of the lens. The camera computes subject distance by analyzing the time it takes for the light to be reflected back to the camera. DSLRs typically use a passive autofocus technique that’s much more sophisticated and usually more accurate. With this approach, the camera uses a small sensor, called a charge-coupled device (CCD), to detect and analyze changes in the contrast of image pixels. Active autofocusing systems can be used in virtual darkness as they provide their own focusing light. Passive systems must have a sufficient amount of light and image contrast in order to work effectively.
AF Target Point
By default, autofocus is usually set to a single target point located in the center of the image. When the main subject is positioned in the center of the frame, this works well. Simply set the focus and snap the image. However, a different focusing strategy must be employed when the subject is placed in an off-center position. With most cameras, this involves the following steps: 1) place the main subject in the center of the screen; 2) acquire and lock the focus by depressing the shutter button halfway; 3) reframe the main subject in an off-center position; and 4) fully depress the shutter button to capture the image. Many cameras provide options for acquiring focus with user-select, single-spot, or multi-spot target points.
While active and passive autofocusing systems have improved dramatically over the years, neither method is foolproof. At some point, autofocus will let you down as the camera miscalculates the proper focus setting. Problems are likely to occur in the following situations:
- ■ When near and distant objects are mixed close together within the frame, the camera may be unable to determine which object in the composition to focus on.
- ■ Moving objects like cars and bikes can confuse the autofocus sensor, causing a focus shift at the point of acquisition.
- ■ Extremely bright lights or subject areas can make it difficult for the camera to lock onto a subject and acquire focus.
- ■ Monochromatic scenes can lack the contrast necessary for acquiring an accurate focus.
Selective Focus
Photographs are two-dimensional. They only have width and height. We infer depth based on visual clues, which can be created using a range of lighting, exposure, and focus techniques. Selective focus is a popular technique used by photographers to heighten the interest of an otherwise ordinary composition. Using selective focus, only one primary element in a scene is sharply in focus. The rest of the background and/or foreground elements of the scene are blurred, creating a sense of compositional depth (see Figure 10.21, right).
Manual Focus (MF)
On professional cameras with interchangeable lenses, focus can be acquired manually by rotating the innermost ring on the circumference of the lens. Turning the ring in either direction changes the sharpness of the image. On less expensive cameras, manual focus will be either unavailable or controlled through the use of a menu or button. The viewfinder usually displays an MF or AF as a reminder of which mode is currently active. Manual focus should be used whenever you are located more than 25 feet away from the subject or whenever the camera is unable to isolate the subject or acquire focus automatically.
Depth of Field
Depth of field (DOF) refers to the area of a scene in front of and behind the main subject that is in focus. The term great depth of field is used to describe a photograph where the majority of the scene is sharply defined (see Figure 10.21, left). Shallow depth of field describes an image where noticeable portions of the foreground and/or background areas of a scene are out of focus (see Figure 10.21, right).

Figure 10.21
These images were made almost identically, with the only changes being the shutter speed and aperture. The aperture changes each in a way that alters its success through directing the viewer’s gaze. While neither is necessarily “right,” the image with less depth of field seems more successful, since in the one with greater depth the decoy’s bill seems to be competing for attention with the tools in the background.
Source: Chris Walker.
Photographers will sometimes manipulate DOF to emphasize the focal point of a composition through visual contrast. Background elements can often steal attention away from the main subject in a photograph. For example, when an image is taken of a person positioned directly in front of a tree or wall, the subject and the background appear to merge. The lack of three-dimensional depth creates a flat image lacking in visual contrast. Decreasing DOF in a scene such as this deemphasizes the visual importance of the background by drawing the attention of the viewer to the portion of the scene that is in focus. In some cases, the photographer will use an exceptionally shallow depth of field, blurring the background to the point that it may be all but unrecognizable. In photography, this effect is often referred to as bokeh (BOH-ka), from a Japanese term meaning blur or haze.
The factors affecting DOF in an image are rather complex and would require more time than we have to go into here. In the simplest terms, it can be said that DOF is largely affected by three main variables: 1) the size of the lens aperture or f-stop setting; 2) the focal length of the lens; and 3) the distance from the camera to the subject.
Aperture Size
The size of the aperture is inversely related to the DOF of an image. As the size of the aperture decreases, DOF increases, causing more of the scene to appear in focus. As the aperture is enlarged, DOF decreases, creating greater contrast between foreground and background objects. In a brightly lit scene, the aperture is normally small, making it more difficult to acquire shallow depth of field. In situations like this, a larger aperture setting can be obtained by zooming in or by increasing the camera’s shutter speed or decreasing the film speed (see Figure 10.22).
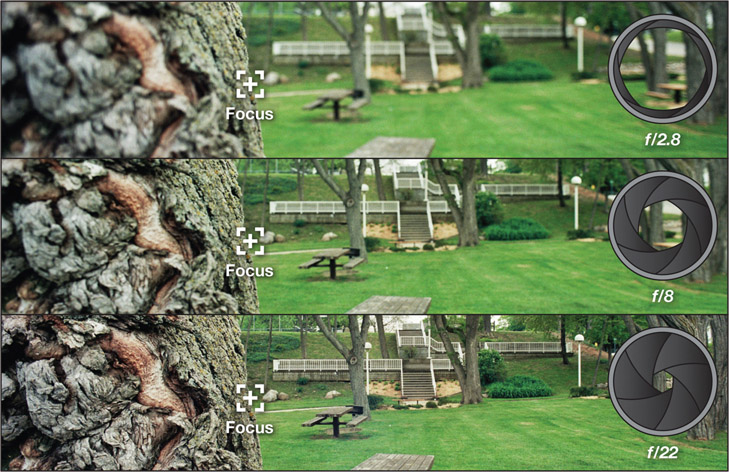
Figure 10.22Depth of field is the front-to-back distance within a scene that appears to be in focus because of the aperture at which the image was made. In this comparison, the top image, shot at f/2.8, exhibits very shallow depth of field, while the bottom image, shot at f/22, exhibits maximum depth of field.
Source: Adam Bulgatz.
Focal Length
The focal length of the lens is also inversely related to DOF. As you zoom in on an image, the focal length of the lens increases while DOF decreases. For this reason, wide-angle shots such as landscapes and vistas often have a great depth of field, while narrow-angle shots acquired with a telephoto lens often have a shallow depth of field.
Subject/Camera Distance
The physical distance between the camera and the subject is the third variable affecting DOF in a composition. DOF increases with distance and decreases as you move the camera physically closer to the subject.
Exposure Modes
Digital cameras feature a variety of exposure modes designed for many of the most common shooting conditions. The exposure mode options vary by camera, but they normally span a range from fully automatic, where control of image exposure is retained entirely by the camera, to fully manual, where the photographer assumes command of all exposure settings. A number of semi-automatic modes exist in between the two extremes, allowing the photographer and camera to share control of exposure settings.
Automatic Modes
Fully Automatic Mode
When set to fully automatic mode, a camera will analyze the area of a scene and calculate the settings for shutter speed, aperture, ISO, white balance, focus, and flash. Depending on the quality of the camera, shooting in auto mode can produce good results under normal lighting conditions most of the time. While shooting in auto mode makes the camera easier to operate, it significantly reduces the photographer’s role in the creative process.

Figure 10.23
On many DSLRs, the exposure mode can be quickly changed using a rotating dial such as this on the top of the camera.
Portrait Mode
In portrait mode, the exposure controls of the camera are optimized for shooting close-ups with a shallow depth of field. The objective in this mode is to keep the subject in focus while blurring the background. The camera accomplishes this by raising the shutter speed in conjunction with widening the aperture. Portrait mode works best when the subject is tightly framed and there is considerable distance between the subject and the background. Shallow DOF is always more difficult to achieve when the subject is placed directly against the background.
Landscape Mode
Landscape mode is the opposite of portrait mode. In this mode, the exposure settings of the camera are optimized for shooting wide shots with a great depth of field. The objective in landscape mode is to keep as much of the scene as possible in focus. To accomplish this, the camera combines a small aperture with a slower shutter speed. As a result, in some cases, you may need to use a tripod to maintain a steady shot.
Sports Mode
Sports mode, or action mode, as it’s sometimes called, favors a fast shutter speed and is recommended for shooting a moving subject within a scene. When capturing moving subjects during a bike race or soccer game, for example, a fast shutter speed is required in order to freeze the image without blurring. If the shutter speed is too slow, a motion blur will occur. When composing an action scene, a dramatic effect can be achieved by panning the camera along with the moving subject while depressing the shutter button. This technique produces a sharply defined subject while creating an intentional motion blur in the background (see Figure 10.24).

Figure 10.24
Sports mode is useful for stopping action and having enough depth of field left to make your images sharp. But sometimes it’s good to experiment and “pan” a few frames. Panning is the process of selecting a slow shutter speed, such as 1/8th or 1/15th, and triggering the shutter while following the action. This method is not for the impatient; photographers who succeed at panning learn early on to shoot hard and edit harder.
Source: Chris Walker.
Night Mode
Night mode uses a slow shutter speed combined with the flash when shooting a subject set against a dimly lit backdrop like a sunset or evening sky. The long exposure time allows the details of the background to remain correctly exposed during the firing of the flash to illuminate the subject. A tripod should be used in order to prevent unintentional blurring.
Tech Talk
Stitching Mode Stitching mode is used for acquiring a sequence of shots that can be joined together in editing to create a high-resolution segmented panorama (see Figure 10.25). After taking the first picture in stitch mode, the camera provides a split screen view of the previous shot and the currently framed scene to help you align the end of one frame with the beginning of the next. Many smartphone cameras and compacts offer a panorama mode to achieve a similar outcome. Instead of shooting multiple segmented images of a scene and stitching them together later in editing, your camera creates a single image on the fly as you pan slowly across the scene during exposure. Shooting in panorama mode is easy and can produce good results under the right conditions. However, it isn’t really the same thing and can often lead to unintended visual artifacts. When done well, stitching produces more professional results without visual artifacts because much more original image data goes into the formation of the panorama.

Figure 10.25
Stitching mode can be used to take a series of photos that will be loaded into Photoshop, or an internal camera program, to “stitch” them together. The key to success lies in overlapping your images—between a third and a half of the area of the previous—so the computer can read the design of one image as it prepares to lace it together with the next one in the series. This stitched image, a tiny courtroom where Lincoln practiced law, is a composite of six vertical photos.
Source: Chris Walker.
Semi-Automatic Modes
Aperture Priority Mode
In aperture priority mode, the photographer determines the f-stop setting manually while the camera sets the remaining exposure variables. The main purpose of using this mode is to control for depth of field in a scene. However, unlike portrait or landscape modes, the photographer retains total control of the aperture.
Shutter Priority Mode
In shutter priority mode, the photographer sets the shutter speed while the camera sets all the remaining exposure variables. This mode is used when the photographer wants to retain precise control of exposure time. For example, when shooting a waterfall, a slow shutter speed can be set in order to accentuate motion by blurring the water while the surrounding area of the scene remains sharp (see Figures 10.26 – 10.28). Using a fast shutter speed on the same scene can result in the effect of suspended droplets of water hovering in midair for heightened effect.
Program Mode
Some cameras offer a program mode setting in which the camera determines the correct settings for aperture and shutter speed while allowing the photographer access to other controls like ISO, white balance, flash, and so on.
Manual Mode
In full manual mode, the photographer has control of all the camera’s exposure settings and related controls. While this mode requires the most skill and knowledge, it also allows for the greatest degree of creative control.

Figure 10.26
Shutter priority mode allows the photographer to choose a shutter speed and leaves it up to the camera’s programming to choose the appropriate aperture. For this rainy afternoon, the shutter speed was approximately 12 seconds and the aperture was f/32.
Source: Chris Walker.

Figure 10.27
The length of exposure needed for this image ultimately gives the illusion of clouds or fog mingling among the rocks below. In reality, though, it’s the frothy heads of crashing waves that have been rendered softly over the course of the 20-minute exposure, cumulatively being gathered as they blur and overlap on a single piece of film.
Source: Chris Walker.
Image Stabilization

Figure 10.28
By opting for a lengthy exposure, the water was allowed plenty of time to blur—about a minute—while the photographer’s luck held out and very little wind stirred the leaves in the foreground.
Source: Chris Walker.
Tripods, monopods, and other camera-mounting devices are used in still photography and video production to keep the camera stable when shooting and are covered in greater depth in chapter 13. Even the slightest move ment of the camera during acquisition can result in a fuzzy image or a distracting visual shift when using a video camera. The potential for shakiness increases when the camera is set to a slow shutter speed and/or to a long focal length. Therefore, it’s critical to stabilize the camera in low-light conditions or in situations where you are not close to the subject. In video production, shooting from a tripod should be considered the norm rather than the exception. Random or unmotivated camera movements are one of the telltale signs of an amateur production. While using a tripod adds another degree of difficulty to a production setup, having stable shots makes it worth the effort. In situations where using a tripod is not possible, you can help the situation by moving closer to the subject, adjusting the lens to a wide-angle setting, and supplementing existing light, particularly if it is a bit dark.
Video cameras often include a feature called optical image stabilization (OIS) that works by shifting the pixel matrix in the direction of camera movement in order to counteract the effects of camera motion. While it may work well under certain conditions, it is a digital effect, and its use can lead to the creation of unintended visual artifacts, making it a poor substitute for using a tripod.
Solid-State Memory Cards
The images captured by a digital camera are usually stored on a removable solid-state memory card. These cards can best be thought of as a temporary storage solution for digital images until they can be downloaded to a computer or transferred to a more secure location. Since the beginning of digital photography, a variety of different card formats have been introduced, leading to a confusing myriad of storage options. Since the cards are not interchangeable, it’s important to know what type of flash memory card your camera uses and what capacity it supports.
The CompactFlash (CF) card format was introduced by SanDisk Corporation in 1994 and features a footprint that’s a bit smaller than a matchbook and weighs only half an ounce. You can find CF memory cards in a range of storage capacities, including some that will hold over 100 GB of data.
The Secure Digital (SD) card format was developed jointly by Matsushita, SanDisk, and Toshiba and was released in 2000. SD cards are roughly half the size of CF cards and come in three main categories (according to storage capacity) as defined by the SD Association standards and specifications. Standard Memory Cards (SD) are the oldest and cheapest and have a capacity up to 2 GB. High-Capacity Memory Cards (SDHC) provide for data storage above 2 GB up to a maximum of 32 GB. Extended Capacity Memory Cards (SDXC) are rated above 32 GB up to a maximum of 2 TB (see Figure 10.29). Be careful, though, as older SD cameras and devices usually cannot use the newer SDHC or SDXC formats. Some devices, particularly mobile phones, use smaller versions of these SD formats under the labels miniSD, microSD, miniSDHC, microSDHC, and microSDXC.
SD cards are also rated for speed, primarily to help consumers know which cards are appropriate for video recording (see Table 10.5). SD Speed Class standards were established by the SD Association to support video recording to flash memory cards. The higher the SD classification number, the faster the speed of the card. When shooting video with a DSLR or video camera, be sure to consult the manual for the type of card to use. Class 2 cards are fine for general-purpose photography and standard-definition video recording but are limited in terms of capacity. Cards with a Class 4, 6, or 10 rating are designed for high-definition video recording. Class 10 is recommended for use with professional video cameras. UHS-1 and UHS-3 offer the best speed performance for professional HD and ultra HD production workflows.

Figure 10.29
Since 2000, when SD cards were first introduced, their capacity and speed have steadily increased. Because they vary so much in terms of format and class, be sure to read the fine print on the label to ensure you are getting the best card your device can support.
Source: SanDisk.
Table 10.5 SD Card Speed Class Standards
| Mark | Minimum Writing Speed | Application | |
| Speed Class | Class 2 | 2 MB/s | Digital photography and standard video recording (SD) |
| Class 4 | 4 MB/s | HD and Full HD video recording | |
| Class 6 | 6 MB/s | ||
| Class 10 | 10 MB/s | Full HD video and HD still image continuous shooting | |
| UHS Speed Class | UHS-1 | 10 MB/s | |
| UHS-3 | 30 MB/s | 2K and 4K video recording |
Source: http://www.sdcard.org.
The MultiMediaCard (MMC) format was launched by Siemens AG and SanDisk in 1997. MMCs come in three different sizes, with the smallest version roughly the size of a postage stamp. SD has largely supplanted MMC in most new devices.
Sony developed the Memory Stick (MS) in 1998 as a proprietary format for their line of multimedia products. The Memory Stick Duo (MS Duo) is a variation of the MS, which is smaller in size.

Figure 10.30
For today’s young generation of digital photographers who’ve never shot with film, the idea of manually loading a spool of 35 mm film into an analog camera must seem rather odd and old-fashioned. By comparison, inserting a solid-state memory card is a virtual “no-brainer.”
Transferring and Managing Images
Most cameras made today have a USB port built into the camera for connecting directly to a computer to download images. Assuming that all the necessary hardware drivers are installed, your computer should automatically recognize a camera connection as soon as the cable is attached, the power is turned on, and the camera is placed in playback mode. If you have a computer with a built-in SD card reader, you can avoid cables altogether by removing the card from the camera and inserting it directly into the computer. In recent versions of Windows, connecting a camera should trigger the AutoPlay dialog box to open, which will present you with options for viewing, selecting, and downloading images from the camera’s memory card to an attached hard drive. In Mac OS X, the default imaging software, iPhoto or Photos for OS X, will launch once a camera or SD card is detected, providing you with similar options as AutoPlay. Unless you specify a different location, both Windows and Mac systems will store your downloaded images by default in the Pictures library of the currently logged-in user. Likewise, both operating systems provide users with the option of manually downloading images from the camera (or memory card) to a designated folder or storage drive that is attached to the computer locally or remotely via the cloud or network connection.
Digital Image Management
Most people download images to a computer giving very little thought as to their location, organization, or potential retrievability. Without proper care, the My Photo or Pictures folder can quickly resemble the overstuffed family shoebox that’s

Figure 10.31
With each photograph, the camera gathers a significant amount of information, called metadata, that gets stored in the image file. In addition to a complete list of camera settings, some models even gather GPS data, allowing photographers to later identify locations or revisit them for subsequent shoots.
Source: Chris Walker.
Metadata Every time an image is captured and saved by a digital camera, nonpicture information about the image is recorded and saved to the file header. This information is called metadata and includes things such as the date and time of image acquisition, the camera make and model number, image size, and values for exposure settings such as aperture, shutter speed, focal length, ISO, and, in some cases, GPS (Global Positioning Sys tem) data. Most cameras today encode metadata using an international standard called the Exchangeable Image File Format (EXIF). Nearly all image-editing programs are capable of displaying EXIF metadata. In Photoshop, selecting File>File Info opens up a dialog window containing access to EXIF metadata along with a number of blank entry fields the photographer can use to attach more descriptive details to an image file (see Figure 10.31). Be careful about metadata. It often embeds a thumbnail of the original image that is not necessarily modified when you modify the actual image. This means that if you erase something from the image, it may still be visible in the thumbnail. If your camera has a GPS, you need to know that the GPS data is included in the image—something that is common on GPS-enabled smartphones. While software can use this information to help sort your images, it also means someone can easily find out where you took the image. Think before you release your images.
In 1979, the International Press Telecommunications Council (IPTC) developed a more extensive set of labeling attributes to give photographers the ability to add descriptive details about the origins and subject matter of an image to the file header. IPTC headers include a variety of informational fields such as object name and title; the city, state, and country of origin; credits; subject category, image caption, and keywords; and special instructions. Professional photographers, digital media producers, and large media organizations typically rely on some type of asset management system for logging, storing, and retrieving digital image files according to embedded IPTC metadata. Programs like Canto Cumulus and Extensis Portfolio provide a visual interface for logging images with IPTC tags, making it possible for content producers to locate and retrieve matching files using keywords and user-specified search criteria.
filled willy-nilly with 20 years of old photographs. And with digital images, the virtual shoebox is likely to become a cluttered mess all the more quickly. In order to effectively organize and manage an image library, the photographer should take the time to: 1) properly assign a descriptive name to each image file; 2) store related sets of images in topical subfolders; and 3) modify the metadata fields of an image file to include details about the picture’s origins and subject matter. While this may seem like busywork, it is not. Asset management is an incredibly important part of any multimedia endeavor and invariably leads to a better workflow.
Renaming Images
Digital cameras usually assign rather meaningless names to image files. Renaming your image files is one of the first and most important things you can do to bring a sense of order and uniformity to a collection of related images. Programs such as Adobe Bridge and Apple’s Aperture can help automate this process. When you rename the files, consider using a standard prefix for related images. For example, for a group of photos taken of Beth on her birthday in 2006, you could use beth_ bd06_ as the prefix. As discussed in chapter 7, “Web Design,” use lowercase names if you plan to use the images online. Similarly, use an underscore instead of a space when you want to separate the character elements in a file name. After establishing the prefix, you need to make the remaining part of the file names sequential. This is where using a program to automate the process really helps. In some cases, you may be able to use part of the file name generated by the camera. This is very helpful for preserving the chronological order of the collection.
Image Folders
Try to avoid the habit of storing all your digital images in a single master folder. As your image library grows, the folder will swell, and it will become increasingly difficult for you to navigate such a large collection of files in one location. A better method is to use subfolders to store related sets of images. Some of the same naming strategies we’ve discussed so far can be applied to the naming of image sub-folders. Sorting images into subfolders according to project or client name, subject name, or event title will help alleviate a great deal of confusion and expedite locating image assets.
Chapter Summary
A digital camera is one of many tools a multimedia producer can use to create visual assets for a project. The more knowledgeable you are about the imaging process, the more creative freedom you will be able to exercise during the acquisition of digital pictures. This chapter has focused primarily on the mechanical aspects of digital photography by discussing the operational function of imaging components and the management of exposure controls. As the photographer, the degree to which you retain control during the exposure process is determined by which shooting method or mode you adopt. In fully automatic mode, the camera retains total control of all the exposure variables. In manual mode, the photographer has more latitude and creative freedom but must also possess greater skill and knowledge about the camera, its operation, and intentional outcomes.