
Key Terms
Advanced Audio Coding (AAC)
Advanced Video Coding (AVC)
AIFF (Audio Interchange File Format)
Audio Compression
AVCHD
Bit Depth
Bit Rate
Codec
Container Format
Dolby Digital (AC3)
DVD Video
Encoding
File-Based Recording
Follow Focus
FWIGSS
H.264/H.265
High-Definition Television (HD)
ISO/IEC/ITU (International Organization for Standardization/International Electrotechnical Commission/International Telecommunication Union)
Motion Pictures Experts Group (MPEG)
MP3
MPEG-1
MPEG-2
MPEG-4
Neutral Density Filter
Open Standard
Panasonic P2 Memory Card
Professional Disc
Pulse-Code Modulation (PCM)
Quantization
QuickTime
Rack Focus
Record Format
Red Book Standard
Red Digital Cinema
Sample Rate
Sony SxS Memory Card
Ultra-High-Definition Television (Ultra HD)
Video Compression
Videotape
WAV (Waveform Audio File Format)
Zebra
The current saturation of relatively inexpensive multimedia communication tools holds tremendous potential for destroying the monopoly of ideas we have lived with for so long … A personal computer can be configured to act as a publishing house, a broadcast-quality TV studio, a professional recording studio, or the node in an international computer bulletin board system.
—Mark Dery, author and cultural critic (1993)
Chapter Highlights
This chapter examines:
- ■ The evolution of analog and digital videotape recording formats
- ■ The transition from tape-based recording formats to file-based recording formats
- ■ Open and proprietary standards for encoding digital audio and video files
- ■ The difference between compressed and uncompressed audio and video file formats
- ■ FWIGSS—six basic camcorder settings everyone should understand
At some point in your multimedia endeavors you may find yourself having to operate a digital audio recorder or camcorder to record an interview or event. At the very least, you will be tasked to work with media file formats with strange looking extensions such as .wav, .aif, .mp3, .mov, .m4v, etc. and will be expected to know what they are and what to do with them. As the first of four chapters dealing with our final topic of time-based media, this chapter seeks to establish a foundation. Some of the questions we will tackle include: How are video images and audio signals recorded and stored as media files? What is the difference between a media container format and a codec? How do I know which recording format and settings to choose when my camera or audio recorder offers so many selections? Chapter 12 focuses on audio production and the equipment and techniques used for sound acquisition. Chapter 13 covers video production while chapter 14 wraps up the section with the topic of editing and motion graphics.
Legacy Television Recording Formats
In the early days of television broadcasting, programs were produced and transmitted simultaneously. During a “live” production, the audience would see the on-screen performance as it was carried out in real time, most likely in a remote television studio far away. Recording technologies, like videotape, that have long been associated with television and video production were not invented until long after television was established as a viable commercial enterprise.
Ampex Corporation invented the world’s first open-reel audio tape recorder in 1948. Dubbed the Model 200, it was used by the American Broadcasting Company (ABC) for the tape-delayed transmission of The Bing Crosby Show. The event went down in history as the first tape-delayed broadcast of a radio program in the United States. It took Ampex another eight years to release the first commercial videotape recorder, the VRX-1000 (or Mark IV), which they introduced at the National Association of Radio and Television Broadcasters’ convention in Chicago in 1956.

Figure 11.1
The popular children’s program Howdy Doody was telecast by NBC from 1947 to 1960. Prior to the invention of video recording, programs like this one were produced and transmitted “live” to the home television audience.
Videotape
Unlike motion picture film, the frame and track regions on a magnetic tape are invisible to the human eye. But just because you can’t see them doesn’t mean they don’t exist (see Figure 11.2). For recording purposes, videotape is divided into four tracks. The video track is the widest region and is used to store the picture portion of a television program. Videotape also contains two audio tracks. These audio tracks can be used in tandem for recording one two-channel stereo signal or separately for recording two monaural feeds. For example, in a two-person interview, the microphone input from Person A can be recorded to one track while the signal from Person B is routed to the second one.
The fourth region of a videotape is designated as the control track. To understand the purpose of the control track, it is helpful to draw a comparison to motion picture film. Film contains two lines of sprocket holes along each edge of the filmstrip. As a film is projected, moving gear-like wheels engage the sprocket holes to advance each frame of film to the next. The sprocket holes keep the film aligned and moving at the appropriate speed. Like film, videotape is in constant motion during record and playback modes. As the video and audio signals are recorded to tape, an electronic synch pulse is written to the control track to mark the location of each video frame. U.S. broadcast video systems traditionally generate 30 frames of picture information every second. The control track marks where these frames begin and end in order to ensure the videotape plays correctly.

Figure 11.2
The surface area of a videotape is divided into linear regions called tracks. Most tape-based formats include one track for video, two tracks for audio, and one track for synchronization or control data.
Analog Tape Formats
The 1970s ushered in the era of electronic news gathering (ENG) and electronic field production (EFP) with the invention of the camcorder and a variety of consumer and professional videocassette tape formats such as VHS and U-matic. A chief disadvantage of analog tape formats was the problem of generation loss, which would occur whenever a program was copied from one tape to another. Since most editing at that time was performed machine to machine—basically through systematic dubbing from one videotape recorder (VTR) to another—generation loss was a pervasive concern. A copy of an analog tape was never as good as the original it was dubbed from. While in a first-generation dub (a copy of the original), the quality loss might not be too noticeable; signal degradation would get progressively worse with each additional dub to the next generation. Thus, a fourth-generation dub (a copy of a copy of a copy) looked far worse than one that was reproduced directly from the original.
Digital Tape Formats
The 1980s was marked by the digital revolution, which dramatically changed the nature of broadcast technologies and production workflows. Digital recording offered numerous advantages over earlier analog methods, but perhaps none was greater than the elimination of generation loss during editing and duplication. Digital VTRs recorded video and audio signals as discrete binary values that could be copied without error from one tape to the next. A data point was either a zero or a one, which meant that a copy of a copy of a copy would be virtually identical to the master recording every time.
All of the legacy analog formats and early digital formats recorded only in standard definition NTSC (National Television Standards Committee; 720 × 486) or PAL (Phase Alternating Line; 720 × 576). It wasn’t until the mid- to late 1990s that professional high-definition (HD) tape formats became available, and initially, they were very expensive formats to work with. As an alternative to full-bandwidth HD formats such as D5HD and HDCAM, manufacturers discovered a way to record a low-resolution version of HD (1440 × 1080) on standard DV tape—a digital video tape format that sold for a fraction of the cost. This hybrid format, called HDV, appealed to many people working in the prosumer and educational markets and remained quite popular until the advent of high-definition file-based recording.

Figure 11.3
Tape formats are not interchangeable. The professional VTR on the left was designed specifically for use with Digital Betacam tapes, a format that is incompatible with the VHS recorder pictured right.

Figure 11.4
Over the years, videocassette tapes were produced in many different formats and sizes. Here, the full-size version of a Sony Betacam SP tape (purple) is compared to Panasonic’s DVCPRO (yellow) and the popular consumer format MiniDV (red).
Flashback
Timeline of Professional Videotape Formats
Analog Tape Formats
1971 U-matic 3/4-Inch
The Japanese consortium of Sony, JVC, and Matsushita (Panasonic) pioneer a new era of electronic news gathering (ENG) with their joint release of the U-matic videotape recording format. U-matic, better known as 3/4-inch, gave field producers the first viable alternative to a film-based production workflow.
1982 Sony Betacam and Panasonic M
Sony introduces Betacam, the first component video format designed specifically for professional use. In response, Panasonic releases the M format (or Recam). Both of these component formats used a new narrower tape medium that was only one-half inch thick. The M format proved largely unsuccessful.
1986 U-matic SP
Sony releases U-matic SP (for Superior Performance), which used chrome tape and enhanced signal processing to produce a better picture. It remained, however, a composite videotape format. U-matic is regarded as one of the most successful and longest lasting video formats of all time.
1986 Betacam SP and MII
Sony and Panasonic upgrade their professional line of recording formats with the release of Betacam SP and MII (pronounced m-two). While MII fared better than its predecessor (the failed M format), Betacam SP grew to become the dominant professional tape format throughout the 1990s.
Digital Standard-Definition Tape Formats
1986 D1
Sony and BTS bring the first digital tape format to market. Dubbed D1, the format provided a way for broadcasters to digitally write an uncompressed component NTSC video signal to tape. Unfortunately, D1 was a costly and inefficient format and had limited success.
1988 D2
Ampex and Sony introduce D2, the first digital tape format to be widely accepted by professional users.
1991 D3
Panasonic releases the D3 format. D3 decks were able to write uncompressed composite video to a one-half-inch-wide tape, the narrowest yet for a professional digital format.
1993 Digital Betacam
Sony unveils Digital Betacam (or Digibeta). Whereas their first attempt to design a digital component recorder proved a dismal failure, Digibeta proved a great success.
1994 D5
Panasonic introduces D5 for recording uncompressed digital component SD video.
1996 Betacam SX
Sony releases Betacam SX, a cheaper version of Digital Betacam specifically designed for those working in ENG.
Digital High-Definition Tape Formats
1994 D5HD
Panasonic introduces a high-definition companion product to D5.
1997 HDCAM
Sony releases HDCAM as a high-definition version of Digital Betacam, with the ability to record 1080i video at a native resolution of 1440 × 1080.
2001 MPEG IMX
Sony releases an advanced digital HD format that is fully compatible with the DTV (Digital
Television) standard. It is also provided full support for all the legacy Betacam formats (Betacam, Betacam SP, Digital Betacam, and Beta SX).
DV Formats
1995 DVCPRO
Panasonic introduces this prosumer variant of the DV specification. DVCPRO was marketed to low-budget professional users (small market ENG news crews, etc.) looking for an alternative to expensive digital formats like Digital Betacam. Panasonic released DVCPRO50 as a high-end professional DV format two years later.
1997 DVCAM
Sony follows suit with its own professional format based on the DV standard.
2003 HDV
A consortium of four companies (Canon, JVC, Sharp, and Sony) introduce the HDV standard as a way to record HD video on a standard DV tape. To do so, they decreased the resolution of the HD image to 1440 × 1080. HDV provided an affordable way for low-budget professionals to begin working in HD.
File-based Recording Formats
While some people today still shoot on tape using older cameras that are rapidly becoming outdated, most consumers and professionals have embraced the shift to tapeless technologies that utilize solid-state media and file-based recording formats. With file-based recording, digital devices such as DSLRs (digital single lens reflex cameras), video camcorders, audio recorders, smartphones, and so forth encode audio and video signals directly to a flash drive or memory card as digital bitstreams enclosed in a wrapper or container file. A bitstream is a sequence of bits used to represent individual video or audio signals.
Codecs and Container Formats

Figure 11.5
The sequence preset window in Adobe Premier Pro displays a long list of video formats it supports. While the choices may seem daunting at first, most of the time you will find yourself working with a handful of trusted video formats and codecs. So don’t panic, you don’t need to understand them all.
Source: Adobe product screenshot reprinted with permission from Adobe Systems Incorporated.
The process of encoding is at the very heart of file-based recording. Without being overly technical, encoding is the method a device or software application uses to numerically represent a multimedia asset in binary form. An encoding algorithm, more commonly known as a codec, is a specially created file format used to arrange the underlying bits (zeros and ones) to conform to a particular standard. Decoding goes hand in hand with encoding. Your digital device or software app must be able to decode (or read) a file format in order to accurately play the contents back to you (see Figure 11.5). A codec, short for co der-dec oder, is said to be supported when a device or program is able to decode it and make sense of it and is unsupported when it is not able to do so. Transcoding is the process of converting a file from one format (or codec) to another; for example, converting a Microsoft Word document to PDF or a WAV audio file to MP3.
A multimedia container or wrapper file is used for bundling and storing the raw digital bitstreams that codecs create. For example, a digital stereo audio signal contains two bitstreams, one for the left channel and one for the right. An audio codec such as PCM is used to encode each bitstream while a container file such as WAV or AIFF keeps them together in a single data file. Each codec (and there are many of them) performs a single encoding/decoding function, while a container format can, and often does, support multiple codecs. Apple QuickTime is a popular container format. QuickTime supports a vast assortment of codecs, including these that are widely used in multimedia: 1) GIF, JPEG, PNG, and TIFF for graphics; 2) AIFF, AAC, MP3, and WAV for audio; and 3) AVCHD, DV, MPEG-4, H.264, and QuickTime Movie (.mov) for video (see Figure 11.6). Any file created with one of these QuickTime-supported codecs can be viewed using Apple’s QuickTime Player or with a software program that supports QuickTime.
Hundreds of codecs have been developed for digital video and audio applications over the years. Some codecs, such as Dolby AC3 and WMA, are proprietary and may only work with certain programs or devices. Others, like MPEG-4, are supported by open standards, which means they are more universally accepted and supported. Some codecs are also designed to perform compression— the process of encoding or transcoding a data file using fewer bits. A compression codec is designed to reduce the file size of a digital asset without adversely affecting its resolution. The popular MP3 audio format is a compression codec that’s used to reduce the size of a digital recording, thereby allowing you to fit thousands, rather than hundreds, of songs on your portable music player.

Figure 11.6
Apple continually updates this long list of video and audio file formats and codecs supported by its popular QuickTime Player.
Source: http://www.apple.com/support.
Digital Audio Encoding
Analog audio technologies like the phonograph and cassette tape recorder were designed to capture or reproduce the natural fluctuations of original sound waves from beginning to end without interruption. For example, when listening to a phonograph record, the stylus or needle remains in continuous contact with the vinyl disc as it spins on the turntable. There is a perfect one-to-one correlation between the modulation of the analog signal and the vibrations picked up by the stylus as it travels along a spiral path. Many audiophiles prefer analog recordings to digital recordings for the simple reason that they reproduce sound more organically, in much the same way that a human hears and processes sound (see Figure 11.7).
Pulse-Code Modulation
In order for sound to be understood by a computer, it must be converted from its native analog form to a digital format that can be represented with discrete numerical values. Pulse-code modulation (PCM) is one of the most common codecs used for recording audio as a digital stream of binary data. British engineer Alec Reeves conceived of PCM in 1937 as a way of reducing noise during the transmission of speech over long-distance telephone lines. His theory of PCM transmission relied on a process called sampling to transform a continuous signal into a sequence of discrete measurements occurring at regular intervals. Each measurement (or sample) represents one instance of a sound wave’s properties at a single moment in time (see Figure 11.8). In digital recording, each sample is stored numerically as a binary string of zeros and ones. The fidelity of a PCM audio stream is determined by three variables: 1) sample rate, which specifies the number of samples recorded every second; 2) bit depth, which specifies the number of bits used to encode the value of each sample; and 3) bit rate, which specifies the number of bits per second transmitted during playback.

Figure 11.7
Audio recording technologies have changed often over the years. Physical media like vinyl records that you can hold and touch have been replaced with invisible data files that can be purchased online and downloaded to a portable MP3 player in a matter of seconds.

Figure 11.8
Top: An analog audio signal is continuous, without interruption. Bottom: A digital audio signal is produced through sampling, a technique whereby sound is measured and recorded at discrete intervals across time.
Sample Rate
The audio sample rate is designated in kilohertz (kHz) units. For example, a 48 kHz sample rate indicates that the recording was sampled 48,000 times per second. While working for Bell Laboratories, engineer Henry Nyquist discovered that the sample rate must be at least twice as large as the bandwidth (or frequency range) of the signal being recorded. Since human hearing has a frequency range of 20 Hz (hertz) to 20 kHz, a minimum sample rate of 40 kHz is required in order to effectively capture and encode all the frequencies within this range. If the sample rate is any lower than this, certain frequencies within the human hearing range may be lost during the recording process. If it is any higher, you’re just wasting bits because the human ear cannot discern any notable differences in quality beyond this point. Because of Nyquist’s work in sampling theory, 44.1 kHz eventually became the industry-standard sample rate for recorded music.
Bit Depth
Whereas sample rate largely impacts the frequency response of a digital recording, bit depth affects its dynamic range and the amount of noise and distortion introduced during the recording process. Each audio sample is stored as a binary sequence of zeros and ones. The bit depth setting determines how many zeros and ones are assigned to each sampling interval (usually either 16 or 24). The more bits you have to work with, the more descriptive the encoding can be to reflect the subtle fluctuations in the waveform’s amplitude. Quantization is a term that’s often associated with bit depth and is used to describe the mathematical process of assigning discrete numerical values to each voltage measurement.
An 8-bit sequence has 256 possibilities. A 16-bit sequence has 65,536 possibilities. And a 24-bit sequence can be arranged 16,777,216 different ways. The most common bit depth settings used in professional audio and video recording are 16 bit and 24 bit. While 24-bit recording is technically superior in terms of dynamic range, the higher bit depth also results in larger audio files. Large data files require more resources from your computer system and software when editing and mixing, potentially causing problems if your system isn’t equipped to handle 24-bit audio processing. While the difference between 24 bits and 16 bits sounds relatively small, at a sample rate of 44,100 kHz, the amount of digital data stored every second becomes quite substantial. In a 16-bit/44.1 kHz audio recording (standard definition), 700,600 bits of uncompressed data are produced every second. In a 24-bit/96 kHz recording (high-definition), it jumps to more than 2.3 million bits per second.

Figure 11.9
Adobe Media Encoder CC is a software product designed to transcode video and audio files into a different format. Here, an uncompressed AIFF audio file is being transcoded to a WAV file. The Export Settings properties window allows the user to specify a value for the following settings: 1) audio file format, 2) sample rate, 3) bit depth, and 4) mono or stereo sound.
Source: Adobe product screenshot reprinted with permission from Adobe Systems Incorporated.
The Red Book Standard
Sony and Philips are familiar names in the consumer electronics industry. They joined forces to create the audio compact disc format in 1980. In doing so, they developed the infamous “red book” standard for the audio compact disc (CD), which specifies a sample rate of 44.1 kHz and a bit depth of 16 bits. To this day, it remains the professional industry standard for distributing digitally recorded music to consumers on CD. No matter what the bit rate and sample rate are during production and editing, the final distribution file for your audio project should conform to 16 bit/44.1 kHz before being burned to a CD. In digital film and video production, a slightly higher sample rate of 48 kHz was adopted as the industry standard. This rate conforms to the encoding standards set by Philips, Sony, Toshiba, and Time Warner for the digital versatile disc (or DVD) recording platform in 1995. Because of this, camcorders are often programmed to encode the sound portion of a video recording at a sample rate of 48 kHz.

Figure 11.10
A portable compact disc player.
Bit Rate
With lossy compression formats such as MP3 and AAC, the number of bits assigned to each sample varies, making the concept of bit depth irrelevant. Instead, the number of bits available for encoding each sample is determined by the bit rate. Bit rate refers to the transmission speed of a compressed audio stream during playback—either locally or online in real time—and is expressed in kilobits per second (Kbps). In an MP3 audio recording, the bit rate has a user-defined range from 16 to 320 Kbps. The higher the bit rate, the better the quality of the recording. However, higher bit rates also produce larger files that require more transmission bandwidth and/or time to stream than files encoded at a lower bit rate. Setting the bit rate too high can hinder smooth playback of a recording that is being streamed in real time across a Wi-Fior cellular network. Voice recordings retain more quality at lower bit rate settings than music. For music, 128 Kbps is considered the minimum threshold setting for hi-fidelity. For best results, choose a higher setting of 192 or 256 Kbps. Most audio recorders and some cameras allow you to record sound in a compressed format. In such cases, you will find the bit rate setting in the system menu of the device. However, as a matter of best practice, avoid recording audio in a compressed file format. Instead, when given a choice, record audio uncom-pressed at the highest PCM resolution (AIFF or WAV). You’ll be glad you did!

Figure 11.11
When Adobe Media Encoder is used to transcode an AIFF file to MP3, the basic audio settings look a little different. First, sample rate is no longer an option. This is because MP3s are almost always encoded at 44.1 kHz to conform to the industry standard for audio compact disc. Media Encoder assumes this, so no selection is required. Second, since lossy compression is being applied, bit depth is irrelevant. The only quality setting the user needs to be concerned with here is bit rate.
Source: Adobe product screenshot reprinted with permission from Adobe Systems Incorporated.
Open Standards for Video and Audio Encoding
An open standard is a publically released specification or set of specifications used in the design of a product, process, or protocol. You can think of them as rules that companies voluntarily choose to follow in order to make their products compatible with equipment or software made by others. For example, think about how convenient it is to be able to plug in your computer or smartphone charging cable to virtually any wall outlet. What if every hotel or university or business building installed a different type of wall outlet that wasn’t supported by your device? You would be out of luck, or—at the very least—forced to carry around an adapter everywhere you went. In fact, when I travel to London, I do just that. I pack a universal power adapter because the electrical interface standards in the U.S. and the U.K. are incompatible.
Standardization makes life better and more predictable for everyone by reducing consumer confusion and creating a more level playing field for companies that design and manufacture similar products for everyday use. So where exactly do these standards come from? Largely, they are formed by consensus within international bodies and working groups made up of industry stakeholders and experts who share a common interest. The most well-known of these include: the International Electrotechnical Commission (IEC), the International Organization for Standardization (ISO), and the International Telecommunication Union (ITU). Together, they created the World Standards Cooperation in 2001 “to strengthen and advance the voluntary consensus-based international standards systems.”1
In 1988, the ISO/IEC jointly established a working group called the Moving Picture Experts Group (MPEG) and tasked it with developing open standards for digital audio and video encoding. While MPEG, and other similar groups, have published a wide assortment of standards for digital audio and video encoding over the years, we’ll touch on only a few of the most significant ones here.
MPEG-1 Audio Layer III (MP3)

Figure 11.12
More than a decade after launching the original iPod player in 2001 (inset), Apple advertises the iPod touch on a double-decker bus in London, England (2012).
Source: Inset: Image courtesy of Apple, Inc.; Main image: Mira Agron/Dreamstime.com.
MPEG’s first set of standards was initially published in 1993 under the name MPEG-1. Part three of this five-part standard was released in 1995 specifying the details for three classes of lossy audio compression. The third class, formally termed MPEG-1 Audio Layer III, introduced the MP3 audio compression format. MP3 would eventually become one of the most widely known audio codecs in the world—its popularity heralded by the fact that it was the first digital format designed for encoding and storing music digitally on a portable audio player (see Figure 11.12). With this format, users could now compress a CD-quality audio track, originally distributed as an uncompressed WAV or AIF file, by a ratio of 10:1. With such a drastic reduction in file size, consumers could now store roughly 10 times as many songs on a portable device. This was a key selling point for Apple when they released the first generation of the iPod portable MP3 player in 2001 and proudly flaunted the advertising slogan “1,000 songs in your pocket” (see Figure 11.12). The downside to lossy compression, of course, is that it results in a permanent loss of original file data. When you apply MP3 compression to a file, you invariably discard 90% of the original data in the sound file. An MP3 version, therefore, is significantly inferior in quality to the uncompressed original in terms of sound quality and fidelity. As time would later prove, however, consumers would be willing to accept this trade-off—more songs for an acceptable loss of quality—and many would never even notice the quality loss while listening through low-fidelity earbuds.
MPEG-2
In addition to MP3, MPEG-1 specified one of the first standards for encoding video, but because the image quality was so poor, its acceptance was short-lived. As a next step, the ISO/IEC released MPEG-2 in 1996. Specifically, MPEG-2 introduced H.262, an advanced format for encoding standard definition (SD) and HD video at a significantly higher bit rate then MPEG-1 allowed. MPEG-2 soon became the international standard for encoding SD video on a red-laser DVD. The new format paved the way for DVDs to eventually replace VHS tape as the primary distribution medium for home movies. MPEG-2 video was vastly superior to a VHS recording and, when combined with a DVD, came with many added benefits over videotape for the consumer (chapter menus, durability, random access to content, more storage capacity for bonus material, computer compatibility, etc.).
Advanced Audio Coding (AAC)
Audio compression was enhanced as well. With MPEG-2 came Advanced Audio Coding (AAC), a format that extended the stereo capabilities of MPEG-1 to multi-channel surround sound. Dolby Digital (also known as AC3) is a widely popular multichannel surround sound standard capable of supporting up to 7.1 channels of audio. Dolby Digital 5.1 is a six-channel broadcast, cinema, and home theater standard that distributes audio to five normal-range speakers—three in the front (L-C-R) and two in the rear (L-R)—and one subwoofer (for low-frequency sounds). Dolby Digital 7.1 adds two additional side-mounted speakers (L-R) into the mix. AAC compression produces a superior quality recording and a smaller file size compared to MP3 files encoded at the same bit rate.
In addition to becoming the encoding standard for DVD video, MPEG-2 was incorporated into digital tape formats like HDV, XDCAM, tapeless video formats like MOD and TOD, and the terrestrial HDTV broadcasting standards ATSC (Advanced Television Systems Committee) and DVB (Digital Video Broadcasting). MPEG-2 is an evolving standard that has been amended several times since its initial public release.

Figure 11.13
Apple iTunes includes a built-in audio encoder primarily for the purpose of converting uncompressed AIF and WAV files, such as those imported from an audio compact disc, to AAC or MP3. As shown here, you can specify a default codec in the application’s general preferences menu.
MPEG-4
MPEG-4 is a more recent set of standards having to do with the compression and encoding of high-definition audio and video signals. Most likely, the video you shoot today with your smartphone, watch on a Blu-ray disc, stream from your Netflix or Hulu account, or publish to YouTube or Vimeo is encoded in a format prescribed by the now ubiquitous MPEG-4 standard. MPEG-4, like many open standards, has been modified and expanded many times. Like its predecessors, it is divided into multiple subsections called “parts,” with each one specifying one particular aspect of the overall specification. From its inception in 1998 to 2014, MPEG-4 evolved into an extensive 30-part standard. The most important of these for audio and video professionals was introduced in 2003 and is called MPEG-4 Part 10 Advanced Video Coding (AVC).
H.264/AVC
The MPEG-4 initiative led to the development of a largely universal format for encoding full-bandwidth HD video on a digital camera or camcorder (including mobile devices) and delivering it with efficiency to the home and mobile consumer across a Wi-Fior cellular network. It serves equally well as both an acquisition format and a delivery format. Part 10 of the standard was truly revolutionary, as it introduced the Advanced Video Coding format, better known today as H.264, or generically as MP4. While people sometimes use the labels H.264 and MP4 interchangeably, technically, H.264 is the video compression codec and MP4 is the container format.

Figure 11.14
Adobe Media Encoder is used to transcode a QuickTime movie to MPEG-4/H.264. Encoding programs such as this allow users to control basic settings such as: 1) resolution (width × height), 2) frame rate, 3) field order (interlaced or progressive), 4) pixel aspect ratio, and 5) bit rate. These will be discussed in more detail later in the chapter.
Source: Adobe product screenshot reprinted with permission from Adobe Systems Incorporated.
As a codec, H.264 produces exceptional picture quality at a fraction of the file size of earlier methods of video encoding. At the time, keeping file size to a minimum was deemed critically important for speeding up the process of distributing video online and streaming it to users without unnecessarily long wait times or interruptions due to network congestion and buffering. The main reason you can view a video feed so quickly today on your Facebook page is because of the industry standard H.264 codec. Due to its immense popularity, H.264 quickly gained a following as one of the most widely adopted video compression formats of all time. Both ATSC and DVB have approved AVC for use in terrestrial HDTV broadcasting. The vast majority of digital cameras in use today support MPEG-4 encoding while nearly all video nonlinear editing (NLE) software programs support native capture and editing of MPEG-4–encoded media files. For the audio portion of a video recording, MPEG-4 carried forward the earlier specification from MPEG-2 for AAC compression.
Encoding for YouTube and Vimeo
MPEG-4 helped standardize the process of encoding video for use with online sharing services and is without question the best format to use when uploading a video to YouTube or Vimeo (see Figure 11.15). The compression guidelines for both services specify using MPEG-4 as the file format (or container file), the H.264 codec to encode video, and the AAC codec to encode audio.
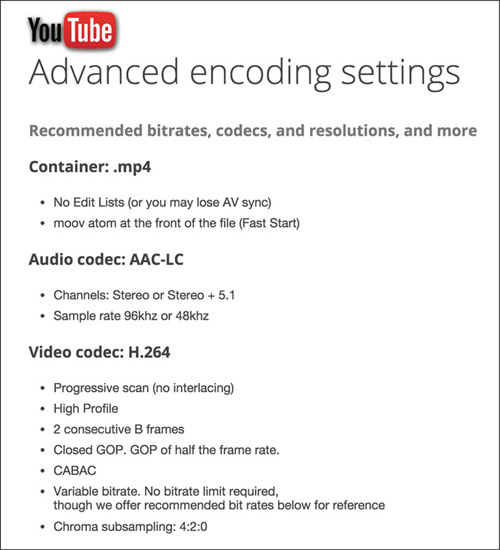
Figure 11.15
YouTube recommends uploading video using the MPEG-4 (.mp4) container format and includes a detailed set of specifications on its website for properly encoding the video and audio portions of your program.
Source: http://www.support.google.com.
High Efficiency Video Coding/H.265
While H.264/MPEG-4 AVC provides excellent encoding for standard high-definition video, it was not designed to handle the advanced bandwidth and compression requirements of ultra-high-definition television (ultra HD or UHDTV). Also known as Next Generation Television, UHDTV packs 4 to 16 times as many pixels into the image raster as standard HD. With the consumer electronics industry pushing for the rapid adoption and integration of 4K and 8K video systems, it should come as no surprise that the encoding formats are evolving once again. In 2013, the ISO/IEC MPEG and ITU-T Video Coding Experts Group (VCEG) jointly announced a new standard called High Efficiency Video Coding (HEVC). Dubbed H.265, the HEVC specification is the successor to H.264/MPEG-4 AVC, although it will take some time for manufactures to fully integrate this relatively new standard into new lines of equipment. HEVC/H.265 supports video resolutions up to 8K (8192 × 4320 pixels) and currently boasts twice the compression performance of its predecessor.
Proprietary Standards for Video and Audio Encoding
A proprietary format is one designed or licensed to work only with specific equipment or computer software. As the chief pioneers and innovators of videotape recording, it’s no surprise that Sony and Panasonic were likewise instrumental in leading the professional marketplace into a new era of tapeless recording. Together, they released three proprietary solid-state formats: Professional Disc, SxS, and P2. As proprietary card formats go, these are expensive high-end solutions—both in terms of the cost of the camera and the recording media they use. However, as one might expect, they are engineered to meet or exceed the high recording standards for broadcast television. As a result, proprietary formats such as these are typically more physically robust and yield higher quality results than consumer- or prosumer-grade cameras based on open standards. While these card formats are indeed proprietary, depending on the make and model of the device, the codec used by the camera to record video may or may not be proprietary. The cards are just the medium used to store the zeros and ones. It’s the camera that determines which codec or format is used during recording.
SxS
Sony introduced XDCAM in 2003, a line of high-end cameras using Professional Disc, an optical recording medium like Blu-ray disc, capable of storing up to 50 GB of data. In 2007, Sandisk and Sony announced their joint release of the SxS (pro nounced S-by-S) memory card specification. SxS is Sony’s solid-state memory card format that combines high-speed flash memory with a standard PCI Express case (see Figure 11.16). Today, the vast majority of Sony’s high-end camcorders record to SxS media. SxS-1 was introduced in 2009 as a less expensive alternative to the costly SxS cards. While cheaper, SxS-1 cards have a shorter life span, even though they are still rated to last five years under heavy use. The SxS Pro+ format came out in 2013 to support 4K video acquisition.

Figure 11.16
This Sony XDCAM EX professional camcorder records video to a proprietary SxS memory card.
P2
In 2004, Panasonic introduced P2, a solid-state memory card format for use with its top-of-the line broadcast cameras. A P2 card is made up of multiple SD cards enclosed in a PCMCIA card case. In 2012, Panasonic release a smaller version of the P2 standard called microP2, which is compatible with the SDHC/SDXC memory card specifications. A P2 camcorder can record to a microP2 card using a card adapter and firm-ware update.
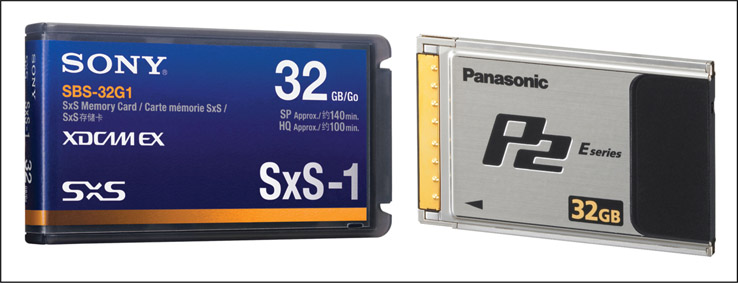
Figure 11.17
Proprietary card formats like SxS and P2 are designed for professional users. These cards are significantly better than off-the-shelf SD memory cards, and as a result are more robust and reliable. They are also more expensive, a fact that puts them out of reach for many low-budget producers.
RED
RED Digital Cinema cameras use proprietary solid-state drives (SSDs) to store 4K and higher-resolution recordings. The RED MINI-MAG SSD can store 512 GB of data while the larger REDMAG comes in three sizes: 48 GB, 64 GB, and 240 GB. All things being equal, these custom RED drives are more expensive than almost any other forms of proprietary media. But for filmmakers, the investment is quite reasonable once you factor in the cost savings of no longer shooting in film.
Great Ideas
The RED Camera
The RED Digital Cinema Camera Company is a U.S. firm founded in 2005 that produces advanced high-resolution cameras used in professional filmmaking (see Figure 11.18). They released their first camera in 2007. Dubbed the RED ONE, it featured an advanced 4K image sensor (4096 × 2160) with more than four times the resolution of standard HD. While the RED ONE was not the world’s first 4K camera, it was the first to provide a legitimate challenge to 35 mm film in terms of image quality. Since its introduction, hundreds of motion pictures and television shows have been shot digitally with various versions of the RED cinema camera, including Peter Jackson’s popular trilogy The Hobbit (2012–2014).

Figure 11.18
A RED Scarlet 4K Digital Cinema Camera and a follow focus system (discussed later) are mounted to a portable shoulder rig.
AVCHD
In 2006, Sony and Panasonic jointly released AVCHD, a proprietary format based on the MPEG-4 specifications. AVCHD has been incorporated into a growing number of consumer, prosumer, and professional camcorders and has been licensed for use by other manufacturers, including Canon, JVC, and Hitachi. A consumer-grade version of the standard, called AVCHD Lite, has a maximum resolution of 720p and is often used in digital still cameras for shooting HD video.
Like many digital formats, AVCHD offers a broad set of parameters that can be individually set by the camera operator for defining how a video signal is encoded. These settings are often located in the menu system of the camera and may have different names and options depending on the manufacturer. For example, a user may select any combination of the AVCHD record options on a SonyHXR-NX70U camcorder shown in Table 11.1.
The video quality setting is similar to the JPEG compression setting on a digital still camera. Choosing the highest bit rate produces the best quality image with the least amount of compression. However, the higher setting also reduces the amount of recordable material your memory card or drive can hold (see Table 11.2).
Table 11.1 Sony HXR-NX70U Record Options
| Record Format | Bit Rate (Quality) | Resolution | Aspect Ratio | Frame Rate |
| High-Definition (HD) | FX – Highest (24 Mbps) | 1920 × 1080 | 16:9 | 60i |
| FH – High (17 Mbps) | 1920 × 1080 | 60p | ||
| HQ – Standard (9 Mbps) | 1440 × 1080 | 24p | ||
| LP – Long Time (5 Mbps) | 1440 × 1080 | |||
| Standard Definition (SD) | HQ – Standard (9 Mbps) | 720 × 480 | 4:3 or 16:9 | 60i |
Table 11.2 A Comparison of Record Time (Minutes), Record Format, and Memory Card Capacity for the Sony HXR-NX70U
| Memory Card Capacity | |||
| HD Quality | 8 GB | 16 GB | 32 GB |
| FX | 40 | 80 | 170 |
| FH | 55 | 110 | 225 |
| HQ | 90 | 185 | 375 |
| LP | 145 | 295 | 590 |
Note: The approximate recording time (in minutes) for each of the four quality settings on the Sony HXRNX70U camcorder. Actual time depends on other variables such as frame rate and method of recording audio (compressed or uncompressed).
QuickTime
In addition to being a media player, Apple QuickTime is a multimedia container format that’s been around since 1991. As noted earlier in this chapter, QuickTime supports a wide range of graphic, audio, and video codecs (see Figure 11.6). In fact, the MPEG-4 specification, which wasn’t released until 10 years later, was based almost entirely on QuickTime. Because of QuickTime’s native compatibility with MPEG-4, many cameras, editing applications, and encoding programs include both QuickTime/MOV and MP4 encoding options. The only tangible difference between the two is that the MOV version includes a QuickTime wrapper and .mov file extension while the other has an MPEG-4 wrapper and an .mp4 file extension.
WAV and AIFF
The two most common container formats for professional audio recording are: 1) the Waveform Audio File Format (WAV) developed jointly by Microsoft and IBM and 2) the Audio Interchange File Format (AIFF) released by Apple. WAV and AIFF are very similar. They both contain raw uncompressed PCM audio streams. When an audio file is converted from WAV to AIFF or vice versa, the enclosed bitstreams are left alone. Only the container file or wrapper is modified. You may have noticed that when you insert an audio CD into a Windows PC, the track icon for each song appears as a WAV file. If you take the same CD and insert it into a Mac, the track icons will appear in the AIFF file format. While WAV and AIFF are rival proprietary container formats, they are largely interchangeable, and virtually all video and sound editing programs support both formats.
Formatting Memory Cards
Most camcorders record to a removable memory card, such as Memory Stick or SD, or to an internal solid-state drive. With removable media, cards can be shared between users and devices to facilitate the quick and easy transfer of files. With an internal drive, the recorder must be physically connected to your computer, usually via a USB cable, in order to transfer files. Before you record your first shot, be sure to properly initialize or format the card or drive. This is especially important when using a memory card or recording device for the first time. As a matter of good practice, get in the habit of formatting your media at the beginning of each shoot or production day. Formatting is sort of like rebooting your computer—it’s a simple step that helps ensure the recording process will go smoothly each and every time. Formatting will erase all the data on the card, so be sure to back up your card files to a dedicated hard drive after each recording session (see Figure 11.20). Formatting also creates the root directory and file system that may be required by your device for writing and reading media files and metadata. Figure 11.19 shows the root directory and file system used on AVCHD camcorders.

Figure 11.19
The AVCHD standard specifies this file directory structure for recording video and metadata to a solid-state memory card. It’s important to keep this file structure intact. If any of the folder names is altered, your editing software may not be able to recognize the video files. With AVCHD, video files are saved to the STREAM folder in the .mts format (MPEG Transport Stream).

Figure 11.20
The menu system of a Canon C100 cinema camera displays a final warning that the initialize media function (or formatting procedure) will “completely erase” all the data on the card.
It’s best to format a memory card using the actual device you are recording with and not on a standalone computer. After inserting the memory card, search the system menu for the media or card formatting option. For devices that allow you to record on either a memory card or an internal drive, you may be prompted to specify which media platform to format before performing the procedure.
Device Settings
Nearly every digital camera or audio recorder has built-in settings to control the operation of the device (see Figure 11.21). Sometimes these device settings are located on the camera body as switches, dials, buttons, and so on that you can physically move or turn to make a change (see Figure 11.22). This is particularly true of professional cameras and devices that are larger and have more surface area. More and more, however, especially as consumer electronics have become smaller in size, these settings are accessed through the system menu. Some devices have touch screen menus (like on your smartphone) while others provide buttons and scroll wheels to navigate through the various levels of menus and submenus. This chapter cannot possibly prepare you for all of the possible things you will run into, but it can highlight some of the most important device settings that are found on most audio and video recorders. For everything else, just remember that electronic devices almost always comes with a user’s guide or manual—and these days, it isn’t very difficult to find a PDF version of one waiting for you online. So be sure to spend time learning about your device’s settings—how to access them, what they do, and how to control them for maximum effect.

Figure 11.21
FiLMiC Pro is a mobile video camera app that features many of the same device settings and controls found on professional camcorders. While this app is entirely touch screen driven, the inclusion of professional features such as these can transform a smartphone or tablet into a professional video acquisition tool.
Source: Courtesy of Cinegenix, LLC.

Figure 11.22
A number of important camera settings can be adjusted on the Canon C100 using external buttons or dials. Many of the ones pictured here will be explained later in the chapter: 1) focus mode switch (auto or manual), 2) image stabilization switch (on or off), 3) neutral density filter wheel, 4) exposure controls, 5) white balance presets and controls, and 6) zebra button (on or off).
Recording Format
As the first half of this chapter addressed, there are many file-based recording codecs and container formats to choose from when working with digital video and audio. The good news is that most of the guesswork has been done by the manufacturer of your device. As is often the case, you won’t have to select a specific recording codec or container file because many devices only support one format. If given a choice, however, be sure to select the best quality format that’s available. For example, if the audio recorder you’re using allows you to record in either WAV or MP3, choose WAV because it is uncompressed and superior to MP3. Likewise, some cameras still give you the option to record in either standard definition or high-definition, and this choice affects which codec is used (MPEG-2 or MPEG-4). These days, I don’t know what would possess anyone to choose the SD recording mode on an HD camera, but you may have a choice. My advice, choose HD!
Video Encoding Settings
After choosing your format, you will need to confirm the video encoding settings. Most cameras include menu settings for specifying resolution, scanning method, frame rate, and bit rate.
Resolution or Frame Size
Resolution is the number of pixels in the digital frame. Most HD cameras offer two levels of resolution. The highest resolution (full bandwidth) for HD is 1920 × 1080 pixels. This option may be listed as 1080i or 1080p depending on the scanning method (i-interlaced or p-progressive). To conserve disk space, HD can be scaled down to the lower resolution of 1280 × 720 (shown as 720i or 720p). If you are shooting in SD, you may be able to choose between a standard 4:3 or widescreen 16:9 aspect ratio. Because of its large sensor size, a 4K camera includes many resolution options. In addition to standard HD resolutions such as 720i/p and 1080i/p, you should see options for 2K (2048 × 1080) and 4K (4096 × 2160). As with most of these choices, selecting the highest quality setting available is the best way to go as long as your recording media and postproduction software can handle it.
Scanning Method
You usually have the option of recording interlaced or progressive frames during recording (refer back to chapter 9 for more about this). The legacy NTSC and PAL formats only supported interlaced scanning; however, HD supports both methods—even though broadcast transmission standards still call for interlaced scanning. Unless there is a specific request from the client or producer to record interlaced video, shooting in progressive mode is generally a safe bet. Progressive mode produces a sharper image overall and conforms more closely to current industry standards for electronic display screens and mobile devices. Converting interlaced video to progressive is easy. Most editing programs and software encoders provide a de-interlace option when exporting to your final distribution format. However, as a general rule, it’s best to acquire video in the same format you plan to export it to when finished.

Figure 11.23
Users of the Canon C100 can specify the bit rate and frame rate they want to use in the camera’s menu system.
Frame Rate
In the United States, the standard frame rate for broadcast television transmissions is 30 or 24 frames per second (fps), which most digital cameras support. Filmmakers often prefer to shoot in 24p because it mirrors the native frame rate of motion picture film and creates a more film-like aesthetic. Again, the frame rate you use during recording can be changed later in postproduction, but every time you make a change to a video setting in post, you re-encode the video and potentially lose data from the original recording. Select the frame rate that best fits your final distribution format (see Figure 11.23, left).
Bit Rate
As in audio sampling (mentioned earlier), a separate bit rate setting determines the amount of compression that is applied algorithmically to the video stream. As you might expect, the higher the bit rate setting, the better the quality of the video and the larger the corresponding file will be (see Table 11.1). Most cameras offer a handful of bit rate compression settings listed either according to the actual bit rates (24 Mbps, 17 Mbps, 9 Mbps, and 5 Mbps) or by a qualitative scale of some sort (best quality, high quality, standard quality, long play). Choosing the highest bit rate ensures that your camera records the best image possible (see Figure 11.23, right).
Audio Encoding Settings
You will usually have the option of recording the audio portion of a video recording in one of three formats: 1) Linear PCM, 2) AAC, or 3) Dolby AC3. The uncompressed LPCM format is clearly the best choice over either of the compressed formats; however, when shooting at a higher video bit rate setting, your camera may force you to choose a compressed audio file format. Even so, these compression codecs are so good you needn’t worry about this. If you use an external audio recorder such as the Zoom H4n, the same principle applies—select the highest quality uncompressed format available (in this case WAV). The H4n offers MP3 as an option, but it is intended primarily for long-play voice recordings (see Figure 11.24). A professional would never choose MP3 over WAV or AIFF. Also, if given a choice, be sure to select the highest settings on your device for sample rate, bit rate, and bit depth.

Figure 11.24
In the menu system of the Zoom H4n you can choose one of two formats (WAV or MP3) and various quality levels based on the user-defined sample rate and bit depth. The highest quality setting produces an uncompressed WAV file with a sample rate of 96 kHz and a bit depth of 24 bit.
After determining the recording format and encoding settings, it’s time to move on to compose your shot and adjust the camera’s image and sound recording properties for optimal picture and sound quality. Chapter 12 will focus more on shooting and producing techniques while the remainder of this chapter will address a basic set of important variables you need to know to operate a camcorder and acquire usable content.
FWIGSS
For a person new to video and filmmaking, it can be overwhelming trying to understand all the many buttons, dials, switches, symbols, connectors, functions, and menu settings on a digital camera or DSLR. For this reason, my colleagues and I employ the acronym FWIGSS to help students remember six basic camera functions that anyone operating a digital video camera must grasp in order to achieve professional results. Let’s begin by unpacking this acronym to get our first glimpse of these six important control settings:
- 1. Focus
- 2. White Balance
- 3. Iris
- 4. Gain
- 5. Shutter Speed
- 6. Sound
While digital cameras offer many more features and functions than these, mastering FWIGSS will get you well underway to becoming a competent videographer. While some of these concepts were covered earlier in chapter 10, “Photography,” this section will focus more on how they apply to the craft and techniques of video acquisition.
Think of FWIGSS as a basic to-do list that must be performed every time you set up a camera and begin recording. If you strike one shoot and set up 10 minutes later in a new location, be sure to go through the FWIGSS setup procedure again to help ensure consistent quality in your video and sound recordings. What follows may seem like a lot of steps and details to remember, but after you practice this workflow for a while, and learn how to adapt FWIGSS to your particular camera, you will be able to accomplish the basic setup procedures in just a few minutes every time.
Focus
Acquiring focus and maintaining it throughout the duration of a shot is a critical component of professional film and video acquisition. In chapter 10, this subject was discussed in terms of still photography, where focus only has to be maintained for a brief moment of time during exposure of a single frame. When shooting video, focus has to be maintained across time for the duration of a shot—which can last for several seconds or more—and adjusted on the fly to compensate for subjects that are in motion.
We refer to a camera image as sharp when the main subject within the frame is in focus. Foreground or background objects that appear along the z-axis may appear out of focus (depending on depth of field), but as long as the main subject is clearly defined, the image is in focus. A soft image is one where the subject or the entire frame is out of focus. Unintentionally blurry subjects are a visual distraction to the viewer and should be avoided at all cost.
Where you set the focus depends mainly on the distance between the camera and the main subject. In cases when the camera-subject distance is fixed throughout the duration of a shot, you only need to focus once to ensure the image remains in focus when zooming. However, if the distance between the camera and subject changes during a shot, such as in a soccer match where the goalie is sprinting away from the camera along the z-axis, you will need to ride the focus—a technique that involves continually adjusting focus on the fly while keeping the shot properly composed. Shooting moving subjects and keeping them in focus takes practice and requires considerably more skill than shooting in a setting where the camera and subject are fixed.
Autofocus and Manual Mode
Nearly every camera comes equipped with an autofocusing (AF) system. Like other automatic features on a digital camera, autofocus is intended to make your life easier, giving you one less thing to worry about while composing and shooting video. As long as the lighting is good, the subject-camera distance is relatively stable, and there isn’t a lot of visual complexity or movement within the frame, autofocus can yield acceptable results. So there’s nothing innately wrong with using this feature, even if you are an aspiring professional. With AF turned on, the camera will automatically calculate the distance from the lens to the main subject and adjust the focus setting accordingly. However, you must remember that a camera is an electromechanical device that lacks any human capacity for intuition or judgment. It cannot think, only adjust as it was programmed to do based on its settings and the data it receives through its onboard systems. In certain situations where the variables are beyond those it was designed to handle, autofocus may create unintended visual artifacts or simply refuse to work at all. For instance:
- ■ AF may acquire focus on the wrong subject within the frame. In a situation where there are two or more people in the frame, the AF sensor may not know which one to lock on to. By default, AF usually attempts to set focus in the center of the frame. However, if the subject you are shooting is off-center, using AF may not work. Refer back to chapter 10 on photography for more information about setting the AF target point.
- ■ AF may roll or shift as the subject moves within the frame. If the scene you are shooting contains any subject movement or sudden lighting changes, AF may have trouble maintaining a lock on the main subject. In this situation, the image may suddenly and momentarily blur as the AF mechanism moves rapidly back and forth looking for a subject to acquire. Unintended AF roll or shift is a visual distraction that should be avoided.
- ■ AF may not be able to stay focused on highly reflective or complex subjects. The busier the detail in a shot, the greater the opportunity for the AF sensor to get confused. Repeating patterns and glossy surfaces are just two examples of things that may prove too difficult for AF to handle.
- ■ AF may not work at all in low-light or low-contrast situations. Nighttime shots and low-contrast settings make acquiring focus with AF extremely difficult.
As you get comfortable shooting with a video camera, try switching from AF to manual focus more often. It may take some practice getting the hang of it, but unless you are doing lots of action-oriented photography, shooting in manual focus (MF) mode isn’t as hard as you may think—and doing so often leads to more satisfactory results.

Figure 11.25
For best results, set the camcorder to manual focus mode and follow these steps for setting the focus every time you change positions in relation to the subject.
Setting Focus in MF Mode
A common scenario for a videographer or film-maker is shooting an interview where the camera and the subject are locked down in a fixed position. For example, consider a scenario where the subject is seated in a chair that is situated six feet from a camera mounted on a tripod. To set the focus, follow these steps (illustrated in Figure 11.25).
- STEP 1: Compose your shot. Make sure the camera is set to MF mode.
- STEP 2: Next, zoom in as far as you can on the subject’s eyes.
- STEP 3: Adjust the focus control until the eyes are sharply in focus. Moving quickly back and forth in smaller sweeps can help you identify the sweet spot more accurately.
- STEP 4: Zoom back out to compose your shot.
You may now adjust the focal length of the lens to any position between a tight shot and a wide shot without losing focus. If at any point the distance between the camera and the subject changes, repeat these steps.
In this example, the subject’s eyes lie along an invisible vertical plane that intersects with the z-axis. This is where we usually want the image to be the sharpest. I routinely set focus on the eyes because most of us are taught from childhood to look someone in the eyes when we are speaking with them. “The eyes are the window to your soul” goes the proverb, and it’s the eyes upon which the viewer most often affixes his or her gaze.
Focus and Zoom Controls
Focus and zoom controls vary depending upon the type of camera you are using. For cameras equipped with broadcast ENG/EFP lenses, DSLR lenses, or cinema lenses, focus is adjusted with the outer ring located closest to the front of the lens. Zooming is controlled with the middle ring or with the camera’s servo control. The iris/aperture is adjusted with the ring closest to the rear of the lens. The placement of the focus control at the front of the lens enables a camera operator to support the front of the camera with one hand while simultaneously focusing. This location is particularly handy when making quick focus adjustments while walking or tracking moving subjects. Cheaper camcorders with built-in lenses may also come equipped with a focus ring on the lens while the least expensive compacts and smartphone cameras offer only touch screen control of these manual functions, if any at all.
Studio cameras and studio-configured cameras, such as those used at live events, feature rear controls for zoom and focus (see Figure 11.26). The zoom control is usually mounted to the right pan bar while the focus control is attached to the left. Mounting the controls on the pan bars allows the operator to tilt and pan the camera while simultaneously zooming and focusing as required.
Filmmakers will sometimes attach a follow focus system to a cinema lens in order to shift control of the focus to a more ergonomically friendly position on the side of the camera (see Figure 11.18). For example, on a dolly shot or walking shot, where the camera is physically transitioning from a wide angle to a tight shot of the subject, a second person (called a focus puller) can operate the focus control while the cinematographer concentrates on framing the subject. A follow focus system includes a large hand wheel and marking disk where focus marks can be applied with an erasable marker.
Pandering to an ever-savvy customer base of smartphone photographers and movie makers, developers of Android OS, Mac iOS, and Windows Phone OS now include support for manual focus mode in third-party smartphone camera apps. Unfortunately, controlling MF on a smartphone will likely require using an ergonomically unfriendly touch screen interface.

Figure 11.26
A camera operator uses the rear focus and zoom controls to maintain composition during a live television newscast.

Figure 11.27
The rack focus technique is used here to shift the focus in real time from the foreground subject to the background subject.
Rack Focus
Rack focus is a popular technique that shooters use to rapidly shift the viewer’s attention from one subject to another along the z-axis (see Figure 11.27). With this technique, shallow depth of field is used to obtain a noticeable contrast between a sharply focused foreground subject and a soft or blurry background one (or vice versa). With the camera rolling and on the director’s cue, the focus puller changes the focus setting until the sharp subject in the frame gradually turns soft and the soft subject gradually comes into focus. The viewer’s gaze will naturally shift to the portion of the frame that is most clearly defined.
White Balance
Digital cameras are basically colorblind. In order to accurately capture true colors, the camera must be calibrated to a reference color. We use pure white as the reference color because white light contains the three primary colors in equal measure. Once a camera “knows” what white looks like under a specific lighting condition, it will be able to accurately reproduce all other colors under the same lighting conditions.
Since shots are often combined in editing to create scenes and sequences, it’s important that related shots have matching color profiles. For this reason, great care should be given to set the camera’s white balance whenever the lighting source or color temperature in a scene changes, regardless of whether or not the camera is physically moved. For starters, be sure to reset the white balance whenever you move the camera from an indoor location with artificial light to an outdoor venue with natural light or vice versa. But remember, the color properties of light can also vary within an indoor setting by type of lighting fixture or outdoors by atmospheric conditions or time of day. For example, fluorescent bulbs emit a different color temperature than tungsten light fixtures. Likewise, as the position of the sun changes throughout the day, the color temperature it emits also changes. For this reason, white balancing the camera and doing so often is important—and once you learn the steps, the procedure takes only seconds to complete.
White Balance Controls
Auto white balance (AWB) is a feature found on most digital cameras today. With AWB turned on, the camera assesses the light hitting the image sensor and calibrates accordingly. Under certain conditions and with a high-quality camera, AWB may work great most of the time, but it will not work consistently all the time. AWB will fail you at some point, which is why you should never use this feature when working on a professional project.
The next best option you may choose is to use the white balance presets. Many cameras include a switch or menu setting that allows you to select a broadly defined lighting scenario such as Sunny, Cloudy, Fluorescent, Tungsten, and so on. Presets will put you in the ballpark, but they may not fully compensate for the subtle variations in color temperature that may exist within a specific type of light.
The best option to choose, if your camera allows, is to perform a custom white balance (see Figure 11.28). To do so, follow these steps:
- ■ Locate the white balance settings on your camera and select the manual or custom WB option. On higher-end cameras, WB controls are often found on the exterior of the camera body. On less expensive cameras, be prepared to delve into the onboard menu system.
- ■ Have the subject or an assistant aim a white card or sheet of paper at the camera. The card should reflect the same light source hitting the subject.
- ■ Zoom in on the card to fill 80%–100% of the frame with white. Be sure your exposure and focus settings are properly set. If the image is too dark or out of focus, the camera may not be able to perform the operation.
- ■ Press and hold the Set button until the camera confirms that white balance has been acquired. If the color temperature has changed dramatically from the last time you performed a white balance, you may actually notice a color shift in the viewfinder. But don’t worry if don’t see a dramatic change. If you followed the procedure correctly, your camera is now set to reproduce the best color possible.

Figure 11.28
The videographer zooms in on a white card held by the subject to perform a white balance at the start of a recording session.
Iris
In chapter 10, we learned that exposure is the product of light intensity and time. Specifically, three variables continually interact to form what photographers call the exposure triangle: aperture, ISO/gain, and shutter speed. The first of these, aperture, is controlled by the camera’s iris to regulate the amount of light hitting the image sensor. The aperture is an opening in the iris at the rear of the lens through which light passes. As with all the other functions discussed so far in this section, you can control this function manually or allow the camera to control it for you automatically. Which should you choose? Here, it really depends on your level of experience in photography or videography. If you are relatively inexperienced, you may be better off entrusting this control to your camera. For the most part, when it comes to automatic exposure controls, digital cameras are pretty good at calculating proper settings for exposure, especially when the subject is well lit.
Those of you with a more advanced understanding of lenses, cameras, and lighting may want to retain control of the iris function in order to achieve a specific look. For example, all things being equal, the size of the aperture affects the relative degree to which you achieve great or shallow depth of field. But here’s the rub— there are many other variables to consider as well, such as sensor size, lens type, focal length, shutter speed, lighting, and so on. Learning how to master manual control of all these functions goes beyond the scope of this book. So don’t be timid about experimenting with manual controls or deepening your knowledge through books and tutorials that go into much greater detail on this subject.
The key for beginners to understand is that proper exposure is essential to producing a professional-looking video image. Images that are too dark are called under-exposed. Pictures that are too bright are overexposed. Work in well-lit areas until you develop the ability to compensate for darker settings or learn how to supplement poorly lit subjects with professional light kits or reflectors.
Neutral Density (ND) Filters
When shooting in a bright location such as the beach on a cloudless summer day, you may have difficulty keeping images from being overexposed, even with the aperture completely stopped down. For this reason, professional video cameras often include a built-in set of neutral density (ND) filters situated between the lens and the image sensor. You can think of an ND filter as a pair of sunglasses for your camera. It reduces the overall amount of light entering the camera without altering the color properties of the light. Hence, they are color neutral. There are also standalone ND filters designed to attach to the front of prime and zoom lenses using a threaded mount (see Figure 11.29). The use of an ND filter gives the photographer greater latitude in controlling the iris (as well as other exposure controls), especially in bright conditions—thereby helping prevent overexposure. ND filters come in many different styles. Some are solid while others are graduated. Variable ND filters, while more expensive, offer a range of light-reduction capability, typically from two to eight steps of light control. Solid ND filters reduce light by a fixed amount.
Zebra Stripes

Figure 11.29
Left: This neutral density filter kit contains three ND filters with varying degrees of exposure adjustment (2, 3, and 4 stops). Right: Filters such as these are designed with a threaded ring for quick connection to a compatible lens.
To assist you in monitoring exposure levels during recording, many cameras include a Zebra feature. With Zebra turned on, the viewfinder will display cross-hatched diagonal lines, resembling Zebra stripes, over any portion of the image that is overexposed (see Figure 11.30). The iris can then be adjusted up or down until the Zebra stripes either go away entirely or are barely visible, resulting in an image that is properly exposed. The Zebra setting corresponds to IRE units, a broadcast engineering standard for defining the relative range from black to white in a composite video signal. On the low end, a value of 7.5 IRE corresponds to video black, while on the other end of the continuum, a value of 100 IRE represents the peak white levels before clipping. To ensure that your video is legally broadcast safe, strive to keep the video levels within this range.

Figure 11.30
In the top image, the zebra lines tell us the image is grossly overexposed. The bottom image displays the same shot after correcting exposure. While the zebra lines have not entirely disappeared, the subject is now properly exposed as indicated by only a few minor hot spots in the lighter regions of the background.
Professional NLE software includes a special type of oscilloscope known as a waveform monitor that allows an editor to visually evaluate video levels in IRE units during postproduction. Aperture settings correspond to IRE units, with each f-stop equaling roughly 15 IRE units. The Zebra control can usually be set to one of two light-intensity thresholds: 70% or 100%. When set to 100%, the warning stripes appear whenever a portion of an image clips at 100 IRE. Under normal lighting conditions, white clothing or other white articles may register slightly higher than 100 IRE since they are the brightest objects within the frame, and this should be expected. The 70% threshold corresponds to the upper end of the range we normally expect for Caucasian skin tones (60–70 IRE). The use of this setting may help you optimize exposure when shooting human subjects with lighter skin tones. Zebra stripes are a visual aid to help ensure that video clipping does not occur and that your image is neither under- nor overexposed. They appear only in your viewfinder during recording and are not permanently recorded to the image file.
Gain
Shooting in a low-light situation can pose a challenge to both the still photographer and the videographer. If supplemental lighting is not available, the only option you may have to keep a shot from be underexposed, and potentially useless, is to increase the light sensitivity of your camera. Chapter 10 discussed the ISO system that was originally adopted for photographers as a way of rating the light sensitivity of photographic film. As a reminder, the higher the ISO rating, the more sensitive film is to light, but, also, the grainier the image will be when processed. With a digital camera, the electronic image sensor, which replaces physical film, can also be made more or less sensitive to light by turning a dial, flipping a switch, or changing a menu setting.
Video cameras traditionally provide a gain control with a three-position setting labeled 0 dB, +6 dB, and +12 dB. Gain works by amplifying the voltage level of the composite video signal, which explains why decibels are used as the unit of measure. Every 6 dB of gain doubles the light sensitivity of the image sensor as well as the amount of noise in the image. It also provides the equivalent of one full f-stop of light (or brightness) to the image. The optimal position for gain is 0 dB, which will render the cleanest image minus any visual noise due to amplification.
For all practical purposes, the ISO and gain controls perform the same function. However, because it has been around for so long, ISO is a much more familiar system to photographers and DPs who understand and know how use it in conjunction with the other two variables in the exposure triangle. The ISO standard also goes beyond the three simple gain settings found on most video cameras. For example, the Canon C100 has an ISO range from 320 to 80,000 in 1/3 step increments. As digital cameras keep improving, the nominal ISO setting continues to improve. This means that shooters can now go much higher up the ISO scale than previously before encountering noticeable noise or degradation in the video image. What gets a little confusing these days is that some hybrid cameras are equipped with both an ISO and gain setting. In the end, don’t worry about it. Just remember that when you need a little extra punch of brightness in your dimly lit shot, you have these controls at your fingertips to make a difference and perhaps even save the day.
Shutter Speed
On a digital still camera, the shutter is a component that controls the duration of time that light accumulates on the image sensor during a single exposure. Shutter speed is the duration of the interval. On DSLRs, the shutter is a mechanical curtain that opens or closes to permit light to pass or block its transmission when the camera is set to still picture mode. On video cameras, compacts, and smartphones, or when DSLRs are set to video mode, the shutter is an electronic component that instructs the image sensor when to turn on and off. A shutter functions somewhat differently when recording video then when shooting still pictures. In still picture mode, the shutter opens only once per individual exposure. In video mode, the shutter opens and closes repeatedly at a constant rate, which may or may not correspond directly to the current frame rate of the camera.
Shutter speed is expressed as a fraction of second. For example, a shutter speed of 1/250 indicates that the shutter will open and close at a rate of 250 times per second during recording. For normal shooting situations, the general rule of thumb is that the denominator in the shutter speed fraction should be double the frame rate of your video. Since most video today is shot at 24, 25, or 30 frames per second (fps), this would suggest a corresponding default shutter speed of 1/48, 1/50, or 1/60. It’s important to understand, however, that shooting at a different shutter speed than any of these defaults will not alter the frame rate of your recording.
As the third member of the exposure triangle, you can expect shutter speed to influence the amount of light coming into contact with the image sensor. Because the shutter momentarily impedes the flow of light to the image sensor, acting like a gate; increasing shutter speed decreases the amount of light hitting the sensor. To compensate, you can add more light, open up the aperture, increase the ISO/gain setting, or perform some combination of the three. Likewise, reducing shutter speed increases the amount of light striking the image sensor.
As in still photography, videographers use faster shutter speeds for capturing fast-moving subjects and action shots so that they appear sharply defined with little to no blurring. Choose a fast shutter speed when shooting sporting events and other activities where there is a relatively high degree of primary motion within the frame and plenty of light. Choose a slower shutter speed in low-light conditions and when the subject’s movements are minimal.
Sound
Using the word film or video to describe the art of motion picture recording is a bit of a misnomer because it tends to emphasize the visual component of the craft at the expense of sound. It cannot be overstated how important the element of sound is in professional videography and filmmaking. In fact, because of huge advances in recent years in the performance capabilities of automated metering and exposure controls on digital cameras, it is not at all difficult, with decent lighting, for an amateur with little training to walk away with great looking video at the end of a shoot. Acquiring professional sound is usually another story. Much of what you need to understand about acquiring professional sound can be found in chapter 12, which focuses entirely on audio production. For now, I just want to focus on a few things to consider before pressing the record button.
Connections and Signal Flow
Camcorders typically come with a built-in microphone, which usually works well for recording natural sound. When shooting interviews, however, be sure to use an external microphone connected to the camera. Whether the microphone is wireless or wired doesn’t matter, as long as it’s a decent microphone rated for professional

Figure 11.31
Audio signal flow and record levels on the Canon C100 are controlled here. As with most professional camcorders, up to two external microphones can be attached via the XLR connectors (see inset). Half the controls correspond to microphone input 1 while the other half are for input 2. 1) Record Level—use this control to set the record level when the A/M switch 2) is set to Manual. Monitor the VU meters on the viewfinder to determine the appropriate level. 3) Choose LINE when connecting a line-level device, such as an MP3 player, to a microphone input. Chose MIC when using a self-powered (dynamic) microphone. Choose MIC +48V when using a condenser microphone requiring phantom power. 4) Choose INT when using the camera’s built-in microphone. Choose EXT to change the signal flow to an external microphone.
use. After connecting it to the camera, verify that the audio signal is registering on the camera’s VU meter and that you are hearing it through your attached headphones. As stressed further in chapter 12, monitoring audio without headphones is not an option, unless you just don’t care about obtaining best results or want to throw caution to the wind. Follow this checklist for ensuring quality audio acquisition and for problem-solving signal flow issues:
- 1. Choose a location relatively free of unwanted sources of background sounds that compete with or detract from the primary audio. A few examples of things to avoid include: air handling units, construction equipment/tools, crowds, fountains, high winds, traffic/vehicular noises (cars, planes, trains), speaker/PA (public address) systems, and so on. If a background sound is related to the subject of your interview/story, it may actually compliment the interview. Just make sure the subject’s audio is the most prominent source in the mix and that it is audible and clearly distinguishable above any background sounds.
- 2. Listening through your headphones, make sure the audio signal is free of transmission noise caused by ground loops, RF (radio frequency) interference, phase cancelation, or electrical shorts such as: buzzes, crackling, hum, intermittent breakup, missing frequencies, static, and so on.
- 3. If the attached microphone has an on/off switch, make sure it is turned on.
- 4. Make sure the XLR cable connectors are fully seated on both ends to the corresponding jacks and securely locked in place.
- 5. If you are using a condenser microphone, verify that it has a working battery (typically AA) or that phantom power (if available) is turned on.
- 6. Confirm that the microphone preamp is set to an appropriate record level. The record level is visually represented by the VU meters and is indicative of what the camera “hears” and the amount of preamplification that is applied to the signal during recording. Make sure the signal is strong enough without clipping. Since most cameras feature two microphone inputs, be sure to set the record level that corresponds to the input number of the microphone you’re adjusting.
- 7. Connect headphones to the input jack (usually color coded green) and set the headphone volume to an appropriate level. Remember, the headphone volume is what you hear and has no impact on the recorded audio signal.
- 8. After following these steps, if you are still experiencing problems, you may have a bad microphone or microphone cable. Try alternately swapping out the cable and microphone with another one in an effort to narrow down which component may be causing the problem.
- 9. Record a brief sound check with the subject while fine-tuning the record level. Play back the sound check while monitoring it through the headphones to make sure you are happy with the quality of the recording.
Chapter Summary
Video recording began in 1956. Since that time, many formats have come and gone as engineers and product developers found newer and better ways to encode video and audio on magnetic tape or solid-state media. For many years, the recording device (the camera or VCR) was outfitted to work with a specific physical container such as a magnetic tape reel or plastic cassette. A videotape recording could be played back only on a corresponding VTR designed work with the same tape format.
The most significant development in recent years was the development of solid-state technologies that use file-based recording formats and codecs. Such formats have drastically reduced the cost of professional HD recording systems and the media we use to store digital files. However, because these formats are digital, there is hardly ever just one way to record or transcode a video or audio signal. You can’t just turn the camera on, press the record button, and expect the best results. You need to know a lot more information related to recording formats, codecs, container files, resolutions, frame rates, sample rates, bit rates, and so forth in order to make informed judgments about the best resolution and quality for a given job or assignment. The more you know now, the better you will be able to adapt when everything changes once again—and the next generation of recording technologies emerge.