

In this chapter we will look at many of the resources you have available to create textures with. Starting with the best, or most appropriate, texture resource possible is crucial to ending up with a great texture. We will look at the various sources of digital resources for texture creation and each of the steps in the process of gathering, preparing, and storing your assets.
Although the focus of this book is the creation of textures using Photoshop so that you develop strong Photoshop skills, in reality it is more common, easier, and more effective to use photo references in texture creation. We will be using a little photo reference in the book, and you will have access to a collection of the kinds of images that I find to be the hardest to create in Photoshop without actually hand-painting them. Cracks, splats, drips, wood grains, and other organic random stuff, though they can be created in Photoshop, simply look more genuine when taken from a good source photo. This library of images can be found online at the website for this book.
Typically, a texture is built with layers containing various sources of imagery, and photo reference plays a big part in this process. Layers are “composited” together using the various tools in Photoshop, such as layer-blending modes. (If you are unfamiliar with the concept of layers and layer-blending modes, see Chapter 2. For additional information, see the appendix on Photoshop.) We will be using compositing throughout the book. Even if all the elements of a texture are created entirely in Photoshop, we will still be using layers and blending modes to composite the various parts together. No matter what source you get the image from, you always end up using Photoshop to combine and manipulate the various sources to create the imagery that fits your needs. You will almost always use Photoshop in the creation and final output of a texture.
A resource, in the context of this book, is any digital image from any source that helps you create your art. Therefore, a small checkered pattern made in Photoshop that can be tiled across a canvas in Photoshop and used as the base of a tiled floor is a resource. A high-resolution digital photograph of a dirty surface that you might overlay to make the tiled pattern look dirty is another resource. And so is any other image that can be used to get the effect you desire (Figure 4.1).
The examples are as endless as your imagination and limited only to the number of digital images you can collect. There are no cut-and-dried rules here. A resource that might seem useless to some artists might be just what you need. In general, you will want to avoid wasting space and dealing with the clutter of low-resolution, poor-quality, and just plain bad images. But if you come across an image that you have a specific use for, keep it! Keep in mind that although it is easy to make a texture like the previously mentioned plain-and-simple checkered texture, it takes time to create. Why not have one on hand that you can drop into an image when needed?
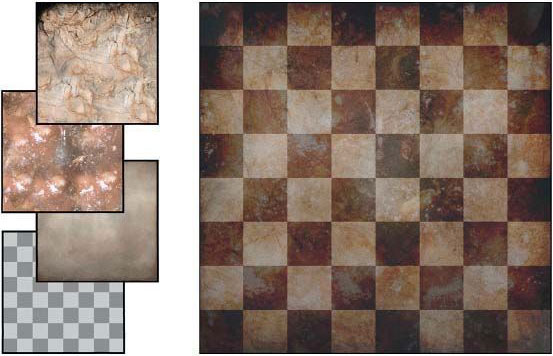
FIG 4.1 A resource is any image that can be used to create art. Here, a simple checkered pattern was used to create a tile floor by combining it with other images.
If possible, save everything you can. You never know when you will need a high-resolution image of a penny, a close-up of rotting meat, or 101 highway signs from South America. Naturally, my first recommendation to you as a game artist is to buy a very large hard drive—the biggest you can afford. This makes the process of sharing, backing up, and switching to a new computer much easier. In addition to a large external hard drive, I also have a redundant array of independent disks (RAID) in my system that mirrors several hard drives, so if one crashes I don’t lose any work—even my most recent work.
It has also provided me with peace of mind, in that when I’m out of town I can leave my external drive in a safe location away from my house. If my computer is stolen, the house burns down, or my system is damaged in any way, I will still have my external drive. I could more easily replace the system than the data stored on it.
It is also a good idea to crop, resize, and otherwise manipulate your images to make them as size-efficient and user-ready as possible without degrading their quality. An image that tiles nicely and is already a power of two will not slow your inspired workflow, since you can simply drop it into your work and not stop to crop, clean, tile, and otherwise make it useful.
In the process of obtaining and collecting digital images, you will discover that whatever time you spend up front to make them easier to find and use in the long run will be worth every second. You need to categorize your assets by type (terrain, liquid, doors) as well as keep track of where you got them. Some texture collections have copyrights and “use restrictions” attached to them. Therefore, you might not be able to store all your images in one neat structure, instead of having them in various folders according to many criteria. We will look at that process later in this chapter in some detail.
First, let’s look at the process of gathering the raw images for your collection. There are many ways to collect images for your collection; all have their pros and cons.
There are many sources for textures and digital imagery, including creating them in Photoshop, taking digital photographs, scanning them in, buying texture collections, surfing the Internet for useful images, and using 3D applications to model and render images.
Creating Textures in Photoshop
Although there are many ways to create a texture, for this book I wanted to focus on using pure Photoshop as much as possible. I believe that if you are able to create anything you want in Photoshop, when you have the other resources at your disposal you will be much better and faster at creating textures. I briefly introduce this method here, and we will spend the rest of the book creating textures using Photoshop. Technically, every game texture you create will pass through Photoshop and become a “Photoshopped” image to some degree. This is especially true in the age of shaders/materials. You will spend more time in Photoshop creating, adjusting, and altering the other images often used in shaders to control the various effects.

FIG 4.2 The image on the left is a digital photograph; the one on the right was created entirely in Photoshop.
Many people are intimidated by the prospect of a blank slate in Photoshop when they’re creating a texture, or they may be critical of this method based on low-quality work that they have seen. Creating basic materials and even objects in Photoshop is not that hard and does not require special painting skills. In fact, you can create materials and objects with a greater degree of control and thus create an image that might be better than a digital image of the same thing in some cases; see Figure 4.2.
In the end, no matter what source you obtain your raw assets from, you will always use Photoshop (or a similar 2D image editor) to manipulate and assemble your textures in their final state. For example, you may create a frame for a window in Photoshop based on a photograph, create the glass panes from scratch, and use an actual image of a wood grain to add detail to the window frame and overlay a grime layer, too (see Figure 4.3).
There are some cons to this method. It does take some time to start from a blank slate and use all the proper filters and tools to create a realistic texture or material from scratch. If you are not patient and do not understand the methods, the textures will look Photoshopped, which is not a negative term pertaining to Photoshop but is a comment on a lack of quality in the image itself. Not adjusting any Photoshop default values or taking the time to tweak and test the texture will result in substandard work. One positive is that this method allows you to create an image that is uniquely yours. You will never be stuck without the texture you need. If you can imagine it, you can create it in Photoshop. Just because you can’t find a picture to manipulate, you don’t have to stop working.

FIG 4.3 This window was created in Photoshop using a mixture of photographic and Photoshop elements.
Even if you don’t need to create from a blank slate in Photoshop, you will still need to use Photoshop to manipulate your images to make them useful to you. The better you know how to use Photoshop and its many tools, the better your work will be—no matter what method you use.
Finally, there is consistency. Knowing how to use Photoshop to its fullest extent will allow you to achieve consistency with your texture sets, and that is very important. No matter how great your textures look, if they don’t visually mesh together in a game world, all the good you have accomplished in your texture work will be diminished.
Digital Cameras/Phones/Mobile Devices
Using a digital device to collect images is something everyone can do nowadays with the proliferation of phones and mobile devices. A standalone camera will still get a much higher quality image, but some of the newer mobile devices have very good cameras built into them.
One thing to watch for when taking digital images for use elsewhere is legal concerns such as privacy and copyright issues. While people today are used to getting their picture taken and copyrighted items are digitally copied all the time, it doesn’t mean you can use a person’s likeness or a company’s logo in your art.
Other than the cost of a camera there are no real drawbacks to this method, and chances are you have a decent camera built into your phone already. You can take pictures of dirty dishes and fake blood smears on paper (red paint), and anything you come across like an interesting gate or door. Be warned that since September 11, 2001, taking multiple pictures at many locations will get you noticed. Before September 11, no one would think much of it if you were taking a picture of the rusted door of a power station or warehouse, but now you may be watched or even reported. I have been pulled over and questioned by the police after taking pictures around a warehouse. Someone thought it suspicious, wrote down my car’s license plate number, and reported it.
Digital images are versatile, too. Don’t be limited to the original context or scale of the asset. Use the texture where it works. A rock can be the side of a mountain, a small crack in a sidewalk can be a large crack in a wall, a small electric watch motor can be a giant hatch in a wall, and so on (Figure 4.4). This applies not just to scale but to context as well. A really great source for some of the most disgusting textures I have ever seen were simply close-ups of the pots and pans in the kitchen after dinner. Grease drippings from a roast, congealed butter after the vegetables have been removed, and dried ketchup can make for some great imagery. Figure 4.5 shows some of the sick images in my collection.
The possibilities are as endless as your imagination with a digital device. Another benefit is the ease and extremely low cost of experimentation with a digital device. You are not limited by factors such as the number of prints on a roll or the cost of film and developing. You can shoot and delete 1,000 images for the price of 10.
Tips on Taking Digital Photographs
Taking digital photographs for use as texture resource takes a different mindset than traditional photography. Most likely, the first images you take will have aspects that will make them hard to use in a texture. You won’t be able to see these problems right off; in fact, you will have to go home and look at the images up close on your computer and try to work on them before the problems pop up. But there is no substitute for this process, and going through it a few times is the only way to develop an eye for potential problems before taking a picture. Even so, here are some general tips for using a digital camera to capture texture resources that will help speed up that process.

FIG 4.4 Don’t be limited to the original context or scale of an asset. Use the texture where it works. A rock can be the side of a mountain, a small crack in a sidewalk can be a large crack in a wall, and in this case a small machine part can be a large sci-fi wall detail.

FIG 4.5 Guess what these are.
Image Resolution
This first tip is an obvious one. The higher you set the resolution on your camera, the higher the detail will be in the image. It also eats up memory, can require more light, and might be harder to get in focus if that is the case, but a higher-resolution image makes for a better resource.
Diminish Image Tilt
This is a rather simple tip. When you take a picture, look closely in the viewfinder. You will see some marks (Figure 4.6); whether they are lines, squares, or circles doesn’t matter. These marks may be there for a number of reasons, but primarily they are there to help you line up your shot. These are very useful and easy to use when you are taking a picture of a surface with straight lines, such as a brick wall or the frame of a window. Unfortunately many newer cameras don’t have viewfinders anymore; rather, they have a small screen on the back of the camera. This screen may or may not have any marks at all. If you have such a camera and want to line up your shots, you can carefully draw a set of your own lines using a very fine-point water-soluble marker. If you do this, be very careful not to scratch the screen, don’t use a permanent marker unless you want the marks to be permanent, and do this at your own risk. Take your time measuring out the lines so they are perfectly straight across the screen horizontally, vertically, and centered.
Watch the Auto Settings
Many digital cameras come with preprogrammed image control modes. These are various presets for the camera for taking various types of pictures: close-ups, portraits, sports, and nighttime pictures, to name a few. The danger here is that some of the presets have a shallow depth of field and other settings that can distort or affect the image in an undesirable way. Depth of field refers to the area of the image that is in focus from the camera lens to infinity. You can have a shallow depth of field so that items that are only within a few feet or inches are in focus and objects that are farther from the camera are blurry. In Figure 4.7, you can see a few examples of depth of field.

FIG 4.6 Save yourself some work; use the marks in the viewfinder to line up your shot. These marks are very useful and easy to use when you are taking a picture of a surface with straight lines, such as a brick wall or the frame of a window.

FIG 4.7 Many digital cameras come with preprogrammed image control modes. Be careful of the presets that have a shallow depth of field and other settings that can affect the image in an undesirable way. Depth of field is the area of the image that is in focus from the camera lens to infinity. You can have a shallow depth of field so that items that are only within a few feet or inches are in focus and objects that are farther from the camera are blurry. To the left you can see that the bird and the background are both in focus; in the middle the bird is in focus, but the sky is not; and on the right is an image where the foreground object is in focus but the background is not.
A shallow depth of field can be bad when it is so shallow that when you are photographing a surface, parts of the surface are out of focus and blurry and other parts are crisp. This can easily happen if you are taking a picture at an angle—looking up at a window, for example—and using a shallow depth of field. The part of the window closest to you will be in focus and the farthest parts will be blurry.
Diminish Lens Distortion (Fisheye)
When purchasing a digital camera, make sure that you get a decent lens. Cheaper lenses tend to give you a fisheye effect (Figure 4.8), spherically distorting the image, which can make it much harder to clean up your images for use. You can get a 5-megapixel camera the size of a pack of cigarettes and a lens the size of a drop of water, which will give you bad distortion. There are cheaper cameras with lower pixel resolution and better lenses, and those are the ones I would buy over the ones with poor lenses.
If you have a camera with a lens prone to fisheye, you can counter the effect by getting as far back as you can from the surface you are photographing and zooming in. See Figure 4.9 for an example of a surface that was photographed close up and zoomed all the way out and then farther away and zoomed in as far as possible. The effect is not very pronounced, but the bulge in the lines of the bricks would be very noticeable if you tried to tile this image.

FIG 4.8 When you’re buying a digital camera, try to get a decent lens. Even high-megapixel cameras often have cheap lenses that distort the image, creating a fisheye, or spherical, effect. This makes using the image as a texture more difficult because it takes more time to correct such errors and does more damage to the image when doing so. This image is very distorted due to the cheap lens on the camera and would be very hard to correct (not even worth it, in my opinion). Notice the orange lines that are straight compared to the edges of the window frame.
Diminish Angle Distortion (Position)
Distortion also comes from the position of the camera in relation to the subject. This issue relates to perspective, which we discussed in Chapter 1. When you take a picture standing above, below, or to the left or right of whatever you are photographing, you are creating perspective in the image. You will not have straight lines and therefore will need to make corrections in Photoshop. The Photoshop work is not too time-consuming when you’re correcting straight lines that are at an angle using the Free Transform or Crop tool (we look at that later in this chapter). Correcting a bulged-out image might be harder, but what’s bad about skewed angles as opposed to the bulge is that dramatically changing the perspective and angles in an image will cause it to fall apart visually. Even if the lines are perfectly straight, an object with any kind of depth, such as windows and doors that have protruding frames around them, retains visual information about the angle at which the object was captured (this relates to Chapter 1’s discussion, too—particularly light and shadow). The human eye will detect those differences and the image will look off. There are ways to correct those errors, but they are time-consuming, since you are basically rebuilding the image—so it’s best to avoid them if possible. So, even if you get all the lines in the image straight in Photoshop, the shadows will simply not look right. Things that are flat like signs can be more easily compensated for in Photoshop. You can see some examples in Figure 4.10 and in an illustration on how to position yourself in Figure 4.11.

FIG 4.9 Distortion from a cheap lens can be countered somewhat by getting as far back from the surface you are photographing as you can and zooming in. This is an example of a surface that was photographed close up and zoomed all the way out and then from farther away and zoomed in as much as possible. The effect may not look that pronounced, but later, when you try to use this image to tile across a wall surface, the effect will be very noticeable.
Diminish Lighting Problems
Lighting is a big concern, too. If you have studied photography or film, you may be familiar with the term golden hour. For photographers, the best light for photography occurs one hour after sunrise and one hour before sunset. During this time, the light is diffuse. For a texture hunter, this is not always the best time to take pictures, because the light tends to be saturated with blues and oranges and is changing rapidly. But during the day, light is of very high contrast and harsh when the sun is overhead. When the sun is low in the sky, the shadows can be equally harsh but longer. During these hours, when the sun is low in the sky, you are also faced with the problem that anything you are trying to photograph might be facing away from the sun and therefore silhouetted. These images generally come out really dark. This is not a good time to take texture source images, either.

FIG 4.10 Distortion also comes from the position of the camera in relation to the subject. When you take a picture standing above, below, or to the left or right of whatever you are photographing, you are creating perspective angles in the image that will have to be corrected in Photoshop. The windows on the upper left are okay, but the windows on the upper right are at too dramatic an angle. The second row shows some windows all taken at a good straight-on angle. The third row shows a sign that was taken at a skewed angle but that can be easily fixed because it is flat and lacks a lot of depth. The windows on the bottom left are at a very extreme angle. Bottom right, even after straightening the lines, the protruding frame retains visual information about the angle at which the window was captured and the image doesn’t work.

FIG 4.11 Ideally, you want to take a picture straight on to minimize angle distortion, but even if you can’t get into an optimal position, you can still minimize angle distortion by positioning yourself as straight vertically or horizontally as you can. At the top, ideally the camera should be pointing straight at the subject. If this is possible, the image will be mostly square and easier to fix in Photoshop. The illustration in the middle is of the camera looking up, like at a window or a sign high on a wall. In this scenario the image will come out wider at the top than the bottom. At the bottom you can see that taking a picture from an angle that is both horizontally and vertically off will create a very distorted image.
So, what does that leave us? If possible, wait for a cloudy or overcast day. Although many photographers don’t go out on overcast days, it is the best time for game artists to go out and shoot. Light is plentiful, it is just diffused by the clouds. There are no harsh shadows because the light is more evenly distributed. On overcast days, plants and trees in particular are more saturated. Although we have a lot of control over our image in Photoshop, harsh shadows are almost impossible to remove. Figure 4.12 shows two wooden shutters, one shot on an overcast day and one on a sunny day.
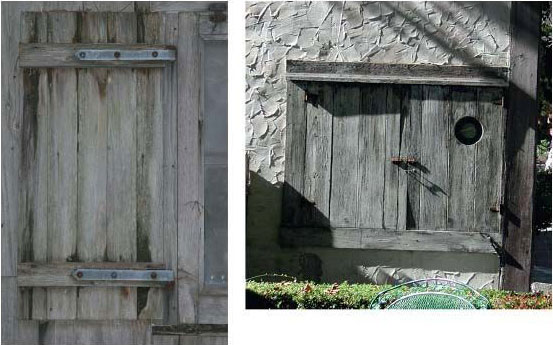
FIG 4.12 Although we have a lot of control over our images in Photoshop, harsh shadows are almost impossible to remove. Here are images of two wooden shutters, one shot on an overcast day and one on a sunny day.
Don’t Use the Flash If at All Possible
Another problem is flash burn. Avoid using flash if possible. A professional photographer knows how to use a flash so that it casts just the right amount of controlled light, and maybe you can learn that, too, but in general if you take a picture using a flash, you will get harsh light and shadow and a large flash burn in the image. Even surfaces that don’t seem highly reflective will be burned by a flash. In fact, even if you are photographing a very matte (nonreflective) surface, you will still get a large overlit area in the middle of the image and the edges will recede into darkness. This is just as bad as a burn for texture work. You can remove a mild flash burn in Photoshop, but usually doing so requires you to clone and paint the flashed part of the image to remove it. I would opt to take another path if possible. Figure 4.13 shows a flash-burned image and how poorly it tiles.
Plan for Alpha Channels
We talked about alpha channels in Chapter 2 (making parts of the image transparent) and later we will look at various ways to create alpha channels. Many of the techniques for removing backgrounds to create alpha channels rely on the separation and deletion of the background colors from the foreground objects. Knowing this, if it is at all possible try to make sure that the objects you are capturing have a contrasting color behind them. Figure 4.14 depicts a plant that was photographed so that the background could easily be removed and an alpha channel created. There is also an example of an image of grass that is too full of grass; there is no clear delineation between grass and background.
Plan for Tiling
If you know that you will be tiling the surface you are photographing, then try and capture all the edges and boundaries you will need to make the tiling easier. If you clip off part of the image, the tiling of that surface will be much harder. If you are photographing a surface, such as a brick or stone wall that you intend to tile, try to pick a section of the wall that has as few repeatable aspects as possible.

FIG 4.13 Avoid using a flash if possible. In general, if you take a picture using flash, you will get harsh light and shadow and a large flash burn in the image. Even surfaces that don’t seem highly reflective will be burned by a flash. The top image shows a flash burn and the bottom shows how poorly it tiles.

FIG 4.14 Plan for creating alpha channels if possible. Try to make sure that the objects you are capturing have a solid color behind them so that the background is easier to remove. In this image there is no clear delineation between the branch and the ground behind it.
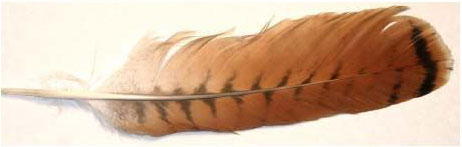
FIG 4.15 You can scan small 3D objects such as knives, leaves, or feathers. Just be careful not to scratch the glass or spill damaging liquids into your scanner.
Scanners
Scanners are another way to capture digital images. Not only can you scan documents, you can also scan small 3D objects such as knives, leaves, or feathers (Figure 4.15). Just be careful not to scratch the glass or spill damaging liquids into your scanner. Keep in mind that even though scanners have dropped in price and increased in quality, it is often easier to simply take a picture of an object with a digital camera rather than scan it. Also keep in mind that most existing images you would like to scan may be copyrighted.
Scanners are great for artists who actually do their work on paper, but once again a digital camera would be better, considering the fact that artwork can easily be too big for a scanner and the paint or ink may rub off on the scanner glass.
Texture Collections
There are some terrific texture collections for sale that anyone can buy, and they fall into three general categories:
• The finished game texture
• The digital photograph collection
• The digital image of a surface or thing
The problem with the finished game texture is that anyone and everyone will recognize those purchased textures. They can almost never be used “as is” and will need to be modified, so it is generally better to get a good set of base images and build your own textures. But if you can get your hands on these texture collections, they are very useful for learning. You can also use these “as is” in certain circumstances. If you are prototyping or building a walkthrough that will not be sold on artistic merits, these sets can be very useful and can save you time.
The digital photograph collection is the sort that features a kid holding balloons, a shot of the Chrysler building, the Statue of Liberty, and a sunset. These are editorial shots, and though they may have their uses, they aren’t generally useful to the texture artist. Give me a good image of a rusted dumpster panel, cracked stucco, or a wall of wooden planks. The digital photograph is sold mostly as clip art for blogs and other publications. Only a texture artist would love a high-resolution image of a pile of rotten meat swarming with maggots. Most people would prefer the kid holding the balloons.

FIG 4.16 From left to right, an image of a digital photograph from a clip-art collection and a digital image of—ugh, that’s sick. Which image would you prefer in your collection? (By the way, it’s ketchup and bacon fat.)
Finally, we have the digital image of the rusted dumpster panel, the side of the dead seal, the close-up of pork drippings, and dried vomit (see Figure 4.16). These are the images the texture artist lives for—the ones we find most useful. These are the images you will composite over other images in Photoshop using the layer-blending modes to create some incredible textures. You can build your collection by swapping yours with fellow artists.
The Internet
The Internet is a great source of images. Of course, you will run into copyright restrictions and low-resolution images, among other problems, but quite often the images you will find by going to the image search on Google will be surprisingly good (Figure 4.17). Even just for a source of reference, the Internet can be invaluable. Type in a few keywords and you can see pirate gold, maps, Persian rugs—almost anything you can imagine that someone took a picture of and uploaded somewhere on the Internet.
Using 3D Applications
Another method for creating 2D textures is to model them in 3D. This method is great for modeling things that you can’t get a picture of and that would lack the depth you need in Photoshop. This method also allows you to create a surface using all the lights, materials, and shaders the 3D package has to offer. You can render an image from a 3D application, process it in Photoshop, and then apply it to a lower-poly-count game model. The big drawback to this method is that it relies on the assumptions that you (1) are a 3D modeler and (2) own the necessary software. It is obviously a major drawback if you don’t own and know how to use the software to create the 3D model, apply the texture to it, and light the scene it is in. This method can also be time-consuming and must be weighed against other options.

FIG 4.17 Type a few keywords into the Google image search and you can see pirate gold, maps, Persian rugs—almost anything you can imagine that someone took a picture of and uploaded to the Internet. Searching for the word rust netted me 13,200,000 images (it was 178,000 images in 2009). (Google image search screen used with permission.)
The process of cleaning up your textures is an important one. Time spent at this stage will save you a good deal of time later on. When an image is cropped, it saves space; when it is named and saved appropriately, it is much easier to find when you need it; and when an image tiles nicely, it can be used “as is”; you won’t have to stop your creativity to clean up the image. Also, the process of working for a few minutes with each texture helps you become familiar with the images you have on your hard drive. This will speed up your workflow and allow you to create better textures because you will be aware of the many options you have when building your texture. Of all the things you can do to manipulate an image when you’re cleaning it up, the first thing you will most likely do is crop it.
Cropping
Cropping an image is simply the process of cutting off unwanted portions of it. Cropping literally chops away the portions of the image outside the crop box (see Figure 4.18). The Crop tool in Photoshop can, however, do much more than merely cut your image down to size. Some of the features of the Crop tool can be very useful and save you time.

FIG 4.18 Cropping chops the image down to the size of the crop box and removes what’s outside it.
As you are cropping your images, keep in mind that although power-of-two textures (discussed in Chapter 2) are often your final goal, a perfect square of any size will be fine as long as you remember to start your texture work in the power of two, resizing the source to fit. Some resource images defy the perfect-square rule, so don’t stress about it. If the image is a panoramic scene of the horizon or is to be used as an overlay for stains and weathering, leave it as complete as you like.
Cropping an image can save file space, as can resizing it, but I don’t resize and I crop as little as possible. I like to keep the entire image, and I always use a copy of the image and never alter the original. Increasing the image size doesn’t buy you anything but a larger file size; sizing it down or cropping it only degrades quality and/or removes portions of the image you can’t get back later if you need them. I do crop a lot when I am working on windows, doors, and things like that as I straighten them, especially if all there is around the window is a boring wall that looks like all the other walls I have.
Cropping is permanent unless you change the Delete option to “Hide” in the option bar in Photoshop. Once you do that, the canvas size will be scaled down, but the image will still be the same size and is simply hidden because it is outside the canvas area. If you use the Delete option and save and close your file, you can never get the cropped portion back. You cannot use the Hide option on an image that only has a background layer. You need to either convert the background to a layer, duplicate it, or create a new layer.
![]() Note
Note
You can make the canvas size larger using the Crop tool. You can drag the crop box handles outside the canvas.

FIG 4.19 You can rotate the crop box and it will crop and rotate the image to match the selection. From left to right: The original image, the crop box dragged out, the crop box rotated, and the final result after you press Enter.
Here are some helpful tips for cropping an image in Photoshop. Using the Crop tool, you can do the following (see Figure 4.19):
• Hold down Shift and it will make the selection perfectly square.
• Hold down Alt and you can drag and size the crop box from its center point.
• Hold down the Shift and Alt keys and make the selection perfectly square as well as drag and size from the center point of the crop box.
• Press the Caps Lock key and your cursor will change to the small crosshairs instead of the thick Crop icon that can get in the way of the image you are trying to crop.
• Enter a height and width in the options bar. After you drag out the crop box and press Enter, the image crops and resizes. You will notice that you can size the crop box but not change the proportions. The height and width stay proportional to the values you entered.
• You can also hold down the Ctrl and Alt keys after you start dragging out the crop box to make the crop box selection the exact size of the dimensions you entered, so the image will not resize after you press Enter.
• You can rotate the crop box and it will crop and rotate the image to match the selection.
Fixing Perspective (Bad Angles) with the Crop Tool
Using the Crop tool in Photoshop, you are also able to instantly fix perspective problems. I find this feature particularly useful. All you have to do is drag out a crop box on your canvas (doesn’t matter how big it is; you can adjust it later) and make sure that the Perspective box is checked in the options bar. Then you can drag each individual handle to the corners of the thing you want to crop and fix. When you press Enter the image is cropped and the perspective fixed. See Figure 4.20 for a visual of the Crop tool fixing perspective in an image. This works best on images with straight lines. I mentioned earlier that a bulged-out image is harder to work with than one with straight lines. This is one of the reasons. The lines connecting the crop box handles are straight, but if the area of the image you are trying to crop is bulged, the lines will be curved and you won’t get a clean result when you crop.

FIG 4.20 The Crop tool allows you to instantly fix perspective problems. The image at the upper left is the source. The upper right shows the extent of the perspective problem with red lines. The lower left image is the crop box on the canvas after each handle has been dragged to the corners of the part of the image I want to retain and fix. Shown in the lower right, after you press Enter, the image is cropped and the perspective fixed.
Resampling an Image Using Crop
Resampling means resizing your image to change the pixel height and width of the image. The Crop tool allows you to crop your image based on the dimensions and resolution of another image. You must first open the image you want to take the information from and then select the Crop tool. Click Front Image in the options bar and then click on the image you want to crop. Drag the crop box out (it will maintain the proportions of the sampled image), and when you crop your image it will also resize it.
You can also change the color and opacity of the shading shield and turn it off and on (see Figure 4.21). The shading shield is the area outside the crop box that will be cropped.
Crop Using the Trim Command
The Trim command (Image > Trim) crops an image by cropping away the parts of the image that have transparent pixels; therefore, Trim will have no effect on a full layer (see Figure 4.22).

FIG 4.21 You can change the color and opacity of the shading shield and turn it off and on. The shield is the area outside the crop box. Here you can see various settings applied to the shield.

FIG 4.22 The Trim command crops an image by cropping away the parts of the image that have transparent pixels.
The Free Transform Tool
The Free Transform tool allows you to size and distort the layer or selection in many ways. This tool is particularly useful for cleaning up textures and in texture creation. The Free Transform tool allows you to scale, rotate, skew, distort, and change the perspective of an image as well as other options for quickly rotating or flipping the image (see Figure 4.23). You can choose to flip the image horizontally or vertically or rotate the image exactly 90° clockwise or counterclockwise as well as 180°. All of this manipulation of an image is really useful for creating textures. Manipulating one visual element to fit convincingly into another is a good deal of what you will be doing during texture creation. Not all digital resources will come to you at the same resolution, angle, and so on. You might want to overlay a crack from one image on a wall texture and might need to scale, rotate, or even distort it to make it look the way you want it to.

FIG 4.23 Use the Free Transform tool to scale, rotate, skew, distort, and change the perspective of an image as well as other options for quickly rotating or flipping the image.
You will use the Free Transform tool frequently in texture creation. As you are creating a texture, you will be bringing images together from various sources, and those images will be of various sizes. You may be working on an image that is one size, say 1024×1024, and paste in an image to use in the texture as an overlay or detail that is larger or smaller and will need to be fit into the texture.
![]() Note
Note
Once an image is in the computer, the maximum detail is set and cannot be increased. The Free Transform tool is one way to make an image larger, but the amount of detail doesn’t increase; only the number of pixels is increased by a mathematical process called interpolation. This process does not increase the detail; it simply adds extra pixels to smooth the transition between the original pixels.
![]() Warning
Warning
Be careful doing any severe manipulation to an image, because you could degrade the image quality. Resizing, for example, does a lot of damage to an image. If you reduce a large image and later reenlarge it, you will seriously degrade its quality. Once you shrink an image and save it, you lose the resolution of the original image.
Texture Tiling
A tiling texture is an image that can repeat over a surface and still look good. Although it is easy to remove the seams in an image in most cases, it is more art than science to create a texture that can tile across a large surface, not have a pattern to it, and still look good (not being a blurry mess in order to tile). I purposely didn’t discuss how to tile a texture until after I discussed the best way to collect and prepare your resources, because some images are just not worth working with if you can help it. If the lighting is so bad, the resolution so low, or the image so distorted that you are looking at some serious reworking of the image, I would wager that it would probably be quicker to get a new base image than to try to rebuild a bad one. There are so many sources of digital imagery it just doesn’t make sense to perform major surgery on a bad base image. Some images are literally tiles—like floor tiles—and are easy to make repeat across a surface, but others can be complex manmade or organic patterns that are more challenging to work with. With these types of images the challenge is not only to make them tile but also to create an interesting texture without high contrast or unique details that make the tiling noticeable (see Figure 4.24). These errors are often called banding and hot spots.
Tiling a texture is arguably the most discussed aspect of texture creation, but there is more to tiling than just using the offset Filter and cloning away the seams. That method doesn’t always work when you’re tiling various surfaces. The approach you use to tile an image will depend on the image you start with, where the texture will be used, and even the technology you use.

FIG 4.24 At the top are examples of organic and inorganic images that do not tile well. The organic water image has severe banding; you can see harsh, dark stripes running vertically in the tiled image. The inorganic white bricks have a very severe hot spot; there is a clearly identifiable spot on the texture that you can see repeating. The bottom two examples are a set of organic and inorganic images that tile much more nicely.
The Base Image
The condition of the base image and what the final outcome must be will determine what you will have to do to the image to make it usable. At this point in the chapter, you are well aware of the things you can do: cropping, fixing angles, smoothing the lighting, and others. If you are starting with an image that was shot dead-on straight, you might not need to fix the angles. If it was perfectly lit, you will not need to spend time adjusting the lighting. You get the idea.
The Context of the Texture
Where will this texture be used? The answer to this question has a lot to do with the tiling techniques we’ll discuss shortly. But context also has to do with how close the player gets to the image and how many times the image will tile across a surface. You need to know this information because you can spend a lot of time making a texture tile a thousand times across a large terrain and find out that the image will be used in a place where it will only tile four times or that you took too much detail out of the image trying to make it work where it was not intended to.
The Technology Used
If you are developing for a platform or technology that is limited to low-color 128×128 images or a cutting-edge game engine using a high-end system that allows for high-color 1024×1024 images, you will obviously approach the processing and creation of the image differently. A larger image will allow for more detail and be a bit easier to tile due to the larger area it covers. But image size is not the only technological consideration when you’re determining the final appearance of your texture. What you can do with those textures in the game engine makes a huge difference in the final form that your texture will take.
Some game engines allow combining of multiple layers of textures on terrain (just like Photoshop layers), and this allows the texture artist to make a number of textures that are predominantly one material. Textures composed of one material are much simpler to tile. It used to be that terrain was covered in one texture and if you wanted something like a road or dirt patch, you had to create various versions of that one texture to place on the terrain polygon on which you wanted the road to run or the dirt patch to appear. This was limiting, to say the least; roads ran in straight lines and right angles, and you had to create a separate texture for any unique terrain detail. Now we can create a few versions of the terrain textures—packed dirt, grassy dirt, dried dirt, grass, dead grass, and other single-themed textures—and paint them onto the terrain. We can make our base layer grass and paint on darker grass, dirt patches, or a dirt road with a dirt-to-grass border. This is easier, and the results are far more pleasing. This approach also makes dealing with texture tiling much easier. See Figure 4.25 for an example of a terrain built using the layer system.
Some engines allow for random swapping of textures across a surface. You can create a texture and various versions of it and apply the main image to a surface, and the game engine will randomly assign the textures to various polygons. This method usually relies on a naming convention so that the engine will know that when Wall_Texture_001_a (for example) is present and Wall_Texture_001_b is also present, and more in the sequence, it should use those other textures in the random tile.
These random tiles are usually more subtle in their differences than the textures in a texture set, as shown in Chapter 2. In a texture set, you may have a very noticeable detail in the various textures: vents, large cracks, and so on. But a random tile is meant to break up the pattern produced by a tiling texture and not add specific detail (Figure 4.26). Four vents showing up at random spots on a wall would look weird, whereas subtle variances in the pattern of a brick—and even gradual light shifts, in this case—could work well. This is another technology that would allow for smaller textures. Four 128×128 versions of a randomly tiled texture would look better than one 256×256 tiled texture and would take up the same texture memory. (If this doesn’t make sense, look at Chapter 2, in which I discussed the power of two.)

FIG 4.25 Not too long ago (top), terrain was textured by covering it in one texture. Roads, dirt patches, and any unique area had to be created as a separate version of the base texture and placed on the terrain polygon where the detail appeared. Roads ran in straight lines and right angles. Nowadays (bottom), most commercial game engines allow for the layering of textures on terrain, like Photoshop layers. These textures can be composed of predominantly one material. Using base dirt, grass, and other single-type textures, you can paint them onto the terrain. This method allows for a much more organic terrain with more variety using the same number of textures. Not only are the results far more pleasing, but this approach also makes dealing with texture tiling much easier.
But this newer approach is being supplanted by an even newer technology. With shaders and projected textures, or decals, you can make the wall texture simple and add detail in other ways. Figure 4.27 shows an example of how a projected texture works. Shaders (discussed at length in Chapter 2 as well, with visual examples) can use even simpler textures and process varied detail in real time.

FIG 4.26 Some engines allow for random swapping of various textures across a surface. This method usually relies on a naming convention so that the engine will know to include all textures of a certain naming pattern in the process. These random tiles are usually more subtle in their differences than the textures in a texture set. In a texture set you have noticeable detail, but a random tile is meant to be subtle, to break up the pattern produced by a tiling texture and not add specific detail. In the left image, you can see a repeating pattern. On the right, three versions of the tile have been randomly applied to the surface. Some of the bricks are actually more pronounced, lighter or darker, but still work because of the random tiling.

FIG 4.27 A projected texture works the way it sounds. You can project a texture onto a surface in the game world. Here you can see the image of a crack with an alpha channel projected onto a wall texture, and the result is a wall with a crack in it.
Fixing Light Variations Across an Image
You will notice that when you are tiling a digital image (right after you run the offset filter for the first time), there are often variations in the lighting across the surface. This is almost unavoidable and why I spent some time earlier saying, “Diffuse light good, flash bad.” Probably the first thing you should correct in an image you plan to tile is the lighting. There are several ways to do this. Most commonly you can use the High Pass filter or use the image itself to manually adjust the lighting (or a bit of both).
The High Pass filter basically “reduces brightness differences, it also reduces the contrast of the image, paling the colors.” The use of the High Pass filter is detailed in an excellent article on Gamasutra, “The Power of the High Pass Filter,” by Peter Hajba (www.gamasutra.com/features/20010523/hajba_01.htm).
I try many things in conjunction with the High Pass filter. For one, I copy the image I am repairing on a new layer (Ctrl+A, Ctrl+C, Ctrl+N, and Ctrl+V), blur the copy using the highest setting of Gaussian Blur (this makes the layer a solid color), or just use an adjustment layer (explained in Chapter 3) and fill it with a desired color. Then I use the High Pass filter on the original layer. Tweaking the High Pass filter is a balancing act between the smaller radius (gray and flat) and a higher radius (little to no effect on the image) to even out the lighting. Then I play with the blending modes (also explained in the last chapter) and levels and other settings on the color layer. Sometimes I even use a copy of the high pass layer, invert it, blur it a little, and play with the blending modes and opacity to further adjust the lighting.
New to Photoshop CS is the Shadow/Highlights command (Image > Adjustments > Shadow/Highlights). This tool allows you to control the shadows and highlights in an image, especially silhouetted and flash-burned images. The Shadow/Highlights command goes beyond levels and does not merely darken or lighten the image. It treats the shadow and highlight areas separately from each other and enables their independent control. Because the default settings are designed for images that have bad backlighting, you will have to play with the adjustments if your image doesn’t look just right when you first open the tool.
Each image you process will be different from the last. There is no one perfect way to fix the lighting in an image. At first you might have to experiment with several ways, but after a while, you will begin to have a more immediate sense of the best approach for each particular image. (See Figure 4.28.)
One-Way Tiling (Horizontal and Vertical)
Making an image tile on only one axis, horizontal or vertical, is much easier than making an image that must tile across a larger surface in all four directions. See Figure 4.29 for a visual of one-way tiling. One-way tiling is usually used on a wall where the texture only needs to tile across the wall, not up and down it.

FIG 4.28 On the top left is an image of dirt and to the right the image is offset, so you can see the lighting variance. Below are three versions of the image from the same PSD file. Playing with the blending modes and other variables will give you various results.
Three- and Four-Way Tiling
Three-way tiling is used in the case of a wall set where the sides of the texture are designed to tile with each other and the top edge with another texture; the bottom edge doesn’t tile at all. The top of the wall texture will tile with itself side to side and with another texture on the bottom (see Figures 4.30 and 4.31). The center tile must tile in all four directions (with itself) and the top of the bottom texture and the bottom of the top texture. This is easy to understand when it’s presented visually. Four-way tiling can be easy if you are working with clean and simple textures such as clean blocks and bricks. In the figures, the center of the brick wall tiles with itself, is clean, and is not a huge challenge. It gets a bit more challenging when you are working with stone walls and odd-sized bricks with dirt and weathering thrown in.

FIG 4.29 Upper left, the wall texture was designed to tile only one way: horizontally. Right, the vertically stacked textures show how the texture was not designed to tile. Below, the texture is horizontally tiled. At the bottom, the texture is used in a scene where it is horizontally tiled.
Organic vs. Inorganic Tiling
Inorganic surfaces are manmade and generally more easily tiled along seams. Things like walls, bricks, cut wooden planks, metal plates, windows, and so on are pretty easy to tile. Organic surfaces can be easy, too. Things like grass and dirt are fairly easy to tweak and blend into a seamless tile. The challenge comes when you try to tile things with obvious and complex patterns, such as cobblestones and other assembled stone surfaces that aren’t on a grid. Organic surfaces with pronounced segments—pine bark, dirt, rock with striations, or even certain grasses—can be challenging to tile. Because of the randomness with which the objects or materials are laid out, they don’t tile in the real world and are harder to capture and tile on the computer. This leads us into the next section on the various tiling techniques.

FIG 4.30 Three- and four-way tiling is used in this wall texture set. The top texture tiles only in three directions: with itself, side to side, and with the base wall texture below it. The base wall texture in the center tiles in all four directions, and the bottom texture tiles in three directions, side to side and with the base above it.

FIG 4.31 Here are the three- and four-way tiling texture sets used in a scene.
On the top left is an image of dirt and to the right the image is offset, so you can see the lighting variance. Below are three versions of the image from the same PSD file. Playing with the blending modes and other variables will give you various results.
Texture Tiling in Practice
There are several ways to tile a texture, and like most other aspects of computer art, you will most likely use a bit of each technique to get the job done. Of course, most texture tiling starts with the classic offset filter. The simple steps are as follows:
1. Copy the layer you want to tile.
2. Run the offset filter.
3. Enter half the height and width of your image (or use the slider bars to move the image in real time).
4. Erase the hard line in the texture that appears in the vertical and horizontal centers of the offset image with a soft brush.
… and voilà, you have removed the seams.
This is the first technique you will learn. If you are new to texture creation and have tried to find any information on the topic, you most likely didn’t find much beyond the use of the offset filter. In four lines or less, you can be taught to tile anything, right? Or maybe you need the deluxe version of the tutorial that tells you to use the Clone tool to remove conspicuous detail that could be noticeable when the texture tiles. Unfortunately, making a texture tile usually involves more work than this. Even if the texture looks flawless by itself, when it is repeated over a surface several times it might be painfully obvious that your texture is tiling (Figure 4.32).
Edge Copy
Other than using the offset filter, you can also use a different technique. The Edge Copy method involves starting with an image larger than you intend the final texture to be and copying some of the outer portions of the image from one side and moving them over to the other side. You don’t flip or rotate this piece. By selecting a piece of the image outside the portion of the image you want to tile and moving it over, you are creating a seamless transition between the left and right sides of the image. The seam you need to deal with now exists on the inside edge of the pasted portion and is easier to work with than an offset image. This process is detailed in this section.
You will still need to clean and clone, but I prefer this method when I’m trying to tile an image with large irregular elements, such as stones. With this method you are working with one edge, whereas with the offset filter you are trying to blend two edges at once.

FIG 4.32 The offset filter is the first tiling technique you will learn, but making a texture tile usually involves more work than simply removing the noticeable seams. Even if the texture looks flawless by itself, when it is repeated over a surface several times it might be painfully obvious that your texture is tiling. The top left image is the original, the top middle is the offset image, and the top right is the image with no seams. The large image at the bottom is the seamless tile tiling, but it’s not doing it very well. Notice the very repetitive patterns and the diagonal banding, too.
Project: Tiling Stones Using Edge Copy
One problem with tiling stonework is that often there are wide variations of color, contrast, size, and even the positions of the stones. Unlike bricks, wooden planks, and other manmade materials, stones are not uniform in length and width and as a result don’t fit together in a perfect pattern. There is another, simpler, way than this to make stones in Photoshop that are more uniform and easier to tile. I prefer that method and use it in the chapter on fantasy textures. But you should know this method in the event that you need to tile a specific image that fits these criteria. The following project illustrates edge tiling as well as a few tricks to make natural stones more uniform.
Setting Up the Image
1. Open the source image for this project from the book’s website. Note that this image is larger than 1024 and not a power of two. That is preferred in this instance.
2. Set your grid to 128 (Edit > Preferences > Guides, Grid).
3. Choose a square portion of the image you want to tile. Use the grid and make sure your selection is a power of two. I selected the portion you can see outlined in red in Figure 4.33. The square I chose is a 1024×1024 section, with some of the image to the left and the bottom of the selection.
4. Drag out some guidelines to mark the four edges of your selection. These will help you later on. You might even want to zoom in and make sure your guides are snapped precisely on the edge of the selection.

FIG 4.33 Setting the grid and choosing the portion of the source image you want to tile.

FIG 4.34 Making all the stones more consistent before working on the image makes tiling easier later on. The original image is on the left and the corrected image on the right. By cloning some stones over others, using various parts of several stones to create or fix another, the stone can be made to look more uniform.
Cleaning Up the Image
The very first thing I do when working on an image like this is to make all the stones more uniform. I don’t just mean adjusting the lighting, but actually resizing and moving stones just a bit to get them closer in size. I find this practice makes tiling easier later on. You can see the original image and the corrected image where the stones are more similar in Figure 4.34. I resized and moved stones by cloning some stones over others, using various parts of several stones to create, or fix, another. That technique is explained next. You can also play with the High Pass filter, the Highlights and Shadows command, and other methods for adjusting the lighting and consistency at this point. In this case I simply used the High Pass filter.
Copy and Crop Parts
1. Now select the left part of the image on the outside of your square selection. This is the 128×1024 column marked in blue in Figure 4.33 and you can see it in Figure 4.35.
2. Copy the selection and paste it, creating a new layer (Ctrl+C and Ctrl+V), and move the new layer with the copied part of the image over to the right side of your selected area. Make sure you have snap turned on, so it will snap in place and look like Figure 4.35.
I turned off the grid so you could see the part of the image pasted over the right side and how obvious the inner seam is that needs to be cleaned up. You can also see that by moving the outer piece we just moved to where it is inside the image, the edges will now tile. The small arrows point out a spot where it is easy to see how the two halves of the stone will line up.

FIG 4.35 By selecting an area outside the part of the image you want to tile and moving it over, you are creating a seamless transition between the left and right sides of the image. The seam now exists on the inside edge of the pasted portion and is easier to work with than an offset image.
• Repeat these steps for the horizontal portion of the image below your selection. Don’t worry if this piece is not exactly 1024×128. This image was not a power of two to begin with, so the part at the bottom will not be 128 pixels high. Just make sure that the top of your selection is aligned with the bottom of the selected portion of the image we are going to tile.
• Copy and paste this horizontal section into its own layer, drag it up to the top of the image, and hide the layer for later.
Removing the Seams
To remove the seams, I don’t use the eraser. I find it so much easier, and faster, to create a layer mask and paint the edges away. If I make a mistake, I don’t need to lose any work with the Undo command; I can just press the X key and switch the brush color from black to white and paint back what I want.
1. Press the D key to set your colors to black and white.
2. Select the layer with the vertical portion of the image on it that we first created.
3. Create a layer mask for this layer by clicking the mask icon on the bottom of the Layers palette.
Start painting away the seams. Use the X key to switch from black to white. You will find that some areas miraculously work and others simply will not. Just do your best on this first pass and don’t try for perfection just yet. Figure 4.36 shows what I ended up with, good and bad.

FIG 4.36 After you create a layer mask and paint away the seams, you will find that some areas work and others don’t. Just do your best on this first pass and don’t try for perfection just yet.
4. Unhide the vertical layer and do the same.
5. Flatten the image.
6. Crop the image to a 1024×1024 image (Image > Crop). Use the grid to set your crop area precisely.
7. Filter > Other > Offset. Because this is a 1024×1024 image, the offset values in both directions should be 512. You will see that although there are no hard seams, we still have work to do.
Build/Rebuild Stones Using Clone
To get stones to tile involves a few tricks to make all the seams between the stones look good. Simply copying the stones won’t work because they are not all the same size or shape or at the same angle. Usually you will never get a copy of a stone from one part of an image to fit with the other stones in different parts of the image.
You want the stones to all look different (but not too different), and many copies of the same stone would stand out. The answer is to build and rebuild stones using parts of other stones.
Where two stones have blurred over each other, you can find edges and corners from other stones to clone over these stones. Figure 4.37 shows the few steps it took to restore the space between the stones. You will also need to use the Clone tool lightly in some cases to retouch the main surface of the stone, as in Figure 4.37.

FIG 4.37 You can use edges and corners from other stones to restore or build the space between stones. You will also need to use the Clone tool lightly in some cases to retouch the main surface of the stone. On the upper left are the blurred stone and the three places from which I determined I could take detail using the Clone tool. The lower right is the result of the repair.
This process may take some time, so be patient and get those edges clean. I said earlier that you probably can’t copy and paste a stone into your image and have it fit neatly, but you can copy small portions of a stone (a bottom edge or corner) and paste them in if they need to be rotated to fit. You can also use parts from other images. If you took several pictures of the same stone wall, you can use stone parts from all the images to build one clean texture.
Testing a Tiling Texture
After you have rebuilt and repaired the stones to your liking, you can test the tiling of the texture. This is easy to do using the Define Pattern option in Photoshop. Note that there is a difference between defining a pattern and the Pattern Maker. We are defining a pattern to later fill in an area; this does not alter the image. Pattern Maker attempts to create a tiling pattern using a selection. Pattern Maker gives me mixed results, sometimes good and sometimes bad. Even the good results will require some touchup.
1. To get the best result, you might want to first look at your image size. If you are working on a large image (and you should be), you might want to create a copy of the image and reduce it to 256×256 so you can tile it across a larger canvas without creating a super-huge image.
2. Select your entire image (Ctrl+A). You can select an unflattened Photoshop file, which will create a pattern using all layers that are visible.
3. Go to Edit > Define Pattern. These steps are illustrated in Figure 4.38.
4. The Pattern Name dialog box will appear and you will see a small thumbnail image of your pattern and have the option to name it.
5. Select OK. Nothing will seem to happen, but your pattern is now in the Pattern Preset Library.
6. Create a new image (Ctrl+N) and make it at least four times the size of your texture. If your image is 256×256, make the new image at least 1024×1024.
7. Select the entire surface of the new image (Ctrl+A).
8. Right-mouse-click inside the selection and choose Fill….
9. When the Fill dialog box comes up, you will be able to choose what to use to fill the selection. You can also drop down the Custom Pattern list below that and your new pattern will be at the end of the list.
After you select the pattern, click OK and the image will be filled with the pattern.
You can now get a much better idea of how your image will tile over a large surface. It is still preferable to put the image into the game engine it will be used in and see it tile there. The size of the pattern you create and the size of the test image you create to tile it in also depend on the final use of the texture. If you are creating a horizontally tiling wall texture, you can make the pattern larger, say, 512×512, and make the new fill image 512 pixels high but 1024 pixels or more wide.

FIG 4.38 The basic steps to define a pattern to test the tiling of your image. The upper left is the beginning image and the lower right the tiled result.
After a few times doing this, your Pattern Preset Library will begin to get pretty full. You can delete patterns by going back to step 9 in the previous list, and when you have access to the pattern library, simply right-click and select Delete or hold down Alt. The cursor turns into a cute little pair of scissors and you can left-click to delete the pattern.
![]() Note
Note
You can’t undo or cancel the deletion of a pattern from the preset library!
The way you store your textures is important. The names you give your images, where you save them, the resolution and file format you save them in, and other decisions will directly affect how well you can work with your resources. As mentioned earlier in this chapter, you might need to store image assets according to several criteria in your personal collection, such as ownership, image size, and usefulness. Here we will discuss how you should name those images and save them in a directory structure so that you can find and use them later on.
If you buy a texture set and want to save all those files on your hard drive so you have easy access to them, you should simply name a folder after the company and copy all the files into it. If you are surfing the Internet and you download a hundred images from various sources on a theme, name a folder “Internet Images of Dogs” (or whatever you were researching) and save them there so you know where they came from. When you start snapping your own digital images and creating your own textures, you will want to have a folder for raw assets and finished work for each project.
When you name a folder or individual file, choose a naming convention and use it. A naming convention is a set of rules for naming the files in an organized fashion. Keep in mind that it is simple to create a naming convention and far harder to stick with it. One key is to create a text file or document with the legend to your naming convention and folder structure in it and place it in your art drive. Print it out and keep it nearby until you get used to the convention. Although we can use long filenames now, it is always advisable to keep filenames as short and consistent as possible. This makes it easier to skim through them and sort them. In some cases, computer applications still don’t like long filenames.
Tips for Good Naming Conventions
Use underscores (_), not dashes (-), in your filenames because the computer will see the dash as a minus sign and that affects the sorting of filenames.
Underscores are good separators for data; they make content easier to read. Consider grndrtrghv2.tga versus grn_drt_rgh_v2.tga. Using this example, here is a sample naming convention for a set of images, grn_drt_rgh_v2.tga, which might mean the following:
grn=Ground
drt=Dirt
rgh=Rough v2=Version 2
That convention might be for finished textures. For 150 raw images of pinecones, you may want to use numbering at the end, like so:
fol_pine_con_001.tga fol_pine_con_002.tga
and so on. The naming convention for this raw asset is as follows:
fol=foliage
pine=pine trees
con=cone
###=the number of the many images you took of pinecones
Some artists like to include the file size in the naming convention, such as “lrg” or “sml” for large or small, or even the resolution, say, 256 or 512. Naming conventions, like so many other aspects of game development, are often dictated by the project, the technology, and the company you are working for. A certain company might have strict naming conventions or might leave you in charge of creating your own. A certain game technology might need certain naming conventions such as “_a” appearing at the end of a texture that uses an alpha channel. A large outdoor game might have a complex naming convention for foliage, and an indoor game with a few trees might simply have the trees stored as decorations or props.
No matter what, you need to be consistent and persistent with naming and organization. Writing the naming convention down and making sure that everyone understands and uses it is a good idea.
This chapter looked at the important aspects of collecting, preparing, and storing your textures and resources. Next we will start creating textures—and we will start with the sci-fi setting.
1. What are some good sources for gathering textures?
2. List at least five tips for taking digital photographs.
3. What are the basic types of texture collections?
4. What are the most common functions used to clean up a texture?
5. What is tiling? Are there different types of tiling?