
In this chapter we will make our base materials and several highly detailed textures for a high-polygon-count scene. We will also use the Path tool to create the fancy curves you see in some textures of the scene. Finally, we will create the textures needed for a simple shader.
Although we will be creating the art for the typical fantasy setting, this setting can also be a medieval castle. Take away the fantastic elements and you are left with a room in a castle. See Figure 7.1.
This concept sketch has a great level of detail. Aside from creating all that detail, the challenge with this sketch is that it is in black and white. This is a great exercise, because sometimes you might have to pick the colors of the textures you need to create. We will start with the colors of the familiar materials that we can easily guess, things like wood and stone. But what about the other items? The pitcher, for example—what is that made of, ceramic or silver? Should the color scheme reflect an evil or good inhabitant? And the door—is that metal or wood? This place looks pretty nicely furnished and well kept, so we can imagine that the colors will be fairly saturated and the materials not as basic as ceramic. Judging by the spellbook and map this is a magician’s room and the goblet appears to be ornate and have gems in it. The pitcher looks like part of a set, so it is most likely not ceramic but of the same material as the goblet. The chest seems well constructed and locked. I am assuming there are some valuables in there. The windows are made of fine stained glass. There is a thick and plush-looking animal fur on the floor. If I had to guess, I would say this was a good magician, based only on the fact that the symbols in the window seem to be of the sun and moon with the earth in front of it. That doesn’t look evil to me. The similarity of the symbols on the banner, the book, and the door indicates an order or school of magic. The banner also looks like the type held on a pole when rushing into battle, so at the very least this person is well traveled, if not actually an adventurer.

FIG 7.1 This setting can also be medieval.
Breaking Out the Materials in the Scene
The materials common in the fantasy settings are rough stone for the walls, stone flooring, rough-hewn wood, coarse metals, and the ceiling in this setting seems to be made of a light stucco or plaster. We will add some weathering and wear, because even though this is a very posh-looking room, wear makes things look much more convincing and interesting. The good news is that we are not starting from zero this time. We have already created several textures that we can use as bases for these textures. If you skipped straight to this chapter, don’t worry—you can go back to those sections. I will refer to them in the text. The list of base materials we need to create is as follows:
• Stone flooring
• Rough stone wall
• Rough wood beams
• Plaster or light stucco
• Base metals—dark iron, pewter or dull silver, gold
Aside from the common base materials, like wood and stone, we need to break out the details—and there are a lot more of them in this scene. I also included my assumptions about each item, because the sketch is in black and white and we need to know, before we create textures, the colors and makeup of the materials as well as other information about the scene.
• Animal-fur rug: Thick and plush bear skin.
• Chest: Wood bound in heavy metal; well-worn, too.
• Candlestick: Dark, silver-like pewter. We also must create the flame and the candle itself.
• Spellbook: Metal-bound with a hide cover and inset gems. The symbols on the cover and the spine are embossed.
• Map: Old and worn dark parchment with burnt edges and faded ink.
• Windows: Bright, based on the light shafts, and the glass looks clean and unbroken. The colors are yellow and blue based on the sun and moon.
• Banner: Cloth and the colors are the same as the window, but these colors will be more desaturated based on the material, the location of the banner, and its assumed adventuring history.
• Door: Metal intricately carved with symbols and writing. The symbols and the writing have a magical glow.
• Pitcher and goblet: Gold with red gems.
After I did this exercise, I e-mailed my assumptions to the artist who drew this scene, who responded by saying that I was on target. He told me that he envisioned this to be the room of a member of an order of magic, only he didn’t think of it as good or evil, rather “a more druid-like order.” Technically, that’s good to me, being in line with nature and all, but he didn’t think of it that way as he drew it.
He added that what is most important to him, more than seeing detail, is to feel the room as if he were in it. “Do you smell mold and mildew or strong incense? Is it cold or warm? Do you feel tension or are you at peace in the room? Is the light cold or warm? As I draw, I put myself into the environment. It is how the detail becomes so, well, detailed and ‘real.’” These are the same questions that texture artists need to ask themselves as they work. He was successful as a concept artist, as his art conveyed all that information to me, and more. I think my assumption about the nature of this inhabitant being good was correct, but not conscious on his part, as he later e-mailed me and said, “If I had done an evil environment, I would have to have been thinking about it. I think I gravitate to light or good naturally without thinking about it.” And, he added, “the rug is bearskin.”
We will start, as always, by creating the base materials for our scene. Several of these textures are created using images already created in this book.
Stone Flooring
We will start with our floor. We are creating a texture for the floor that is different than the wall (which we will create next), because a floor is exposed to different treatment than a wall. A floor has been laid down for a different purpose—walking on it—and therefore needs to be smoother. It will have different light and shadow than a wall. And last but not least, the same stone on the floors and walls would look bad. There would be no division, no distinction, between the wall and floor.
The way we will be creating the stone floor is very versatile. You can adjust the space between the stones, the size of the stones, and the color and texture of the stones and mortar all by changing a few variables.
1. Create a new 1024×1024 image and name it fantasy_stone_floor.
2. Fill the background with a dark gray: RGB 68,68,68.
3. Filter > Noise > Add Noise: Amount –10%.
4. Filter > Artistic > Cutout: Number of Levels 8, Edge Simplicity 2, Edge Fidelity 2.
5. Filter > Brush Strokes > Accent Edges: Edge Width 4, Edge Brightness 23, Smoothness 3.
6. Create a new layer and name it stones.
7. Fill this layer with white.
8. Make sure that your foreground color is black.
9. Filter > Texture > Stained Glass: Cell Size 45, Border Thickness 10, Light intensity 0.
10. Filter > Other > Offset 512×512.
I found these settings to be best for this application, but these are some of the variables that you can change to make a different type of stone. Smaller cells mean more and smaller stones. Border thickness helps determine the space between stones. You will notice a hard line running in both directions down the center of the image. Use a hard brush and the X key to toggle between black and white to fix the tiling problems now. It is much easier than trying to tile the stones later. See Figure 7.2. I also used this opportunity to make the cells/stones a bit less uniform. As you are doing this, zoom in to work and zoom out to look at your stones. You will have to do more than just smooth the lines. Even after the lines are smoothed, you will probably notice that the spaces between the stones still run too straight and will need to be tweaked.
11. Filter > Blur > Gaussian Blur 10 pixels.
12. Filter > Artistic > Cutout: Number of Levels 8, Edge Simplicity 4, Edge Fidelity 1.

FIG 7.2 The progression of the base material and the steps to creating our stones.
13. Run this filter at least three more times using Ctrl+F.
14. Use the Magic Wand to select the center of a stone. Right-click and select Similar.
15. Look at your selection. If you find that the spaces between the stones are too far apart, you can use Select > Modify > Expand: # pixels to close the gap. Contracting the selection will widen the gap between stones.
16. Fill the selection with white (the stones should be white).
17. Right-click > Select Inverse. Fill the spaces with black.
18. Offset this image again and clean it up. Sometimes there are gaps or artifacts to fix and they are so much easier to deal with now. Remember to use black and white, not the eraser. This is also an opportunity to remove any edges that may be too pointy or straight. You can even run the Ripple filter on this, but don’t make the lines too wavy.
![]() Tip 1
Tip 1
I find it easier not to try and paint the black lines perfectly, but rather to use one large brush (about 45 to 65 pixels) and cover the general area with black, overlapping the stones on either side of the lines, hit the X key, and paint the white stone back in. I find this is not only easier, but looks better, because the larger brush makes for a smoother stone edge.
![]() Tip 2
Tip 2
Offset the image again to check your tiling, only this time don’t enter exactly 512 for a 1024 image: try 256. The reason for this is that an exact offset often covers a mistake in tiling that you won’t notice until you are finished with the texture and have it tiling across a floor. The few minutes it takes to recheck things like this make things much faster in the long run.
19. Use the Magic Wand to select the space between the stones and delete it. If you have wide spaces between your stones and want to work on the mortar between the stones by itself, then you can create a new layer and fill the selection in.
20. Create a new layer on the top of the stack and name it stone material.
21. Set your foreground color to black and the background color to white (D).
22. Filter > Render > Clouds.
23. Image > Adjustments > Brightness/Contrast: Use Legacy, Contrast –50.
24. Filter > Render > Lighting Effects.
Light Type: Spotlight
Intensity: 10
Focus: 69
Gloss: 42
Material: 56
Exposure: 0
Ambience: 10
Texture Channel: Blue
Height: 87
See Figure 7.3, top middle, for the Lighting Effects dialog box and how to adjust the spotlight. In the window to the left you can see the small version of your texture and the circle that represents the spotlight. There are four squares along the edge of this circle. Drag the right-hand square out until the spotlight circle is completely outside the image.
25. You can run the Lighting Effects filter once more if you want a rougher stone. I did not in this case.
26. You can also run the Filter > Brush Strokes > Accent Edges: Edges to get a richer stone. I did.

FIG 7.3 The major steps in creating the stones.
27. Save a copy of this base stone as a separate image in your asset library for later use.
28. Duplicate the layer. We are doing this so the stones will look like they are made from random stones and not one sheet of stone.
29. Flip the layer vertically and horizontally (use Ctrl+T and right-click on the selection).
30. Offset this layer by 512 in both directions. Clone out the hard seams.
31. Turn both new layers off: stone material and stone material copy.
32. Select the stone layer.
33. Select about half of the stones with the Magic Wand in a random pattern. I find that occasionally turning the layer off so you can see the selection by itself makes it easier to see the distribution of selected stones.
34. Invert the selection.
35. Select the stone material layer and press Delete.
36. Deselect the layer and use Levels (Ctrl+L) and darken the stones slightly.
37. Merge this layer with the stones layer.
38. Select one of the remaining white stone on the stone layer and select Similar. Invert this selection.
39. Go to the stone material copy layer and press Delete.
40. Merge these layers. You should have two layers remaining: the stones and the background.
41. Add layer effects to the stones and change the following settings:
Drop Shadow
Use the default settings
Outer Glow
Blending Mode: Normal
Opacity: 54%
Noise: 20%
Color: Black
Size: 27 px
Inner Glow
Blending Mode: Hard Light
Opacity: 60%
Color: Black
Noise: 20
Size: 40 px
Bevel and Emboss
Technique: Chisel Soft
Soften: 10 px
Highlight Mode Opacity: 60%
42. Copy the stone and background layers into a set and merge the copies.
43. Set your background color to black.
44. Filter > Brush Strokes > Accent Edges 2, 20, 4.
45. Filter > Noise > Add Noise: Amount 4%.
46. Filter > Brush Strokes > Accent Edges 2, 20, 4 (yes, again).
47. Clean up: The stones already tile, but you need to do two things to clean them up. First, use the Crop tool to remove the excess pixels from outside the canvas area. When you merge a layer with an effect on it like Outer Glow with another layer, the effects cease to be a dynamic effect and become actual pixels outside the canvas area. If you can’t visualize this, tile the image before you crop it and you will see what I mean.
48. Offset this image. You also need to use the Clone Brush to remove the line across the image where the effects were frozen.
If you want, you can create two versions of the stone layers as you did in the previous exercise, both offset exactly 50% from the other. They would be identical, but after they were merged, the line that runs through the texture would be in different places on the textures. Just offset one of them and they will line up perfectly; then you just erase the hard line from the top image to expose the good part of the one below. I chose not to do this, because although my goal is speed on one hand, I also want things to look good and this was an opportunity for me to mix up the light and dark stones.

FIG 7.4 Two variations of the final stone floor texture. The stones displaced using a displacement map created in seconds.
The rendered lighting effects tend to lighten the middle stones. Your image should look like Figure 7.4. Also note that by working in layers, I could create the displacement map for this texture in seconds (literally) and the result is pretty impressive. The map is black and white with some gradient and no detail from the stones themselves.
Rough Stone Wall
We will use the pattern of the brick texture that we created in the warehouse in the urban chapter and the stone material we created for the floor to create our stone wall.
1. Start by opening a copy of the brick pattern you created in the chapter on urban textures (brick_pattern), or go back and create it now. Save this file as fantasy_stone_wall.
2. Set the grid at 32 with 1 subdivision.
3. Free Transform the Brick Shape layer and drag the bottom handle down until the bottom two rows of bricks are off the canvas.
4. Crop the image at its current size to remove the outer portions of the layer. Simply drag the Crop tool across the canvas. Make sure that you do not change the canvas size of the image.
5. The bricks are now vertically thicker and still tile perfectly. You may want to run the Offset filter to make sure the image tiles perfectly.
6. We want to wear down the edges with a hard eraser like we did for the urban bricks. Turn off the grid and use a 13-pixel eraser and zoom into the image so you can work accurately. Be patient and subtle. Don’t take too much off; we just want the bricks to look older and hand-carved from stone. You will notice that you have more leeway to remove stone vertically, because stretching the bricks made the mortar spaces wider horizontally, but not vertically. Your image should look like Figure 7.5 at this point.
7. Select the background layer and change the color to a dark gray: RGB 73,73,73.
8. Filter > Noise > Add Noise: Amount 5%.
9. Filter > Brush Strokes > Accent Edges: Edge Width 2, Edge Brightness 13, Smoothness 4.
10. Copy and paste a copy of the stone_material on the top of the stack from the stone floor image.
11. Duplicate the layer.
12. Flip the layer vertically and horizontally (use Ctrl+T and right-click on the selection).
13. Offset this layer by 512 in both directions.

FIG 7.5 The bricks from the Urban Scene on the left and on the right after we stretch them down.
14. Turn both these new layers off.
15. Activate the Brick Stone layer.
16. Select about half of the wall stones with the Magic Wand in a random pattern and invert the selection.
17. Activate the stone_material layer and press Delete.
18. Deselect the layer, use Levels (Ctrl+L), and darken the wall stones slightly. Merge this layer with the Brick Stone layer.
19. Add layer effects to the bricks and change the following settings:
Drop Shadow
Use the default settings.
Outer Glow
Blending Mode: Normal
Opacity: 54%
Color: Black
Size: 18 px
Bevel and Emboss
Technique: Chisel Soft
Size: 5 px
Soften: 4
Highlight Mode: Normal
Opacity: 38%
Shadow Mode Opacity: 40%
20. Add a new layer on top of the stack and name it dirt.
21. Filter > Render > Clouds.
22. Filter > Blur > Gaussian Blur: 5 pixels.
23. Image > Adjustments > Brightness/Contrast: Brightness +25, Contrast –50.
24. Change the Blending Mode to Multiply and the opacity to 45%.
Depending on how and where you are using this texture, you might need to play with the Levels and the Brightness/Contrast. Your image should look like Figure 7.6.
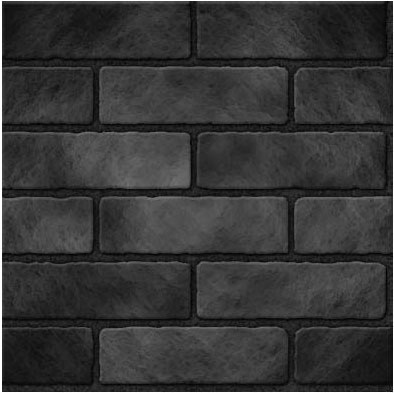
FIG 7.6 This is what the stone wall looks like so far.

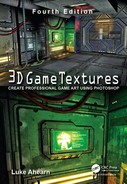
FIG 7.7 Here is the final stone wall texture and a few simple variations.
25. Create a layer set and put the three layers into it we just created. You will have to duplicate the background layer to include it in the layer set.
26. Duplicate the layer set. And hide the original set. Flatten the new layer set (Ctrl+E).
27. Filter > Artistic > Sponge: Brush Size 2, Definition 2, Smoothness 11.
28. Fade this filter (Ctrl+Shift+F) to 50%.
29. Filter > Artistic > Poster Edges: Edge Thickness 4, Edge intensity 5, Posterization 2.
30. Fade this filter: Opacity 25%, Blending Mode: Multiply.
31. Filter > Noise > Add Noise: Amount 5%.
32. Crop the image to remove the excess image that is outside the canvas and offset the image to check your tiling.
33. Your image should look like Figure 7.7.
Rough Wood Beams
We will base this texture on the wood fill from the warehouse. This will be used as a horizontally tiling beam, so we will make it longer and narrower, and add some detail.
1. Open a copy of the image named Wood_Fill_001.
2. Change the image size to 256, with constrained proportions.
3. Duplicate the wood layer and make the Canvas Size 1024 in height. Keep the same width.
4. Tile this wood four times to fill the layer, and merge the four layers.
5. Liquify this layer and create three or four knot holes and pinch the grain together in some spots along the beam.
6. Use the Burn and Dodge tools to create an uneven hewn look to the beams’ edges. Go easy; don’t create any hotspots that will show up later when you tile the beam.
7. Check your tiling both ways. Even though this is designed as a vertically tiling beam, smoothing out the lines where the horizontal edges meet will make this texture easier to use and more versatile.
8. Use Levels to darken the wood slightly if you like. See Figure 7.8 for the steps I described here.
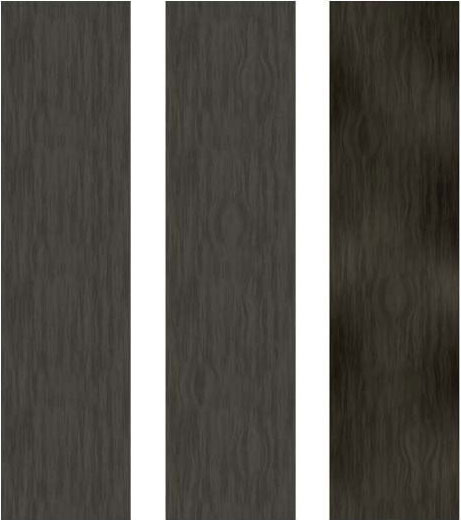
FIG 7.8 The stages of the rough-hewn wooden beam.
Plaster or Light Stucco
The plaster ceiling is based on the concrete texture we created in the warehouse. We will do a few things to make this concrete look like old stucco.
1. Open the image you created for the concrete with pits in it in the urban chapter, or go back to that chapter and create the image.
2. Colorize the image (Ctrl+U): Hue 38, Saturation 6, Lightness –39.
3. Create another layer on top of the stack and name it cracks.
4. Filter > Render > Clouds.
5. Filter > Artistic > Cutout: Number of Levels 8, Edge Simplicity 1, Edge Fidelity 2.
6. You can select and delete various parts of the resulting pattern.
Depending on what you select and what you delete, you will get various crack patterns. The variations are endless. You can apply a variety of layer effects such as a very light Bevel and Emboss and Inner Glow to make the stucco have depth. Use the shape to mask off another image to get the effect that plaster is falling away from the wall and exposing the material behind it. Figure 7.9 shows the various effects I got using this method. I also used this cracked stucco as an overlay on the stone wall for the medieval version of this room at the end of the chapter.

FIG 7.9 Variations of the stucco using the same technique, but with altered variables.
7. Create a new layer on top and name it dirt.
8. Filter > Render > Clouds.
9. Filter > Render > Difference Clouds. Repeat a second time.
10. Change the layer blending mode to Multiply and the opacity to 39%.
You can also create one strong crack in your stucco.
11. Use the Gradient tool with a black-to-white gradient on a new layer named crack.
12. Filter > Render > Difference Clouds.
13. Adjust your layer (Ctrl+L) by dragging the center arrow of the input to the left.
14. Zoom in and use the Magic Wand to select the darkest center of the crack and select Similar.
15. Invert the selection. Press Delete.
16. Now you can apply a Bevel and Emboss to the crack to add depth. See Figure 7.10.

FIG 7.10 A harder, more defined crack using a different method.

FIG 7.11 The width and tightness of the gradient determines the chaos of the crack line.
There are several variables you can play with. The width and tightness of the gradient determine the chaos of the line. See Figure 7.11 for an illustration of this. You can also expand or contract the selection before you delete the pixels outside the crack.
Base Metals: Dark Iron, Pewter or Dull Silver, Gold
Dark iron, pewter, or even a dull silver can simply be the base metal we created for the sci-fi hall.
1. Open a copy of sci_fi_metal_base and save it as fantasy_metal_base.
2. Image > Adjustments > Brightness/Contrast: Contrast –50%.
That’s all you need to do. We will be using this base in various ways, and it works perfectly as a hand-crafted, beaten-up metal. As we use it, we will do specific things to the metal depending on where it is and what it is used on. When we make the gold, it will be a very basic texture with a special shader applied to it.
These detail textures will have a lot more detail in them than the previous textures and will require many steps to complete. We will start with the easiest and work up to the more complex textures.
Table Trim
In the concept art, you can see the trim on the side of the table. This is simple and based on the wood we created for the heavy beams.
1. Open a copy of the wood beam texture and name it fantasy_table_trim.
2. Image > Rotate Canvas: 90 degrees.
3. Crop the image so it is 1024 wide and 128 high.
4. Create a new layer and name it trim.
5. Fill the layer with a color; it doesn’t matter what color.
6. Using the grid and the circular selection tool, cut the arches out of the wood by pressing Clear and moving the selection. If you set the grid to 32, you can make the arches 7 units (224 pixels) with one unit between them all.
7. Use a hard, medium brush to make the circles (around 20 pixels). Apply layer effects and change the following settings:
Fill: 0
Drop Shadow
Size: 25 px
Outer Glow
Blend Mode: Normal
Opacity: 33%
Color: Black
Size: 38 px
Bevel and Emboss
Highlight Mode Opacity: 50%
Shadow Mode Opacity: 60%
8. You can copy these layers and merge the copies so that you can offset them to clean up the seams. See Figure 7.12 for a progression of the table trim.

FIG 7.12 Progression of the table trim texture.
Fur Rug
The animal fur on the ground is a thick, plush bearskin rug. This requires a little hand painting, but is easy and looks great. You do need to be patient and methodical, but you don’t need very much artistic talent.
1. Open a new 512 wide × 1024 high image and name it fantasy_bearskin. Make sure your background is black.
2. Create a new layer and name it bearskin.
3. Fill this layer with a light brown RGB 144,109,30.
4. Use the Lasso tool and outline the general shape of half the bearskin. We are doing half for one of two reasons; this texture can be mirrored on the 3D model that it will be applied to, which saves texture memory, or you can complete half and then copy and mirror it. This saves a lot of work. If you need to, you can spend a few extra minutes on the entire rug to make it look less “mirrored.”
5. Invert the selection and delete.
6. Filter > Noise > Add Noise 10%.
7. Filter > Blur > Motion Blur: Angle 0, Pixels 32.
8. Filter > Brush Strokes > Angled Strokes: Direction Balance 6, Stroke Length 13, Sharpness 5.
9. Use the Smudge tool and the hair brush (see the note) and start by smearing out the edges of the bearskin. You are going to have to adjust the size of the brush (use the [ and ] keys to do this quickly) and the amount of smear. I find that around 50% works best. See Figure 7.13.

FIG 7.13 The bearskin outline before and after smudging.
![]() Note
Note
To make your own hair brush, open the image in the projects folder for this chapter (from the book’s website). Select the entire canvas and go to Edit > Define Brush Preset and name your new brush. This brush is perfect for painting hair. It has five dots, so no matter what direction you drag, you are getting a good even hair shape. Change the brush settings so that there is no spacing and so the Shape Dynamics are set to Fade. Adjust the number to the right of this to the amount you want the brush to fade. This number depends on the size of the image you are working on, among other factors such as the length of the hair and your own preferences. This number determines the number of brush increments, not pixels, that the brush takes to fade away. Therefore, a larger brush with the same value entered will take a longer distance to fade away. (See Figure 7.14.)

FIG 7.14 Create your own hair brush and start the bear skin. These are the stages of the bearskin rug. The fur looks great when it is done, but it starts with a simple layout that builds upon itself.
10. This is the fun part—actually, it’s the tiresome part that is really fun when you are done because it looks so cool. We start by gradually outlining the general flow of the fur and will spend time building the fur up in layers—not hard, just a bit tedious. Because fur actually grows in layers and tends to clump, you don’t have to draw individual hairs, and it looks great when you are done. Use the Burn tool—Midtones, exposure 38%—and a soft brush (13 pixels) and start by making basic lines and triangles defining the general pattern of how the fur grows from the pelt.
11. Dodge with a larger soft brush (27 pixels) and give each triangle a quick dash of highlight. You don’t have to be too exact—just a general swoop down the middle.

FIG 7.15 The complete bearskin rug.
12. Burn with the hair brush hairs across the rug. This is where you need to be a bit more patient. Zoom in a bit and hit the ] and [ keys a few times to make the brush larger and smaller as you work. Start on the edges and work your way inward.
13. Dodge highlights by doing the last step again, but use the Dodge brush.
14. Burn some depth into the rug using a large, soft brush (100 pixels) by darkening the edges and a few major clumps of fur.
15. Dodge a highlight on the clumps you created.
16. Burn over the fur again with your hair brush to make it pop a little more. You don’t need to do quite as much; use this opportunity to hit areas that may be a little too light.
17. Dodge the highlights too and focus on the too-dark areas.
18. Filter > Artistic > Dry Brush: Brush Size 2, Brush Detail 10, Texture 1.
19. Fade this (Ctrl+Shift+F) to 30%.
20. You are going to want to tweak a little with the Burn and Dodge tools, and use the Smudge tool again on the edges. The painted hairs may look like they are dead-ending into the edge of the fur, and smudging them will blend the painted hairs into the edge. See Figure 7.15 for the final bearskin rug.
Chest
This chest is made of wood bound in heavy metal. We will use the base metal that we created from the sci-fi metal. The beam we created in this chapter is actually a little too rough to use for the chest, so we will use the wood planks that we created in Chapter

FIG 7.16 A typical template for a UV-mapped model—in this case, our chest.
In this exercise I will provide you with a UV template (Figure 7.16). This is an image that has all the parts of a 3D model that needs a texture laid out flat and efficiently. The art of laying out a UV map efficiently and creating the texture for a UV-mapped model is another book altogether. But I did want you to get a feel for what it is like to work with a UV map. Once you do this, you will see the relationship between model and texture more clearly.
UV mapping a model before the texture is created is pretty common. It is also common for one artist to create both the texture and the model. The benefit is that the artist is able to switch among the texture, the UV editor, and the model, changing all three, and is not held to painting on one template. Although that seems easier, UVing a model in advance and using the template is far easier and nets better results. Also, a lot of your work has been done for you if you are the texture artist getting the UV map: you don’t need to examine the model and do the tedious work of laying the UVs out and placing them in the square texture space in the most efficient way. This template may not be as efficiently laid out as possible (that wasn’t my focus when I did it), but you will get a taste of creating textures within boundaries. There are some quick, but major, efficient practices I did exercise. Notice that in this texture layout there are parts of the image that are used in repeated places on the model. The panels are repeated and the inner part of the panel is used as the top of the lid. The metal trim of the panel is used on all the small edges of the chest. This may not be a valid layout for some projects that are using specific material systems or shaders, and other projects may demand a more efficient use of textures and may have even more overlap.
I’ve always heard that guys like big chests in the fantasy genre, so let’s give ’em what they want and make a big chest. The chest texture is composed of the following elements:
• The side panels
• The arched side panels on the top of the chest
• The lock
• The braided decorative band wrapped around the chest
These elements can all fit with room to spare on one texture, and we can make them all the same relative size. Relative sizing is important, because if we made the side panels really big and then had to squeeze the lid panel in, making it smaller to fit, you would see the resolution difference on the final model.
Open the image from the book’s website fantasy_chest_UV_MAP and save it as fantasy_chest.
1. I pasted Wood_Planks_001 into the image and tiled four copies of it on the wood layer. The image sci_fi_metal_base is on the metal layer.
2. Turn off the wood and metal layers.
3. Open the UV Map layer set. This layer set has the UV map in it as well as a layer with text labels identifying the parts. There is also a layer with dashed lines that indicate where the parts of the chest are that we don’t need to create art for, as they use parts of the existing texture. Select the layer with the UV map on it. You can turn the other layers off as you work.
4. Use the Magic Wand tool and select the darker blue inner section of the chest lid and panel. These will be the wooden parts of the trunk.
5. Go to the wood layer, invert your selection, and press Delete.
6. Duplicate the metal layer and name it panel frames. Make sure that this layer is on the top of the stack.
7. Go back to the UV map and select the lighter blue outer portion of the panel and lid (the metal frame around the wood panels we just created) and the decorative plate in the center of the panel. Invert this selection.
8. On the panel frames layer, press Delete. If the metal layer is still visible, you won’t see anything happen, so turn it off.
9. Apply layer styles with the following settings:
Outer Glow
Blend Mode: Linear Burn
Opacity: 15%
Noise: 13%
Color: Black
Size: 62 px
Inner Glow
Blending Mode: Vivid Light
Opacity: 45%

FIG 7.17 The beginnings of the chest with the major metal and wood parts in place.
Noise: 17%
Color: White
Size: 35 px
Gradient Overlay
Blend Mode: Vivid Light
Opacity: 29%
Bevel and Emboss
Technique: Chisel Soft
Contour: default
Texture:
Scale: 412%
Your image should look like Figure 7.17.
10. Create a new layer and name it bolts. Copy the layer styles from the panel frames layer and change the following settings:
Drop Shadow: default settings
Outer Glow
Opacity: 24%
Size: 29 px
11. Use a hard brush with a medium gray and place the large bolts on the corners of the chest frame and lid frame. I eyeballed this, but if you like you can use four guidelines to get them placed perfectly.
12. Duplicate the metal layer and name it lock.
13. Copy the layer style from the bolts layer and paste it on the lock layer.
14. Go to the UV Map layer, select the parts of the lock, and invert the selection.
15. On the lock layer, press Delete.
16. Duplicate the bolts layer and name it lock bolts. Clear this layer of pixels (Ctrl+A and Ctrl+X).
17. Use a small, hard brush and a medium gray and place the small bolts on the lock.
18. Change the following settings in the layer style:
Drop Shadow
Distance: 4
Size: 6
Outer Glow
Opacity: 35%
Size: 8 px
Inner Glow: Turn it off
19. Duplicate the metal layer and name it band.
20. Select the band on the UV Map layer and invert the selection.
21. On the band layer, press Delete.
22. Duplicate the band layer and name it band top. Press Delete on this layer, too. You should have two identical layers at this point: band and band top.
23. Copy the layer style from the lock bolts layer, paste it into the band layer, and change the following settings:
Bevel and Emboss
Size: 9
Soften: 7
24. Copy the layer style from the band layer and paste it into the band top layer.
25. We need to cut the diagonal spaces into the band top. Use the grid and the Polygonal Selection tool to create a diagonal selection, move it along the grid, and press Delete. You can see the chest in the final render, but Figure 7.18 shows the texture with a close-up of the chest. Notice that the top of the lid is the side panel texture, and the trim parts inside the metal frame are the trim from the metal bands on the lid.

FIG 7.18 The final chest texture with a close-up of the chest from the fantasy scene.
Candlestick
The candlestick is actually three separate images.
• Candlestick: Metal, pewter with etched-in leaves
• Candle flame: Small, separate illumination-mapped texture
• Candle wax: illumination-mapped, but differently than the flame
Metal Candlestick
1. Open a copy of the base metal we made for the sci-fi setting. Change the image size to 512×512. Save this image as fantasy_candlestick.
2. Filter > Brush Strokes > Crosshatch: Stroke Length 10, Sharpness 6, Strength 1. This helps the metal look more worn and smoother than the rough base metal.
3. Duplicate this layer and name it pewter.
4. Duplicate it again and name it ridges. Make sure that this layer is on top.
5. Using the grid and a hard-brushed eraser (9 pixels), erase four evenly spaced horizontal lines. Don’t forget that the top and bottom must have a half-line erased from each, or offset the image vertically and erase the line. We are doing this horizontally because not only is it much easier to work horizontally and rotate the texture on the model, but we can also more easily use this texture in other places with a horizontal orientation.
6. For this step, you can apply layer styles including Bevel and Emboss or use the Burn and Dodge tools to create the highlights and shadow on the metal. I opted to use Burn/Dodge, because at the end it looked better and was easier to tile. Here are the settings you need to change from the layer styles:
Outer Glow:
Color: Black
Size: 6 px
Inner Glow
Opacity: 51%
Noise: 13%
Color: White
Size: 29 px
Bevel and Emboss
Depth: 61%
Size: 64
7. Link the pewter and ridges layers, Create New Set from Linked, and duplicate the layer set.
8. Hide one of the layer sets and merge the other.
9. Crop to remove the excess pixels outside the canvas area of the merged layer set.
10. Duplicate the layer and offset it 256 pixels in both directions. Use a large, soft brush to remove the seams.
11. Link these layers and merge them. The last thing we have to do is create the leaf pattern.
12. Create a new layer and name it leaf.
13. Use the Custom Shape tool, select the Leaf 3 shape, and make one big leaf on the new layer. Use the Free Transform tool to size and rotate the leaf until it fits on about one-fourth of the top band. Apply layer effects and change the following settings:
Fill: 0
Outer Glow
Blend Mode: Color Burn
Opacity: 45%
Noise: 11
Color: Black
Size: 13 px
Bevel and Emboss
Style: Pillow Emboss
Depth: 60 px
Size: 12
Gradient Overlay
Blend Mode: Color Dodge
Opacity: 58%
14. Duplicate the leaf layer and flip the leaf vertically; adjust the two layers back and forth until the leaves look right, taking up about half the band (you want to fit four of them across eventually). See Figure 7.19. Change the following settings in the layer effects:
Color Overlay
Blend Mode: Overlay
Opacity: 70%
15. Now that these two leaves look good, duplicate them and place them on the other half of the band. Keep duplicating leaves until you fill the texture. You can leave all these layers unflattened and output the texture as you need it. Even if I flatten a texture before I output it, I always copy layers that I may want to change later.

FIG 7.19 The candlestick metal with the first leaves in place.

FIG 7.20 The final candlestick texture with the model.
That’s it. Here is the final texture with the model applied (Figure 7.20). The candle itself doesn’t look good, because we haven’t made the wax and flame yet.
Candle Flame
1. Create a new 256 wide by 512 high image with a black background and name it candle_flame.
2. Snap a vertical guideline to the center of the image.
3. Create a new layer and name it orange.
4. Use a large, soft brush (200 pixels) and put a big fuzzy orange circle at the bottom of the layer in the center: RGB 255,127,0.
5. Use the Free Transform tool and stretch this ball up by using the middle top handle. You will have to zoom way out to do this, and this will put a lot of nearly invisible pixels outside the canvas area, so you will want to crop the image to remove them. You should also clean the edges with a small, hard eraser and a larger, soft one if you see a hard line in the orange.
6. Create a new layer and name it white. Set your foreground color to white.
7. Use a smaller soft brush (65 pixels), open the Brushes palette, and set the Shape Dynamics to Fade and the Fade Size to 55. Start very near the bottom and hold Shift to keep the flame straight and draw upward. I also smudged the tip of the flame to get a better-looking flame tip.

FIG 7.21 The stages of creating the candle flame.
8. I put a small black line in the center for the wick and brushed some white over the tip to blend it into the flame. See Figure 7.21 for the candle flame and its stages.
9. To create the alpha channel, simply duplicate the layer or the entire image, depending on how you need to handle the alpha channel, and desaturate it (Ctrl+Shift+U). Use the Hue/Saturation (Ctrl+U) to make the flame darker (Lightness –43) so that it is more transparent. Use a white brush and make the wick solid white so that it is not transparent at all.
10. To create an Illumination Map, copy the alpha image and use Hue/Saturation to make it much brighter. The Illumination Map makes areas of the object mapped with white fully bright and not affected by light, while black areas have no illumination and usually light normally, depending on the game engine or technology you are using. The lightness and darkness of the grayscale determine the amount of illumination. (See Figure 7.22.)

FIG 7.22 The candle flame with and without the illumination map. Makes a big difference, doesn’t it?
Candle Wax
1. Create a new image 256 wide and 512 high. Name it candle_wax.
2. Create a new layer and name it wax.
3. Fill this layer with a desaturated light yellow: RGB 198,184,135.
4. Filter > Noise > Add Noise: Amount 20%.
5. Filter > Blur > Gaussian Blur: 5 pixels.
6. Filter > Brush Strokes > Spatter: Spray Radius 6, Smoothness 6.
7. Filter > Render > Clouds.
8. Fade (Ctrl+Shift+F): Opacity 65%, Blending Mode: Overlay.
9. Use the Burn tool and a large, soft brush (100 pixels) and darken the horizontal edges of the candle slightly.
10. Use the Dodge tool and a smaller, soft brush (45 pixels) and do a faint line or two of highlight up and down the horizontal center of the candle. If you want the candle to look more like shiny wax, then also add another stronger, narrower line to the highlights.
11. To get the dripping wax effect, create as new layer and name it dripping wax. Apply layer effects and change the following settings:
Fill: 0
Drop Shadow
Opacity: 38%
Distance: 3 px
Size: 13 px
Outer Glow
Blend Mode: Color Burn
Opacity: 38%
Color: Black
Size: 35 px
Bevel and Emboss
Size: 16 px
Soften: 3 px
Highlight Mode Opacity: 60%
Shadow Mode Opacity: 31%
Texture
Pattern: Molecular
Scale: 474%
Depth: +102%
Check the invert box
12. To make the drips, use a soft 27-pixel brush, paint along the top, and draw a drip or two coming down the candle. Copy the layers and merge them so you can offset them and clean the tiling edge.
13. To make an illumination map, you do it the same way as the candle flame—copy the image, desaturate it, and adjust the darkness and lightness of the image in order to get the illumination effect you desire. In this case, I used a black-to-white gradient (black starting at the bottom of the candle) and faded it to 70% and changed the blending mode to Linear Burn. I also tweaked the brightness at the top and the darkness at the bottom of the candle. This illumination map will make the candle appear to glow with the light of the flame. Figure 7.23 shows the candle with and without the illumination map in both a lit and nonlit scene.

FIG 7.23 Candles 3 and 4 are in a very low-light scene; you can see the difference between the one with the illumination map and the one without. Candles 1 and 2 are in a brighter scene, but the illumination map still helps the candle look more authentic, as the glow brings the perception of translucence to the candle. The bottom left image is the candle texture and the bottom right is the illumination map.
Spellbook
Now we will create the spellbook, which is a bit more complex. This book has a metal cover binding a dragonscale hide and is inset with gems. There is embossed writing and symbols on the cover and spine. For the writing, we will use one of my favorite techniques—fonts. I got permission from the font’s creator to use it in the book, and it is available on the book’s website, too. You will need to install this font before you start this exercise. We will also be creating the unique shapes on the cover using paths. These shapes are also used on the door, banner, and map. Creating them using paths is flexible and you can drop the shapes into the other textures that use them. If you hand-paint the shapes on the texture, you will be repainting them every time you need them. Finally, we will create the decoration on the spine, the page edges, and the gems.
The spellbook is similar to the chest in that we will be using a UV map template. The main parts of the spellbook on the UV map in Figure 7.24 are as follows:
• Metal binding, trim, and spine
• Dragon hide cover inset
• Page edges
• Gem

FIG 7.24 UV map template for the spellbook.
Metal Binding, Trim, and Spine
1. Open the image from the website download fantasy_spellbook_UV_ MAP and save it as fantasy_spellbook.
2. The metal layer has the sci_fi_metal_base already there for you.
3. Turn off the metal layer.
4. Open the layer set UV Map. This layer set has the UV map in it as well as a layer with text labels identifying what the parts are. Select the layer with the UV map on it. You can turn the other layers off as you work.
5. Use the Magic Wand tool and select the lighter blue sections of the book. These will be the metal bindings of the book. Make sure you get the book frame, trim piece, and all the parts of the spine.
6. Go to the metal layer, invert your selection, and press Delete.
7. Apply layer styles with the following settings changed:
Outer Glow
Blend Mode: Linear Burn
Opacity: 15%
Noise: 13%
Color: Black
Size: 62 px
Inner Glow
Blending Mode: Vivid Light
Opacity: 45%

FIG 7.25 The metal binding of the book.
Noise: 17%
Color: White
Size: 35 px
Gradient Overlay
Blend Mode: Vivid Light
Opacity: 29%
Bevel and Emboss
Technique: Chisel Soft
Contour: default
Texture:
Scale: 412%
8. Filter > Brush Strokes > Crosshatch: Stroke Length 16, Sharpness 6, Strength 2.
9. Set your background color to gray: RGB 120,120,120.
10. Filter > Artistic > Smudge Stick: Stroke Length 4, Highlight Area 12, Intensity 4.
11. You can create a place for the gems to be set in by duplicating the metal layer. Save it as gem settings and clear the layer contents. Set the Fill to 0 and use the circular selection to place a setting and Inner Stroke it. Your image should look like Figure 7.25.
Runes
The runes are very easy. First, make sure the Tengwar-Gandalf font from the book’s website is installed.
1. Create a new layer set named runes and a new text layer named runes and set the font to Tengwar-Gandalf. Make it about 42 pts.
2. Set the Tracking to –10 (tracking is the space between the letters).
3. Type whatever you want until the line of text fills the space between the gems.
4. Apply layer effects with the following settings changed:
Inner Glow
Blending Mode: Vivid Light
Opacity: 62%
Noise: 4%
Color: White
Size: 10 px
Bevel and Emboss
Style: Outer Bevel
Technique: Chisel Soft
Depth: 101%
Size: 2 px
Contour: default
Color Overlay
Blend Mode: Normal
Opacity: 100%
Color: RGB 67,90,106
5. You can duplicate this layer and use the Free Transform tool to rotate it to line up on the four sides of the book binding. You may have to delete or add letters to make a nice fit. You can also type different words if you want to make sure that the runes look different on every side.
6. We also need to do the runes on the book spine, too. For this I pressed Return after each letter and made the font a little larger (about 60 pt) and adjusted the leading (the space between the letters vertically) to 35 pt. I linked all the runes so I could collapse them, but you can keep them separate if you think you will want to edit them later. Your image should look like Figure 7.26.
Spine Decoration
The decoration on the spine is broken down into three steps: top, middle, and bottom.
1. Create a new layer set named spine decoration. Create a new layer named top.
2. Use the Shape tool and select the shape Leaf 3 and start by making the center leaf; make it big to start with. The color doesn’t matter.
3. Copy the leaf layer three times and use the Free Transform tool (Ctrl+T) to flip and rotate the leaves into position. Use Liquify and a very large brush to move the leaves around until they looked good. Merge the layers together.
4. Duplicate this half you just created, flip it, line up the two halves, and merge them. Copy and paste the layer effects from the runes layer. Your image should look like Figure 7.27.

FIG 7.26 Runes on the cover and spine of the book.

FIG 7.27 The progression of the creation of the top of the spine decoration.
5. The middle of the spine decoration is a twist pattern. Select the Type tool and set the font to Eras Demi iTC. Create a new text layer, type a capital S, and make it pretty big.
6. Rasterize the layer and erase the ends of the S. Free Transform the curve down to a size small enough that you can stack them into the twist shape.
7. Snap a guide to the center of the resulting curve and copy the curve vertically using the guide to keep the curves centered. You can use the Free Transform tool to manipulate the complete twist to fit it into the spine the way you like it.
8. Copy the layer style from the top layer and paste it to this layer. See Figure 7.28 for the progression of the creation of the twist.

FIG 7.28 The progression of the creation of the curve for the spine decoration.
9. Create a new layer named bottom and copy the layer style from the top or twist layer and paste it to this layer.
10. Use the Shape tool and select the Fleur-De-Lis and drag one out on this layer. You will need to use the Free Transform tool to flip it vertically and resize it to fit on the spine below the twist and between the runes. Figure 7.29 shows the finished book spine with runes and decoration.

FIG 7.29 The finished book spine with runes and decoration.
Dragon Scales
Here I will introduce the Pen tool. The Pen tool creates paths, which allow for the easy creation of smooth and complex curves. The great thing about paths is that they are editable. You can lay them down quickly without being too exact and then you can add and subtract points, move them, and adjust the handles to get any curve you can imagine. You can also save paths, fill them, stroke them, and more.
1. Create a new layer set and name it scales.
2. Create a new layer and name it scale.
3. Select the Pen tool. I turned on the grid for this part of the project. See Figure 7.30 for the general placement of the anchors and points, the final path, and the final scale shape.
a. Click somewhere in the upper-left-hand side of the image.
b. Click and drag a little in the lower left of the image to create an anchor point.
c. Click and drag between the center line and the last anchor point.
d. Click once on the center line.
e. Hold Shift and move the line straight up and click once at the top center, at the same horizontal height as the starting point.
f. Click once on the starting point to close the path off.

FIG 7.30 Initial path point placement, the final half-scale path, and the final full-scale shape. Note that you click and drag where the arrows appear. This creates curved lines instead of straight.
4. After you have created the path and adjusted it to your liking, go to the Paths palette and save the path as scale path so it is still there after you close the file and reopen it later.
5. Fill the path with a medium green: RGB 77,145,66. Right-click and choose Fill Path.
6. Turn off the path. Go to the Paths palette and click outside the path layer.
7. Go back to the Layers palette and copy and paste the scale half. Flip it horizontally and line it up with the other half and merge the two layers. At this point you may not like the shape you created. You can either use Free Transform or go back and adjust your path.
8. Filter > Noise > Add Noise: Amount 10%.
9. Filter > Blur > Gaussian Blur 1.5 pixels.
10. Now you will use your Dodge and Burn tools, just like we did on the banner in the warehouse and on the fur recently. Start by dodging a light line down the center of the scale using a soft, 45-pixel brush. Look at Figure 7.31 for a progression of the painted scale.

FIG 7.31 The progression of the painted scale.
11. Dodge the edge of the scale. You can use short, choppy strokes if you don’t have a graphic tablet or the ability to draw a continuous fluid line. Actually the lumpiness of a choppy line helps the scale look more organic than a smooth line. I dodged those two extra ridges in the sides of the scale to make it more interesting.
12. Burn the outer edge of the scale and in between the highlights to build up the depth of the scale. Go slow and use this opportunity to burn in between the bright spots to get a lumpy appearance, unless you want a smooth scale.
13. Set your background color to black.
14. Filter > Brush Strokes > Accent Edges: Edge Width 10, Edge Brightness 22, Smoothness 3.
15. Filter > Brush Strokes > Spatter: Spray Radius 8, Smoothness 8.
16. Filter > Artistic > Plastic Wrap: Highlight Strength 11, Detail 8, Smoothness 2.
17. I went back and strengthened some of the highlights and shadows with the dodge and burn again.
18. For this next step, I turned off all other layers.
19. Create a copy of this layer and hide it. You want to keep one large copy of the scale in case you need it later.
20. Use the Free Transform tool and size the scale down until you like the size. I made it about 200 pixels high.
21. Apply the Drop Shadow layer effect to the scale and change the following settings:
Uncheck the Use Global Light option.
Opacity: 25%
Distance: 12 px
Size: 10 px
22. I found it easier at this point to copy this layer and merge it with an empty layer to freeze the layer effects. You can also go to the Layers menu and Create Layers and merge the two as well. I am just in the habit of creating an empty layer and linking and merging faster than I can click through a menu.
23. Select All and use Ctrl+Alt to copy the scale on the layer. You don’t want the first row of scales to touch or overlap. Lay them out on the grid with roughly half a scale space between them like in Figure 7.32. Start at the bottom and when you have a row, duplicate the layer and move it up half a scale and center it between the scales below.

FIG 7.32 Scales laid out on the grid to create the cover. The top row of scales (1) is the first row you create. This goes at the bottom of your image. The second row (2) shows the duplicated layer placed above the first. The third row (3) shows the scales filling up the layer. You work from the bottom up, overlapping scales like a roofer laying tiles.
24. Merge all the scale layers together and name the layer finished scales. I thought my scales were too bright, so I used Ctrl+U to lower the saturation and the lightness a bit.
FIG 7.33 The cover with the finished scales.
25. Filter > Brush Strokes > Spatter: Spray Radius 8, Smoothness 8.
26. Filter > Artistic > Plastic Wrap: Highlight Strength 9, Detail 7, Smoothness 2.
27. Filter > Brush Strokes > Accent Edges: Edge Width 7, Edge Brightness 22, Smoothness 2.
28. Turn all the layers back on (except for the UV layer set and the saved scale). Mostly, you want to see the metal layer and how the scales look under the metal frame of the book. Free Transform the scales until you like the size.
29. Go to the metal layer and select the empty inside of the cover with the Magic Wand and invert the selection.
30. Go to the scales layer and press Delete. Your cover should look like Figure 7.33.
Cover Symbols
We will use paths again to create the symbols on the cover. These symbols will be used again on the map, banner, and door. When you create these shapes, don’t try to make them to fit the book cover; make them large so they can easily be reused.
1. Create a new layer set and name it symbols.
2. Create a new layer and name it symbol.
3. Select the Pen tool. I turned the grid off for this part of the project.
a. Click somewhere in the lower-left-hand side of the image.
b. Click and drag in the upper-right-middle of the image to create an anchor point.
c. Click to the right and a little lower of the last anchor point.
d. Click down and a little to the left.
e. Click and drag a little higher and to the left of the last point.
f. Click once on the starting point to close the path off.
4. After you have created the first shape and adjusted it to your liking, go to the Paths palette and save the path as symbol path so it is still there after you close the file and reopen it later.
5. Fill the path with any color. Right-click and choose Fill Path.
6. Turn off the path: go to the Paths palette and click outside the path layer.
7. Go back to the symbol layer and use the Magic Wand tool and select the shape.
8. Select > Modify > Contract: select a number of pixels to contract the selection that looks good to you. Press Delete.
9. To create the circular shapes on the cover, create a new layer named circle. Create a circular selection and fill it.
10. Snap a guideline line to the vertical and horizontal center of the circle.
11. Drag out a circular selection centered on the circle using the guides and press Delete.
12. To make the half-moon shape, create a new layer named half-moon and drag out an oval selection. Make sure that this selection is a little thicker vertically. Snap this selection to the center of the guidelines. Fill this selection.
13. Drag a circular selection out from the center of the guidelines that is a bit larger than the circle on the circle layer.
14. Press Delete to remove the middle of the oval and erase the remaining left-hand portion of the shape.
15. Now you have all the shapes you need to create the symbols on the cover. Duplicate the symbols layer set and name it cover symbols. Now all the original large versions of the shapes are there for you to create the other textures in the scene.
16. In the cover symbols layer, copy and manipulate the shapes until they look like the symbols on the cover and merge all the layers. See Figure 7.34 for the general placement of the anchors and points, the circular shapes, and the final shape.
17. Apply layer effects with the following settings changed:
Fill: 0%
Outer Glow
Blending Mode: Multiply
Opacity: 100%
Color: Black
Spread: 9%
Size: 18 px
Bevel and Emboss
Style: Inner Bevel
Technique: Chisel Soft

FIG 7.34 Initial path point placement, the circular shapes, and the final shape.
Depth: 131%
Size: 5 px
Contour: default
Color Overlay
Color: White
Opacity: 50%
Gradient Overlay: default
See Figure 7.35 for the book cover with the symbols in place.

FIG 7.35 The cover with the symbols in place.
Page Edges
The book has old, well-worn page edges. These are easily created.
1. Create a new layer set named pages.
2. Create a new layer named pages.
3. Go to the UV Map layer set and the UV Map layer and select the pages area with the Magic Wand tool.
4. Go to the pages layer and move the selection up to the middle of the canvas and use the Select > Transform Selection command to rotate the selection 90 degrees.
5. Reset your colors (D key) to black and white.
6. Fill the selection with black.
7. Filter > Render > Fibers: Variance 10, Strength 15.
8. Colorize this (Ctrl+U): Hue 45, Saturation 27, Lightness –57.
9. Reset your colors (D key) to black and white and swap them (X key).
10. Filter > Distort > Glass: Distortion 4, Smoothness 7, Scaling 62%.
11. Rotate the pages back horizontally and position them over the UV area for the pages.
12. You can use the Burn tool to darken the top, bottom, and side edges of the pages. See Figure 7.36 for the progression of the pages.

FIG 7.36 The progression of the pages.
Gem
Finally, we need to make the gem for our spellbook. Another easy task.
1. Create a new layer set and name it gem.
2. Create a new layer and name it gem.
3. Go to the UV Map layer set and select the gem area of the UV map.
4. Go back to the gem layer and fill the selection with it with any color you want. You want to use a color that’s not too close to black or white. A pretty well-saturated color works best.
5. Keep the selection active or lock the layer transparency.
6. Apply layer effects with the following settings changed:
Inner Shadow
Blending Mode: Multiply
Color: Black
Opacity: 49%
Distance: 30 px
Choke: 7 %
Size: 38 px
7. Use the Dodge tool and lighten the lower edge of the gem.
8. Create a new layer and name it highlights.
9. Use a soft brush of various sizes and paint on some white highlights. Having the highlights on a separate layer allows you to edit them. Sometimes you might want to repaint them. If the highlights are too strong, you can apply a Gaussian Blur or take down the opacity. See Figure 7.37 for the stages of the gem.
A final step that makes the gem look great—that is, in other contexts, but not in this case, because the gem will be mapped to geometry—is to apply a large outer glow and a strong inner glow. Try these settings:
Outer Glow
Blending Mode: Normal
Opacity: 75%
Color: The color you chose for the gem
Spread: 10%
Size: 250 px
Inner Glow
Blending Mode: Normal
Opacity: 83%
Color: White
Choke: 3%
Size: 116 px

FIG 7.37 The progression of the creation of the gem. The last one on the right is the gem with added effects that look great in other contexts, but not here. It’s a neat trick, though.

FIG 7.38 The final spellbook texture.
You are finished all the details of the spellbook. Figure 7.38 shows the final spellbook texture.
Old Map
Now we will create the old map on the table. This map is old dark parchment with burnt edges and faded ink. You can see the complex torn edges of the map and the holes in it as well. For this effect we will use an alpha channel.
1. Open a new 1024×1024 image and name it map. The background color should be black.
2. Create a new layer and name it paper. Fill this layer with the color RGB 193,166,101.
3. Filter > Noise > Add Noise: Amount 15%.
4. Filter > Blur > Gaussian Blur: 5 pixels.
5. Reset your colors to black and white (D key).
6. Filter > Render > Clouds.
7. Fade the clouds (Ctrl+F): Opacity 20%, Blending Mode: Multiply. See Figure 7.39.
8. Now we need to tear up the edges of the map. I started by making a square selection that had a 32-pixel border all the way around (I used the grid for this). Invert the selection and press Delete.
9. Use the eraser with a large, hard brush (40 pixels) and erase the general outline of the torn paper (Figure 7.40).

FIG 7.39 The parchment base.

FIG 7.40 The parchment with the beginning of a worn edge.

FIG 7.41 The parchment with torn and burnt edges.
10. Use the 9-pixel Drippy Watercolor brush. You may have to load the Wet Media Brushes to make the brush a little larger and start eating away the edges of the paper. I experimented with a few brushes at various sizes to get different torn edge effects. One was the Brush Heavy Flow Scatter.
11. Apply layer effects with the following settings changed:
Inner Glow
Blending Mode: Overlay
Opacity: 52%
Noise: 5%
Color: Black
Choke: 9%
Size: 90 px
See Figure 7.41.
12. Create a new layer named terrain and set the opacity to 49% and the blending mode to Overlay. Use a small black brush (3–5 pixels) to draw some details on the map. Don’t worry; they can be pretty simple. We will add more detail shortly. And don’t worry if the lines don’t look like the old ink you want it to; we will process that later. You can look at Figure 7.42 to see what I drew before it was processed.
13. Now go back to the spellbook and copy the symbol layer into the map. Turn off all the layer effects and add a new one:
Stroke Size: 1 px
Position: Inside
Blending Mode: Overlay
Opacity: 49%
Color: Black

FIG 7.42 The terrain lines—don’t have to be too good at this point.
14. Now you can copy and resize a few of these symbols about the map. You can erase portions of the symbols, flip them around, do whatever you think will look good.
15. Select the Text tool, select the Tengwar-Gandalf font, and make it 82-point. Type whatever you want on the map. Make a few short lines of text, as if notes were written on the map. You may need to adjust the spacing between the letters and the lines of letters. Set the layer Fill to 0 and add the following layer effects:
Color Overlay
Blending Mode: Color Burn
Color: RGB 92,45,45
Opacity: 50%
16. Use the Free Transform tool to rotate the text up on the right-hand side so it looks more handwritten.
17. Create a new layer and name it dirt.
18. Use the Color Picker to set your foreground color to a color close to the map’s color. Just select anywhere on the map.
19. Filter > Render > Render Clouds.
20. Filter > Render > Render Difference Clouds. Repeat.
21. Filter > Blur > Gaussian Blur: 25 pixels.
22. Set the layer blending mode to Overlay and the opacity between 40% and 55%, depending on how dirty you want your map. See Figure 7.43.
23. Link all the layers except for the background and Create Layer Set From Linked.

FIG 7.43 The map getting dirty.
24. Duplicate this layer set and unlink the text layer. Merge all the linked layers and make sure that the text layer is on top.
25. Select the paper layer in the original, unflattened layer set.
26. Selection > Load Selection > press Okay. The proper file name and layer should be the default when the correct layer is selected.
27. Hide the unflattened layer set.
28. Invert the selection.
29. Highlight the new flattened layer with the map on it and press Delete.
30. Filter > Brush Strokes > Spatter: Spray Radius 8, Smoothness 8.
31. Filter > Distort > Ocean Ripple: Ripple Size 12, Ripple Magnitude 4.
32. Filter > Brush Strokes > Accent Edges: Edge Width 4, Edge Brightness 24, Smoothness 4.
33. Turn the text layer back on. See Figure 7.44.
34. Create a new layer, name it alpha, and fill it with black.
35. Select the paper layer in the original, unflattened layer set.
36. Selection > Load Selection: Press Okay.
37. Turn off every layer but the new alpha layer.
38. Select the alpha layer and fill the selection with white (right mouse, Fill). See Figure 7.45.
Windows
The windows are bright, based on the light shafts, and the glass looks clean and unbroken. The colors are yellow and blue based on the sun and moon symbols. The seams are the bulgy lead seams typical of stained glass. We will create an illumination map, which is simply a grayscale image based on the complete texture to be used in a shader.

FIG 7.44 The final old and worn map.

FIG 7.45 The alpha channel for the map.

FIG 7.46 UV Map template for the window.
1. Open the 512×512 image fantasy_window_UV.psd from the book’s website. See Figure 7.46.
2. This image is a UV template like the chest, only not nearly as complex. This image is rather simple to create and really simple to map onto a piece of geometry. You will notice some space to the right of the window shape—that is semi-wasted space. In a real-world scenario, we could use this for the candle flames, or find another use for this space. Here the focus is creating the art itself and not laying out UV coordinates as efficiently as possible. I wanted you to be aware of this fact so that in actual practice you could address this issue.
3. Use the Magic Wand to select the shape.
4. Create a new layer and name it lead.
5. Look at Figure 7.47. You can see the pattern of the lead seams very clearly. Correcting for the angle of the drawing and given the fact that we are working from a template, we should be able to recreate this fairly easily. Also, there is no reason for this unique, one-of-a-kind, texture to be tileable, on the grid, or exact in any way. That makes recreating it a lot easier.
6. The easiest thing to create first is the frame that surrounds the glass. If your selection is not still active, use the Magic Wand again to select the shape and activate the newly created lead layer.
7. Stroke the inside of the selection with a 5-pixel black line.

FIG 7.47 The stained-glass windows from the concept sketch, and the finished frame we created in Photoshop.

FIG 7.48 A progression of the lead seams being drawn for the stained-glass window (A–D).
8. Snap a guideline to the vertical center of the window frame and one to the horizontal center. Look at the concept art. The next easiest thing to do would be to draw the line that runs up the center of the window. Refer to Figure 7.48 for a progression of the lead seams as they are drawn.
9. Select a hard, 5-pixel brush and draw the line up the center and go a little beyond where the guidelines meet.
10. Use the Circular Marquee and hold down the Alt and Shift keys to make the marquee symmetrical and to make the start point the center of the selection. Make the circular selection about 160 pixels and vertically centered on top of the straight line we just drew, like a lollipop (Figure 7.48-A).
11. Make another circular selection as we just did, only make it about 130 pixels and move it to the left and press Delete before stroking it 5 pixels (Figure 7.48-B).
12. Select a 5-pixel hard brush and draw a line dividing this new circle in half.
13. Make a new circular selection about 43 pixels in the center of this line, press Delete, and stroke it 5 pixels (Figure 7.48-C).
14. There is a cool moon/crescent moon below the large moon we made first. Make a circular selection that is 70 pixels, centered on the vertical line, and just a tad under the horizontal line (Figure 7.48-D).
15. Press Delete to remove the line, stroke this 5 pixels/inside, and then move the selection over to the right until the left edge snaps to the center guideline.
16. Stroke the 5 pixels on the outside of the selection.
17. Deselect and use a hard eraser and erase the unwanted outer ring of the moon. Be careful erasing where the two rings overlap.
18. All that’s left to do is create those ray-like lines coming from the main moon/sun. Choose a hard, 5-pixel brush and click a dot where you want the line to start, hold Shift, and click where you want it to end and you will have a straight line between the two points.
We will apply the layer effects to the lead seams after the glass panes are in place. Logically, we need to see what’s below the lead seams before we are able to tweak and adjust their layer effects.
19. The glass is easy to make now that the frame is made. Activate the lead layer and use the Magic Wand to select the areas in the frame where the darker, blue glass will be. Look at the concept art for this.
20. Create a new layer and name it panes. Fill the selection with blue: RGB 74,90,171.
21. Go to the lead layer and select the remaining areas inside the frame except for the small moon inside the larger moon at the top of the window and the large crescent to the right. Activate the panes layer and fill these spaces with yellow: RGB 175,172,89.
22. Go back to the lead layer and select the small moon inside the larger moon and the large crescent. Activate the panes layer and fill these two spaces with white (Figure 7.49).
23. Deselect the selection.
24. Reset your colors to black and white (D key) and switch them (X key) so black is your background color.
25. Filter > Noise > Add Noise: Amount 10%.
26. Filter > Distort > Glass: Distortion 8, Smoothness 4, Texture Frosted, Scaling 100.
27. Fade this filter to 50%.
28. Filter > Artistic > Sponge: Brush Size 2, Definition 2, Smoothness 1.
29. Filter > Distort > Glass: Distortion 2, Smoothness 7.
30. Filter > Artistic > Plastic Wrap: Highlight Strength 13, Detail 5, Smoothness 2.
31. Fade this filter: Opacity 50%, Blending Mode: Vivid Light.
32. Filter > Blur > Gaussian Blur: 1.5 pixels.
33. Filter > Distort > Glass: Distortion 3, Smoothness 3, scale 58%.

FIG 7.49 The window glass, colored.
34. Add the following layer effects and change these settings:
Inner Shadow
Distance: 6 px
Size: 10 px
Inner Glow
Blending Mode: Multiply
Opacity: 59%
Noise: 5%
Color: Black
Size: 24 px
Gradient Overlay
Blend Mode: Vivid Light
Opacity: 29%
At this point I was happy with the blue and yellow glass, but the parts that we left white still looked too plain to me, so I selected their spaces on the lead layer and ran the ink Outlines filter on the panes layer: Stroke Length 12, Dark intensity 6, Light intensity 9.
Meanwhile, back at the lead seams:
35. Turn on the lead layer and apply the following layer effects.
Drop Shadow: default settings
Outer Glow
Blending Mode: Multiply
Opacity: 47%
Noise: 2%
Color: Black
Size: 32 px

FIG 7.50 The final window texture.
Bevel and Emboss
Technique: Smooth
Depth: 111%
Size: 1
Contour
Cone: Inverted
Texture
Scale: 127%
Depth: 371%
Gradient Overlay
Blend Mode: Normal
Opacity: 50%
Style: Radial
Scale: 65%
See Figure 7.50 for the final window texture.
The illumination map is nothing more than a grayscale image. Black is dark and white is fully illuminated.
36. Duplicate the window image and name it fantasy_window_illumination.
37. On the lead layer, turn off the Bevel and Emboss layer effects and apply a solid black Color Overlay layer effect.
38. Go to the panes layer and desaturate it (Ctrl+Shift+U).
39. Image > Adjustments > Brightness/Contrast: Brightness +22, Contrast +48.
40. You will still need to use a large, soft brush of various sizes to airbrush the centers of the panes white and leave only a small amount of darkness at the edges. Figure 7.51 shows the illumination map with the texture in a dark room with and without the illumination map.
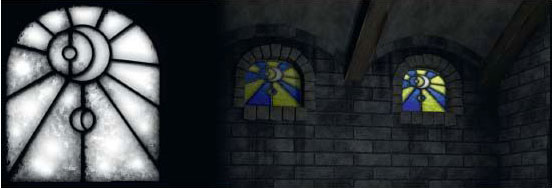
FIG 7.51 The illumination map for the window and the texture in a dark room with and without the illumination map.
Banner
The banner is cloth and the colors are the same as the window, but these colors will be more desaturated based on the material, the location of the banner, and its assumed adventuring history. In this exercise we will use the shapes we created for the spellbook cover like we did on the map. We will also create new paths to define the outline of the banner. Finally, we will create the alpha channel for this banner and put a faked shadow in it. The great thing is that if you don’t want the shadow, you can turn it off.
1. Open a new 1024×1024 image and name it fantasy_banner.
2. Create a new layer and name it banner outline.
3. Look at the shape of the banner in the concept sketch. We will create half of the banner using paths and then flip it. See Figure 7.52 for the shape breakdown of the banner.
4. Drag a vertical guide out to the 400-pixel mark on the canvas. Hold down Shift and the guide will snap every 10 pixels. We don’t want to build the shape in the exact center, because we want to leave some space for the alpha-channeled objects.
5. Select the Path tool and drag out the shape of the banner. I detailed the creation of a shape using the Path tool a few times previously in this chapter. If you don’t know how to use the Path tool, go back to those sections and practice on those shapes. See Figure 7.53 for the banner path click-and-drag points.

FIG 7.52 The breakdown of the banner shape. From left to right: the banner cropped from the concept sketch, the straightened version, the half-banner path line, and the final shape.
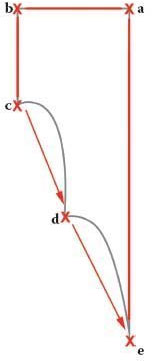
FIG 7.53 The click-and-drag points of the banner path.
6. Once you have half the banner outlined, you can save the path if you wish. Make sure you are on the banner outline layer and still have the Direct Select tool selected, then right-click to fill the banner with the blue: RGB 62,98,163.
7. Turn off the path. Duplicate this layer and flip it horizontally.
8. Line up the two halves, link them, and merge them. Make sure the resulting shape is solid and that there is no seam between the two pieces. Also make sure there is enough space at the bottom between the end of the banner and the edge of the banner if you plan to put a drop shadow in.
9. Filter > Noise > Add Noise: Amount 5%.
10. Filter > Brush Strokes > Crosshatch: Stroke Length 31, Sharpness 10, Strength 1.
11. Filter > Artistic > Poster Edges: Edge Thickness 1, Edge intensity 1, Posterization 3.
12. Filter > Blur > Gaussian Blur: 1.5 pixels.
13. Filter > Artistic > Paint Daubs: Brush Size 6, Sharpness 0, Brush Type Dark Rough.
14. Open the spellbook file and find the symbols layer that has the original, large version of the shapes you created for the cover of the spellbook. Copy this layer into the banner image. If you didn’t copy the entire layer set, create a new layer set so all the shapes and symbols are easily collapsed and organized later.
15. Refer to the concept art and start the process of laying the banner shapes out with the symbol shapes you already have. I was able to create all the shapes by copying the original shapes and using Free Transform. The only shape I needed to create by hand were the cross bars in the lower symbol. I took some time and filled in the circles and erased them, making them look a little more organic or handmade. See Figure 7.54 for the progression from basic shapes to the final banner decoration.

FIG 7.54 The progression from basic shapes to the final banner decoration. Using shapes previously created saved us a lot of time presently.
16. Collapse all the symbols onto one layer and apply layer effects with the following settings:
Fill: 0%
Outer Glow
Blending Mode: Multiply
Opacity: 71%
Color: Black
Noise: 8%
Spread: 5%
Size: 29 px
Bevel and Emboss
Style: Inner Bevel
Technique: Chisel Hard
Depth: 81%
Size: 5 px
Contour: default
Texture: default
Color Overlay
Color: yellowish RGB 178,166,38
17. The next thing we need to make is the fringe that borders the banner. Create a new layer and name it fringe.
18. Go to the banner outline layer and use the Magic Wand to select the area outside the banner and invert the selection.
19. Go back to the fringe layer and stroke the selection: Inner Stroke and 16 pixels.
20. Remove the very top line of the stroked outline using a hard eraser or the Selection tool (pressing the Delete key).
21. Copy the layer effects from the symbols layer and paste them into the layer.
22. Duplicate the fringe layer. Now we can erase the gaps in the top layer to make the border fringe look wound. You can eyeball this with a small, hard eraser or use the grid with a selection, moving the selection and pressing Delete, if you want the gaps perfectly spaced.

FIG 7.55 The banner with fringe on it.
23. Duplicate one of the fringe layers, make sure it is on the top of the other two, and clear the contents from this layer (Ctrl+A and Ctrl+X). Change the following settings in the layer style of this layer.
Bevel and Emboss
Technique: Smooth
Size: 21
24. Use a 40-pixel hard brush and put the balls on the ends of the banner points. Your image should look like Figure 7.55.
25. Link all the layers except for the background and choose Create Layer Set From Linked.
26. Duplicate this layer set and name it banner flat and flatten it. Hide the original unflattened layer set.
27. Filter > Noise > Add Noise: Amount 5%. I also took the saturation and contrast down just a little on the banner.
28. Filter > Artistic > Dry Brush: Brush Size 3, Brush Detail 5, Texture 1.
29. Filter > Brush Strokes > Accented Edges: Edge Width 4, Edge Brightness 26, Smoothness 2.
30. To create the alpha channel and to make the drop shadow part of the texture, you need to go to the original unflattened banner layer set and duplicate it. Name it alpha.
31. Turn off all the Outer Glow layer effects in the layer set, but leave the rest of the layer effects on. Flatten the alpha layer set.
32. Select > Load Selection and choose OK, and go back to the banner layer. Invert the selection and press Delete. The outer glow should disappear—make sure that this is the only active layer if you don’t see this happen.
33. We also need to create the end cap. Create a new layer and name it end cap.
34. Use the Shape tool with the Fill Pixel option chosen and set your foreground color to a medium gray.
35. Choose the Fleur-De-Lis shape and drag out a shape that fills in part of the empty space. This doesn’t have to be too big and doesn’t need to be constrained using the Shift key. I made mine a little longer than wide.
36. Erase the bottom three smaller tips of the shape and apply the following layer style and settings:
Bevel and Emboss
Style: Inner Bevel
Technique: Chisel Soft
Depth: 111%
Size: 27 px
Soften: 3 px
Contour: default
Texture: Pattern: Satin, Scale: 341%, Depth +34
Color Overlay
Color: yellowish RGB 178,166,38
37. Duplicate the end cap layer and link it to the alpha layer and merge them.
38. Put a solid black Color Overlay on the alpha layer and a Drop Shadow to your liking. I changed only the distance (17 px) and the Size (21 px). If your background layer is black, you won’t see any of this, so make it a light gray.
39. Create a new layer and link it to the alpha layer and merge them so that the effects are baked in and become pixels rather than an effect.
40. Select > Load Selection > OK.
41. Go to the Channels tab and create a new alpha channel and fill the selection with white. You should only have to right-click in order to do this here.
42. Now the alpha channel contains the fake drop shadow. Figure 7.56 shows the banner, the alpha channel, and the banner with the alpha enacted with the faked drop shadow. And Figure 7.57 shows a couple of variations on the banner using the same technique (I used an overlay of an image for the one on the right).
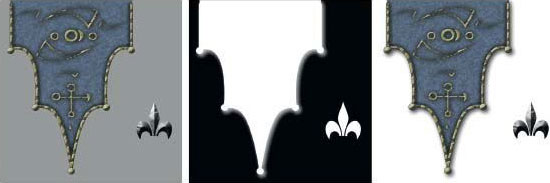
FIG 7.56 Left to right: the banner, the alpha channel, and the banner with the alpha enacted showing the faked drop shadow.

FIG 7.57 A couple of variations on the banner using the same technique (I used an overlay of an image for the one on the right).
Magic Door
The door is metal and intricately carved with symbols and writing. The symbols and writing have a magical glow. The door was easier to do than I originally anticipated. By the time you get to this point in the fantasy setting you have all the shapes, symbols, and magical writing you need for the door. Plus, the curves you see in the door are not made by you with paths; they are part of the model, and hence part of the UV map.
1. Open the image from the book’s website named fantasy_door_UV_ Map.psd. See Figure 7.58.
2. You see the familiar setup, the UV map, and the labels for the parts.
3. Paste the base metal in you made for the fantasy setting on the top of the stack of layers and name it metal.
4. Duplicate the metal layer and name it door frame.
5. Turn both layers off and go to the UV map and select the frame, select similar, and invert the selection.
6. Select the door frame layer to turn it on and press Delete.
7. Apply layer styles with the following settings changed:
Drop Shadow
Blend Mode: Multiply
Opacity: 53%
Distance: 6 px
Size: 18 px
Outer Glow
Blend Mode: Linear Burn
Opacity: 19%
Noise: 17%
Color: Black
Size: 65 px
Bevel and Emboss
Technique: Smooth
Depth: 151%

FIG 7.58 UV map template for the magic door.
Size: 9
Highlight Mode Opacity: 57%
Shadow Mode Opacity: 57%
Texture: Pattern: Molecular, Scale: 537%, Depth: +95
8. Now we will create the magical writing all over the door. Create a new layer set and name it writing.
9. Select the Text tool and the Tengwar-Gandalf font. Make it 35 pt.
10. Type whatever you want and then use the Warp Text tool to fit the text into the spaces in the door. This is a trial-and-error process. You have to experiment with more or fewer letters and different warp settings. I also used the Character palette and adjusted the tracking (horizontal spaces between letters) and moved the letters closer to each other. See Figure 7.59 for the layout of the text on the door.
11. When you have placed all the text, select one layer and apply layer styles with the following settings changed:
Outer Glow
Blend Mode: Color Burn
Opacity: 24%
Color: Black
Technique: Precise
Size: 9 px
Bevel and Emboss
Style: Outer Bevel
Technique: Chisel Soft
Depth: 127%
Direction: Down
Size: 2
Highlight Mode Opacity: 69%
Shadow Mode Opacity: 74%

FIG 7.59 Placing the text on the door is a trial-and-error process, but well worth the effort.
Color Overlay
Blend Mode: Normal
Color: RGB 167,255,239
12. Link all the text layers, copy the layer style from the initial text layer, and select Paste Layer Style to Linked.
13. The shapes on the door are the last thing to do. You can open the shapes you saved elsewhere and paste them into a layer set named shapes and manipulate them with the Freeform tool and Liquify, or you can easily create these shapes using paths, or even the circular selection tool. For the little shapes toward the bottom, I used a few brushes so there would be variety and interest there. See Figure 7.60 for the layout of the door shapes.
14. Once one side of the door is complete, you can duplicate the layer, flip it horizontally, position it, and alter it a little so that it looks more interesting and not like a perfect mirror of the other side.
15. Copy the layer style from the text layers, paste it onto this layer, and change the following settings:
Color Overlay
Blend Mode: Vivid Light.
Opacity: 47%.
16. See Figure 7.61 for the final door. You may notice that there is the door edge to the left; that is a simple layer shape based on the UV map with the layer Fill set to 0 and a Bevel and Emboss applied.

FIG 7.60 The layout of the shapes on the door.
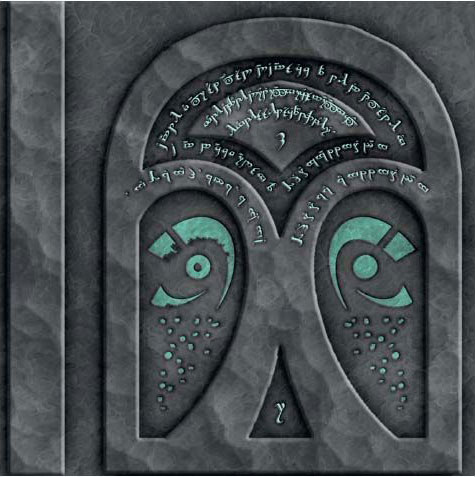
FIG 7.61 The final magical door texture.
Pitcher and Goblet Set
The pitcher and goblet are made of fine metal with inset gems. Although highly polished, these vessels have seen their share of use and bear many dents and scratches. In order to get a reflective gold metal that has bumps and scratches in the surface—ones that look real—we need to use a shader. Shaders are becoming very common. In fact, I don’t think there is a game today on any console or desktop computer that doesn’t use some form of shader. Even games on mobile devices that look like traditional 2D games often are using the 3D capabilities of the hardware and software for the game. I discussed shaders way back in the beginning of the book, defining what they are and looking at some visual examples of them. I noted that as artists, we are most often concerned with the input and the output of the shader and not the code itself. One of the primary tasks you will perform as an artist will be to create several images that the shader will use to process various real-time effects. You will often redo these images and adjust them until you get the visual results you want. We will use this part of the fantasy scene to take the creation of a basic shader step by step. If you are not familiar with shaders, you might be surprised how simple some of them can be. Not to oversimplify a potentially very complex topic, but most of the common shaders are fairly easy to work with. In this case, we will be using a common shader that uses the following map types:
• Diffuse (or color) map: Contains almost exclusively color information
• Bump mapping: Grayscale image that simulates bumps and scratches
• Environment (or cube) map: A series of images used to fake a reflection
• Environment mask: Grayscale image that alters the reflective value of the cube map
I will not step you through the creation of these maps. Based on their simplicity and what you have already learned in this book, making them should be easy for you. Let’s look at the pitcher before any visual information is applied. In Figure 7.62 you can see that this is relatively a simple mesh.

FIG 7.62 The pitcher mesh before we apply any visual information.
Diffuse Map
The diffuse map is what most people are talking about when they use the word texture. Previously, the diffuse map contained virtually all the visual information that would be applied to the 3D geometry of a game. The diffuse map is still referred to as a texture, but more commonly it is again being referred to as the diffuse map, or color map, as it now contains virtually nothing but color information. See Figure 7.63 for the diffuse map and the map applied to the pitcher. Notice how plain it is.
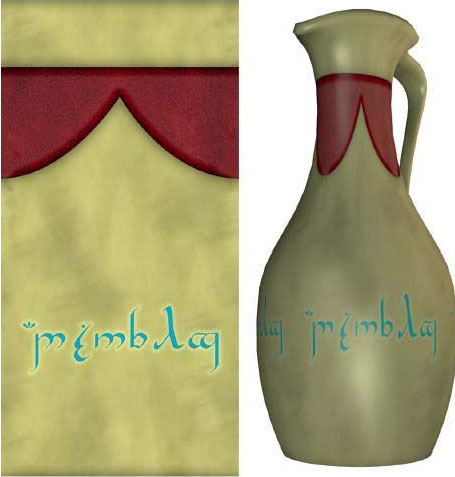
FIG 7.63 The diffuse map and the diffuse map applied to the pitcher. Notice how plain it is. Now that shaders process many visual details in real time, we don’t need to add this detail to the texture.
In this book we created textures that contained all of the visual information pertaining to an object or surface: color, highlight, shadow. Having all this visual information painted into the image, and therefore static or nonreactive to the environment, is often referred to as “baking,” as in, “The shadows are baked into this texture.” The techniques in this book don’t bake the visual information into the source image; therefore, you can easily go back and split the visual information out before flattening the PSD file to make maps for a shader. Learning to paint a texture is the best way to get the strong basis you will need to create effective shaders. You can’t rely on technology; shaders are a tool and not a replacement for artists.
Bump Map
Bump mapping makes the surface of the texture appear to be … bumpy. White on the bump map represents the highest parts of the surface and black the lowest. You can use bump maps to simulate etched letters with solid black and hard edges, or dents with lighter gray and soft edges. The bump map adds detail that makes the geometry look far more detailed than it really is. See Figure 7.64 for the bump map of the pitcher and the pitcher with the bump map applied. Notice that the letters are solid black with hard edges and the dents are softer and lighter in color so they are not as harsh and deep as the letters. You can also see in Figure 7.65 the effect of using high- and low-resolution images for the bump map.

FIG 7.64 The bump map for the pitcher and the pitcher with the bump map applied. White represents the highest parts of the surface and black the lowest. To the far right is the pitcher with the diffuse and bump map applied.
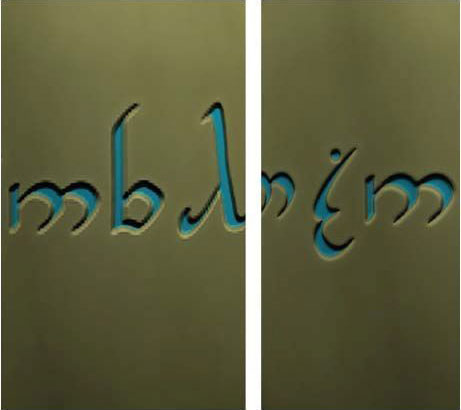
FIG 7.65 The resolution of the bump map image affects the outcome. A low-resolution image was used for the bump map on the left and a high-resolution image for the one on the right.
Environment or Reflection Map (Cube Mapping)
We will create a reflective surface on our pitcher using an environment or reflection map. The environment map uses a series of images called a cube map to fake the reflection on the surface of an object. Cube maps, as mentioned earlier, are so named because the reflections you see are actually six images arranged in a cube. These images are rendered from the spot the reflective object is located, so the cube map reflects the object’s surroundings accurately. These six images cover all directions: up, down, front, back, left, and right. Ideally, they will all line up, meaning that the images meet at the edges so the reflection is seamless. The images of the cube map are most commonly static, or always the same. If you are looking into a reflection created by a static cube map, you won’t see yourself (or your in-game character). This is the most efficient way to handle cube mapping, but there are also other techniques for generating real-time reflections. One of those techniques is called dynamic cube mapping. This method redraws the six images in the cube map every frame. If the object mapped with the environment map moves, or something in the environment around it moves, the cube maps are updated to render an accurate reflection in real time. See Figure 7.66 for an illustration of the (static) cube map as it was created for this scene and Figure 7.67 for the cube maps arranged as if the cube were folded open like a box. If you don’t have access to a 3D package, you can also use an image of clouds, or a blurry nondescript image, for a cube map. Figure 7.68 shows the pitcher with only the cube map applied in its initial state. The cube map is clear and reflecting at 100%.

FIG 7.66 The six images that form the cube map were rendered from the location of the pitcher so the metal looks as if it is reflecting its surroundings.

FIG 7.67 The six images that form the cube map arranged as if the cube were folded open like a box.

FIG 7.68 The pitcher with only the cube map applied in its initial state. The cube map is clear and reflecting at 100%.
Because this metal pitcher has seen a good deal of use, the metal shouldn’t reflect like a mirror, so there are several things we can do to make this reflection look much more realistic. First I blurred the cube maps so the reflection appears less crisp and mirror-like. I also desaturated the images a little. Figure 7.69 shows the pitcher with a blurred and desaturated cube map and Figure 7.70 the final result.
At this point, if you turn on your color map and bump map, you will see the pitcher taking shape.
The final step that adds a final level of realism and finishes this surface off nicely is a mask for the reflection. This mask determines how strong various parts of the reflection are based on grayscale values. White is fully reflective and black is matte, or nonreflective. I used some light-gray areas so that the pitcher looks well worn; see Figure 7.71. Figure 7.72 shows the progression of the pitcher from simple mesh to finished product. You will notice the gems in the concept art and the final scene. These were smaller, red diffuse maps, but used the same environment map as the pitcher.
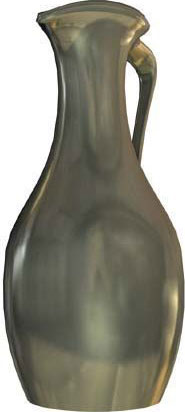
FIG 7.69 The pitcher with the blurred and desaturated cube map.

FIG 7.70 The pitcher with the color map, bump map, and reflection active.

FIG 7.71 The pitcher with the final detail, masking the reflection.

FIG 7.72 The pitcher in all of its stages.
That’s the end of the fantasy setting. Here is the complete scene using all the textures you created (Figure 7.73). And as I mentioned in the beginning of the chapter, the medieval setting is simply the fantasy setting stripped down (Figure 7.74).

FIG 7.73 The completed fantasy scene.

FIG 7.74 The (stripped-down) medieval scene.
1. Create a set of textures that make this setting look as if an evil person lives here. Consider color, shape, and other visual clues that might tell an observer what type of person lives here.
2. Create a stone floor with smaller stones.
3. Create three variations of a wall based on the information in the section “Plaster or Light Stucco.” Can you create a stucco that’s falling away from boards?
4. Paint a fur rug that is from a shorter-haired creature with a pattern like a tiger or zebra. What about a yeti fur? This would affect the shape of the skin.
5. Create a chest texture that is all metal—and looks good.
6. Create a spellbook texture that has some or all of the following differences: try different shapes for the metal parts, try differently colored and shaped dragonscales, color the metal like gold or brass, try wood and various other surfaces instead of dragonscales.
7. Create a map that has different burn patterns and tears, a different mapped location, and for one extra Schrute buck, paint folds into the map and make it look like it is hanging on a wall. Go back to Chapter 6 if you need to review how to do this.
8. Windows: Create your own window pattern. Create an illumination map for the window texture.
9. The door: try creating this out of various materials and try different runes or symbols on the door. Can you make it look like an evil door, a good door, a total mystery?