18
PostgreSQL in Python
This example uses the very popular PostgreSQL relational database. If you compare this example to the one described in Chapter 16, “MariaDB in Python,” you'll see many differences in detail. Those are due mostly to the approaches taken by the two database adapters used by the different examples. This example also demonstrates some new database techniques, such as making the database automatically generate ID values and easily creating many records all at once.
PostgreSQL (pronounced post-gres-kyoo-el) is also known as Postgres. (The nickname Postgres is particularly popular with those who find it hard to pronounce PostgreSQL. It's also shorter and, therefore, gives you slightly fewer chances to make typos.) It's a free open source relational database management system.
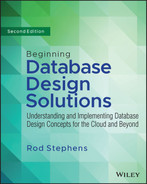
This example builds a small order database for a coffee supply store named the Brew Crew. Customers place orders that have order items. Figure 18.1 shows the design with some data added to the tables.
First, I'll tell you where you can download and install Postgres. Then I'll explain how to install the Psycopg data adapter for Python.
INSTALL PostgreSQL
Download Postgres from www.postgresql.org/download. You will need to click a link, download an installer, and run it. (It should only take a few minutes if you have a fast network connection.) Install the version that's appropriate for your computer. I installed postgresql-14.4-1-windows-x64 (Version 14.4-1 for 64-bit Windows x86).
When you install the database, use a good superuser password just as you used a good root password when you installed MariaDB in Chapter 16. (I used MyPassword. You should use something better.)
Before you can use the database, the engine must be running so that it can watch for requests sent to it by the database adapter. Normally, installing the database should also install a server daemon so that the database will be running when you need it.
To create the database, we'll use the database management program pgAdmin 4 that is installed along with Postgres. To start that program, look in the folder created by the installer and launch pgAdmin. (On my system, the folder is called PostgreSQL 14.)
This tool lets you do things such as building databases, creating tables, defining constraints, and examining the records in tables. It's similar to the HeidiSQL program mentioned in Chapter 16. We'll use only a tiny fraction of its capabilities later in this chapter.
RUN pgAdmin
Before you can start dumping data into tables, you need to do a little setup. First, you need to create a Postgres user. Then you need to create the database and define the tables in it. Only then can you start working with data.
We'll use the pgAdmin program for the first steps. We'll only use Python at the end to add and retrieve data.
Design the Database
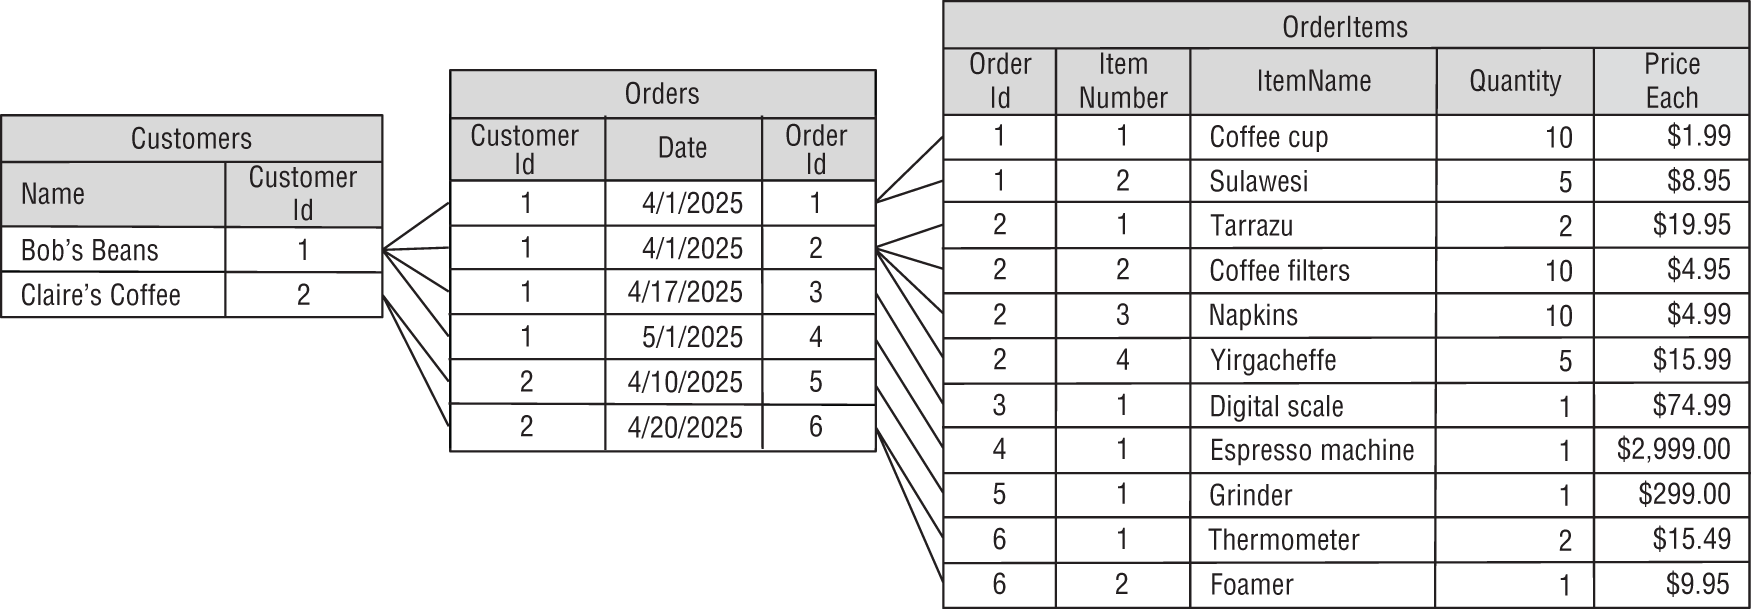
The Brew Crew orders database contains three tables: customers, orders, and order_items. (We'll talk about the capitalization issue shortly.)
As you can probably guess, the customers table holds information about customers, the orders table holds information about orders, and the order_items table holds information about the items in the orders. Figure 18.2 shows the relational design.
This isn't a very complete database and a real business would need a whole lot more, but it's enough for a meaningful example program.
Create a User
When you installed Postgres, it created a user named postgres. That user has superuser powers so it can do anything to any database. It's generally not a good idea to run your programs as a superuser just in case the program does something wrong like deleting an unrelated database, destroying other users, launching nuclear weapons, or whatever. It's better to work with a user who has the minimum powers necessary to get the job done. To do that, we'll create a new user named brew_master.
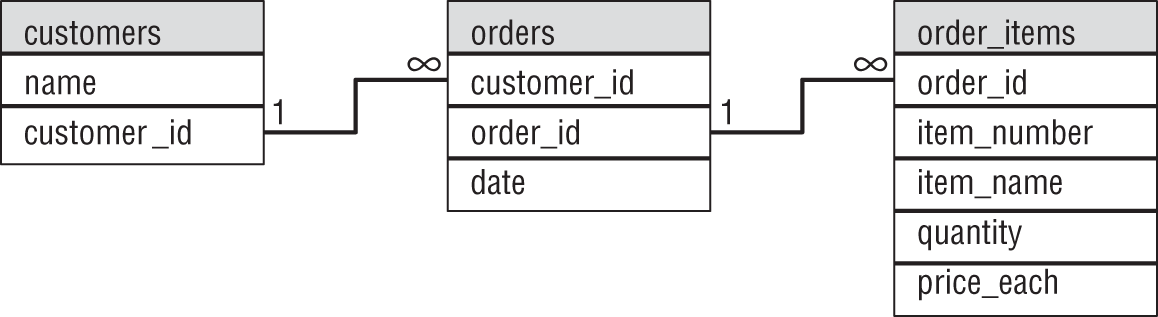
To create the user, launch pgAdmin. Expand the PostgreSQL branch, right-click Login/Group Roles, expand the Create submenu, and select Login/Group Role, as shown in Figure 18.3.
On the General tab, enter the name brew_master. Select the Definition tab and enter a password for the new user. For this example, I used the password brew_password. Click the Privileges tab and select Can Login. (Otherwise, the user won't be able to log in to the database. While that gives the database maximum protection, it's not very useful for the user.)
If you switch to the SQL tab, you'll see that pgAdmin uses the following SQL statement to create this user:
CREATE ROLE brew_master WITHLOGINNOSUPERUSERNOCREATEDBNOCREATEROLEINHERITNOREPLICATIONCONNECTION LIMIT -1PASSWORD 'xxxxxx';
After you've finished viewing the SQL code, click Save to create the user.
Create the Database
When you installed Postgres, it created a database named postgres. Normally, each application should work inside its own database so that it doesn't interfere with other applications. Therefore, our next step is to create a database for the Brew Crew project.
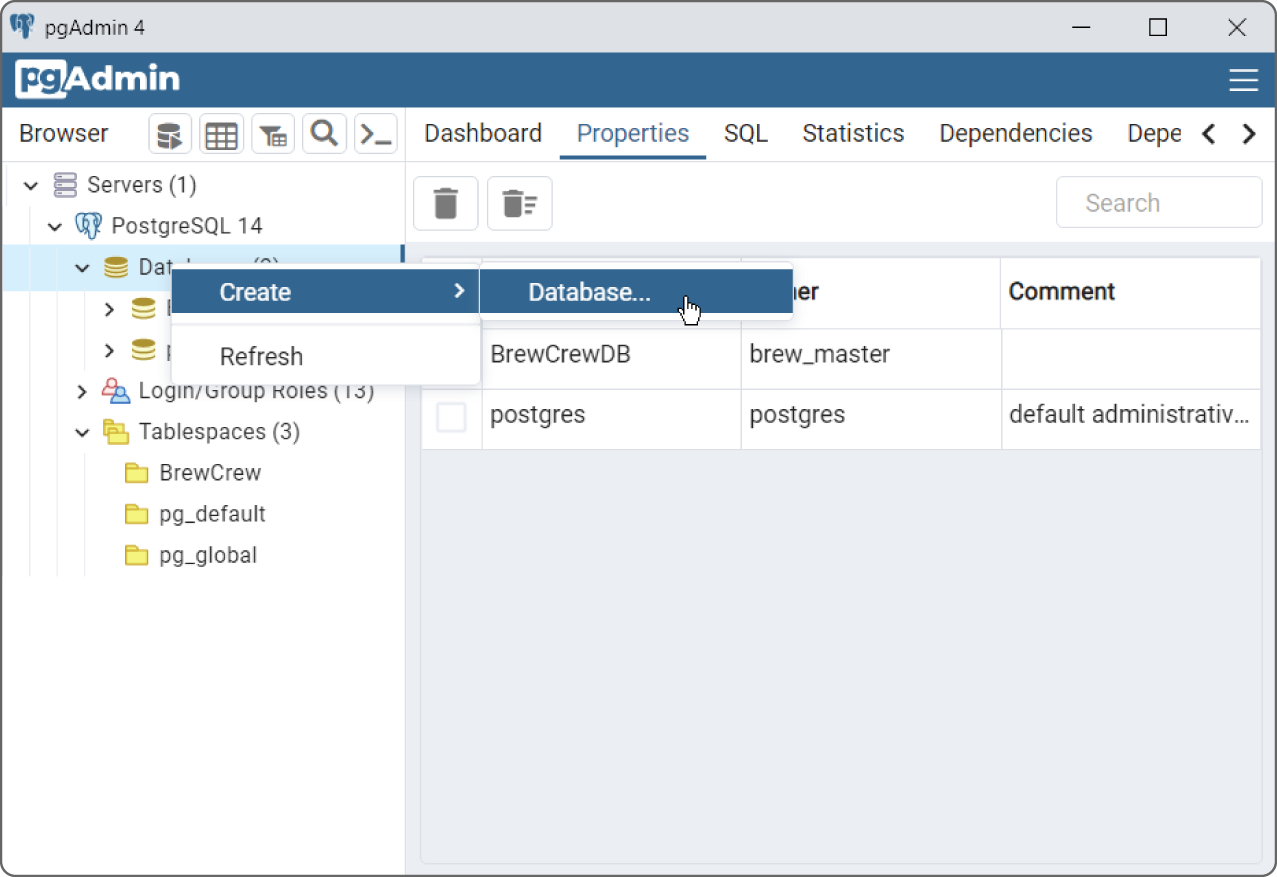
To create the database, launch pgAdmin (if it's not already running), expand the PostgreSQL branch, right-click Databases, expand the Create submenu, and select Database, as shown in Figure 18.4.
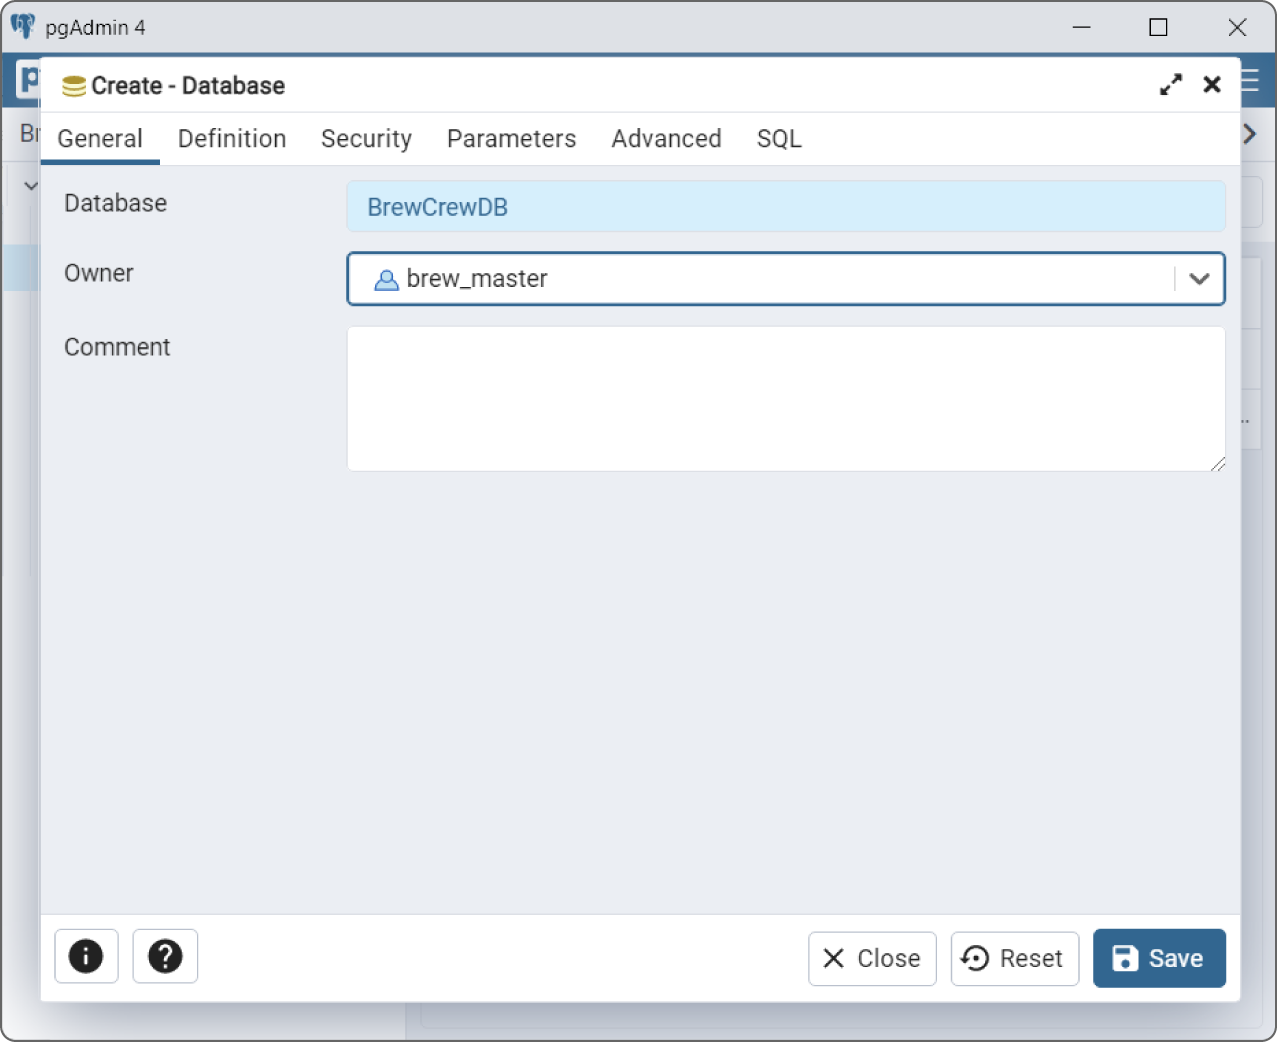
Set the database's name to BrewCrewDB and set its owner to brew_master, as shown in Figure 18.5.
If you switch to the SQL tab, you'll see that pgAdmin uses the following SQL statement to create this database:
CREATE DATABASE "BrewCrewDB"WITHOWNER = brew_masterENCODING = 'UTF8'CONNECTION LIMIT = -1;
After you've finished viewing the SQL code, click Save to create the database.
Define the Tables
You can create the tables in SQL code if you like in the same way we did in Chapter 16, but for this example we're going to use pgAdmin to define the tables interactively. If pgAdmin isn't already running, start it now.
Define the customers Table
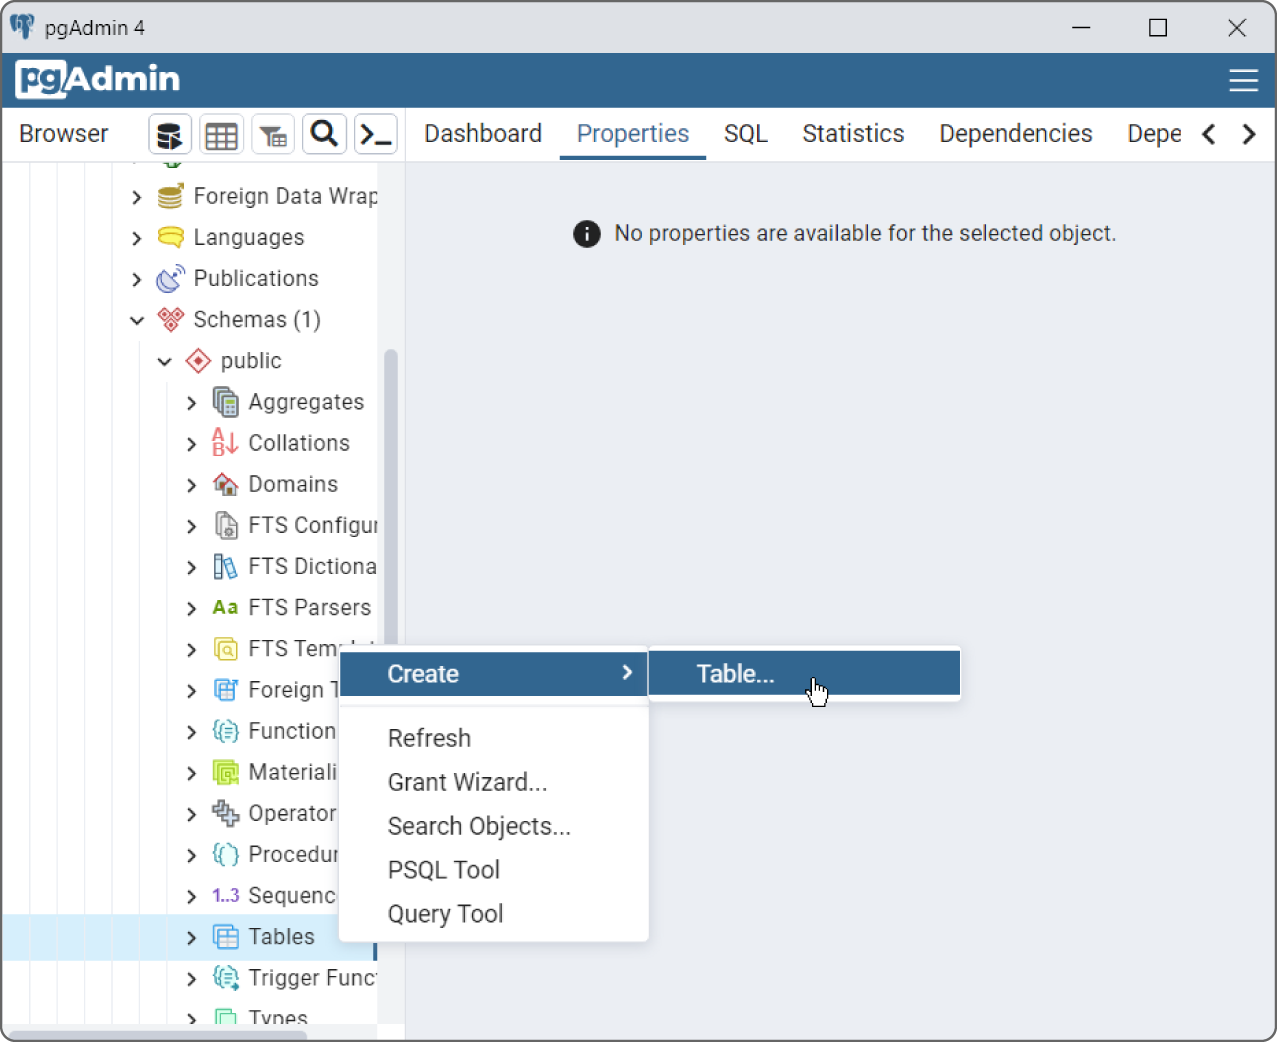
Expand the Databases branch. Then expand BrewCrewDB, its Schemas branch, and the Public branch inside that. Next, right-click the Tables entry, open the Create submenu, and select Table, as shown in Figure 18.6.
On the General tab, set the table's name to customers and set its owner to brew_master.
Now, move to the Columns tab. Click the plus sign (+) to add a new row to the columns list. Set the column's name to name (this will hold the customer's name), set its data type to text, and select Not NULL.
Repeat those steps to create the customer_id field. Give it the type integer and select both Not NULL and Primary Key.
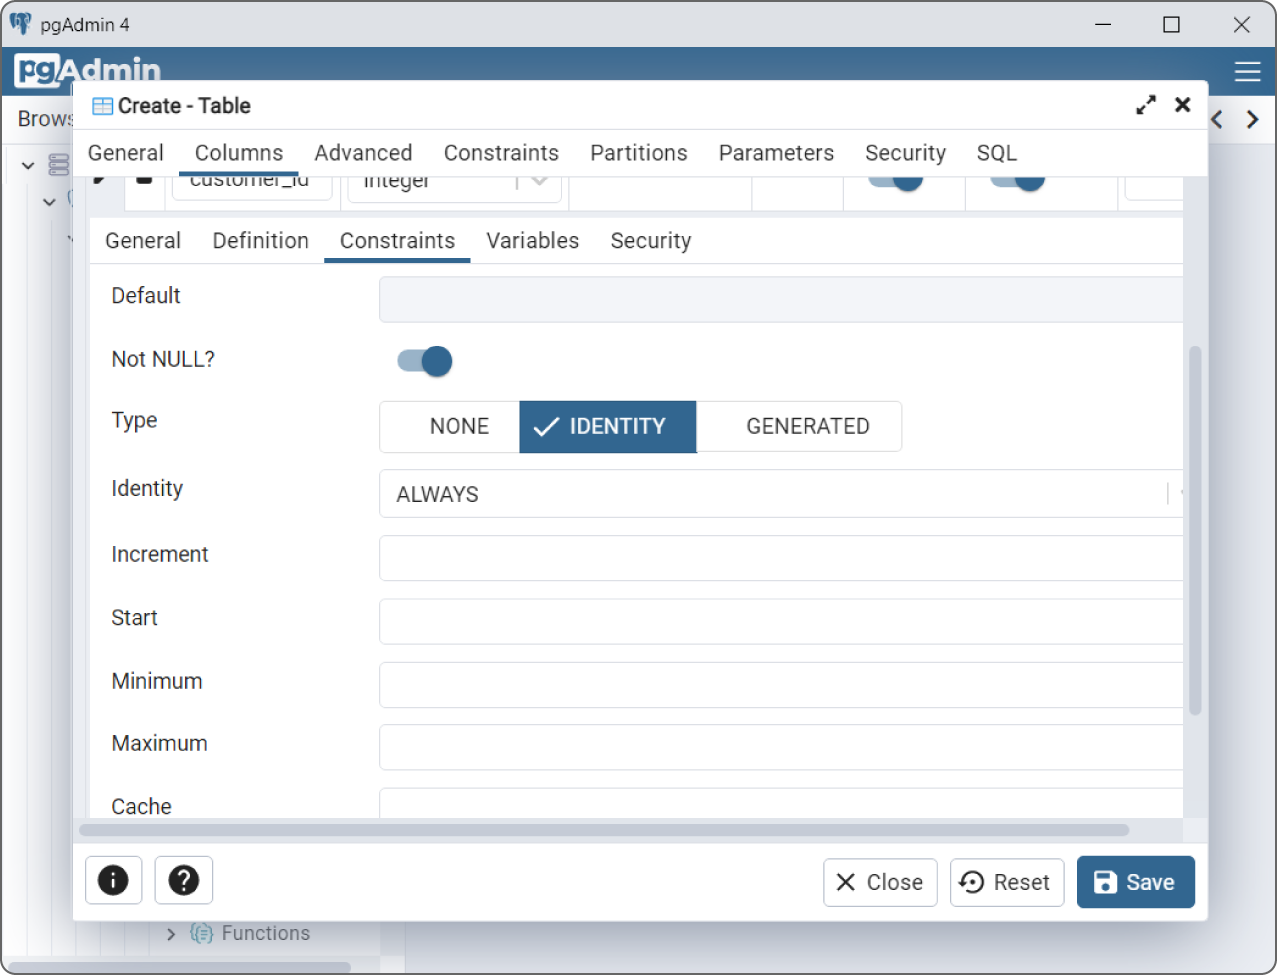
To make the database automatically generate customer_id values, click the pencil to the left of that column. In the editing area that appears, go to the Constraints tab and select the Identity option, as shown in Figure 18.7.
If you like, you can use the Increment, Start, Minimum, and Maximum fields to control how the IDs are generated. For example, you could have IDs start at 1337 and increment by 17 each time one is generated. (I don't know why you would do that, but who am I to judge?)
If you switch to the SQL tab, you'll see that pgAdmin uses the following SQL statements to create this table:
CREATE TABLE public.customers(name text NOT NULL,customer_id integer NOT NULL GENERATED ALWAYS AS IDENTITY,PRIMARY KEY (customer_id));ALTER TABLE IF EXISTS public.customersOWNER to brew_master;
After you've finished viewing the SQL code, click Save to create the table.
Define the orders Table
Repeat the preceding steps to create the orders table using the design shown in Figure 18.2 as a guide. This should be mostly straightforward, but here are some hints:
- Be sure to make the table's owner
brew_master. - Make customer_id an integer with Not NULL.
- Make order_id an integer with Not NULL, Primary Key, and the IDENTITY.
- Give the date column the
datedata type and make it Not NULL.
After you define the columns, you need to define the foreign key constraint that matches customers.customer_id with orders.customer_id. To do that, click on the orders table's Constraints tab, and then below that select the Foreign Key tab.
Now, click the plus sign (+) to create a new row in the table. Name the key fk_customer_id and click the pencil to the left to edit it.
In the editing area, click the Columns tab. In the Local Column field, select customer_id. In the References field, select the foreign table public.customers. Finally, in the Referencing field, select the foreign table's field customer_id.
After you've defined the fields, click Add to add the constraint to the table. Note that you could add other columns if the constraint needed to constrain multiple columns.
You can look at the other tabs if you like. For example, the Action tab lets you specify the On Update and On Delete actions for the foreign key.
If you switch to the SQL tab, you'll see that pgAdmin uses the following SQL statements to create this table:
CREATE TABLE public.orders(customer_id integer NOT NULL,order_id integer NOT NULL GENERATED ALWAYS AS IDENTITY,date date NOT NULL,PRIMARY KEY (order_id),CONSTRAINT fk_customer_id FOREIGN KEY (customer_id)REFERENCES public.customers (customer_id) MATCH SIMPLEON UPDATE NO ACTIONON DELETE NO ACTIONNOT VALID);ALTER TABLE IF EXISTS public.ordersOWNER to brew_master;
After you've finished viewing the SQL code, click Save to create the table.
Define the order_items Table
Hang in there, we're almost done defining the tables. Repeat the preceding steps to create the order_items table, again using the design shown in Figure 18.2 as a guide. As before, this should be mostly straightforward, but here are some hints:
- Be sure to make the table's owner
brew_master. - Make all columns Not NULL.
- Set Primary Key for both of the columns order_id and item_number to make both columns part of the primary key. Making them the primary key means the values in those columns must be unique within the table. For example, there can be several records with order_id 1096, but the
item_numbervalues must be different. (Typically, theitem_numbervalues will be 1, 2, 3, and so forth. That differentiates them and gives each a position in the order.) - Give the price:each column the
numericdata type.
The price:each column should really have the money data type because that type uses special rules for rounding currency values. Unfortunately that type is deprecated in Postgres, so we use the numeric type instead. Some database engines support the money type and some do not.
After you define the columns, make a foreign key constraint matching order_items.order_id with orders.order_id.
If you switch to the SQL tab, you'll see that pgAdmin uses the following SQL statements to create this table:
CREATE TABLE public.order_items(order_id integer NOT NULL,item_number integer NOT NULL,item_name text NOT NULL,quantity integer NOT NULL,price:each money NOT NULL,PRIMARY KEY (item_number, order_id),CONSTRAINT fk_order_id FOREIGN KEY (order_id)REFERENCES public.orders (order_id) MATCH SIMPLEON UPDATE NO ACTIONON DELETE NO ACTIONNOT VALID);ALTER TABLE IF EXISTS public.order_itemsOWNER to brew_master;
After you've finished viewing the SQL code, click Save to create the table.
At this point, the database is created and ready to go, so it's time to write our Python program to add and fetch data. Before we can do that, however, we need to install the Psycopg database adapter.
CREATE THE PROGRAM
To create a Python program to work with the Brew Crew database, create a new Jupyter Notebook, and then add the code described in the following sections.
Unlike the program described in Chapter 16, this example's cells do not each connect to the database and perform a stand-alone action. In this example, the first cell (after installing Psycopg) creates a database connection, and then the following cells use that connection to insert data into the database. After the data is inserted, the program closes the connection. The final cell then opens a new connection to fetch the data and verify that it was saved correctly.
If you like, you can join most of the cells together into one long cell. I've used several cells to make it easier to understand and to debug the pieces separately.
Install Psycopg
Psycopg is a PostgreSQL database adapter for Python. For general information about Psycopg, see www.psycopg.org/docs.
If you're experienced with pip, then you can install Psycopg with the following command:
$ pip install psycopg2-binaryIf you're not familiar with pip, then you can install Psycopg by executing the following command in a Jupyter Notebook cell:
!pip install psycopg2-binaryThat's all there is to it!
Now that the database is ready and we've installed Psycopg, it's time to work on the code that adds and fetches data.
Connect to the Database
The first cell that's actually part of the program (after the one that installs Psycopg) uses the following code to connect to the database:
# Prepare to use psycopg2.import psycopg2# Connect to the database.conn = psycopg2.connect(database="BrewCrewDB",user = "brew_master",password = "brew_password",host = "127.0.0.1", port = "5432")
This code simply imports the psycopg2 library and then opens the connection. The program uses the connection to control the database.
Delete Old Data
The next cell executes the following code to delete any existing data in the database:
# Delete any existing data.cursor = conn.cursor()cursor.execute("DELETE FROM order_items")cursor.execute("DELETE FROM orders")cursor.execute("DELETE FROM customers")conn.commit()
This code first uses the connection object to create a cursor. It uses the cursor's execute method to run SQL DELETE commands that remove all data from the tables.
After it deletes the records, the code calls the connection object's commit method to make the deletions permanent.
Create Customer Data
The next cell uses the following code to create some records in the customers table:
# Create some customers records.cmd = """INSERT INTO customers (name)VALUES ('Bob''s Beans')RETURNING customer_id"""print(cmd)cursor.execute(cmd)bobs_id = cursor.fetchone()[0]print(f"Bob's ID: {bobs_id} ")cmd = """INSERT INTO customers (name)VALUES (%s)RETURNING customer_id"""print(cmd)cursor.execute(cmd, ("Claire's Coffee",))claires_id = cursor.fetchone()[0]print(f"Claire's ID: {claires_id} ")conn.commit()
This code demonstrates two methods for creating new records. First, it composes a string that contains the following SQL INSERT statement:
INSERT INTO customers (name)VALUES ('Bob''s Beans')RETURNING customer_id
Notice the awkward syntax used to put an apostrophe inside the text Bob's Beans. Each ' adds an apostrophe to the string. Because the apostrophe is inside part of the string that's surrounded by single quotes, SQL requires two apostrophes so that it knows this isn't the end of the quoted section. (Yes, it's confusing. The code that creates the record for Claire's Coffee is simpler.)
The statement's last clause is RETURNING customer_id. The customers table's customer_id field is autogenerated, so this clause tells the database to return the newly generated value.
After it composes the statement, the code uses the cursor to execute it. It then calls the cursor's fetchone method to retrieve the value that the command returns. That result is a tuple, so the code uses the index [0] to retrieve the first value, which is the newly generated customer_id. The code saves that value in the variable bobs_id for later use.
After it creates the Bob's Beans record, the code uses a slightly different method to create the entry for Claire's Coffee. The code composes an INSERT statement as before, but this time it does not include the text that should be inserted into the name field. Instead, it replaces that value with the placeholder %s.
When the code calls the cursor's execute method, it passes in the SQL statement and a tuple of parameters that should replace any placeholders. The name parameter is surrounded by double quotes, so you can include an apostrophe without using the strange syntax used for Bob's Beans.
There is one weirdness here, however. If you create a tuple containing a single item in Python, the program ignores the parentheses and just uses the single value as it is. To create a tuple containing one item, you need to follow that item with a comma. It's a little strange, but not as bad as the '' required to create the Bob's Beans record.
The code fetches the new record's autogenerated customer_id and saves it in the variable claires_id for later use.
The cell finishes by committing the insertions.
Create Order Data
The next cell uses the following code to demonstrate a third record-creation technique, this time to add records to the orders table:
import datetime# Create some orders records.# Prepare the INSERT command.cmd = """PREPARE insert_order_plan ASINSERT INTO orders (customer_id, date)VALUES ($1, $2)RETURNING order_id"""cursor.execute(cmd)# Execute the INSERT command.cmd = "EXECUTE insert_order_plan (%s, %s)"bobs_order_ids = []cursor.execute(cmd, (bobs_id, datetime.datetime(2025, 4, 1)))bobs_order_ids.append(cursor.fetchone()[0])cursor.execute(cmd, (bobs_id, datetime.datetime(2025, 4, 1)))bobs_order_ids.append(cursor.fetchone()[0])cursor.execute(cmd, (bobs_id, datetime.datetime(2025, 4, 17)))bobs_order_ids.append(cursor.fetchone()[0])cursor.execute(cmd, (bobs_id, datetime.datetime(2025, 5, 1)))bobs_order_ids.append(cursor.fetchone()[0])claires_order_ids = []cursor.execute(cmd, (claires_id, datetime.datetime(2025, 4, 10)))claires_order_ids.append(cursor.fetchone()[0])cursor.execute(cmd, (claires_id, datetime.datetime(2025, 4, 20)))claires_order_ids.append(cursor.fetchone()[0])conn.commit()print("Orders created")
This code creates a string holding a PREPARE statement. That statement prepares a plan for an INSERT statement that will create records in the orders table. This time the statement replaces its values with the placeholders $1 and $2 and returns the autogenerated order_id value.
After composing the PREPARE statement, the code executes it to make the database create an execution plan for the INSERT statement. Now the program can execute that statement more quickly than it could if it created a new INSERT statement for each record.
Next, the code creates an EXECUTE statement that executes the prepared plan. This time it replaces the values that the plan expects with the %s placeholder.
When the code executes the EXECUTE statement, it passes in the values that should be inserted in place of the placeholders. The orders table has three fields: customer_id, date, and order_id. The last of those is autogenerated, so the code only passes the customer_id and date to the execute method. Those values are inserted into the EXECUTE statement, which then inserts the values into the INSERT plan.
After it creates each record, the code uses the command object's fetchone method as before to save the newly generated order_id values in the lists bobs_order_ids and claires_order_ids.
The code uses this technique (which I admit takes longer to explain than to use) to create four orders for Bob's Beans and two records for Claire's Coffee. Notice how the code uses the customer IDs that were generated earlier rather than hardwiring the ID values into the code.
After it has created the order records, the code commits the insertions.
Create Order Item Data
The following code in the next cell uses one final technique for inserting records, this time in the order_items table. Actually this is really the third technique that uses a PREPARE statement again, but this time the program executes that statement in a loop:
# Create some order_items records.# Define the data.item_data = [(bobs_order_ids[0], 1, "Coffee cup", 10, 1.99),(bobs_order_ids[0], 2, "Sulawesi", 5, 8.95),(bobs_order_ids[1], 1, "Tarrazu", 2, 19.95),(bobs_order_ids[1], 2, "Coffee filters", 10, 4.95),(bobs_order_ids[1], 3, "Napkins", 10, 4.99),(bobs_order_ids[1], 4, "Yirgacheffe", 5, 15.99),(bobs_order_ids[2], 1, "Digital scale", 1, 74.99),(bobs_order_ids[3], 1, "Espresso machine", 1, 2999.00),(claires_order_ids[0], 1, "Grinder", 1, 299.00),(claires_order_ids[1], 1, "Thermometer", 2, 15.49),(claires_order_ids[1], 2, "Foamer", 1, 9.95),]# Prepare the INSERT command.cmd = """PREPARE insert_order_item_plan ASINSERT INTO order_items(order_id, item_number, item_name, quantity, price:each)VALUES ($1, $2, $3, $4, $5)"""cursor.execute(cmd)# Insert orders data.cmd = "EXECUTE insert_order_item_plan (%s, %s, %s, %s, %s)"for order_data in item_data:print(order_data)cursor.execute(cmd, order_data)conn.commit()print("Order items created")
This code first creates a list of tuples named item_data holding the values for each record. It uses the order IDs saved in the lists bobs_order_ids and claires_order_ids for the order ID values.
Next, the code composes a PREPARE statement much as before and executes it. It creates an EXECUTE statement and then loops through the item_data list executing the EXECUTE statement for each of its tuples.
After it finishes inserting the new records, the code commits the changes.
Close the Connection
To prove that it created the records, the next cell uses the following code to close the cursor and database connection:
# Close the database connection.cursor.close()conn.close()
Perform Queries
The program's final cell uses the following code to fetch data from the database:
# Reconnect to the database.conn = psycopg2.connect(database="BrewCrewDB",user = "brew_master",password = "brew_password",host = "127.0.0.1", port = "5432")cursor = conn.cursor()# Fetch datacmd = """SELECT date, name, orders.order_id, item_number, item_name,quantity, price:each, quantity * price:eachFROM customers, orders, order_itemsWHEREcustomers.customer_id = orders.customer_id ANDorders.order_id = order_items.order_idORDER BY date, order_id, item_number"""cursor.execute(cmd)rows = cursor.fetchall()last_order_id = -1order_total = 0for row in rows:if row[2] != last_order_id:if order_total> 0:print(f" Total: ${order_total:8.2f} ")order_total = 0print(f"{row[0]}, {row[1]}, Order ID: {row[2]}")last_order_id = row[2]item = f" {row[3]}. {row[4]:20} {row[5]:3} @ "item = item + f"${row[6]:8.2f} = ${row[7]:8.2f}"print(item)order_total += row[7]if order_total> 0:print(f" Total: ${order_total:8.2f} ")cursor.close()conn.close()
This code connects to the database and creates a cursor. It then composes a query to fetch information from the three tables using the customer_id and order_id values to link related records. It orders the results by date, order ID, and item number. Notice that the last field selected is a calculated value that holds the item's quantity times the item's price each.
After it composes the query, the code executes it and calls the cursor's fetchall method to retrieve the results. This result is a list of tuples where each tuple holds one row of results.
Before it processes the results, the code defines two variables. It uses the variable last_order_id to track the current order's ID. It initially sets that variable to –1 so the first row will have a different ID.
The code uses the variable order_total to keep track of the current order's total cost. It initially sets this value to 0.
Having initialized the last_order_id and order_total variables, the code loops through the returned list.
If the new row's order ID is different from the one stored in last_order_id, then this row starts a new order. If the order total is greater than 0, the program prints it and resets order_total to 0 so that it can add up the costs of the items in the next order.
If we are starting a new order, the code also prints the new order's date, customer name, and order ID. It then saves the new order ID in the variable last_order_id so we'll know when we start the next one.
Next, whether this is the start of a new order or not, the code prints the row's item number, description, quantity, price each, and total price. It adds the total price to order_total.
The program continues looping through the returned rows until it has processed them all. When it has finished displaying all the rows, the program displays the order total for the last order.
The code finishes by closing the cursor and database connection.
The following shows this cell's output:
2027-04-01, Bob's Beans, Order ID: 6451. Coffee cup 10 @ $ 1.99 = $ 19.902. Sulawesi 5 @ $ 8.95 = $ 44.75Total: $ 64.652027-04-01, Bob's Beans, Order ID: 6461. Tarrazu 2 @ $ 19.95 = $ 39.902. Coffee filters 10 @ $ 4.95 = $ 49.503. Napkins 10 @ $ 4.99 = $ 49.904. Yirgacheffe 5 @ $ 15.99 = $ 79.95Total: $ 219.252027-04-10, Claire's Coffee, Order ID: 6491. Grinder 1 @ $ 299.00 = $ 299.00Total: $ 299.002027-04-17, Bob's Beans, Order ID: 6471. Digital scale 1 @ $ 74.99 = $ 74.99Total: $ 74.992027-04-20, Claire's Coffee, Order ID: 6501. Thermometer 2 @ $ 15.49 = $ 30.982. Foamer 1 @ $ 9.95 = $ 9.95Total: $ 40.932027-05-01, Bob's Beans, Order ID: 6481. Espresso machine 1 @ $ 2999.00 = $ 2999.00Total: $ 2999.00
SUMMARY
PostgreSQL is a popular relational database system that in many ways is similar to MariaDB. The main differences between this example and the MariaDB example are due to the ways that the two programs’ database adapters work.
For this example, you used pgAdmin to create an orders database. The example program then adds some records to the database's tables and fetches the data, linking related records together to reproduce the customers’ orders. In a real application, you would want to add other features to let the user interactively work with the database to create, read, and edit orders.
The next chapter describes a similar example that uses C# to build and manipulate a PostgreSQL database. Before you move on to Chapter 19, however, use the following exercises to test your understanding of the material covered in this chapter. You can find the solutions to these exercises in Appendix A.