22
MongoDB Atlas in Python
This chapter's example uses Python to build a NoSQL document database in the cloud. It uses the MongoDB Atlas database to save and query the following data about assignments for East Los Angeles Space Academy graduates, as shown in Table 22.1.
TABLE 22.1: Graduate assignments
| FIRSTNAME | LASTNAME | POSITION | RANK | SHIP |
|---|---|---|---|---|
| Joshua | Ash | Fuse Tender | 6th Class | Frieda's Glory |
| Sally | Barker | Pilot | Scrat | |
| Sally | Barker | Arms Master | Scrat | |
| Bil | Cilantro | Cook's Mate | Scrat | |
| Al | Farnsworth | Diplomat | Hall Monitor | Frieda's Glory |
| Al | Farnsworth | Interpreter | Frieda's Glory | |
| Major | Major | Cook's Mate | Major | Athena Ascendant |
| Bud | Pickover | Captain | Captain | Athena Ascendant |
The next few sections talk a bit about this data, the way document databases store information, and the MongoDB Atlas database that we'll use for this example. The rest of the chapter describes the example program.
NOT NORMAL BUT NOT ABNORMAL
If you remember the relational database normalization rules, then you know that the data in the preceding table is not normalized because some non-key fields do not depend on all the key fields. Here, the key fields are FirstName, LastName, and Position, because we need all three to identify a record. However, the fields Rank and Ship depend on FirstName and LastName but not on Position.
You can also see the problem by looking for anomalies. For example, if you change one of Sally Barker's Ship values, then her ship assignments will be inconsistent (an update anomaly). In fact, Al Farnsworth's Rank assignments already don't match.
For another example, if you delete the last record to remove the information about Bud Pickover, then you also lose the fact that the ship Athena Ascendant exists (a deletion anomaly).
This data won't fit in a relational database without some revisions, but it's no problem for a document database. That kind of database stores each document separately, so it doesn't matter if the documents don't hold exactly the same types of data. That does mean the data may be subject to some anomalies, but that's up to the way you (and your program) manage the data.
XML, JSON, AND BSON
Document databases do not have table definitions, so they need some other way to keep track of what “fields” are in a document. They do that by using formats that include both the field names and their values.
For example, the following shows how we might store the first record in an Extensible Markup Language (XML) format document:
<posting><FirstName>Joshua</FirstName><LastName>Ash</LastName><Position>Fuse Tender</Position><Rank>6th Class</Rank><Ship>Frieda's Glory</Ship></posting>
Each of the values inside the open and close tokens is an element of whatever object contains it. For example, Joshua is the value of this posting's FirstName element.
XML also supports attributes that you can use to save some space. Here's the same data in attribute form:
<postingFirstName = "Joshua"LastName = "Ash"Position = "Fuse Tender"Rank = "6th Class"Ship = "Frieda's Glory"/>
This works, but the first version allows you to create repeated elements and this version doesn't. For example, Sally Barker has two positions. You can include those as separate <Position> elements in the first version, but you cannot give the posting element two Position properties in the second version.
JavaScript Object Notation (JSON) is another format for storing documents that's currently more popular with document databases.
The following text shows a JSON version of Sally Barker's data:
{"FirstName": "Sally","LastName": "Barker","Position": "Pilot","Position": "Arms Master","Ship": "Scrat"}
This version is slightly more compact than the first XML version because it doesn't require closing elements such as </FirstName>. Notice that it contains multiple Position elements. (Just to be clear, the first XML version can also contain repeated elements.)
Notice also that Sally's data doesn't include a Rank because it wasn't included in the original data. That's a feature of document databases: each document sets its own rules.
Some databases let you define a database schema that defines rules about what a document must contain. For example, you could require that posting documents include a Rank value, but you aren't required to do that.
Behind the scenes MongoDB stores data in a binary version of JSON called Binary JavaScript Object Notation (BSON) to save space, to better encode some data types such as dates and binary values, and because it's a bit faster for some operations.
MongoDB stores documents in BSON format, but your database adapter will probably convert it to JSON when you display it. However, it may not observe niceties such as adding line breaks, indentation, and other formatting. For example, the following code shows how the Python statement print(record) displays Joshua Ash's data:
{'_id': ObjectId('62e2d70c359cf3cfda8deb21'), 'FirstName': 'Joshua','LastName': 'Ash', 'Position': 'Fuse Tender', 'Rank': '6th Class','Ship': "Frieda's Glory"}
This is pretty hard to read, so you may want to write some code to pull out the record's fields and display them in a more reasonable format.
INSTALL MongoDB ATLAS
MongoDB Atlas is a cloud database. To get started, go to www.mongodb.com/cloud/atlas/register and create a free user account. When you create the account, you will receive an email containing a button that you must click to verify your email address (possibly so bots can't create hordes of free Atlas accounts, or possibly just so MongoDB can send you advertising later).
After you successfully log in, select the Database category on the left and click the big Build a Database button shown in Figure 22.1.
The next page gives you three options for the kind of service that you want:
- Serverless—With this option, you pay per transaction, currently starting at $0.10 per million reads. This is a good choice if your workload varies throughout the day.
- Dedicated—This option gives you more advanced configuration options and a set cost, currently $0.08 per hour regardless of the number of transactions. It's designed for large production systems.
- Shared—This is the free “try it out” version. It has a limit on the number of connections that you can use, uses shared memory, has limited storage, and is generally perfect for this example.

After you click the Shared option's Create button, you'll see a page where you can pick a cloud provider to host the database and a region. I'm using Amazon Web Services (AWS) as the provider for this example, so click the big AWS button.
Below the provider selection buttons is a list of regions that you can select to locate your server. It may be tempting to set your host location to an exotic place like Bahrain or Tokyo, but the server won't send you postcards or anything, so just pick the one that's physically closest to you. In a real application, you may be required to pick a particular location to satisfy data sovereignty rules (mentioned way back in Chapter 1, “Database Design Goals”), such as storing personal customer data within your country's borders.
If you scroll to the bottom, you can expand the Cluster Name area and enter a name for your cluster. If you don't, you'll get the accurate but uninspired name Cluster0 and you can't change the name later. I'm going to use the name PostingsDB.
After you pick your provider and optionally set the cluster name, click Create Cluster.
Next, you decide how to connect with the database. For this example, select the Username and Password options. Enter a username and password in the indicated boxes. You can use the Autogenerate Secure Password button to make the system pick a good password for you. If you do that, click Copy to copy the password to the clipboard and paste it somewhere safe. After you've set the username and password, click Create User.
Scroll down to the next section, where you indicate how you would like to access the database. The choices are My Local Environment (run the database on your computer) and Cloud Environment (run the database in the cloud). Pick Cloud Environment.
When you're finished defining the database, click Finish and Close. In the congratulatory dialog box, click Go to Databases.
FIND THE CONNECTION CODE
Connecting to most databases isn't hard, but it can be annoyingly difficult to find out exactly what syntax and connection data to use. For example, how do you specify the database's location, a username, and the password? I'm glad you asked!
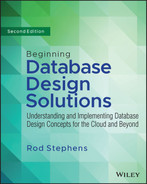
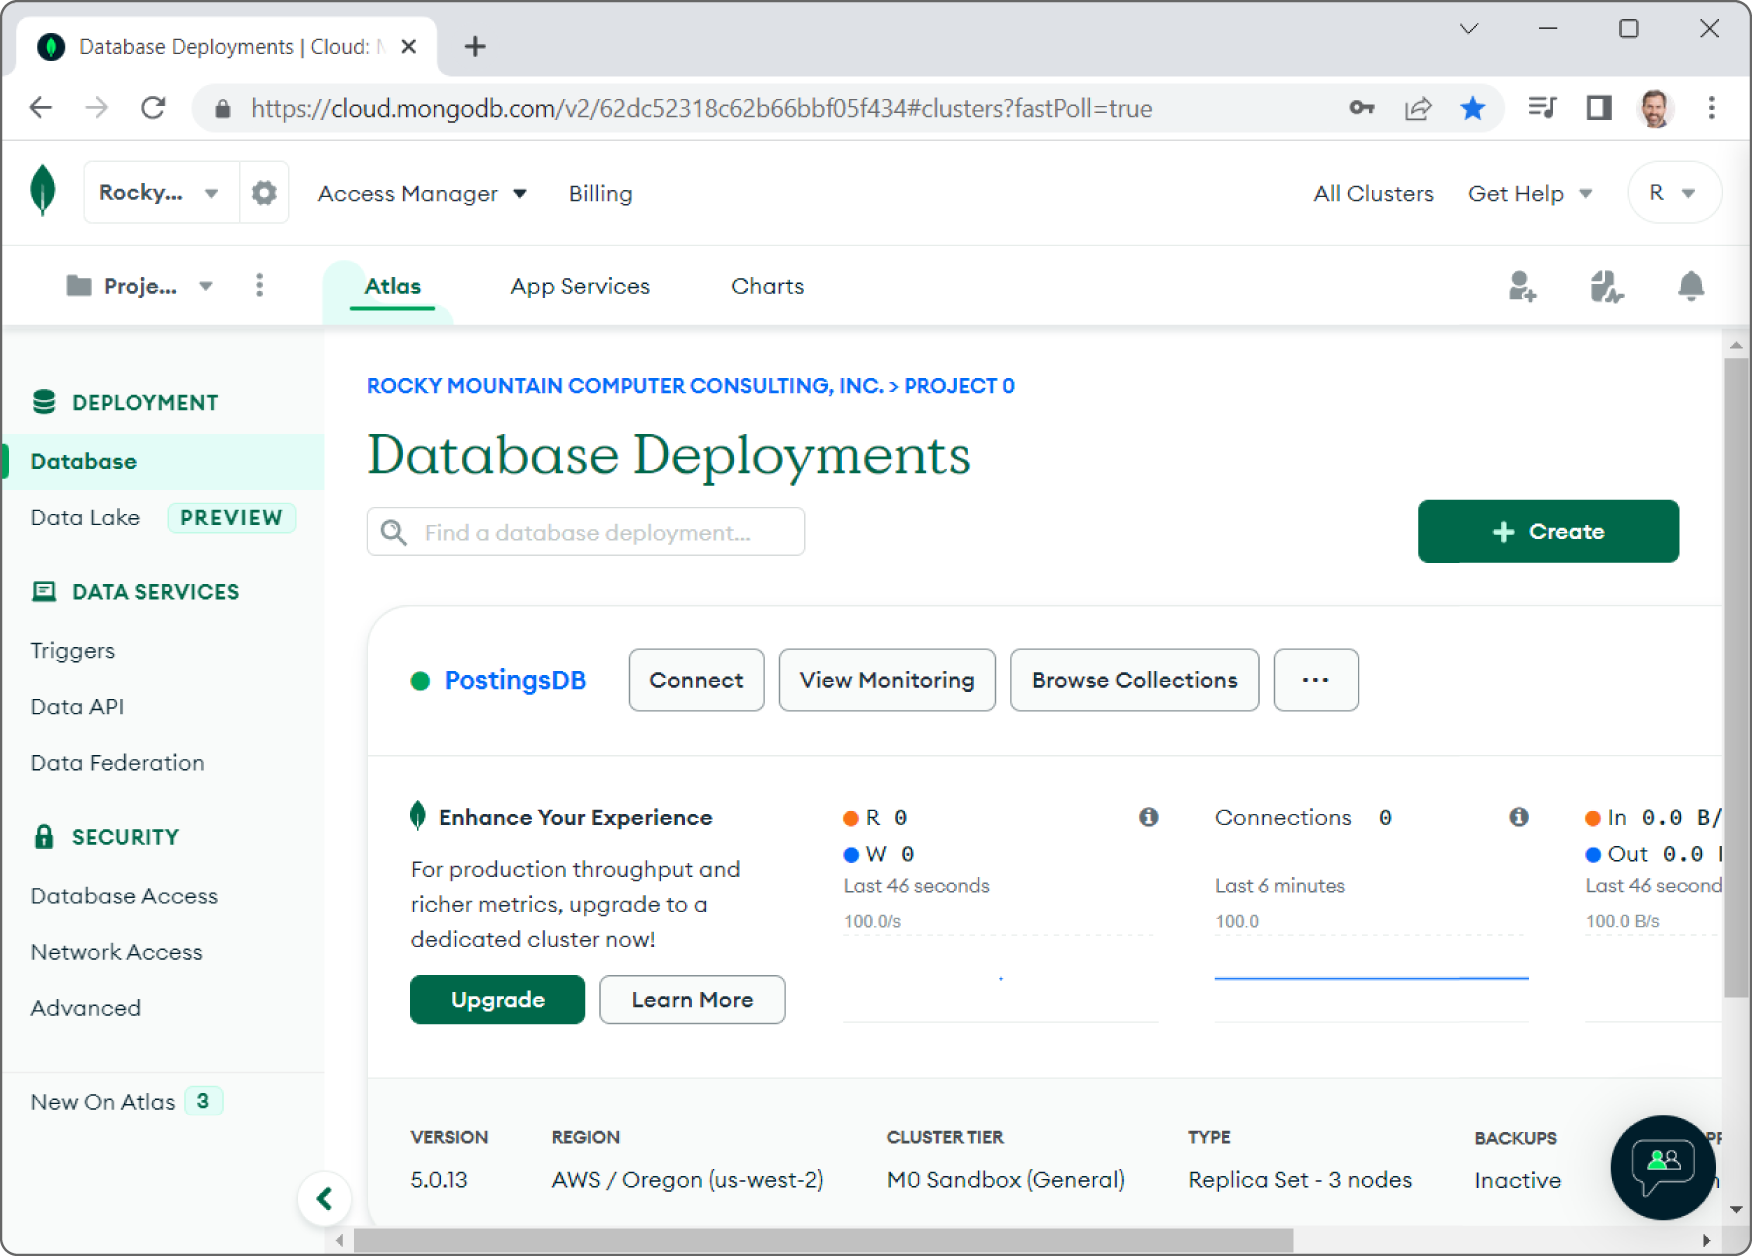
MongoDB's database deployments page gives you a handy tool for figuring out how to do that. If you look at Figure 22.2, you'll see a row of buttons for the cluster named PostingsDB. Click Connect to display the dialog box shown in Figure 22.3. Now, click the second choice, Connect Your Application, to see the page shown in Figure 22.4.
For this example, select Python from the left drop-down list. (For Chapter 23, “MongoDB Atlas in C#,” select C#/.NET.) Then from the right drop-down list, select the appropriate PyMongo driver version. If you haven't installed PyMongo yet (it would be surprising if you have), then you'll probably want the most recent version.
If you're not sure which version to use, install the database adapter (I'll show you instructions shortly), and then run the following code in a Jupyter Notebook cell:
# Get the pymongo version.import pymongopymongo.version
When I ran this code, Jupyter Notebook told me that I had PyMongo version 4.2.0 installed, so I selected the newest version from the drop-down list, which was version 3.12 or later (as you can see in Figure 22.4).
When you pick the driver version, the page shows a connect string that you can use to connect your program to the database. If you select Include Full Driver Code Example, as shown in Figure 22.4, then you'll see a complete Python code snippet that you can copy and paste into your program. There's even a button to the right that copies the code to the clipboard for you. Copy that value and paste it somewhere safe so that you can use it later.
Notice that the snippet includes the password as <password>. You need to replace that (including the brackets) with the actual password. For this example we'll be lazy and include the username and password in the program, but it's always best to not include real credentials in your program's code. Ask the user for a username and password and insert them into the connection string at runtime.

CREATE THE PROGRAM
Now that the database is waiting for you in the cloud, you need to install a database driver for it. Then you can start writing code.
To create a Python program to work with the Atlas ship assignment database, create a new Jupyter Notebook, and then add the code described in the following sections.
Install the PyMongo Database Adapter
The PyMongo driver is the official MongoDB driver for synchronous Atlas applications in Python. To install this driver, simply use the following pip command:
$ pip install pymongo[srv]If you're not familiar with pip, you can execute the following command in a Jupyter Notebook cell instead:
!pip install pymongo[srv]If you use a Notebook cell to install PyMongo, then you'll need to restart the kernel to use it. Use the Kernel menu's Restart command or click the circular Restart button. That's all there is to it!
To build the example program, create a new Jupyter Notebook and enter the following code into the first cell:
# Prepare to use PyMongo.import pymongofrom pymongo import MongoClientfrom pymongo.server_api import ServerApi
This just gets you ready to use the MongoDB client tools and the server API.
The following sections describe some helper methods that the program will use. The last section in this part of the chapter describes the main program.
Helper Methods
These methods do all of the program's real work. The main program just connects to the database and then calls them.
Table 22.2 lists the helper methods and gives their purposes.
TABLE 22.2: Helper methods and their purposes
| METHOD | PURPOSE |
|---|---|
person_string | Formats a string for a document |
connect_to_db | Connects to the database |
delete_old_data | Deletes any old data from the database |
create_data | Adds documents to the database |
query_data | Displays a header and the records in the postings collection |
The following sections describe these helper methods.
person_string
The following person_string method returns a string holding the first name, last name, ship, rank, and position for a person's record formatted so that it will line up nicely in the final output:
# Return a string for a person's record.Def person_string(record):# These should always be present.Name = record["FirstName"] + " " + record["LastName"]ship = record["Ship"]# This might be a single value or a list.Position = record["Position"]if isinstance(position, list):position = ", ".join(record["Position"])# Rank may be missing.If "Rank" in record:rank = record["Rank"]else:rank = "---"return f"{name:16}{ship:19}{rank:15}{position}"
The code first gets the FirstName and LastName fields from the record and concatenates them. It also gets the Ship value.
Because this kind of database doesn't have a fixed format for its records the way a relational database does, a field can hold more than one kind of information. In this example, Joshua Ash has one Position value (Fuse Tender), but Sally Barker has two (Pilot and Arms Master).
The database doesn't care what values are in a document; your program is responsible for dealing with this issue. That's why the method gets the Position value and then uses Python's isinstance function to see if that value is a list. If it is a list, then the code joins the position values, separating them with commas, and saves the resulting string in the position variable.
If the Position value is not a list, then the position variable already holds the value, so the program leaves it alone.
Just as the database driver doesn't care if different documents store different values in a field, it also doesn't care if a field is missing. If the code tries to access a value that isn't there, it will throw a KeyError.
To protect against that, the code uses the statement if 'Rank' in record to see if the Rank value is present in this document. If the value is there, then the method gets it. If the value is missing, then the method uses three dashes in its place. (The program assumes that the FirstName, LastName, Ship and Position fields are present in all records. If this isn’t the case, then you need to use if … in record to see if they are present.)
Having gathered all the values that it needs into variables, the method composes the person's string result and returns it. For example, the following shows the result for Sally Barker:
Sally Barker Scrat --- Pilot, Arms Masterconnect_to_db
The following code shows how the connect_to_db method connects to the database:
# Connect to the database.def connect_to_db(user, password, url):global client, dbconnect_string =f"mongodb+srv://{user}:{password}@{url}/?retryWrites=true&w=majority"client = MongoClient(connect_string, server_api=ServerApi('1'))db = client.personnel
The method begins with the following global statement:
global client, dbThis allows pieces of code outside of this method to use the variables client and db later so that they can manipulate the database.
The method takes a username, password, and URL as parameters. It uses them to compose a connect string (using the format provided by the web page), and uses that string to create a MongoClient that connects to the cluster.
The code then uses the statement db = client.personnel to set MongoClient to connect to the personnel database. If that database does not exist, this creates it. You can also access a collection with the syntax db = client["personnel"].
delete_old_data
The following code shows the delete_old_data method:
# Delete any old data.def delete_old_data(db):db.postings.delete_many({})print("Deleted old data ")
The code db.postings accesses the postings collection in the db database.
In MongoDB, a collection is somewhat analogous to a table in a relational database except that it holds documents instead of records. This example uses the postings collection.
The code adds a call to delete_many to delete multiple documents from the collection. The empty curly braces {} pass the method an empty dictionary of things to match, so delete_many matches every document in the collection and deletes them all.
The method finishes by displaying a message just so you know that it did something.
create_data
The following code shows how the create_data method adds documents to the postings collection:
# Create sample data.def create_data(db):josh = {"FirstName" : "Joshua","LastName" : "Ash","Position" : "Fuse Tender","Rank" : "6th Class","Ship" : "Frieda's Glory"}sally = {"FirstName" : "Sally","LastName" : "Barker","Position" : [ "Pilot", "Arms Master"],"Ship" : "Scrat"}bil = {"FirstName" : "Bil","LastName" : "Cumin","Position" : "Cook's Mate","Ship" : "Scrat","Rank" : "Hall Monitor"}al = {"FirstName" : "Al","LastName" : "Farnsworth","Position" : [ "Diplomat", "Interpreter" ],"Ship" : "Frieda's Glory"}major = {"FirstName" : "Major","LastName" : "Major","Position" : "Cook's Mate","Rank" : "Major","Ship" : "Athena Ascendant"}bud = {"FirstName" : "Bud","LastName" : "Pickover","Position" : "Captain","Rank" : "Captain","Ship" : "Athena Ascendant"}# Insert josh individually.result = db.postings.insert_one(josh)# Insert the others as a group.others = [sally, bil, al, major, bud]result = db.postings.insert_many(others)print("Created data ")
The method first creates several dictionaries to hold data for the people that it will create. Notice that each of these defines its data exactly the same way a JSON file does.
The Position value is a string in Joshua's data, but it's a list of strings in Sally's data. Sally's data also does not include a Rank. You can look through the code if you like to verify that it defines the data shown in the table at the beginning of the chapter.
After it defines the dictionaries, the code executes the following code to insert a single document into the collection:
# Insert josh individually.result = db.postings.insert_one(josh)
It then executes the following code to show how you can insert multiple documents all at once:
# Insert the others as a group.others = [sally, bil, al, major, bud]result = db.postings.insert_many(others)
In general, performing many operations with fewer commands saves network bandwidth, which can be important in a cloud application.
The method finishes by displaying a message so you know it did something.
query_data
The query_data method displays a header and then repeats the same pattern several times. It uses the find method to find documents that match a pattern, and then loops through the results to display information about the documents that were returned.
The following shows the pieces of the method one operation at a time. I'll show you the whole method in one piece at the end of this section.
Here's the first piece of the method:
# Query the data.def query_data(db):print(f"{'Name':16}{'Ship':19}{'Rank':15}{'Position'}")print("------------- ---------------- ------------ -----------")# List everyone.print(" *** Everyone ***")cursor = db.postings.find({})for doc in cursor:print(person_string(doc))
The method first calls find, passing it the empty dictionary {}. That gives find no values to match, so it returns every document in the postings collection. The code loops through the results and calls person_string to print each record's data.
Here's the second operation:
# People posted to Scrat.print(" *** Assigned to Scrat ***")cursor = db.postings.find({"Ship": "Scrat"})for doc in cursor:print(person_string(doc))
This code passes the dictionary {"Ship": "Scrat"} to the find method. This makes find match documents that have the Ship property equal to Scrat. Again the code loops through the result to display the data for those assigned to the Scrat.
Next, the method uses the following code to find documents that have a Rank value:
# People with Rank values.print(" *** Has a Rank ***")cursor = db.postings.find({"Rank": {"$exists": True}})for doc in cursor:print(person_string(doc))
The code then uses the dictionary {"Rank": {"$exists": True}} to find documents that have a Rank property. In this dictionary, the value of the Rank property is another dictionary. For each record, the inner dictionary invokes the database function $exists on the Rank property. If that value is True, then the document matches and it is added to the results.
The program then repeats that query, except this time it looks for documents that do not have a Rank property:
# People with no Rank.print(" *** Has no Rank ***")cursor = db.postings.find({"Rank": {"$exists": False}})for doc in cursor:print(person_string(doc))
The next piece of code shows how you can match multiple criteria:
# Cook's Mates or people on Frieda's Glory.print(" *** Cook's Mates or on Frieda's Glory ***")cursor = db.postings.find({"$or": [{"Position": "Cook's Mate"},{"Ship": "Frieda's Glory"}]})for doc in cursor:print(person_string(doc))
This time the query dictionary's single entry has a key that invokes the database's $or operator. That operator takes as a value a list of dictionaries that define conditions. If a document matches any of those conditions, then it is returned in the result. This part of the example searches for documents where the Position value is Cook's Mate or the Ship value is Frieda's Glory.
The database also understands the logical operators $and, $not, and $nor. The $nor operator is a combination of $not and $or, so it returns documents that do not match any of the conditions in the following array.
The next piece of code repeats the previous selection and then sorts the result:
# Cook's Mates or on Frieda's Glory, sorted by Ship.print(" *** Cook's Mates or on Frieda's Glory, sorted ***")cursor = db.postings.find({"$or": [{"Position": "Cook's Mate"},{"Ship": "Frieda's Glory"}]}).sort("Ship", pymongo.ASCENDING)for doc in cursor:print(person_string(doc))
This code selects documents where the Position value is Cook's Mate or the Ship value is Frieda's Glory. It then calls the cursor's sort method to sort the results by the Ship value. The sort method sorts the data in the original cursor and returns a new cursor holding the sorted data.
The last piece of code repeats this query and then sorts by Ship and FirstName:
# Cook's Mates or on Frieda's Glory, sorted by Ship then FirstName.print(" *** Cook's Mates or on Frieda's Glory, sorted ***")cursor = db.postings.find({"$or": [{"Position": "Cook's Mate"},{"Ship": "Frieda's Glory"}]}).sort([("Ship", pymongo.ASCENDING),("FirstName", pymongo.ASCENDING)])for doc in cursor:print(person_string(doc))
This code matches documents where the Position value is Cook's Mate or the Ship value is Frieda's Glory as before. It then sorts the results first by Ship and then by FirstName. In this data set, Al Farnsworth and Joshua Ash are both assigned to Frieda's Glory, and this sort puts Al's document first.
The following code shows the whole method in one piece:
# Query the data.def query_data(db):print(f"{'Name':16}{'Ship':19}{'Rank':15}{'Position'}")print("------------- ---------------- ------------ -----------")# List everyone.print(" *** Everyone ***")cursor = db.postings.find({})for doc in cursor:print(person_string(doc))# People posted to Scrat.print(" *** Assigned to Scrat ***")cursor = db.postings.find({"Ship": "Scrat"})for doc in cursor:print(person_string(doc))# People with Rank values.print(" *** Has a Rank ***")cursor = db.postings.find({"Rank": {"$exists": True}})for doc in cursor:print(person_string(doc))# People with no Rank.print(" *** Has no Rank ***")cursor = db.postings.find({"Rank": {"$exists": False}})for doc in cursor:print(person_string(doc))# Cook's Mates or people on Frieda's Glory.print(" *** Cook's Mates or on Frieda's Glory ***")cursor = db.postings.find({"$or": [{"Position": "Cook's Mate"},{"Ship": "Frieda's Glory"}]})for doc in cursor:print(person_string(doc))# Cook's Mates or on Frieda's Glory, sorted by Ship.print(" *** Cook's Mates or on Frieda's Glory, sorted ***")cursor = db.postings.find({"$or": [{"Position": "Cook's Mate"},{"Ship": "Frieda's Glory"}]}).sort("Ship", pymongo.ASCENDING)for doc in cursor:print(person_string(doc))# Cook's Mates or on Frieda's Glory, sorted by Ship then FirstName.print(" *** Cook's Mates or on Frieda's Glory, sorted ***")cursor = db.postings.find({"$or": [{"Position": "Cook's Mate"},{"Ship": "Frieda's Glory"}]}).sort([("Ship", pymongo.ASCENDING),("FirstName", pymongo.ASCENDING)])for doc in cursor:print(person_string(doc))
As a reminder, Table 22.3 contains the data inserted by the create_data method.
TABLE 22.3: Data inserted by the create_data method
| FIRSTNAME | LASTNAME | POSITION | RANK | SHIP |
|---|---|---|---|---|
| Joshua | Ash | Fuse Tender | 6th Class | Frieda's Glory |
| Sally | Barker | Pilot | Scrat | |
| Sally | Barker | Arms Master | Scrat | |
| Bil | Cilantro | Cook's Mate | Scrat | |
| Al | Farnsworth | Diplomat | Hall Monitor | Frieda's Glory |
| Al | Farnsworth | Interpreter | Frieda's Glory | |
| Major | Major | Cook's Mate | Major | Athena Ascendant |
| Bud | Pickover | Captain | Captain | Athena Ascendant |
Finally, here's the program's output:
Deleted old dataCreated dataName Ship Rank Position------------- ---------------- ------------ -----------*** Everyone ***Joshua Ash Frieda's Glory 6th Class Fuse TenderSally Barker Scrat --- Pilot, Arms MasterBil Cilantro Scrat Hall Monitor Cook's MateAl Farnsworth Frieda's Glory --- Diplomat, InterpreterMajor Major Athena Ascendant Major Cook's MateBud Pickover Athena Ascendant Captain Captain*** Assigned to Scrat ***Sally Barker Scrat --- Pilot, Arms MasterBil Cilantro Scrat Hall Monitor Cook's Mate*** Has a Rank ***Joshua Ash Frieda's Glory 6th Class Fuse TenderBil Cilantro Scrat Hall Monitor Cook's MateMajor Major Athena Ascendant Major Cook's MateBud Pickover Athena Ascendant Captain Captain*** Has no Rank ***Sally Barker Scrat --- Pilot, Arms MasterAl Farnsworth Frieda's Glory --- Diplomat, Interpreter*** Cook's Mates or on Frieda's Glory ***Joshua Ash Frieda's Glory 6th Class Fuse TenderBil Cilantro Scrat Hall Monitor Cook's MateAl Farnsworth Frieda's Glory --- Diplomat, InterpreterMajor Major Athena Ascendant Major Cook's Mate*** Cook's Mates or on Frieda's Glory, sorted ***Major Major Athena Ascendant Major Cook's MateJoshua Ash Frieda's Glory 6th Class Fuse TenderAl Farnsworth Frieda's Glory --- Diplomat, InterpreterBil Cilantro Scrat Hall Monitor Cook's Mate*** Cook's Mates or on Frieda's Glory, sorted ***Major Major Athena Ascendant Major Cook's MateAl Farnsworth Frieda's Glory --- Diplomat, InterpreterJoshua Ash Frieda's Glory 6th Class Fuse TenderBil Cilantro Scrat Hall Monitor Cook's Mate
You can look through the output to see how the different find statements worked. The first statement used an empty dictionary, so find returned every document. Notice how the person_string method displayed three dashes for missing Rank values and how it concatenated values when a document had multiple Position values.
The next find picked out the documents where Ship is Scrat.
The two after that found documents that had a Rank value and that did not have a Rank value, respectively.
The first statement that used $or found information about Cook's Mates and those assigned to Frieda's Glory. (Admittedly, that's a combination that you might never find useful in a real program.)
The next example sorts those results by Ship. The final find sorts by Ship first and then FirstName, so Al Farnsworth comes before Joshua Ash.
Main Program
Compared to the previous methods, the main program is relatively simple:
# Main program.# Connect to the database.user = "Rod"password = "KENDmaHmdhK23Kn"url = "postingsdb.b1bprz5.mongodb.net"connect_to_db(user, password, url)# Delete old data.delete_old_data(db)# Create new data.create_data(db)# Query the data.query_data(db)# Close the database connection.client.close()
This code stores the username, password, and database URL in variables. You should replace those values with the ones you got in the “Find the Connection Code” section earlier in this chapter.
The code calls the connect_to_db method to connect to the database and initialize the db variable. It then calls the delete_old_data, create_data, and query_data methods to do the interesting work. Finally, it closes the database connection.
SUMMARY
This chapter shows how you can use Python and a NoSQL document database to store and retrieve JBON documents.
As you work with this example, you might notice that operations are relatively slow, particularly if you have a slow network connection. This is generally true of cloud applications. Network communications tend to be slower than local calculations.
The PyMongo database driver uses dictionary objects to define data. You build a dictionary containing field names as their values. Then you can use the database collection's methods such as insert_one and insert_many to add documents to the database. Later, you can use the find method to find those documents.
The next chapter shows how to build a similar example program in C#. That example uses a very different method for finding documents.
Before you move on to that example, however, use the following exercises to test your understanding of the material covered in this chapter. You can find the solutions to these exercises in Appendix A.