
Ghost in the Machine
IF YOU’RE TRYING to understand just how good an obfuscator or decompiler really is, then it helps to be able to see what’s going on inside a classfile. Otherwise you’re relying on the word of a third-party vendor or, at best, a knowledgeable reviewer. For most people, that’s not good enough when you’re trying to protect mission critical code. At the very least, you should be able to talk intelligently about the area and ask the obvious questions to understand just what’s happening.
Pay no attention to the man behind the curtain.
—Wizard of Oz
At this moment, all sorts of noises are coming out of Microsoft in Redmond saying that there really isn’t anything to worry about when it comes to decompiling .NET code. Sure, hasn’t everyone been doing it for years at the Assembly level? Similar noises were made when Java was in its infancy.
So, in this chapter, you’ll be pulling apart a Java classfile to lay the foundation for the following chapters on obfuscation theory and to help you during the design of your decompiler. In order to get to that stage, you need to understand bytecodes, opcodes, classfiles, and how they relate to the Java Virtual Machine (JVM).
Several very good books are on the market about the JVM. The best is Bill Verner’s Inside the Java Virtual Machine (McGraw-Hill, 1998). Some of the book’s chapters are available online at http://www.artima.com/insidejvm/ed2/. If you can’t find this book, then check out Verner’s equally excellent “Under the Hood” articles in JavaWorld. This series of articles was the original material on which the book was based. Sun’s Java Virtual Machine Specification (2nd Edition), written by Tim Lindholm and Frank Yellin, is both comprehensive and very informative for would-be decompiler writers. But because it is a specification, it is not what you would call a good read. This book is available online at http://java.sun.com/docs/books/vmspec or you can purchase it (Addison-Wesley, 1999).
Oddly enough, I’ve yet to see a book that covers how to build a JVM; every book published so far focuses on the abstract JVM rather than how someone would implement one. With the rise of alternative JVMs from IBM and others, I really expected to see at least one JVM book full of C code for converting bytecode to executable native code, but it never came. Perhaps this is because it would have a very limited audience and its sales would be in the hundreds rather than the thousands.
However, my focus is very different from other JVM books. You could say I’m approaching things from the completely opposite direction. Your task is to get from bytecode to source, whereas everyone else wants to know how source is translated into bytecode and ultimately executed. You should be much more interested in how a classfile can be turned into source rather than how a classfile is interpreted.
In this chapter, you’ll be looking at how a classfile can be disassembled into bytecodes and how these bytecodes can be turned into source. Of course, you need to know how each bytecode functions, but you should be less interested in what happens to them when they are within the JVM, and my emphasis will differ accordingly.
The JVM: An Exploitable Design?
Java classfiles are designed to be quickly transmitted across a network or via the Internet. As a result, they are compact and are relatively simple to understand. For portability, a classfile is only partially compiled into bytecodes by javac, Sun’s Java compiler. This is then interpreted and executed by a JVM, usually on a completely different machine or operating system.
The JVM’s classfile interface is strictly defined by Sun’s Java Virtual Machine Specification. But how a JVM ultimately turns bytecodes into machine code is left up to the developer. However, that really shouldn’t concern you, because once again, your interest should stop at the JVM. It may help if you think of classfiles as being analogous to object files in other languages, such as C or C++, waiting to be linked and executed by the JVM only with a lot more symbolic information.
There are many good reasons why a classfile carries around so much information. For many, the Internet is seen as a bit of a modern day Wild West where crooks and criminals are plotting to infect your hard disk with a virus or waiting to grab any credit card details that might pass their way. As a result, the JVM was designed from the bottom up to protect web browsers from any rogue applets. Through a series of checks, the JVM and the class loader make sure that no malicious code can be uploaded onto a web page.
However, all checks have to be performed lightning-quick to cut down on the download time, so it’s not really surprising that the original JVM designers opted for a simple stack machine with lots of information available for those crucial security checks. In fact, the design of the JVM is pretty secure even though some of the early browser implementations made a couple or three serious blunders.
Unfortunately for developers, what keeps the code secure also makes it much easier to decompile. The JVM’s restricted execution environment and uncomplicated architecture, as well as the high-level nature of many of its instructions, all conspire against the programmer in favor of the decompiler.
At this point, it is probably also worth mentioning the fragile superclass problem. When a new method is added in C++, all classes that reference that class need to be recompiled. Java gets around this by putting all the necessary symbolic information into the classfile. The JVM then takes care of all the linking and final name resolution, loading all the required classes—including any externally referenced fields and methods—on the fly. This delayed linking or dynamic loading, possibly more than anything else, is why Java is so much more prone to decompilation.
By the way, I’m going to ignore native methods in these discussions. Native methods, of course, are when some native C or C++ code is incorporated into the application. This spoils Java application portability, and is one surefire way to prevent a Java program from being decompiled.
So without further ado, let’s take a brief look at the design of the JVM.
Simple Stack Machine
The JVM is in essence a simple stack machine with a program register to take care of the program flow thrown in for good luck. The Java class loader takes the class and presents it to the JVM.
You can split the JVM into four separate but distinct parts.
Every application or applet has its own heap and method area and every thread has its own register or program counter and program stack. Each program stack is then further subdivided into stack frames, with each method having its own stack frame. That’s a lot of information for one paragraph, so in Figure2-1, I illustrate this in a simple diagram.

Figure 2-1 The Java Virtual Machine
Heap
I’ll deal with the heap first to get it out of the way because it has little or no effect on the Java decompilation process.
Unlike, say, C or C++, Java programmers cannot allocate and deallocate memory; it’s all taken care of by the JVM. The new operator allocates objects and memory on the heap, which is automatically freed by the JVM garbage collector when an object is no longer being referenced by the program.
There are several good reasons for this. Security dictates that there are no pointers in Java, so hackers cannot break out of an applet and into the operating system. No pointers mean that someone/thing else—in this case the JVM—has to take care of the allocating and freeing memory. Memory leaks should also become a thing of the past, or so the theory goes. Some applications written in C and C++ are notorious for leaking memory like a sieve because programmers don’t pay enough attention to freeing up any unwanted memory at the appropriate point in the program—not that anybody reading this would be guilty of such a sin. Garbage collection should also make programmers more productive with less time spent on debugging memory problems.
However if you do want to know more about what’s going on in your heap, try Sun’s Heap Analysis Tool (HAT). It uses the hprof file dumps or snapshots of the JVM heap that can be generated by Java 2 SDK, version 1.2 and above. It was designed to, now get this, “debug unnecessary object retention,” which translates to memory leaks to you and me. See, garbage collection algorithms, such as reference counting or mark and sweep techniques, aren’t 100 percent accurate either. Classfiles can have threads that don’t terminate properly, or ActionListeners that fail to deregister, or simply static references to an object that hang around long after the object should have been garbage collected.
HAT has little or no impact on the decompilation process. I only mention it because it’s either something interesting to play with or a crucial utility that helps debug your Java code, depending on your mindset or where your boss is standing.
This now leaves us with three areas to focus on: program registers, the stack, and the method area.
Program Counter Registers
For simplicity’s sake, the JVM uses very few registers—the program counter that controls the flow of the program and three other registers in the stack. Having said that, every thread has its own program counter register, which holds the address of the current instruction being executed on the stack. Sun chose to use a limited number of registers to cater to architectures that could support very few registers.
Method Area
If you skip ahead to the next section, “Inside the Classfile,” where the classfile is broken down into its many constituents, you’ll see exactly where the methods can be found. Within every method is its own code attribute, which contains the bytecodes for that particular method.
Although the classfile contains information about where the program counter should point for every instruction, it is the class loader that takes care of where the actual code is placed in the memory area before the code begins to execute.
As the program executes, the program counter keeps track of the current position of the program by moving it to point to the next instruction. The bytecode within the method area goes through its Assembler-like instructions using the stack as a temporary storage area as it manipulates its variables while the program steps through the complete bytecode for that method. A program’s execution is not necessarily linear within the method area; jumps and gotos are very common.
Stack
The stack is no more than a temporary storage area for holding temporary variables. All program execution and variable manipulation takes place by pushing and popping the variables off a stack frame. Each thread has its very own stack frame.
The stack consists of three different sections for the local variables: (vars), the execution environment (frame), and the operand stack (optop). The vars, frame, and optop registers point to each different area of the stack. The program method is executed in its own environment and the operand stack is used as the workspace for the bytecode instructions. The optop register points to the top of the operand stack.
As I said, the JVM is a very simple machine that pops and pushes temporary variables onto the operand stack and keeps any local variables in the vars, while continuing to execute the method in the stack frame. The stack is sandwiched between the heap and the registers.
Because the stack is so simple, no complex objects can be stored there. These are farmed out to the heap.
Inside a Classfile
To get an overall view of a classfile, take a look at an applet version of “Hello, World” (see Listing 2-1). Compile it using javac and then make a hexadecimal dump of the binary classfile, shown in Listing 2-2.
As you can see, the classfile in Listing 2-2 is small and compact, but it contains all the necessary information for the JVM to execute the “Hello, World” code.
To open up the classfile further, in this chapter, you’re going to simulate the actions of a disassembler by breaking down the classfile into its different parts. In the meantime, build your own primitive disassembler called ClassToXML,1 which takes the classfile and outputs the code into an easy-to-read XML format.
You can break the classfile into the following constituent parts:
- Magic number
- Minor and major version numbers
- Constant pool count
- Constant pool
- Access flags
- This class
- Super class
- Interfaces count
- Interfaces
- Field count
- Fields
- Methods count
- Methods
- Attributes count
- Attributes
Sun’s JVM specification uses a struct-like format to show the classfile’s different components, as shown in Listing 2-3.
However, this always seemed to be a very cumbersome way of displaying the classfile, so you’re going to use an XML format because it allows you to traverse in and out of the classfile’s inner structures a lot more quickly. It also makes the classfile information a heck of a lot easier to understand as you try to unravel its meaning. You can see the complete classfile structure—with all the XML nodes collapsed—in Listing 2-4.
You’ll now look at each of the different nodes and I’ll attempt to explain their form and function.
It’s pretty easy to find the magic and version numbers because they come at the start of the classfile—you should be able to make them out in Listing 2-2. The magic number in hex is the first four bytes (i.e., 0xCAFEBABE), and it just tells the JVM that it is receiving a classfile. Curiously enough, these are also the first four bytes in multiarchitecture binary (MAB) files on the NeXT platform. I guess some cross-pollination of staff must have occurred between Sun and NeXT during early implementations of Java.
0xCAFEBABE was chosen for a number of reasons. First of all, it is pretty hard to come up with meaningful eight letter words out of the letters A–F. Secondly, rumor has it that it was chosen in honor of some waitresses in a nearby café. It was then only a very small step to choose Java as the new name of the programming language formerly known as Oak. It probably helped that Java was originally designed for kitchen and household appliances.
Mind you, OxCAFEBABE is also a great lesson in why it isn’t a very good idea to choose nerdy names during the prototype stage. More often than not they stay around longer than planned. My first reaction was to think that it’s a real pity 0xGETALIFE isn’t a legitimate hexadecimal string, but then I couldn’t come up with any other meaningful hexadecimal name either.
Microsoft’s Common Language Runtime (CLR) files have also got a similar header, BSJB, which was chosen after four of the original developers of the .NET platform, namely Brian Harry, Susan Radke-Sproull, Jason Zander, Bill Evans. OK, maybe 0xCAFEBABE isn’t so bad after all.
Minor and Major Versions
The minor and major version numbers are the next four bytes, 0x0000 and 0x002E, or minor version 0 and major version 46 (see Listing 2-2), which means the code was compiled by the JDK 1.4. The JVM uses these major and minor numbers to make sure that it recognizes and fully understands the format of the class file. JVMs will refuse to execute any classfile with a higher major and minor number.
The minor version is for small changes that require an updated JVM; the major number is for wholesale fundamental changes that require a completely different and incompatible JVM, like one designed to stop decompiling.
It is probably worth noting that Sun and Microsoft’s JVMs—assuming you can find one of them—are still compatible at the interface level, or, in other words, they use the same bytecodes. It’s the different standard classes that cause all the problems, not the underlying JVM.
All class or interface constants are stored in the constant pool. And surprise, surprise—the constant pool count, which takes up the next two bytes, tells you how many variable-length elements follow in the constant pool.
0x0034 or integer 52 is the number in Listing 2-4. The JVM specification tells us that constant_pool[0] is reserved by the JVM. In fact, it doesn’t even appear in the classfile, so the constant pool elements are stored in constant_pool[1] to constant_pool[51].
Constant Pool
The next item is the constant pool itself, which is of type cp_info, shown in Listing 2-5.
The constant pool is made up of an array of variable length elements. It’s full of symbolic references to other entries in the constant pool with the constant pool count telling you just how many variables are in the constant pool.
Every constant and variable name required by the classfile can be found in the constant pool. These names are typically strings, integers, floats, method names, and so on, all of which remain fixed. Each constant is then referenced by its constant pool index everywhere else in the classfile.
Each element of the constant pool—remember there are 52 in our example—begins with a tag that tells exactly what type of constant is coming next. Table2-1 shows a list of valid tags and their corresponding value used in the classfile.
Table 2-1 Constant Pool Tags
Constant Pool Tag | Value |
|---|---|
CONSTANT_Utf8 | 1 |
CONSTANT_Integer | 3 |
CONSTANT_Float | 4 |
CONSTANT_Long | 5 |
CONSTANT_Double | 6 |
CONSTANT_Class | 7 |
CONSTANT_String | 8 |
CONSTANT_Fieldref | 9 |
CONSTANT_Methodref | 10 |
CONSTANT_InterfaceMethodref | 11 |
CONSTANT_NameAndType | 12 |
Many of the tags in the constant pool are symbolic references to other members of the constant pool. For example, each CONSTANT_String_info points at a CONSTANT_Utf8_info tag where the string is ultimately stored. The CONSTANT_Utf8_info has the data structure shown in Listing 2-6.
I’ve collapsed these data structures wherever possible in my XML output of the constant pool, as you can see in Listing 2-7, so that you can read it easily and remove redundant information to save space.
It really is a simple, yet elegant, design when you take the time to examine the output of the class file. Take the first method reference, constant_pool[1], for instance:
<Tag_1>
  <Type>CONSTANT_Methodref</Type>
  <Class_Index>15</Class_Index>
  <NameType_Index>26</NameType_Index>
</Tag_1>
This tells you that its belongs to the class in constant_pool[15]:
<Tag_15>
  <Type>CONSTANT_Class</Type>
  <Value>41</Value>
</Tag_15>
which points to constant_pool[41], the applet class:
<Tag_41>
  <Type>CONSTANT_Utf8</Type>
  <Value>java/applet/Applet</Value>
</Tag_41>
But you also have a NameType_Index to resolve, which will give you the Name and Type of the method.
<Tag_26>
  <Type>CONSTANT_NameAndType</Type>
  <UTF8Name_Index>16</UTF8Name_Index>
  <Utf8Desc_Index>17</Utf8Desc_Index>
</Tag_26>
Elements 16 and 17 of the constant pool point at the method name and its descriptors. According the JVM specification, method descriptors take the following form:
(ParameterDescriptor *) ReturnDescriptor.
The return descriptor can be either V for void or one of the field types, shown in Table2-2.
<Tag_16>
  <Type>CONSTANT_Utf8</Type>
  <Value><init></Value>
</Tag_16>
<Tag_17>
  <Type>CONSTANT_Utf8</Type>
  <Value>()V</Value>
</Tag_17>
In this case, the name of the method is <init>, an internal JVM method that is in every classfile; its method descriptor is ()V, or void, for the field descriptor mapping (see Table2-2).
So, you can now re-create the method as follows:
void init()
Table 2-2 Field Descriptors
Descriptor | Name |
|---|---|
B | Byte |
C | Char |
D | Double |
F | Float |
I | Int |
J | Long |
L<classname> | Class |
S | Short |
Z | Boolean |
[ | Array |
You can try to unravel some other classes too. It may help if you work backward from the target class or method. Some of the strings are pretty unintelligible, but with a little practice, the method signatures become clear.
The earliest types of obfuscators simply renamed these strings to something completely unintelligible, which stopped primitive decompilers, but didn’t harm the classfile because the JVM uses a pointer to the string in the constant pool and not the string itself—well, so long as you didn’t rename internal methods such as <init> or destroy the references to any Java classes in an external library.
You already know what classes you need for your import statements from the following entries: constant_pool[30,32,41,42,49]. Note that no interfaces or static final classes exist in the earlier simple example (see Listing 2-1). These would come up as field references in the constant pool, but so far, your simple class parser is complete enough to handle any classfile you care to throw at it.
Access Flags
Access flags tell you whether you are dealing with a class or an interface, if it is public or abstract, and assuming it is a class rather than an interface, whether it is final or not. All interfaces are abstract.
<AccessFlags>0x21</AccessFlags>
At the moment, there are only five access flag types (see Table2-3), but there may be more in the future. ACC_SUPER was a relatively recent addition; it tells the JVM that the class was compiled with a JDK 1.1 compiler and to treat the superclass methods differently.
Table 2-3 Access Flags
Name | Value | Description |
|---|---|---|
ACC_PUBLIC | 0x0001 | Class or interface |
ACC_FINAL | 0x0002 | Class |
ACC_SUPER | 0x0020 | JDK1.1 compiler or above |
ACC_INTERFACE | 0x0200 | Interface |
ACC_ABSTRACT | 0x0400 | Class or interface |
Access flags are or’d together to come up with a description of the modifier before each variable. This tells you that the Hello class is a public class, which you can verify is true by going all the way back to Listing 2-1.
The next two values point at the constant pool index for this class and the super class.
<ThisClass>14</ThisClass>
<SuperClass>15</SuperClass>
If you follow the XML output in Listing 2-8, constant_pool[14] points at constant_pool[40]. This CONSTANT_Utf8_info structure contains the string Hello, telling us that this is the Hello class. The super class is in constant_pool[15] or the applet class as described in constant_pool[41].
Interfaces
The current example doesn’t have any interfaces, so you really have to look at a different example to get a better understanding of how interfaces are implemented in the classfile, as shown in Listing 2-8.
Listing 2-8 has two interfaces: IProgrammer and IWriter. When you run classtoxml against the class files, you get the following information in the interfaces section.
<Interface_Count>2</Interface_Count>
 <Interfaces>
 <Interface>8</Interface>
 <Interface>9</Interface>
</Interfaces>
which resolves to the IProgrammer and IWriter strings in the constant pool as follows:
<Tag_8>
  <Type>CONSTANT_Class</Type>
  <Value>27</Value>
</Tag_8>
<Tag_9>
  <Type>CONSTANT_Class</Type>
  <Value>28</Value>
</Tag_9>


<Tag_27>
  <Type>CONSTANT_Utf8</Type>
  <Value>IProgrammer</Value>
</Tag_27>
<Tag_28>
  <Type>CONSTANT_Utf8</Type>
  <Value>IWriter</Value>
</Tag_28>
Fields
As it stands, Hello.class has no field information. This is simply because the classfile has no instance variables. As a result, you need to make some simple changes to the original code to declare some variables in the classfile before anything will show up in the classfile fields (see Listing 2-9). In this listing, you also make them static and final to force a ConstantValue field attribute.
If you pull out the relevant section in the XML, you see that there are three fields. The first of these is shown in Listing 2-10.
Field Access flags, as shown in Table2-4, tell you whether the field is public, private, protected, static, final, volatile, or transient.
Table 2-4 Access Flags
Name | Value | Description |
|---|---|---|
ACC_PUBLIC | 0x0001 | Class or interface |
ACC_PRIVATE | 0x0002 | Class |
ACC_PROTECTED | 0x0004 | Class |
ACC_STATIC | 0x0008 | Class or interface |
ACC_FINAL | 0x0010 | Class or interface |
ACC_VOLATILE | 0x0040 | Class |
ACC_TRANSIENT | 0x0080 | Class |
The first five keywords should be obvious to anyone who has written any Java. However, the volatile keyword tells a thread that the variable may be updated by another thread, and the transient keyword is used in object serialization and was introduced in the JDK 1.1. An Access Flag of 0x0018 denotes a static final field.
You’ll need to go back to Table2-2 to refresh your memory before you unravel the different field descriptors.
<Field>
  <AccessFlags>0x0018</AccessFlags>
  <NameType_Index>16</NameType_Index>
  <Description_Index>17</Description_Index>
  <…>
 </Field>

 <Tag_16>
   <Type>CONSTANT_Utf8</Type>
   <Value>s</Value>
 </Tag_16>
 <Tag_17>
   <Type>CONSTANT_Utf8</Type>
   <Value>Ljava/lang/String;</Value>
 </Tag_17>
The descriptor points back to the field s, which has the field descriptor constant_pool[17] or Ljava/lang/String, which is an instance of a String class.
Field Attributes
Attributes count is, no surprise, the number of attributes, which is immediately followed by the attributes themselves. Several different attribute types are found in the field data structure, the methods data structure, and the attributes data structure itself—the final element of the classfile data structure. However, really only two possible field attributes exist: ConstantValue and Synthetic. ConstantValue is used for constant variables, such as those declared as static and final in the current example. The Synthetic variable was introduced in JDK 1.1 to support inner classes. Users can define their own attribute types, but they’re irrelevant to the current discussion.
<Attribute_Count>1</Attribute_Count>
<Attributes>
        <Attribute>
                <Attribute_Type>ConstantValue</Attribute_Type>
                <Attribute_Length>2</Attribute_Length>
                <Attribute_Value_Index>8</Attribute_Value_Index>
         </Attribute>
</Attributes>
The attribute for the first field is a constant that can be found in constant_pool[8], a string, which, in turn, points at the string Hello.
<Tag_8>
   <Type>CONSTANT_String</Type>
   <Value>41</Value>
 </Tag_8>

 <Tag_41>
  <Type>CONSTANT_Utf8</Type>
  <Value>Hello, </Value>
 </Tag_41>
You have now decompiled the first field into its original format:
static final String s = “Hello, “;
And now, for the most important part of the classfile, the methods. All the source code is converted into bytecode and stored or contained in the method_info area. Well it’s actually in the Code attribute within the methods, but you are getting very close. If someone can get at the bytecode, then they can try to convert it back into source. The methods in Listing 2-1’s classfile are shown in Listing 2-11.
The Methods element is preceded by a method count and the data structure is not dissimilar to the field_info structure in the previous section. This time around, three types of attributes normally appear in method_info: Code, Exceptions, and once again, Synthetic for inner classes.
Different access flags are set for each method depending on what modifiers were used in the original source (see Table2-5). A number of restrictions exist because some of the access flags are mutually exclusive—in other words, a method cannot be declared as both ACC_PUBLIC and ACC_PRIVATE or even ACC_PROTECTED. However, you won’t normally be disassembling illegal bytecodes, so you’re unlikely to come across any such eventualities.
<AccessFlags>0x0001</AccessFlags>
All of the methods in the example are public methods.
Table 2-5 Method Access Flags
Name | Value | Description |
|---|---|---|
ACC_PUBLIC | 0x0001 | Class or interface |
ACC_PRIVATE | 0x0002 | Class |
ACC_PROTECTED | 0x0004 | Class |
ACC_STATIC | 0x0008 | Class |
ACC_FINAL | 0x0010 | Class |
ACC_SYNCHRONIZED | 0x0020 | Class |
ACC_NATIVE | 0x0100 | Class or interface |
ACC_ABSTRACT | 0x0400 | Abstract |
ACC_STRICT | 0x0800 | Strict |
You can now find the name and the method descriptors of the final method.
   <NameType_Index>22</NameType_Index>
   <Description_Index>23</Description_Index>
Then you pull out the name and description of the method from constant_pool[22] and constant_pool[23].
<Tag_22>
  <Type>CONSTANT_Utf8</Type>
  <Value>paint</Value>
 </Tag_22>
 <Tag_23>
  <Type>CONSTANT_Utf8</Type>
  <Value>(Ljava/awt/Graphics;)V</Value>
 </Tag_23>
You can now reassemble the method without any of the underlying code.
public void paint(java.awt.Graphics g) {
        /*        */
}
Or simply
import javaawt.Graphics;
…
public void paint(Graphics g) {
        /*        */
}
The remaining methods fall out of the constant pool in a similar fashion.
Attributes appear in the field, method, and attributes elements of the classfile structure. Each attribute begins with an attribute_name_index that references the constant_pool and an attribute length. But the meat of the classfile is within the method attributes, as shown in Listing 2-12.
The attribute type above is a code attribute. The attribute_length is the length of the code attribute minus the first 6 bytes.2 The Max stack and Max locals gives the maximum number of variables on the operand stack and local variable sections of the stack frame.
<Code_Length>36</Code_Length>
    <Code>2bbb000659b700071208b600092ab6000ab6000
        9120bb60009b6000c10321019b6000db1</Code>
<Code_Length></Code_Length> gives the size of the following code array. The code array is simply a series of bytes where each bytecode is a reserved byte value or opcode followed by zero or more operands; or, to put it another way,
opcode operand
Looking at the output from running classtoxml on Hello.class (see Listing 2-1), you see that there are three methods for the applet, namely getLocalHostName, paint, and the empty constructor that the Java compiler always adds when the developer chooses not to add their own constructor. Each method has its own Code array. Listing 2-12 shows the attributes for the paint method only.
<init> Method
Before I explain what bytecode maps onto which opcode, let’s look at the simplest method to unravel, the first code segment.
<Code>2ab70001b1</Code>
When you convert this into opcodes and operands, it becomes
2a                aload 0
b70001        invokespecial #1
b1                return
2a becomes aload 0. This loads the local variable, 0, onto the stack as required by invokespecial. b70001 becomes invokespecial #1, where invokespecial is used to invoke a method in a limited number of cases, such as an instance initialization method or <init> to you and me, which is what you have here. #1 is a reference to constant_pool[1], a CONSTANT_Methodref structure. You can collect all the constant pool references for constant_pool[1] as shown here:
<Tag_1>
  <Type>CONSTANT_Methodref</Type>
  <Class_Index>15</Class_Index>
  <NameType_Index>26</NameType_Index>
 </Tag_1>

 <Tag_15>
  <Type>CONSTANT_Class</Type>
  <Value>41</Value>
 </Tag_15>

 <Tag_26>
  <Type>CONSTANT_NameAndType</Type>
  <UTF8Name_Index>16</UTF8Name_Index>
  <Utf8Desc_Index>17</Utf8Desc_Index>
 </Tag_26>

 <Tag_16>
  <Type>CONSTANT_Utf8</Type>
  <Value><init></Value>
 </Tag_16>
 <Tag_17>
  <Type>CONSTANT_Utf8</Type>
  <Value>()V</Value>
 </Tag_17>
You can resolve the symbolic references by hand to
<Method java.applet.Applet.<init>()V>
This is the empty constructor that the javac compiler adds to all classes that don’t already have a constructor. The final b1 opcode is a simple return statement. So your first method can be converted straight back into the following code, an empty constructor.
public Hello(){
}
The second code attribute is a much less trivial affair. To get any further, you really need to know what hexadecimal values map onto what opcodes, (see Table2-6). You will also need to know how each element of the Java language is compiled into bytecode so that you can reverse the process.
Table 2-6 Bytecode to Opcode Mapping
Opcode | Hex Value | Opcode Mnemonic |
|---|---|---|
0 | (0x00) | nop |
1 | (0x01) | aconst_null |
2 | (0x02) | iconst_m1 |
3 | (0x03) | iconst_0 |
4 | (0x04) | iconst_1 |
5 | (0x05) | iconst_2 |
6 | (0x06) | iconst_3 |
7 | (0x07) | iconst_4 |
8 | (0x08) | iconst_5 |
9 | (0x09) | lconst_0 |
10 | (0x0a) | lconst_1 |
11 | (0x0b) | fconst_0 |
12 | (0x0c) | fconst_1 |
13 | (0x0d) | fconst_2 |
14 | (0x0e) | dconst_0 |
15 | (0x0f) | dconst_1 |
16 | (0x10) | bipush |
17 | (0x11) | sipush |
18 | (0x12) | ldc |
19 | (0x13) | ldc_w |
20 | (0x14) | ldc2_w |
21 | (0x15) | iload |
22 | (0x16) | lload |
23 | (0x17) | fload |
24 | (0x18) | dload |
25 | (0x19) | aload |
26 | (0x1a) | iload_0 |
27 | (0x1b) | iload_1 |
28 | (0x1c) | iload_2 |
29 | (0x1d) | iload_3 |
30 | (0x1e) | lload_0 |
31 | (0x1f) | lload_1 |
32 | (0x20) | lload_2 |
33 | (0x21) | lload_3 |
34 | (0x22) | fload_0 |
35 | (0x23) | fload_1 |
36 | (0x24) | fload_2 |
37 | (0x25) | fload_3 |
38 | (0x26) | dload_0 |
39 | (0x27) | dload_1 |
40 | (0x28) | dload_2 |
41 | (0x29) | dload_3 |
42 | (0x2a) | aload_0 |
43 | (0x2b) | aload_1 |
44 | (0x2c) | aload_2 |
45 | (0x2d) | aload_3 |
46 | (0x2e) | iaload |
47 | (0x2f) | laload |
48 | (0x30) | faload |
49 | (0x31) | daload |
50 | (0x32) | aaload |
51 | (0x33) | baload |
52 | (0x34) | caload |
53 | (0x35) | saload |
54 | (0x36) | istore |
55 | (0x37) | lstore |
56 | (0x38) | fstore |
57 | (0x39) | dstore |
58 | (0x3a) | astore |
59 | (0x3b) | istore_0 |
60 | (0x3c) | istore_1 |
61 | (0x3d) | istore_2 |
62 | (0x3e) | istore_3 |
63 | (0x3f) | lstore_0 |
64 | (0x40) | lstore_1 |
65 | (0x41) | lstore_2 |
66 | (0x42) | lstore_3 |
67 | (0x43) | fstore_0 |
68 | (0x44) | fstore_1 |
69 | (0x45) | fstore_2 |
70 | (0x46) | fstore_3 |
71 | (0x47) | dstore_0 |
72 | (0x48) | dstore_1 |
73 | (0x49) | dstore_2 |
74 | (0x4a) | dstore_3 |
75 | (0x4b) | astore_0 |
76 | (0x4c) | astore_1 |
77 | (0x4d) | astore_2 |
78 | (0x4e) | astore_3 |
79 | (0x4f) | iastore |
80 | (0x50) | lastore |
81 | (0x51) | fastore |
82 | (0x52) | dastore |
83 | (0x53) | aastore |
84 | (0x54) | bastore |
85 | (0x55) | castore |
86 | (0x56) | sastore |
87 | (0x57) | pop |
88 | (0x58) | pop2 |
89 | (0x59) | dup |
90 | (0x5a) | dup_x1 |
91 | (0x5b) | dup_x2 |
92 | (0x5c) | dup2 |
93 | (0x5d) | dup2_x1 |
94 | (0x5e) | dup2_x2 |
95 | (0x5f) | swap |
96 | (0x60) | iadd |
97 | (0x61) | ladd |
98 | (0x62) | fadd |
99 | (0x63) | dadd |
100 | (0x64) | isub |
101 | (0x65) | lsub |
102 | (0x66) | fsub |
103 | (0x67) | dsub |
104 | (0x68) | imul |
105 | (0x69) | lmul |
106 | (0x6a) | fmul |
107 | (0x6b) | dmul |
108 | (0x6c) | idiv |
109 | (0x6d) | ldiv |
100 | (0x6e) | fdiv |
111 | (0x6f) | ddiv |
112 | (0x70) | irem |
113 | (0x71) | lrem |
114 | (0x72) | frem |
115 | (0x73) | drem |
116 | (0x74) | ineg |
117 | (0x75) | lneg |
118 | (0x76) | fneg |
119 | (0x77) | dneg |
120 | (0x78) | ishl |
121 | (0x79) | lshl |
122 | (0x7a) | ishr |
123 | (0x7b) | lshr |
124 | (0x7c) | iushr |
125 | (0x7d) | lushr |
126 | (0x7e) | iand |
127 | (0x7f) | land |
128 | (0x80) | ior |
129 | (0x81) | lor |
130 | (0x82) | ixor |
131 | (0x83) | lxor |
132 | (0x84) | iinc |
133 | (0x85) | i2l |
134 | (0x86) | i2f |
135 | (0x87) | i2d |
136 | (0x88) | l2i |
137 | (0x89) | l2f |
138 | (0x8a) | l2d |
139 | (0x8b) | f2i |
140 | (0x8c) | f2l |
141 | (0x8d) | f2d |
142 | (0x8e) | d2i |
143 | (0x8f) | d2l |
144 | (0x90) | d2f |
145 | (0x91) | i2b |
146 | (0x92) | i2c |
147 | (0x93) | i2s |
148 | (0x94) | lcmp |
149 | (0x95) | fcmpl |
150 | (0x96) | fcmpg |
151 | (0x97) | dcmpl |
152 | (0x98) | dcmpg |
153 | (0x99) | ifeq |
154 | (0x9a) | ifne |
155 | (0x9b) | iflt |
156 | (0x9c) | ifge |
157 | (0x9d) | ifgt |
158 | (0x9e) | ifle |
159 | (0x9f) | if_icmpeq |
160 | (0xa0) | if_icmpne |
161 | (0xa1) | if_icmplt |
162 | (0xa2) | if_icmpge |
163 | (0xa3) | if_icmpgt |
164 | (0xa4) | if_icmple |
165 | (0xa5) | if_acmpeq |
166 | (0xa6) | if_acmpne |
167 | (0xa7) | goto |
168 | (0xa8) | jsr |
169 | (0xa9) | ret |
170 | (0xaa) | tableswitch |
171 | (0xab) | lookupswitch |
172 | (0xac) | ireturn |
173 | (0xad) | lreturn |
174 | (0xae) | freturn |
175 | (0xaf) | dreturn |
176 | (0xb0) | areturn |
177 | (0xb1) | return |
178 | (0xb2) | getstatic |
179 | (0xb3) | putstatic |
180 | (0xb4) | getfield |
181 | (0xb5) | putfield |
182 | (0xb6) | invokevirtual |
183 | (0xb7) | invokespecial |
184 | (0xb8) | invokestatic |
185 | (0xb9) | invokeinterface |
186 | (0xba) | xxxunusedxxx |
187 | (0xbb) | new |
188 | (0xbc) | newarray |
189 | (0xbd) | anewarray |
190 | (0xbe) | arraylength |
191 | (0xbf) | athrow |
192 | (0xc0) | checkcast |
193 | (0xc1) | instanceof |
194 | (0xc2) | monitorenter |
195 | (0xc3) | monitorexit |
196 | (0xc4) | wide |
197 | (0xc5) | multianewarray |
198 | (0xc6) | ifnull |
199 | (0xc7) | ifnonnull |
200 | (0xc8) | goto_w |
201 | (0xc9) | jsr_w |
Let me clarify a few things before I continue. First, this list is shorter than most other opcode lists because we’re ignoring any opcodes above 201. These are reserved for future use. True, Sun is already using 203 to 228 for “quick” versions of some existing opcodes. Sun’s JVM, for example, will replace any invoke_virtual with an invoke_virtual_quick immediately after resolving the relevant constant_pool entries for the initial invoke_virtual. The _quick version is faster because it uses the stored result of the earlier resolution; as a result, it doesn’t need to do any subsequent checking. However, because any JIT or JVM transformations have no effect on the original bytecode in a classfile, you can safely forget about them.
I’m not going to examine how to turn the bytecode into source just yet. However, you can still see how the remaining Code attributes can be turned into opcodes and their operands.
In the second method
public String getLocalHostName()
you have an exception or a try-catch block.
     <Exception_Table_Length>1</Exception_Table_Length>
     <Exception_Table_Attributes>
      <Start_PC>0</Start_PC>
      <End_PC>9</End_PC>
      <Handler_PC>9</Handler_PC>
      <Catch_Type>4</Catch_Type>
     </Exception_Table_Attributes>
The exception is thrown when the program counter (pc) equals 0, which is then caught between a pc count of 9 and 11. You can easily calculate what the pc counter is at any stage. Some opcodes take no operands, such as aload_0, some take one, and some even take two operands. The pc is incremented for every byte and each opcode or operand takes a single byte. This helps you judge where to insert the try and catch blocks.
<Code>b800024c2bb60003b04c1205b0</Code>
The Code attribute can then be broken down as shown in Table2-7.
Table 2-7 Method 2 Code Attribute Breakdown

invokestatic invokes the static method getLocalHost(). invokestatic invokes a class method directly and doesn’t require any local variables to be placed on the stack before the calculation. The result is then stored, astore_1, as a local variable. invokevirtual invokes the getHostName(). Of the four method invocation operands, invokevirtual is the most common. It begins with an aload_1 that pushes the object reference address onto the stack where it can be used by getHostName(). The return value from the method invocation, a String, is then returned from the method, via a return.
If an exception was thrown, say, if the localhost could not be determined, then the ldc operand pushes the Not Known string in constant_pool[5] onto the stack where it is then returned from the method.
If the class is compiled without the -O option, you can see how the line number attribute shows where the pc matches up with the original code.
<Code_Attributes>
  <Code_Attribute>start pc: 0 line number 9</Code_Attribute>
  <Code_Attribute>start pc: 4 line number 10</Code_Attribute>
  <Code_Attribute>start pc: 9 line number 13</Code_Attribute>
 </Code_Attributes>
This is useful, but not exactly crucial information from a decompilation point of view. Admittedly, you would have to fill in a lot more gaps, but you should be able to see how the code begins to look like the original method.
9        public String getLocalHostName() {
10                try {
11                        InetAddress address = InetAddress.getLocalHost();
12                        return address.getHostName();
13                } catch (UnknownHostException e) {
14                        return “Not known”;
15                }
16        }
Be careful not to place too much faith in the line number attribute because a note in the JVM specification says that the javac in Sun’s JDK 1.0.2 can generate LineNumberTable attributes that are not in line number order. Or, to put that another way, sometimes there isn’t a one-to-one mapping of the bytecode with the original source, which is a shame. It is also worth mentioning that backward compatibility means that this may not be fixed in future versions.
The final method has the following 36-byte Code attribute.
  <Code_Length>36</Code_Length>
  <Code>2bbb000659b700071208b600092ab6000ab60009120bb6000
        9b6000c10321019b6000db1</Code>
You can break this down in a similar fashion to the previous method, as you can see in Table2-8.
Table 2-8 The Third Method—Code Attribute Breakdown
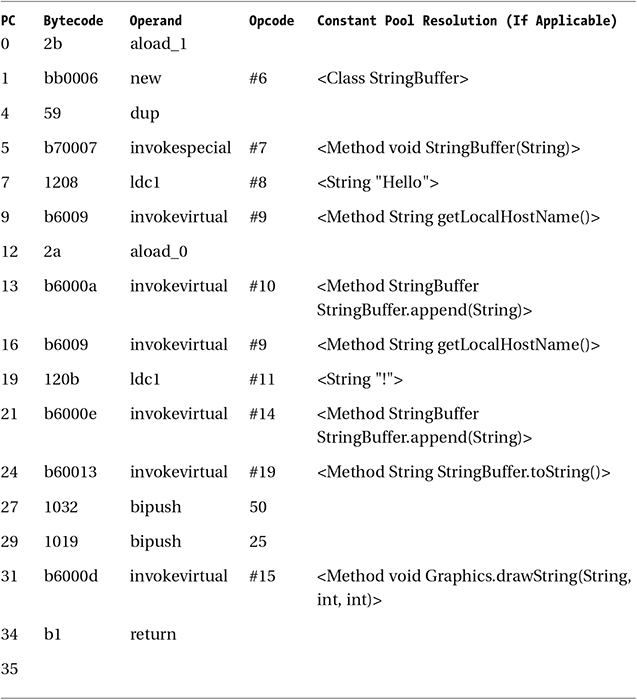
new creates a new StringBuffer class object. dup makes a copy of this object reference. The stack now has two copies of an uninitialized StringBuffer. ldc loads a copy of constant_pool[4] string, Hello, onto the stack, which is then turned into a StringBuffer by the static class method StringBuffer(). getLocalHostName() is once again loaded on the stack, popped, and appended using StringBuffer.append(String). The ! string is pushed onto the stack by ldc, where it is once again popped and appended. The StringBuffer is then converted to a string. The two integers are bipush’d onto the stack, and the drawString method is called by popping the two integers and the recently converted string. Finally, the whole result is returned out of the method.
<Code_Attributes>
  <Code_Attribute>start pc: 0 line number 17</Code_Attribute>
  <Code_Attribute>start pc: 35 line number 18</Code_Attribute>
 </Code_Attributes>
Once again, you can re-create the method using your analysis, and you can add the line numbers using the line number attribute.
17        public void paint(Graphics g) {
18                g.drawString(s + getLocalHostName() + “!”, w,h);
19        }
ClassToXML, available from the downloads area of the Apress web site, will output bytecode like a true disassembler. And now that you’ve seen just how easy it is to write a disassembler, you can see why so many disassemblers have user interfaces.
The only piece of information I haven’t mentioned is which opcodes take zero, one, or more operands; until you know this, you don’t know when one command starts and another finishes. I’ll return to this in Chapter 6.
Attributes
The final two elements contain the number of classfile attributes and the remaining attributes, which are usually the SourceFile or InnerClasses attributes.
<Attributes>
 <Attribute>
  <Attribute_Type>SourceFile</Attribute_Type>
  <Attribute_Length>2</Attribute_Length>
  <Source_File>sourcefile: Hello.java</Source_File>
 </Attribute>
</Attributes>
SourceFile is the name of the Java file that was used to originally generate the code. The InnerClasses attribute is a bit more complicated and is ignored by several decompilers that cannot yet handle inner classes.
You’re not just limited to the SourceFile and InnerClasses attribute either. You can define new attributes here or indeed in any of the field or methods attribute sections. You may have your own reasons why you want to store information in a custom attribute, perhaps using it for some low-level check or for storing encrypted Code attributes to possibly prevent decompilation. Assuming your new Code attribute follows the format of all other attributes, you can add any attribute you want, which will be ignored by the JVM. Each attribute needs to begin with a two-byte attribute_name_index to resolve the reference to the name of the attribute in the constant pool, and a four-byte attribute_length that gives the length of the remaining bytes in the attribute.
Conclusion
You’ve finally come to the end of the guts of the classfile and built your own disassembler classtoxml in the process. Hopefully, you can see, or at least begin to see, how it all fits together. Although the design of the classfile is neat and compact, because of the split between the initial and final compilation stages, you have an awful lot of information to help you recover the source. For many years, programmers have been protected by the encryption that compiling to an executable usually offers, but splitting the compilation and carrying around so much information at the intermediate stage is just asking for trouble.
In Chapter 4, you’ll take a look at both the theory and practice of the science of obfuscation. Now that you know how a classfile is put together, you will find it a lot easier to see how the different tactics that people employ really protect your code.
_________________
1You can download the ClassToXML code in its entirety from the downloads section of the Apress web site (www.apress.com).
2The attribute type and attribute name take up the first 6 bytes and are not included in the attribute length.