
CHAPTER 6
Creating Your Own Templates
A key reason that Joomla has been able to thrive in the CMS space despite numerous excellent competitors is its ability to be extended by users. For instance, the ease with which it's possible to design a new template puts customization within the reach of the average Joomla user. You won't be using Joomla long before you will want to either create your own templates or make substantial modifications to an existing template.
Joomla templates operate similarly to templates available in most word processors. In a word processor, a resume template has the general layout and basic content items that should be present in a generic resume. The job applicant loads the resume template and then fills in the personal information such as name, contact information, and work history. A Joomla template works in the same fashion, except that the Joomla CMS retrieves content from the database and fills in the blanks of the template.
The template (or presentation) is completely separate from the content. By selecting a new template, you can change the look of a site from the presentation shown in Figure 6-1 to the one shown in Figure 6-2 with a single click in the Template Manager.
In this chapter, you'll learn how to create a new template that reflects the identity of your web site. The creation of the graphics for the template will be demonstrated in a program called GIMP. If you're unfamiliar with GIMP, you'll be glad to discover that it is a free, open source equivalent of Adobe Photoshop. GIMP is available for all the major operating system platforms (Windows, Mac OS, and Linux).
Since the structure of a template can be confusing at first, you can begin down the road of template knowledge by following the instructions in the Quickstart section to create a simple Hello Joomla template. Hello Joomla is a template of the most rudimentary kind. Once the Quickstart template basics have been covered, you can advance to creating a substantial style sheet–based template.
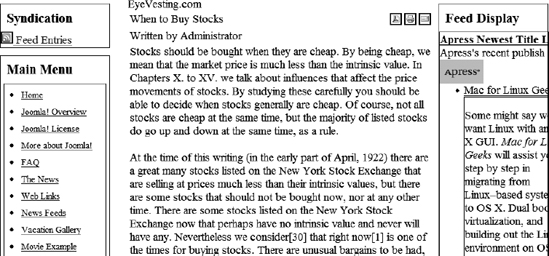
Figure 6-1. A site using a text-based template
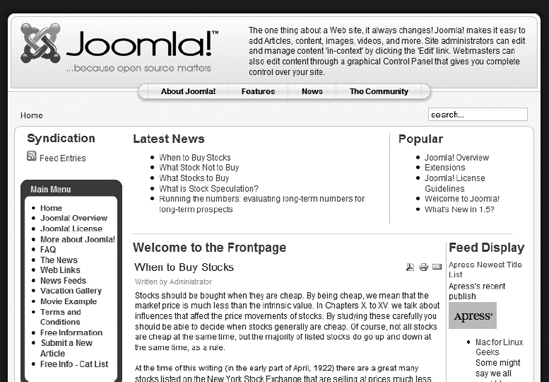
Figure 6-2. A site using a graphics-heavy template
Quickstart to Creating a Hello Joomla! Template
A Joomla template is made up of a number of files that work together to display the content held in the database. A template depends on at least two main files:
templateDetails.xml: A file (in XML metadata format) used by Joomla to retrieve information about the template (name of the template, author, creation date, etc.). It also contains a list of the files that make up the template itself. The file list should include all index files, style sheets, images, media, and any other files installed with the template.index.php: A file that contains the presentation code to display text, components, and modules. It is the central file that loads modules, parses the Joomla template data, and handles the primary display.
Joomla templates are located on the web server in the /templates directory. Each template has its own directory and that directory must exactly match the name of the template. For example, the template rhuk_milkyway must be located in a directory named rhuk_milkyway. Joomla is case-sensitive, so if the template is named rhuk_milkyway, a directory named RHUK_MILKYWAY won't be recognized as holding the template.
The /templates directory holds a separate folder for each template that you currently have installed. It may be helpful for you to examine the contents of one or more of these folders. You'll see that no matter how different the templates appear when presenting content, the type and number of files used to create them are very similar.
Note Templates have changed tremendously from Joomla version 1.0 to 1.5. While many older templates used the patTemplate engine as the core technology to render their output, Joomla 1.5 has done away with patTemplate and includes it only for backward compatibility. The object framework has also been rewritten from the ground up. Therefore, if you have experience with designing older templates, the implementation and structure have changed almost entirely. Examine the sample templates in this chapter as well as the site default template to understand the workings of the new template engine. If you simply want to use a Joomla 1.0 template with a 1.5 deployment, you will need to turn on the System - Legacy plug-in in the Plugin Manager.
Creating the Hello Joomla! Template Files
You'll create the two Hello Joomla template files using your text editor of choice (anything from Windows Notepad to vim to a sophisticated code editor). To begin, you will need a new folder to hold these files.
Create a folder named /tmplHelloJoomla in the /templates folder. If you're developing on a Windows-based staging server, the path to the folder may look like this:
C:Program FilesApache Software Foundation

    Apache2.2htdocs	emplates	mplHelloJoomla
Note In an attempt to keep things simple, these instructions will have you manually installing the template files and folders. Templates are generally stored as a ZIP archive, and an administrator uses the Extensions ![]() Install/Uninstall option to insert the template into the system. For development, creating a new ZIP archive each time you make a change to a file, particularly when frequent changes are likely, is impractical. Instead, you can either create the template directory manually if you're running Joomla on a staging server or upload it via FTP if a remote host is being used.
Install/Uninstall option to insert the template into the system. For development, creating a new ZIP archive each time you make a change to a file, particularly when frequent changes are likely, is impractical. Instead, you can either create the template directory manually if you're running Joomla on a staging server or upload it via FTP if a remote host is being used.
Create the following basic index.php file in your text editor and save it to the /tmplHelloJoomla folder:
<html>

<head>

<jdoc:include type="head" />

</head>


<body>

<jdoc:include type="message" />

<div class="center" align="center">Hello World!</div>

<jdoc:include type="modules" name="debug" />

</body>

</html>
This index.php file is simplified to the point where it doesn't even comply with simple HTML rules, such as including a DOCTYPE parameter. When you create a full template later in this chapter, you will see all of the bells and whistles that should be included with even a basic template. For the purposes of the Hello Joomla template, however, you can forego them to make the code as straightforward as possible.
In the index.php file, the first Joomla code is the <jdoc:include type="head" /> statement, which inserts the site-specific information into the header. This directive will even insert the metadata used by search engines. For the home page of my web site, for example, the following information is sent to the visiting browser by the header include directive:
<title>xxx.com</title>

<meta name="generator" content="Joomla! 1.5" />

<meta name="description" content="xxx" />

<meta http-equiv="Content-Type" content="text/html; charset=utf-8" />

<meta name="robots" content="index, follow" />

<meta name="keywords" content="xxx" />

<link href="http://localhost/favicon.ico"

      rel="shortcut icon" type="image/x-icon" />
This header information will change depending on the page that the template is rendering (e.g., the Front Page will be different from article pages). The header information will be drawn from the menu or article that is being presented.
Note Many beginning Joomla users want to change the title of the Front Page, and they look in vain at the template code. As you can see from the jdoc head included in the index.php file, page titles are generated dynamically. So where is the title obtained for the Front Page? Go to the items held in the Main Menu (through Menus ![]() Main Menu). Edit the first item in the menu (generally named "Home") to show the
Main Menu). Edit the first item in the menu (generally named "Home") to show the Page Title parameter. Set that parameter to the text you want as the title of your Joomla home page.
The second Joomla statement is <jdoc:include type="message" />, which simply includes any server messages in the post. In most cases, no messages will exist, so no extra content will be added.
The final Joomla statement, <jdoc:include type="modules" name="debug" />, references the debug module. Normally this doesn't display anything. However, if you turn on the Enable Debugging option in the Global Configuration screen (available under the Site ![]() Configuration menu), the debugging information will be displayed below the page. This information can be extremely helpful, as it will describe the execution of the template page. For example, the Front Page debug information may appear like this:
Configuration menu), the debugging information will be displayed below the page. This information can be extremely helpful, as it will describe the execution of the template page. For example, the Front Page debug information may appear like this:
Application 0.156 afterLoadFramework

Application 0.233 afterStartFramework

Application 0.268 afterDisplayOutput
The numbers that follow the Application denotation describe the page-rendering time for each step in the sequence. If your page is slow to load, you can begin to determine the cause of the delay by checking where the slowdown occurred.
To complete the template, you need to create the XML details file that directs the Joomla system to the template files. Enter the following code into your text editor and save the file as templateDetails.xml to your /tmplHelloJoomla directory:
<?xml version="1.0" encoding="utf-8"?>

<install version="1.5" type="template">

    <name>Hello Joomla template</name>

    <description>

    Simplest template in the Joomla world.

    </description>

    <files>

    <filename>index.php</filename>

    <filename>templateDetails.xml</filename>

    </files>

</install>
That's it! Go to the Template Manager (under the Extensions menu) in the Joomla Administrator interface. You will see your new template listed there. Click the radio button to the left of the template name to select it, and then click the Default button, as shown in Figure 6-3.
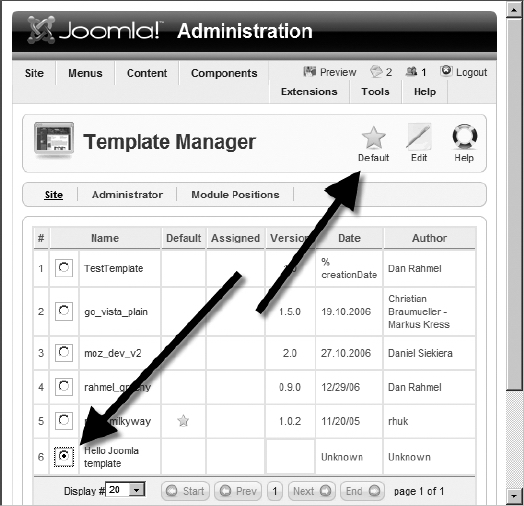
Figure 6-3. Select the Hello Joomla template and click the Default button to make it the default template.
Open a browser window and go to the Front Page of your site. If the template is working properly, you will see the "Hello World!" greeting, as shown in Figure 6-4. Congratulations, you've just created your first template!
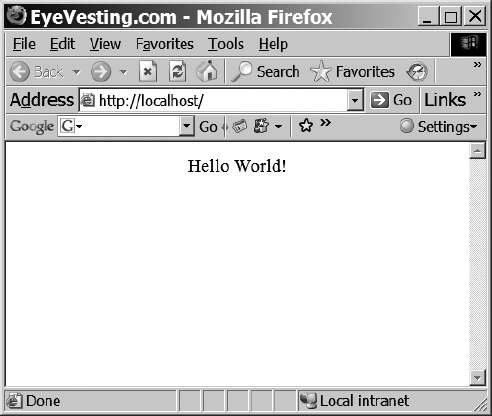
Figure 6-4. The browser displays the "Hello World!" greeting from the template.
I know this template isn't very impressive. However, you now know the basic structure of a template and how Joomla PHP directives are included within the file.
The first problem with the Hello Joomla template is that it doesn't display any of the content from the site. Before you abandon this template for a more advanced template implementation, it would be a good idea to add a Joomla component to display some basic content.
Adding a Module and a Component to Hello Joomla!
With your primitive template working, it's time to add the instructions that would begin to make it a real template. After all, Joomla isn't much of a CMS if it can't display content. With only a couple of lines of code, you can add a single module and a single component to the template. The module will display the latest news items, and the component will display the text of the latest Front Page article.
Open your Hello Joomla index.php file and add the bolded lines after the Hello World! element:
<div class="center" align="center">Hello World!</div>

<jdoc:include type="modules" name="user1" style="xhtml" />

<jdoc:include type="component" />

<jdoc:include type="modules" name="debug" />
In the first added line, the module directive adds the user1 module to display the Latest News title and a list of the latest news articles. The second new line adds a component that displays the text of the most recent Front Page article.
You may notice that unlike the module directive, the component directive does not have a name attribute specified for the component. If there is no name specified, the component held in the system's $option request variable is used, which in most cases is the default content component. This default component, named com_content, will display the main body content for a page.
When you refresh the browser window, you should see the article contents, as shown in Figure 6-5.
All Joomla templates match the essential structure of this simple Hello Joomla template. Complete templates use style sheets to more closely control layout, graphics to make the display more robust, and template screenshot thumbnails to make administration easier. They also may feature a number of other enhancements. However, all templates follow the basic pattern of the template you just created.
Note If you are working on your staging server and your text editor program refuses to save over a file, telling you that the index.php or other file is "in use by another process or application," wait a few moments and try again. The PHP engine should release file access after a short time.
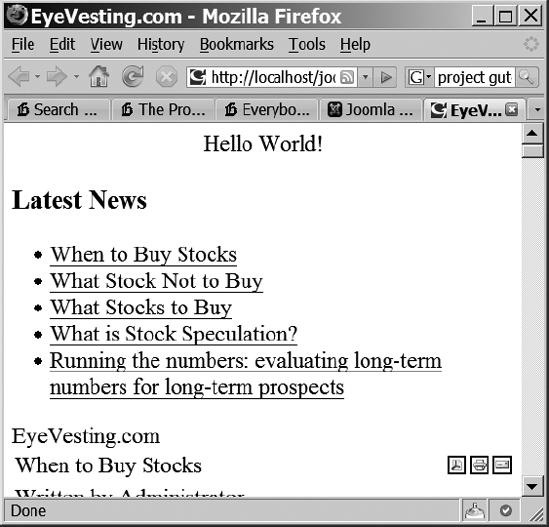
Figure 6-5. The module and the component will display Joomla system content.
Modifying an Existing Template
With a primitive template under your belt, it is time to progress to a more powerful one. On most occasions, when you need a custom template, rather than starting from scratch, you will begin with an existing template as a foundation and tailor it to meet your needs. In this section, you'll make a slight modification to the main default template that ships with Joomla. It will provide your first real exposure to a commercial-grade template.
The default template includes the "Powered by Joomla" link at the bottom of the page, as shown in Figure 6-6. If you don't mind the attribution, please leave it, as it will expose more people to the technical wonder that is Joomla. However, most organizations prefer to give the appearance that their web site is a custom system; they don't want visitors seeing the wizard behind the curtain. This example describes how to remove the "Powered by Joomla" attribution.
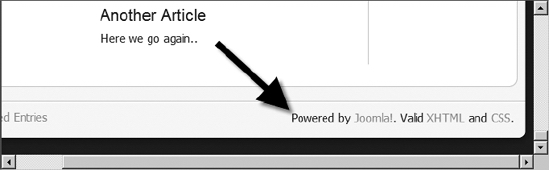
Figure 6-6. A small "Powered by Joomla" text reference and link appear at the bottom of the template.
Most of the display options for Joomla may be modified by using one of the tools provided by the graphical user interface. There are some functions, however, that you can control only by directly editing the template file. To remove the "Powered by" attribution, you will need to edit the PHP of the index page.
You may be intimidated when you look at the actual template code because it is much lengthier and more complex than the Hello Joomla template. However, if you look closely, you will see many of the same directives that you've already used.
Open the Template Manager (under the Extensions menu) in the Administrator interface. Select the rhuk_milkyway template and click the Edit button, as shown in Figure 6-7. The Edit function allows you to edit the various characteristics of the template, including setting any parameters the template supports. Template parameters are settings that an administrator can change without needing to edit the template code directly.
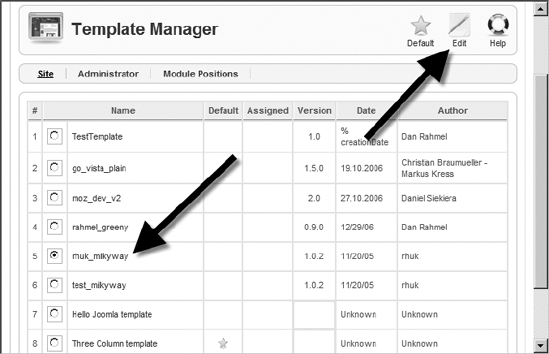
Figure 6-7. Select the rhuk_milkyway template and click the Edit button.
You need to edit the template code, so click the Edit HTML button, as shown in Figure 6-8, to open the Template HTML Editor. The Joomla Administrator interface provides a very basic text editor so that you can make minor changes to the template, even remotely without needing FTP or direct file access.
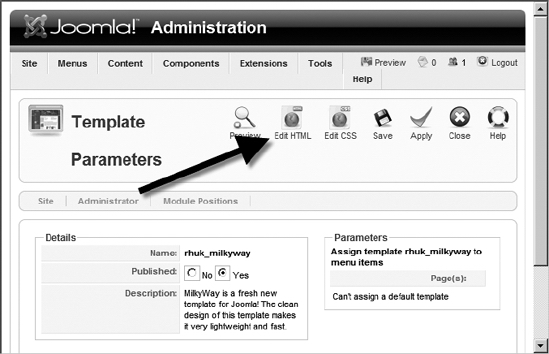
Figure 6-8. Click the Edit HTML button to edit the index.php code.
Scroll to the bottom of the template code to see the lines that generate the "Powered by" information, as shown in Figure 6-9. They should read as follows:
<p style="float:right; padding-right: 25px;">

    Powered by <a href="http://www.Joomla.org">Joomla!</a>. Valid <a

    href="http://validator.w3.org/check/referer">XHTML</a> and <a

    href="http://jigsaw.w3.org/css-validator/check/referer">CSS</a>.

</p>
Select that code and cut those lines (press Ctrl+X on Windows or Cmd+X on Mac OS). It is always a good idea to use the cut option rather than the delete option when modifying a template. If the change results in some problem for the display, you can simply paste the old text back into the template.
If you open a browser window to display your home page, you'll find that the Joomla statement at the bottom is now gone, as shown in Figure 6-10.
While the editor in the Administrator interface is good for minor changes to a template, extensive modifications are best performed with a substantial text editor. In the next section, you'll find an overview of the most popular programs that are used for Joomla development and template creation.
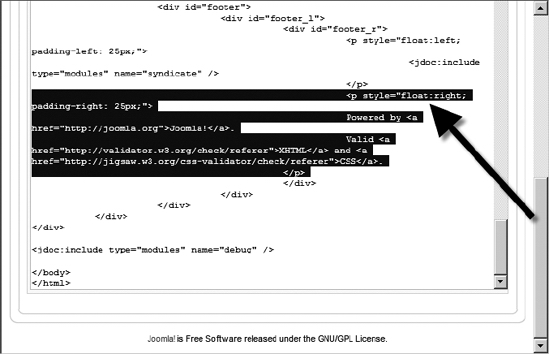
Figure 6-9. Select the lines of code relating to the "Powered by" annotation and cut them from the file.
Figure 6-10. If your edit was successful, the Joomla annotation will be gone.
Tip Before you edit any source file, I recommend that you make a backup of the original file. For article content creation and parameter configuration, the Joomla user interface provides safeguards that will keep you from making a change that will stop the system from functioning. This is not the case when you make direct file edits—a small change to a file could bring down the whole system. You don't want to need to reinstall Joomla if you can't correct the change that made everything stop functioning. With a backup, you can simply restore the initial file to return the system to functioning order.
Creating Templates with Web Editors
You can use various applications to create a new template. If you only have Windows Notepad, you can still author a suitable template with the bare-bones features available in that application. If you prefer the Emacs text editor on Linux, it can provide some powerful features, and the HTML-mode can help you to generate a conforming template. However, most Joomla designers and developers prefer an application that is a little more user-friendly.
There are two primary types of editors: WYSIWYG editors and program editors. Generally, Joomla designers tend to gravitate to WYSIWYG editors for their visual development needs. Joomla developers find the power of direct coding is more accessible in program editors.
WYSIWYG editors—such as Adobe Dreamweaver, Microsoft Expression Web, and Nvu (KompoZer)—present an HTML page almost as it would appear in a web browser. These programs cater to designers who need to make visual modifications to page elements (such as tables) by clicking and dragging. While these programs generally have modes where direct source editing is possible, the coding interfaces have limited capabilities.
Program editors—such as Eclipse, jEdit, UltraEdit, and Leo—display the text just like Notepad or Emacs. However, these program editors have many additional features, including color syntax highlighting (especially useful for Joomla PHP coding), style sheet tag editing, advanced search and replace through general expressions, and automatic code formatting. While program editors sometimes offer some page preview capabilities, they are generally best used when performing nonvisual tasks such as PHP code design.
WYSIWYG Editors
Web editors that display a good facsimile of how a page will appear in the browser are excellent tools for creating and editing presentation. Although some sites can be popular despite a plain appearance—for example, the Drudge Report (see www.drudgereport.com)—such sites are definitely in the minority. Most sites will need a combination of looks and substance to meet the expectations of their visitors.
A web editor that can ease the visual design process can be an excellent investment. Joomla designers may choose from Adobe Dreamweaver, Microsoft Expression Web, and the open source Nvu with the Joomla plug-in. The selection you make in this area will have a great deal to do with your personal preferences, so you should evaluate all of the options.
Dummy Files to Aid WYSIWYG Editing
Joomla template design using an editor is inherently difficult because the pages are generated dynamically from the content of the system. This often creates a substantial barrier to WYSIWYG presentation for editing.
For example, simply loading the default Joomla template into Dreamweaver displays a window such as the one shown in Figure 6-11. The screen is blank because without the content that fills a template, there is nothing to display. Since these WYSIWYG programs don't actually execute the PHP code (which would be impractical), the rough tables are all that are displayed.
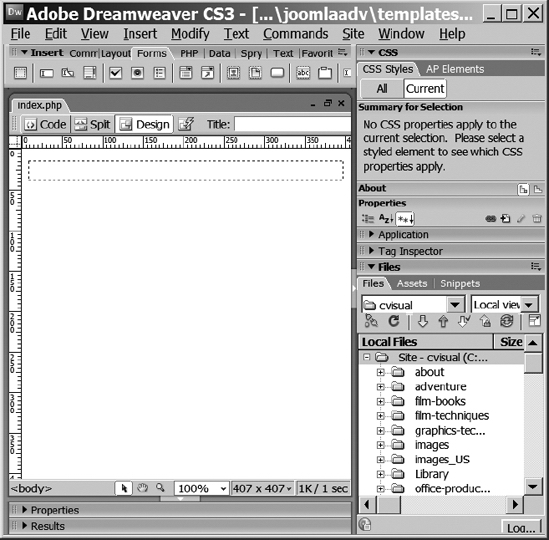
Figure 6-11. Dreamweaver will not effectively display most templates when they are directly loaded.
One useful method of overcoming this problem is to have the developer or the programmer of the template create dummy graphics and presentation items (such as style sheets, tables, headings, etc.). When the site is viewed in a browser, use the File ![]() Save As option to store the HTML rendition of the page with all the graphics and support files. Once saved to a local directory, the folder containing the support files will include the style sheets used by the page, as shown in Figure 6-12.
Save As option to store the HTML rendition of the page with all the graphics and support files. Once saved to a local directory, the folder containing the support files will include the style sheets used by the page, as shown in Figure 6-12.
The files can be given to the web designer for editing and formatting. As long as no new styles are added to the CSS files without consulting the developer, the web designer will have fairly free reign to make changes to the presentation, color scheme, graphics, and so on. Once the visuals are complete, the refined files should be returned to the web developer, who can integrate the new presentation items back into the template.

Figure 6-12. The CSS files of the web page can be found in the support files folder.
Adobe Dreamweaver
Adobe Dreamweaver is a popular HTML editor, and with good reason. The available features for traditional page editing—particularly the asset library and template functionality—make it second to none in manual site administration. For Joomla template design, you'll be using only a minority of the application's features, since all of the actual content management is handled dynamically by Joomla.
With Dreamweaver's ability to edit style sheets, PHP code, and raw HTML, it is perhaps the dominant web editor for Joomla templates. The program is loaded with features such as FTP upload of modified files that make it a compelling program for Joomla use. Dreamweaver is available for Windows and Macintosh operating systems. You can download a 30-day trial from the Adobe web site (www.adobe.com/products/dreamweaver) and try creating a Joomla template with it.
In Figure 6-13, I have loaded the dummy file version of one of my templates into Dreamweaver.
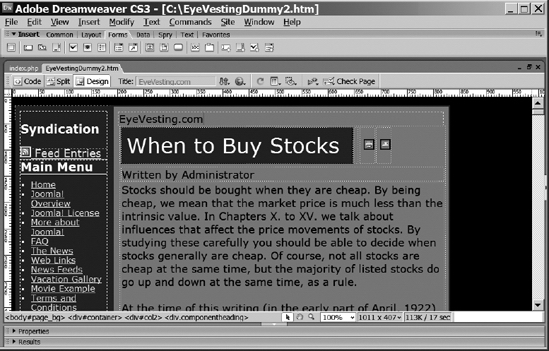
Figure 6-13. Dreamweaver does an excellent job of displaying a template.
Microsoft Expression Web
For a number of years, Microsoft FrontPage had been a popular editing option because it was included with the Microsoft Office suite of tools. In features and usability, however, it lagged far behind those offered by Adobe Dreamweaver. Finally, Microsoft replaced FrontPage with a much more powerful web editor called Expression Web, which has features competitive with Dreamweaver. Users may begin returning to Microsoft for web authoring. You can download a 30-day trial version at the Expression web site (www.microsoft.com/expression).
Expression Web can do a fair job of displaying a saved Joomla template. It also has extremely powerful editing capabilities in the HTML code editing view, as shown in Figure 6-14. Unfortunately, Expression Web will run only on the Windows platform, leaving out the huge market of Macintosh web designers. Furthermore, although the program has now added support for PHP, most of the features are focused on Microsoft's alternative ASP technology. These two drawbacks limit the program's usefulness for Joomla users.
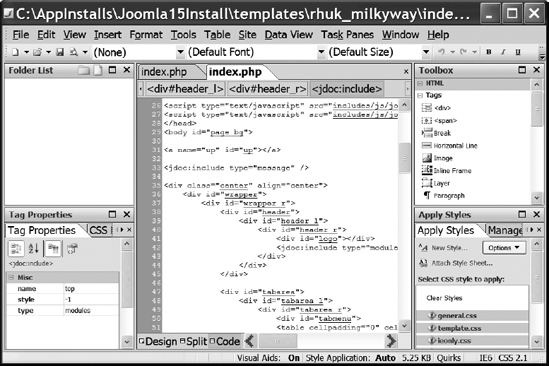
Figure 6-14. The code window display of a template in Expression Web
Nvu/KompoZer
Nvu (pronounced "EN-view"), available from www.nvu.com, is a free, open source alternative to the popular commercial programs. While not nearly as full featured as the commercial alternatives, Nvu has enough capability to handle basic template design jobs. Nvu is available for all three major platforms (Linux, Windows, and Mac). Best of all, there is a Joomla plug-in for Nvu, called Nvu Template Builder, that can be downloaded for free from www.open4g.com. Unfortunately, at the time of this writing, the Template Builder has not been upgraded to create Joomla 1.5 templates, so you will need to put Joomla in Legacy Mode to support them.
Once you've downloaded the plug-in, use the Tools ![]() Extensions menu option in the Nvu interface to install it. After it's installed, it will appear in the Extensions window, as shown in Figure 6-15.
Extensions menu option in the Nvu interface to install it. After it's installed, it will appear in the Extensions window, as shown in Figure 6-15.
What makes the plug-in so useful to a Joomla developer is the automatic handling of a number of tedious Joomla tasks. The plug-in can generate a prototype of a template, manage the templateDetails.xml file, and provide toolbar buttons (see Figure 6-16) that will insert the proper Joomla macro code for common modules and other PHP code.
While this may appear the perfect choice for Joomla editing, the program has several drawbacks. At the time of this writing, the program has many frustrating bugs and incorporates only a limited understanding of style sheets. These shortcomings limit the application's usefulness for any intermediate to advanced Joomla development. They may be resolved by the time you read this book; in which case, Nvu may become the perfect Joomla template tool.
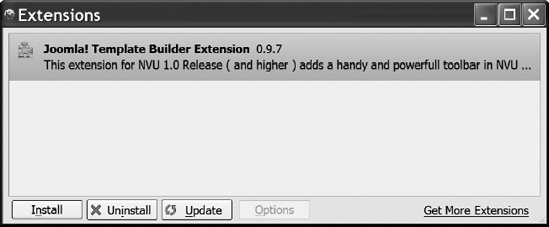
Figure 6-15. The Extension Manager will display the Nvu Joomla extension once it is added.
Note Nvu hadn't been upgraded in some time but, given that the project is open source, another developer has picked up the slack and begun remedying the bugs and other problems. The developer dubbed the new bug-fix version KompoZer (http://kompozer.net), but little of the foundation implementation has changed. So although the screens may say KompoZer, the application itself is, for the most part, Nvu.
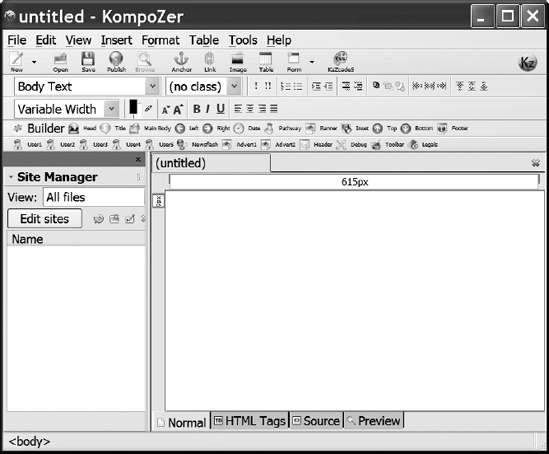
Figure 6-16. Vanilla Nvu/KompoZer with Joomla toolbar and site manager
Program Editors
Program editors are designed for coding rather than presentation. While they may offer some presentation capabilities, these editors are intended to provide easy management and editing of a coding project, and that is where their strengths lie. Three program editors useful for Joomla template creation are Eclipse, jEdit, and Leo. All three have unparalleled ability to search and replace (given that they each have an implementation of regular expressions) and manage code or code projects. They provide such capabilities as syntax and matching tag checking, and include extensive plug-in architectures.
Eclipse is the most powerful and robust, but its focus on Java development can make it unwieldy for smaller project development. The editor jEdit is perfect for single-file editing, but isn't built to manage entire projects (although there is a project plug-in available). Leo has strengths in project organization and documentation, but lacks a robust user interface, which can sometimes make figuring out how to access various functions a challenge.
Eclipse
Eclipse is a project-based integrated development environment (IDE) originally created by IBM for its Visual Age line of development products. IBM later transferred the license to the Eclipse Foundation (a not-for-profit foundation) and made the environment open source. Eclipse (www.eclipse.org) has become an open-ended IDE that can host development in a number of languages: Java, PHP, Python, C++, Cobol, and others. Eclipse's plug-in architecture allows it to be extended for almost any development need.
Extremely popular among Java developers, Eclipse has a fantastic, full-featured interface that excels at the development of rich web client environments such as Joomla. In fact, many of the Joomla development team members use Eclipse for the development of the Joomla CMS.
Of particular usefulness to a Joomla developer is the Eclipse PHP IDE project manager, shown in Figure 6-17.
Eclipse is most useful for extension development and as such will be covered more extensively in Chapter 13. For most template-creation tasks, it has more complexity than is required by the typical Joomla designer or developer. Designed for multideveloper code-based projects, Eclipse can be cumbersome for single-file editing.
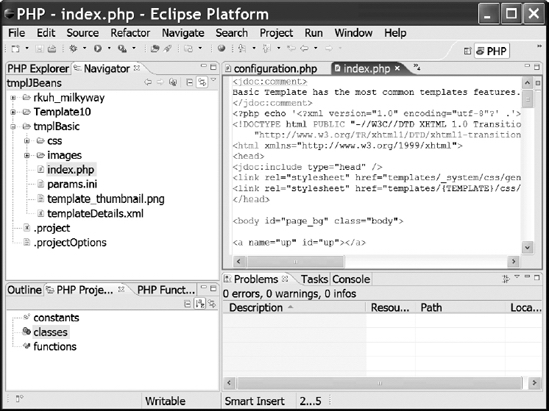
Figure 6-17. Eclipse provides a rich framework in which the PHP IDE project can run.
jEdit
Written in Java, jEdit (www.jedit.org) is a powerful open source program editor that is available for all platforms that can execute Java. Although jEdit itself is loaded with features, it is the thriving development community, which frequently releases industrial-grade plug-ins, that makes jEdit one of the strongest editors available. Extremely useful to Joomla developers, there are plug-ins for the following tasks (and many more):
- CSS editing
- PHP syntax checking
- Color-coded, side-by-side file differencing
- In-program FTP uploading
- Hypersearch (for searching through files on the hard drive) and regular expression searches
- Beautifying code formatting
- Tabbed open file access (like Firefox)
- PHP parsing
- XML formatting
For most basic PHP work, I use jEdit because of its numerous features and plug-ins. In Figure 6-18, you can see the default Joomla template style sheet loaded into jEdit. In the figure, the style sheet plug-in is displaying the properties of the currently selected div#logo style, which can be edited with drop-down menu selections.

Figure 6-18. One of the exceptional features of jEdit is the variety of plug-ins, such as this CSS editor.
jEdit has two primary drawbacks for Joomla development:
- The interface can sometimes be difficult to navigate. Written as a program editor, jEdit expects a high level of technical sophistication, and configuring it to match your preferences can sometimes be difficult.
- Its reliance on plug-ins means that some features are not handled as well as they could be. Some functions, such as XML handling, are handled clumsily by the plug-in, while other text editors (such as UltraEdit) handle them natively and elegantly.
These complaints are minor, however, compared to the power and versatility offered by this application. If you are doing any type of program editing, I highly recommended jEdit as your standard editor.
You were first introduced to the Leo (Literate Editor with Outlines) tool in Chapter 4, where you saw how to use it for planning the Joomla site structure. Leo is actually much more powerful than just an outlining tool. In fact, it can be used as a combined development and documentation system. Leo has complete capabilities for hosting source code (with full syntax highlighting) and also linking to external files to break them into virtual outlines.
For a simple example, let's say you were trying to develop a complex HTML web page. In an editor like jEdit, you would simply load the file into the editor and proceed with editing. However, what if the source code file were 20 pages long? Although not realistic for an HTML page, long files are not uncommon in complex PHP projects, especially ones that contain client-side JavaScript code.
For a long HTML page, it might be useful to divide the file into various parts, such as header, scripts, column1, column2, column3, and footer. In Leo, you can "virtually" break a file into just this sort of organization. Figure 6-19 shows a sample of such an implementation. I've taken a Joomla template and divided the file into outline headings, which are called sections. The arrows in the figure show the sections in the outline and their associated references in the code pane:
- The code begins with a section reference to
<< License >>. In the outline, I've drawn an arrow to point to the node that actually holds theLicensesection. Any text held in the body of that node is inserted into the file when it is saved!
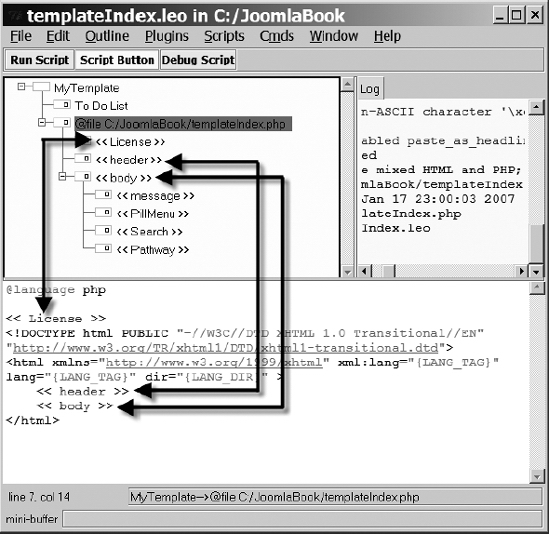
Figure 6-19. Leo can break a file into virtual sections for complete file organization.
<< header >>is another section. Clicking that section node of the outline will display the content held in that section, as shown in Figure 6-20. Only the header code is shown in the code pane. That allows you to focus on editing a particular section of a long file and organize it in the manner that makes the most sense.- Below the
headersection in the outline is the<< body >>section. Thebodysection is further divided into other sections that appear as child nodes.
You may begin to see the power of using Leo to organize a development project. However, this example barely scratches the surface. You may have noticed that the example shows only a single file reference. In fact, all the files of the project can be held in the outline for complete project construction and management. Furthermore, any nodes that are placed in the outline, yet begin with the @ignore directive, will not be stored in the output files. That means you can place complete documentation within the outline without it interfering with the code.
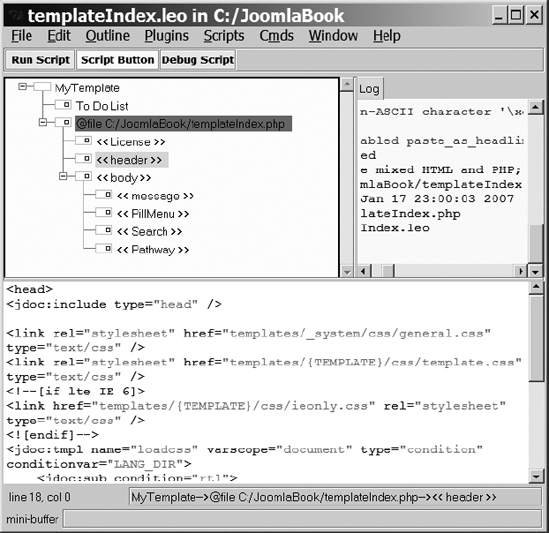
Figure 6-20. The header section shows the header code and only the header code in the bottom pane.
As you progress through this book, you will see other examples of Leo for optimizing Joomla projects. The power for development the Leo editor allows cannot be underestimated. And if you know how to program in the Python language, you can access the core Leo framework to automate nearly any task.
Creating a Real Template
While it was useful for learning the basic structure of a template to create the primitive Hello Joomla template from scratch, most templates are built from an existing foundation or prototype template. It is much easier to use a bare-bones template and add the features you want than to reinvent the wheel. In this section, I'll detail a core template that you can reuse for most of your future templates.
The bare-bones template will be designed around the EyeVesting site model introduced in Chapter 4. Feel free to make any modifications that will more directly address the needs of the Joomla site that you intend to create.
Pieces of the Puzzle: Template Structure
To keep the Hello Joomla template as simple as possible, it was boiled down to the minimum two required files. For most templates, though, three primary files define how the site will appear:
templateDetails.xml: Describes the template files to the Joomla system. You created a basic version of this file for the Hello Joomla template. An actual usable template will require a details file that uses many more parameters.index.php: Contains all of the primary HTML and PHP code that governs the execution of the site. The Hello Joomla index file was extremely simplistic and contained little of the document description information that is important for proper page rendering.template.css: Contains the style settings (font, borders, element positions, etc.) of the main page. This file may override existing styles set for sections, categories, or individual articles.
These three files form the core of almost every template; a real-world template must have at least these three files to be used effectively.
Tip When you create a template and want to share it with the public (or sell it for that matter), you should include some type of usage license that defines the way a user can and cannot use the template. I suggest that you read the excellent explanation of free software licenses on Wikipedia (http://en.wikipedia.org/wiki/Free_software_license). It will give you an overview of general software licensing issues and help you to understand which type of license you should reference in your template. I usually release open source software with a BSD License or GNU Lesser General Public License (LGPL) so commercial vendors can release extensions if they want without fear of license violations.
In Figure 6-21, I've created a simple diagram that highlights some parts of the default Joomla installation, with labels pointing out which style sheets are responsible for each piece of the display.
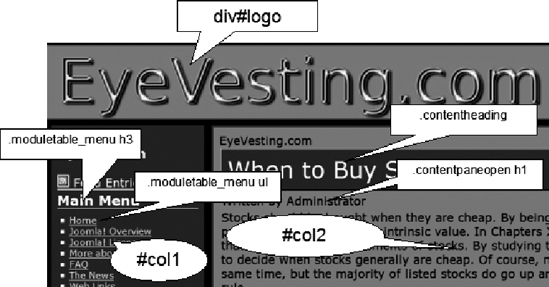
Figure 6-21. Styles of a Joomla page display
Beyond the basic three files, most templates also include the following:
- Thumbnail graphic file: Located in the root of the template directory, this file is a 140-by-90 image with a filename of
template_thumbnail.png. This file is displayed by Joomla as a template preview when a mouse-over event occurs over the template name in the Template Manager of the Administrator interface. - CSS directory: A separate directory named
/csscontains any style sheets used by the template. The main style sheet of the template typically has a filename oftemplate.css. - Images directory: A separate directory named
/imagescontains any graphics used by the template.
The naming and organization for these three items are not rules that the Joomla system enforces, but following these conventions can make a template more comprehensible for later modification. You will find that most existing templates follow these guidelines.
For template distribution, all of the template files are contained within a ZIP or tarball archive. Joomla can read either of these archive types to extract the items they contain and place the files and folders in the /templates directory. That allows you to add a new template via the Joomla Administrator interface, instead of needing to manually create the directories and upload the files through FTP software.
Begin your template construction by creating the empty files and folders you need inside the /templates directory. You will need to create a template directory and two directories inside that one. Since this template will be a two-column rendering, I named the main folder /tmplTwoCol. I created the following three paths:
/templates/tmplTwoCol

/templates/tmplTwoCol/css

/templates/tmplTwoCol/images
Place an empty index.php file and an empty templateDetails.xml at the root of the new template directory. Place an empty template.css file in the /css directory. When you begin your site construction, you can place the code, content, and images in their proper locations.
Step-by-Step Template Creation
A Joomla template is a combination of three key elements: graphics, PHP/HTML code, and one or more style sheets. By methodically working through the process of creating a template, you will have a path to follow when you want to make a new template for your future needs.
You can produce a new template by following these steps:
- Choose a color scheme for the site.
- Create style sheets that match the primary color scheme.
- Choose a font scheme that flatters the content.
- Create the banner graphic.
- Create the
index.phpfile. - Create the
templateDetails.xmlfile.
Once you have implemented your basic template, you can easily upgrade it in the future. Since all web pages in Joomla are generated dynamically, changes you make to the template will be reflected instantly on every web page of your site. Provided you stay within a few well-defined boundaries, just about any changes can be made to the template, and the web site will still function properly.
Choosing the Color Scheme
Most people without web design experience are either intimidated by the amount of knowledge required to make a site design look professional or simply build the site without paying any attention to aesthetic aspects of the presentation. This section will help you chart a middle course between the two extremes. By following a few basic guidelines, you can have a professional-looking web site without spending years learning graphic design.
One of the most important aspects of site design is choosing a color scheme. Your site may have minimal graphic images and only a few well-chosen fonts, but as long as the color scheme is harmonious and flattering, the site will appear clean and professional.
RGB Color Representation
To begin, you need to understand that there are several basic ways to represent color. The most commonly used method on computers is known as RGB, which stands for Red, Green, Blue.
With RGB, a computer stores the color information for every single dot (or pixel) displayed on the screen using three numbers, each representing the quantity of red, green, or blue that needs to be mixed to show a particular color. Most typically, each number falls within the range of 0 to 255. Therefore, a pixel that is completely red has an RGB value of (255,0,0). The pixel has the maximum amount of red and no green or blue. A green pixel is stored with the values (0,255,0), and a blue pixel is stored as (0,0,255). To get yellow, equal parts of red and green are mixed, for a value of (255,255,0). For any color displayed, the three colors are mixed in various quantities to produce the desired color hue and shade.
While the RGB color model is very useful for computers, it is less useful for humans. It is difficult for humans to think in terms of the color-mixing numbers. To make things simpler for us, programmers have devised color-picker interfaces, such as the one shown in Figure 6-22. Even with a color picker, though, it is difficult to systematize which colors will go well together to provide an attractive interface.
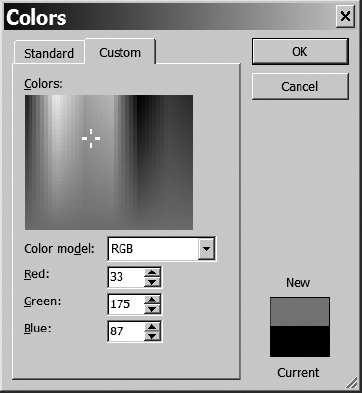
Figure 6-22. A color-picker interface allows the user to click the color and select an RGB value.
Choosing Your Primary Site Colors
If you pay close attention to most attractive web sites, you'll notice that the color scheme is generally very simple. In fact, selecting two colors that work together and then using different hues of these colors can make a quick by-the-numbers color scheme. What colors work together? Typically, you want to select a dark color and a light color to provide good contrast. The following are some typical color pairs:
- Black and white
- Black and yellow
- Blue and yellow
- Red and green
- Red and blue
- Purple and yellow
- Red and white
Although you can choose a color pair and use the colors directly on your site, a site rendered in these colors will look very simplistic and unprofessional. You need to use various shades of your color pair to create an integrated color scheme. Selecting shades of the color pair is no easy task in RGB. To solve the problem, you will need to temporarily leave behind the RGB color model.
Tip Want a great model for choosing effective primary colors? Check out sports logos! Because of the large number of media and materials that are used to reproduce team logos and insignias, professional sports organizations such as the NFL and NBA spend a tremendous amount of energy and expense finding two or three colors that will work together to provide a distinctive team emblem. Checking out the colors of some professional sport teams can help you find your site color pair.
The Hue-Saturation-Brightness (or HSB) Color Model
While the RGB color model is excellent for computers, a web designer will find the Hue, Saturation, Brightness (HSB; also called Hue, Saturation, Value, or HSV) model much more useful. Instead of mixing the three different primary colors, HSB colors are handled in a completely different fashion:
- Hue determines the main color, such as blue, green, purple, yellow, orange, and so on. The value stored for the hue is like a location pointer on a rainbow. A low value means red, a little higher value provides a hue of yellow, higher still is blue, and so on.
- Saturation indicates how much of the color is present. A completely saturated color will be an extremely bright color, like those used in children's toys or present in Technicolor movies like the Wizard of Oz. A completely desaturated color will appear to be gray. Think of leaving a color print out in the sunlight. Slowly but surely, the colors will fade or desaturate.
- Brightness or value determines how bright the color can be. With no brightness (a value of 0), the color will appear completely black. With a maximum value, the color will appear as bright as the hue and saturation will determine it to be. To understand how brightness works, imagine a colored piece of paper (of whatever hue and saturation values) sitting in a dark room. With the lowest brightness, the room is completely black and the sheet will appear black. As you turn the knob to increase the light in the room, you see the color with more and more clarity, until you reach the highest value where you can see the color paper perfectly (even if it is faded or desaturated).
You may be wondering how the HSB color model can help you with your Joomla site design. It's very simple actually. By increasing and decreasing the brightness value of a particular color, you can obtain perfectly complementary shades of your primary colors without any additional work! Therefore, if the banner for your site is a dark blue, you can obtain a lighter tone to use as a background behind the text by simply increasing the brightness.
Choosing a Light or Dark Site Theme
You have presumably chosen your color pair, but now you need to consider how you want to use those two colors on your site. Your two primary choices are a light site theme or a dark site theme. Choosing either light or dark will determine the dominant feel of the site.
Suppose that your two colors are black and white. If you make your text black, it's likely a majority of the display will be white, like black lettering on a sheet of white paper. That means that your site will likely appear shiny, bright, light, or airy to a visitor. Such a scheme might be perfect for a touring bicycle site, a small-town bakery, or a search engine like Google. It might not be the best choice for a site representing a jazz club or a new first-person-shooter videogame.
On the other hand, if you make the text white, the majority of the remaining space will be black. That produces a completely different effect, doesn't it? The site might feel solid, edgy, mysterious, or lush. This theme might be perfect for a hip sunglasses manufacturer or an investment bank. It might not be the best choice for a handicraft or computer dating site.
More realistically, you may have chosen a very light yellow and a very dark blue. With those selections, setting the text in the blue and the background in yellow will produce a light site theme. Doing the opposite, with yellow text on blue background, will produce a dark site theme.
Select how the colors will be used on your site now, so you can more effectively generate the hues that you will need.
Using HSB to Pick Your Site Colors
Now that you've chosen some colors and understand generally how they will be used in your template, you can create a simple HTML page to help you discover the color hues you will need to make your site appear professional. This page will display colors, and convert RGB values to HSB values and vice versa.
Open your text editor and enter the code shown in Listing 6-1.
Listing 6-1. RGB/HSB Color Converter
<html>
<head>
<script language="JavaScript1.2" type="text/javascript">
<!--
function rgbChange () {
updateSample();
}
function testVal(testField) {
if(isNaN(testField)) { testField = 0; }
if(testField<0) { testField = 0; }
if(testField>255) { testField = 255; }
return (testField);
}
function toHexStr(decVal) {
if(decVal<16) strVal="0";
else strVal="";
strVal += (decVal-0).toString(16);
return(strVal);
}
function updateSample() {
r = testVal(document.frmRGB.R.value)
g = testVal(document.frmRGB.G.value)
b = testVal(document.frmRGB.B.value)
hexStr = "#" + toHexStr(r) + toHexStr(g) + toHexStr(b);
document.frmHex.hexVal.value = hexStr;
document.bgColor=hexStr;
}
function convertHSB() {
h = document.frmHSB.H.value/360
s = document.frmHSB.S.value/100
v = document.frmHSB.B.value/100
hi = parseInt(h*6);
f=1;
var_h = h * 6;
var_i = Math.floor(hi);
p = v*(1-s);
q = v*(1-s*(var_h - var_i));
t = v*(1-s*(1 - (var_h - var_i)));
switch(hi){
case 0: r=v; g=t; b=p; break;
case 1: r=q; g=v; b=p; break;
case 2: r=p; g=v; b=t; break;
case 3: r=p; g=q; b=v; break;
case 4: r=t; g=p; b=v; break;
case 5: r=v; g=p; b=q; break;
}
document.frmRGB.R.value = Math.round(r*255);
document.frmRGB.G.value = Math.round(g*255);
document.frmRGB.B.value = Math.round(b*255);
updateSample();
}
function convertRGB() {
r = testVal(document.frmRGB.R.value)/255
g = testVal(document.frmRGB.G.value)/255
b = testVal(document.frmRGB.B.value)/255
v = Math.max(r, g, b);
myMin = Math.min(r, g, b);
if(v==0) s=0;
else s=1-(myMin/v);
if(v==myMin) h=0;
else
switch(v){
case r:
if(g>=b) h=60*((g-b)/(v-myMin));
else h=60*((g-b)/(v-myMin))+360;
break;
case g:
h = 60*((b-r)/(v-myMin))+120;
break;
case b:
h = 60*((r-g)/(v-myMin))+240;
break;
}
document.frmHSB.H.value = Math.round(h);
document.frmHSB.S.value = Math.round(s*100);
document.frmHSB.B.value = Math.round(v*100);
}
-->
</script>
</head>
<body>
<h1>RGB/HSB Convert</h1>
<table width="200" border="1" bgcolor="#FFFFFF">
<tr> <td>
<form name="frmRGB" id="frmRGB">
<label>R (0-255)
<input name="R" type="text" id="R" accesskey="R"
onKeyUp =javascript:rgbChange(); value="255" size="5">
</label><p>
<label>G (0-255)
<input name="G" type="text" id="G" accesskey="R"
onKeyUp =javascript:rgbChange(); value="0" size="5">
</label></p><p>
<label>B (0-255)
<input name="B" type="text" id="B" accesskey="R"
onKeyUp =javascript:rgbChange(); value="0" size="5">
</label></p><p>
<label>
<input name="cmdConvertRGB" TYPE="button"
value="Convert >" onClick=javascript:convertRGB();>
</label></p>
</form></td><td>
<form name="frmHSB" id="frmHSB">
<label>H
<input name="H" type="text" id="H" size="5">
</label><p>
<label>S
<input name="S" type="text" id="S" size="5">
</label></p><p>
<label>B
<input name="B" type="text" id="B" size="5">
</label></p><p>
<label>
<input name="cmdConvertHSB" TYPE="button"
value="Convert <" onclick=javascript:convertHSB()>
</label></p>
</form></td></tr>
<tr><td>
<form action="" method="post" name="frmHex" id="frmHex">
<label>Hex
<input name="hexVal" type="text" id="hexVal">
</label>
</form></td>
<td> </td>
</tr>
</table>
</body></html>
Save the file to your local drive as RGB_HSB_converter.html. Open the page in your browser, and you should see a display like the one shown in Figure 6-23. When you change the red, green, and blue values, the background will automatically change color to match the new entries.
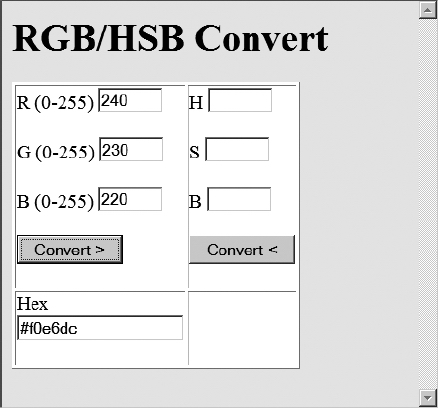
Figure 6-23. The RGB/HSB color converter lets you enter color values for conversion and display.
Enter the RGB value of the first color you have chosen for your color scheme. Notice that the Hex text box near the bottom displays the RGB value in hexadecimal notation. That is the notation used by HTML, so you'll need to record that value so you can put the color into the Joomla template.
I've chosen a color close to evergreen for my dark color. It has an RGB value of (88,161,85) with a hex value of #58a155. For my light color, I'm going to go with a simple white.
Click the Convert > button to fill the HSB fields with numbers that are used to represent that color in the HSB color model. In the case of my first theme color, the HSB value generated was (118,47,63). Here is where the magic begins. I know I'm going to need a darker version of this color for backgrounds and shadows. Therefore, I lower the brightness value until I think it looks right. In this case, I set it at 26, for an HSB value of (118,47,26).
Now click the Convert < button to render the color back into RGB and record the new RGB value (along with the associated hex value). For my darker shade, I got an RGB value of (36,66,35) and hex of #244223. Do you see how it would be difficult to find that color using the RGB color model?
Open your text editor or word processor and make a color chart like the one shown in Figure 6-24. Fill in the details for your color scheme. I've included spaces for a bright color for both of your theme colors. The bright color can often be used for highlights.
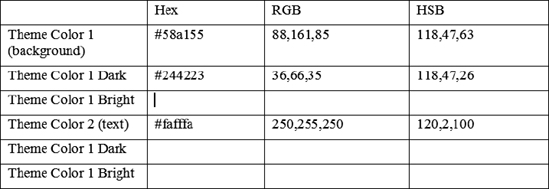
Figure 6-24. A simple color chart for your theme will help you build the template.
You now have a complete color scheme for your template! You'll use these colors for setting up any graphics on the site. You'll also use it to define the colors within your style sheets.
Creating the Style Sheets
With the basic color scheme of the site decided, you can begin defining the visual presentation of the site. Most of the display is handled by the style sheets loaded by the template. Joomla has been widely embraced because it makes style sheets an integral part in the construction of a template.
Rather than using special template-formatting language for the visual component of a template, Joomla embraces existing and popular web standards. CSS is the standard; it's widely accepted and easy to validate to World Wide Web Consortium (W3C) standards.
If you already know all about CSS technology, you can skip the next section and get right to the special considerations of creating Joomla style sheets. If you don't know much about CSS, you're in for a treat! Browser implementation of style sheets is one of the most powerful and labor-saving technologies available for web site creation. Learning how to use CSS will greatly enhance your web skills.
What Is CSS?
CSS was initially invented to solve problems of uniformity and compatibility for HTML-formatted pages. As web pages became more stylistically complex with multiple fonts, color schemes, and standardized formatting (of tables, line breaks, paragraphs, etc.), the HTML coding for each page grew unwieldy. As web sites matured to encompass hundreds or thousands of pages, maintaining a sitewide visual style became an almost impossible task. Enter CSS.
A CSS file holds definitions of various text and graphical elements (such as heading 1 style, link color, etc.). For example, the style definition of a heading 1 that has a font of Verdana, a size of 18 pixels, and a red color would appear in the style sheet as follows:
h1 {

    font-family: Verdana, Geneva, Arial, Helvetica, sans-serif;

    font-size:18px;

    color: #FF0000;

}
Any web page that includes this definition and uses text enclosed by <h1> tags will get this formatting. This style will override the default version of the h1 style. Styles can be much more fluid than redefining existing tags. You could create a custom style named mySmall, for example, like this:
.mySmall {

    font-family: "Times New Roman", Times, serif;

    font-size: 6px;

    vertical-align: top; margin: 3px;

}
To format a paragraph with this style, you need only include a class attribute within the HTML tag definition:
<p class="mySmall">This text is small!</p>
Most often, style definitions are not stored within the HTML of a page (although they can be included in a file between <style> tags). Instead, they are stored in a separate file with the filename extension of .css. With the styles placed in a file, any web page that needs formatting in the styles defined in the CSS file need only include a single line of code in the HTML of the page like this:
<link rel="stylesheet" href="/css/styles.css" type="text/css" />
The browser will automatically retrieve the style definitions and format the page to match them.
Note If you're not very familiar with HTML coding and the information in this chapter seems slightly confusing, please stick with it. Almost everything you need to do to create a template can be accomplished with tools that will do most of the coding for you. You can use some of these tools (such as the jEdit CSS plug-in) with their simple GUI interfaces to accomplish many tasks.
Common CSS site files are just one of the many advantages provided by using a CSS. At the time the CSS technology was being born, Microsoft and Netscape were engaged in a struggle for dominance of the web browser market. As each company released new versions of their browsers at a lightning pace, capabilities were becoming more robust. However, the platforms were so varied (Linux, Mac, Windows, etc.), sometimes the browsers adopted by users were hobbled by technical limitations of the platform on which they ran—such as a lack of standard fonts.
To resolve this problem, a CSS file can provide formatting choices that offer one or more options, and the platform could choose an option to best display the content. That means that a site using a CSS file can modify the presentation of the page based on the browser that is accessing it. For example, a CSS file could have explicit styles that are used only when a cell phone browser accesses it. This type of presentation logic is perfectly suited for a CMS such as Joomla, where all content is displayed through a number of site templates.
Using CSS to define a Joomla template allows the content to be completely separate from the presentation. Content articles are stored in the database, while the presentation is contained in the CSS files. One style can be replaced with another (perhaps based on the browser type addressing the page), and instantly, the entire site will take on a new look without any modification of content.
Tip One objective you should set for yourself when creating a new template is to minimize the use of tables for layout. Generally, layout can be controlled much more effectively when stored as elements of a style sheet in a CSS file. Using a CSS file to control layout also promotes cleaner coding for the web site and greater likelihood that multiple browsers and search engine spiders (detailed following) will be able to correctly interpret the content of the site.
The CSS standard includes numerous features, such as font alternatives, that make it likely that a browser can properly display a web page, regardless of whether the browser is formatting for a 21-inch flat screen or 3-inch cell phone display.
Search Engine Considerations and CSS
Another reason why implementing CSS can be helpful is that it is machine-readable. For massive search engines such as Google, it would be impossible for individual workers to read and index the tens of millions of web pages that are available for searching. Therefore, search engine companies have technology (called web spiders) that reads a web site and creates an internal summary of each web page. These summaries are indexed and filed where the search engine algorithm can find them if they match a user query.
The more machine-readable a web page is to the web spider, the greater chance the search engine algorithm will understand it and can guide visitors to that page. Conversely, the less machine-readable it is, the more "invisible" it will be to search engines. A simple example of search engine invisibility is a web page with a graphic banner that reads XYZ Company. The search algorithm won't be able to read the graphic at all; it reads only text. Therefore, even if the graphic shows the company name in letters 5 inches tall, it will be invisible to the web spider. If earnest web searchers typed "XYZ Company" into their browser, they would not find the page.
Let's say that the web designer was a little astute and provided a text alternatative to the graphic through the alt attribute defined by the HTML standard. Now the search engine would see that the graphic represented the text XYZ Company, but how important would the search algorithm consider this graphic over the other graphics on the page? Other graphics with alternate text of screen divider, home link, and CEO photo would compete with the banner for the web spider's attention.
A much better site, in terms of being found by a search engine, is a CSS-based page. That web page would have a central banner with the text XYZ Company defined as a heading 1 style. Immediately, the search program would recognize that this heading is one of the most important parts of the page and rank it appropriately. The heading 1 style could be defined in the CSS file to use a special font, color, horizontal width, and so on to ensure the display would still be impressive.
This example is not very realistic on the surface, since most companies want a central banner graphic that expresses their image exactly. Additionally, there are other ways to make sure the search program knows the important elements of the page, and you'll learn more about these in Chapter 12.
But how about individual articles? Many web sites use custom graphics for the titles of articles or even departmental sections of their web sites. If they instead used CSS formatting, the web spider would be able to much more accurately create a search summary. That means more hits, more traffic, and maybe more money for XYZ Company.
Joomla! Template CSS
With that introduction to the power of CSS out of the way, you can begin to examine the Joomla CSS file to understand what types of alterations you might want to make. The rhuk_milkyway template included with the standard Joomla installation contains two dozen different styles that define the presentation of the template.
In Listing 6-2, you can see a sampling of the styles that define the template page. Notice that each style defines only a small number of parameters. Styles are essentially hierarchical, so when the styles of links are defined in the first style (a:link and a:visited) for the page, all other presentation on the page will use these styles unless explicitly overridden.
Listing 6-2. With Only a Few Styles, the rhuk_milkyway Template Defines the Primary Pieces of a Page
a:link, a:visited {

    color: #1B57B1; text-decoration: none;

    font-weight: normal;

}


#page_bg {

    height: 100%;

    padding: 10px 0;

    margin-bottom: 1px;

    background: #0C3A6D;

}


div.center {

  text-align: center;

}


div#wrapper {

        height: 100%;

        background: #f7f7f7 url(../images/mw_shadow_blue_l.png) 0 0 repeat-y;

        margin-left: auto;

        margin-right: auto;

        min-width: 750px;

        max-width: 1050px;

}


div#wrapper_r {

    background: url(../images/mw_shadow_blue_r.png) 100% 0 repeat-y;

}


div#header {

    background: url(../images/mw_header_blue_t.png) 0 0 repeat-x;

}


div#header_l {

    background: url(../images/mw_header_blue_t_l.png) 0 0 no-repeat;

    position: relative;

}

.ol-foreground {

    background-color: #f6f6f6;

}


.ol-background {

    background-color: #666;

}


.ol-textfont {

    font-family: Arial, Helvetica, sans-serif;

    font-size: 10px;

}
As you can see from these styles, you can define almost every aspect of presentation—from text styles to fonts to margins to borders. You can also define the more fundamental parts of layout, including columns, absolute positioned elements (such as images), and float blocks. Unfortunately, many templates (including rhuk_milkyway) don't take advantage of the CSS capabilities for layout.
Instead of using CSS, many templates use tables to perform layout functions. Basic layout might appear like this:
<table>

    <tr>

        <td>Column1</td><td>Column2</td><td>Column3</td>

    </tr>

    <tr>

        <td>Home</td><td>ArticleContent</td><td>ItemPrice1</td>

    </tr>

    <tr>

        <td>FAQs</td><td>ItemName2</td><td>ItemPrice1</td>

    </tr>

</table>
Using tables is problematic. It requires a great deal of code (especially if spacer images are used) and it is confusing to read. It is also difficult for search engines to understand, and that makes it less likely that your site will be found by people using the search engines. Furthermore, changes to the layout require a significant amount of code revision.
Creating three columns using a style sheet, however, requires simple CSS code, like this:
#col1 {float:left;width:20%;}

#col2 {float:left;width:60%;}

#col3 {float:left;width:20%;}
The code to place content within each column would look like this:
<div id="col1">Column1<br>Home<br>FAQs</div>

<div id="col2">MyArticle</div>

<div id="col3">Column advertisements </div>
Isn't that much clearer? Search engines think so. However, the navigation and menu content held in col1 still appears first in the code order, while col2 likely holds the most important content of your site. Since search spiders think the content that appears earlier in a web page is more important, this isn't an optimal way of organizing the site.
There is a method of sorting the columns so that even though the display will match the one created with the preceding code, the col2 content will appear first in the HTML code, making it also the first text the search engine scanning program will see (and therefore on which the search engine will place the most importance). You'll learn about this technique in Chapter 12.
Note When you study CSS technology, you will come across many frustrating implementation choices made by Microsoft for Internet Explorer 6 that defy the CSS standard. You may have noticed that Joomla templates generally include a style sheet called ieonly.css. It includes definitions that specifically handle the Internet Explorer 6 way of doing things. I will try to detail as many of the Internet Explorer 6 pitfalls in this book as possible. However, I would recommend that you always test your page with Internet Explorer and at least one other browser so you can have confidence that your style sheets are displayed correctly, no matter which browser is being used. Note that many of these problems have been corrected in Internet Explorer 7.
Modifying the column settings for all of the pages that use a template is as simple as changing the column definitions in the single CSS file. For example, you can add an internal column margin to provide some spacing for the content by adding the margin attribute. Unfortunately, Internet Explorer 6 ignores this attribute, so it requires a little extra work to make the template Internet Explorer 6 compatible. To include spacing or a "gutter" around each column, you will need to add a <div> element for Internet Explorer 6 that contains the spacing information, like this:
<div id="col1">

    <div class="gutter">

        <jdoc:include type="modules" name="left" />

    </div>

</div>
Now you can set up a CSS style that will add a margin when any browser displays the page. In the CSS file, adding this line will do the trick:
.gutter {padding:8px;}
Making a Two-Column Layout with CSS
To create a new template that has a two-column setup, you'll need to configure the CSS file to handle the spacing for the page. If you are already familiar with creating HTML tables, the CSS formatting will be familiar.
A CSS layout can be considered much like the newspaper layout model described in Chapter 4 as it applies to a Joomla page. Each panel is like a box that can hold contents (most often text) and has attributes such as border, border width, padding, and margins. Figure 6-25 shows a simple diagram of a panel and its various attributes.
Margins for a panel are always transparent. A background within the panel will include all of the area inside the borders. For all of the various attributes, different widths may be set for the different sides. For example, a border could have a 1-point top border and a 3-point bottom border.
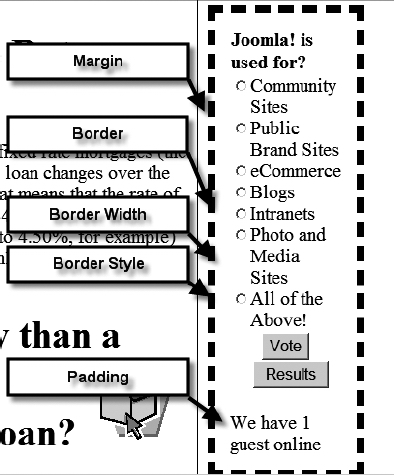
Figure 6-25. A CSS panel has attributes such as border, border width, padding, and margins.
Panels can be created within a hierarchy, which means that a set of panels can be held within a panel, which in turn is held in another panel. Each child panel will inherit most of the styles of the parent panel, so a child panel with no background color defined will use the background color defined by its parent panel.
To define a panel, there are two primary CSS box types: in-line and block. In-line boxes are treated by layout in the same manner as a piece of text or an image. Block boxes live within formatting tags such as <p>, <div>, or <table>. The display attribute of a web page element such as <div> will determine what type of box is being used. If the display attribute is set to none, the box will be hidden from the browser view. In fact, toggling the display attribute between none and another display setting is the way many sites make HTML items (such as menu options) appear and disappear when a user clicks them.
For positioning, CSS supports three different methods: normal, float, and absolute. Normal positioning makes block boxes flow vertically, and it makes in-line boxes flow from left to right. The float elements can be placed on the page relative to other elements and absolute elements can be located anywhere on the page using absolute coordinates.
Note When one vertical block is followed by another vertical block, the vertical margins are collapsed. If two blocks appeared sequentially in a layout, for example, the bottom margin of the upper box would not be added to the top margin of the lower box. This would create great chasms of white space between content. Instead, the larger of the two margins is selected and used as a shared single vertical margin.
You can also have a box with a relative position in relation to another page element. The box can have a number of offsets that will position the box relative to the flow that came before it.
For your two-column template, enter the code in Listing 6-3 and save the file as template.css in the /css folder in your template folder. The index file will access these styles for displaying the content.
Listing 6-3. The CSS for the Two-Column Template
div#logo {

    width: 110%; height: 100px;

    margin-left: −10px;

    background: url(../images/LSlogo.jpg) left no-repeat;

    border: 1px solid #244223 ;

    padding: 20px;

}


#col1 {

    float:left;width:15%;

    background:#244223;

    padding: 10px;

}

#col2 {

    float:left;width:75%;

    border:3px solid #244223;

    background:#58a155;

    padding: 10px;

}


#page_bg {

    font-family: Verdana, Arial, Helvetica, sans-serif;

    height: 100%;

    background: black;

}


.moduletable_menu, .moduletable

{

    color: white;

    border-bottom: 1px solid #fff;

    margin-bottom: −1em;

}


.moduletable_menu h3 {

    border-bottom: 1px solid #FFFFFF;

    margin-bottom: 0px;

}


.moduletable_menu ul {

    margin-left: 10px;

    margin-top: 0px;

    padding: 10px;

    font-size: 80%;

    list-style-type: square;

}


.moduletable_menu a:link, .moduletable a:link {

    color:yellow;

}


.moduletable_menu a:visited, .moduletable a:visited {

    color:cornsilk;

}


.contentheading {

    border-bottom: 2px solid Black;

    border-right: 2px solid Black;

    border-left: 1px solid LightGreen;

    border-top: 1px solid LightGreen;

    background:#244223;

    color: white;

    padding: 10px;

    font-size:2em;

}


.contentpaneopen h1 {

    font-size:1.5em;

    border-bottom: 1px solid #244223;

    padding: 10px;

}
In the style sheet, you can see that the styles like .contentheading are overriding standard Joomla styles. That is an aspect of Joomla that provides the template so much power: content is generated using published style sheet names. That means that any content generated by the system can be formatted using any style sheet attribute included in CSS.
Note Both Mozilla Firefox and Internet Explorer have tools that will display the styles used on a web page that can help you learn which styles you'll want to modify for your template. For Firefox, the Web Developer extension (https://addons.mozilla.org/en-US/firefox/addon/60) and the Firebug extension (https://addons.mozilla.org/en-US/firefox/addon/1843) allow you to examine the styles used on the page and even perform a live modification and application of the changes to see them instantly. For Internet Explorer, go to the Microsoft web site and search the downloads section for the Internet Explorer Developer Toolbar.
Choosing a font scheme is no easy task. The fonts used for your site should be selected for taste as well as availability. If you were to select a font like Smudger LET, the odds are low that a majority of users would have that font on their system. Therefore, if you insisted the text appear in that font, any content that used such a font would need to be rendered as a graphic. Using a lot of rendered text makes maintaining a site onerous with the additional drawback that the technique is not very search engine–friendly, as explained in the "Search Engine Considerations and CSS" section earlier in this chapter.
Tip If you really want to use unique, stylized fonts for some of the headlines in your web page, you might consider using the sIFR (Scalable Inman Flash Replacement) technology (www.mikeindustries.com/blog/sifr). The sIFR technology lets you define a page with normal text, fonts, and styles (so a search engine spider sees it properly). Once the page is loaded, however, JavaScript code executes to replace specified CSS styles with little panels of Adobe Flash. The panels have, embedded within the Flash SWF file, any custom font that you set up. To the user, this happens instantly, so the site displays using precisely the fonts you want to use for a special visual effect.
With CSS definition, the display of a web page is created using styles as a set of guidelines more than a set of rules. A modern browser on a system that has the desired fonts installed will be able to display exactly what the designer intended. However, on a less current system, the web visitor will still get a decent approximation of the design intent.
One of the ways CSS achieves this flexibility is by providing a feature known as font alternatives. Font alternatives are a great example of providing power to the web designer and, at the same time, trying to respect the user with the lowest common denominator system. For a cutting-edge web page, a web designer may want to use a font such as Gill Sans MT Condensed to achieve just the right look. However, if the font is unavailable on the visitor's browser (fairly likely if a cell phone browser is used), the site presentation may be ruined, especially if the browser display fails outright or substitutes an inappropriate monospaced font. The designer can minimize this problem by using a CSS file with font alternatives. Here is an example of a line using font alternatives:
font-family: Gill Sans MT Condensed, Geneva, Arial, Helvetica, sans-serif;
When the browser displays the text, it first will attempt to find the Gill Sans MT Condensed font on the system and use that font for display. Failing that, it will attempt to use Geneva, and so on, down through the list of options until it reaches the lowest common denominator of sans-serif. For a serif font, the lowest common denominator alternatives might be as follows:
font-family: "Times New Roman", Times, serif;
Serifs are the little extra lines or curves on individual letters. For example, the capital letter T in a serif font has extra lines drooping down from the top line and another small line on the base. Fonts without these graphic additions are said to be without (or sans) serif. Therefore, on the most basic level, fonts can be categorized as one of two types: serif and sans-serif.
You may have noticed my font choices in the #page_bg style, in the template style sheet (Listing 6-3):
font-family: Verdana, Arial, Helvetica, sans-serif;
I wanted to use a sans-serif font for the site, and Verdana is a very clean and modern sans-serif font. However, not all systems have Verdana, so the style includes substitute fonts that will provide an approximation of the desired look.
Once you choose to make your site a serif or sans-serif presentation (and you can use both on a site), you need to select individual fonts. Selecting typefaces and font families is more of an art than a science. So I have a shortcut: imitate the professionals!
Find a web site that you think looks good and supplies the font look you would like your site to mirror. For an example of contemporary design, I might examine www.wired.com for font choices, since the publishers of that site (and magazine) expend a great deal of effort on the site's graphic design. Once your desired model site is displayed in your browser, choose the option to save the entire page under the File menu and all of the files of the site will be written to your local drive.
Tip Whenever I want to save a web page and its associated files, I use the Mozilla Firefox browser. For reasons I don't understand, Internet Explorer 6 often has problems saving the site to a local drive, resulting in an abort window that states that the page couldn't be saved. I have never had similar problems with Firefox.
Open the folder that contains the support files (images, advertisements, etc.). You should see one or more style sheets. With a text editor, open the CSS files and determine the font schemes that the site uses. You can now incorporate this scheme into your own site! Most large sites are very aware that they want to reach the broadest audience possible, so they make safe choices in the font lists—fonts that most browsers will be able to display properly.
Creating the Banner Graphic
You have the site color choices and font scheme, so all of the pieces needed to create a good banner graphic are in place.
When discussing graphic web design, one program stands far above the others: Adobe Photoshop. The installed base of Photoshop alone guarantees a tremendous availability of training material, plug-ins, and web support. However, in keeping with the spirit of free and open source, this book will use a program called GIMP to provide graphic editing. GIMP is nearly as powerful as Photoshop, and while it may not have all the bells and whistles, it carries no price tag either. Figure 6-26 shows the GIMP interface.
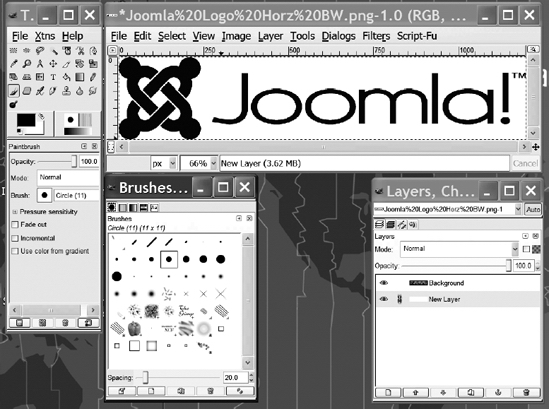
Figure 6-26. GIMP editing the Joomla logo
An installer for GIMP (alternately known as The GIMP) is available at www.gimp.org. GIMP requires a graphics toolkit called GTK+ for display. You will most likely need to download and install GTK+ separately. On the GIMP site, you'll find complete installation instructions.
Tip The excellent book Beginning GIMP: From Novice to Professional, by Akkana Peck (Apress, 2006), can guide you through all of the ins and outs of this wonderful program.
If you already know how to use Photoshop, you should be able to follow the image-editing instructions without any difficulty because of the functional similarity between GIMP and Photoshop. If you have Adobe Photoshop, you probably already know how to create the banner headline you want. Try to make the banner graphic around 150 pixels tall and around 800 pixels across. That will mean most browsers will be able to view it without a problem.
Feel free to use any of Photoshop's capabilities to throw some visual flourish into the template graphics. With source code, a detour away from a tutorial's detailed instructions is likely to cause problems. In contrast, improvisation in graphics tutorials seldom creates any difficulties.
Tip If you are used to the user interface of Photoshop, but want an open source alternative, take a look at GIMPshop (www.gimpshop.com). GIMPshop is a modification of the open source GIMP to use the menus and display structure of Photoshop. It has all the features of GIMP, yet with the industry-standard interface of Photoshop.
To create the banner, fire up GIMP and select the File menu. You will see a submenu labeled Create. This submenu contains a large number of scripted extensions for GIMP that perform macro operations to automate graphic tasks. In the Create menu, you will see an option for Logos. The Logos menu has numerous scripts for the quick and simple generation of banner logos. In Figure 6-27, you can see that I have selected the Chrome logo to create my banner.
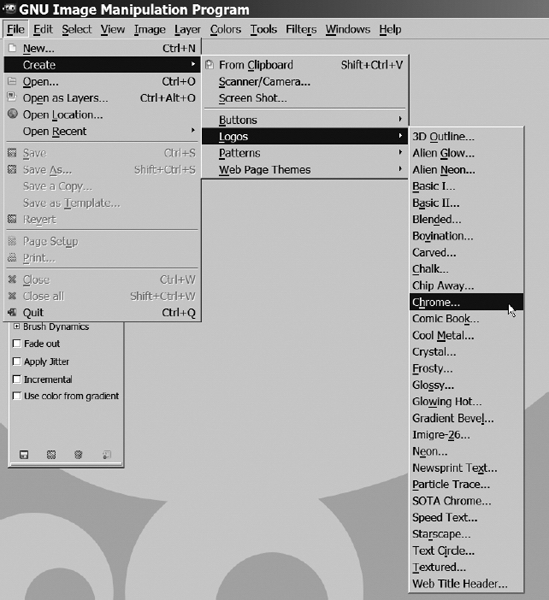
Figure 6-27. Selecting the Chrome logo for a banner graphic
The script will display a window with a number of script parameters or arguments that can be set to customize the rendered graphic. For most of the logo scripts, you can select a color or texture and font. In Figure 6-28, I've entered the text that I want for my banner graphic, and I've changed the background color to match the darker color choice from my site scheme.
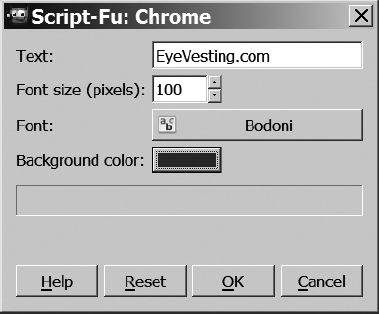
Figure 6-28. Selecting the parameters for your banner graphic
When you click the OK button, the script will execute and generate the requested graphic. That's it! My logo generated as shown in Figure 6-29.
Try a number of the logo scripts, and you will almost certainly find some graphic that appeals to you and fits the look of your web site. When you've chosen the appropriate graphic, save it as a JPG or PNG file and store it in the /images folder of your template.
The most important step is just ahead: creating the index file of your template.

Figure 6-29. After clicking the OK button, you'll see a window displaying your rendered logo.
Creating the index.php File
The index.php file is the central file of the template and holds all of the template logic. In most cases, since the presentation is handled by CSS, template index files are very similar. Unless you need to add user interface coded features (or Ajax functionality), most of the templates you create will have an index.php file almost identical to the one you will create here (although they may have more module inserts).
A template PHP file appears very similar to a standard HTML file, with the addition of processing directives. Here is an excerpt of the default template file so you can see the similarity to a traditional HTML page:
<!DOCTYPE html PUBLIC "-//W3C//DTD XHTML 1.0 Transitional//EN"

    "http://www.w3.org/TR/xhtml1/DTD/xhtml1-transitional.dtd">

<html xmlns="http://www.w3.org/1999/xhtml"

lang="<?php echo $this->language; ?>" xml:lang=

   "<?php echo $this->language; ?>">

<head>

<jdoc:include type="head" />

</head>
Notice that the page opens with a !DOCTYPE declaration. The DOCTYPE tag describes the standards and schema that will be used by the file. It also tells the browser how to interpret the CSS. While not required, having a proper DOCTYPE can prevent a number of compatibility problems with a browser rendering the page.
Caution When you create a new template file, make sure you duplicate the DOCTYPE given in the Joomla default template file exactly. The DOCTYPE in the file has been well tested. Errors in this tag can cause all sorts of unpredictable and difficult-to-locate problems. If you want an excellent account of the importance of the correct DOCTYPE, see the article "Fix Your Site With the Right DOCTYPE!" by Jeffrey Zeldman, on the A List Apart website (www.alistapart.com/stories/doctype). The article explains the reasons behind problems with pages without the proper DOCTYPE.
This tag is followed by the html tag. Within the html tag is embedded PHP code that adds the language attribute before the page is sent to the browser.
The jdoc tag is the Joomla include that executes pieces of the Joomla CMS written in PHP. In any version of Joomla from 1.5 forward, the jdoc (JDocument) interface is used to access the Joomla interface framework. JDocument handles the presentation output of the Joomla system. To include a module in a particular location, you need only use the jdoc:include call. For example, to add the left modules at a place in your index.php file code, you could use the following statement:
<jdoc:include type="modules" name="left" />
Note In older templates and programming items, you may encounter the prefix mos. Joomla was originally based on the Mambo CMS. Mambo often used the prefix mos (for Mambo Open Source). Therefore, you may find Joomla legacy code that still bears the moniker of the predecessor. You'll see it less and less as Joomla moves away from its past. For example, in older Joomla or Mambo templates, functions such as mosLoadModules() and mosCountModules() were used to access the system. These are now replaced by jdoc calls, such as jdoc:include and jdoc:exists, respectively.
It is important to include the head code in the header section of your template, like this:
<head>

<jdoc:include type="head" />

</head>
This code does more than include the general Joomla header. It also determines whether the current page is an article being edited by a front-end contributor. If the article is being edited, the include will insert the selected Joomla editor code into the page.
Enter the code in Listing 6-4 and save the file as index.php at the root of the directory for this template. This file will be the core of the template.
Listing 6-4. The Template Code for index.php
<!DOCTYPE html PUBLIC "-//W3C//DTD XHTML 1.0 Transitional//EN"

    "http://www.w3.org/TR/xhtml1/DTD/xhtml1-transitional.dtd">

<html xmlns="http://www.w3.org/1999/xhtml"

<html xmlns="http://www.w3.org/1999/xhtml"

lang="<?php echo $this->language; ?>" xml:lang=

   "<?php echo $this->language; ?>">

<head>


<jdoc:include type="head" />

<link rel="stylesheet" href="templates/system/css/general.css"

    type="text/css" />

<link rel="stylesheet" href="templates/

   <?php echo $this->template ?>/css/template.css"

   type="text/css" />

</head>


<body id="page_bg">


<jdoc:include type="message" />

<div id="logo"> </div>

<div id="col1">

  <jdoc:include type="modules" name="left" style="xhtml" />

</div>

<div id="col2">

  <jdoc:include type="component" />

</div>


<jdoc:include type="modules" name="debug" />


</body>

</html>
While this code is similar to the Hello Joomla template code you created earlier, it includes a number of refinements that make it a true template file. The opening header information including the DOCTYPE and language definitions are critical for proper conformance to the HTML standards. Furthermore, you can see that two style sheet (.css) files are addressed: the Joomla core styles and the custom style sheet you created earlier (Listing 6-3).
The style sheets are important because the <div> elements are used to specify which content will be displayed in each column. In the left column, the left module will display the selection menus. The right or main column will display the main article component.
That's it. Your template file is simple but clear. Now you need to create the template's metadata file so Joomla can understand which files comprise the template.
Creating the templateDetails.xml File
The final step in deploying the template is the creation of the details metadata file. Enter the code in Listing 6-5 and save the file as templateDetails.xml in the root directory of the template.
You might notice that the file has far more elements than the original details file. The more information you can provide to the Joomla system, the more validity and weight the license denoted by the copyright will hold.
Listing 6-5. The templateDetails.xml File Holds Pointers to All of the Files Used by the Template
<?xml version="1.0" encoding="utf-8"?>

<install version="1.5" type="template">

    <name>Two Column template</name>

    <version>1.0</version>

    <creationDate>01/01/2009</creationDate>

    <author>Dan Rahmel</author>

    <authorEmail>[email protected]</authorEmail>

    <authorUrl>http://www.joomlaJumpstart.com </authorUrl>

    <copyright>2007</copyright>

    <license>GNU/GPL</license>

    <description>

      Two CSS columns in the Joomla world.

    </description>

    <files>

            <filename>index.php</filename>

            <filename>templateDetails.xml</filename>

            <filename>images/LSlogo.jpg</filename>

            <filename>css/template.css</filename>

    </files>

        <positions>

            <position>left</position>

        </positions>

</install>
Template Installation
You have all of the files and folders laid out for proper use. To actually install the template through the Joomla Administrator interface, you need the files to be collected within a ZIP or tarball archive. If you go to your current template folder, you need only create an archive from the files and folders stored there. For those using the excellent WinZip application (www.winzip.com), make sure the "Include folders and paths" option is selected so the directory structure of the template remains intact.
The archive file of your template provides a convenient way for you to distribute a template. You can actually release your custom template for other Joomla administrators to use! To install a template, choose the Extensions ![]() Install/Uninstall option in the Administrator interface, as shown in Figure 6-30.
Install/Uninstall option in the Administrator interface, as shown in Figure 6-30.
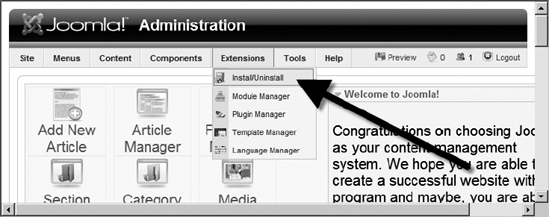
Figure 6-30. The Extensions ![]() Install/Uninstall option allows the administrator to upload a new template into the system.
Install/Uninstall option allows the administrator to upload a new template into the system.
Template Previews
You can preview any template installed on the system. The preview is an excellent feature because it can show the locations of all modules within the layout. That means that an undocumented template will still reveal its layout through the preview.
To see a page preview, open the Template Manager. Click the title of the desired template to display the template parameters. Then click the Preview button near the top of the screen to display the template with the various modules. If you previewed the template you just created, you would only see two modules since that was all that was coded into the template. In contrast, as shown in Figure 6-31, the default template has many page items.
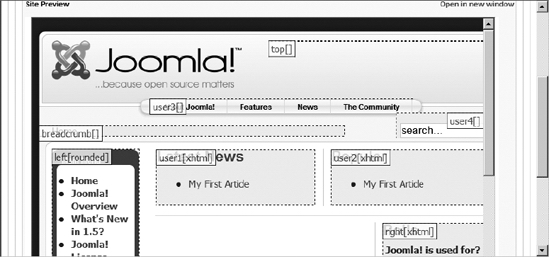
Figure 6-31. The Preview option will display all of the module and component locations.
The Preview screen is also a good starting point if you are considering modifying an existing template. It displays the presentation structure of the template. This structure is sometimes difficult to visualize from the template code.
When you look at the final template, as shown in Figure 6-32, you'll see that the template has come a long way since the primitive functionality of the Hello Joomla incarnation. Additionally, you can understand that it is only a small leap between this basic template and a comprehensive template such as the Joomla default rhuk_milkyway. Most of the work lies in the area of tuning style sheets and adding custom graphics. The Joomla display automation through the jdoc interface takes care of most of the heavy lifting in Joomla site display generation.
Figure 6-32. The final template appears mimimalist, but professional.
Validating Template Code
After you've created a new template, it is always a good idea to validate the HTML code that the template generates to make sure it complies with approved standards. The World Wide Web Consortium (W3C) offers an online tool that will scan a site based on a URL and return a verdict of any problems that might keep you from compliance. You can use your browser to view the following site and enter the URL of your page for validation:
http://validator.w3.org/
Alternatively, you can use a desktop application such as the CSE HTML Validator. This application provides validation of HTML, XHTML, CSS, accessibility, hyperlinks, and even spelling. A desktop test tool can often be used more easily than a web application to check sites on a staging server, as they may not have an access URL outside the intranet. The validator application is available for free download here:
http://download8.htmlvalidator.com/cselite.exe
Conclusion
Based on what you learned in this chapter, you can produce almost any Joomla template you can imagine, limited only by your graphic design skills, knowledge of HTML and PHP, and experience with CSS. You've learned how the template is structured and how to use some of the important Joomla directives. In fact, many Joomla templates use only the directives described in this chapter.
You learned the basics of CSS and saw how tools such as Dreamweaver, jEdit, and Leo can aid in the creation of the files and organize your template projects. With further study of the default templates, you will be able to build on the knowledge you gained from creating your own template from scratch. The RGB/HSB color converter tool constructed here can also be reused for many of your future projects.
Now that your site is attractive enough to attract visitors, it will be important that you understand how to make your site a magnet for web visitors with advanced web site features. In the next chapter, you will learn about the Joomla extension technology that can add capabilities and functionality to your web site.