
CHAPTER 7
Joomla! Extensions
One of the undeniable reasons for Joomla's popularity is the broad spectrum of available extensions. Joomla's celebrated extensibility means much more than adding new templates. Through modules, components, and plug-ins, almost any type of web functionality can be incorporated into your site.
Popular additional features include shopping cart technology, RSS aggregation, shoutbox communication, forums, chat rooms, stock tickers, visitor maps, wiki collaborative authoring, inventory management, and customer relationship management (CRM) functionality. Essentially, Joomla can be expanded to fulfill nearly any web-related need. You can check out the broad range of extensions listed on the main Joomla site at http://extensions.joomla.org.
Almost 90 percent of the available extensions are released for free use, so simply downloading a small extension from the Web can dramatically increase the power and flexibility of your site. The best way to learn about extensions is to examine the ones that come preinstalled with the initial Joomla setup. By learning to administer the existing extensions, you will be able to grasp the workings of most new extensions you might want to use.
The Difference Between Modules, Components, and Plug-Ins
There seems to be a great deal of confusion among beginning Joomla users as to the difference between the various types of extensions. Since there are three different types of extensions and their functionality can somewhat overlap, it is important to be clear about the range of capabilities and the limitations fundamental to each. Many Joomla packages include more than one type, which can lead to further confusion. For example, the Polling package uses a module to display the user interface while the associated component allows configuration and administration.
Each extension entry on the Joomla web site extension directory displays the type or types of extension included in the package. Figure 7-1 shows two extension entries in the list. The first, joomlaXplorer, shows a single icon in the right column indicating that the package contains only a component. In contrast, the second entry shows that the Joom!Fish package includes one or more of each type of extension (component, module, plug-in, and language).
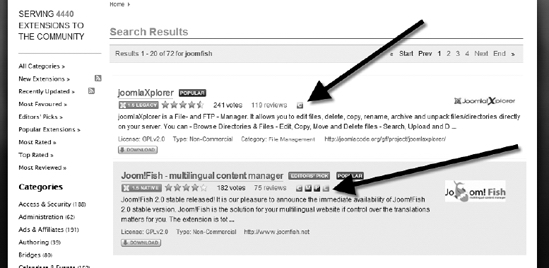
Figure 7-1. Each entry holds icons indicating the extension types found in the package.
Many of the extensions available for the Joomla system have at least two different types for each package. To understand how all of these types function together, it is best to begin with the most complicated type of extension: the plug-in.
Plug-Ins: The Most Advanced Extensions
Plug-ins are the most advanced extension types because they integrate with the Joomla foundation at the very lowest level. A plug-in operates between Joomla and the user, as shown in Figure 7-2. Plug-ins are set to be activated by various events from the server (such as system events, user events, editor events, and content events). A plug-in can intercept output from Joomla and make changes to it before the data is sent to the user browser. On the receiving end, it has access to any user feedback or data entry before the data is processed by Joomla. That means a plug-in can modify data both coming and going.
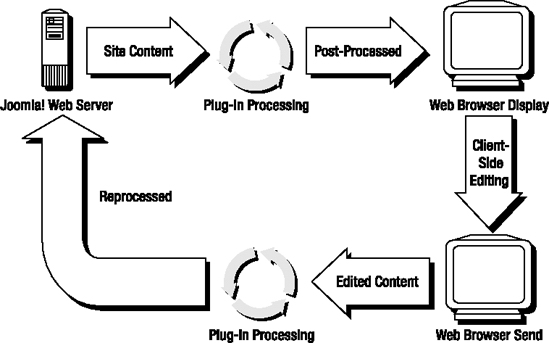
Figure 7-2. A plug-in is situated between Joomla and the web visitor.
The most visible type of plug-in is the WYSIWYG text editor. Article content in the Joomla database is stored in pure HTML. If no editor is selected, the HTML will be sent to a text box for editing by the content contributor. However, if an editor plug-in is selected, the HTML is intercepted by the plug-in and converted into a rich text field that displays bold text, color, images, and other presentation elements.
The user can edit the article content in this WYSIWYG environment. When the user clicks the Save button, the data returned to the system is intercepted by the plug-in, which converts it back into HTML and passes it to Joomla for storage. While this is a simplistic explanation of the actual execution of a Joomla editor, it describes the fundamental process of a plug-in.
You may use a number of plug-ins for your site, but unless you are very ambitious, you are unlikely to actually author a new plug-in. In contrast, even an intermediate user can construct a basic module or component.
Components and Modules
The dividing line between the capabilities of components and modules is not black and white. The component type of extension is the more powerful of the two. While a module can do many things a component can do, and a component can do almost anything a module might, here are a few generalizations that might help you understand the difference:
- Modules are primarily for display while components are mini-applications: Traditionally, a module is either display-only or accepts only minimal interaction. For example, a module might display a stock ticker or allow the simple entry of a poll vote. In contrast, a component might display multiple articles, modify the display style of the page, edit a content article (given proper permissions), or provide a complete user interface (such as a forum/message board component).
- Many modules can appear on a page, but only one component can: A module is located within the module positions (such as top, left, and right) specified in the template. The login module, the search module, and the Banners module are all excellent examples. In contrast, a component generates what is essentially an entire web page within the main page. This operation is seen most easily in the central Front Page component (named
com_frontpage) that displays the intro text of one or more of the most recent articles with complete article formatting. There can only be a single component per page, while many modules are generally present on a page. The component can be thought of as a miniature page generator, while a module is more akin to a user interface widget. - Modules have simple admin settings, but the options of components are usually substantial: The Administrator interface for a module generally consists of just a few parameter settings. In contrast, components often have an elaborate multitabbed administrative interfaces to allow full configuration of functionality and presentation.
These distinctions between components and modules should provide a baseline from which you can understand the differences. The differences are not very important in most circumstances, except when they affect how a particular extension is deployed. In Figure 7-3, you can see a preview of the Front Page of a site. The preview shows all of the display positions of the modules (such as user3[], breadcrumb[], left[rounded], etc.). Notice that only at the center of the page where the component is rendering the content is there no labeled module position (although I have included a label to point out the component display).
Modules appear in specific module positions of a page, so a menu link is never connected to a module. With components, however, adding the component to the site interface generally involves creating a menu item link that, when clicked by the user, presents the page with the component output displayed in the center column.
Components and modules often work together with the component handling the configuration or output and the module rendering the display panel. For example, the search module displays the search entry panel—it needs to be a module so it can appear in a specific location on all pages. However, once a search query is entered by the user and submitted, the search component actually performs the query and displays the results. A similar type of connected relationship exists between the Banners module (which displays the banner) and the Banners component, which allows for the creation and administration of a banner campaign.
Since modules are typically the simplest type of extension, a tour of preinstalled Joomla extensions should begin with them.
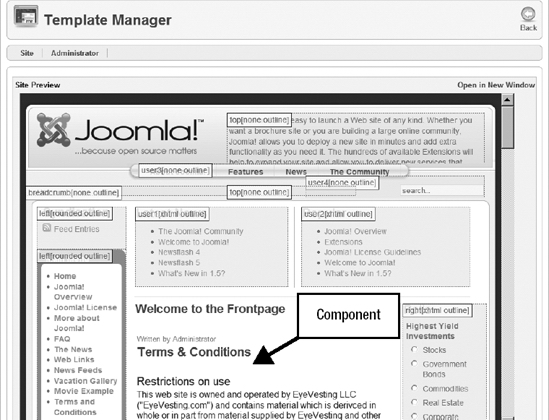
Figure 7-3. The preview of a page shows the numerous module postions.
Module Types
To understand how modules work in the Joomla system, you first have to understand the underlying module type system. The modules shown in the Module Manager list are actually instances created from the various module types. The rightmost column of the module list in the Module Manager shows the type designation for each module listed.
Much like the way a site template is used as an empty form from which a web page is created, module types act as templates atop which the module instance is created. For example, the module list shows many module instances with the type mod_mainmenu. The mod_mainmenu type is the foundation template for the menus on the Joomla system, and the individual instances contain the parameter settings that define the options of each menu.
When you install a module to the system, you are not actually installing a module, but a new module type. The Joomla system automatically creates the first instance of a module from that type—and that instance is the entry listed in the Module Manager.
While the Module Manager lists all of the current module instances on the system, if you click the New button you will see a list of the available module types (see Figure 7-4) from which they were created. Selecting a type will take you to the module creation screen, where you can customize the new instance of the module type.
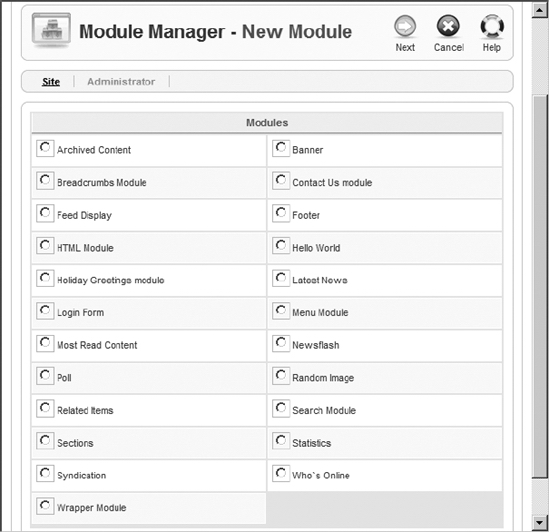
Figure 7-4. You can create a new module from any of the module types installed on the system.
Module types follow a standardized naming convention that includes a prefix (mod_) added to the module name, no spaces in the type name, and all letters of the module name in lowercase. In contrast, module instance names include spaces and have a mixture of uppercase and lowercase. Checking the Type column of the Module Manager will reveal the foundation type that defines each module instance.
Default Site Modules
The site modules that are created with the default installation are shown in Table 7-1. Note that each menu found on a Joomla site is actually a module instance of a menu module type. Therefore, when you create a new menu, the module that actually handles the configuration and display of that menu will appear in the list.
Table 7-1. Default Modules Included with the Joomla Install
Many of these modules will typically appear on a single page. Most of these modules are self-explanatory (e.g., the Search module). Some of them include functions that aren't obvious and have features worth examining more closely.
Wrapper (mod_wrapper)
For adapting an existing site to Joomla, the Wrapper module provides a powerful method of including legacy content before it is imported into the Joomla database. This module allows you to set an existing URL and wrap it inside an inline frame (or iFrame) for display within the Joomla site. In fact, it can even wrap a remote site so that it appears inside your web page. For example, in Figure 7-5, I have used the Wrapper module to encapsulate the Coherent Visual web site into the user1 column of my Front Page.
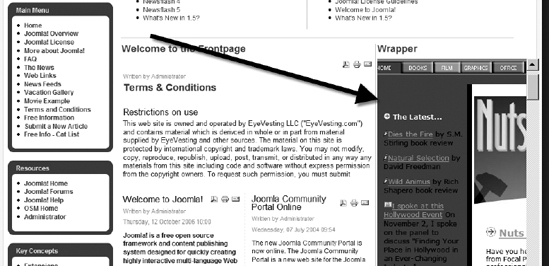
Figure 7-5. External web pages can be wrapped in an iFrame within the page.
The Wrapper module only has a few important parameters that need to be set (see Figure 7-6). The URL is obviously the most important, as it determines the location from which the content to be wrapped will be taken. This URL may be a relative address, a completely qualified URL to content on your web server, or a URL that points to a remote site.
The Module Class Suffix parameter allows you to specify a custom style sheet suffix (for a style stored in the CSS file) that will be used for this module. The other parameters (such as Scroll Bars, Width, Height, and Auto Height) determine the presentation of the content on the Joomla page. Setting the Auto Add parameter to Yes will add an http:// or https:// prefix to the URL field unless it already has one. The Target Name parameter sets the name of the iFrame.
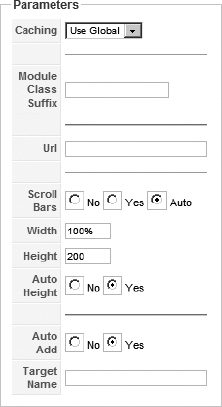
Figure 7-6. The parameters for a Wrapper module define what content is shown and how it is presented.
The Wrapper module that is created by the default installation is essentially a blank module instance created from the mod_wrapper module type. You can create other wrapper modules using the New button in the Module Manager and setting the module type to mod_wrapper.
Random Image (mod_random_image)
The Random Image module displays a random image (JPG, GIF, or PNG) chosen from a specified folder. This module is useful for displaying random banner images that have a similar theme or presentation. The module can essentially impart to frequent visitors that the site is changing and new without requiring the system administrator to do any work beyond the initial setup. This module can also be used for banner advertising, but given the primitive nature of the module, the Banners module would be a better choice for that application.
The parameters for the Random Image module are shown in Figure 7-7. The Image Type and Image Folder settings determine how the images will be retrieved. The Link parameter will attach a hyperlink to the displayed image. The Width and Height parameters will scale the image to fit the corresponding values. Finally, the Module Class Suffix parameter will append a suffix to the style sheet names to access a custom style sheet for this module that has been created in the CSS file.
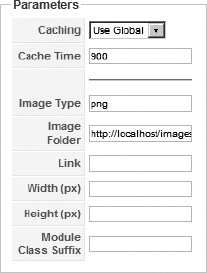
Figure 7-7. The parameters for the Random Image module specify where the images will be collected and how they will be presented.
To test the module, you can easily set the Image Folder parameter to reference the /images/stories directory and set the image type to png. You will need to select where the module will appear, so for simplicity, set the Location to right (for the right-side position of the template). To set the web pages where the module will display, select the All option so every page will feature it. Finally, note the module position and order where the image is set to appear. You need to know where to look when you first test the module. With the settings described, the Front Page of the Joomla site will show a random image in the proper module position and order.
As with most default modules, the Random Image module instance is provided as an example instance in the default installation of the mod_random_image type. You can create new Random Image modules from the Module Manager.
Banners Module and Advertisement Module (mod_banners)
The Banners and Advertisement modules (both of which use the mod_banners type) handle the presentation of banner campaigns created with the Banners component. In the component section, you'll learn how to set up and manage an advertising campaign through this system. For the actual banner display, the Banners module provides a number of options.
Figure 7-8 shows the parameters that affect how the banner is rendered. The Count parameter determines the number of banners to be shown at once. The Banner client and Category parameters allow you to select the campaign that has been created in the Banners component interface. The Search By Tags parameter is a powerful option that matches the banner to the tags or keywords set up for the page or article content. Therefore, you can have baseball banners for pages set with baseball tag words and football banners for those set with football tags.
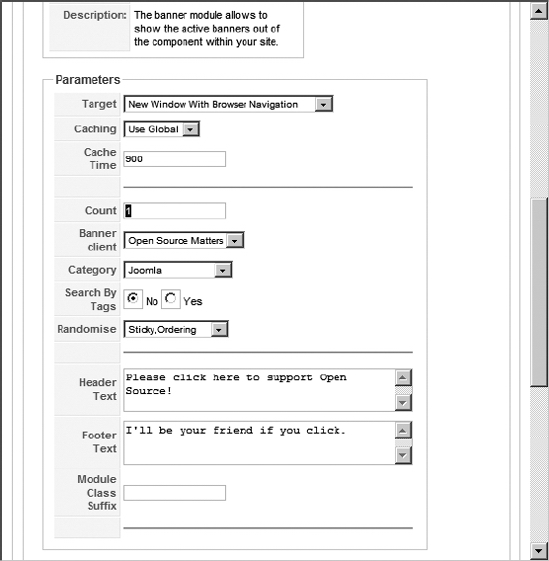
Figure 7-8. The parameters of the Banners module will determine how it is displayed.
The Randomise, Header Text, and Footer Text parameters operate as you might expect. In Figure 7-9, I've set the banner to display in the top section with special header and footer text. Note that in this template, the footer text has been cut off. The template could be modified, however, to display the entire footer.
Figure 7-9. The Banners module is displayed in the top position with header and footer text.
Breadcrumbs (mod_breadcrumbs)
The Breadcrumbs module (see Figure 7-10) shows the organizational path within the web site where the currently viewed page is located. Breadcrumbs can be clicked to jump upward in the page hierarchy. Breadcrumbs are useful to more than just users since search engine spiders can more accurately navigate your web site if these are implemented.
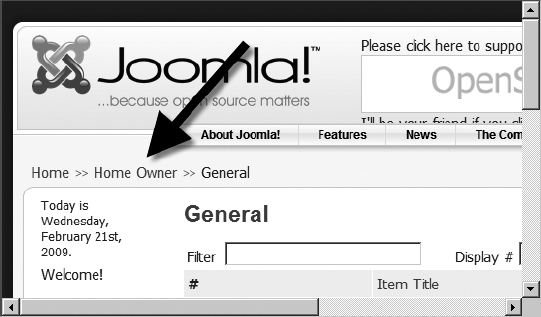
Figure 7-10. The Breadcrumbs module shows the hierarchical path of your current location in the web site.
The Breadcrumbs module parameters (see Figure 7-11) are primarily concerned with the path display. The Show Home parameter determines whether the top level (home) is displayed in the hierarchy. The Show Last parameter determines whether the last element is displayed in the hierarchy. The Text Separator parameter lets you override the default double arrow (![]()
![]() ) separator.
) separator.
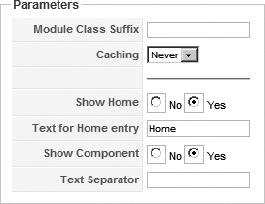
Figure 7-11. The parameters for the module offer a few simple options.
Syndication (mod_syndicate)
The Syndication module will create a syndicated feed for the page it is located upon. News feeds (RSS and Atom are the most common) are a technology that provides an automated method of sharing content with other users and other web sites. If a site has a news feed (or syndication), that means a file is stored on the web server that acts essentially like a table of contents file to all of the newest articles on the site.
This file is read by a piece of software called an aggregator. The aggregator may be a desktop program that can fetch news features from many different sites and display the newest articles for the user to read. Alternatively, the aggregator may retrieve new items and display them within another web site (with proper attribution, of course). Popular aggregators include the web-based Bloglines (www.bloglines.com), the news reader built into Internet Explorer 7, the Live Bookmark feature included in Mozilla Firefox, and the New Account ![]() RSS News & Blogs option in Mozilla Thunderbird.
RSS News & Blogs option in Mozilla Thunderbird.
The Syndication module will automatically generate the table of contents news feed file for articles contained in the Joomla site where it is executing. The module display presents a link to the syndication file (see Figure 7-12).
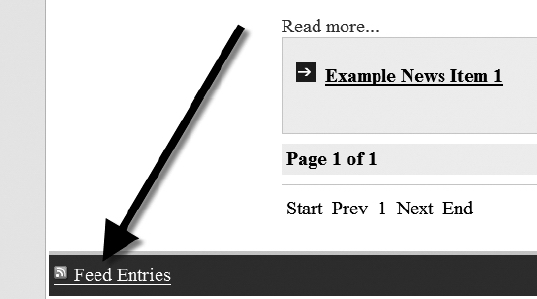
Figure 7-12. The link to the RSS feed is displayed by the module.
If you examine the news feed file (see Figure 7-13) that the link targets, you will find the table of contents for your site stored in an XML file using the format of either an RSS or an Atom feed. In the Module Manager, you can specify whether the feed will be generated using the RSS or Atom standard (although I recommend using RSS as it is becoming the dominant standard). There is also a parameter that lets you set up a custom style sheet suffix to use with the module.
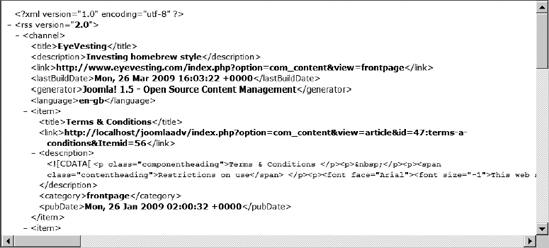
Figure 7-13. The RSS format is a specially formatted XML file.
Feed Display (mod_feed)
While the Syndication module publishes an RSS feed for other sites to subscribe to your content, the Feed Display module allows you to subscribe to other site feeds for display on your Joomla site. In Figure 7-14, I've subscribed to the CNN top stories RSS feed through the Feed Display module, and the top three stories are displayed in the right position of the page.
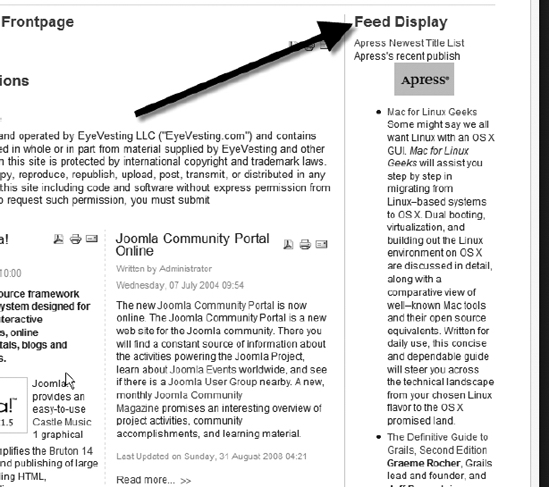
Figure 7-14. The Feed Display module is shown with the three top stories grafted directly into the Joomla page.
Setting up a feed is extremely simple. Find a site that provides an RSS or Atom feed of their content (usually indicated by a linked icon on the home page). Copy the link or shortcut that holds the URL to the feed file. In the module parameters (see Figure 7-15), you need only set the Feed URL parameter to begin receiving the feed articles for display on your Joomla site.
Display of the feed title, feed description, feed image, and item description can all be turned on or off with the corresponding module parameters. You can also set the number of items to display and the maximum number of words that will be presented for each item.

Figure 7-15. Only the URL is required of the parameters to activate the module to display feed content.
Main Menu, Key Concepts, User Menu, Example Pages, Top Menu, and Resources Modules (mod_mainmenu)
All menus that are displayed by the Joomla system have an associated module that actually renders the web page menu. The mod_mainmenu type is used as the basis for most of the menus on the system. Installation of Joomla will automatically create a Main Menu module instance from this module type that is the central module used on the Front Page and cannot be deleted from the system.
There are many parameters for the mod_mainmenu type (see Figure 7-16) that govern how a menu will appear on the page. Several of the parameters relate to hierarchical menus that allow the user to drill down into the site. The default settings are good for most sites, but the available options provide complete control of the menu display without having to modify any code.
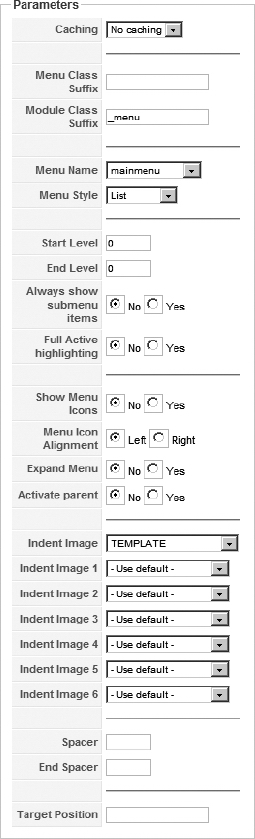
Figure 7-16. The parameters for mod_mainmenu can change everything from the menu style to the menu hierarchy.
The parameters for the mod_mainmenu type include the following:
Menu Class Suffix: Sets the suffix used for custom menu style sheets.Module Class Suffix: Sets the suffix used for custom module style sheets.Menu Name: Specifies the menu record handled by the Menu Manager that is connected to this module.Menu Style: Sets the style of presentation of the menu to one of four formats: list, vertical, horizontal, or flat list. The list and flat list selections use HTML<ul>and<li>tags to define the list. The vertical list and horizontal list selections use an HTML table for formatting instead.Start Level: Specifies the first level of the hierarchy to be displayed.End Level: Specifies the last level of the hierarchy to be displayed.Always show submenu items: Sets the presentation to display the submenu items regardless of whether the visitor is in a location that would normally display them.Full Active highlighting: Supports active highlighting of the links. Selecting this option may render the menu code not entirely compliant with the strict XHTML guidelines.Show Menu Icons: Displays the icons for the menu if any are specified.Menu Icon Alignment: If a menu icon is set for display, this parameter specifies whether right or left justification is used for the associated icon.Expand Menu: With this parameter set to Yes, all of the submenus will always be visible regardless of whether the user expands it.Activate parent: When set to Yes, activation IDs will be set for all parent menus in the hierarchy.Indent Image: Provides a drop-down list of choices to determine the indent images. The default selection uses images specified in the template. Other settings include using default images installed with the system, images specified in the parameters section, and no indent images.Indent Image 1throughIndent Image 6: If the "Use params below" selection is made in the Indent Image parameter, then these six list boxes are used to specify the images to use for the various levels of indentation. All images contained in the/imagesfolder will appear in these six lists for selection.Spacer: Specifies a character or characters to be used as a spacer between menu items when a horizontal list type is selected.End Spacer: Specifies a character or characters to be used before the first item and after the last item in a horizontal menu.Target Position: Determines the target of the links (such as a new window or another existing one).
Administrator Modules
Administrator modules work in a similar fashion to site modules, except they augment the Administrator interface. Adding new modules to supply additional functions such as better reporting, relevant statistical information, custom toolbars, and other functionality can make administering the Joomla site more productive. Generally only very large sites need additional administrator capabilities, so in-depth coverage is beyond the scope of this book.
In Table 7-2, you'll find a complete list of the administrative modules that are included with the default install. You can familiarize yourself with the modules of the system if you intend to replace one or more with a third-party control with additional functionality.
Table 7-2 Administrator Modules Included with the Joomla Default Install
| Module | Description |
| Components | Shows a list of installed components as a tab in the Control Panel |
| Full Menu | Regulates the display of the Administrator interface menu |
| Latest Items | Lists the latest content items added to the site as a tab in the Control Panel |
| Logged | Displays a list of users currently logged into the site as a tab in the Control Panel |
| Menu Stats | Generates the menu statistics shown as the Menu Stats tab at the bottom of the main Control Panel screen |
| Online Users | Displays the number of users currently logged into the site in the place header |
| Pathway | Displays the Administrator pathway |
| Popular | Lists the most visited pages of the site as a tab in the Control Panel |
| Quick Icons | Adds fast access icons to the Control Panel |
| System Message | Controls the messages for system-wide display in warnings, pop-ups, and dialog boxes |
| Toolbar | Regulates the display of the Administrator icon toolbar |
| Unread Messages | Displays the number of unread Administrator messages in the queue in the place header |
Site Components
Components have many more features than modules and generally have an entire configuration interface. For that reason, components have their own menu on the Joomla Administrator interface menu bar.
There are only five components included with the Joomla installation that have a visible user interface. These are the Banners, Contacts, Newsfeeds, Polls, and Weblinks components. Each of these components has a menu under the Components item in the Administrator interface menu. The menu for each component has selections for all of the tab items that will appear in the component configuration window.
Banners Component
The Banners component offers a fairly robust system of banner display that can be used for commercial and noncommercial purposes. Individual banners can be programmed to display a particular number of times (known as number of impressions), and the number of times a visitor clicks the banner (known as click-through) can be monitored. The Banners component works in conjunction with the Banner display module described earlier.
A list of all installed banners is displayed by the Banner Manager (see Figure 7-17). Some of the banner statistics are displayed in the columns, such as the number of impressions, the number of impressions left, and the click-through percentage. The banners created in this interface are displayed on the page by the Banners and Advertisement modules described earlier.
You can change the configuration tracking settings by clicking the Configuration button in the Banner Manager. The configuration allows activation or deactivation of daily banner tracking (see Figure 7-18) and the setting of a tag prefix. Daily banner tracking requires more disk space, but provides a more accurate record of banner activity.
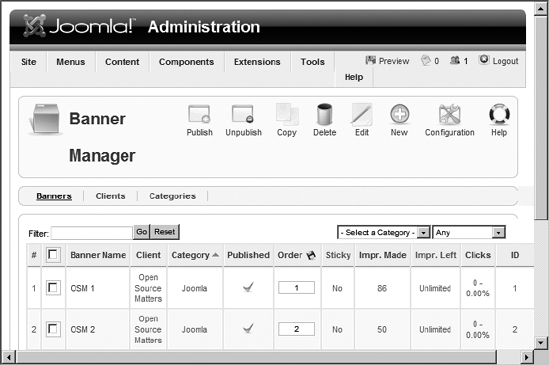
Figure 7-17. The main Banner Manager screen shows all of the individual banners and their statistical information.
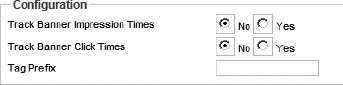
Figure 7-18. The Configuration window of the Banner Manager lets you change tracking options.
You can create a new banner by clicking the New button or edit an existing one by clicking the banner name. You can see by the number of available settings (see Figure 7-19) that you can set up a banner to display in nearly any way you might want. Note that you can even include custom banner code if some JavaScript interactivity is needed.
The actual banner graphics should be located in the /images/banners folder of the installation. You can use the Media Manager or an FTP program to transfer the files into the proper folder. Once there, the filenames will appear in the Banner Image Selector drop-down list.
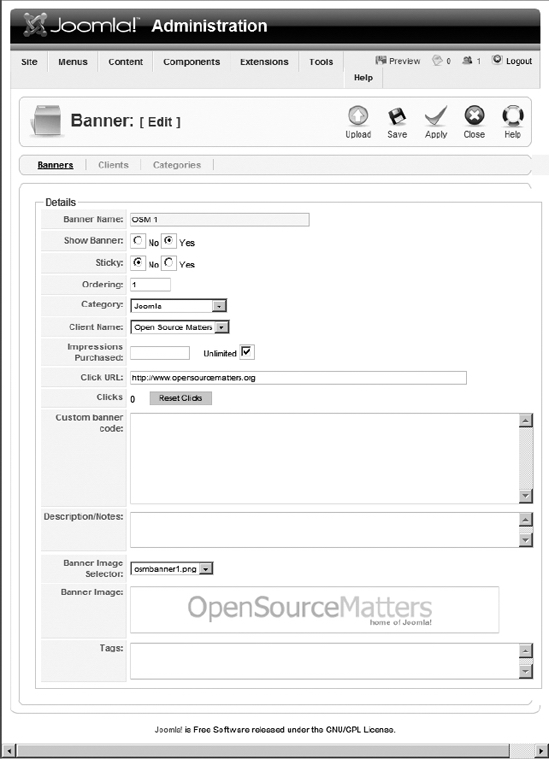
Figure 7-19. Editing the details of a banner allows setting the presentation of the banner, including the image.
The Banners interface handles the banners, while the Banner Client Manager interface handles the actual client or campaign (see Figure 7-20). A single client entry may have many banners linked to it for tracking and administration.
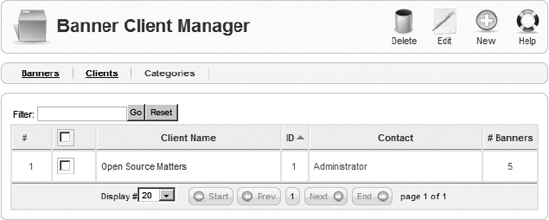
Figure 7-20. The Banner Client Manager shows each client and the number of associated banners.
You can click the New button to create a new client. The client parameters are fairly basic (see Figure 7-21). You can set the client name and the contact information. The client record is primarily an additional type of organization that supplements categories for banner campaigns. The Banners component additionally provides a Categories interface if you would rather organize the banners through that method.
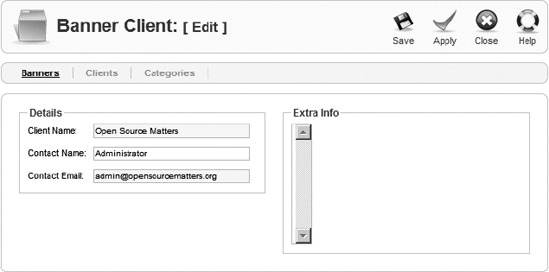
Figure 7-21. You can create a new client record and organize banner campaigns around it.
Contacts Component
Joomla includes a small contact management system within the CMS. Contacts stored in this component can be interlinked with the Joomla accounts of registered users, which makes usage, content contribution, and e-mail transmission all trackable through the Joomla interface. Contact entries are displayed in the Contact Manager (see Figure 7-22). Any accounts linked to a registered Joomla user account are shown in the Linked to User column.
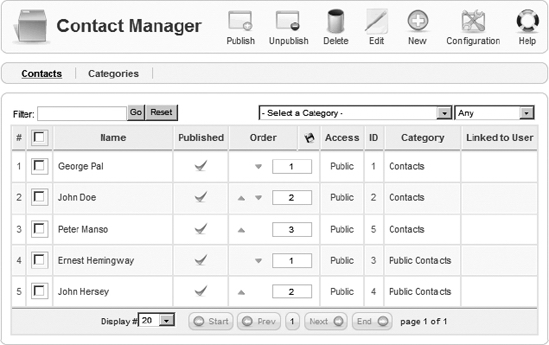
Figure 7-22. The Contact Manager displays the contact list, including the Linked to User column, which shows when a contact record is linked to a Joomla account.
Editing an existing contact (see Figure 7-23) or creating a new one provides all of the common parameters (Name, Street Address, Town/Suburb, State, Telephone, etc.) that a traditional standalone personal information manager might have. Since Joomla is entirely web-based, it provides the advantage of having a contact manager accessible wherever a web connection is available.
The Category Manager of the Contacts component presents the same interface that the site Category Manager does for article content. However, the categories you create in the Contact Manager are kept separate from the categories used for articles, users, or other pieces of site information.
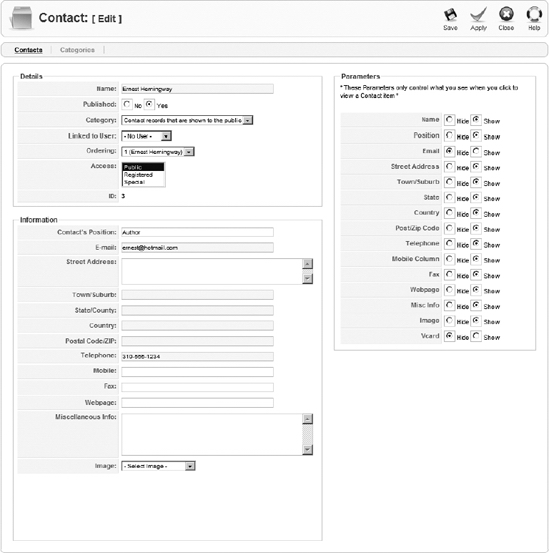
Figure 7-23. The contact editing screen allows the recording of all basic personal information.
Newsfeeds Component
Unlike the Feed Display module that appears within a position of the template (such as the right position), the Newsfeeds component provides a center column display of the feed content. The feed display can be linked into the menu system to provide menu items for browsing or reading any of the feed articles (in contrast to the module, which provides a static summary). Essentially, you can create a news feed section that can act like an feed aggregator within your Joomla site.
All feeds are defined in the Newsfeed Manager (see Figure 7-24, where the list shows their name, category, ID, maximum number of articles, cache time limit, and order).
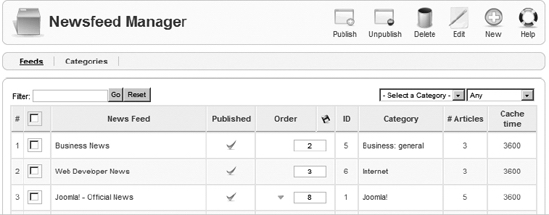
Figure 7-24. The Newsfeed Manager displays a list of each feed and its parameters.
When creating a new feed (see Figure 7-25), you need only assign a name, category, and link to get the feed started. The maximum number of articles displayed by the feed and the cache time limit are also available for modification. If the feed is in a non-English language, the right-to-left reading direction of the feed can be specified.
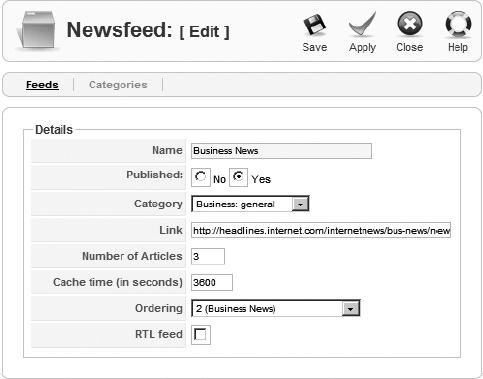
Figure 7-25. When creating a newsfeed or editing an existing one, Name, Category, and Link are the only necessary parameters.
Polls Component
The polling interface available through the Polls component allows you to set up and edit an online poll that is then displayed by the Poll module. All of the current polls are displayed in the Poll Manager (see Figure 7-26). This manager is a good place to check which polls are the most popular (by examining the Votes column) and the number of choices for each poll (the Options column).
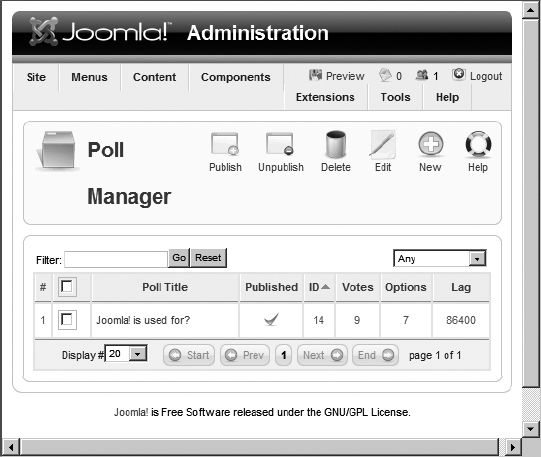
Figure 7-26. The Poll Manager lists the existing polls and also provides a summary column of the number of votes per poll.
The Polls component allows up to 12 options for each poll, as shown in Figure 7-27. It also allows you to set a lag time between when an individual can vote in the same poll again. The default setting, in seconds, is 86,400, which is equivalent to one day. You can increase this value to an extremely high number, such as 31 million (roughly a year), to prevent the voter from participating more than once.
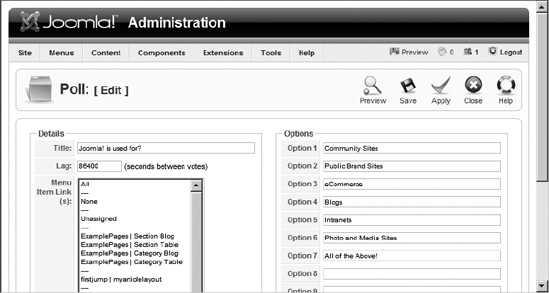
Figure 7-27. When creating a new poll, you can enter up to 12 choices for the voter to select.
Weblinks Component
With the Weblinks component, you can allow registered users to suggest links that can become part of the current list. Allowing link suggestions is a double-edged sword. On the one hand, you can take a step toward fostering a virtual community where users contribute and have an investment in the site. On the other hand, you have to monitor these closely for spam links or objectionable content. Luckily, Joomla provides a built-in interface that allows an administrator to approve or decline to add the suggested link to the current list.
For each link, Joomla lets you specify information for the following parameters (see Figure 7-28): Name, Category, URL, Description, Ordering (where it will appear in the link list), Approved, Published, and Target (whether clicking the link should open a new window to display the target page).
Note When you place an external link on your web site, you should consider if you want your user to leave your web site for another. For example, if a page has a number of footnote links to other sites that support the arguments of the article, you probably don't want a click on the footnote link to take the user to the new site. What if they aren't finished with the article, or they want to click some of the other footnote links as well? By setting the Target parameter of a web link to New Window With Browser Navigation or New Window Without Browser Navigation, you can force the web browser to open a new window and display the destination of the link. This leaves your window still available on the user's system.
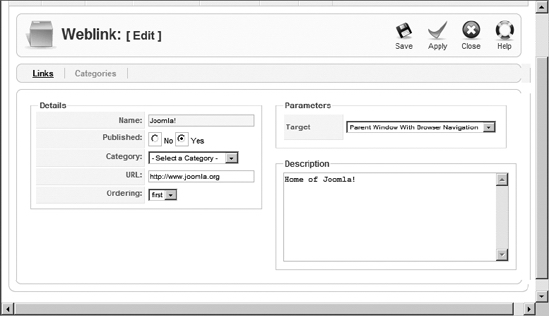
Figure 7-28. The parameters of a web link let you specify a target for the link.
Site Plug-Ins
Nearly every site plug-in handles behind-the-scenes functionality. You can examine plug-ins by accessing the Plugin Manager through the Extensions menu (see Figure 7-29). Few of these have configurable parameters that will significantly affect the system functions.
Although plug-ins are the most powerful type of extension, they usually perform a specific function and therefore operate almost transparently within the system. They are generally bundled in a package with a component or module to supply the presentation and user interface aspects.
Since authentication and security play a large role in e-commerce, you'll examine the system plug-ins directly in Chapter 11 when you learn how to set up a virtual store. Until then, the only plug-ins you will likely want to examine in the Plugin Manager are the editor extensions (TinyMCE and XStandard Lite) and the System - Legacy plug-in.
The editor extensions have a few parameters for modifying the content-editing process that you may find useful (e.g., dealing with compression capabilities or the size of the editor window). The System - Legacy plug-in can be activated to allow Joomla 1.5 sites (and above) to use Joomla 1.0 modules, components, plug-ins, and templates.
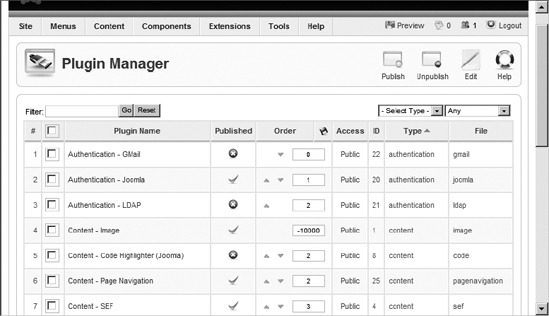
Figure 7-29. The Plugin Manager will list each plug-in available on the system.
Conclusion
In this chapter, you saw how Joomla extensions consist of three types: modules, components, and plug-ins. Each type of extension has particular capabilities that make it useful for implementing a specific sort of task. A module is good for presentation (since it can appear anywhere on a page, and multiple modules can appear on one page) and minimal user interaction. A component can support one or more complete user interfaces both for the web visitor and the site administrator, so it can represent a mini-application within Joomla. A plug-in sits at the foundation of the Joomla system, allowing it to provide low-level interaction such as supplying a WYSIWYG editor for article content.
Often, an extension will include several types in the same package. The Polls extension, for example, includes a component that is used to create, edit, and manage individual polls. The Poll module displays the polling options and allows the user to cast his or her vote.
While the extensions that have been covered in this chapter are included with the Joomla installation, there is a whole world of third-party extensions that can add all manner of functionality to Joomla. In the next chapter, you'll see how a few of these components can be used to facilitate your site becoming the hub of a virtual community.