
CHAPTER 10
Photo Gallery
Joomla's widespread adoption by individual users as well as substantial organizations has created a gap between the need for a quick-and-easy solution and the requirements of a powerful (and often more complicated) industrial-grade solution. The vast divide between the requirements of basic consumer and professional deployment has caused a torrent of extensions that fill many niches. Nowhere is this more apparent than in the flood of photo gallery extensions for Joomla. At the time of this writing, there are over 137 extensions available to add gallery functionality to Joomla that run the gamut from simple image displays to complete photo-publication services.
In the interest of serving both communities, this chapter will demonstrate one simple gallery display component (Phoca Gallery with Slideshow) and one full-featured implementation (Gallery2). Most gallery software falls roughly into one of these two categories, so the information here should be useful regardless of which of the dozens of gallery extensions you finally choose. Whether you want to set up a photo album of your children or launch a web site to compete with the largest digital image licensers, Joomla can be extended to meet your needs.
Tip Before you begin examining the Joomla extensions, think about installing an FTP server to allow better gallery management. You may already have FTP server capabilities activated for use with the Joomla Administrator, in which case you can skip the following section. If not, consider FTP server installation to streamline both upload and download (especially of large photo files) during the creation of a gallery.
FTP Server for Gallery Management
Many gallery extensions allow image upload and maintenance through an FTP server. If you haven't already installed an FTP server, you might consider it now. This section provides FTP server instructions for Linux, Mac OS, and Windows. The basic setup procedures are presented to familiarize you with the server configuration. I recommend that you consult the server documentation for more complete instructions.
Most Linux distributions include an FTP server, although you will likely need to activate it. Likewise, Mac OS X 10.2 and above comes with a preinstalled FTP server. On Windows, if you are using IIS as your web server, you can easily enable the bundled FTP server and configure it through the IIS Management Console. In case you're running Apache on the Windows platform, I've included instructions for installing and configuring FileZilla—a free, open source FTP server application.
Tip If the FTP servers presented here are not to your liking or lack a critical feature you need, take a look at CrossFTP Server. Written in Java, it can execute on any platform. You can download it at http://sourceforge.net/projects/crossftpserver. You can also visit the home page (www.crossftp.com), which has a Web Start live installer to help you simplify installation.
Activating a Linux FTP Server
Most Linux distributions have an FTP daemon installed that can serve FTP files. You can search for the FTP service with this statement executed at the command line:
chkconfig --list | grep ftpd
There are several FTP servers available, so you will have to customize your interaction based on the daemon listed. Some common FTP servers include VSFTPD, ProFTPD, Glftpd, pureftpd, wzdftpd, and wu-ftpd. Most of these FTP servers can be activated with the same commands. For example, if your distribution has VSFTPD installed, you can activate it like this:
vsftpd start
Alternatively, you can use the service command:
service vsftpd start
Tip Many Linux distributions include the service command, although some don't include a path reference to it, so simply entering the command in the console generates a command not found error. Often, you can find the program in the /sbin directory. If you find it there, look for instructions on the Web to add it to the system path. Search terms such as "linux set path variable" should present a variety of web pages with instructions.
To have the FTP server automatically start on boot, with Fedora/Red Hat you can use the chkconfig command, like this:
chkconfig vsftpd on
On Ubuntu or Debian systems, use this command instead:
sysv-rc-conf on
You can check if the FTP server is running like this:
netstat -a | grep ftp
If no output is returned, then the service is not running. Try activating the FTP service and then executing it again. You will generally need to add a user for the Joomla extension so you can give the application access to the upload directory. You can create a new user for the /gallery2 directory (if that is the extension you'll use) like this:
useradd -d /home/gallery2 galleryadmin
The password to the account can be set with this command:
passwd galleryadmin
The passwd command will prompt you with these three inputs, with the new user password blank by default:
Current Password:

New Password:

Confirm New Password:
Then you will have to modify the upload directory with chmod:
chmod 750 /home/gallery2
To give the gallery user the permissioned access to the directory, use the chown command:
chown root:galleryadmin /home/gallery2
On some Linux firewalls, lower port numbers, including the standard FTP port (port 21), may be blocked. You can either reconfigure the firewall to allow traffic on that port or set your FTP server to address a port within the range allowed by the firewall.
Activating the Mac OS FTP Server
On OS X 10.2 and above, the FTP server is enabled through the system preferences. Double-click the Sharing icon to display the Settings window. On the Services tab, use the FTP Access setting to activate the FTP server. Check the box to the left of the setting to enable the server.
Check your firewall settings to make sure that FTP connections (generally through port 21) are available on the machine. On Mac OS Server, you can activate Internet File Sharing Server, which supports the FTP protocol.
Installing FileZilla Server on Windows
Windows bundles Microsoft IIS with an FTP server that has all the features you will need for a Joomla gallery extension. If you are running Apache on Windows, you can use FileZilla FTP server, which is a free, open source, basic FTP server that uses minimal resources on your machine. It can be downloaded from SourceForge at http://filezilla.sourceforge.net.
When you have the FileZilla installer downloaded to your local drive, execute it and choose the options that fit your needs (such as automatic server startup on boot). Make sure you install the administration utility (called the FileZilla Server Interface), which you will need to secure the server to limit access.
To configure the server, execute the FileZilla Server Interface application, and the login window will appear. By default, the administrator has no login password, so you can click the OK button to open the application.
The first thing you'll want to do is secure the site. Select the Settings option under the Edit menu. You should see a window like the one shown in Figure 10-1. Select the "Admin Interface settings" option in the "General settings" list to set the administrator password. Click the "Change admin password" box and enter a new password in order to secure the site. Click the OK button once you've made all the configuration changes you want.
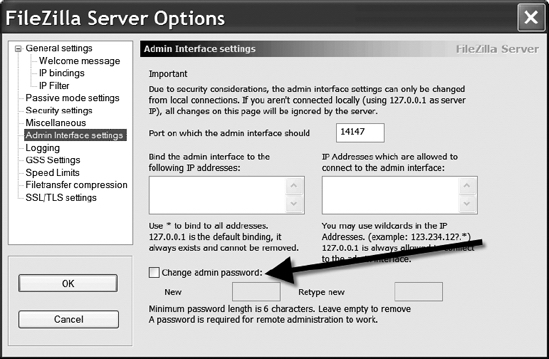
Figure 10-1. Click the "Change admin password" box and enter a new password to secure the site.
After you've set the admin password, it is a good idea to create a user login for the Phoca Gallery component. To create a new user, select the Users option from the Settings menu. You will see a configuration window, as shown in Figure 10-2. Click the Add button to set up a new user.
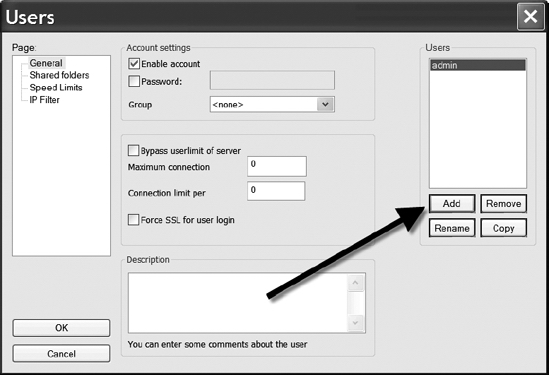
Figure 10-2. The configuration window for FileZilla Server lets you add users and user permissions.
Once FileZilla Server is installed and configured, you should be able to access your own site through any basic FTP program (including the free FileZilla client). Both Mozilla Firefox and Microsoft Internet Explorer 6 and above have built-in FTP clients. You can use these to test the configuration of the FTP server and make certain that the Phoca Gallery user you created has access to the web directories.
Phoca Gallery
Phoca Gallery (see Figure 10-3) is a small, nimble component that allows photos to be added to albums for display on the Joomla front-end. The Phoca Gallery photo-organizer extension features a complete administrative interface where pictures can be uploaded by several methods, and then filed in a number of user-created categories. This extension is meant for display of images and even provides a front-end picture upload method so you can accept submissions from registered users if you want to configure the system for these options.
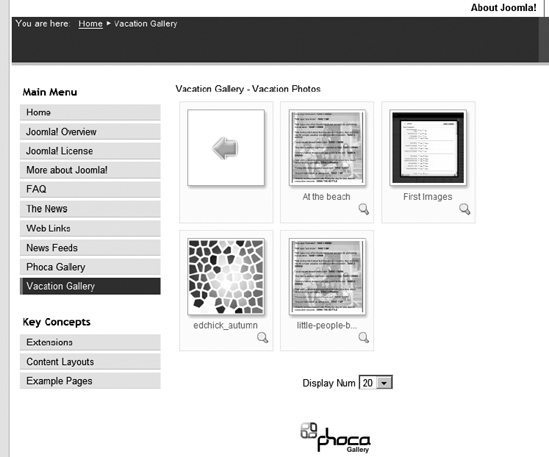
Figure 10-3. The Phoca Gallery presentation can display numerous photographs, filed by category.
Despite the simplicity of the Phoca Gallery interface, the extension includes the following advanced features:
- A front-end upload interface for submissions
- Commenting and rating systems for user feedback related to individual categories
- Server-side directories that may be scanned for multi-image addition
- Upload through FTP for image submission so that ownership and access problems can be avoided.
- Automatic thumbnail generation for images as well as a thumbnail representation for each category
- Support for watermarks
- Themes for customized presentation
- A search engine–friendly (SEF) tagging system
- Private categories for selected users
- Support for server-side resizing and light box effects on images
Phoca Gallery is also very easy to install and manage. So, without further delay ...
Downloading and Installing Phoca Gallery
Phoca Gallery is free for use and available for download under the GPL. This license allows you to distribute, display, and use the component for free. However, you are prohibited from removing the license text or attribution from the component code (although you can remove the "Powered by" text displayed by the component).
You can download Phoca Gallery from http://joomlacode.org/gf/project/phocagallery.
The download is a ZIP archive of around 500KB that has all of the files for both the display component and the administrative component. Store the file on your local drive for subsequent upload into the Joomla system.
To install Phoca Gallery, open the Extension Manager screen in the Joomla Administrator interface. Browse your local drive for the ZIP component, select it, and click the Upload and Install button. If successful, Joomla should display the component success screen. The component will display an Install button and an Upgrade button. Click the Install button to complete the process. Note that even if the component installs successfully, you may not yet be done with configuration.
There is only one requirement to run Phoca Gallery: the GD2 image manipulation library. Phoca Gallery needs to use an image manipulation library in order to generate thumbnails of uploaded images and to allow image-resizing functions. The GD2 library is a library of PHP functions that allow for image manipulation, and is often included with PHP installer binaries and supported by many web providers. Sometimes activating the library is all that is needed to allow it to execute on the server.
To determine if you have GD2 installed on your server, check in your PHP extensions folder, which may be named either /ext or /extensions, depending on the PHP version. On the Windows platform, if the library is installed, you should find a file named php_gd2.dll in that directory. Alternatively, you can execute the phpinfo() function on the PHP server and look in the gd section to make sure GD2 is available (where you should see parameters such as GD Support, GD Version, FreeType Support, JPG Support, and PNG Support).
Tip Joomla includes the phpinfo() page within the Administrator interface. First select the System Info option on the Help menu. If you click the PHP Information heading, you will see the PHP information conveniently displayed in the Joomla window. Simply look for the section labeled gd.
On Linux, make sure the GD2 library is included with your version of PHP through the phpinfo() call. Near the top of the information returned by phpinfo() (perhaps the third entry), you will see a row titled "Configure Command." If GD2 is available, you should see an entry like this in the right column:
cscript /nologo configure.js "--with-gd=shared"
If GD2 is not present on your system, you will need to install it to use the Phoca Gallery image generation. While GD2 is included with the current PHP installers, it is an optional extension and is not installed by default. To obtain the GD2 file, simply download the entire PHP installation archive (ZIP or tar) file from www.php.net/downloads.php.
Open the installation archive and browse to the /extensions folder. In this folder, you should see a GD2 file (such as php_gd2). Extract that file and place it in the extensions folder of your active PHP directory.
To allow PHP to use it, you still need to activate it in your PHP configuration file. Open your PHP configuration file (possibly named php.ini) in a text editor and find the following directive:
;extension=php_gd2.dll
Delete the semicolon (;) from the front of the line and save the file. When PHP is restarted, the GD2 library should load. Be sure to restart the Apache server after this change or the library will not be found.
Note If you are using a remote web host and your service provider uses cPanel for configuration, you can activate GD2 from there. Check in the Update Apache section for a GD2 check box. Selecting the check box will activate the GD2 library so the thumbnails can be rendered.
Configuring Phoca Gallery
With the Phoca Gallery component installed, an FTP server running, and GD2 operational, you are now ready to configure the component. Under the Components menu, you should see a Phoca Gallery menu. Select the Control Panel option from that menu and you will see the screen shown in Figure 10-4.
If you want to configure your preferences, click the Parameters button and modify the Phoca Gallery global settings. For now, leave them at their defaults and set up a sample gallery.
Before you begin working in Phoca Gallery, it's useful to create folders for a few of the albums where you will keep photos. From the Joomla Administrator interface, select the Site ![]() Media Manager option. You will see the tree view of the folders available in the
Media Manager option. You will see the tree view of the folders available in the /images directory.
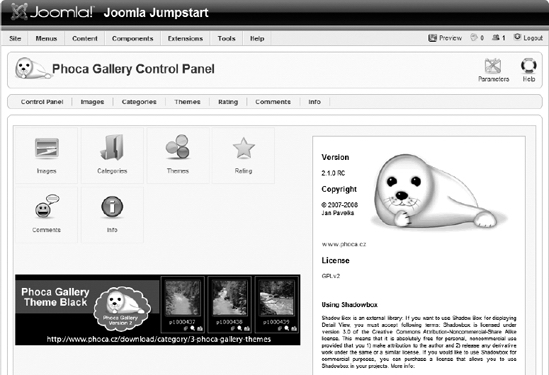
Figure 10-4. The Phoca Gallery Control Panel allows access to all of the functional areas of the component.
A phocagallery folder should be created for you. Phoca Gallery will look for all images within this folder. Click the phocagallery folder in the Media Manager and it will display the empty directory (apart from a possible thumbs folder). In the right text box in the Files panel of the Media Manager, enter vacation for your vacation folder, and click the Create Folder button.
The display should update and show your new folder.
Managing Phoca Gallery
With the category folder created, you're ready to add images to the system. Like Joomla itself, Phoca Gallery organizes content under user-defined categories. Before you begin adding image files, you will need to create one or more categories to hold them.
To create a new category, click the Categories option in the Control Panel interface of the Phoca Gallery component. An empty list of categories will be displayed. Click the New button to create a new category. The Phoca Gallery Category: New screen will be displayed, as shown in Figure 10-5. Enter information relevant to your new category and click the Save button to store it in the gallery. That's it—you're ready to add some photographs.
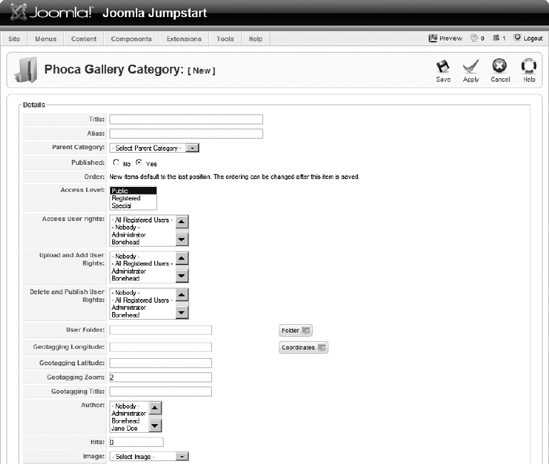
Figure 10-5. The Phoca Gallery Category: New screen allows entry of category title, name, parent, and description.
For the Title parameter, enter Vacation Photos. To have the category use the folder you created earlier, click the Folder button. A file browser will appear, as shown in Figure 10-6. Click the down arrow at the bottom of the vacation folder. The file browser will close and the name of the folder will be populated in the User Folder parameter field.
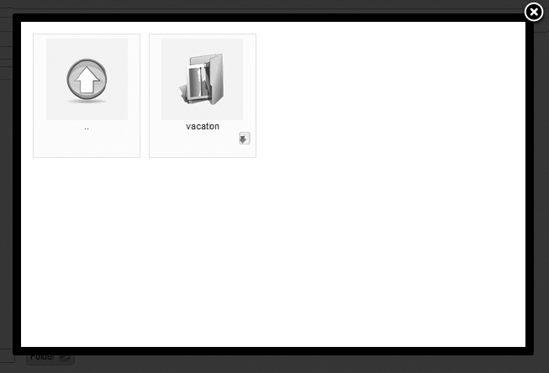
Figure 10-6. The file browser should show the new folder.
Click the Save button to store the changes to the category, and then return to the Control Panel and click the Images icon. Click the New button to add an image.
Note You can load multiple images into Phoca Gallery using the Multiple Add button, which sits to the right of the New button.
Next, click the Image button to upload an image. Use the Browse button to select an image and click the Start Upload button to upload it. You will see a status box as Phoca Gallery creates the thumbnail.
Select the image that you just uploaded and the upload box will close. The name of your image should now appear in the Filename parameter box in the Details panel. Set the Name parameter to First Image.
Select the Vacation Photos category from the Category -drop-down menu. Now click the Save button. You should now see your image in the Phoca Gallery Images window. In the column titled Functions, you can manipulate the image, including rotating it clockwise and counterclockwise. Click the Multiple Add button in the top right corner of the Phoca Gallery toolbar. The Photo Gallery Multiple Add interface will allow you to select a category where the new photos will be filed.
You can choose one of three methods to add photos (see Figure 10-7): existing files in the gallery folder, single file, or ZIP archive. Adding a single image file or a ZIP archive of files is done in the same manner as adding an extension to the Joomla system. For the folder/directory scan, all of the images currently stored in the gallery folder should be displayed.
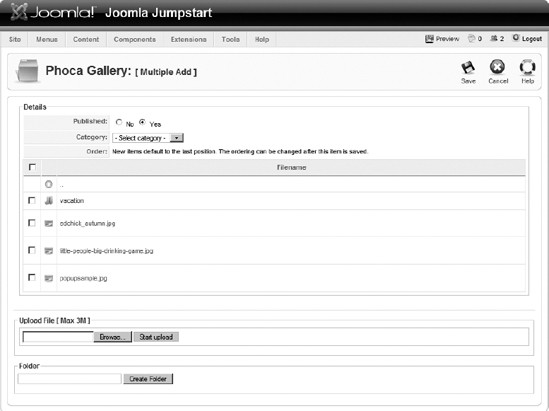
Figure 10-7. There are three upload options for Phoca Gallery.
Upload a few images right now so a gallery will be visible when you add the gallery display to the Joomla system. If you have a large number of photos or individual images that have large file sizes, it is recommended that you use an FTP server to make the transfer quick and more reliable. The size of the HTTP image upload (performed through the Joomla Administrator interface) is determined by the maximum upload size set in the PHP configuration file. If you want to allow larger uploads, you will have to increase the size of the upload_max_filesize parameter to greater than 2MB.
Note If you attempt to upload and receive an error, there may be a configuration parameter that isn't set properly. For example, if you don't have the GD2 plug-in working properly, Phoca Gallery will return an error in the server log that states that the create image function wasn't found when it attempted to create the thumbnail for the image. If you encounter such a problem, return to the earlier "Configuring Phoca Gallery" section for instructions on making sure that the FTP server is installed and GD2 is functioning properly.
Creating a Menu for the Component
Before you can see the images that you've loaded into Phoca Gallery, you will need to create a Joomla menu to access and display the Phoca Gallery component. Go to the Menu Manager and open the menu items for the Main Menu by clicking the Edit Menu Items icon. Click the New button to create a new menu.
Click the Phoca Gallery item to expand the tree to show the various components. Select Phoca Gallery Category Layout, as shown in Figure 10-8. Type a name for the menu (I chose to name my menu Vacation Gallery) and click the Save button to store it in the Joomla system.
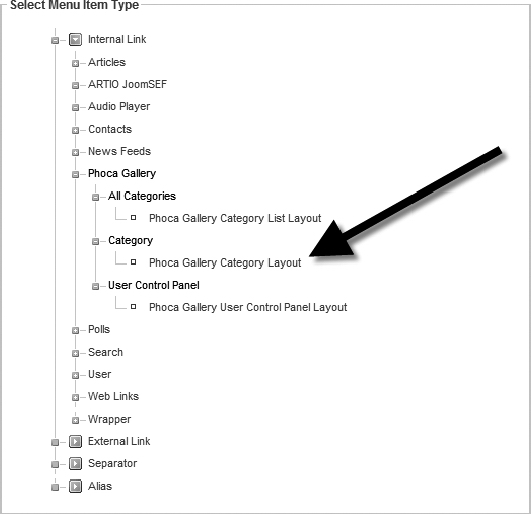
Figure 10-8. Select the Phoca Gallery option to create a connected menu.
Display the home page of the site in a browser window and you should see the photo gallery option at the bottom of the Main Menu list (see Figure 10-9). When you click the link, the categories will be displayed in the Joomla page.

Figure 10-9. Click the photo gallery link to display the gallery in the component space.
Phoca Gallery Front-End
Phoca Gallery has a simple user interface. All categories are displayed with a thumbnail of the first image uploaded. Selecting a category will display a table of all of the photos in that gallery. Clicking an image within the category will display it in real size. Clicking the Magnify icon under any picture will display a light box display of that picture and offer controls to move forward/backward through the images or begin a JavaScript-based slide show.
Phoca Gallery includes literally dozens of options to customize the gallery presentation. Return to the window or tab with the administrative interface. Since you clicked Apply to save the menu settings, you should still see the menu screen. Expand the Parameters (Component) panel and you'll see the many available settings.
Many of the settings will show the Use Global selection. These reference the selections that you can make by clicking the Parameters button in the top-right corner of the Phoca Gallery Control Panel.
Scroll down to the Comment Settings area, set Display Comments to Yes, Comment Box Width to 80, and Maximum Comment Characters to 160, as shown in Figure 10-10. Click the Save button to store these new settings.
Now when you access the gallery (as a registered user), you will see a comment text box directly below the image gallery, as shown in Figure 10-11. Users can only enter one comment per category; once entered, the comment cannot be edited.

Figure 10-10. Set the comment settings to show a box with a width of 80 and 160 maximum characters.
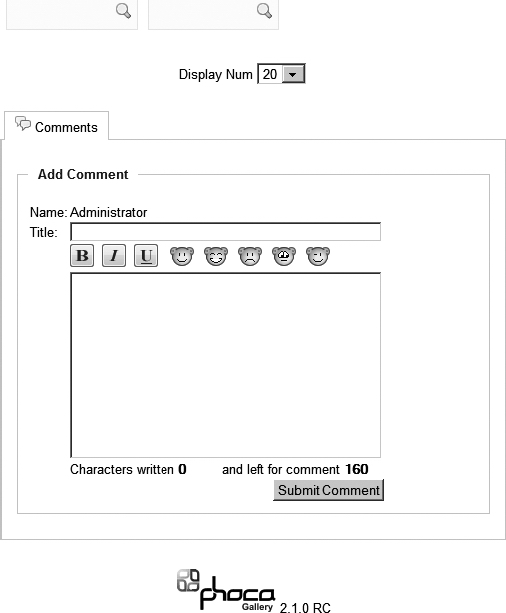
Figure 10-11. The comment text box allows users to add comments and feedback to individual categories.
On the Administrator interface, you can access the Phoca Gallery Comments Administrator from the Control Panel. Comments can be edited, published/unpublished, deleted, reordered, and recategorized as needed.
You have seen how easy it is to add a gallery to Joomla. However, you might need a more powerful gallery that allows user uploads, better categorization, a shopping cart for ordering, and other advanced features. Gallery2 provides all of those features and more.
Gallery2
Gallery2 (see Figure 10-12) is a full-featured, industrial-strength picture gallery application. Unlike the Phoca Gallery component, which was developed expressly for use within Joomla, Gallery2 was written for independent execution in PHP. Like many of the more established photo gallery implementations, Gallery2 was created for the broader web server market.
Fortunately for Joomla users, a bridge extension was created to wrap Gallery2 for use within Joomla. The extension makes Gallery2 appear to a Joomla visitor as if it is executing directly within the Joomla web site. On the Joomla web site (http://extensions.joomla.org), you can find many such bridge extensions that wrap PHP software not natively written for Joomla.
Tip At the time of this writing, Gallery3 is in the early stages of release—although there is no available Joomla bridge for it. Since Gallery3 will also be initially supporting fewer deployment platforms than 2, this section focuses on the second version of Gallery. If there is a stable version of Gallery3 with a Joomla bridge available when you intend to deploy a photo gallery, you might look into it.
Since Gallery2 was written for independent execution, it requires a separate installation and has its own system requirements. While most web providers that host Joomla will be able to support Gallery2, it is important that you check the requirement lists before you attempt to deploy any extension.
To execute properly, Gallery2 has the following requirements:
- PHP version 4.1.0 or above with
safe_modedisabled - MySQL 3.x or above
- A graphics execution library (such as GD2.x or above, ImageMagick 4.x or above, GraphicsMagick 1.x or above, or Netpbm 9.x or above) for creating the thumbnails and handling image resizing
- Drive space for photo storage (more than you might think)
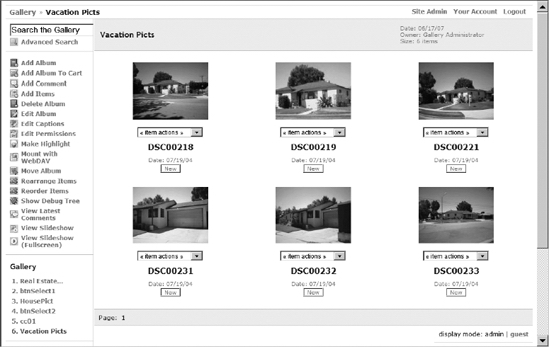
Figure 10-12. The Gallery2 display when running as a standalone PHP application
In contrast to the simple installation of Phoca Gallery, you can see that Gallery2 places more demands on the server. However, the trade-off is the substantial functionality that Gallery2 grants both the front-end user and the administrator of the system.
The most significant challenge of supporting gallery plug-ins for many web providers is the graphics execution libraries. Few web providers will allow you to install execution libraries that are not part of their current system. Fortunately, most web hosts have one of the libraries or provide a plan that can give you access to them.
Tip While you can use GD2 (as you may already have it installed for use with Phoca Gallery), it may not be your best option. At the time of this writing, ImageMagick produces thumbnails and resized images much more quickly than GD2. Netpbm, on the other hand, produces the sharpest thumbnails with the most fidelity to the original image. You may consider using one of these extensions if you have the option.
Downloading and Installing Gallery2
Gallery2 is an open source project, so it is available in several downloadable forms. You can download the current version from the Gallery2 home page, at http://gallery.menalto.com.
The application is available in four installation versions:
- Minimal: Contains the basic application as well as two presentation themes, three graphics toolkits, and the essential functionality modules (similar to Joomla components)
- Typical: Contains the basic application as well as six presentation themes and the most popular modules
- Full: Contains the basic application as well as six presentation themes and all the available modules (there are 56 at the time of this writing)
- Developer: Contains the basic application as well as six presentation themes, all the available modules, and developer tools that allow you to further develop Gallery2 as well as create you own modules
You can also access the Subversion version control system to download the latest development version of the Gallery2 files. However, I don't recommend such a path for your first experience with the application.
I would recommend that you use the typical installation unless space is not precious (as it is on most remote web sites). On a staging server, the full installation is a good choice, as it will demonstrate everything that Gallery2 has to offer.
Create a folder called /gallery2 at the same root where the Joomla system is executing. Joomla will need to access this directory, so it is generally easiest if the folder is located in the same file permissions area as Joomla. On most Linux systems, the path will likely be based on your username and so will be similar to this:
/home/username/public_html/gallery2
On Windows, the directory path may look like this:
C:Program FilesApache Software FoundationApache2.2htdocsgallery2
Copy all of the files from whichever of the four installation archives you've chosen into the gallery2 directory. You will need to execute the setup from within the directory in order to configure that application.
While Gallery2 is optimized for execution on the Apache web server, it can be configured to run on Microsoft IIS. Check out the IIS installation page on the documentation site (http://codex.gallery2.org/index.php) for more information.
Note Some web service providers have built-in Gallery2 installation features as part of their service. These hosts include DreamHost, Go Daddy (as a value-added application), PowerWeb, OpenSourceHost, Delphian Internet, HostGo, CirtexHosting, and DownTownHost. Before you do an installation from scratch, check to see if your host provides one that is preconfigured to match its system parameters.
Creating the gallery2 Database
Before you can install Gallery2, you will need to create the database that will be used by the gallery system since the installer will not do it for you. Although Gallery2 is capable of using several database servers (including Microsoft SQL Server, DB2, PostgreSQL, and Oracle), since Joomla already uses MySQL, that is the database server that will be used here.
To create the gallery2 database, execute the MySQL Administrator application. Once you've logged onto the server, right-click in the Schema pane and select the Create New Schema option (see Figure 10-13). Set the name of the schema to gallery2 for simplicity.
The schema should be left empty, as the Gallery2 installer will populate it with the necessary tables and foundation information. It is a good idea while in the MySQL Administrator application to create a user account that will be used by Gallery2 and has full access privileges to the database. That way you won't need to have the application access the database through a MySQL administrator account.
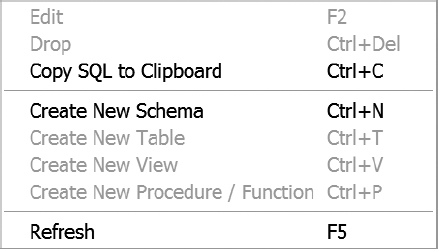
Figure 10-13. Right-click in the Schema area and select the Create New Schema option from the context menu.
To add the user, select the User Manager. Create the new account with the name galleryadmin and set an appropriate password. In the permissions section, give the account all privileges for the gallery2 database. Simply click the left-facing double arrow (<<) button to put all of the permissions in the user permission list, and click the "Apply changes" button to grant the privileges (see Figure 10-14).
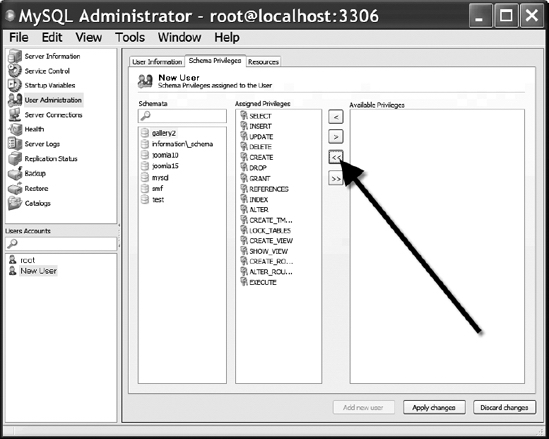
Figure 10-14. Grant the user all permissions for the gallery2 database to the new user account.
Configuring Gallery2
With everything in place, you can activate the Gallery2 installation process. Installation is provided by a dozen-step setup wizard that will do most of the work for you. It will configure all of the necessary files, allow selective activation of installed modules, create the necessary database tables, and populate the tables with the foundation data.
You can begin installation of Gallery2 by accessing the index.php file in the /gallery2 directory. On the Windows platform, your URL may look like this:
http://localhost/gallery2/index.php
The first step of the installation is a simple welcome screen; you can click the Next button to move to the second screen. The second step requires you to create an authentication key file (see Figure 10-15) that you will need to transfer to the web server running Gallery2. This authentication key is later used by the system to prevent hackers from using forgery attacks.

Figure 10-15. The authentication screen provides a link to an autogenerated file for placement on your server.
Right-click the link to the authentication file and save it to your local drive. On a staging server, you can save it directly into your /gallery2 directory. If you're using a remote web host, save it on your local drive and then use your FTP software to upload the file to the proper directory.
Once the file is in place, click the Authenticate Me button to check the file. If there are problems with authentication, go to the Gallery2 home page, which is often updated to detail resolutions to problems users have with authentication on various web providers.
If the authentication is successful, the installer will proceed to the system check execution, as shown in Figure 10-16. You can see from the figure that my web host has several items that generate warnings in this verification phase. If you encounter any failures in the system check, most can be remedied with changes to the PHP configuration file.
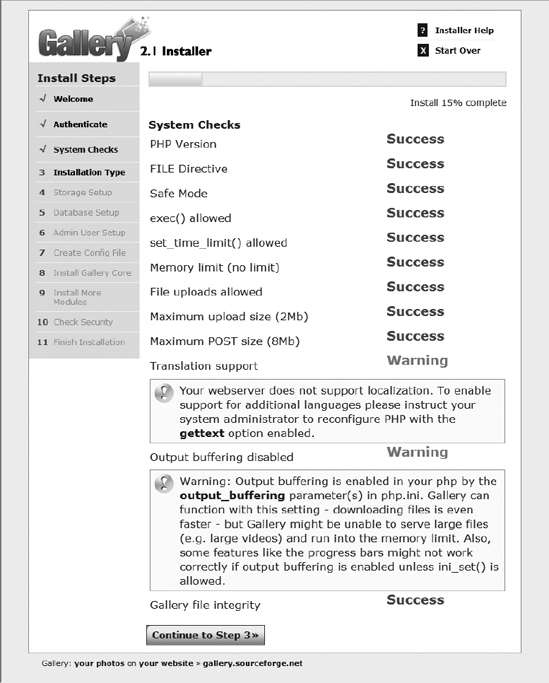
Figure 10-16. The system check attempts to validate the functionality of the web server for proper Gallery2 execution.
The next screen allows you to choose whether there will be multiple installations of Gallery2 running on a single web server (see Figure 10-17). In most cases, you will want to select the "Standard installation" option and continue.
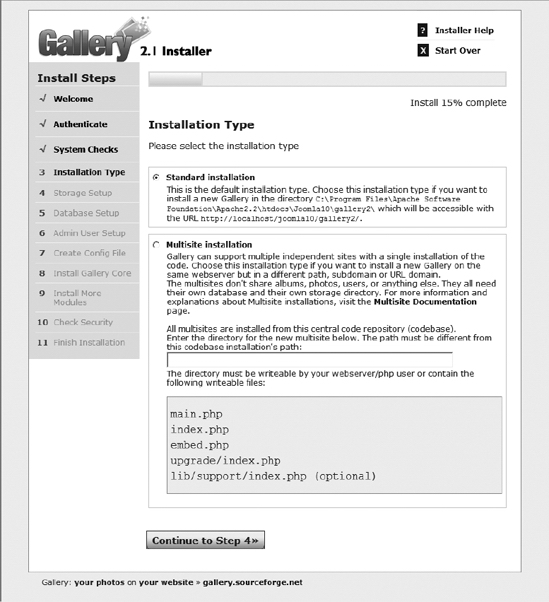
Figure 10-17. This screen allows configuration of a standard installation (normal for a single site) or a multisite installation.
Storage of your pictures is important. For greatest security, it is best to locate the /images folder so that it is available to the Gallery2 system, but not accessible directly through the web server. For this reason, the Storage Setup screen (see Figure 10-18) will request that you create a folder outside the standard web server path and also make the directory name nonstandard so that it cannot be easily guessed by hackers. Therefore, if possible on your Apache server installation, try to locate the folder outside the /htdocs folder.
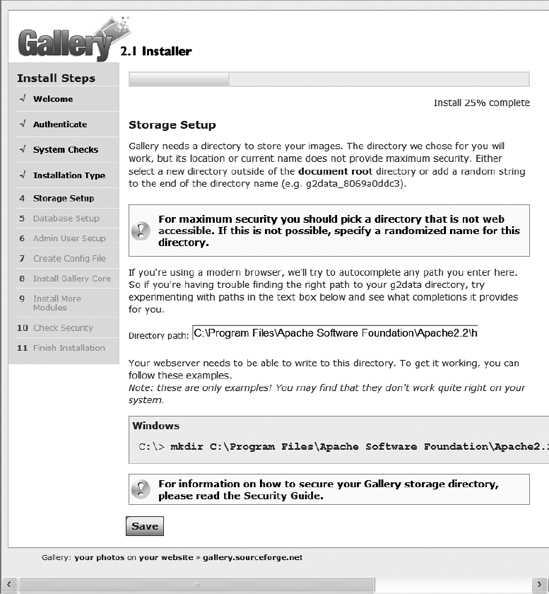
Figure 10-18. If possible, locate your image storage folder outside the general web server path.
You will need to create this directory for the images before you click the Continue button. When you do continue, the installer will check to make certain the directory is accessible and will provide a recommendation if the directory is not as secure as it might be.
On the Database Setup screen (see Figure 10-19), you are prompted for access parameters to your database server. At this point, the installer expects that you have already created the database that it will need to write gallery information. If you haven't created the database already, go back and do that now. Then you can enter the login information for the galleryadmin user that you created in the MySQL Administrator.

Figure 10-19. Enter your database access parameters on the Database Setup screen.
The Gallery2 installer will check the connection and write the default data into the database tables. That takes care of most of the heavy lifting for the installation. The next screen is the Admin User Setup screen, which lets you configure the username, password, and e-mail address for the administrative user of the Gallery2 application. I would recommend that you make this setting match your Joomla Administrator user for ease of configuration.
Clicking the Continue button on the admin setup screen will execute the procedure to create the Gallery2 configuration file (config.php in the /gallery2 folder). If there is any problem with the creation of the file, you will be notified and given the opportunity to correct it and try again.
Tip The configuration file is critical to the proper functioning of the Gallery2 system. For this reason, I would suggest that you routinely back up the file outside the web server path (for security reasons). If the configuration file becomes corrupted (through manual editing or a system fault), Gallery2 will likely stop functioning. Restoring this file can save you from having to do a reinstall of the system.
Clicking the Continue button will execute the process that installs the gallery core modules. If there are any problems with this stage, once again you will be notified of the problems and given the opportunity to correct them.
The Install Other Modules screen (see Figure 10-20) shows a complete list of the modules available for installation. If you downloaded the full installation, you may see a list that spans several screens and literally dozens of optional modules. Whichever installation package you chose, you can leave all of the modules checked for installation unless you see a module that has functions that you will clearly not need to provide.
The final installation screen provides access to a security guide. Read this guide! It will detail all of the best ways to ensure Gallery2 is as secure as possible. Since the application allows uploads, generates new files on the server, and displays images (a common point of entry for buffer overrun hacks), it is critical that you make your server secure. Even if you're executing the application on a remote server, it is a good idea to read through this security manual.
That should be it! You should be able to access the Gallery2 system through a URL such as this:
http://localhost/gallery2
Log onto the Gallery2 system as an administrator to begin. Unlike Phoca Gallery, Gallery2 uses albums to organize images instead of categories, although the difference is only in semantics. Add some albums and photos to make sure the system is working properly. Once you have run through some of the basic functions of the gallery application, you are ready to incorporate it into the Joomla interface.
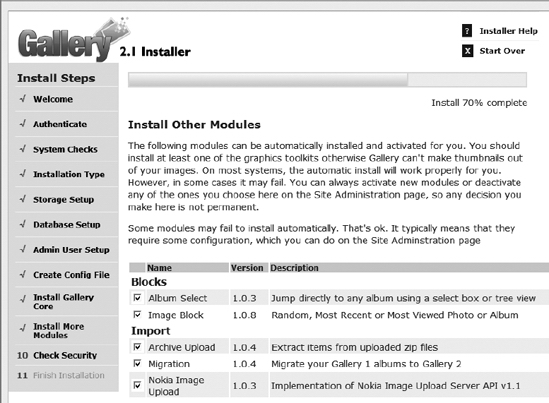
Figure 10-20. The Install Other Modules screen shows a list of all non-core modules for installation.
Using Gallery2 from Within Joomla!
Gallery2 can be run on a web server as a separate application, as you have it installed now. However, it is much more convenient to integrate it with your existing Joomla site. This way, not only will Gallery2 run inside the template interface, but it can also use the Joomla logins for all users on the system. That way you can use a single registration system. Incorporation of Gallery2 within the overall site interface will also provide a single, consistent user interface for web visitors.
To adapt Gallery2 for use within Joomla, you will need to install a component that wraps the gallery functionality. Known as Gallery2 Bridge, this component provides the services of integrating the interface and coordinating the system functions.
Installing Gallery2 Bridge
To let Gallery2 interoperate with Joomla, you will need to download the Gallery2 Bridge component and JoomlaLib, which is a library of routines that the component uses. For the most current version of these extensions, check out the main Joomla extension directory (http://extensions.joomla.org). Alternatively, you can find both the component and JoomlaLib at http://trac.4theweb.nl. You can also find the bridge on JoomlaCode (http://joomlacode.org/gf/project/gallery2_bridge/frs).
Download both components and install them through the Joomla Extension Manager. You should install JoomlaLib first so that the routines will be available to Gallery2 Bridge. When the Gallery2 Bridge installation is complete, Joomla will notify you (see Figure 10-21).

Figure 10-21. Complete installation of Gallery2 Bridge
Before you execute Gallery2 within Joomla, you will need to configure the extension so that it will know where to look for the gallery information.
The Gallery2 submenu under the Components menu has three options: Config, User Management, and Album Management. Select the Config option to set up the component to access your existing installation. In the top-right corner of the configuration window, you will see a Wizard button. Click it, and the wizard will take you step by step through the bridge configuration.
When you click the Wizard button, the Gallery2 URL configuration screen will be displayed, as shown in Figure 10-22. This parameter is the most important of the installation, as the bridge uses this path to locate all of the other files it needs for Joomla interoperation.
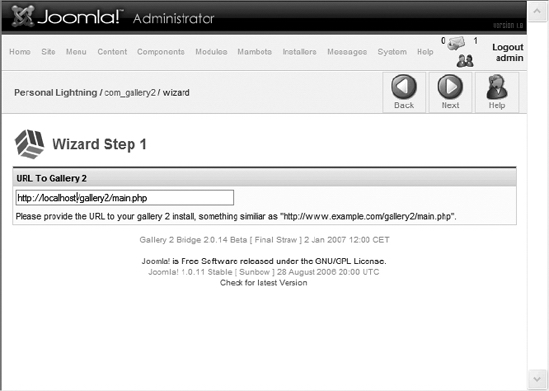
Figure 10-22. Configuration of the Gallery2 Bridge Wizard begins with entry of the URL path to the Gallery2 application.
Follow the wizard through the straightforward steps (such as whether you choose to integrate the registered user lists) and the bridge should be operational. Before you can see it displayed within Joomla, however, you will need to add a menu to access it.
The central bridge component is listed simply as Gallery2 in the Components menu. You already know how to add a menu to direct the site to a component. Create a menu item to address the Gallery2 component so that when you click the menu entry, the Gallery2 application will be rendered into the central column of the Joomla template, as shown in Figure 10-23.
In addition to the main component that integrates the core user interface of Gallery2 into Joomla, there are also a number of modules that allow you to display particular items drawn from the gallery interaction. These modules are available through the Gallery2 Bridge web site, where you downloaded the main component.
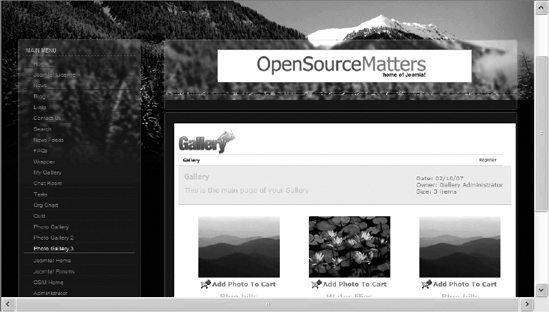
Figure 10-23. Gallery2 will appear in the central template column.
There are five available modules:
- Statistics: Provides statistics that directly relate to the popularity of a particular gallery. Data includes information on images, albums, comments, and totals of the gallery access.
- Sidebar: Displays the sidebar menu that is part of the Gallery2 standalone application. As a module, this menu can be better integrated into the Joomla template interface, and frees up vertical space since the menu doesn't have to be displayed within the component.
- Image: Allows selection of a specific image from the gallery to be displayed in the module position. Options include Random Image, Last Added Image, Most Viewed Image, Random Album, Last Added Album, Most Viewed Album, Daily Image, Weekly Image, Monthly Image, Daily Album, Weekly Album, Monthly Album, and Specific Picture.
- Comments: Shows the user comments about the various images stored in the Gallery2 system.
- Album: Presents a list of current photo albums for more direct access than through the Gallery2 interface.
Each of the modules functions just like a standard Joomla module. Simply install the module, configure it to the parameters that you desire, and add it to a display position.
Other Gallery2 Plug-Ins
If you want to further extend the Joomla/Gallery2 interface, there are a few more plug-ins that offer additional features to bridge these two systems. The following list describes a few of these plug-ins:
- Search Bot: This plug-in integrates the photo and gallery descriptions held in Gallery2 into the Joomla search engine. This eliminates dual search requirements and makes the site more consistent.
- Joomap: This integrates Gallery2 into the sitemap generated through Joomap (including support for Google Sitemap XML generation). The plug-in supplies the proper URLs of images to the sitemap-generation system.
- Community Builder: This plug-in integrates the Gallery2 content with the Community Builder interface. The Community Builder interface can provide much more robust security granularity for images and albums.
Note that all of these extensions are plug-ins and, as such, interface with Joomla at a very low level. Therefore, if you are having slow-downs in performance or untraceable site problems, be sure to check that all your plug-ins are operating correctly.
Conclusion
The photo gallery extensions for Joomla present an incredible opportunity for sharing and/or marketing digital images. The explosion of digital cameras and even cell phone imaging has made the ability to share images an exciting new frontier. With the proper extensions, a Joomla site supplies an excellent foundation for image distribution.
For small or personal sites, the Phoca Gallery extension combines simple installation with straightforward administration. It can readily display your images in a user-friendly way that complements Joomla's visual style. Although there is no opportunity for users to upload to the gallery (access to the Administrator interface is required), this gallery is perfect for quickly sharing photographs. The FTP-based interface helps to avoid possible file permission problems.
Larger galleries and commercial image management sites can use Gallery2 to provide everything from multiformat upload to a shopping cart for image purchases. With Gallery2 Bridge, the Gallery2 application can be incorporated into the Joomla deployment for seamless integration. Gallery2 even features its own plug-in architecture for customization and feature augmentation.
While only two gallery extensions were covered in this chapter, there are literally dozens of other gallery options for Joomla. Some of the most impressive gallery applications that have been integrated with Joomla use an Adobe Flash plug-in to offer more vigorous user interaction and display than a traditional web-based gallery.
In Chapter 11, you'll learn about a comprehensive e-commerce extension that will allow you to add catalog and ordering capabilities to your Joomla site for almost any kind of product or service.