
CHAPTER 11
Joomla! E-commerce
Although Joomla is used for a large number of hobbyist web sites, with the proper extensions it can become a phenomenal commercial platform for e-commerce. On the Web, e-commerce has become big business—particularly for B2B (business-to-business) transactions. To tap into the worldwide customer base that the Internet makes available, you can configure your Joomla site to allow for online purchases or catalog display.
This chapter will focus on a particular open source e-commerce solution called VirtueMart. VirtueMart is a popular web store application with over 600 registered online stores that use its technology to offer online shopping (and over 1.5 million downloads of the software). To show you how VirtueMart works, I'll lead you through the steps of creating an online store called Movie Example. Your sample store will sell old movies on DVD. By working through a real-world example, you can see exactly how a virtual store can be configured and deployed.
VirtueMart: The Joomla! Store
VirtueMart is an e-commerce solution made specifically for execution within Joomla. It provides complete product catalog, inventory control, and shopping cart capabilities. The entire application can be administered through a web-based interface like Joomla itself. It can also accept the import of an existing product catalog using comma-separated value (CSV) files that contain lists of product prices, descriptions, parameters, cross references, and product details.
One of the most full-featured Joomla e-commerce extensions, VirtueMart provides the following:
- Sales and management of downloadable products (such as software and e-books)
- Presentation as either an online catalog or a catalog with shopping cart capabilities
- An administrator interface integrated with the Joomla front-end so that VirtueMart administration is available without full Joomla administrator privileges (so employees can manage the virtual store without having access to the Joomla back-end of the main site)
- Custom attributes for each product, allowing the display of a drop-down list of choices
- Inventory and customer order tracking features
- "Shopper group" creation and administration for custom tracking and pricing per group
- A shipping rate calculator and interface to shippers such as UPS, USPS, InterShipper, and Canada Post
- Report generation for orders, items sold, and revenue
- Integrated search capabilities
- Interfaces with live payment gateways such as PayPal, eWAY, WorldPay, and Paymate
- Architecture allowing plug-ins for custom authoring of modules, such as for payment and shipping
VirtueMart itself is divided into a number of different extensions, so only the desired parts need to be installed. The minimum VirtueMart deployment requires only a single component and a single module to be installed. The main component that supplies the virtual store interface is very efficient, so the store adds little overhead to the existing Joomla system.
System Requirements
If you are already running Joomla on your server, it is likely that you will be able to use VirtueMart. The minimum configuration is as follows:
- PHP 4.3 or above with the PHP extensions to interface with MySQL, XML, and zlib activated
- MySQL 3.23 or above
- Apache 1.13.19 or above; support for HTTPS (OpenSSL) and cURL recommended
Be sure to check your system configuration before you attempt to install VirtueMart. The application doesn't have a system check for minimum system validation like Joomla does, so the effects on a noncompliant system are unknown.
Download Options
VirtueMart (formerly known as mambo-phpShop) is a free, open source e-commerce solution that is released under the GNU GPL (like Joomla). It is available for download from the VirtueMart home page, at www.virtuemart.net.
VirtueMart is a collection of modules, components, and plug-ins, so there are many ways to download and configure it. Each of the extensions requires separate installation in Joomla. On the home page, there are three packages available for download:
- Complete installation: The complete package features the central VirtueMart component, the primary module, ten additional modules (for things such as displaying the latest product or the top ten products), and two plug-ins (for search and content).
- Joomla installation (VirtueMart eCommerce Bundle): The providers of VirtueMart have created a complete Joomla installation image that includes VirtueMart pre-configured with the installation. If you already have Joomla installed, you do not need this version. This installer makes creating a turnkey VirtueMart site simple and quick.
- Upgrade installation (patch package): If you have an older version of VirtueMart already installed, upgrade versions are available that can retain your existing data while adding the newer features and bug remedies.
There are ten optional modules (not required for proper VirtueMart execution) included with the complete installation package:
mod_product_categories: Displays the product categories to the visitormod_productscroller: Presents a marquee that scrolls information about selected productsmod_virtuemart_allinone: Shows a tabbed display that includes tabs for featured, top ten, random, and latest product listsmod_virtuemart_cart: Displays a small cart icon link that can take the visitor to the page that shows the current contents of the shopping cartmod_virtuemart_featuredprod: Shows the products that are selected to be on special salemod_virtuemart_latestprod: Presents a list of the latest products added to the catalogmod_virtuemart_manufacturers: Lists all of the manufacturers or brands of products available and allows listing of products by these categoriesmod_virtuemart_randomprod: Displays a random product from the entire catalog or from a specified categorymod_virtuemart_search: Shows the search box that allows for catalog searchingmod_virtuemart_topten: Lists the ten best-selling products on the site
Download the installation file that matches your needs. All archives contain the installer files, which must be extracted before installation is possible. For example, the central VirtueMart cart module, named something like mod_virtuemart_cart_1.1.2.tar.gz, will be contained within the complete archive, possibly named VirtueMart_1.1.2-COMPLETE_PACKAGE.j15.zip.
Begin the installation by extracting the main module. It will have a name similar to mod_virtuemart_1.1.2.tar.gz. Use the Extension Manager to install it. Make sure that you set the module position to a position available in your selected template so that mod_virtuemart appears somewhere on your site.
After the module is installed, extract the main component, which will have a name similar to com_virtuemart_1.1.2.tar.gz. In the Extension Manager, install this component. Once the installation is complete, the success screen will present a button that can be used to install sample product data (see Figure 11-1). It is a good idea to work from a foundation, so click the button to install the sample data.
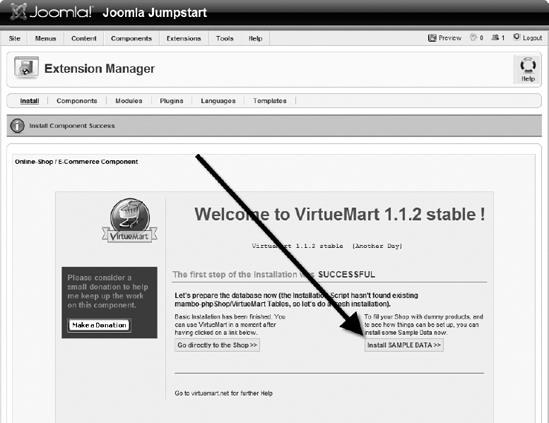
Figure 11-1. After the installation of the component is complete, you can install sample data.
Creating a Virtual Store
Once VirtueMart is installed, you can quickly and easily create an online store. One of the best things about this application is the flexibility of configuration. All settings can be changed later, so it is an excellent idea to start now and begin the setup process, even if you don't know the final settings you'll want. There are no mistakes you can't correct later.
As with a Joomla site, however, time invested in planning the structure of the store will benefit the site greatly in the future. By predefining the intended store structure, you can lay out the store from top down—first by creating product categories, and then by adding products to each category.
VirtueMart Control Panel
If you elected to install the sample data, after the upload is complete you will be automatically taken to the VirtueMart Control Panel, displayed in the Joomla Administrator interface (although it is accessible through the front-end as well). In the Administrator interface, it is accessible from the VirtueMart menu item on the Components menu. The Control Panel (see Figure 11-2) provides quick access buttons to the most useful screens of the component. The Control Panel also contains store statistics (accessible by clicking the Statistics tab) for an instantaneous summary of the current store activity.
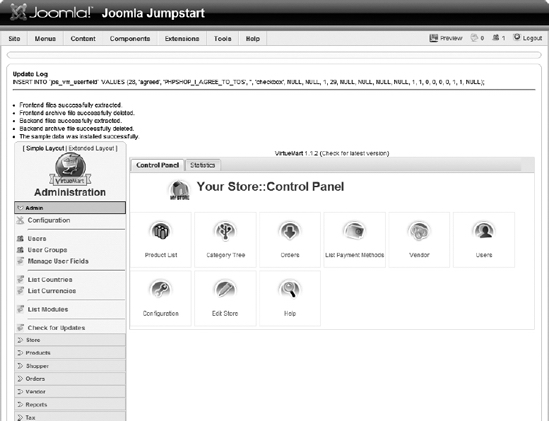
Figure 11-2. The Control Panel on the Administrator interface takes you to different parts of the virtual store setup.
The menu listing displayed on the right side of the Control Panel provides access to all of the VirtueMart screens. Most of the setup options, since they do not need to be regularly accessed after initial store creation, are not available as quick access buttons on the Control Panel. Use the menu bar to access them.
Tax Configuration
Due to the serious legal implications of taxation, you should begin your store formulation by creating a tax item that defines a tax rate. The default install includes a single entry for the state of California in the United States. Wherever you're doing business from, make sure that the tax rate is set properly for your region.
To set up a tax rate option that is different from the one installed (or to set up several), select the Add Tax Rate option from the Tax menu heading. The Add Tax Information screen (see Figure 11-3) will be displayed, on which you can make the appropriate selections.
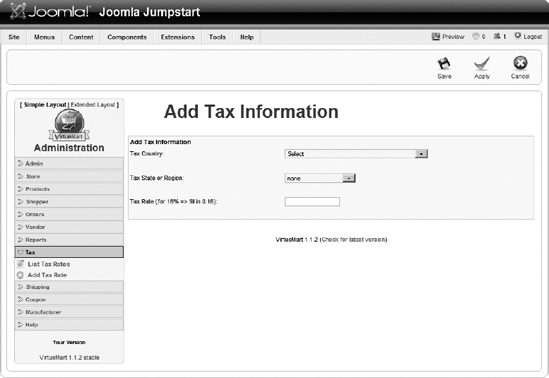
Figure 11-3. The Add Tax Information screen allows configuration of country, state/region, and tax rate.
VirtueMart includes an extensive list of countries and regions within those countries. If your country or region isn't included in the list, you can add it through the VirtueMart administrative interface. There is a List Countries submenu under the Admin menu that will display the Country List screen. That screen holds a New button for adding countries, which will add an entry to the jos_vm_country table.
To add a state or region, on the Country List screen click the Add a State button. Any added entries will now appear in the appropriate drop-down list. Note that these changes will have to be re-created on any other VirtueMart installations. Therefore, be sure to back up your entire Joomla database to allow for full restoration in the event of system failure.
Global Configuration
There are a great many settings available through the Configuration option of the Admin menu. A few options should be configured during the initial setup of your virtual store. When you display the Configuration screen, you are first presented with the Global tab and the associated options (see Figure 11-4).
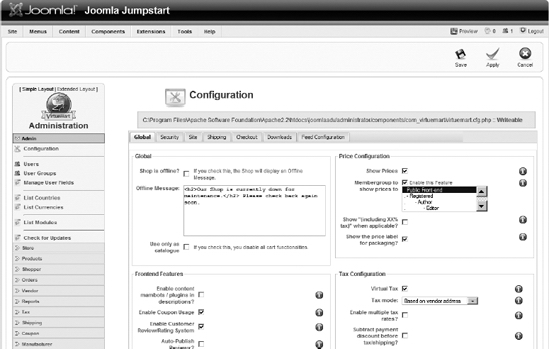
Figure 11-4. The Configuration screen holds the parameters for all of the global VirtueMart settings.
Global Tab Settings
To use VirtueMart strictly as an online catalog, you can check the "Use only as catalogue" option and the shopping cart aspects of the site will be hidden. For users who want an eCommerce site, the default tax options of the Global tab are appropriate, but be sure to check them for your needs.
On the Front-end Features pane, the Enable Customer Review/Rating System setting is active by default. Since this option allows users to not only rate products but also write reviews, consider carefully whether you want to leave it enabled. Unless you are a large company like Wal-Mart, a single bad review can negate a lot of potential sales. However, deleting bad reviews or stuffing the rating ballot box are not the choices most companies should take either. If you choose to keep this enabled, your company will have to take the good with the bad.
You should also review the legal information text displayed in the Legal Information Text field of the User Registration Settings pane. Since the default text holds such information as the return policy, you are committing your virtual store to the terms found in this copy. Be sure it accurately reflects the policies of your store.
Security Tab Settings
The Security tab contains the web configuration settings used to secure your store (see Figure 11-5). If you have an SSL certificate (see the "VirtueMart and Secure Sockets Layer" section later in the chapter), you can configure the URL here. You can also change the table prefix setting, the home page URL, and the error page URL, although modifications to these parameters are rarely required.
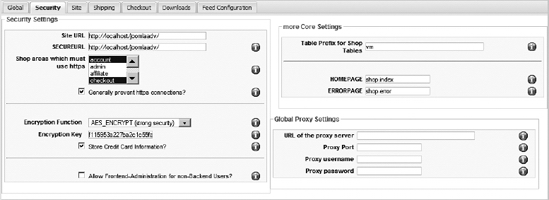
Figure 11-5. The Security tab contains parameters for the secure path, debugging, the page reference, and the database prefix.
Other Tab Settings
A majority of the settings available from the other tabs (Site, Shipping, Checkout, Feed Configuration, and Downloads) can be left as is for the initial site configuration. You may want to make certain that the items on the Shipping tab are configured to your desires. Also, if you are selling downloadable items, the Downloads tab will need to be configured with parameters such as the download root directory and the amount of time after purchase that a downloadable item is available to the customer.
If you've completed all of the global configuration settings for your virtual store, click the Save button to store the settings. In VirtueMart, the Save option will return you to the primary tab of the current area that is being used rather than move up one level—unlike the progression of the normal Joomla interface.
Configuring the Store
Before you open your virtual store, you need to configure it to represent your business. Select the Edit Store option under the Store menu. This option will display the Store Information screen (see Figure 11-6), which allows you to edit core business information, such as the store name, URL, address, phone, and site contact information. It allows you to upload a central image for the store. Note that the selected image is not actually uploaded and displayed until the Save button is clicked. Make sure that the image you upload is not overly large, as it will also be used on the PayPal login screen. If too large, it can hide the PayPal login information.
The Store Information screen also allows you to set the currency type, enter a general description of the store, and include a terms-of-service entry. When the Save button is clicked, VirtueMart presents a basic summary of the information entered.
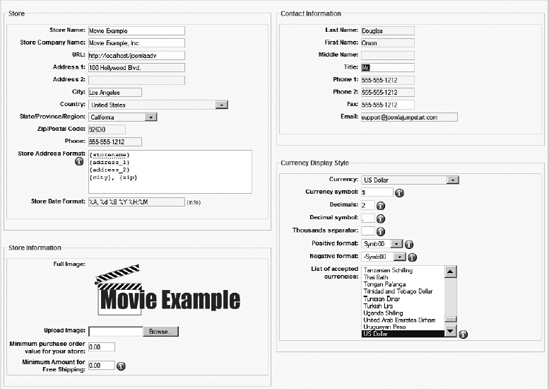
Figure 11-6. Set the store parameters to match the type of web presence you want to create.
Creating Categories
In VirtueMart, products are handled just as if a traditional mail catalog were being created. You can begin by adding categories for various products and then placing products in these categories. The categories can be used to sort the product list display for the user as well as for breakdown analysis in the administrative reporting.
Click the Products menu to expand it, and then click the Add Category option.
For our Movie Example store, begin by adding a Drama category (see Figure 11-7). Enter the category name and a brief description. The Parent drop-down list makes it possible to define hierarchical categories. You can specify the number of products that will appear per row. Also, if you're going to add a Category Browse Page (which is very similar to Joomla's Category List Layout) menu to your site, you can select the type of template to be used to display the item list.
The Category Flypage menu even lets you create a custom page template to be used for the display of the individual product items in this category. When you deploy your actual site, it is a good idea to provide a custom page with some category-specific backgrounds and images.
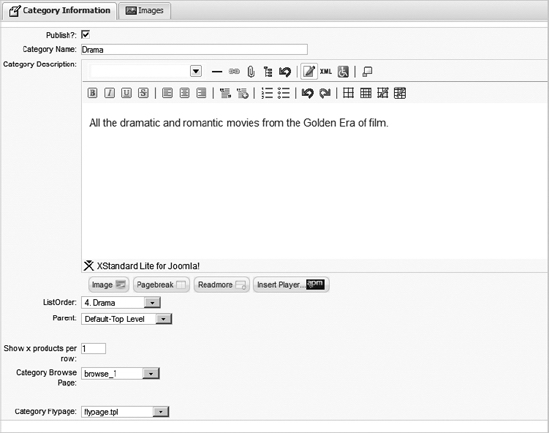
Figure 11-7. Add a Drama category to the sample virtual store.
The Category Description field uses the selected Joomla rich text editor (e.g., TinyMCE or XStandard Lite). Through this editor you can insert images, make font and style changes, and include other media such as a Flash animation.
Click the Save button to store the category information, and then add a second category to your virtual store. For the Movie Example site, I added a Comedy category. You will need at least two categories for proper display on the Front Page of the site. I also unpublished all of the other categories that were installed with the sample data.
Creating Products
To add a product to the catalog, select the Add Product option from the Products menu. Begin the new product definition by setting the title and whatever tracking number you will be using for your products (e.g., SKU, bar code, or Library of Congress number). Set the category to Drama (see Figure 11-8). For this example, I added the classic movie Casablanca. Enter the rest of the information (price, short description, product description, and any other parameters that you will use in your actual site).
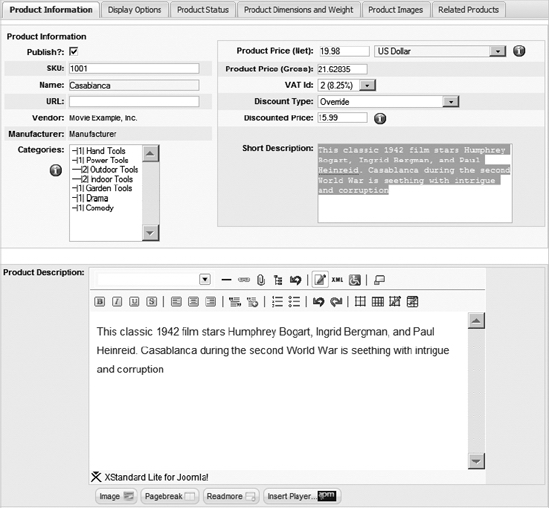
Figure 11-8. The Product Information tab shows each product and the category in which it is located.
Click the Product Status tab to enter the inventory information (see Figure 11-9). You can set an availability date to allow preordering of announced products. You can also specify availability text and/or a graphic to alert the user of the order fulfillment ship time for this product.
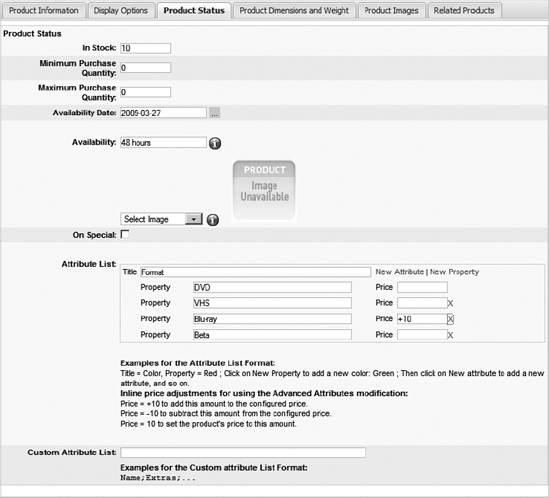
Figure 11-9. The product status parameters determine the number of items in inventory, as well as the availability of the product.
The attribute list is one of the many useful features of VirtueMart. You can click the Add Attribute link to add attributes and the Add Property link to add additional properties to the current attribute. For each property, you can also add a price adjustment if the customer selects that option.
Alternatively, you can enter the properties as a string of parameters through the Custom Attribute list. You can include multiple product option lists by using a semicolon (;) to separate the lists. A list should begin with the attribute name, followed by the set of options separated by commas.
For example, the Movie Example store offers each product in a variety of video formats. These formats can be selected by the customer when they add the product to their shopping cart. The attribute list for the product might look like this:
Format, DVD, VHS, Blu-ray, HD-DVD
When the user looks at this product through the VirtueMart interface, these options will be presented in a drop-down list, as shown in Figure 11-10. The selection that the user makes is stored with the order. If this were a site specializing in shoe sales, attributes such as stripe pattern, shoe size, shoe width, and color might be included as separate attributes.
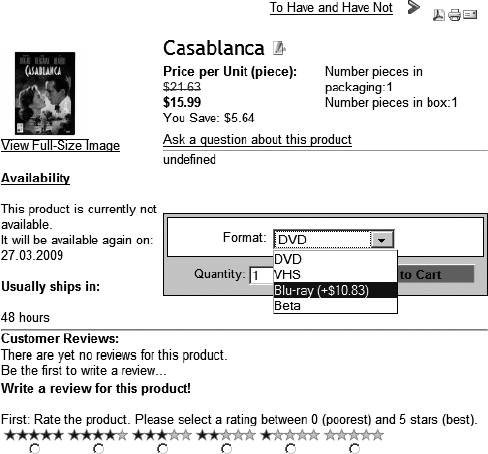
Figure 11-10. Attribute lists set on the Product Status tab will appear as drop-down lists for the product.
Click the Product Dimensions and Weight tab to set up the information useful for calculating shipping (see Figure 11-11). These parameters will be used by the various automated shipping applications, which can calculate the actual postage required for an order. If the product is downloadable, you can also specify the filename or browse to select the file for upload. The file isn't actually uploaded into the system until you click the Save button for the product.
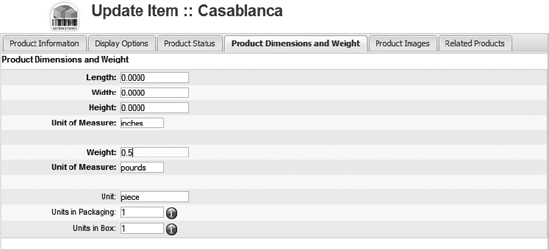
Figure 11-11. The Product Dimensions and Weight tab contains the parameters used for shipping calculation.
Click the Product Images tab (see Figure 11-12) to upload a product image and thumbnail of the product if desired. VirtueMart will automatically generate a thumbnail from the main image if you haven't created one already. The selected images will not be uploaded into the system until you click the Save button.
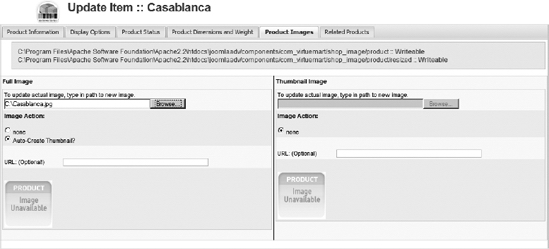
Figure 11-12. The Product Images tab allows you to upload an image and thumbnail to represent the product.
Finally, if there are any related products, click the Related Products tab. It will show a list of all the other products held in the system. If there are related products, you can select one or more of them from this list. When the main product is displayed on the site, the bottom of the page will contain a section titled "You may also be interested in this/these product(s):" and display the thumbnails and titles of any items that you have selected in the list.
Add a few more products so that your catalog provides a rudimentary example of how the site may look. I added an entry for The Flying Deuces, starring Laurel and Hardy, and placed it in the Comedy category. I also added another Bogart movie, To Have and Have Not.
To view the virtual store, add a menu item that refers to the VirtueMart component in the same way you have with past components. When a browser window is opened to display your Joomla site and the link to the component is selected, the categories available for browsing will be displayed at the top level. Selecting a category will display line items for each one published in the catalog, as shown in Figure 11-13.
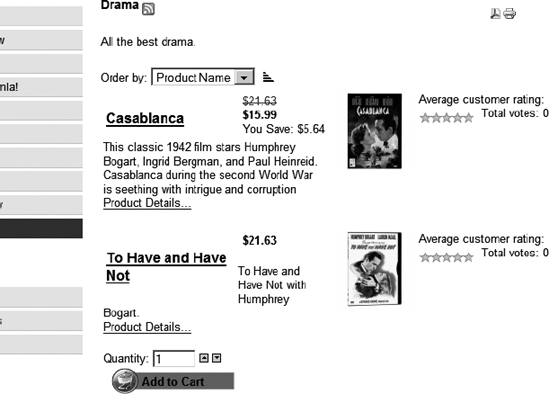
Figure 11-13. Selecting a category will display all of the products contained within it.
You've only just begun to configure VirtueMart for true deployment. The extension has many options, but this chapter will only cover the most important ones to get you up and running. Look through the options of the Administrator interface yourself. Most of the items not covered here are actually fairly self-explanatory.
VirtueMart and Secure Sockets Layer
If you are accepting confidential information over the Web (such as credit card numbers or birth dates), you need to make sure that transmission and receipt of information is secure. Normally, web information is broadcast in plain text, and the very nature of the foundation technology used by the Internet means that all information is passed through many different computers and routing points. That means that information can possibly be intercepted.
While it is essentially impossible to keep information from being intercepted (by a program known as a packet sniffer), it is possible to encrypt the data. That is the role of Secure Sockets Layer (SSL). Under SSL, the same information is broadcast and received, but before any communication occurs, a handshake is made between the web browser and the web server to set up a secure session.
When a secure session is enabled, a small lock icon appears in the browser window, such as that shown in Figure 11-14. Additionally, the URL of the web site, which normally begins with the http:// prefix, will begin with https://, which represents an HTTP secure connection. Anything transmitted between the two parties is now encrypted at one end and decrypted at the other. Although the traffic could still be intercepted, each encrypted packet would have to be hacked and decoded—a process that would take a tremendous amount of computing power and time.
Figure 11-14. The lock icon in the browser shows that the current web session is encrypted.
To use SSL, the web server that hosts the web site must purchase an SSL certificate from a certificate provider (who charges a yearly fee). Most web providers offer an SSL certificate service. To install an SSL certificate on your own server, you can purchase the certificate from VeriSign (www.verisign.com). You can find instructions on activating the certificate on Apache at www.apache-ssl.org.
Once you have the certificate activated on the server, use the Security tab on the Global Configuration screen of the VirtueMart interface to set the secure HTTP address. VirtueMart can use the security to ensure that all of the transactions relating to the shopping cart are encrypted and secure.
Note Most sites only encrypt the web pages that need the security (such as the credit card entry pages). Although year after year computers become faster at processing data, the encryption/decryption cycle is still very computationally intensive, even on a powerful system. Therefore, it is generally a waste of time and processing power for both the browser and the web server to secure all traffic.
Payment Options
Your virtual store can use most of the popular payment services to accept compensation for ordered products. At the time of this writing, VirtueMart features an extensive collection of supported services, including 2Checkout, PayPal (IPN), Payflow Pro, Authorize.Net (AIM), eCheck, eProcessingNetwork, eWAY (XML transactions), LinkPoint, Montrada, Nochex, Paymate, Pay-Me-Now, PBS (Danish), Skipjack, and WorldPay. Even better, the system allows you to create your own payment types and define the transaction process for interfacing with new payment systems.
You can set up the transaction methods (to interface with transaction companies such as PayPal, Paymate, and eWAY) by selecting the List Payment Methods option under the Store menu. All payment methods are displayed with their method code, discount, shopper group, payment method type, and enabled status (see Figure 11-15). As the figure shows, you can even limit payment types to particular shopping groups. You can disable payment types not available to your store without removing them from the system, just in case you need to add support for other services in the future.
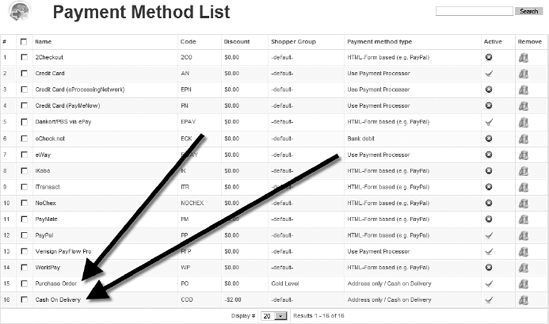
Figure 11-15. Existing payment methods can be edited and additional methods can be added.
If you select an existing payment method or create a new one, the Payment Method Form tab of the payment parameters will be displayed, as shown in Figure 11-16. The Payment Method Form tab displays the summary parameters of the payment. The Code field is the most important field on this screen since it selects the interface with the remote system that actually handles the transaction. The code, which is generally given to you by your payment service provider, might include a key or username.
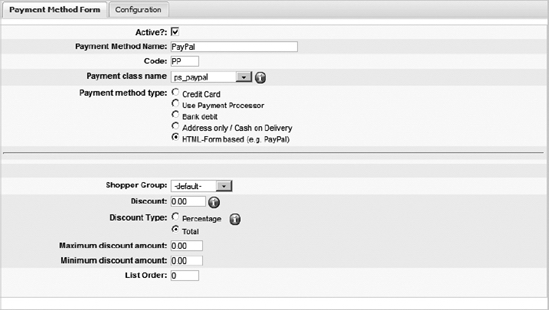
Figure 11-16. The Payment Method Form tab of the payment editing screen holds the general parameter settings.
The Configuration tab (see Figure 11-17) of the payment editing screen is used to address the nuts and bolts of the payment interaction. On the Payment Extra Info pane, you can insert code given to you by your payment processor that will check the status of the payment. This code will be executed when a visitor submits an order, and the order status in VirtueMart will be automatically updated to reflect the current status. The automatic nature of this payment clearance is most useful in a site that offers downloadable products. The client can enter the payment, and once it clears, it will instantly be e-mailed the necessary activation message.
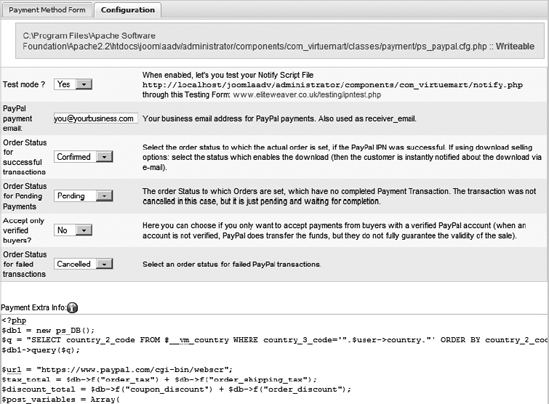
Figure 11-17. The Configuration tab holds the parameters that define how the service is implemented.
For stores that accept credit cards, most services handle a variety of card types, from American Express to Diners Club. When you select the Credit Card List option on the Store menu, the list of supported cards is displayed (see Figure 11-18). Each of these cards can be configured to work with the enabled payment services.
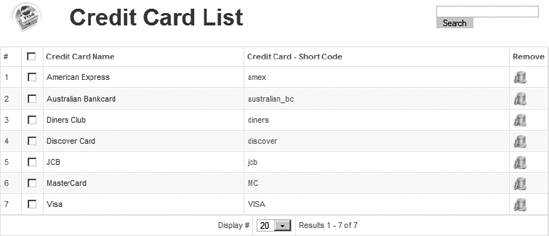
Figure 11-18. All credit card definitions accepted by VirtueMart are included in the Credit Card List
Shopper Groups and User Management
One of the most useful features of VirtueMart is the ability to set up shopper groups. Shopper groups allow you to create a special category for particular shoppers to see your product catalog. Creating a group may allow you to segregate shoppers (e.g., by geographic area) or cater to them more effectively (e.g., for frequent buyers).
A geographic group might be used when a virtual store is supplementing physical store locations. Often, prices vary depending upon location. A widget sold in a store on Rodeo Drive in Los Angeles is likely to be more expensive than the same product on sale in a small town in Minnesota.
By defining groups based on region, the online prices can match the price differences found in the actual locations. Another common group definition is the frequent shopper group. Members receive special discounts and incentives since they are steady repeat customers.
Selecting the List Shopper Groups option from the Shopper menu will display the group list screen. Creating a new group or selecting an existing group will display the Shopper Group Form screen, as shown in Figure 11-19. The parameters of the group are simple and straightforward. The group definition can be used in many places throughout VirtueMart to define special coupon, listing, and shipping options for the members.
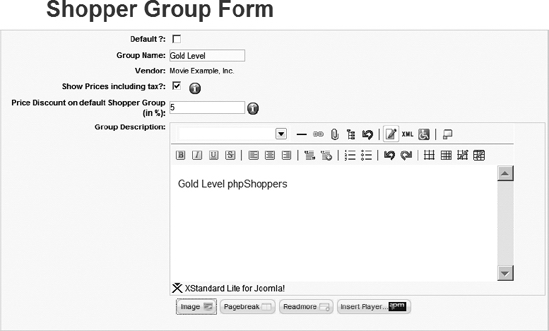
Figure 11-19. You can define shopper groups to control exactly how group members will see your products.
Managing Manufacturers/Brands
The Manufacturers menu in the VirtueMart interface is used to manage brands and distributors of the products available through the virtual store. This menu provides options to access, edit, and add to entries of manufacturers and manufacturer categories. Manufacturers can also be configured with contact and web site information if you want your shoppers to be able to directly reference the manufacturers for warranty and product information.
You may have noticed the Manufacturer drop-down list on the Product Information tab when you created a new product. Each product may have one manufacturer designation, and products can be sorted or searched by this parameter.
Setting up manufacturers is an excellent way to allow the web shopper to sort products by brand. For example, a site that sells computer laptops could include manufacturers for Lenovo ThinkPad, Dell, Fujitsu, Sony, and so on. For many types of e-commerce sites, allowing this method of presentation will be exactly what the customer desires.
Shipping Module
VirtueMart has a powerful shipping system implementation. Not only are the shippers UPS and DHL preconfigured (see Figure 11-20), but the user interface allows a great deal of specific parameter settings to precisely reflect how the shipping is figured in the Shipping Rates items.
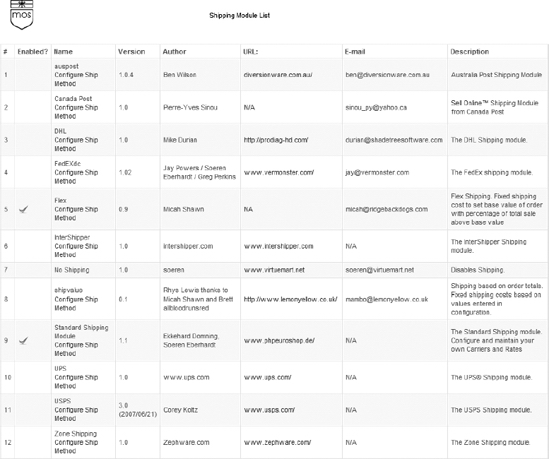
Figure 11-20. Shippers available on the system
Order Management
When VirtueMart receives an order, the new order item will appear in the Order List (see Figure 11-21). You can display the list by selecting the List Orders option on the Orders menu. Clicking the icon in the Print view column will take you to a printable purchase order that you can use to perform product fulfillment.
The Status column shows a drop-down list of status options. You can adjust the status to reflect the current standing of an order by selecting a new option and clicking the Update Status button. If Notify Customer is checked and the user has entered an e-mail address during the registration process, a message will be sent to notify the customer of the change in status.

Figure 11-21. The Order List displays the status of each order and allows display of the order invoice for printing.
Conclusion
Through VirtueMart, Joomla makes deploying an e-commerce solution not only possible, but attractive and full-featured. VirtueMart has enough capability to handle most small and medium-sized businesses. With features including a robust shopping cart, automatic payment submission, and inventory management, nearly all businesses will be able to implement the type of virtual store that fits their needs. The ability to offer downloadable products expands the range of potential storekeepers even further.
However, if the VirtueMart extension does not provide all of the features that you need, don't give up on Joomla. There are a number of other open source extensions as well as commercial packages (such as EZ-Catalog and osCommerce) that may fit your needs. Joomla has such a large development community; there is a solution available to fit nearly any requirement.