CHAPTER 4
EXTERNAL ASSETS AND SYMBOL MANAGEMENT
In the previous chapter we took an in-depth look into the creation of vector-based graphics using the Flash IDE. Though Flash is natively a vector drawing program, it is certainly not limited to that type of asset. Depending on the need, Flash specialists may find that they want to incorporate other types of external assets such as bitmaps, sounds, and videos.
In the first half of this chapter we will focus on how Flash works with bitmap graphics. As discussed in Chapter 3, bitmaps offer a greater degree of visual detail over their vector counterparts. Therefore, this type of graphic is very useful when dealing with items like photographs or video game sprites. And, when used in tandem with vector-based images, bitmaps will help establish a more effective user experience.
You will also learn how to create symbols from graphical elements and manage them with the Library panel. The symbol is one of the key ingredients in any Flash project and could be considered the cornerstone of the Flash design process. Symbols allow you to organize and implement graphical elements with a greater degree of efficiency. With symbols you can easily replicate graphics that not only reduce the overall file size of your SWF, but also make it easier to update your working file.
Let's get started with using bitmaps in Flash.
Using bitmaps in your Flash projects
Bitmaps are an integral part of any application. In fact most, professional-grade user interfaces such as video games, business-tier software applications, and even operating systems all use bitmaps as the primary graphical assets for their user experience. Though Flash does not natively possess the power to create bitmaps—as a program like Photoshop would—it is certainly poised to work with dozens of different industry-standard bitmap file types. In addition, the manner in which Flash does work with bitmaps is virtually seamless when considering the workflow of many design/development processes.
Importing external bitmaps into Flash
To begin working with bitmaps in Flash, all you need to do is simply import that bitmap to either the stage or Library panel. Fortunately, Flash makes this task quite easy. As shown in Figure 4-1, you can import an external asset by selecting File![]()
Import.
You will notice that a fly-out menu appears with the following four options:
Import to StageImport to LibraryOpen External LibraryImport Video
From these four choices you have the ability to import quite a collection of external files ranging from bitmaps, to sounds, videos, and vector graphics. Giving the complete list at this time would probably do more harm than good. For now we will focus on importing bitmaps. And, when you get to Part 5 of this book, we will discuss importing other types of media such as sound and video.
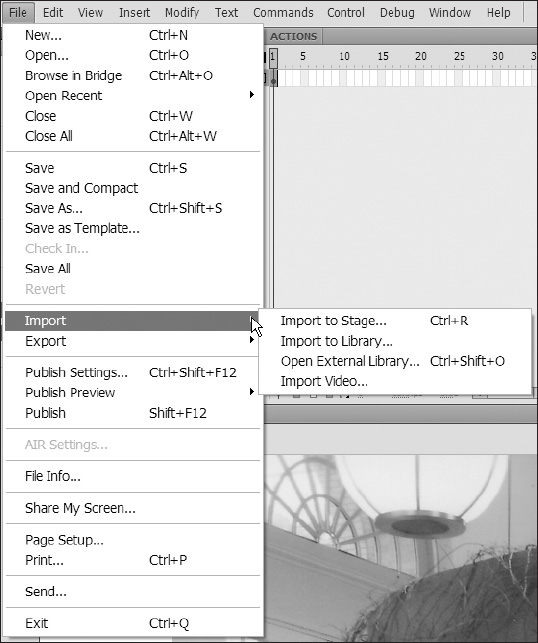
Figure 4-1. Bitmaps are easily imported using the File ![]()
Import command.
Importing to the stage or library
If you select Import to Stage or Import to Library, you will get a File Open dialog that will enable you to browse for a rather hefty number of different file types. And you can select any graphical or audio file type that is included in the File of type drop-down menu. Once you select the item you want to import, you can complete the import by clicking OK. The only major difference in using Import to Stage and Import to Library is the destination of the imported file.
If you import an external asset to the stage, you can move it around and manipulate it as if you had drawn it within Flash. Well, this is not exactly true—the ability to manipulate an asset depends on the type of asset. Bitmaps will initially behave like bitmaps, vector shapes will behave like vector shapes, and so on. The point is, graphical assets that are imported to the stage are immediately available for use in the design of your application and offer similar functionality to those you create in Flash. Further, if an item is imported to the stage, it is automatically placed in the Library panel. More on that in a bit.
Importing an image sequence
When importing images to the stage, if you select a file that has a trailing number such as an_image_0.jpg and an_image_1.jpg, Flash will search for other assets in that directory with the same name. Trailing numbers are commonly used in the naming of frames in an image sequence or animation. If Flash detects that there are other items with the same name and an incrementing trailing number, it will open the dialog shown in Figure 4-2.

Figure 4-2. Flash automatically detects image sequences that could be animations.
Clicking Yes in this dialog will import all the images in the sequence. Again, Flash will be assuming that these images are associated with an image sequence or animation. Because of this it will not only import all the graphics associated with this sequence, but also place each image in its own sequential frame of the timeline. Basically, Flash will reconstruct an image-based animation simply by detecting a possible sequence.
Opening an external library
Open External Library, the third import option available in Flash, allows you to open an external library. You can open the library of any other FLA file without opening the FLA itself. This becomes extremely useful for the management of reusable assets. As a Flash designer you could create an FLA file for containing groups of assets that you can use in future projects. For example, if you were a sprite designer in a Flash game development shop, you may have an FLA that contains nothing but a collection of bullet images. You might have another that contains a bunch of different spaceship graphics. Without question, using external libraries is extremely useful for project organization.
Importing your first bitmap into Flash
Now, we'll take you through the steps for importing a few external items to the stage and Library panel. As discussed earlier, bitmaps can be an extremely valuable aid to any Flash project. Subsequently, Flash makes importing these bitmaps a walk in the park.
- Create a new Flash file by selecting File
 New and choosing Flash File (ActionScript 3.0).
 - Select
File Import Import to Stage. - Browse to the working directory for Chapter 4 and select the file
art_BG001.jpg.ClickOpen.
You should immediately notice the image of a flower being placed on the stage similar to that in Figure 4-3.
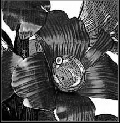
Figure 4-3. Images imported to the stage are immediately available for use in Flash
We're not done yet. We need to import the counterparts for our first graphic. This time we will import them to the Library panel.
- Select File Import Import to Library.
- Browse to the working directory for Chapter 4 and select the files art_BG002.jpg and art_BG003.jpg. You can select both of these files simultaneously by holding down the Shift key and clicking both files.
- Click
Open.
You should now have one image on the stage and three different flower images in the Library panel. In order to view the contents of the Library panel, press Ctrl+L (or Cmd+L on a Mac) or select Window ![]()
Library. This brings up the panel, where you will see the three imported files, as well as the one on the stage. Take notice how that graphic has been placed not only on the stage, but also in the Library panel (also shown in Figure 4-4).
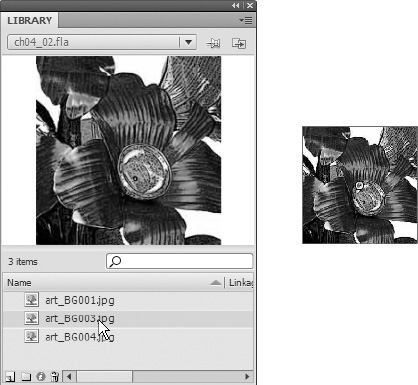
Figure 4-4. Images imported to the stage are also placed in the Library panel.
Setting bitmap properties in the Library panel
From within the Library panel you can edit several properties of any bitmap image. To access the Bitmap Properties dialog, as shown in Figure 4-5, right-click (Windows) or Ctrl-click (Mac) on an image from within the Library panel and select Properties from the context menu. Go ahead and try this with one of the graphics in your current library.
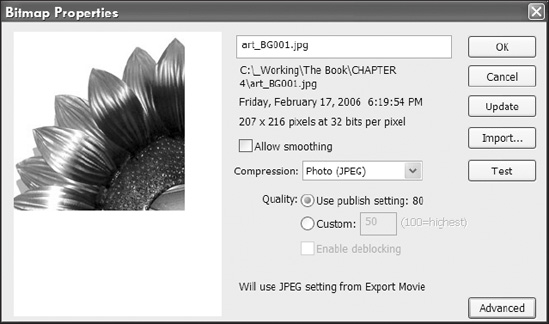
Figure 4-5. Custom compression and rendering properties can be set for each bitmap in the Library panel.
From within this dialog, designers have the ability to control the manner in which the bitmap renders. This can ultimately play a significant role in how the final application performs. Selecting the Allow smoothing check box improves the overall quality of bitmaps as they are scaled. Likewise you have the ability to set the compression of the bitmap.
There are two basic types of bitmap compression in the Bitmap Properties Compression drop-down.
Photo (JPEG)is the default setting for bitmap compression in Flash. As the name indicates, this is the best option when working with photographic images. It offers several options to customize the compression quality.
The following two options are available for Quality settings when the Photo (JPEG) option is selected:
Use publish settinguses the bitmap compression settings as determined in thePublish Settingsdialog, which will be discussed in Chapter 18.Customallows you to select a number between 1 and 100 representing the quality of the image as a percentage. When you select this option, theEnable deblockingcheck box is made active. Selecting this will smooth the look of the bitmap's appearance.
Lossless (PNG/GIF)actually does not discard any information from the image. This option is best when working with simple shapes and a minimal number of colors.
You can test how the bitmap will render by clicking the Test button after adjusting your settings.
From the Library panel's context menu, it is also possible to access an external editing program like Photoshop or Fireworks to edit bitmaps from within Flash. This is an extremely invaluable feature for Flash to have, as it is not a native bitmap editor itself. Having the ability to edit images in an external editor is basically like bringing all the features of that program into Flash. Follow these steps to edit an image externally:
- Right-click the image in the
Librarypanel. - From the context menu select
Edit with. - When the
Open External Editordialog appears, browse to your favorite bitmap editing program and clickOpen. - The image will automatically be opened in the external editor. From here edit the image as needed and save it.
Once the image has been edited and saved in the external editor, it will automatically update its appearance in Flash.
Breaking apart bitmaps
Breaking apart bitmaps opens up a lot of useful functionality for working with them. Recall from earlier in this chapter that we said imported assets behave like any other asset you created in Flash. This feature actually proves the truth in our statement. When you break apart a bitmap, the bitmap is converted to a shape that effectively makes it editable using the Flash drawing tools. In addition, you have the ability to select the bitmap as a fill with the Eyedropper tool. This gives you the ability to use the bitmap as a fill for other shapes or as the fill color for tools used to create fills.
To break apart the bitmap, first select it on the stage. Then select Modify![]()
Break Apart. When the bitmap breaks apart, it will change to a hashed pattern similar to that of a selected vector shape, as shown in Figure 4-6.
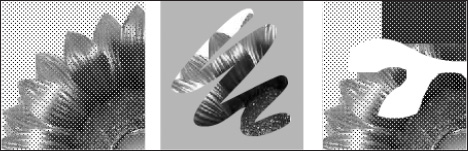
Figure 4-6. Breaking apart bitmaps allows you to treat them as vector shapes.
Once the shape has been broken apart, there are a number of options that become available for further use. What actually occurs when bitmaps are broken apart is that the bitmap is converted to a vector shape with the bitmap's image applied as the fill color. You can then treat the shape itself as a vector shape, exactly as it would be had you drawn it with the Flash drawing tools. The bitmap fill is then tiled across the face of the shape.
The ability to use bitmaps as fills made its first appearance in Flash MX 2004 and over the years proved to be very useful. You can use bitmaps as the "color" for fills and stroke. Flash CS4 makes this process pretty easy. There is no special procedure for getting bitmaps ready to be applied to shapes. As soon as a bitmap is imported into Flash, it is able to be applied as a color.
Let's give this a whirl:
- Select one of the Flash drawing tools (
Rectangle, Oval, orPen). - If it is not already accessible, open the
Property inspectorand select a new stroke color, as shown in Figure 4-7.
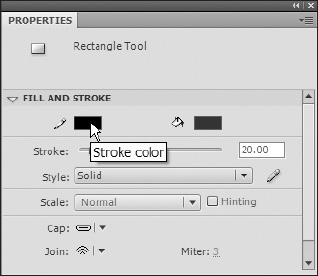
Figure 4-7. To apply a bitmap to a stroke, you must first select the stroke color chip.
- When the color picker opens, you will notice that any available bitmaps are displayed at the bottom, as in Figure 4-8. Select one of the imported bitmaps to use as your stroke color.

Figure 4-8. Bitmaps appear as color options in the bottom of the color pickers.
- Next, adjust the stroke to a value like
20. This will allow you to notice the bitmap pattern that has been applied to the stroke. - Draw a shape on the stage. You should have something that resembles Figure 4-9.

Figure 4-9. Bitmaps can easily be applied to shapes as fill or stroke colors.
Using the Trace Bitmap feature
The Trace Bitmap feature in Flash allows designers to convert any bitmap image into a vector-based graphic. Though this sounds similar to breaking apart images, it is actually different. When you break apart a bitmap image, the image is just converted into a vector shape with the bitmap applied as a fill color. When you trace the bitmap, the bitmap is converted into many vector shapes that are created based on color. The benefits to this process are both decreased file size and increased vector editability.
Tracing bitmaps in Flash is extremely simple. Using the file we have been working with, let's walk through this process. You should have a couple different elements on your stage from previous examples. We will want to get rid of this excess before we begin.
- Select
WindowSelect Allto select all elements on the current stage. Press Delete to delete all selected items. - From the
Librarypanel select one of the bitmaps that you previously imported and drag it to the stage.
- With the
Selectiontool, make sure that the instance of your bitmap is selected. Then selectModify Bitmap Trace Bitmap. This will bring up theTrace Bitmapdialog, as shown in Figure 4-10.
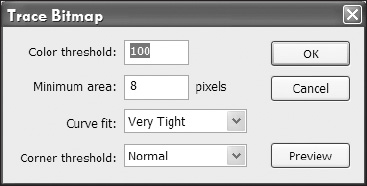
Figure 4-10. The
Trace Bitmapdialog allows you to define settings for an accurate trace. - Using Table 4-1 as a guide, adjust the parameters of the
Trace Bitmapdialog to achieve optimal results. - Check your settings by clicking the
Previewbutton. When you feel the settings are where they need to be, clickOKto complete the process.
Table 4-1. The options in the Trace Bitmap dialog for tweaking the bitmap conversions settings
| Parameter | Effect |
Color threshold |
This setting compares the color values of two adjacent pixels. If the difference in these values is less than the selected threshold value, the colors will be considered the same. Increasing the threshold ultimately decreases the number of colors. |
Minimum area |
This parameter sets the minimum, in pixels, of any shapes that are created. Therefore, if this option is set to 5, there will be no shapes created that are less han 5 pixels in size. |
Curve fit |
In the conversion process, many tiny squares are being converted into vectors (lines). This setting determines how closely the vector created conforms to the original bitmap pixels. |
Corner threshold |
This setting determines how sharp edges are treated, working in a manner similar to that of the Curve fit option. Because Flash is creating vectors (lines) from bitmaps (a checkerboard of square pixels), it needs a way to discern the edge of a pixel from an edge that exists in the graphic. |
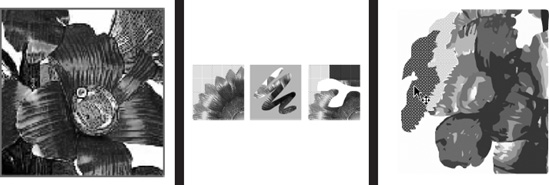
Once the bitmap is converted, it will be comprised of several vector shapes that represent the primary groups of color. Figure 4-11 gives an excellent look at how these colors have been grouped into independent vector shapes that can be modified like any other vector shape created in Flash.
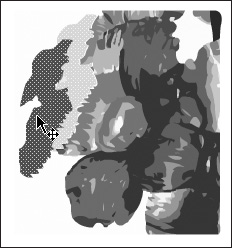
Figure 4-11. The Trace Bitmap feature converts the image into editable vector shapes.
Swapping bitmap images
Finally, you have the ability to substitute any bitmap on the stage with another that exists in the FLA's library. When a bitmap image on the stage has been selected, the Property inspector will change to accommodate bitmaps. As shown in Figure 4-12, you can click the Swap button to open the Swap Bitmap dialog.
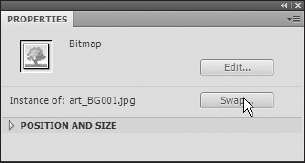
Figure 4-12. The Swap button in the Property inspector allows you to switch between bitmap images.
The Swap Bitmap dialog, shown in Figure 4-13, allows designers to select from any bitmap that happens to be in the library.
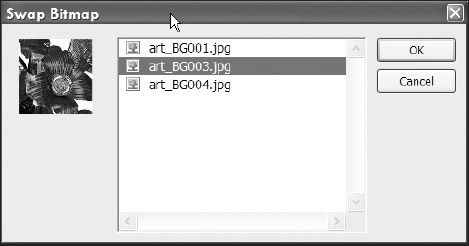
Figure 4-13. Switch between images from within the Swap Bitmap dialog.
Through your work with bitmap images, you have been introduced to how Flash organizes assets into the library. In addition, you were briefly exposed to the idea that library items can be used over and over through the concept of instantiation. Now we will expand on both of these concepts by showing you how to use symbols and further organize them within the Library panel.
Using and organizing symbols
The concept of symbols is the cornerstone of Flash design and development. A symbol is a type of reusable asset that can be used throughout your Flash project. Any visual asset that is created or imported into Flash can be converted to a symbol. Once a symbol is created, it is added to the Library panel. As with other elements in the Library panel, you can create an unlimited number of instances of that symbol. (Instances are discussed later in this section.) Further, some symbols can be set up to be used with ActionScript.
The primary benefit to using symbols is the efficiency that is gained by creating an asset only once. Because all symbol instances are derived from one single symbol (also referred to as a symbol definition), the size and performance of the Flash movie are greatly optimized. Further, since symbols serve as blueprints for symbol instances, changes or updates to the symbol will propagate through all symbol instances.
Imagine you need to create an animation that involves dozens of snowflakes falling to the ground. By using symbols, you would only need one actual snowflake image. Once that image was converted to a symbol and available in the Library panel, you could make tens or hundreds of snowflakes from that single snowflake image.
Let's take a look at the types of symbols available.
Types of symbols
There are four types of symbols that are available to Flash designers, as outlined in the following list. In this chapter we will be discussing the first three, which are associated with graphic elements. Font symbols will be discussed in detail in Chapter 13.
- Graphic symbols constitute the most basic symbol type available for use with Flash. Graphics are used for creating simple graphic assets like background images. Graphics cannot be used with sound, video, interactivity, or animations involving an independent timeline. This reduced functionality is beneficial because it allows graphic symbols to be inherently smaller than buttons and movie clips.
- Button symbols are used to create simple interactive elements. This type of -symbol offers a unique four-frame timeline for establishing different graphical representations for each state of the button.
- Movie clip symbols are the most widely used type of symbol. They have their own timelines, which can run independently of the main timeline. In addition, movie clips are capable of the full range of interactivity that is offered by the button symbol. The main timeline in Flash is actually an instance of a movie clip.
- Font symbols are employed to embed fonts into a Flash movie for use with ActionScript or other SWF files.
There is a fifth type of symbol, the sprite. Sprites can be thought of as a hybrid of the graphic and movie clip symbols. They are also often referred to as one-framed movie clips. The benefit of sprites is that the absence of a timeline reduces file size, but they still retain the interactive aspects of movie clips. Sprites are typically used only in ActionScript development.
Creating and managing symbols
Any one of the previously mentioned symbols can be created directly from the stage. The stage is typically the most logical place to create symbols as it is usually integrated within the workflow of the design process.
The quickest and easiest way to create a symbol is to simply convert a vector or bitmap that is located on the main stage to a symbol. The following example will get you started with creating various symbols:
Open ch04_02.fla. On the stage you should see both a vector-based red rectangle and one of the previously imported flower bitmaps.- Right-click (Windows) or Ctrl-click (Mac) the image of the flower. From the context menu select
Convert to Symbol.TheConvert to Symboldialog, shown in Figure 4-14, will display the default options for defining a symbol.
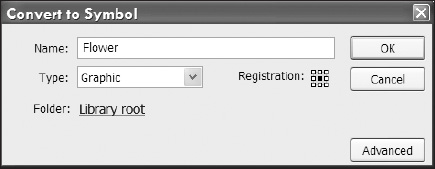
Figure 4-14. The
Convert to Symboldialog allows you to create graphic, movie clip, and button symbols. - Set the fields as follows to define the symbol:
- The
Namefield allows you to define a custom name for your symbol. It is important to understand that there can only be one symbol in your library for any given name. For this example, we have named this symbolFlower.Therefore, there can be no other symbols with the nameFlower. - The
Typedrop-down menu gives us the ability to select from the three primary types of visual symbols. In this case, because this is a basic image and you will not be using animation or interactivity, set this toGraphic. - The
Registrationpoint determines the location of the symbol's (0,0) coordinates. By default this will be set to the center point. You can change this setting to any one of the nine points shown. These points indicate the corners, sides, and center of the symbol. A selected registration point will be black. - The
Folderoption determines which folder in the library should contain the symbol definition. Since there are no folders in the library as of yet, this symbol will be placed in the library root, or topmost location.
- The
- Click
OK.
You have successfully created your first symbol. Check the Library panel; you should now see the Flower symbol, in addition to the bitmaps that were imported from earlier in this chapter.
Creating symbol instances
An instance of a symbol is basically a copy of a symbol definition that is active in the Flash movie. The symbol definition is the actual symbol that resides in the library. You can create as many copies (instances) of this original symbol as your application dictates. Again, the benefit of this approach is demonstrated in both application performance and ease in the ability to update.
Creating symbols is a fairly straightforward task. The easiest way to accomplish this is by simply dragging an instance of the symbol from the Library panel to the stage as we did with bitmaps. Go ahead and drag three instances of the Flower symbol to the stage.
Once you have an instance of a symbol on the stage, Flash allows you to edit various properties of each symbol instance independently of the symbol definition or other symbol instances. Through the Property inspector and transform tools, you have the ability to edit each symbol instance to give it some degree of uniqueness.
- Select one of the three symbol instances you created from the last section.
- Open the
Property inspectorby selectingWindow Properties.Figure 4-15 shows the various options that are available to a designer when a symbol instance is selected. ThePositionandSizeoptions allow you to adjust the height, width, and general position of the asset. In theColor Effectsettings you have the ability to adjust theBrightness, Tint, Advanced, andAlpha(transparency) settings.Advancedis a combination adjustment of color percentage, alpha percentage, and color offset.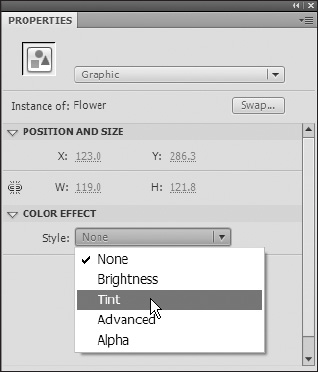
Figure 4-15. The properties of symbol instances can be adjusted using the
Property inspector. - Select
Tintfrom theStyledrop-down menu in theColor Effectsection of theProperty inspector. - Adjust the
Tintsetting to experiment with different outcomes. - Select another symbol instance. This time choose
Alphafrom theStyledrop-down. - Change the
Alphasetting to15%. - Finally, select the third symbol instance.
- Select the
Free Transformtool from theToolspanel. - Adjust the size and rotation of the symbol instance.
As you can see from this exercise, all three symbol instances can be adjusted independently from one another and from the symbol definition itself.
Creating button symbols
Buttons symbols allow you to quickly create interactive objects with states. All the symbol types that we are discussing in this chapter are nothing more than movie clip symbols. Graphics are movie clips with limited functionality. A button is also a special kind of movie clip that contains only four frames to govern the states of the button.
- Select the red rectangle that is on the stage.
- Right-click (Windows) or Ctrl-click (Mac) and select
Convert to Symbol. - Name the symbol
Red Buttonand selectButtonfrom theTypedrop-down.
Excellent, now that the button symbol has been created, we will need to set up the button to have states. To accomplish this, we will need to edit the symbol.
Editing symbols
Editing symbols can take some getting used to. The best thing to do is think of each symbol as its own SWF file inside of your main SWF. There are three primary methods by which you can edit your Flash symbols:
Edit in Placeallows you to edit a symbol definition directly from the instance of the symbol on the stage. To edit a symbol through this option, you simply double-click any instance of the symbol that resides on the stage. You will then notice that all other visual assets become dimmed.Edit in New Windowopens a new tab in the Flash IDE, allowing you to edit the symbol definition in a separate window.Symbol-Editing Mode (Edit)opens the symbol definition in the same window as the stage.
Preparing to add states to the button
Now we can add the state to our button symbol by editing it in place. Start by double-clicking the red rectangular button symbol. This will take you inside the red button symbol and allow you to edit its special timeline.
Flash helps you keep track of which symbol you are actually working in through a series of icons located on the top of the document window. These icons are arranged from left to right to also indicate the nesting order of each symbol instance. Figure 4-16 shows icons for Scene 1 and Red Button. Red Button is the rightmost icon, which is the current symbol we are working on. The fact that Scene 1 is to its immediate left tells us the symbol instance we accessed is currently nested in Scene 1. Selecting the Scene 1 icon would take us back out of the symbol and return us to the main stage.
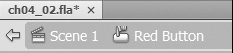
Figure 4-16. The document window displays icons that allow designers to navigate among symbols.
The next thing to notice is that the red rectangle on the stage is actually the original vector rectangle that was used to create this symbol. And because it is a vector shape, we can edit this shape, and the changes will update in every symbol instance used in our Flash movie.
Finally, the timeline that is used for button symbols is quite different from the timeline used for movie clips and graphic symbols. This timeline, as shown in Figure 4-17, contains the four following frames. Three of these frames represent the states of this button; the last frame is the hit area.
- Up is used for when the button is in the up state.
- Over is used for when the mouse is over the button.
- Down is used to define what will happen when the button is pressed.
- The hit area defines the active clickable area for the button.
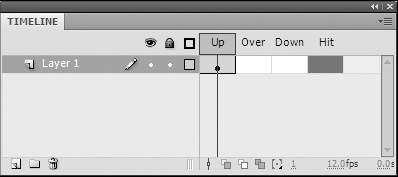
Figure 4-17. Button symbols have a special four-frame timeline that contains a frame for each state of the button.
So, what is a button without states? Adding such a button is actually your first step in creating interactivity in Flash. Although no significant reaction will occur from pressing this button, it is no less interactive. Therefore, your application will, in a way, respond to a user's input.
- First test the movie by clicking
Control Test Movie. - Try to click the red button. You will no doubt notice that nothing happens. This is because the button has no state and no hit area.
- Close the test movie.
- In the timeline, select the frame under the
Overlabel and press F6. This will add a new keyframe to allow us the ability to change the appearance of the button when we select it. - Select the red rectangle shape on the stage and change its color to blue.
- Now select the frame labeled
Downand press F6. - Select the blue rectangle on the stage and change its color to green. You should now have a red rectangle on the Up frame, a blue rectangle on the Over frame, and a green rectangle on the Down frame.
- Finally, select the frame under the Hit label and press F6. You will not need to change the color here because there is no visual representation for this frame. It simply defines the interactive area of the button.
- Test the movie again, and now try to click the button.
You should now notice that the button will react to all states that have been defined in this exercise. Later in this book, you will learn how to make buttons like this accomplish more meaningful tasks.
Swapping symbols
In some cases a designer may need to swap symbol definitions. Doing so can give a designer the ability to change the symbol that is linked to a specific instance. This is often helpful when dealing with last-minute tweaks and proofing. To accomplish this, select a symbol instance on the stage of a Flash movie and click the Swap button (see Figure 4-18) from within the Property inspector. This opens the Swap Symbol dialog, as shown in Figure 4-19, allowing you to pick the new symbol to be used with that symbol instance.

Figure 4-18. In the Property inspector, click Swap to swap symbols.
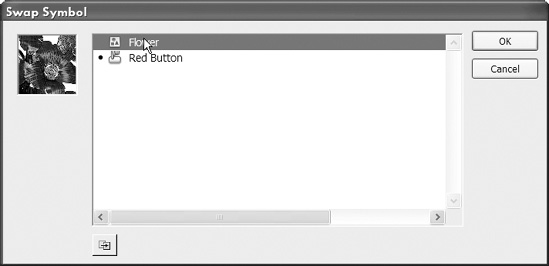
Figure 4-19. The Swap Symbol dialog lets you select a new symbol definition to be used for an instance.
Breaking apart symbol instances
Similar to the way that you break apart bitmaps, you can also break apart symbols. When you break the symbol instance apart, the link to the symbol definition is broken, and the instance is converted back to the internal graphic of the symbol. The symbol definition remains in the library.
To break apart a symbol, right-click (Windows) or Ctrl-click (Mac) the symbol and select Break Apart from the context menu.
Duplicating symbols
When creating Flash projects, it can sometimes be necessary to create duplicates of symbols. For example, if you want to create a group of buttons that all looked the same but have different textual labels on them, you might want to make duplicate symbols. The conundrum with symbols is that many new Flash designers often think they can change the labels (or other internal graphical elements) from within the symbol instance. The problem is that instances are linked to the definition. If you edit the instance, you are really editing the symbol definition. If a symbol contains a text label inside of itself and that label is changed, the change will be implemented across all symbol instances. For this reason, it is necessary to create a duplicate symbol.
When you duplicate a symbol, you are taking an existing symbol definition and creating a completely new and independent symbol definition from it. Do not confuse this with creating a symbol instance. A symbol instance is a copy of a symbol definition. A duplicate symbol is an entirely new symbol altogether. Therefore, this process creates a new symbol definition in the library.
To duplicate a symbol, right-click (Windows) or Ctrl-click (Mac) on any symbol and select Duplicate Symbol from the context menu. This will bring up the New Symbol dialog, allowing you to set the properties for the new duplicated symbol.
The Library panel
The Library panel is probably the single most important panel used in Flash design and development. It is used to organize all assets that are employed in a Flash project. Libraries can also be used to store and access assets for other projects as well. From here you can quickly access the elements of your project to make edits or change specific settings. Nonetheless, both designers and developers alike will find the Library panel beneficial to their efforts.
So far in this chapter you have had some minimal exposure to this panel, but it is worth covering in more detail.
Getting familiar with the Library panel
The Library panel is not as complicated as some of the other panels used in Flash. It is actually quite intuitive to use, as it possesses some aspects common to file browsers found on most computers. Taking a closer look at the Library panel, you can see that it is comprised of two primary sections.
The first of these sections, as shown in Figure 4-20, is the preview pane. The preview pane occupies the upper portion of the Library panel and is used to get a quick glimpse of items as you are browsing the library. From this area you also have the ability to preview sounds and animations as well.
The second key area of focus in the Library panel is the item browser, which occupies the majority of the lower half of the panel. In this area you will find icons and details that represent each symbol, sound, video, or other asset in your project. From this section you can organize, edit, and remove the various elements of your Flash project.
Finally, there are several other elements shown in Figure 4-20 that are worth mentioning:
- The
Panelmenu contains options that allow you to create, edit, and remove-symbols. - The
New Library Panelbutton opens additionalLibrarypanels that can be used to browse external libraries. - The
Pin Librarybutton locks the currently selected library to the currently selected Library panel. - The library browser allows you to browse all libraries that are currently open in Flash.
- The
Search Libraryfield allows you to browse the library for assets. - The
New Symbolbutton will open the New Symbol dialog and allow you to create a new symbol. - The
New Folderbutton creates a new folder in theLibrarypanel. - The
Propertiesbutton opens the Properties dialog for the currently selected library item. - The Delete feature (represented by a
trash canicon) will remove the currently selected library item.
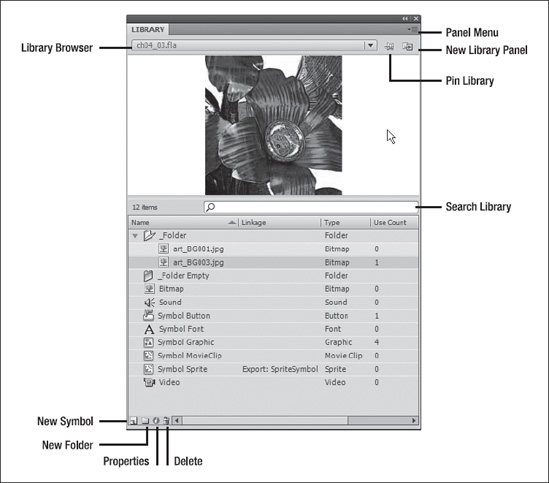
Figure 4-20. The Library panel offers an efficient way to organize the assets used in a Flash application.
Examining library items
You have been working with library items from the first couple pages in this chapter. A library item is any asset (symbol, sound, video, font, etc.) that is stored in the Library panel. As you learned, it is very simple to import items to the Library panel or add items to the Library panel when creating symbols. You can also add these items (and instances of these items) to your projects by simply dragging them onto the stage.
Organizing with folders
Folders are an invaluable resource. If you are a regular computer user (this is certainly assumed), you will no doubt be familiar with the benefit of organizing your files in folders. Folders in the Flash library offer this same degree of higher organization as you would expect from folders on your computer's hard drive.
Folders can be created using the New Folder button located at the top of the Library panel. Once created, you can drag items to these folders for organization. Figure 4-21 demonstrates that items located within a folder will be indented. Folders may contain any item located in the library including other folders. For further organization, folders may be expanded or collapsed by pressing the gray arrow located to the left of the folder's icon.

Figure 4-21. Folders can be used to organize the library.
Sorting and searching
Sorting and searching library items are both new to Flash CS4. Though users had the ability to sort items by type in Flash CS3, it was nowhere nearly as effective as the sorting method in this release. It is now possible to sort in ascending or descending order from any of the columns in the Library panel simply by clicking on a column's header.
Searching, on the other hand, is completely new to this version and in our opinion long overdue. Using the Search Library field gives you the opportunity filter the library based on an item's name. Figure 4-22 shows that typing Bitmap into the Search Library field will prompt the library to show only those items with "Bitmap" in their names. All other items will be hidden.

Figure 4-22. Use the Search Library field to locate specific items in the library.
To clear the search and restore the other library items to visibility, click the × located in the right side of the Search Library field.
Finding unused library items
Over the course of a project's life cycle, it is possible for the project to accumulate a number of library items that are no longer used or required. Similar to cleaning out a closet or a junk drawer, it can be useful to perform a bit of spring cleaning on your projects. For this Flash offers the Select Unused Items feature in the Library panel menu.
Rather than have you go through every item in your Flash project and try to determine which are in use and which are not, Flash will do all the work for you. By selecting SelectUnused Items from the Library panel menu, Flash will automatically select all library items that are not being used or referenced in your project. It will then highlight those items in gray as shown in Figure 4-23. From here you can simply click the Delete button at the top of the Library panel, and all useless items will be removed from your project.
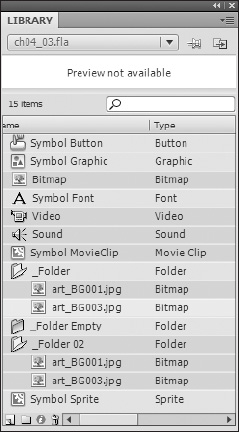
Figure 4-23. Useless library items can be removed using the Select Unused Items command.
Updating imported library items
Updating library items can be particularly useful if you work from a central graphics repository or have imported items from an external library. Updating files can be useful because it maintains the integrity of the existing library item. Therefore, rather than reimporting (which could cause a naming conflict), you can simply update external items if their original files have been changed.
To update a library item, select it in the Library panel. Then select Update from the Library panel menu.
Summary
In this chapter we continued to lay the foundation for things to come. Bitmaps and symbols are going to be inherent to the majority of Flash projects you work on. Having a conceptual understanding of how symbols and symbol instances relate to one another will also give you a leg up when it comes time learn ActionScript.
In this chapter we discussed the following key topics:
- Basic use of bitmap images
- Importing external graphic assets into Flash
- Using the library
- Symbol creation and management