CHAPTER 6
BASIC ANIMATION IN FLASH
In this chapter we'll consider the following questions:
- When is animation appropriate?
- What can be animated in Flash?
- What specific properties of an object can be changed over time?
- What are some of the limitations of various types of symbols during animation in Flash?
- "Where" does animation happen in Flash?
- How do you control the animation by fine-tuning the tween?
We also want to talk a little about why animation is important. We'll discuss ways to engage users in an experience. We'd also like to explain the role of animation in the presentation of information and how it relates to the importance of Flash as an application platform.
Animating to convey information
It can be asserted that basic animation is at the core of why the Rich Internet Application has taken hold of late. On the one hand, other web technologies have static page after page of lists and lists of information. Yes, sortable, filterable, savable: all very necessary functions for dealing with information. On the other hand you have Flash, now with its powerful programming language and data connectivity, that can take information and do all of that sorting, filtering, and saving as well as present it in a form with which human beings can easily identify. Check out www.gapminder.org to see what we mean.
Human beings respond to cues about dynamic relationships between things in space and apply meaning to them. We can use animation in the presentation of information systems to help users keep track of where they are within that information, how the information relates to itself and the other elements, or what types of information appear in the interface.
We can also use animation to help users keep track of where they are within the structure of our web sites and presentations as well. You'll even find this type of animation used on the desktop, as evidenced by the "genie" effect on the Mac and minimize animation on PCs. These effects tell users "Here I am! You didn't close me all the way, and if you need me, just click down here where you saw me move to, and I'll just pop right back up."
Finally, we can suppose that the reasons that moving pictures were invented and translated to computers are the same. It's a natural thing for us to want all of what we interact with in the virtual world to emulate the things we interact with in the real world.
Animation for impact and emotion
Other obvious uses of animation are impact and emotion, as devices for driving your point home or telling a story. Combined with sound, motion is a powerful tool for creating an "experience," an event that people will remember and then associate with a feeling. This is important because this feeling, as advertisers well know, is the key to selling—not just products, but also ideas and concepts. People's decisions are generally either supported by emotion or dictated by it, in spite of the facts.
The disciplines of animation
A distinction should be made between types of animation, and we don't mean from a technology point of view, but from a craft point of view. Here are some common types of animations:
- Interface animation
- Character animation
- Game-play animation
- Motion graphics for video
They're all different. Any of these disciplines of animation could be (and have been) a book unto themselves, so keep in mind that what we're talking about here is the Flash CS4 tool and how it applies to animation and not necessarily the craft of animation itself.
Now that we have given you some ideas about how you can use animation effectively, let's have a look at the nuts and bolts of animation in Flash.
Understanding animation in Flash
Some major changes have occurred to the way animation happens in Flash with CS4, so even if you're a seasoned Flash professional, you may want to become acquainted with the new approach.
Motion tweening vs. frame-by-frame animation
Tweens are mathematical interpolations of the change in a symbol (such as a movie clip instance) over time. You tell Flash what that movie clip instance looks like on frame 1 (a keyframe). Then you tell Flash what that movie clip instance is supposed to look like on frame 10 (another keyframe). Finally, Flash tells you what it thinks the movie clip instance should like on frames 2 through 9.
We'll discuss the following types of tweens:
- Shape tweens
- Motion tweens
- Classic tweens
The benefit of tweening has always been, and largely remains, a reduction in the file size of your animation and an increase in speed of development. For the most part this works great. It's fast and easy and gets the job done; but keep in mind that what is lost is complete control over the "in-betweens"—the frames between keyframes. While you can add keyframes where you need them to tweak your animations, this quickly adds file size to your Flash movie and just as quickly renders your animation unmaintainable. There are times when complete control over the in-betweens is of paramount importance—in character animation, for instance.
The shape tween
Shape tweening is useful for applying a smooth morphing effect to shapes or other drawing objects in your design that don't warrant the creation of a symbol. You cannot apply a shape tween to a symbol or group. You can only do so to drawing objects or shapes. Figure 6-1 shows a shape tween on the timeline.

Figure 6-1. A shape tween
Introducing the new motion tween
The motion tween has been an invaluable tool for the Flash designer and developer alike. This version of Flash brings a significant change to how the motion tween is approached in the authoring environment. Figure 6-2 shows the new motion tween as it appears on the timeline.

Figure 6-2. The new motion tween
Since ActionScript 2.0, the developer has been able to create tweens using code and therefore use and reuse that code, applying it to different objects at will, even changing the properties of that tween dynamically. This version of Flash applies that paradigm to the stage and timeline. You can now give your motion tweens instance names, because that's what they are—instances of a tween object. You can then access those motion tweens via ActionScript just like any other named instance on the stage.
Many character animators rely on the motion tween as a way to encapsulate their animation. Because their characters are actually complex collections of other movie clips or graphics symbols, it allows them to animate each element separately without affecting the other. For instance, an animator could change the speed at which his or her character moves from left to right across the stage while leaving the animation of the legs (a separate clip nested within the character clip) alone. You cannot do this using drawing objects or shapes, which utilize the shape tween.
Classic tween
If you would rather continue on motion tweening the way Flash has done so well for so many years, you are free to do so with the classic tween, shown here in Figure 6-3. Creating these classic motion tweens has not changed from previous versions of Flash.

Figure 6-3. The classic tween
Now that you have an idea of the different types of tweens, let's get to the business of making one in real life.
Creating a motion tween—a step-by-step primer
This demonstration might seem elementary to you, but we want to take some time to really dig into the root of animating in Flash. For the moment, let's forget that we can use shape tweens and that we can continue to tween discrete instances of objects on the timeline by using what are now called classic tweens.
Right now we want to focus on the new approach to tweening in Flash CS4, and that is motion tweening (object-based tweening). Don't confuse this to mean tweening ofobjects—what we are talking about here is the tween as an object of its very own with many malleable parts. We will come back to the shape tween and classic tween methods of creating motion in Flash, but for now we want you to brave this strange new idea, step by step:
- Create a new Flash file with one layer, no frames, and your document frame rate set to 24 fps.
- Create a symbol on the stage.
- Right-click your symbol and select
Create Motion Tweenfrom the context menu. - Move the playhead to another frame.
- Move your symbol.
You made some basic motion in Flash. Notice that your layer has been converted to a tween layer and it now has 24 frames (see Figure 6-4). A tween layer is like a guide layer and a layer with a classic tween on it all rolled into one, and it is cool. Play your timeline or test the movie (Ctrl+Enter or Cmd+Return on a Mac) to see your motion, well, in motion.

Figure 6-4. The tween layer is like a guide layer and a layer with a classic tween combined.
Flash CS4 has a few rules about this type of tweening, but it does an excellent job of helping you out. If you are trying to create a tween on a shape or drawing object, Flash displays the dialog shown in Figure 6-5 and offers to convert your shape into a symbol. If you have multiple symbols selected or a mix of symbols and shapes, you will get the same dialog.
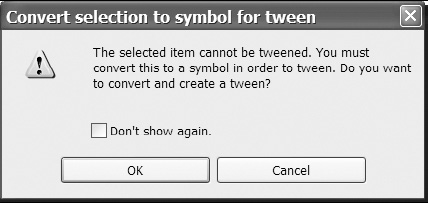
Figure 6-5. Convert selection to symbol for tween dialog
Flash CS4 does a few cool things for you at this point. If you have no frames on the layer that your symbol of interest is on, Flash will create 1 second's worth of frames from the keyframe where your symbol instance is. If you select a symbol instance on a layer that has other objects on it as shown in Figure 6-6, Flash will create a tween layer for you. Flash will then move your symbol to the new tween layer it created, as shown in Figure 6-7. Pretty sweet!
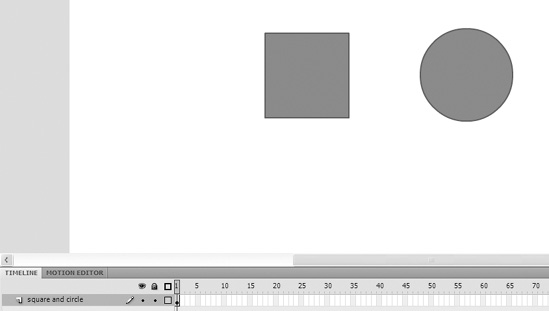
Figure 6-6. Two symbols on one layer
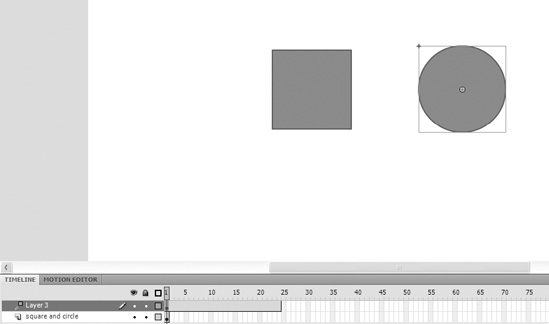
Figure 6-7. The motion layer created by Flash with the nontweened symbol remaining on its layer
To change the properties of your tween, simply select any point on the timeline on your tween layer between the first keyframe and the last frame of the tween, and then use the Property inspector to make changes. Next we'll look at the many ways to modify your new motion tween.
Modifying a motion tween
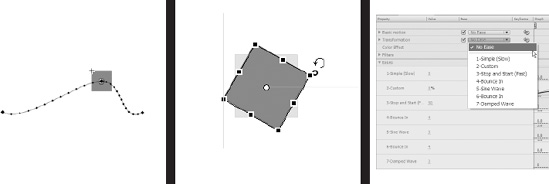
So you may be less than impressed with your moving box (or circle, or whatever you made), but fear not, there's more. Notice on stage that there is a line with diamonds on the ends and small pluses (they may look like dots) distributed over the line. This is the motion path, or the path that your symbol takes over time, and it's illustrated in Figure 6-8. The diamonds are the endpoints, which are keyframes in the animation, not of the timeline, and the other dots represent each frame that your motion tween occupies on the timeline.
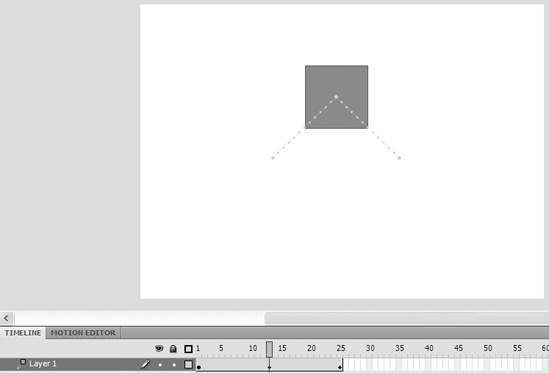
Figure 6-8. New animation keyframes are added to the tween span in the timeline as well as the motion path.
Moving the playhead and then changing your symbol's position will create a new tween keyframe on the timeline and add a diamond to the motion path shown in Figure 6-7. Once you do this, that value for your symbol's position persists to the end of the motion tween.
Moving a motion path
Occasionally you may want to move the location of your tween. Everything about it could be perfect aside from where it is on stage. No problem! With the Selection tool, you select all of it and just move it. Or just grab a segment and change the curve or change the position of the line segment joint or endpoint. Figure 6-9 shows the entire motion path while being moved.
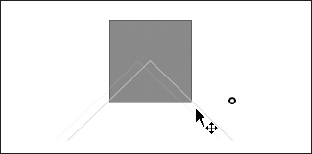
Figure 6-9. Moving the entire motion path
Changing the curve of a motion path
With the Selection tool active, hover over the motion path until you see the curve indicator as shown in Figure 6-10 and modify the motion path as you would a line. With the Subselection tool, select the motion path and modify the motion path using handles or endpoints.
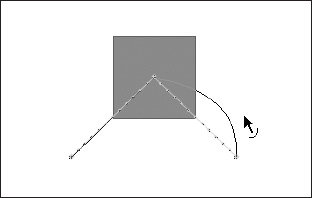
Figure 6-10. The small curve next to the cursor indicates what will happen when you drag the motion path. As you drag, the original path and future path are drawn.
To rotate, scale, or skew the motion path
With the Transform tool active, select the motion path. Transform it as you would any other shape. Figures 6-11 through 6-13 show the rotate, scale, and skew of a motion guide.
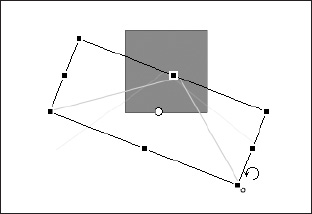
Figure 6-11. Rotating a motion guide
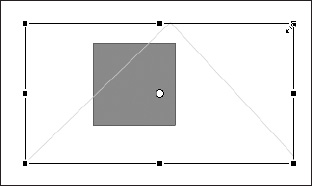
Figure 6-12. scaling a motion guide
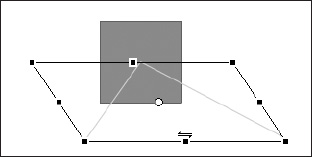
Figure 6-13. skewing a motion guide
As you can see, the motion path gives us the same creative control over the path of our symbols that the guide layer does when applied to a symbol in the classic tween, without the extra overhead of another layer in our timeline.
There are quite a few ways to tweak your tween right on stage. Now let's look at how you can change the speed of your tween over time using easing.
Understanding easing
Easing is how your animation is distributed over time. In plain language, when you ease in to an animation, you sort of take it easy to begin with, start off slow, and make up for it at the end of the animation. Most of your time is spent at the beginning of your tween. Easing out is the opposite. You start quickly and then change less and less as your animation slowly winds to a close. Most of your time is spent at the end of your tween.
Easing in and easing out are the very basic of eases. All of the complex types are combinations of these two, and we'll look briefly at them when we explore the Motion Editor later in this chapter. For the most part, experimentation will serve you well in understanding easing.
Changing the easing of your tween
To change the easing of your tween, select either your motion path or the tween span in the timeline so that the motion tween properties appear in the Property inspector, as shown in Figure 6-14. You'll see the motion tween symbol in the Property inspector.
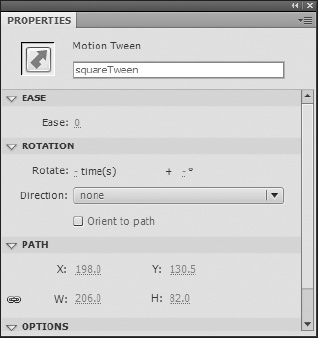
Figure 6-14. The Property inspector for the new motion tween. The field for inputting an instance name for your motion tween is new in Flash CS4.
The easing value can be anywhere between −100 and 100, and you can interpret this range as follows:
0means your animation is distributed evenly over time.−100means most of your time is spent in the beginning of the tween (easing in).100means most of your time is spent at the end of your tween (easing out).
Play with this value and take note of how the plus marks on the motion path change, remembering that marks on the path represent individual frames on the timeline, and that frames on the timeline (for purposes of our discussion here) represent equal chunks of time.
With the ease set to 0 (shown in Figure 6-14), you'll note that the small pluses on your motion path (indicating individual frames on the timeline) are evenly distributed. This means time is evenly distributed, as shown in Figure 6-15.
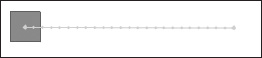
Figure 6-15. The motion guide with easing set to 0
With the ease set to −100 (shown in Figure 6-16), you'll note that the small pluses on your motion path (indicating individual frames on the timeline) are squished at the beginning. Much time is spent at the beginning of your tween.
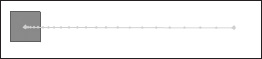
Figure 6-16. The motion guide with easing set to −100
With the ease set to 100 (shown in Figure 6-17), you'll note that the small pluses on your motion path (indicating individual frames on the timeline) are squished at the end. Much time is spent at the end of your tween.

Figure 6-17. The motion guide with easing set to 100
To exaggerate the effect this value has on your animation, extend the duration of your tween as explained next, or better yet lower your frame rate until you see what's going on.
Changing the duration of your motion tween
To change the duration of your tween, hover over the end of the tween span in the timeline. When you see the cursor change into the horizontal double arrow (see Figure 6-18), you may drag the end of the tween span in or out to the desired length as shown in Figure 6-19. Keyframes that follow the tween span on that layer are moved in or out depending on how you changed the length (duration) of your tween.
Figure 6-18. The horizontal double-arrow cursor
Figure 6-19. Dragging the end of a motion tween on the timeline
It's important to note that this is a significant difference from the classic tween where changing the duration required adding frames between the beginning and ending keyframes of a motion or shape tween. Because the property keyframes belong to the tween object (and not the instances of the symbol as in the classic tween), you have more control over their behavior as you change the duration of the tween.
If you right-click the tween span, at the bottom of the context menu, you will see the three following options for modifying your motion path:
Switch keyframes to rovingSwitch keyframes to non-rovingReverse Path
The third option will actually reverse the property keyframes of your tween! Figure 6-20 displays these options.
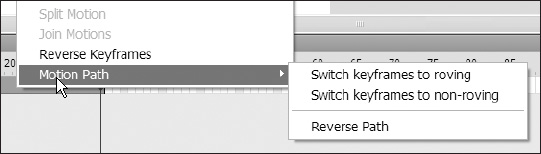
Figure 6-20. New tween keyframe options
Roving keyframes vs. nonroving keyframes
When you change the duration of your tween, nonroving keyframes will stay put. A keyframe that was on frame 50 will remain on frame 50. A roving keyframe will move so that it occurs in the same relative time. For instance, a roving keyframe placed at the halfway point of an 80-frame tween (frame 40) will move to frame 60 when that tween is lengthened to 120 frames.
As you can see, this approach to motion tweening gives you unprecedented control over the path and easing of your tween. This next section goes beyond the path and easing and looks at how to make changes to the symbol that you're tweening in the first place.
Modifying your symbol
So far we've been talking about ways in which you might change the path that your symbol takes on stage over time, but you can also, and will likely want to, change some properties of the symbol itself as well.
Changing the position of your symbol
While the position of your symbol can be modified by manipulating the motion path, you can also simply move your symbol to the position on stage where you'd like it to be at a given time, and Flash will modify the motion path for you.
If your motion path is a straight line and you drag your symbol to a new place on stage, the resulting motion path will be two straight lines, as shown in Figure 6-21. If your motion path is a curve and you drag your symbol to a new position on stage, the resulting motion path will be a more complex curve like the one in Figure 6-22.
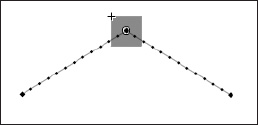
Figure 6-21. A straight motion path after changing the position of the symbol being tweened
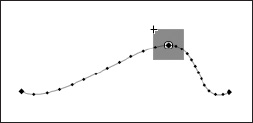
Figure 6-22. A curved motion path after making the same change of the position of the symbol being tweened
Alternatively, you can select your symbol on stage and use the Property inspector to change the value of the x and y properties of your symbol.
Changing the rotation of your symbol
Things spin, so Flash gives you the ability to change the rotation of your symbol in three easy steps:
- Activate the
Transformtool. - Select your symbol on the stage.
- Rotate your symbol as shown in Figure 6-23.
A new motion keyframe will be added to your motion tween.
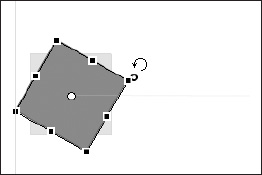
Figure 6-23. Rotating a tweened symbol
Alternatively, you can select your motion tween from the timeline and use the Property inspector to change the value of the rotation properties of your symbol. Figure 6-24 shows the rotation section for the Property inspector of the motion tween.
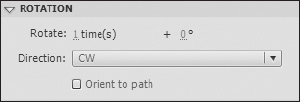
Figure 6-24. The rotation section for the Property inspector of the motion tween
This is kind of an odd bird in that you are changing the rotation of a symbol, but you do so by changing the properties of its motion tween. Your options include the following:
Rotatetells Flash how many times to rotate your symbol over the time span of your motion tween.- Additional degrees tell Flash how much further than the number of rotations to turn your symbol. If you enter
360as the additional degrees value, Flash will change it to0and add1to your rotate value. Directionchoices areCW(clockwise),CCW(counterclockwise), orNone. CWis selected by default. SelectingNonewill reset rotation and additional degrees to empty values.Orient to pathnegates all of the other settings and rotates your symbol to follow your motion path.
Experiment with these options. It's fun—seriously.
Color animation
Changing color over time can be instrumental in fine-tuning animation. The subtle change in the intensity of a shadow to indicate changes in button state or adding a hint of red to that reflection effect can make all the difference between "things that move" and a living interface. To animate changes in color, follow these steps:
- Create a symbol on stage.
- Right-click (Option-click) your symbol and select
Create Motion Tween. - You should have 1 second's worth of frames in your timeline with the playhead positioned at the last frame.
- Select your symbol. Notice the
Property inspector. With the exception ofBlending, any of these properties can be changed over time. - In the
Color Effectsection of theProperty inspector, chooseTintfrom theStyledrop-down menu. - Select a color from the color picker. (Click the color chip next to the drop-down menu.)
- Notice that an animation keyframe has been added to the timeline.
Filter animation
You can also use animation to change the following filters:
- Drop shadow
- Blur
- Glow
- Bevel
- Gradient glow
- Gradient bevel
To adjust color filters over time, simply move the playhead to a desired location in time and select the symbol you wish to affect. For example, from the Property inspector add a drop shadow filter, as shown in Figure 6-25.
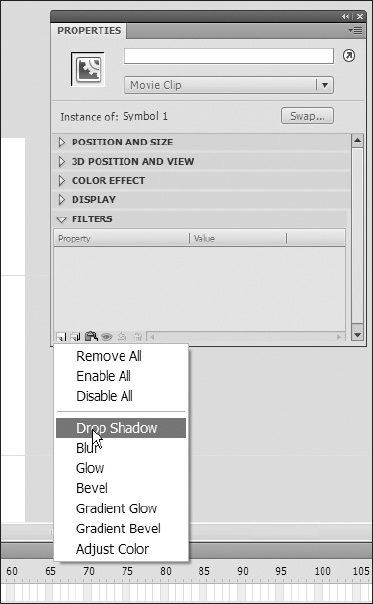
Figure 6-25. Selecting Drop Shadow from the Filters drop-down menu in the Property inspector
Change some values for that filter and also change the x and y values and notice the change on stage. If you test your movie, you will see the drop shadow changing over time on your symbol.
You can add more than one of each type of filter as your project requires. Move the timeline and make adjustments as needed as explained in the previous sections of this chapter.
To this point you've been using the Timeline panel and Property inspector to craft your animation—a traditional approach to animation in Flash. Next we're going to introduce you to the brand new Motion Editor—a completely new way to edit motion in Flash.
Introducing the Motion Editor
The Motion Editor is brand new in Flash CS4, and it provides you with an expanded interface for changing symbol properties over time independently. The Motion Editor is broken into five main sections, shown here in Figure 6-26.
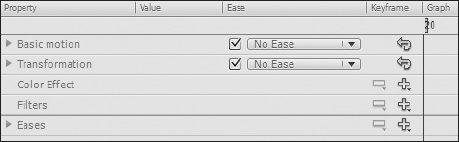
Figure 6-26. The layer information half of the Motion Editor with all sections collapsed
You'll notice that each of the five sections addresses the properties that can be changed over time. You should be familiar with them because you've seen them earlier in this chapter. Top to bottom they are as follows:
Basic Motion: Holds controls for changing values of the x, y, and z properties of the object being animated as shown in Figure 6-27.Transformation: Manages controls for changing skew and scale values for the object being animated, shown here in Figure 6-28.Color Effect: Manages controls for alpha, brightness, tint, and advanced transformation values for the object being animated. (Advanced transformation gives you independent control over RGB, RGB offset, and alpha offset values.)Filters: Manages controls for drop shadow, blur, glow, bevel, gradient glow, gradient bevel, and adjust color and each of their properties.Eases: Represents a bit of a special case, as indicated visually by the darker, heavier line that separates it from the other sections of the Motion Editor as shown at the top of Figure 6-29. It manages the various types of eases you can apply to all of the other sections of the editor.
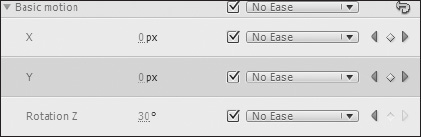
Figure 6-27. The Basic Motion section of the Motion Editor. Here, the y property layer is active as indicated by the darker gray color.

Figure 6-28. The Transformation section of the Motion Editor

Figure 6-29. The Eases section of the Motion Editor shown with the default ease—Simple (Slow)
Each of these sections is distinguished in a manner consistent with the Property inspector and other panels of the interface. Main sections have a slightly darker gray and an arrow to the left for collapsing and expanding that section.
Understanding the Motion Editor
We'll discuss the sections of the Motion Editor in detail in a moment, but we wanted to point something out if you have not already noticed it. Not only can you control each of these areas independently, you can control every property of each of these independently, all from a single editor. Without the Motion Editor, you would have to create and make changes to a new instance of an object on the timeline every time you wanted to change any of the properties, which as you can imagine gets out of hand rather quickly.
If you don't get how extremely cool this is right now, don't worry about it. By the end of this chapter, you will be wondering how you got along without the Motion Editor.
In order to actually use the Motion Editor, you must have created a motion tween using the new method of object tweening detailed earlier in this chapter in the section "Creating a motion tween—a step-by-step primer." Once you have created a tween, you can switch to the Motion Editor view, as shown here in Figure 6-30.
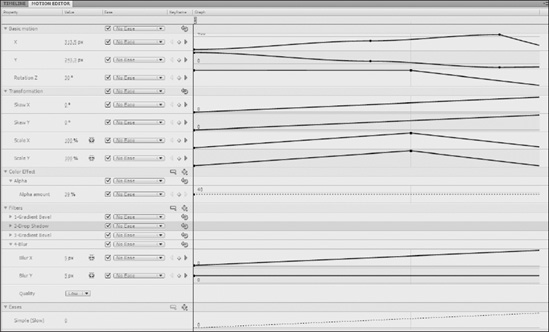
Figure 6-30. The Motion Editor
You must have only one tween selected from the timeline or only one object on stage that is being tweened in order to edit a tween with the Motion Editor. Think of it as an auxiliary Property inspector on steroids just for animation.
The Motion Editor interface
Being a type of extension of the timeline, the Motion Editor is laid out in much the same way, with a section on the left for the property layers and a grid on the right showing the property curves over time. You can use both the controls found in the property layers and the property curves to interact with the values of properties.
Under the Ease column of the Motion Editor you will notice a check box (checked by default) and a drop-down menu with the default value No Ease on every property layer. These controls on the section headers serve as master controls for all of the property layers that fall under that section. The check box enables and disables easing for every property or effect within that section. The drop-down will change the method of easing for all properties within that section at the same time.
To the right of the Ease drop-down you'll notice an arrow turning back on itself. Clicking this button will reset all the values of the property layers below it.
The property layers
If you expand the Basic Motion section, you will see three property layers below in a lighter gray: one each for x, y, and rotation z values, as shown in Figure 6-31. Clicking one of these property layers will both expand that property layer's height and make it a darker gray, indicating that it is the active portion of the Motion Editor. Clicking the property layer again will minimize that layer, but it will remain selected.
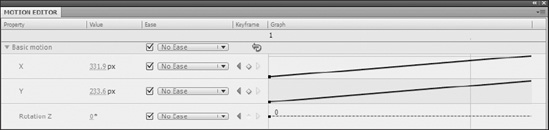
Figure 6-31. The Basic Motion section and its property layers
The headers along the top of the Motion Editor indicate the following:
Property:The name of the property. This cannot be changed.Value:The value of the property. This can be changed either via the numeric hot text or property curve on the graph.Ease:Easing controls, as described in the previous section (enable/disable check box, easing type drop-down).Keyframe: Previous Keyframe, Add Keyframe, andNext Keyframebuttons. Use these buttons to jump to the next or previous keyframe on the layer or to add a new keyframe where the playhead is when clicked.Graph:The property curves, visual representations of the changes in value over time of any given property.
The Eases section
We're going to talk about this section of the property layers first, even though it appears at the bottom of the Motion Editor, because it acts as a tool that lets you determine what eases are made available to the rest of the property layers.
This may be one of the coolest parts of the Motion Editor. Now, you can apply different easing to various properties of your tween. You can apply a bounce ease to your color effect while applying a fast ease in to your rotation while adding a custom ease to your motion blur. How sweet is that?!
Here's how it works. The Eases section of the Motion Editor shows you which eases are available for the tween you are editing. By default only Simple (Slow) is available, shown expanded in Figure 6-32.
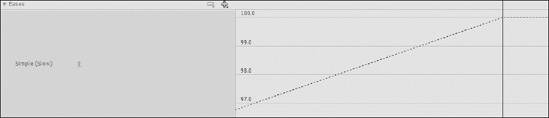
Figure 6-32. The default Eases section of the Motion Editor with Simple (Slow) expanded
To make eases available to your motion edit, click the plus icon in the Eases header and select from the drop-down as shown in Figure 6-33. (We'll choose Custom.)
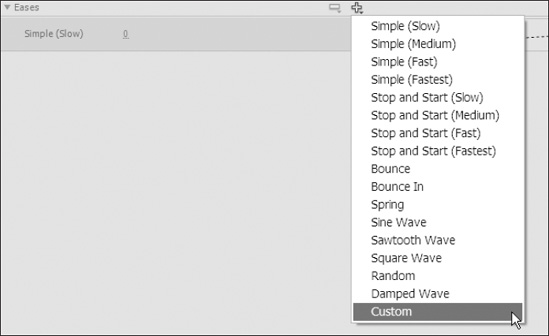
Figure 6-33. All of the prebuilt eases in the Motion Editor and a custom ease for you to make your own eases with
You'll notice in Figure 6-34 that the custom ease layer is the only one with keyframe controls—this is because it is the only type of ease that is editable. Don't worry, though, you can make as many as you want.

Figure 6-34. The custom ease has keyframe controls. None of the premade eases do.
You'll notice in Figure 6-35 that any ease added to the Eases section of the Motion Editor will be available to you in the drop-down Ease selector of the other sections of the editor.
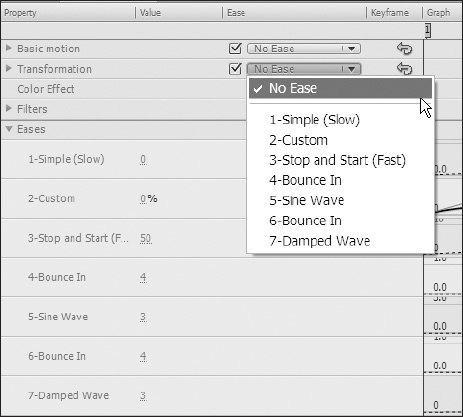
Figure 6-35. All of the eases added to the Eases section are available for use on the properties of your tween.
Making custom eases in the Motion Editor
Even though Flash CS4 comes with a healthy number of eases, we can never tweak animation enough—so we have the custom ease. Follow these steps to create and edit a custom ease:
- Add a custom ease to the Motion Editor by clicking the
plusicon on theEasessection header. - Add a keyframe to the value line on the graph. Right-click the point of the line where you want a new keyframe (shown in Figure 6-36). As an alternative, move the playhead to that point and click the
Add Keyframebutton located at the right side of the layer information portion of the Motion Editor. - Select the handles that appear when you click the line and edit your line as a Bezier curve (see Figure 6-37). You can also click and drag any keyframe to modify your curve.
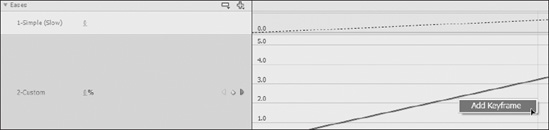
Figure 6-36. Adding a keyframe to a custom curve
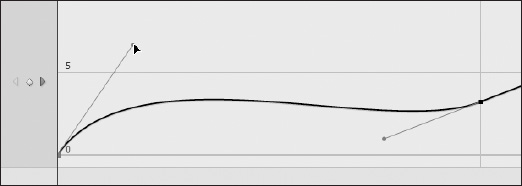
Figure 6-37. Handles on the Bezier curve of the custom ease
The_graph
The graph shown in Figure 6-38 should look a little familiar to you now. With the playhead and frame numbers across the top, it should resemble the timeline, and for good reason. Figure 6-38 shows frames 15 through 23, with the playhead on frame 23.
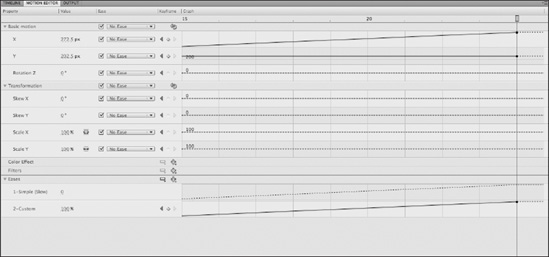
Figure 6-38. The graph appears on the right-hand side of the Motion Editor and shows the change in values of properties over time.
As you make changes to the properties of a symbol over time, those changes will be represented on the graph as a line. If there is only one keyframe for that property, the line will be dotted. If there is more than one keyframe for that property, the line will be solid. All properties have by default one keyframe where its symbol is instantiated on the stage.
You can change values of properties in one of the following ways by interfacing with the graph:
- Add keyframes: Adding keyframes creates discrete points in time where values can be changed.
- Move keyframes: Moving a keyframe horizontally changes when a property's value changes. Moving a keyframe vertically changes the value of a given property at that time.
- Move graph lines: Moving a graph line horizontally will change the time at which the keyframes at either end occur by the same amount. Moving it vertically changes the value of the keyframes at either end by the same amount.
If you happen to drag a keyframe vertically out of visual range of the property layer, the graph for that portion of the layer will begin to scroll. You'll notice the numbers on the left of the graph begin to change with it, indicating the value range of the current view of the property layer's graph.
When you release that keyframe, the property layer will immediately adjust to include the entire range of values in the visible timeline. For instance, if the x values of an object range from 0 to 50, the property layer will indicate this with horizontal lines on the graph labeled 0 and 50. If, however the range is from 0 to 2300, the property layer would reflect this with horizontal lines on the graph labeled 0, 500, 1000, 1500, and 2000. In both cases, the property layer will take up the same vertical real estate in the Flash interface.
Figure 6-39 shows the value line of the x property being tweened from 0 to 2500 over a period of five frames.
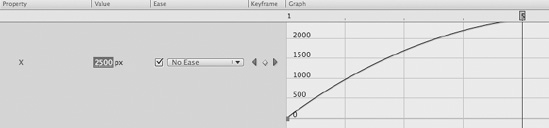
Figure 6-39. The horizontal lines that make up the graph are labeled with the range of values for that property.
Because the property layer updates immediately, this process may take some getting used to. A better way of making large changes in values is through the numeric hot text on the layer information side of the Motion Editor.
To create a new keyframe on the fly, simply move the playhead where you want a change to occur and then change the property's value using the numeric hot text. A new keyframe will be created for you.
Adding a color effect
To add a color effect to your tween by way of the Motion Editor, click the plus icon of the Color Effect section. This presents the drop-down shown in Figure 6-40. You can choose to add an alpha, brightness, tint, or advanced color effect to the tween.
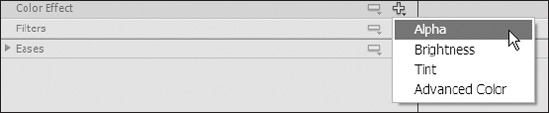
Figure 6-40. Adding a color effect to the Motion Editor
Just as with adding these effects from the Property inspector, you can have only one per motion tween. If you have one selected and change to another type, the first is replaced.
To remove the effect, click the minus icon (shown in Figure 6-41) from the Color Effect section header and select your effect from the drop-down. (There will be only one to choose from.)

Figure 6-41. Removing the color effect in the Motion Editor
Adding filters to your tween
To add a filter to your tween by way of the Motion Editor, click the plus icon of the Filters section. This presents the drop-down menu shown in Figure 6-42. You can choose to add a drop shadow, blur, glow, bevel, gradient glow, gradient bevel, or adjust color filter to the tween.
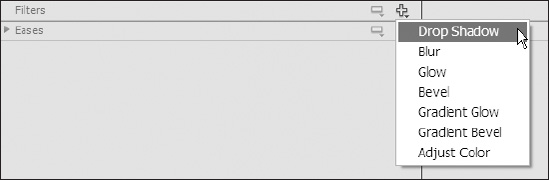
Figure 6-42. Adding a filter to the Motion Editor
Just as with adding these filters from the Property inspector, you can have many on one motion tween (even multiple filters of the same type). Filters are stacked on one another under the Filters section header, and each has its own easing master controls as do the Basic Motion and Transformation sections and operate as described previously.
As you add filters you'll notice that each one can be expanded to reveal property layers of its own. Each section changes to reflect the available properties of the filter you have added. Figure 6-43 shows what the properties of the glow filter look like in the Motion Editor.
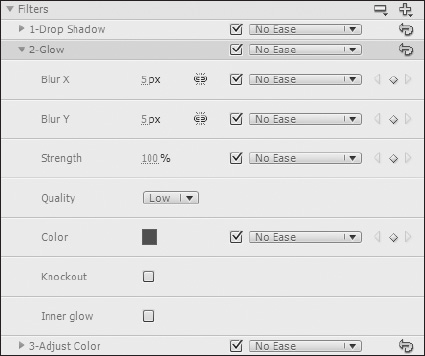
Figure 6-43. The expanded view of the glow filter shows all of the properties that can be edited in the Motion Editor.
You can use all of the tools and methods described earlier to modify the properties of the filters you have added to the tween. To remove a filter, click the minus icon from the Filters section header and select the filter you wish to remove from the drop-down. Choose Remove All to remove all filters at once as shown in Figure 6-44.
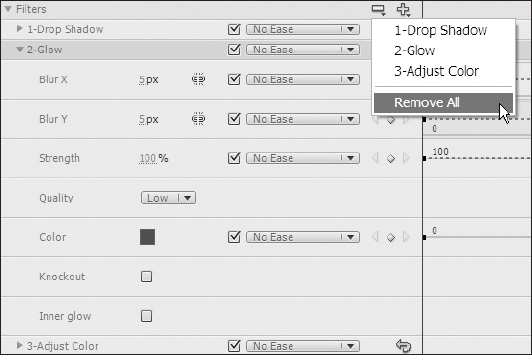
Figure 6-44. Removing all filters at once
Something to keep in mind
The Motion Editor is a very powerful interface enhancement that provides new control over all of the properties of your tween from a single interface. Just keep in mind that all of the properties accessible through the Motion Editor are the very same properties that you may already be used to accessing through the Property inspector.
The Motion Editor is a convenient and powerful way to modify many properties quickly and with real-time feedback—but none of the properties themselves are new to Flash.
Now that you know about the many ways of creating and modifying motion in Flash, let's talk about making it easy get the most from your hard work by reusing it.
Reusing animation
Duplicating motion in CS4 is a pretty straightforward operation, and you have the following methods to choose from:
- Duplicating a tween from the timeline
- Saving animation as ActionScript
- Saving animation as XML
- Using motion presets
The rest of this chapter is dedicated to explaining these ways of reusing animation.
Duplicating a tween from the timeline quickly
In many cases you may want to repeat an animation but not necessarily need or want to nest it in its own timeline. Here's how to quickly repeat a tween from the timeline:
- Select a tween.
- Right-click (or Ctrl-click on a Mac) and select
Copy Frames(see Figure 6-45).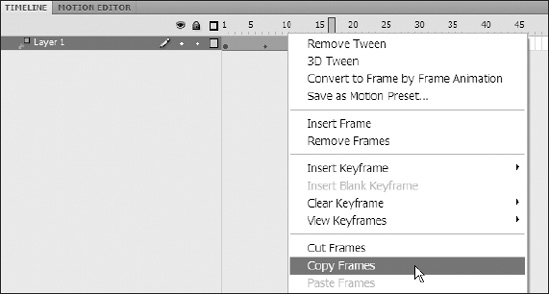
Figure 6-45. The context menu of the motion tween
- Select a frame on the timeline and right-click (Option-click on a Mac).
- Select
Paste Frames.
Voilà! A copy of your tween (see Figure 6-46).

Figure 6-46. Pasting frames at the playhead position
You can now drag this tween around the timeline at will when selected, as shown in Figure 6-47. Your tween will also stay on your clipboard until you replace it with something else.

Figure 6-47. Dragging a motion tween on the timeline
Saving animation as ActionScript
To save your motion as ActionScript, right-click a tween span on the timeline and select Copy Motion as ActionScript from the menu. Now that it's on your clipboard, you can paste the ActionScript version of your motion into the editor of your choice—it's just text at this point. You could even e-mail it to a friend or post it on your blog. Of course, the real power here is having Flash write the complex code for your animation and then using that code over and over as you see fit without having to reanimate it every time.
Saving animation as XML
To save your motion as XML, select a tween span on the timeline. From the Commands menu select Copy Motion as XML. Now that it's on your clipboard, you can paste the XML version of your motion into the editor of your choice—again, it's just text at this point, and the real advantage to doing this is the reusability and portability.
Using motion presets
Motion presets are animations stored as XML files on your computer. The motion presets in Flash CS4 are a set of commonly requested animations put in one convenient place. Your operating system user name and installation drive name will dictate exactly where the motion presets are stored. Browse to the following location in your file system to find these files. (User installation and user name values are substituted with <harddisk> and <user>, respectively.)
- Windows:<
harddisk>DocumentsandSettings<user>Local SettingsApplicationDataAdobeFlashCS4<language>ConfigurationMotion Presets - Mac: <
harddisk>/Users/<user>/Library/Application Support/Adobe/FlashCS4/ <language>/Configuration/Motion Presets/
Applying motion presets
Follow these steps to apply motion presets to a symbol:
- Open the
Motion Presetspanel if it is not already open by selectingMotion Presetsfrom the window menu. - Select the symbol instance on stage you wish to apply motion to or drag one from your library if one is not already on stage. You must have something selected on stage in order to apply animation to it.
- With a symbol instance selected, choose the motion preset you wish to apply, and then click
Apply. - If you want to apply a different animation to that symbol, simply select that symbol or the tween span in the timeline, select a new preset from the
Motion Presetspanel, and clickApply. The new preset will be applied to your symbol, replacing the old motion.
Saving your animation as a custom preset
To save your motion tween as a custom preset, right-click your motion tween in the timeline and select Save as Motion Preset from the menu as shown in Figure 6-48.
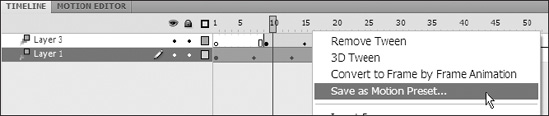
Figure 6-48. You can save motion presets right from the timeline.
You will be prompted with a dialog (see Figure 6-49) asking you to name your new preset. Enter the name of your new preset and click OK to save or Cancel to stop the process.
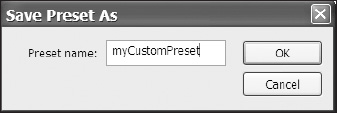
Figure 6-49. The Save Preset As dialog
To verify your animation has been saved, look in the Motion Presets panel under Custom Presets as in Figure 6-50.
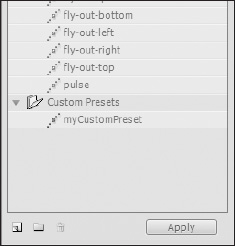
Figure 6-50. Your custom motion saved as a preset in the Motion Presets panel
Managing motion presets
You can manage motion presets much in the same way you manage your symbol library. The Motion Presets panel comes with two folders, Default Presets and Custom Presets, that cannot be renamed or deleted. However, you can create your own folder hierarchy under the Custom Presets folder, which might come in handy if you have some signature animations you want to keep separated, or perhaps different clients have specific animations that they use and reuse. Figure 6-51 shows a sample custom preset folder hierarchy.
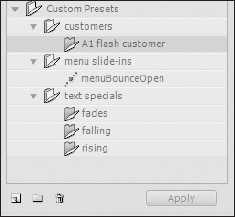
Figure 6-51. A sample custom preset folder hierarchy
When you save your motion as a preset, it gets placed in the Custom Presets folder. You can then drag it into any folder or subfolder you have made under the Custom Presets folder. You cannot drag custom presets into the Default Presets folder.
One nice feature is the search function. Below the motion preview and above the preset folders is a search field marked by a binoculars icon, as shown in Figure 6-52. Enter text to search on, and the presets list gets filtered as you type.
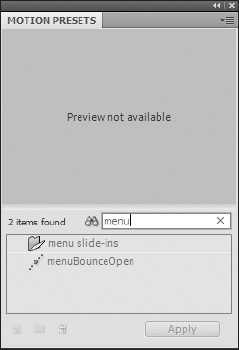
Figure 6-52. Searching motion presets
To clear your search and restore the list, click the X at the right of the search field.
Converting motion presets to frame-by-frame animations
You can use the motion tweens as starting points and then convert them to frame-by-frame animations to customize if you choose to. After applying a preset, just right-click your motion tween on the timeline and select Convert to Frame by Frame Animation from the menu shown in Figure 6-53. This will change every frame of your motion tween to a discrete instance of your symbol as well as change the layer to a normal layer as shown in Figure 6-54.

Figure 6-53. Converting a motion tween to a frame-by-frame animation

Figure 6-54. The motion tween after conversion to frame-by-frame animation
Exporting and importing motion presets
Since motion presets are stored as XML files on your system, they are easily shared among the people you work with and other developers and animators in the community.
Here's how to export a motion preset:
- Choose the preset in the
Motion Presetspanel that you want to export. - Select
Exportfrom the panel menu located in the upper-right corner of the panel or right-click a preset to bring up the menu shown in Figure 6-55, and selectExport.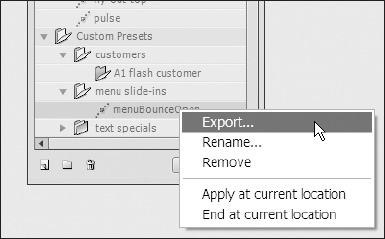
Figure 6-55. Context menu for a motion preset
- In the
Save Asdialog box (see Figure 6-56), pick a name and location for the XML file and clickSave.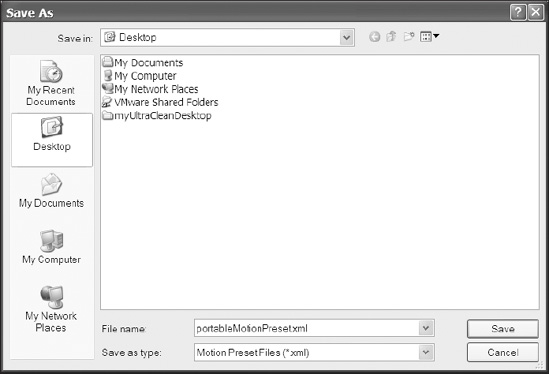
Figure 6-56. Choosing a file name and location for your exported file
Follow these steps to import a motion preset:
- Select
Importfrom the panel menu located in the upper-right corner of theMotion Presetspanel, as shown in Figure 6-57.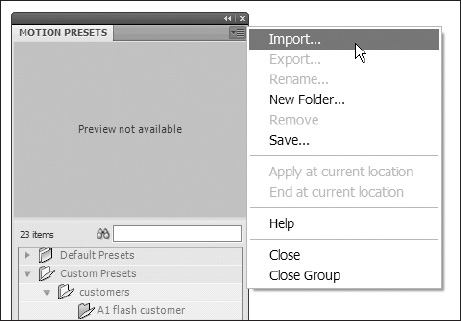
Figure 6-57. Choosing to import a file
- Browse to the preset file, select it, and click
Open. The preset will appear in theMotion Presetspanel under theCustom Presetsfolder as shown in Figure 6-58.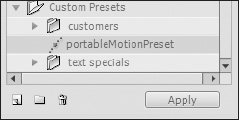
Figure 6-58. A newly imported preset in the
Motion Presetspanel
Summary
In this chapter we talked about why animation is important. We discussed when it might be appropriate to use animation in your project. You learned the following:
- Basic animation with the new motion tween
- How the classic motion and shape tweens work
- How to use the new Motion Editor
- How to use, create, and share motion presets