CHAPTER 8
THE PROGRAMMING PRIMER: A FLASH DESIGNER'S INTRO TO ACTIONSCRIPT 3.0
Welcome to the wonderful world of ActionScript programming. In the first two parts of this book, you have been exposed to what is classically considered the design side of Flash authoring. Throughout the duration of this book, you will gradually be introduced to the versatile capabilities of ActionScript, the developer side of Flash authoring.
In terms of programming languages, ActionScript is easily the most widely used language in new media. Its functionality is applicable in industries such as web design, game design, courseware development, and enterprise-level application development. Developers or graphic designers possessing a keen sense of proper ActionScript usage open a whole new level of opportunity for their career.
In this chapter you will be introduced to the most basic elements of ActionScript programming. You will gain needed insights and the proper foundation to adequately implement the various aspects of ActionScript that will be covered in the upcoming chapters. Even if you are an experienced programmer, this chapter will serve as your point of translation and allow you to quickly apply programming logic you may already know to ActionScript.
If you are someone transitioning to the world of Flash, it is important that you do not become discouraged or overwhelmed by the breadth of this topic. At any given point in this publication, it is possible to extract a section or chapter and have an entire book devoted to only the material covered in that section. In fact, because there are so many directions a Flash professional could take, Adobe once offered two certification exams to adequately represent a person's true understanding of the software.
Additionally, you should understand that programming, in its own right, is a topic that goes beyond the scope of Flash itself. Therefore, though you will be introduced to the language and some basic programming concepts, we encourage you to explore and reinforce your learning through additional reading and research.
Some excellent online resources for learning Flash and ActionScript include www.kirupa.com and www.actionscript.org. The benefit of online tutorials and forums is that it is very common for other developers to be seeking answers to the same problems as you. This is beneficial because it has a tendency to yield many solutions. We will also point out additional resources in later chapters as it becomes relevant.
Before we get started with the tools and elements of ActionScript, if you are a nonprogrammer or Flash designer, we would like to offer a few paragraphs to help you get in the right frame of mind.
Dreaming in metaphors
Programming is very much like creating a new world. As the programmer, you have complete control over that world. You decide what exists in that world and how things interact with one another. And, if you happen to be a really good programmer, you have the ability to create something that is virtually incomprehensible in the physical world we live in. Because of this complexity, that creation can often become extremely difficult to articulate using known concepts. So, it is ultimately necessary to illustrate a topic by relating it to another. Enter the metaphor. Actually, it entered a few sentences ago!
You can think of this in much the same manner as trying to describe color to a blind person. Color, in this case, would be considered something that is incomprehensible and abstract to a person who cannot see. How would you begin to describe color to a blind person? It would be something very hard to articulate. You would need to find a mediating idea, or metaphor, that would not only be familiar to the blind person, but also convey the idea of color. For example, you may try to use concepts like heat or anger to describe a color like red.
Nonetheless, if you want to be a great programmer, you will need to become an abstract thinker capable of dreaming in metaphors. And remember, if this book is your first step into programming, be sure to give yourself enough time to take it all in.
Now that you are in the right frame of mind, let's discover what ActionScript is and how it has matured with the various releases of Flash.
Following the evolution of ActionScript 3.0
Elements of Flash-based scripts can be traced back as early as Flash 2. However, the name "ActionScript" did not make an appearance until the release of Flash 5 in 2000 with the release of ActionScript 1.0. ActionScript was originally a scripting language built to aid in the navigation of the Flash animation environment. These simple scripts were nothing more than the ability to change frames or scenes. With each new release of Flash, however, ActionScript becomes more and more adherent to the ECMA-262 standard, which allows for an even greater degree of optimization.
The release of ActionScript 3.0 has been no exception. This version offers an ActionScript language that has been completely reconstructed from the ground up. Though much of the base syntax remains, it is often said that ActionScript 3.0 should be approached as an entirely new language, independent of previous releases of ActionScript.
The Flash-based release of ActionScript 3.0 saw many key architectural improvements such as a true object-oriented model, enhanced low-level access, and a revamped version of the ActionScript Virtual Machine (AVM2). All of these improvements combined to create blistering fast performance and a greater degree of optimization.
Further, programmers were introduced to complete reconstructions of many core features including redesigns to the Events, Display, Loading, and XML classes. With Flash CS4, programmers can also reap the benefit of additional enhancements like a more robust Sound API and improvements to the Drawing API. Finally, developers are also introduced to the Vector data type, which allows for strict data typing of arrays.
Now that you have an idea of what ActionScript is, it's time to start creating ActionScript programs. In the next section, we'll take a look at a traditional example that will help you get your feet wet when working with ActionScript and the Flash IDE.
Crafting your first ActionScript application
In the course of computer programming history, there have been many great traditions passed down from programmer to programmer. One of the most famous practices of ritualistic behavior comes in the form of the Hello World application. The Hello World application is typically used as the very first example in a book or as the first computer program written by a new programmer. It is basically nothing more than the words "Hello World" being displayed on the screen. Though we contemplated skipping the Hello World app for this section, we wouldn't be honorable men if we chose to neglect such a fabled institution. We can think of no fewer than six titles we have read that have included a Hello World app.
This example will serve as an excellent lead-in for you to get exposed to the many aspects of this chapter. You will be introduced to some important tools like the Actions panel, Script Assist, and trace statement. Later in this chapter we will discuss these tools in greater detail. The exercise will then serve as your frame of reference. So without further ado, it's time for your first program to say "Hello!"
- Open Flash CS4.
- Create a New Flash file (ActionScript 3.0) by either choosing the
Flash File(ActionScript 3.0) option on the FlashWelcome Screenor selectingFile
Newand choosingFlash File(ActionScript 3.0) from theNew Documentwindow. - Once your new document has been created, open the
Actionspanel by selectingWindow Actionsor by pressing F9. (F9 is definitely a shortcut you should remember.) - Once the
Actionspanel is open, activate the Script Assist by clicking theScript Assistbutton, located in the upper right of theActionspanel as shown in Figure 8-1. At this point you will notice the expansion of the Script Assist above the script pane. You should also notice that not much is happening there at the moment.
Figure 8-1. the
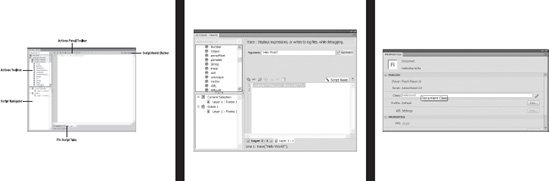
Script Assistbutton - In order to use the Script Assist, you will need to add a code snippet from the Actions toolbox. The Actions toolbox is located in the upper right of the
Actionspanel. Using Figure 8-2 for reference, make sure that the scrollbar in the Actions toolbox is at the topmost position. Then selectLanguage Elements, followed byGlobal Functions.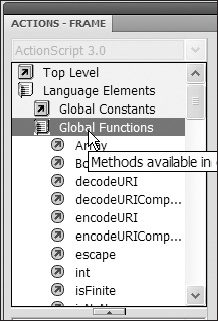
Figure 8-2. the available features in the
Actionstoolbox - One of the coolest features in the Script Assist is the fact that you can see what each function does before you use it. With
Global Functionsexpanded, scroll down until you see the trace function. Single-click the trace function to see what it is used for. - Add a trace statement to your ActionScript by either double-clicking it or dragging it to the script pane. Immediately, your script is added to the script pane and a list of parameters is now visible in the Script Assist pane.
- Now that the function has been added to your ActionScript, you will need to fill out the
Argumentsfield to get it to work properly. As you will find out shortly, the trace statement is primarily used to write information to theOutputpanel in Flash. For now it will be sufficient for you to type"Hello World!"(including the quotation marks) as shown in Figure 8-3.
Figure 8-3. The
tracestatement's output to theOutputpanel - Test your movie by selecting
ControlTest Movieor by pressing Ctrl-Enter/Option-Enter. This will publish your SWF file, and immediately you will see theOutputpanel appear with the phrase "Hello World!," as shown in Figure 8-3.
Congratulations! You have just written your first ActionScript program. Now we will take a closer look at the various components that were used to create this application. In the next section, you will be officially introduced to the trace statement, a tool that will help you communicate with your program.
The trace statement: Leaving breadcrumbs
In the last exercise you created the all-too-famous Hello World application. In that application you used a popular statement known as the trace statement. The trace statement is actually a special kind of statement known as a top-level function.
The primary function of the trace statement is to send any expression to the Output panel during author-time testing of your Flash movies. You may also send output to a log file during debugging. Typically, trace statements are used to check the execution timing and values of dynamic parts of any given program. If you're familiar with the children's fairy tale "Hansel and Gretel," the trace statement can be thought of as your bag of breadcrumbs to help you find your way home if you get lost in the programming woods.
As you saw in the previous section, the trace statement is actually quite easy to evoke. Simply type the keyword trace followed by a set of parentheses. Within the parentheses you type the item you would like printed to the screen. As illustrated previously in Figure 8-3, typing the phrase "Hello World!" between the trace parentheses printed "Hello World!" to the screen.
With the trace statement you also have the ability to print multiple items to the screen at one time. To do this, simply type the values you would like to trace delimited by a comma. With the following example, the characters a, & and b would all print to the Output panel.
trace("a","&","b"); //a&b
The trace statement is one of the most useful allies that any ActionScript developer can have. It will allow you to communicate with yourself as a program executes. You will certainly get plenty of exposure to the trace statement as you work through the rest of this book.
In addition to the trace statement, the single most important aspect of developing ActionScript from within Flash is the Actions panel. Let's have a look at the many benefits this tool has to offer.
Moving into the Actions panel: Your new home
When authoring ActionScript in Flash, all of your work will be done in one of two ways. The first of these is the use of external ActionScript files (which have the extension .as). As you become more familiar with the proper techniques of programming ActionScript, more and more of your work will be done in external files.
The second method for writing ActionScript is to apply actions directly to keyframes using the Actions panel (select Window ![]()
Actions or press F9) in the Flash development environment. For this chapter a majority of the examples we will look at can be easily coded using the Actions panel.
Further, you will notice when migrating to programming with external files that they are opened in Flash using a document window that is very much like the Actions panel. Though this is not actually the Actions panel, you probably won't notice much difference. As a convention, we will refer to ActionScript written in external .as files as external and ActionScript placed on the timeline in Flash as embedded.
Looking closely at the Actions panel
The Actions panel is comprised of several important sections as shown in Figure 8-4.
- The script pane is the primary section of the
Actionspanel positioned at the right. Within this pane, you will enter all scripts that will be used in your ActionScript program. As shown in Figure 8-4, the script pane currently has the script //This is ActionScript!on line 1. - The Actions toolbox is located in the upper-left portion of the
Actionspanel. Within the toolbox you have access to all core ActionScript libraries that were included with your installation of Flash. From here you can access all objects including their properties (variables) and methods (functions). Double-clicking an element of the Actions toolbox will automatically add it to the script pane. - The Script Navigator is located at the bottom left of the
Actionspanel. This feature will allow you to browse all embedded scripts for the FLA you are currently working on. All scripts are organized hierarchically by object and location. This pane is available only if you are authoring ActionScipt that is embedded on the timeline within an FLA. Therefore, if you are working on an external ActionScript file, you will notice that this pane has disappeared. - The
Actionspanel toolbar is a list of tools to aid in the organization and development of ActionScript code. This set of tools is located directly above the script pane. These tools are available for both embedded and external ActionScript files. Pin Scripttabs give developers the ability to quickly switch between various scripts in their ActionScript program.- The
Script Assistbutton is used to open the Script Assist pane in theActionspanel.
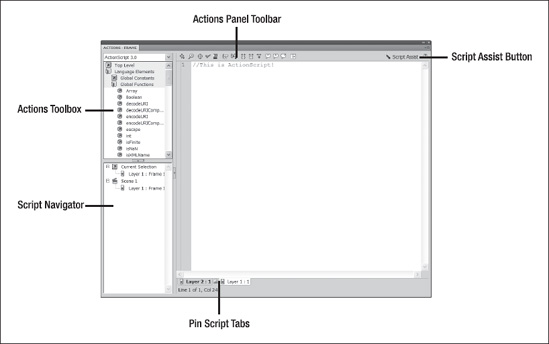
Figure 8-4. The main areas of the Actions panel
Though pointing out the primary sections of the Actions panel will certainly help you in learning your way around, it is probably more helpful to discuss a few of these sections in more detail. As you'll see in the following three sections, the Actions panel toolbar, Pin Script tabs, and Script Assist can all offer a greater degree of organization and efficiency when working with ActionScript.
Actions panel toolbar
The Actions panel toolbar offers developers a quick method to check, reference, and format their code. The following toolset is one that should definitely be made familiar to every ActionScript programmer.
Add New Item to the Scriptis represented by the blueplusicon located at the left of theActionspanel toolbar. It works in the same manner as the Actions toolbox. Selecting this will open a drop-down menu containing all of the core libraries contained in the Flash installation. Selecting any item from this drop-down will add it to the script pane.Findgives you the ability to find and replace any text located in your ActionScript.Insert Target Pathis only available for use with embedded ActionScript. This tool allows you to locate a symbol instance in your FLA file and reference its name in ActionScript. Paths can be either absolute or relative.Check Syntaxallows you to quickly determine whether or not your scripts contain syntax errors.Auto Formatformats your scripts so they are syntactically correct and are more easily read. This includes the addition of normals and semicolons. You can adjust the format setting using thePreferenceswindow (EditPreferences) underAuto Format.Show Code Hintwill allow you to receive a code hint for the code you are working on.Debug Optionsallows you to set breakpoints for debugging your ActionScript files line by line. This feature is only available for embedded ActionScript files.Collapse Between Bracescollapses all code that exists between curly braces. In addition, it will collapse all code between parentheses if that is where the cursor is currently located.Collapse Selectioncollapses all code that is currently selected.Expand Allexpands all code that has been previously collapsed.Apply Block Commentwill add multiline comment markers at the beginning and end of currently selected code.Apply Line Commentwill add a single-line comment marker at the current position of the cursor. If multiple lines are selected, it will add a single-line comment marker to the beginning of each selected line.Remove Commentremoves all comments from currently selected code or the line containing the cursor.Show/Hide Toolboxtoggles the Actions toolbox as either hidden or visible.
Pinning scripts so you don't lose them
Though it is becoming less common in ActionScript development, it is inevitable that at some point in your Flash career you will need to have multiple scripts embedded in several different locations of your FLA file. It is also more than likely that you are going to have to jump back and forth between these scripts. For such an occasion, the Actions panel comes equipped with the Pin Script feature.
As shown in Figure 8-4, the Pin Script feature is a series of tabs located at the bottom of the script pane in the Actions panel. The script that is currently active is always represented by the leftmost tab. However, if you browse to other scripts located on other keyframes in your FLA, you have the ability to pin this for easy access. Once you have navigated to the new script, simply click the pushpin icon located next to the first tab, shown in Figure 8-4 as Layer 1:1. After clicking the pushpin icon a new tab will appear, allowing you to jump directly back to this script at a later time.
Script Assist—taking it easy
For those professionals who are either new to ActionScript or only interested in learning just enough to get by, Flash offers a rather helpful tool, the Script Assist. You should have some familiarity with this from the previous Hello World example. The Script Assist is located at the top left of the Actions panel, inline with the Actions panel toolbar. You should notice a button labeled Script Assist with the icon of a magic wand.
The true benefit of this tool is that it allows developers to work in tandem with the Actions toolbox to quickly develop scripts that are meaningful to their program. As shown in Figure 8-5, once the Script Assist button is clicked, you will immediately notice that the portion of the Actions panel above the script pane extends to reveal the Script Assist pane. You can then browse for items in the Actions toolbox. By single-clicking items in the toolbox, the Script Assist will display a brief description of that item. Double-clicking an item will then add it to the script pane.
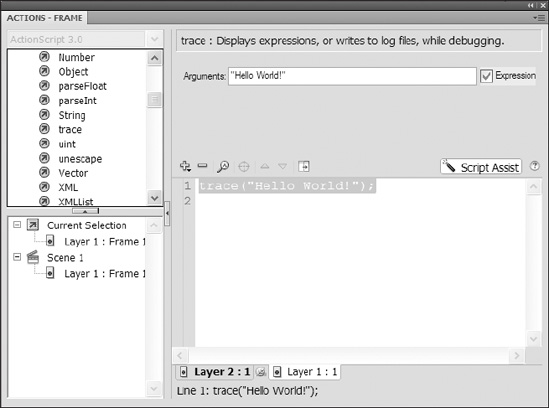
Figure 8-5. Proper use of the Script Assist
Once an item has been added to the script pane, the Script Assist then displays a list of fields that are relevant to properly constructing that section of code. Therefore, a beginner can quickly create well-formed ActionScript with a just few clicks and filling out a couple of fields.
Because the Script Assist is so user friendly, it is often an excellent starting point for someone wanting to learn ActionScript without the worry or hassle of proper syntax and-formatting.
Now that you have been acquainted with the most important tools for working with ActionScript, let's now transition into the most basic elements of the ActionScript language itself and how to work with them.
Basic elements of ActionScript programming
Though we will be looking at the elements of programming as they apply to Flash and ActionScript, it is worth pointing out that most programming languages within a certain categorization operate in pretty much the same fashion. By "categorization," we mean the type of language. In this book we will be speaking about object-oriented languages. In fact, given the industry to which this book is associated, it is a pretty safe assumption to say that you are more than likely only going to ever use markup languages and object-oriented languages. Therefore, even though this book is directly specific to the ActionScript language, the programming basics that you will learn here are easily transferable to many other object-oriented languages.
Syntax
The syntax of any given language simply refers to the rules that govern how elements are structured or put together to form meaningful statements. In the English language the minimum requirements for a sentence are typically a subject and a verb as well as appropriate punctuation. Even in an exclamation such as "Run!," the subject is the person being spoken to and the verb is undoubtedly "run."
If we were to take a closer look at a sentence like "He runs," we can extract a few simple rules that determine whether or not this sentence is properly structured. There are basically four things that we are going to look at. Is there a subject, is there a verb, is there a punctuation mark, and is the first letter of the sentence capitalized? By now this stuff is more or less inherent; you probably can't even remember where you learned these rules.
Just like any written language, programming languages are also governed by a specific set of rules that need to be followed in order for the statements to make sense to the computer. Fortunately, this set of rules is infinitely less complicated than those applied to written language. And, without question, they will ultimately become as second nature to you as looking for a period at the end of a sentence.
Case sensitivity
ActionScript is classified as a case-sensitive language. The term "case sensitive" refers to the manner in which a programming element is physically entered into the computer by a programmer using the keyboard. The following example shows the declaration of two variables, mylist and myList. At first glance they may look the same, but the capitalization of the letter "L" in the second variable name is enough differentiation for these to be treated as completely different elements.
var mylist:String;

var myList:String;
Though this may not seem like a tremendous issue, it is the small details like this that wreak havoc on many programs. As a new programmer, case sensitivity will more than likely be the culprit for the majority of your programs not working properly.
Dot syntax
In ActionScript, dot notation is used to perform two primary functions. First, as you become familiar with working with external class libraries, you can use the dot operator to import these libraries into your Flash program. As you begin to break a program into manageable chunks, you will want to begin to create ActionScript files externally. A library is nothing more than a collection of external ActionScript files that is stored in a centralized location.
If you were to try to gain access to this location from your computer's desktop, you would use slash notation (/). To access the same information from Flash, you would use dot notation (.). The next example shows the path to an AS called myasfile.as This file is being stored in a folder called which is stored in MyDocuments The first line shows how the file is addressed using slash notation, and the second line shows dot-notation.
MyDocuments/ASFiles/myasfile.as


MyDocuments.ASFiles.myasfile
Flash installs with a rather robust set of core functionality that is also managed using external libraries. The following paths determine the location of the Flash core class libraries based on computer platform:
- Windows:
Hard DiskDocumentsandSettingsuserLocal SettingsApplication DataAdobeAdobe Flash CS3languageConfigurationClasses - Macintosh:
Hard Disk/Users/user/Library/Application Support/Adobe/Adobe Flash CS3/language/Configuration/Classes
The second use for the dot operator is to access the members of a particular object. Again, don't be confused by the phraseology. As you will learn very shortly, objects used in object-oriented programming are comprised of properties, methods, and events. These items are known collectively as the members of the object. And, the dot operator will grant you access to some of these members for the benefit of your program.
For sake of simplicity, we will pretend that I (Paul) am an ActionScript object called Paul. As an object I could contain various properties like height, weight, and whether I have hair. Similarly, I could have a method for performing various tasks like eating, sleeping, and working. It is bleak, I know. Additionally, I could react to an event. If someone were to tickle my nose, I may react by saying "AH-CHOO!" In the next chapter, we'll demonstrate that events are nothing more than functions triggered under certain circumstances, as well as look more closely at the differentiation between properties, methods, and events.
Now if we wanted to access one of those properties or tasks, we would do so using dot notation. The following example shows access to various members of the Paul object:
Paul.height = 6.25;

Paul.weight = 225;

Paul.hair = true;

Paul.hair.color = "brown";


Paul.sleeping();

Paul.eating();

Paul.working();


Paul.addEventListener(Event, sneeze);

function sneeze (e:Event)

{

  trace( "AH-CHOO!");

}
Expressions and literals
Literals refer to values in a program that are typed (keyed in) and returned verbatim. In the following example the variable myName is assigned the literal value of "Paul". When the trace statement is used to print this variable to the Output panel in Flash, you will notice that it returns the value Paul exactly as it was assigned.
var myName:String = "Paul"; //String literal

var currentAge:int = 5; //Numeric literal

var birthday:int = currentAge + 1; //Numeric expression

trace(myName + " is " + birthday + " years old.");ww

//Paul is 6 years old.
Conversely, expressions are values that are resolved by the execution of a statement. The variable birthday in itself does not have a legitimate value. It is dependant on the value of the variable currentAge. Therefore, the expression currentAge + 1 must resolve to a legitimate value before any value can be assigned to birthday. If you were to delete the second line of the preceding program, you would notice that the expression would be unable to resolve, and an error would appear. Fortunately, in this case, the value does resolve to 6.
Finally, all of the items in the parentheses of the trace statement would also be considered an expression. Though there are several string literals present, the entire group of elements needs to resolve to a single value before it can be passed to the Output panel.
Semicolons
In Flash the semicolon is used to indicate the end of an executable statement. You should think of this as a period in your program. Though semicolons are not required, not using them could cause some unexpected results while programming. For example, omitting a hard return between two lines of code that are also not delimited by a semicolon would cause your program to fail to execute. Further, it is considered good practice to use them.
The following two code examples look almost identical to one another. The first example is missing the semicolon after the string "Paul". Without this semicolon, ActionScript cannot tell that each line actually contains two statements. Therefore, an error occurs in the first line.
var myName:String = "Paul"  trace(myName); // error


var myName:String = "Paul";  trace(myName); // Paul
parentheses
The primary uses of parentheses are similar to the function they serve in basic arithmetic. That is, they are responsible for changing the order of operations in any given expression. Therefore, any expression or part of an expression that is encapsulated within parentheses is executed first. You may also continuously nest groups of parentheses to further control the order of operations.
The following example demonstrates several examples of parentheses usage. As the mathematical order of operations suggests, the contents of the innermost parentheses are executed prior to that of the outermost parentheses.
trace (2+2*3); //8

trace ((2+2)*3); //12

trace (((2+2)/6)*3); //7
Similarly, you can use parentheses to execute a series of statements separated by a comma. The statements are executed sequentially, and the result of the final statement is returned.
In the following example, the first five lines of code are simplified into one statement using comma-separated statements encapsulated within parentheses.
var a:int = 1;

var b:int = 2;

a++; //the variable a is incremented by 1 (a = a+1)

b--; //the variable b is decremented by 1 (b = b-1)

trace (a+b); //3


//The preceding statements could be simplified as

trace ((a++, b--, a+b)); //3
Finally, parentheses are used to pass parameters to a subroutine, known in Flash as a function.
function passParameter(theParameter)

{

  theParameter++;

  trace(theParameter)

}


passParameter(3); //Traces 4 to the Output panel
Comments
Comments are an extremely important part of any program. Though you may only be writing a program for your own benefit, chances are you are actually writing the program for the benefit of a team or company. Regardless of the end result, it is more than likely that someone else will eventually have to go into your code and make some kind of tweak or edit. It is considered excellent practice and extremely courteous to properly comment your code.
Commenting allows programmers to type additional text among their program's code offering directions, instruction, or additional insights. Any line that is commented will be ignored by the compiler and will neither interact nor interfere with any part of your program.
In Flash, there are two ways to generate comments. For a single-line comment, a programmer can use double (//) slashes. All characters to the right of the double slash will be commented out.
The second method of commenting is the multiline comment. This is achieved by using the single slash and asterisk (/*) character combination to open the comment and the asterisk and single slash (*/) character combination to close the comment.
As shown in the following example, both double-slash and slash-asterisk notation are used to create a line comment and a block level, or multiline, comment.
//Use double slashes to create a single-line comment


/* Use a slash then asterisk to open a multiline comment

and use an asterisk then slash to close it */
This technique will also prove invaluable to you when testing various options while writing your programs. As shown here, multiple trace statements have been created to trace different options. Commenting can be used as a way of "turning off" trace statements.
trace("option1"); //option1

//trace("option2");  Will not trace
Variables
Variables are the most basic component of any given computer program. Technically speaking, a variable is a reference to a portion of memory that has been allocated for the storing of a particular type of data. Basically, this is a fancy way of saying it is a name given to a location where a specific kind of information will be stored. And a computer program is nothing more than a sophisticated way of manipulating information. In some capacity or another, every statement in a computer program must interact with a variable. Therefore, variables can be thought of as the subject or noun of the computer program.
To declare a variable in ActionScript, you must first use the var keyword. For example, the following statement declares the variable myVariable. Failing to use the var keyword in the declaration of a variable will result in an error in your program.
var myVariable;
As a programmer you have complete control over the names you give your variables. However, there are a few rules that need to be followed when creating a variable name:
- Variable names can contain any number or letter, dollar signs ($), and underscores (_).
- Variables names cannot begin with a number.
- They cannot contain spaces.
- Variable names must be unique. Two variables cannot share the same name within the same scope.
- Variable names are case sensitive. It is also recommended that you avoid using the same variable names with different case. For example,
myvaris different frommyVarbut will probably create confusion.
Though it is not absolutely necessary, it is considered best practice to strictly type your variable by assigning it a data type. To strictly type a variable, add a colon (:) followed by the desired data type. As you will learn in the next section, data typing is beneficial for more efficient programming.
In the following code, we assign the variables myVariable and myNumber the respective data types of String and Number.
var myVariable:String;

var myNumber:Number;
Once a variable is declared, you can give it a value by using an assignment operator (=) followed by the value. As shown here, our previously defined variables are assigned the values of Hello and 4:
var myVariable:String;

var myNumber:Number;


myVariable = "Hello";

myNumber = 4;
You can also assign the value to a variable when it is created as follows:
var myVariable:String = "Hello";
Though it is also possible to instantiate multiple variables at one time using the comma delimiter, it is not considered best practice. In the following example, the variables myVar_1, myVar_2, and myVar_3 are all created in one statement using the comma delimiter.
var myVar_1:int = 1, myVar_2:int = 2, myVar_3:int = 3;
Right now you are probably thinking of variables in terms of a name-value pair. For example, myName="Paul" is basically a variable for my (Paul's) actual name. And the variable has been given a name that more or less describes what the value is going to be, a name. So, the statement is really comprised of nothing more than a variable's name and the variable's value. As you become more and more familiar with using ActionScript, you will come to realize that variables become references to extremely complex objects that may also contain a number of additional variables.
Data types
If variables are thought of as the nouns of computer programming, data types can be thought of as the adjectives. A data type is used to describe what type of information is going to be stored in a variable. Though strict data typing is not required, it is considered excellent practice.
Practically speaking, data typing can serve several purposes. First, strict data typing reduces the amount of memory needed for using any given variable. Therefore, if you data type your variables, the variable will only accept information of a specific type. For instance, if a variable is typed String, you know the variable is going to be of the String data type and only store characters. Further, if a variable is type Number, you know that the variable will only accept numbers. Subsequently, if a variable is type String and you try to assign a value to it that is a number, you will receive a type-mismatch error from the compiler.
Second, typing your variables enables inline code hinting. Inline code hinting is a feature of the Actions panel whereby suggestions are made from the Actions panel as to what code should come next.
In ActionScript, data types can be classified into two categories:
- Primitive: Primitive data types are what you have been exposed to so far in this chapter. They include the most basic type of data that can be used in Flash programming. Table 8-1 gives a list and definition of the primitive data types.
- Complex: Complex data types are every other type of data used in Flash. They include common reference data types such as
Array, Date, andMath. Where primitive data type can only contain primitive types of data such as numbers and letters, complex data types can contain many primitive values and other complex values at the same time.
Table 8-1. Primitive data types
| Data type | Example | Description |
Boolean |
True/False |
Values of this type can only be true or false. These are commonly used for comparison and decision making. |
String |
"Hello World" |
This type is used for any text-based value or string of characters. |
Number |
1,88,4.3 |
This type is used for any numerical value including floating-point or decimal values. |
int |
0, −5, 3 |
This type is used for any integer or whole number. |
uint |
1, 2, 3 . . . |
Short for unsigned integer, this type can contain any whole number that is not negative or a decimal. |
void |
This type is used if a function does not return any value. | |
* |
untype |
This type is used if a variable is not of a specified type. |
undefined |
undefined |
This type indicates untyped variables that have not been initialized. |
null |
null |
This type is used for variables that do not have a value at all. |
Operators
Adobe defines operators as special functions that take one or more operands and return a value. An operator, though defined as a function, is usually nothing more than one, two, or three characters used to take two or more values and evaluate them. The best way to comprehend this is with simple arithmetic. If we were to take the math problem 2 + 2 and turn it into a computer program, it might look very similar to what you see here:
var answer:uint;

answer = 2 + 2;


trace(answer); // 4
These statements are pretty simple to understand. We have declared the variable answer and given it the data type uint because we are fairly certain the result will be a positive number. We then assign the value of answer the expression 2 + 2. Finally, we trace out the value of answer, and we are given 4. The operator in this series of statements is the plus sign (+), also known as the additive operator. What is happening here is that the additive operator (+) is evaluating the operands (2 and 2). And because the additive operator (+) is responsible for adding things together, it determines the type of data that is involved and joins them appropriately.
Further, had we attempted to add two strings together, the result may not be as expected. For instance, let's change the 2 and 2 to "two" and "two". As shown in the following code, you would then end up with something entirely different. Keep in mind that because strictly typed variables can only accept the data of one type, the data type will also need to be changed from uint to String for this to properly execute. In this case, the resulting join of two character strings is known as concatenation. Additionally, when an operator has the ability to change the way it reacts based on the type of operand it is dealing with, as the additive operator (+) did here, it is known as operator overloading.
var answer:String;

answer = "two" + "two";


trace(answer); // twotwo
As you can see, even the most basic use of an operator can become extremely convoluted. If we were to simply list all of the ActionScript operators and descriptions in tabular format, it would probably take about three or four pages. Further, if we were to take the time to explain them all in detail, it could easily be an entire chapter. As a general rule, most of the time operators behave intuitively; a plus sign will add things together, or an asterisk will multiply them. They maintain an order of operations similar to arithmetic. Because operators are such an integral part of a programming language, it is best to introduce them in the manner in which they are operating. This facilitates the best comprehension.
Postfix operators
Postfix operators are typically used to increment and decrement one numerical operand by 1. As shown in the following example, the variable a is incremented using the increment (++) operator. It is then decreased using the decrement (−−) operator.
var a:uint = 0;

a++;

trace (a); // 1

a--;

trace(a); //0
Table 8-2 lists the postfix operators.
Table 8-2. Increment and decrement postfix operators
| Operator | Name | Description |
| ++ | Increment | Increments a numeric variable by 1 |
| -- | Decrement | Decrements a numeric variable by 1 |
Multiplicative and additive operators
Multiplicative and additive operators perform similarly to their arithmetical counterparts. They are used to add, subtract, multiply, and divide various operands. The following example demonstrates a simple mathematical operation performed using the multiplicative operator (*):
var a:uint:Number;

a = 3 * 4;

trace (a);  //12
Table 8-3 lists the standard multiplicative and additive operators.
Table 8-3. Most commonly used multiplicative and additive operators
Relational operators
Relational operators are used to compare the value of two operands. The resulting value is Boolean, either true or false. The following sample checks to see whether the value of the variable a is greater than or equal to the value of the expression (1+2):
var a:uint = 2;

trace (a >= (1+2)); //false
Table 8-4 lists the standard relational operators.
Table 8-4. Standard relational operators
| Operator | Name | Description |
< |
Less than | Checks whether the left value is less than the right value |
> |
Greater than | Checks whether the left value is greater than the right value |
<= |
Less than or equal to | Checks whether the left value is less than or equal to the right value |
>= |
Greater than or equal to | Checks whether the left value is greater than or equal to the right value |
Equality operators
Equality operators work in much the same fashion as the relational operators in that they compare two values and return a Boolean value of either true or false.
In the next example the assignment operator (=) is used to give a value to the variable a. The first statement can be read a is equal to 2. Conversely, the trace statement uses the equality operator (==) to compare the values of a and the expression (1+2). Therefore, relational and equality operators can be thought of in terms of questions. Is a equal to (1+2)?
You can also use the NOT operator (!) to determine whether values are not related.
var a:uint = 2;

trace (a == (1+2)); //false

trace (a != (1+2)); //true
Table 8-5 lists the standard operators of equality.
Table 8-5. Most common operators of equality
| operator | Name | Description |
== |
Equality | Checks whether the left value is equal to the right value. |
!= |
Inequality | Checks whether the left value is notequal to the right value. |
=== |
Strict equality | Checks for same values, as well as compares the data types of each value. If the left value and the right valueare the same and the data types are the same, the expression returns true. Objects and arrays are compared by reference, not data type. |
!== |
Strict inequality | Checks for the same values, as well as compares the data type of each value. If the left value and the right value are not equal or the data types are different, the expression returns false. Objects and arrays are compared by reference, not data type. |
Logical operators
The logical operators are also similar to the relational and equality operators in that they compare the values of two operands. The primary difference is they give programmers the ability to compare multiple comparative statements. The following sample checks to see whether the value of a is greater than 1 and less than 3:
var a:uint = 2;

if( a > 1 && a < 3)

{

  trace ("Yes"); //Yes

}
Table 8-6 lists the common logical operators.
Table 8-6. The AND and OR logical operators
Conditional statements
Conditional statements are one of the first logical needs in any programming language. Quite simply they allow a programmer, or more to the point the program, to make an intelligent decision based on a set of predetermined conditions. For instance, if it is raining outside, wear a raincoat or else you'll get soaked.
If . . . else statement
The if statement is the simplest and most commonly used conditional statement in programming. It can be thought of as the fork-in-the-road decision maker. As shown in the next example, the statement is comprised of four primary parts. The if keyword simply lets the program know that it is going to be entering the if statement. The second part, characterized by parentheses, is where the actual decision is made. The third part consists of two curly braces that signify a code block associated with the if statement. Finally, all statements within the curly braces are executed if the if statement evaluates to true.
if (weather == "rain")

{

  putOnRaincoat();

}
The if statement works by evaluating expressions that are encapsulated within these parentheses. There are only two possible outcomes for the evaluation of any given expression with respect to an if statement, true or false. Therefore, the preceding example asks, "Does the value of the variable weather equal rain?" Again, the outcome can only be true or false.
The else clause can be added to the end of an if statement to offer a desired outcome for the if statement evaluating false. Therefore, rather than having your program do nothing, you have the ability to have it act intelligently with respect to either decision. As shown in the following code, the else clause enables the if statement to have an alternative option in the event it evaluates to false:
if (weather == "rain")

{

 putOnRaincoat();

}

else

{

 putOnShades();

}
else . . . if clause
A third option for working with if statements is the use of the else...if clause. The following example shows how this option gives you the ability to break your decision making into multiple branches.
if (weather == "rain")

{

  putOnRaincoat();

}

else if (weather == "snow")

{

  putOnBoots();

else

{

  putOnShades();

}
Logical operators && and ||
Finally, by using the logical operators && and ||, you have the ability to create compound evaluations to check multiple conditions at one time. The following sample code shows the use of both types of logical operators to evaluate compound conditions:
if ((weather == "rain") && (temperature == "4 degrees"))

{

  stayHome();

}


if ((weather == "snow") || (temperature == "4 degrees"))

{

  dressWarm();

}
switch
The switch statement is a special kind of conditional that allows you to define a multitude of outcomes based on the evaluation of a single statement. Unlike the if statements, which check only whether an expression is true or false, the switch statement checks the actual value of the variable, compares it to the list of viable options, and determines the appropriate code block to execute.
As shown next, the switch statement is defined by the switch keyword followed by a set of parentheses that contain the expression to be evaluated. All execution options are then encapsulated within the curly braces. Each subsequent option is defined by the case keyword, followed by an option value and a colon. The colon is then followed by any code statements that are to be executed should this option be met. Each case statement is then closed with the break keyword.
switch (weather)

{

  case "rain":

    putOnRaincoat();

    break;

  case "blizzard":

    putOnBoots();

    break;

  default:

    checkWeather();

    break;

}
Loops
In addition to making decisions, it is also very common for a computer program to repeatedly execute a series of statements until a certain parameter is met. Loops are essentially statements that increment a variable a given number of times until a condition is met. In ActionScript the two most commonly used loops are the for and while loops.
for
The most common loop used in programming languages like ActionScript is the for loop. As shown next, the anatomy of a for loop is rather unique in that unlike other functions it uses the semicolon as the delimiter instead of the comma. The reason for this is that you are actually sending three statements to the loop as opposed to an expressed value.
var i:int; //i is classically used for the incrementing variables

for (i = 0; i < 5; i++)

{

    trace(i); // 0 1 2 3 4

}


for (var i:int = 0; i < 5; i++)

{

    trace(i); // 0 1 2 3 4

}
The first of these statements, i = 0, sets the starting value for our count. The second statement sets the ending value of our count to 4. Finally, the third statement uses the incrementing postfix operator to increment the value of i by 1. These statements can be read as "For i is equal to 0 and i is less than 5, add 1 to i."
The loop works as follows. With the first pass through the for loop, the value of i is 0. Therefore, the trace statement traces 0. When the loop has completed its first pass, i is incremented to 1. The loop compares this to the second statement. Is i less than 5? Yes! The loop runs again. The trace statement traces 1 and the cycle repeats until the variable has reached the value as predetermined in the second statement—in this case 4.
While
The while loop works in exactly the same manner as the for loop. As shown next, the first step is to define a base starting point for the incrementing variable. In this case, i will once again begin at 0.
var i:int = 0;

while (i < 5)

{

    trace(i); // 0 1 2 3 4

    i++; // Adds 1 to the current value of i

}
The while loop is a bit less complex than the for loop in that you now only need to give the while statement one conditional expression in the parentheses. Therefore, we again want this loop to run until it is less than 5, or 4. Finally, all code that we wish to have execute is placed in between the curly braces of the while function. As you can see, it is here that we tell our i variable to increment.
Functions
Functions are the part of the program that makes things happen. To continue the English-language metaphor we have also been using in this chapter, functions can be thought of as the verbs of the program.
Think about the trace statement, which should now be very familiar to you. As you learned earlier, the trace statement is a special kind of function that passes information to the Output panel. This information comes in the form of a variable that can be either a literal or an expression. Like the trace statement, other functions have the ability to accept variable information in the form of arguments, also known as parameters, through the use of parentheses.
Defining your own functions
Functions are defined using a special predefined keyword, function. This keyword works in the same manner as does the var keyword. Once a function is declared by using the function keyword, the function is then named under the same guidelines that govern the naming of variables. (See the section "Variables" earlier in this chapter for an explanation of these guidelines.) The function name is then always followed by a set of parentheses. These parentheses are used to pass information to the inner workings of the function in the form of variables. These variables can also be declared in the parentheses at the time the function is declared. The function body is then established using a pair of curly braces. Within the function body, all statements that define the execution of the function are placed.
The following sample shows the definition of a function called helloWorld. The helloWorld function accepts one parameter, message, of the String data type. The function will then pass the message variable value to the trace statement located in the function's body.
function helloWorld(message:String)

{

    trace(message);

}
In order to use a function, you simply need to type the function's name followed by the desired parameter value encapsulated in parentheses. The following example demonstrates how the helloWorld function can be used within the program. By passing Hello World! as the parameter, the helloWorld function will then trace the parameter to the Output panel.
function helloWorld(message:String)

{

    trace(message);

}


helloWorld("Hello World!"); // Hello World!
Returning values from functions
For the time being we have been working with trace statements. The problem with the trace statement is that it always works. You put something in, you get something out. Given any logical parameter, the trace statement will give you some kind of meaningful feedback. Unfortunately, that is not indicative of how functions really work.
Functions can be thought of as a machine that operates on data. However, you don't always have to give it information. Additionally, it doesn't have to give you information back. In some cases, it will not want anything from you or give anything back. The trace statement, of course, is an elementary example of the other extreme.
You have learned how to pass information into a function. Remember, the parameters of functions that are defined in the parentheses allow you to pass information to the function. Now let's take a look at how to get things back. The following function performs a basic arithmetical process on a couple of variables:
function mathMachine (a:int, b:int)

{

  var c:int

  c = a + b;

}


trace(mathMachine(1,2)) //undefined
You will notice that when we try to trace the value of the mathMachine function, it returns the value of undefined to the Output panel. This is because the function is not returning any value. It is accepting two parameters, a and b. It is also, without question, adding a and b together and assigning that value to c. Right now, it simply isn't returning a value.
In order for a function to return a value, we have to use a special keyword, return. The return keyword does exactly what it says in that it returns the variable it is assigned to. To use the return keyword, enter it as you would keywords like var or function followed by the variable name you would like returned.
function mathMachine (a:int, b:int):int
{

   var c:int

   c = a + b;

   return c;

}


trace(mathMachine(1,2)) //3
After adding our return statement, you will notice that the function returns a value of 3, as expected. Did you also notice the addition of the :int data type? Yes, functions can be data typed as well. The purpose of data typing functions is to make the program aware of what type of value is going to be returned by the function. Again, it is not required but considered extremely good practice.
Variable scope
Scope refers to what parts of a program's code have the ability to reference a variable. Scope is always assigned automatically based on where the variable is declared. In ActionScript variables are defined by two different types of scope, global and local.
Global variables
A global variable is one that can be accessed by all parts of your code. Global variables are defined independently of functions—that is, they reside outside of the body of any function. In the following example the variable myVar is declared outside of the body of the function global Therefore, it is accessible from any part of the program. As you can see, both trace statements are able to trace the value of the variable myVar, which is.
var myVar:String = "Hello";


function global()

{

    trace(myVar); // Hello

}

global();


trace(myVar); // Hello
Local variables
Local variables on the other hand, exist only in a small portion of your program. Local variables are declared within a function's body. They are only accessible directly by the function itself. As shown next, the myVar variable is declared inside the function's body. Therefore, when we try to trace the variable using a trace statement located outside of the function, we receive a compiler error.
function local()

{

    var myVar:String = "Hello";

}

local();


trace(myVar); // error 1120: Access of undefined property myVar
Shadowing global variables
It is also possible for a local variable to shadow a global variable. The term "shadow" is used to describe a situation in which the same variable name is employed for two separate variables that are defined in different scopes of the same program. In the next example myVar is used as the name of a variable declared outside of the function shadow. In addition, the same name is used to describe the variable declared inside the function. As you can see, the local trace statement uses the local declaration of the myVar variable.
var myVar:String = "Hello";


function shadow()

{

    var myVar:String = "There";

    trace(myVar); // There

}

shadow();


trace(myVar); // Hello
Finally, let's take a look at the last primary component of ActionScript development, the class.
Having a little class or a big one
The last stop in the development of an ActionScript program is going to be the construction of a class. A class is a collection of related properties (variables) and methods (functions) that are grouped together in one collection. If you think of classes in the same way you think of functions, they are a means by which you can group similar code into one well-organized package. The idea of grouping code to make it more efficient is referred to as modularity. To get an idea of how this is helpful, consider the following list:
- A variable is the most basic element in a computer program.
- Statements are used to manipulate and change the information stored in-variables.
- A series of repetitive statements can be organized into functions for the sake of efficiency.
- For an even greater degree of organization, functions and variables can be grouped together into what is known as a class.
In Chapter 10, you will build a multiclass application. In this example, we are going to show you how to construct a simple one-class application so you gain familiarity with the basic structure of an ActionScript-based class.
Building your first application
Alright, now before we wrap up and move on to bigger and better things, let's take a moment and construct a simple application to give you a basic understanding of how you create one and what the important parts are.
First thing you need to do is open Flash, if you don't already have it open. Next, you need to create two new files. First, create a new Flash file by either selecting the Flash file (ActionScript 3.0) option from the Welcome Screen or by selecting File ![]() New and choosing
New and choosing Flash file (ActionScript 3.0) from the document window. Save this file as HelloWorld.fla in a directory that you are comfortable with.
The document class
The document class is a property of an FLA file that assigns any given class as the primary class to be used for this Flash file. Like all other document properties such as canvas size, background color, and frame rate, the document class can be set using the Property inspector. For this step we will need to have HelloWorld.fla as the active window in Flash.
To access the Property inspector, select Window ![]()
Properties or press Ctrl+F3. To assign a document class, simply type the name of the ActionScript file you would like to use (without the .as extension) in the field labeled Class. In the case of this example, you will be using the HelloWorld class (which you create in the next section). Therefore, type HelloWorld in the Class field of the Property inspector, as shown in Figure 8-6.
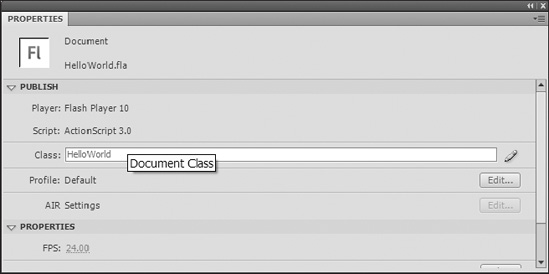
Figure 8-6. The Document Class field in the Property inspector
Packages and import statements
Now that your files are properly set up, you can start defining your class file. You will need to create an ActionScript file by selecting File ![]()
New and choosing ActionScript File from the document window. Save this as HelloWorld.as in the same directory as the HelloWorld.fla file.
The first step in defining a class is to properly define a package. In Flash, a package is nothing more than a collection of AS files. At this point, your AS file is located in the same directory as your FLA file, so it will not be necessary to give your package a name. However, it is a required element of any custom class, so it will need to be added. Go ahead and add the following lines of code to HelloWorld.as:
package

{


}
The next thing that you will need to do is import other packages for use in Flash. Recall that Flash installs with core functionality that is comprised of hundreds of classes. In order to use any functionality from another class, you will need to import it. To do this, you will use the import statement followed by the location of the class. Because you will need to use some of the functionality from the display and text packages, you will need to import those.
package

{

  import flash.display.*;

  import flash.text.*;

}
The preceding example uses the import statement to import the classes from the display and text packages. In the preceding code, flash represents the physical location of those files on your computer's hard drive. display and text represent folders in that location. These folders are what we referred to as packages. Inside each package is a varying number of AS files. The asterisk here represents "all" of the AS files in that package. Therefore, these two statements have imported all of the classes from both the display and text packages.
Class definition
The next thing that you need to do is define your class. As you can see in the next example, you'll have to add quite a bit of text in the form of keywords. For now, all you really need to be concerned with are the words class and HelloWorld. The rest, though necessary, will be explained in more detail in Chapter 10. Declaring a class is actually the same process as declaring a variable or function. You need the reserved keyword, class, to let the compiler know that this is indeed a class. And you need an appropriate name. The naming of a class is extremely important. It must be the exact same name as the AS file that it resides in, case and all. Therefore, because this class is being written in the HelloWorld.as file, it needs to be called HelloWorld.
package

{

  import flash.display.*;

  import flash.text.*;


  public class HelloWorld extends MovieClip

  {


  }

}
Constructor functions
Constructor functions are the last absolutely necessary piece of any given class. When a class is instantiated, or declared in the program, the constructor function is responsible for what happens. It is the initializer of the class's functionality. It is the first domino, so to speak.
Like any other function in ActionScript, the constructor is declared using the function keyword and named appropriately. As with the class, the naming of the constructor is crucial. It must be the same as the name of the class and the file it resides in. For this example, the constructor must be HelloWorld.
package

{

  import flash.display.*;

  import flash.text.*;


  public class HelloWorld extends MovieClip

  {

    public function HelloWorld()

    {


    }

  }

}
Wrapping it up
To finish up your first class, you need only add the nuts and bolts to the constructor function. By now this should be a fairly simple task. What you are doing here is emulating the trace function. Because the trace function does not render anything to your published SWF file, you are going to need to fake it using a simple text field.
In this chapter, you worked with primitive data types such as String, int, and Boolean. In the upcoming example, you will create the variable helloText and give it a data type of TextField. A TextField is considered a complex data type. Complex data types are named so because they can contain complex sets of data. This means that they can represent entire classes. As you know, classes can contain members, which can consist of properties (variables) and methods (functions). Therefore, in direct contrast to a primitive data type like int, which is simply a whole number like 3, a complex data type can contain an abundance of information ranging from primitive data types or other complex data types.
When you assign a value to helloText, you will use the new keyword followed by the TextField() function. In this process, you are instantiating an object based on the TextField class. So, when you use the new keyword to assign a value to helloText, you are actually referencing the constructor function of the TextField class to create a new text field.
You also learned that an object, like a TextField, can have properties. These properties can be accessed using dot notation. In this case, text fields have a property called text, which is nothing more than a variable that represents the text displayed in the text field. So, the second statement in your constructor function will essentially take a TextField object named helloText and set the value of its text property to Hello World!
Finally, to get this TextField to display on the stage of your SWF, you need to add it to the display list. This is accomplished using the addChild() method. Therefore, you will add the helloText TextField to the stage with the statement addChild(helloText);.
The following shows the addition of the three previously mentioned statements to the HelloWorld constructor function:
package

{

  import flash.display.*;

  import flash.text.*;


  public class HelloWorld extends MovieClip

  {

    public function HelloWorld()

    {


       var helloText:TextField = new TextField();

       helloText.text = "Hello World!";

       addChild(helloText);


    }

  }

}
Go ahead and save your HelloWorld.as file and press Ctrl+Enter/Option+Enter to publish your SWF. You should see the text "Hello World!" publish to the stage!
Summary
In this chapter you were exposed to quite a bit of information. Though it may have seemed overwhelming, it is important to keep in mind that it was a mere overview of what is to come. In much the same fashion that you would need to learn the alphabet before you can write an epic, so must you learn the basics of ActionScript.
It is true that much of the syntax will become second nature as you learn other aspects of ActionScript. However, there is no replacement for having a good understanding of the basics. Be sure to utilize tools like the Script Assist and Actions panel, as mentioned in this chapter.
Remember, variables are the building blocks of any ActionScript program. Variables are references to memory that are used to store information. You can manipulate this information using statements. Repetitive statements can be grouped into collections, called functions. Finally, groups of related variables and functions can be grouped into even larger collections called classes.
The following are the most important topics from this chapter:
- Using the
Actionspanel - Using Script Assist for easy ActionScript
- Proper ActionScript syntax
- Creating and data typing variables
- Manipulating variables through statements
- Using functions to group repetitive code
- Further organizing and modularizing your code via classes