CHAPTER 16
WORKING WITH AUDIO IN FLASH
When I (Chris) was thanking my first video customer for hiring me to add sound and music to his video, he said, "No, thank you. Without audio, video is just surveillance." Ironically, good audio is almost never heard—or maybe we should say never noticed. In order to effectively add audio to your Flash projects, you'll need to have an understanding of the various ways audio can be included in those projects as well as all of the things you can do with it once it's in there.
In this chapter we'll talk about
- Thinking about audio
- Importing audio into the Flash authoring environment
- Using audio in the authoring environment
- Using library audio assets at runtime
- The Sound API
- Loading audio at runtime
- Manipulating audio at runtime
Let's begin this chapter by thinking about how you might approach using audio for your project. Is your audio going to be design or content? Roll-over sounds for buttons or full-length songs for playback? Perhaps both? Once you know what your sound is going to be used for, you can create a plan for successful integration.
Thinking about audio
If a tree falls in the woods and no one is there to hear it, does it make a sound? If you're a sound designer, your response would likely be "What kind of tree was it, soft wood or hard wood? They sound different."
In sound design you paint pictures with sound. You give weight to objects, add speed to animation, add comedy to animated characters, and a whole lot more. Your job is to use sounds that are the result of something happening. Within the world of Flash, that could be most anything: a button click, a moving panel, a morphing shape, a change in the state of an application, a color transformation. The bottom line is that there is a wealth of opportunity for sound design in Flash.
As it happens, Flash is also a tremendous platform for presenting linear media, which could be anything that plays from beginning to end without opportunity for the user to interact with it, like cartoons or movies or songs or audio books.
Flash is a great choice for a custom media player with the usual capabilities: select a track, play, stop, select another track. Not only can you use Flash to load and play back audio files at the implicit request of the user, you can also programmatically respond to the audio itself, offering you the opportunity to create a responsive interface.
Understanding audio in the Flash authoring environment
Even though a vast majority of the control you have over audio comes through ActionScript, you may never have a need to use ActionScript for audio if you use the timeline for sound design. Even if you do, you may choose to import your audio resources into your FLA or perhaps create a SWF made entirely of sounds to be used as a library for shared use among many other SWFs. In short, there are many reasons you may need to import audio into the Flash authoring environment.
To import audio into the Flash authoring environment, do the following:
- Choose
ImportorImport to libraryfrom the file menu. - Browse to your file or files.
- Click
Import.
This will add audio assets to your library bearing the file name of the source files. Once you've imported some audio into the authoring environment, you can put audio on your timeline by selecting a keyframe and then either dragging the audio file from your library onto the stage or using the Sound panel, explained next. While audio can span many frames, it must begin on a keyframe.
Using the Sound panel
The Sound panel, shown here in Figure 16-1, is your primary tool for dealing with audio in the interface. This panel is an extension of the frame Property inspector so the changes you make here deal with instances of audio files that are actually on the timeline.
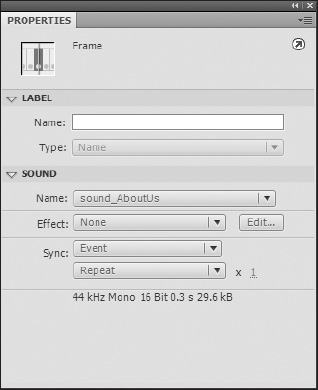
Figure 16-1. The Property inspector when a keyframe with audio has been selected. Here you can select which library asset to apply to the keyframe, effect, sync type, and repeat settings.
Applying audio to a keyframe
Use the Name drop-down menu in the Sound panel section of the Property inspector (see Figure 16-1) to select an audio file to put on the currently selected keyframe. You can also select a number of keyframes to add sound to all of those keyframes at once.
Quickly applying effects
The Effect drop-down menu lets you quickly add fades and pans and other effects to your audio. You have the following options for volume presets:
Left Channelplays only the left channel of audio by turning the volume of the right channel all the way down.Right Channelplays only the right channel of audio by turning the volume of the left channel all the way down.Fade to Rightis actually fade from left to right: it turns the volume of the left channel from all the way up to all the way down while at the same time turning the volume of the right channel from all the way down to all the way up over the duration of the audio.Fade to Leftworks in the opposite manner asFade to Right.Fade Indoes just what it sounds like. At the beginning of the audio, on both channels it will change the volume from all the way down to all the way up over time.Fade Outalso does just what it sounds like. On both channels it will change the volume from all the way up to all the way down so that the volume is off at the end of the audio.Customwill open the Envelope Editor discussed later in this chapter in the section "Fine-tuning audio with the Envelope Editor."
Selecting a synchronization type for your audio instance
Audio can be treated in two ways when working on the timeline: it can be event audio or streamed audio. Both have their pros and cons and behave differently both at author time and runtime.
Event audio just happens. When the playhead reaches a frame with event audio on it, the audio plays with complete disregard for the rest of the movie. "Complete disregard" may sound like a negative; however, it could be just what you need. Consider a sound effect that needs to continue, even if the visual event it's associated with stops or gets-interrupted.
It is important to know that event audio must be completely downloaded to the end user's player before it will play at all, so if you plan to use event audio, be sure to preload your sound library. Also, you cannot trigger playback of the audio at author time by dragging the playhead over it; you must play the timeline.
Audio designated as streaming behaves much differently. When the playhead reaches a frame with streaming audio on it, the Flash Player will only play back the portion of audio on that frame. Using streaming audio will ensure that the playhead keeps up with the audio at runtime; however, it's important to know that it accomplishes this by dropping frames of animation if the host computer cannot keep up. It's also important to note that each instance of streaming audio needs to be downloaded, so using the same sound repeatedly would add significantly to file size.
Streaming audio instances are commonly used if you are working on animation tasks like lip syncing where keeping the visual contents of each frame synchronized with the audio is crucial. If you drag the playhead on a timeline that has an audio instance set to streaming, the audio will scrub, or play back, at the speed at which you drag the playhead, forward and backward. You can use this feature to find the approximate frame where an event in the sound happens (a loud crash or a big empty space, for instance) so you can synchronize your visuals to it or even use it as a reference for editing using the Envelope Editor (explained in detail later in this chapter in the section "Fine-tuning audio with the Envelope Editor").
To understand the difference between these sync types, set up a file as shown in Figure 16-2. In this example, both audio files are much longer than the timeline of the movie. The sound on the event layer is set to sync type event and the sound on the stream layer is set to stream. If you position the playhead on frame 1 and play the timeline, you'll notice that when the playhead reaches the end (assuming Control ![]()
Loop playback is unselected), the event audio continues to play, while the audio on the stream layer stops when the playhead does.

Figure 16-2. The top sound set to event will continue to play even after the playhead reaches the end of the timeline.
Also in the Sync section of the Sound panel is where you can set how many times to repeat an instance of a sound, if at all, or to designate it as a loop, which will repeat it indefinitely.
Info
The bottommost section of the Sound panel is the Info section. This unlabeled area shows you abbreviated information about the source audio file being referenced by Flash during author time including the sample rate, channels, bit depth, duration, and file size. For more complete information about the source file, double-click the sound icon in the library next to the sound you want to find out about. This will open the Sound Properties dialog.
Export settings in the Sound Properties dialog
The Sound Properties dialog, shown in Figure 16-3, is where you manage an individual sound asset's properties and export settings, including its library name, compression type, bitrate, and quality. You can also use this dialog to test output settings and update or import over sound assets (just as you can with bitmaps).
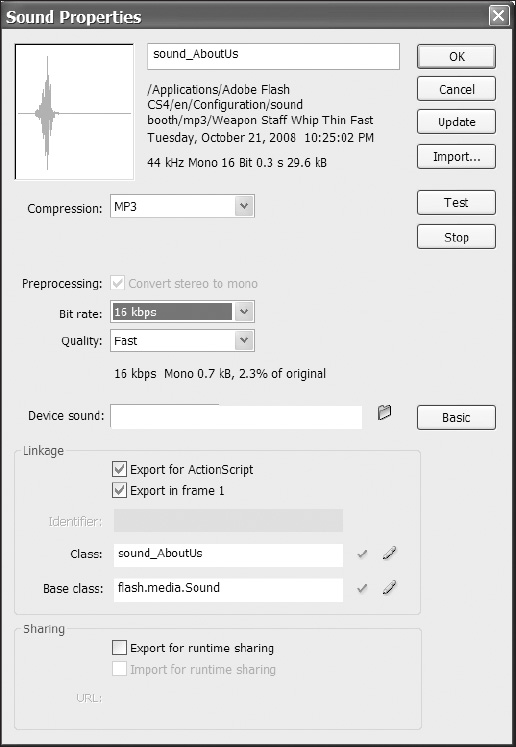
Figure 16-3. The Sound Properties dialog is where you manage a sound asset's properties, including its library name and compression settings. You can also use this dialog to test output settings and update or import over sound assets.
Basic operation of the panel is as follows:
- To save any changes made in the
Soundpanel, click theOKbutton. - To close the panel without making any changes, click the
Cancelbutton. - To update your audio file with a newer version, click the
Updatebutton. - To replace your audio file with a different one, click the
Importbutton, browse to the new file, and clickopen. - To hear what your audio will sound like after compression, click the
Testbutton. - To stop hearing what your audio will sound like while testing, click the
Stopbutton.
To change the compression type of your audio, use the Compression drop-down to select from the following options:
Default, which will use the compression settings of the documentADPCM(Adaptive Pulse Code Modulation)MP3(MPEG-1 Audio Layer 3)RAW, which will not compress the audio at allSpeech, which applies an aggressive compression tailored for the spoken word
You'll notice as you change your selection from one codec to the next that your compression options change as well, including the availability of preprocessing (converting a stereo file into a mono file) and the range of options in the Bit rate and Quality drop-down menus. As a general rule, the larger the bitrate, the better the audio will sound—but the larger the resulting file. Make adjustments to your settings and then use the Test button to listen until you have a quality-to-file-size compromise that suits you. Use the information just beneath the Quality drop-down menu to determine the final file size of the audio you are compressing.
To replace audio with files intended for mobile devices, use the Device sound text input field. Using this will replace the file used during authoring with a file that is meant for use on a mobile device and cannot be played back within the Flash authoring environment.
To make a sound file available for use in ActionScript or assign a custom class to a sound, make sure the Export for ActionScript check box in the Linkage area is selected.
To make a sound available for runtime sharing, select the Export for runtime sharing check box in the Sharing area and then enter the URL where your SWF will be posted. The author of other SWF files can then use the sound object by referencing that URL or by dragging the library symbol of that sound into his or her FLA.
Fine-tuning audio with the Envelope Editor
You can use the Envelope Editor to fine-tune the volume and duration of your instances of audio assets. Fine-tuning in the editor will only affect the instance of the audio that is on the keyframe selected when the editor is opened.
Open the editor by clicking the Edit button (the button with a pencil icon) next to the Effect drop-down box or by selecting Custom from that same drop-down box. Refer to Figure 16-4 as you read through the following sections.
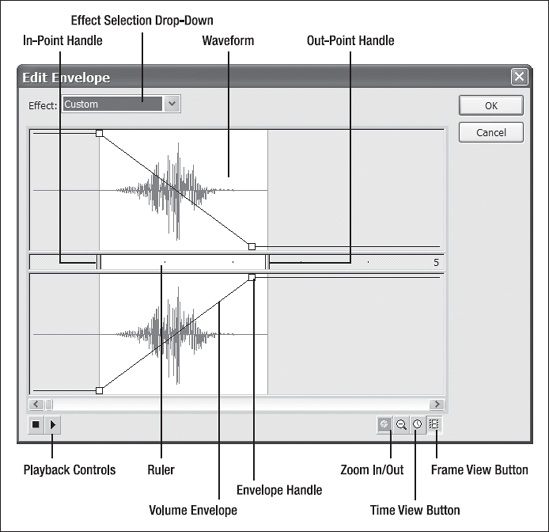
Figure 16-4. The Envelope Editor consists of these elements.
Trimming your audio
To change the point in your audio where this instance of audio will begin playback, use the in-point handle. Simply drag it to the point of the waveform that you want to be the beginning of that instance.
Setting the point in the audio source where you want your instance to end is almost identical except that instead of moving the in-point handle, you will drag the out-point handle back to the point in the audio source where you want your instance to end. If your source audio file is long, you may need to zoom out so you can see more of the waveform in the editor or scroll to the end.
Custom effects
A custom effect is any volume envelope that does not conform to the preset effects discussed earlier in this section.
The Envelope Editor is by no means a fully featured audio editor, but it will let you add up to seven handles in the amplitude (volume) envelope, allowing you to adjust the volume. Click anywhere on the amplitude envelope to add a handle. When you add a handle on one channel, a handle is added on the other channel as well. These handles are locked together, and the pair only count as one of the seven permitted.
Certainly there are more comprehensive tools geared toward audio work, but it's quite likely that you will receive audio from a customer that needs some minor tweaking even if you are working without the benefit of these tools—and for this purpose the Envelope Editor will serve you well.
We've also seen it used quite effectively for breaking up longer files of dialog into separate instances for each character so that different animators can use the same finished source audio to work with during lip syncing.
Changing the view
As you work through trimming and adding custom effects to your audio, you might find it helpful to be able to manipulate the view of your audio. The Envelope Editor offers you a few different ways of looking at your source waveform.
The most fundamental is zooming (mentioned before). You can use the Zoom In/Zoom Out buttons (Figure 16-4) to zoom in to the waveform to help make trimming more accurate or to show more of the waveform to help you quickly move from point to point in longer audio.
You can also choose to change the ruler from time increments to frame numbers in the event that you either know the time or frame number of an event in your audio by clicking the Frame View or Time View buttons.
Adding audio to a button
Now that you know how to bring audio into the workspace and understand the basics of how sound is handled, let's look at a practical application of audio in the timeline as it is added to the over state of a button.
Buttons can help set the tone of your interface with audio on them. Let's see how it's done when you want your audio embedded in the movie.
To add audio to a button in the timeline, follow these steps:
- Import the audio.
- Add the audio to the
Overstate frame of your button as shown in Figure 16-5.

Figure 16-5. The timeline of a button with audio in the over state. Whenever this button is rolled over, the audio will play.
- Trim the audio if needed.
- Adjust the volume if needed.
- Address export settings.
- Test your movie.
So that was a very straightforward process, but what if you want to choose from different sounds depending on what was going on in your Flash movie at the moment? For instance, what if you want the roll-over sound of your navigation to be different for each area of your site? You could create a set of buttons for each area of your site, but maintenance could get out of hand in a hurry! A more dynamic approach might be to create a button that, on roll-over, asks the application what area the user is currently viewing and then plays the appropriate sound. If you're interested in using Flash to control audio in the way we just described, then read on!
Using library audio assets at runtime
We're now going to walk through our earlier scenario in which the button asks the application where our user is and changes sounds accordingly. Rather than create a full-on application with navigation, we're going to scale it back a wee bit, but leave in enough to show you what you need to know.
This is a long example, so for clarity here are the major steps we're going to cover:
- Create the application and document class files.
- Establish application state.
- Create the user interface and add code to handle user input to change application state.
- Add sounds to the library and make them available to ActionScript.
- Create the sound objects and change sounds at runtime.
We'll cover the following Flash concepts and skills in this example on using audio assets at runtime:
- Using the document class (which we covered in detail in Chapter 8)
- Using variables (also covered previously in Chapter 8)
- Making library assets available to ActionScript (this chapter)
- Using the Sound class (this chapter)
- Handling events (this chapter)
You can see that they are not all sound related, but they are covered elsewhere in this book. The purpose of this section is to provide examples that are relevant in the real world.
First things first—let's create our application
It's a good idea to get into the practice of setting up applications in Flash that use the document class. Even though this example could be done with code in the FLA, it's more and more likely that you will need to know how to do it from an external ActionScript class file.
To create the dynamic button audio application, start with these steps:
- Create a new FLA and save it as
DynamicButtonAudioApp.fla. - In the
Classfield of the document'sProperty inspectortypeDyanmicButtonAudioApp.Now you must make a class with that name for your FLA to use when it compiles the SWF, or it will create its own. Since you don't want that, move on to step 3. - Create a new AS file named
DynamicButtonAudioApp. as and save it in the same directory asDynamicButtonAudioApp.fla. - Add the code shown here to
DynamicButtonAudioApp. as:
package {


  import flash.display.MovieClip;


  public class DynamicButtonAudioApp extends MovieClip {


    public function DynamicButtonAudioApp() {


      trace("You have a working document class!)

    }

  }

} - Test your FLA by pressing Ctrl+Enter (PC) or Cmd+Enter (Mac).
You should be rewarded with the text You have a working document class! in your Output window.
Application states made simple
In order for your application to have an answer when your button asks what state it's in, you'll need to establish and keep track of its state. And what's good for storing information? Variables, that's what!
Let's create a property in the application class that represents the state of the application. Add the following code in bold to Dyna micButtonAudioApp. as:
package {


  import flash.display.MovieClip;


  public class DynamicButtonAudioApp extends MovieClip {


    private var myState:String;


    public function DynamicButtonAudioApp() {


      this.myState="Home";

      trace("You have a working document class!);

      trace("My app state is: "+ this.myState);

    }

  }

}
When you test the movie, you should be rewarded with the text You have a working-document class! My app state is: Home in the Output window.
Buttons please—changing states
In this section you'll add to your interface a text field that will help you observe the state of your application as well as two buttons.
To add two buttons and a dynamic text field to the stage for changing and displaying the application state, follow these steps:
- Add a dynamic text field to your stage and name it
state_txt. - Add two
Buttoncomponents to the stage as well. Give one an instance name ofhome_btnand the otheraboutUs_btn. - Label the two buttons
HomeandAbout Us, respectively. - Add the following bold lines of code to Dyn
amicButtonAudioApp. as:
package {


  import flash.display.MovieClip;


  // we need to import the flash.events package in order to add event

  // listeners to the buttons and handlers to handle events.


  import flash.events.*;


  public class DynamicButtonAudioApp extends MovieClip {


    private var myState:String;


    public function DynamicButtonAudioApp() {


      this.myState="Home";

      this.state_txt.text=myState;


      // adding event listeners to the buttons here and designating the

      // 'navClick' function as the handler


      home_btn.addEventListener(MouseEvent.CLICK, navClick);

      aboutUs_btn.addEventListener(MouseEvent.CLICK, navClick);


    }


    // The navClick function handles the mouse events generated by the

    // mouse clicks on the buttons.We use the label text of the

    // clicked button to set the state of the app.


    private function navClick(e:MouseEvent) {

      this.myState=e.currentTarget.label;

      this.state_txt.text=myState;

    }

  }

}
We have had you add quite a bit there, so check out the comments for brief explanations of the code. In a nutshell what you want to happen is when you click either button, the application state will be changed and displayed in the text field.
Making library audio assets available to ActionScript
For this example you're going to need two different sounds: one for the roll-over sound in the Home state and the other for the roll-over sound in the About Us state. After you have these assets in your document, you'll need to make them available to ActionScript at runtime.
If you don't happen to have any sounds handy, fear not. With Flash CS4 comes a new common library with just audio in it. From the Window menu select Common libraries![]()
Sound. This will open the SOUNDS.FLA library.
Since this is an exercise in Flash and not in sound design, pick any two short but distinctly different sounds from the SOUNDS.FLA library. We chose Weapon Knife Sharpen On Metal 01.mp3 for the Home state and Weapon Staff Whip Thin Fast 02.mp3 for the About Us state. To add them to our FLA, just drag them from the common library onto the document library. We renamed them in the document library to sound_Home and sound_aboutUs, respectively.
To make a sound available to ActionScript at runtime, right-click (or Ctrl-click on Mac) the sound in the library and select Properties to open the Sound Properties window shown earlier in Figure 16-3. Make sure the advanced options are visible and select Export for ActionScript. The Class field will auto-populate with the name of the library symbol and the Base Class field with flash.media. Sound.
Creating sound objects and changing sounds at runtime
Now that the audio symbols are available to you via ActionScript, you need to import the classes that let you work with sounds. You'll also create a sound object for each of your sounds and rollOver events to the buttons by adding the following code in bold to Dyn amicButtonAudioApp. as:
package {

  import flash.display.MovieClip;

  import flash.events.*;


  // we need to import the flash.media package in order

  // to create and use Sound objects in our code


  import flash.media.*;


  public class DynamicButtonAudioApp extends MovieClip {


    private var myState:String;

    private var soundHome:Sound;

    private var soundAboutUs:Sound;

  public function DynamicButtonAudioApp() {


    this.myState="Home";

    this.state_txt.text=myState;


    home_btn.addEventListener(MouseEvent.CLICK, navClick);

    aboutUs_btn.addEventListener(MouseEvent.CLICK, navClick);


    // here we add an event listener for the rollOver event and

    // designate the navRoll function as the handler


    home_btn.addEventListener(MouseEvent.ROLL_OVER, navRoll);

    aboutUs_btn.addEventListener(MouseEvent.ROLL_OVER, navRoll);


    //here we instantiate our two Sound objects.

    soundHome = new sound_Home();

    soundAboutUs = new sound_AboutUs();

  }


  private function navClick(e:MouseEvent) {

    this.myState=e.currentTarget.label;

    this.state_txt.text=myState;

  }


  private function navRoll(e:MouseEvent){


    // all we do here is check the value of myState

    // and play a different sound accordingly

    switch (myState)

    {

      case "Home":

        soundHome.play();

        break;

      case "About Us":

        soundAboutUs.play();

        break;

      default:

        trace("play no sound");

    }

   }

  }

}
You should now have a good idea how to use sounds in your library at runtime using ActionScript; however, there may be times when you won't want to or be able to store all of your audio assets in the source file library to reference. In these cases you'll need to load them in at runtime.
Loading audio at runtime
There are a lot of things to consider when loading audio into your application at runtime. You want to consider giving your sounds time to load, what happens if the sound file can't be found, and what will be the impact on your UI if a sound fails to load prior to the UI being used.
The first step in learning to load audio at runtime is understanding the audio-related classes in the flash.media package.
Understanding the Flash.media package
Before you start creating a media player that loads audio at runtime, let's discuss some of the basic elements of the Flash.media package as it pertains to audio in Flash, namely these three classes:
SoundSoundChannelSoundTransform
The Sound class lets you create objects that can load an external file into them and then access data about that file such as the number of bytes in the file and ID3 metadata like artist and album information, which we talk about later in this chapter.
Once you have that Sound object, you'll want some control over it. This is performed through the Sound Channel and Sound Transform classes. As the sound comes into a real audio mixer channel, you can adjust the volume, EQ (equalization), and PAN position (left-to-right balance) of the sound on that channel strip. You can think of the Sound Channel class as the channel strip on an audio mixer and the SoundTransform class properties as all of the things (like volume, EQ, and PAN) you can adjust that change the sound as it is sent to the speakers.
While it's possible you may need to load sounds at runtime for sound design, it's much more likely to be the case when making a media player application (or adding narrations to a slide show); so we'll use that example as a basis for the next section of this chapter.
You're going to create a very simple media player that allows the user to cycle through a set of songs that you define using XML. To do this you'll need to
- Create a playlist (in an XML file).
- Write ActionScript that loads the playlist into Flash.
- Create buttons the user can click to load the audio files referenced in the playlist for playback.
Creating a playlist with XML
Let's begin by creating a list of audio for the user to choose from by using this very basic XML as the basis for your playlist and saving it as playlist.xml:
<?xml version="1.0" encoding="UTF-8"?>

<PLAYLIST>

  <PLAYLIST_ITEM file="Fish Bonz.mp3" />

  <PLAYLIST_ITEM file="Mailbox Pony.mp3" />

</PLAYLIST>
Loading the playlist into the media player application
Next you need an application to load the playlist into—call your authoring document jukebox.fla and the document class file Jukebox. as. Save them in the same location as playlist.xml.
In Jukebox. as start with the code shown here:
package {


  import flash.display.MovieClip;

  import flash.errors.*;

  import flash.events.*;


  import flash.net.URLLoader;

  import flash.net.URLRequest;


  public class Jukebox extends MovieClip

  {

    private var theData:XML;

    private var tracks:XMLList;


    public function Jukebox(){

      loadData();

    }


    public function loadData(){


      // here's where we load the playlist file

      var request:URLRequest = new URLRequest("playlist.xml");

      var dataLoader:URLLoader = new URLLoader();

      // designate the 'handleData' function to

      // execute when the COMPLETE event is broadcast.

      dataLoader.addEventListener(Event.COMPLETE, handleData);


      // catching errors will help you deal gracefuly with failures in

      // loading data

      try{

        dataLoader.load(request);

      }catch (error:ArgumentError){

        trace("An ArgumentError has occurred.");

      }catch (error:SecurityError){

        trace("A SecurityError has occurred.");

      }

      }


      public function handleData(e:Event):void{

        // the loaded XML

        var theXML = XML(e.target.data);


        // this line makes an XMLList out of every PLAYLIST_ITEM node in

        // 'theXML' - our playlist.

        tracks = theXML.PLAYLIST_ITEM;


        // we subtract 1 from the number of our tracks

        // because the index of the last track in the

        // XMLList is one less than the number of

        // tracks we have - XMLList is zero based.

        trackCount = tracks.length()-1;

      }

    }

}
Creating the user interface
So now that you have some data in your application and a general understanding of the basic ActionScript classes involved with sound, you'll create a very simple interface that will allow a user to click through all of the tracks in your playlist. (Later you'll add some text feedback that shows the volume, artist, song name, and album information.)
For convenience, use flat blue back and flat blue forward from the Buttons common library. Window ![]()
Common Libraries ![]()
Buttons) Open jukebox.fla, drag an instance of each onto the stage, and name them next_btn and prev_btn.
Next, open Jukebox.as and add the bold code shown in the next example. As you go through the code in the following sections, keep in mind the following things that need to happen (the STEP numbers correspond to comments in the code in this and the next-section):
STEP #1 Import related classes and instantiate aSoundChannel object.
STEP #2 Determine which track to load.
STEP #3 Request the audio file on UI click.
STEP #4 Instantiate a Sound object to load your audio data into.
STEP #5 Load the file into the Sound object.
STEP #6 Assign the sound to the SoundChannel object.
package {

  import flash.display.*;

  import flash.errors.*;

  import flash.events.*;


  // STEP #1

  // we also need the URLLoader and URLRequest classes to request and

  // handle the loading the audio files

  import flash.net.URLLoader;

  import flash.net.URLRequest;


  // STEP #1

  // the three classes discussed previously need to be imported

  import flash.media.Sound;

  import flash.media.SoundChannel;

  import flash.media.SoundTransform;


  public class Jukebox extends MovieClip

  {

    private var theData:XML;

    private var trackNow:Number = 0;

    private var tracks:XMLList;

    private var trackCount:Number;


    // STEP #1

    // instantiate a soundChannel object as we declare it

    private var channel:SoundChannel = new SoundChannel();

    private var mySound:Sound;

    private var mySoundTransform:SoundTransform;


    // rest of class remains unchanged

    .

    .

    .

  }

}
Wiring the UI and making it play
Believe it or not, it's time to wire up your (two-button) user interface and make this thing play. (Remember—you'll need to have audio files with the names indicated in your playlist.xml in order for this to work.) This next stretch of code covers steps 2 through 6, which continue from the previous example.
package {

  .

  .

  .

  public class Jukebox extends MovieClip

  {

    .

    .

    .

    public function Jukebox(){


      loadData();


      // STEP #2 - determining which track to load

      // here we add event listeners to the prev_btn

      // and next_btn buttons for the CLICK event.

      prev_btn.addEventListener(MouseEvent.CLICK, navClick);

      next_btn.addEventListener(MouseEvent.CLICK, navClick);

    }

    .

    .

    .

    // STEP #2 (also)

    // this function is called when either of our

    // two buttons is clicked

    private function navClick(e:MouseEvent)

    {

      // e.currentTarget.name tells us the instance

      // name of what dispatched the CLICK event.

      if(e.currentTarget.name == "next_btn"){

        // check to see we're not at the end of our

        // playlist then either increment our track

        // number or reset to 0.

        if(trackNow < trackCount){

          trackNow++;

        }else{

          trackNow = 0;

        }

      }else if(e.currentTarget.name == "prev_btn"){

        // check to see we're not at the beginning of

        // our playlist then either decrement our track

        // number or set to the last track.

        if(trackNow == 0){

          trackNow = trackCount;

        }else{

          trackNow--;

        }

       }


       // now that we have our track number figured out, play the track

       playTrack();


     }


     private function playTrack(){


       // this function will get called every time we want to

       // change songs, so the first thing to do is stop any

       // and all sounds playing in the SoundChannel named

       // 'channel'


       channel.stop();


       var fileLoader:URLLoader = new URLLoader();


       // STEP #3

       // tracks[trackNow].@fileresolves to a file name -

       // remember that tracks is an XMLList and you access

       // its items the way you would items in an Array.

       // 'trackNow' represents the index of tracks that

       // we're interested in.Finally we use the handy @

       // method of E4X to give us the vaule of the attribute

       // 'file' - the file we want to load.

       var soundRequest:URLRequest = new URLRequest

 (tracks[trackNow].@file);


       // STEP #4

       // here we create the sound object that our URLRequest

       // (audio file) gets loaded into.

       mySound = new Sound();


       // STEP #5

       // now we tell the sound to go ahead and load the file

       mySound.load(soundRequest);


       // STEP #6

       // this may be the single most confusing line of code

       // here, but all we're doing is assigning 'mySound'

       // to the soundChannel 'channel' and telling the sound

       // to play.

       channel = mySound.play();


     }

   }

}
Manipulating audio at runtime
At this point you should have a working, albeit limited, little media player application; and it's the "limited" part of it that brings about the need for this section. In order to impart control to your user, you need to know the basics of manipulating audio at runtime.
In practice, most of the control you exercise over audio at runtime is at the request of the user—change the volume, pause, stop, play, etc.; but other times you may want to do these things to audio as a result of your own intention—slowly fading a background track as a user visits a section of your site, and then bringing it back up again as that user navigates to another, for instance.
Of the many things you will no doubt be asked to do when integrating audio into a Flash project, allowing the user to control the volume will top the list. In this example you're going to accomplish this by using avolume strip, which is essentially a volume bar without the slider; the mouse's position over the bar will dictate the volume.
The first thing you're going to do is create a dynamic text box named vol_txt and a rectangular movie clip named volumeStrip to the user interface. vol_txt will show us what the volume is and volumeStrip will act as our control. Add the following code in bold to Jukebox.as:
package {

  .

  .

  .

  // in order to adjust volume we need to have the SoundTransform class

  // available

  import flash.media.SoundTransform;


  public class Jukebox extends MovieClip

  {

    .

    .

    .

    // new var 'mod' (short for modifier) for volume calculation

    private var mod:Number;


    public function Jukebox(){


      loadData();

      // since we don't always know how wide our volume bar

      // will be we'll divide 1 (our range of volume is 0 to 1) into

      // equal parts of the total width of our bar

      mod = 1/volumeStrip.width;


      // now add an event listener so that when the

      // mouse moves and is over the volumeStrip clip, it calls the

      // 'doVolume' function.

      volumeStrip.addEventListener(MouseEvent.MOUSE_MOVE, doVolume);

      // rest of function remains the same

     }

     .

     .

     .

     private function playTrack(){


       channel.stop();

       var fileLoader:URLLoader = new URLLoader();

       var soundRequest:URLRequest =

 new URLRequest(tracks[trackNow].@file);

       mySound = new Sound();

       mySound.load(soundRequest);

       channel = mySound.play();


       // we need to instantiate our SoundTransform object.The .7 is

       // starting volume and the 0 is for center panning.

       // Panning can be anything from −1 (all the way left)

       // to 1 (all the way right) with 0 being in the center.

       mySoundTransform = new SoundTransform(.7, 0);

      }


      // this function gets called when the mouse moves and is over the

      // volumeStrip clip

      private function doVolume(e:MouseEvent){


        // as the mouse moves, we take the localX position of the mouse

        // and multiply it by the modifier we calculated earlier - then

        // cast it as a String so we can display it as text in 'vol_txt'.

        vol_txt.text = "Volume: "+String(mod*e.localX);


        // tell our SoundChannel, named 'channel', that the

        // sound transform object it should use is 'mySoundTransform'.

        channel.soundTransform = mySoundTransform;


        // finally we set the value of the volume property of

        // 'mySoundTransform' to correlate to the x position of the mouse

        mySoundTransform.volume = mod*e.localX;

       }

       .

       .

       .

       // rest of class remains unchanged

     }

   }
Now that you have given the user a little bit more control over the sound, let's have a look at how the sound can in turn influence the user interface.
When the music stops—handling audio events
Your little playback application is starting to take shape, but it's still missing the feedback that your users need in order to connect with the content. In this section you'll add some text to the UI that shows users some information about what they are hearing by listening for the id3 event of the Sound class.
ID3 is arguably the most popular audio file data tagging format in use. ID3 is a data container within an MP3 file that usually carries information about the MP3 file such as artist, album, etc.
The id3 event is broadcast when ID3 data from a Sound object becomes available. You listen for it in ActionScript by adding an event listener to your Sound object. To include this functionality in your player, put a dynamic text field on the stage called id3_txt and add the following bold code to Jukebox.as:
package {

  .

  .

  .

  // in order to read the ID3 info we need to have the ID3Info class

  // available

  import flash.media.ID3Info;


  public class Jukebox extends MovieClip

  {

    .

    .

    .


    private function playTrack(){


      channel.stop();

      var fileLoader:URLLoader = new URLLoader();

      var soundRequest:URLRequest =

new URLRequest(tracks[trackNow].@file);

      mySound = new Sound();


      // Here's where we add any event listeners to our sound object.

      // Events for the Sound class have to do with DATA;

      // IO errors, Loading progress, load completion, etc.

      // AUDIO-related events like when a song is done playing

      // belong to the SoundChannel class.

      mySound.addEventListener(Event.ID3, id3Handler);


      mySound.load(soundRequest);

      channel = mySound.play();

      mySoundTransform = new SoundTransform(.7, 0);

    }

    private function id3Handler(event:Event):void {


      // id3 is now a property of 'mySound', and that property is

      // an object with properties of its own, like artist,

      // songName, and album.

      var myId3:ID3Info = mySound.id3;


      // clear the text from the previous track if any.

      id3_txt.text = "";


      //add the text for this track

      id3_txt.appendText("
" + "Artist: " + myId3.artist + "
");

      id3_txt.appendText("Song name: " + myId3.songName + "
");

      id3_txt.appendText("Album: " + myId3.album + "

");

    }

    .

    .

    .

    // rest of class remains unchanged

  }

}
It's important to note the difference between the complete event of the Sound class, which lets you know when the sound data has finished loading, and the complete event of the SoundChannel, which lets you know when a Sound object has finished playing.
Summary
In this chapter we talked about some different approaches to audio and the impact they have on how you might bring audio into Flash and work with it. No doubt the flash.media package holds much more than we can cover in one chapter, but this foundation should serve you well as you work with audio in your Flash projects. We talked about
- Importing audio in the Flash authoring environment
- Using the
Soundpanel - Choosing export settings for audio
- Using the Envelope Editor
- Changing sounds dynamically
- Choosing and loading sounds dynamically
- Modifying audio at runtime
- Handling audio events