CHAPTER 17
WORKING WITH VIDEO IN FLASH
This chapter aims to provide you with the skills needed to handle common requests related to using video in Flash. We'll discuss
- Using the Video Import Wizard
- Understanding the
FLVPlaybackcomponent - Skinning the
FLVPlaybackcomponent - How to create an interface that can play back user-selected video clips from a menu or list of videos
- Customizing the playback controls of the
FLVPlaybackcomponent to match the rest of a custom design - Using cue points to synchronize text and other media, like images and animations, with video
When two of the largest viewer-supplied video web sites got together, our lives as Flash developers changed forever. Everyone suddenly knew for sure that Flash could do video on a large scale, and since Google was doing it, then maybe it was good enough for them too. As a result, skill in integrating video with Flash is now a table stake of the Flash designer and developer resume.
While popularity and high adoption rates for the Flash Player are good reasons to use Flash for video, there are some other reasons.
Flash offers a unique environment for video in that the Flash Player can respond to and interact with video content in ways that other technologies cannot. Bidirectional communication between the Flash Player and the Flash Media Servers offers even more possibilities in connecting many users around video content in meaningful ways.
Consider a training simulation where participants in geographically disparate locations all contribute to the outcome. Each of their decisions, or perhaps all of the decisions, made during the simulation can contribute to what pieces of video are shown and in what order during the simulation; and because it's Flash, everything will happen within a single-interface.
Before you can run, though, you have to walk, so let's put one foot in front of the other and get some video playing in Flash using the Video Import Wizard.
Using the Video Import Wizard
Using Flash for the delivery of video has become so popular that you will at least want to know the very basics of putting video into your Flash applications. Fortunately, Flash comes with a wizard to help you quickly and easily integrate video with Flash. In order to use the Video Import Wizard, you will need to use video files that can be played back via Flash such as FLV or F4V files. To open this wizard, select File![]()
import![]()
Import Video. The Video Import Wizard is shown in Figure 17-1.

Figure 17-1. Select the location of your video and how you want to use it in your movie.
First, you will need to tell the wizard where your file is located. It is either on your computer (or local network) or it has been deployed to a web server, Flash Video Streaming Service (FVSS), or Flash Media Server (FMS) of your own. The wizard provides handy links to learn more about FVSSs and the family of Flash Media Servers shown at the bottom of Figure 17-1.
If the file resides on your computer or local network, you have two options. The first option is to have the wizard create an FLA file that uses the FLVPlayback component to play back your video. The second option is to import the video into your FLA for use on the timeline. If the file resides with an FVSS or on an FMS, you will need to provide the wizard with a URL for the video.
Click Next (or Continue on a Mac) to proceed.
If you elected to have the wizard use an instance of the FLVPlayback component or if the video resides on a server, you will be given an opportunity to select a skin for your FLVPlayback component on the Skinning screen shown in Figure 17-2. The skin is an external SWF file that, as stated in the dialog, "determines the appearance and position of the play controls."
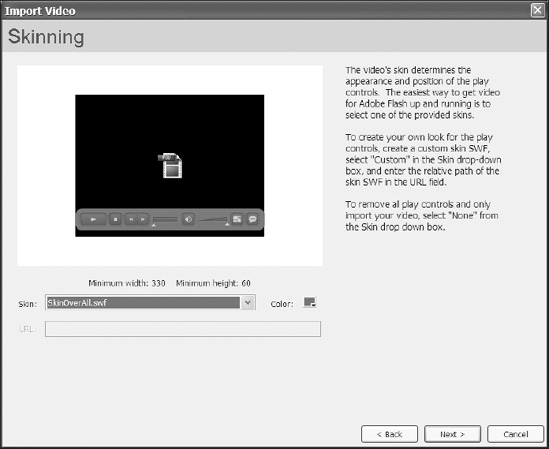
Figure 17-2. Select a skin from the drop-down menu. Then choose your skin color with the color chip. Flash will copy the required skin file to your project directory automatically.
If you elected to embed the FLV file into the timeline, you'll get the Embedding screen displayed in Figure 17-3. On this screen you select the type of symbol—embedded video, movie clip, or graphic—your video is put into. Other options include whether or not you want an instance of that symbol placed on stage automatically, and if so, whether you would like the timeline to expand to the duration of your video. You can also choose to exclude the audio content of the video at this time.
The next screen is the Finish Video Import screen, as shown in Figure 17-4. This screen gives you detailed instructions for what to do next and what you can expect to see depending on the selections you made during import. If you try to import video that cannot be played back by Flash, you will be prompted to open the Adobe Media Encoder and convert your video.
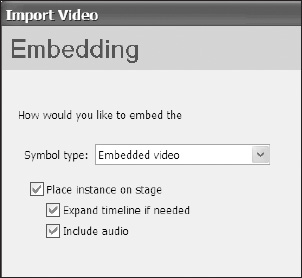
Figure 17-3. Options for embedding a Flash video file within your FLA
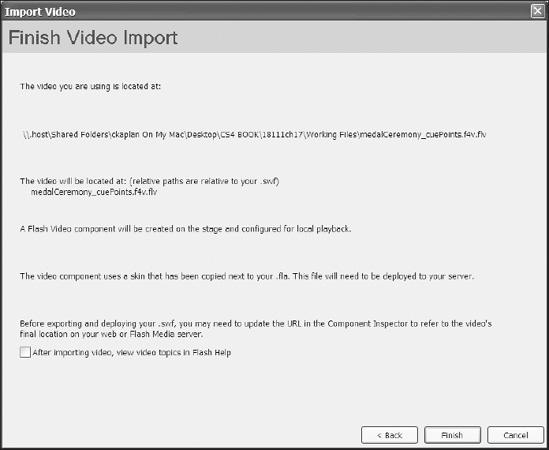
Figure 17-4. The finish screen when importing a local video file where Flash will create an instance of the FLVPlayback component on the stage. This screen gives you information about what you will see next and where to find your assets.
The Video Import Wizard provides a step-by-step guided method for including video in Flash. If you need more control over how your video is implemented in your project, read on to explore the FLVPlayback component.
Understanding the FLVPlayback component
The FLVPlayback component is designed to let you easily add video to Flash. It enables video playback and includes play controls that provide the user with all of the standard capabilities found on a media player, such as play, pause, seek, and volume controls.
The FLVPlayback component can be added to your movie by using the Video Import Wizard or dragging an instance of the component onto the stage of your movie, or through ActionScript.
Using the component in the Flash authoring environment provides you with an easy-to-use component inspector for controlling, among other things, what file to play and what the playback controls should look like.
Hello World
The "Hello World" example of the FLVPlayback component involves the following steps:
- Drag an instance of the component to the stage.
- Open the
Component inspector(discussed next). - Enter name and path to a video file for the
sourceparameter. - Test the movie.
Many quickly find themselves needing to know how to say more than just "Hello," so next let's learn how to say "Nice to meet you. Where is the bathroom?"
FLVPlayback Component inspector
The FLVPlayback component consists of the video player and its play controls, which you can manipulate through the Component inspector. After you drag an instance onto the stage, you can launch the Component inspector from the Property panel of the FLVPlayback component. The Parameters tab of the FLVPlayback Component inspector is shown in Figure 17-5.
The Component inspector shows a subset of parameters of the component that can help with some general behaviors such as how the player adjusts its size to accommodate-different-sized video (scaleMode), whether or not the player plays its video as soon as the source is set (autoPlay), and the playback skin along with some of the skin's properties. We'll discuss the following parameters:

Figure 17-5. The FLVPlayback Component inspector shows the basic parameters of the component, but even these few parameters offer you ample control. Further control over the component can be achieved through ActionScript.
Understanding and setting the scaleMode parameter
The scaleMode property determines how the video will resize after loading. This property can be confusing, and it might not behave the way you first expect. For instance you might assume that the noScale property set to true would prevent the video from changing dimensions. Instead, what it does is force the FLVPlayback component to take on the size of the source file. So if your component on stage is 320×240 but your source video is 640×480, the component will resize to 640×480 when the noScale property is set to true.
You have the following three options for the scaleMode parameter:
maintainAspectRatio: Adjusts the video aspect ratio and dimensions to fit within the rectangle defined by the size and location of yourFLVPlaybackinstance on stage or itsregistrationX, registrationY, registrationWidth, andregistrationHeightproperties.noScale: Causes the video to size automatically to the dimensions of the source FLV file. This parameter refers to the control of the video—not the playback component instance.exactFit: Causes the dimensions of the source FLV file to be ignored, and the video is stretched to fit the rectangle defined by the size and location of yourFLVPlaybackinstance on stage or theregistrationX, registrationY, registrationWidth, andregistrationHeightproperties. If this is set after an FLV file has been loaded, an automatic layout will start immediately.
To set the scaleMode parameter in the Component inspector, click in the Value column next to the scaleMode parameter. Use the drop-down menu to select one of the three options.
Setting the skin parameters
Another key parameter is the skin parameter. What you are doing when you select a skin here is telling Flash to load an external SWF file at runtime that handles the layout and configurations of the play controls. There are essentially 34 configurations of the same skin to choose from. For instance, you might choose to have only a play button and a full screen button on your controls. That would be one configuration. Another configuration might include the play button, the stop button, and the caption button. That would be another. Further, you might want those controls overlaid on the video. That would be yet another configuration. Add the multiple arrangements of controls to the color variations and alpha control, and most of us will have all the variety we need.
To select a skin, click in the Value column next to the skin parameter and then select a configuration from the drop-down menu shown in Figure 17-6 that meets your needs. You can also select the background color for your skin at this time using the color chip next to the drop-down menu. You can select and reselect as many times as you need before leaving the Select Skin dialog.
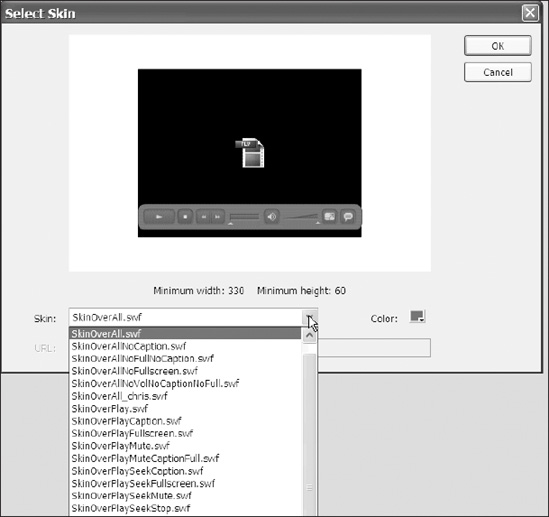
Figure 17-6. The Select Skin dialog
When you return to the Component inspector, you can choose to adjust the color further without having to reopen the Select Skin dialog by clicking in the Value column next to skinBackgroundColor. You can also adjust the skin's transparency by clicking in the Value column next to skinBackgroundAlpha and entering a value between 0 (for transparent) and 1 (for solid).
Setting the source parameter
Flash Player can play FLV and F4V formats, but with Flash Player 9 update 3, Adobe added the ability to play back MPEG 4 formats that use H.264 encoding. These formats include MP4, M4A, MOV, MP4V, 3GP, and 3G2.
To set the source parameter for your instance, click in the Value column next to the source parameter of the Component inspector. Then browse to the file you wish to play back and select it or enter the URL to your video. When setting the source parameter in this way, Flash will read the metadata of the file you have selected and can therefore give you the option of sizing your playback component to match. If you weren't involved in production of the video and weren't told the dimensions of the video, this can eliminate some guesswork for you.
Menu-driven video playback
As mentioned at the beginning of this chapter, creating an interface that can play back user-selected video clips from a menu tops our list of requests when it comes to using video in Flash.
Following are the steps for creating a menu-driven video playback application. This example shows how to load and playback video from a combo box component.
- Create an FLA and make its document class
VideoPlayer_understanding.as. - Drag an instance of the
FLVPlaybackcomponent from theComponentspanel to the stage of the FLA. Name itmyVideoPlayer. - Drag an instance of the
ComboBoxcomponent from theComponentpanel to the stage and name itselector_cb. Load your combo box with titles and file names of videos you have encoded for playback in Flash using theComponent inspector. Please refer to Chapter 14 for more information about theComboBoxcomponent. - Create a dynamic text field on stage and call it
feedback_txt. - Create the file
VideoPlayer_understanding.as and insert into it the following code:
package{


  import flash.display.MovieClip;

  import flash.events.*;

  import flash.text.*;


  import fl.video.FLVPlayback;

  import fl.video.VideoEvent;


  public class VideoPlayer_understanding extends MovieClip{


    public function VideoPlayer_understanding(){

      // this one will show us selecting from multiple videos and

multiple sizes

      selector_cb.addEventListener(Event.CHANGE, handleChange);

      myVideoPlayer.addEventListener(VideoEvent.READY, playerReady);

    }


    private function handleChange(e:Event){

      // do the video selection

      trace(selector_cb.selectedItem.data);

      feedback_txt.text = "You have selected:

"+selector_cb.selectedItem.data;


      myVideoPlayer.load(selector_cb.selectedItem.data);

      myVideoPlayer.play();


    }

    private function playerReady(e:VideoEvent)  {

      myVideoPlayer.x = 0;

      myVideoPlayer.y = 0;

    }

  }

}
Here's what this code does (please read through the comments for specific details):
- Import the necessary classes.
- Add event listeners for the combo box CHANGE event and the
FLVPlaybackREADY event. - Load the selected video file into the player and update the feedback text.
- When the player broadcasts the READY event, you reposition the player. If the loaded video's size is different from the player's size, its position will change depending on the
scaleModesetting. After the auto layout process, you can safely reposition the video display.
As you can see, creating this functionality can be very straightforward. So now that you are able to select and play back video from a menu, let's move on to making the component look the way we want it to by creating a custom skin.
Customizing the FLVPlayback component skin
One very common request you might get is to make the video player controls match the carefully crafted design elements that surround it. Another might be to apply design elements provided to you by the designer to the playback controls. In this section we're going to take a closer look at the FLVPlayback component's skin and how you can use the prebuilt skins as a starting point to create your own custom skins. We're also going to show you how to use ActionScript with your own custom assets to control the FLVPlayback component.
As mentioned before, you can make some color and alpha (and control configuration) selections using the Component inspector; however, what we're talking about here is a complete departure from the skins that are included with Flash CS4.
Understanding the FLVPlayback component skin
In order to customize the FLVPlayback component skin, you need to understand how it's put together. You can find the source files where Flash was installed on your computer.
When you first open the FLA for an FLVPlayback skin, the first thing you should do is save it with a new name. This will prevent you from overwriting any of the original files from the installation of Flash.
In the FLA you will see two distinct areas labeled Layout Layer (Exported to SWF) and Sample Controls Layers (NOT Exported to SWF) on stage as shown in Figure 17-7. In the Layout Layer area you see the skin as it will appear applied to your FLVPlayback component. In the Sample Controls Layers area you can see all of the states (normal, over, down, and disabled) for each of the skin elements.

Figure 17-7. The FLVPlayback skin source file
If you look at the Timeline panel, you'll see that the symbols on stage are arranged nicely into two folders of layers, and each element resides on its own layer within that folder. The layers in the Sample Controls Layers folder are set as guide layers and will not export with the layout layers.
There is a third (topmost) layer in the timeline called All Scripts. Have a look if you like, but it's not necessary to make any changes in the ActionScript in order to modify the skin.
Since you've saved this FLA as a new file with a new name, you can go ahead and play around in the library. As you can see here in Figure 17-8, the library is organized into folders that contain the unique parts of each respective control.
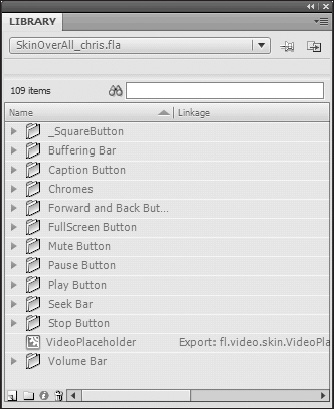
Figure 17-8. The library of the FLVPlayback skin source file is organized into a useful folder hierarchy.
You want to drill into each folder until you see a folder called Assets (see Figure 17-9). It's the elements in these Assets folders that you should modify to make visual changes to individual controls.
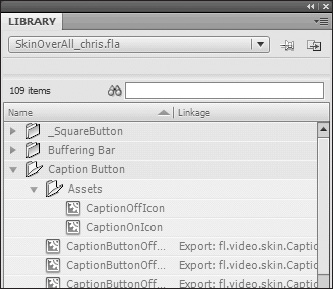
Figure 17-9. Exploring the structure of the library to reveal the Assets folder of the Caption Button control
So now that you have your bearings, let's make a custom skin by replacing some of the graphic elements. The goal is to quickly convert the square buttons in this skin into round buttons with different colors for each button state.
- Open
SkinOverPlayMute.FLA and then save the source FLA asSkinOverPlayMuteRound.FLA. - With the source FLA open, browse to the _
SquareButton folder in the library. You should see threeMovieClipsymbols in this folder,SquareBgDown, SquareBgNormal, andSquareBgOver, as shown in Figure 17-10.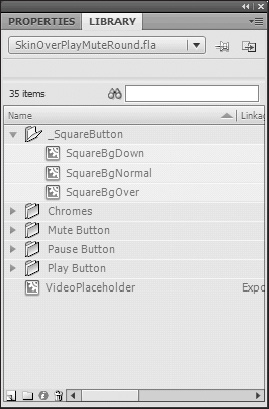
Figure 17-10. The three movie clips used for the down, normal, and over state backgrounds
- Double-click
SquareBgDownto open it in edit mode. Add a layer to the timeline and move it to the topmost layer. Draw a circle on this layer that covers the existing artwork. Your screen should look similar to Figure 17-11. You can delete the other layers if you wish.
Figure 17-11. Adding graphic elements to a preexisting background graphic
- Select and copy the circle you drew to your clipboard by pressing Ctrl+C or Cmd+C.
- Repeat step 3 with
SquareBgNormalandSquareBgDown, in turn changing the color of the circle in each clip. (Paste the circle from your clipboard to the new layer in each symbol using paste-in-place by pressing Ctrl+Shift+V or Cmd+Shift+V on a Mac to ensure consistent placement from clip to clip.) - Return to the main timeline. Your stage should look similar to Figure 17-12.
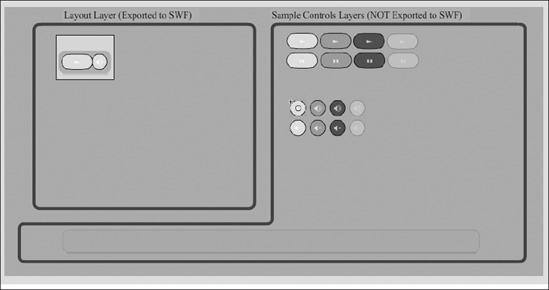
Figure 17-12. The stage after modifying the three button state movie clips
- Export the skin, and then move the resulting SWF to the FLVP
layback Skins/ActionScript 3.0directory. - Create a new FLA and drag an instance of the
FLVPlaybackcomponent to the stage. Open theFLVPlayback Component inspectorand skin the component with your custom skin. (See "Setting the skin parameters" earlier in this chapter to see how.) - Set the
sourceparameter in theComponent inspectorand then test your movie so you can see your custom skin in action! Your SWF might look something like the one in Figure 17-13.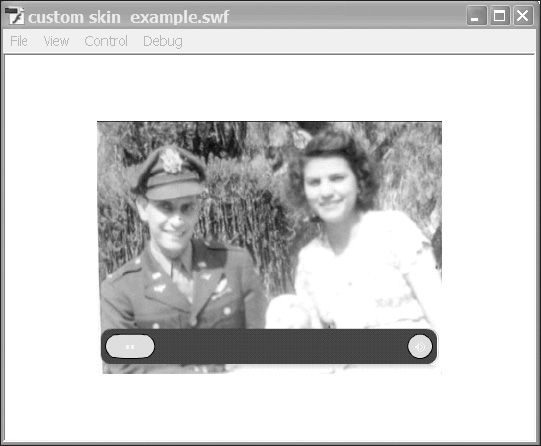
Figure 17-13. The custom skin on the
FLVPlaybackcomponent
The easiest way to modify a given button is to drill into it from the stage, keeping track of what symbol you're in and making the changes you want.
You should not replace a clip that is set to export for ActionScript. If you want to change the way one of these clips looks, then put your new design elements in that clip—do not replace it. The reason for this is that the skin uses those classes to control how the skin lays out, how it controls its video player, and how it responds to user input (like rollover or click events). If you want to replace the whole thing altogether, simply give it the same class name when you set it to export for ActionScript.
Figure 17-14 shows the symbol properties of the down state of the caption button when captions are turned off. Notice in the Linkage section that Export for ActionScript is selected and the class is CaptionButtonOffDown, the fully qualified class name being fl.video.skin.CaptionButtonOffDown. To open the Symbol Properties dialog, right-click (or Ctrl+click on a Mac) any symbol and select Properties from the context menu.
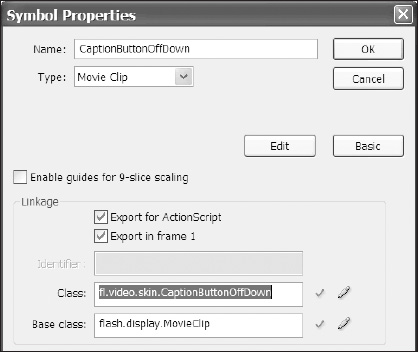
Figure 17-14. It is critical that the class remains the same while modifying or replacing elements of the FLVPlayback skin.
One benefit of customizing the FLVPlayback component this way is that you don't need to write any code to make it work. You can also easily distribute the new skin SWF to other members of your team or the Flash developer community. Also, if your custom skin SWF is placed in the skins directory, it will appear in the list of available skins while setting the skin property in the Component inspector, allowing you to use it right away like the one we just made, SkinOverPlayMuteRound.swf, show in Figure 17-15.
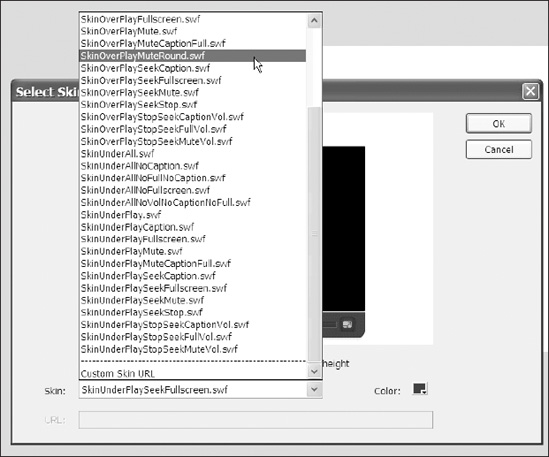
Figure 17-15. The Select Skin dialog shows the custom skin SWF after it is published to the directory with all of the built-in skin SWF files.
On the downside, using the prebuilt skins as a starting point restricts you to using one of the predetermined configurations of controls and its layout. Fortunately, the controls come as separate components, and you can customize and use these individual components to configure your own custom play controls and layouts.
Creating custom play controls
In order to successfully customize and use the play control components (see Figure 17-16), you'll need an understanding of how they are put together so you know which pieces to replace and which ones to keep intact. We'll use the PlayButton as an example; you can find it in the Components panel.
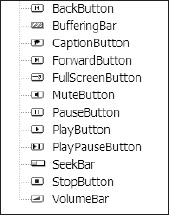
Figure 17-16. The play control components available in the Components panel
Understanding play control components
When you assign a movie clip to be the play button (or any other control) for an instance of the FLVPlayback component, that clip needs to define the class for each of its button states. If you look at the ActionScript in frame 1 of the script layer of an instance of the PlayButton component, you'll find the code that does just that:
stop();

this.upLinkageID = "customPlayNormal";

this.overLinkageID = "customPlayOver";

this.downLinkageID = "customPlayDown";

this.disabledLinkageID = "customPlayDisabled";
The values defined for each state's linkage ID corresponds to the class name (or linkage ID) of the movie clips found on frame 2 of the PlayButton component. Your linkage IDs can change, but not the property they are being assigned to. For instance, the following code will work just fine as long as you have a clip in your library with a linkage ID or class name of myUserDefinedUpLinkageID:
this.upLinkageID = "myUserDefinedUpLinkageID ";
More to the point, the following code will not work because there is no reference to userDefinedPropertyLinkageID in the FLVPlayback component:
this.userDefinedPropertyLinkageID = "myUserDefinedUpLinkageID ";
So when you customize or replace the visual elements of these components, it is critical that you maintain the script in frame 1 of your new control.
Keep in mind that some of the buttons are toggles and are made up of two sets of buttons. If you drag an instance of the PlayButton to your stage and double-click it to enter edit mode, you'll see that it is comprised of two layers and two frames. The top layer is for ActionScript; the second layer, named contents, contains the visual contents of the component. The first frame of the contents layer represents the normal state of the component. The second frame has an instance of all four states of the button, which are as follows:
- Normal
- Over
- Down
- Disabled
Notice that none of these clips have instance names; however, if you find them in the library, you'll see that their class names (or linkage IDs) are, respectively, as follows:
PlayButtonNormalPlayButtonOverPlayButtonDownPlayButtonDisabled
It is within these MovieClip symbols where you will put custom graphics, animations, sound, and so forth because it is the class name that links the clip to the control component. Figure 17-17 shows these clips in the library.
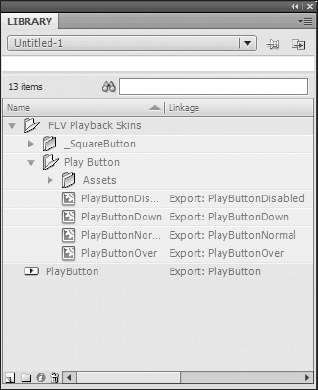
Figure 17-17. The PlayButton components that are used for the four button states
Assigning custom play controls to an FLVPlayback component
Whether or not you replace the visual elements of a play control component, you will need to associate the component with an instance of the FLVPlayback component. Doing this is incredibly straightforward. Assuming you have an instance of the FLVPlayback component named myVideoPlayback and an instance of the PlayButton control named customPlay_btn on stage (or instantiated through code), you can assign a play button to myVideoPlayback with the following line of code:
myVideoPlayback.playButton = customPlay_btn;
At this point you should be familiar with the FLVPlayback skins, their source files, and how to customize them. You should also understand how the play control components work as stand-alone components in Flash and how to assign them to an instance of the FLVPlayback component.
Now that we have explored how to customize the FLVPlayback component using skins and play control components, let's look at how to get your interface and related media to respond to the video.
Synchronizing video, text, and other media using events
In order to understand how to synchronize text and other media like images and animation to video playback, you need to understand how to handle events and, more specifically, how to handle the CUE_POINT event.
Responding to events allows you to do things like apply cue points to video dynamically and react to changes in the player's state. You saw in the previous example of menu-driven video playback that we waited until the playback component was ready before we attempted to reposition it by listening for the ready event. If we had tried to change its position prior to the player going through its layout process, it would not have worked. Either the properties needed to position the player would not have been available to us or the component would have overwritten them as part of another process.
You can also use cue points to load and display text, images, animations, or other media at specific points during a video's playback. If you know how to use cue points and events, you can sync anything to your video—except maybe the kitchen sink.
Beyond the Ready event—other key video events
The FLVPlayback component inherits a long list of events but also adds its own. Here's a brief introduction to a few events we've found to be key when integrating video with Flash using the FLVPlayback component:
bufferingStateEntered: This event is dispatched when theFLVPlaybackinstance enters the buffering state. This event comes in handy for assessing the quality of your user's experience. You can also use it to have your interface respond while video buffers.Complete: This event is dispatched when playing completes because the player reached the end of the FLV file. The most obvious use of this event is to auto-advance to another video in a playlist, but you could just as easily switch to another view state or send a message to a server-side application; whatever you need to do when the video reaches the end, do it with this event.cuePoint: This event is dispatched when a cue point is reached. For us, this is the mother of all video events. It's the key to synchronizing associated content with your video, and we cover it detail in the next section.Layout: This event is dispatched when the video player is resized or laid out.metadataReceived: This event is dispatched the first time the FLV file's metadata is reached. If you need to display information about the video or use it for layout purposes, you won't be able to access it until this event is dispatched.playheadUpdate: This event is dispatched while the FLV file is playing or when rewinding starts. This event is essential for repetitive actions tied to playback such as runtime indicators.Ready: This event is dispatched when an FLV file is loaded and ready to display. This is one of our favorite events. There's little you can't do to theFLVPlaybackcomponent or its video source after this event is dispatched.stateChange: This event is dispatched when the playback state changes—which is indispensable for troubleshooting.
Regardless of how you choose to use these events, implementing listeners for them is the same. Consider this excerpt from our preceding example:
// here we add a listener to the FLVPlayback instance 'myVideoPlayer'

// and designate the 'playerReady' function as the event handler - both

// player instance and handler function are named by the programmer

myVideoPlayer.addEventListener(VideoEvent.READY, playerReady);

// this is the handler function for the READY event

private function playerReady(e:VideoEvent)  {

      myVideoPlayer.x = 0;

      myVideoPlayer.y = 0;

}
Mastering the handling of events and understanding when and in what order these events occur will open new possibilities for working with video. The most obvious event for creating synchronized content is the CUE_POINT event.
Understanding cue points
In this section we'll talk about the general categories of cue points, what specific types of cue points fall into each category, and how you create them.
Generally speaking, there are two ways to create cue points. The method you use determines what type of cue point you can make as well as how that cue point can be referenced via ActionScript. The two categories of cue points are embedded and ActionScript.
- Embedded: Of the three types of cue points available, two can be created during encoding: event and
navigation. These can be referred to as embedded. - ActionScript: The third type of cue point is the
actionscriptcue point. It can be added only through ActionScript.
The secret to understanding cue points is that they are not just events dispatched by the FLVPlayback component. They are also a special type of object, and furthermore not all cue points are the same.
All of the cue points are similar in that each has a name, a time, and a parameters object. Name and time values are required when creating a cue point. Event cue points can be thought of as baked-in ActionScript cue points. Both are intended to trigger the CUE_POINT event during playback and can carry additional information via the parameters property of the event, which we cover later in this chapter. Navigation cue points come with the built-in ability to allow your user to skip from cue point to cue point using the forward and back buttons of the FLVPlayback skin.
As you can imagine, each category comes with its own pros and cons. While embedded cue points are more accurate, they can only be enabled or disabled at runtime and cannot be changed unless the file is reencoded—sometimes a lengthy process. ActionScript cue points, on the other hand, can be created at runtime but lack the accuracy of embedded cue points.
Creating ActionScript cue points
To create ActionScript cue points you can use the Cue Points inspector in Flash shown in Figure 17-18, or use ActionScript as explained in the next section. To open the Cue Points inspector, double-click the cuePoints property in the FLVPlayback Component inspector. Using the Cue Points inspector has the advantage of simplicity and speed when you are only concerned with the playback of a single video.
It is important to know that while you can see and disable embedded cue points (those added during encoding), you cannot edit them.
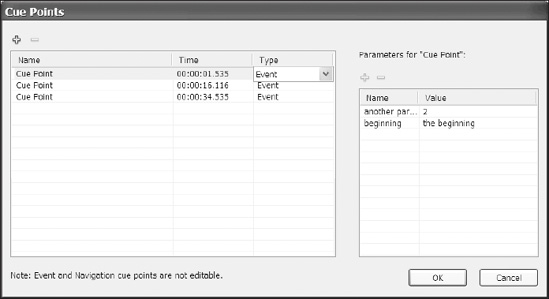
Figure 17-18. Embedded cue points of an FLV file. The first cue point (selected) has two parameters.
To add a cue point to your video, click the plus icon at the top of the dialog and name it myCuePoint. Note that you cannot change the cue point's type. Creating it here precludes it from being an event or navigation cue point—it will be an ActionScript cue point.
To add parameters to the cue point, select the cue point and then use the plus icon under Parameters for "myCuePoint": as shown here in Figure 17-19. Each parameter must have a unique name.
Use ActionScript if you want to apply your cue points at runtime; doing so will give you great flexibility. You can change your mind about just when an event occurs, and what happens as a result of it, based on other data in your application.

Figure 17-19. Cue point parameters must have unique names for any given cue point.
To apply a cue point at runtime, call the addAS CuePoint method of the FLVPlayback component shown here:
addASCuePoint(timeOrCuePoint:*, name:String = null,

parameters:Object=null):Object
The addAS CuePoint method can be a little confusing at first. How can it be expecting a cue point as the first parameter if we are now making the cue point?! Don't worry. What it means is that there are two ways to call this method. The following examples show both ways:
// the first method involves creating an object with time and name

// properties. Both are required in order to successfully create the

// cue point.


Var tmpGenericObject:Object;

tmpGenericObject.time = 2; // in seconds

tmpGenericObject.name = "slideCue";


// the object ('tmpGenericObject') is then passed as a single parameter

// to add the cue point to the FLVPlayback instance.

// myVideoPlayer is the name of our FLVPlayback instance


myVideoPlayer.addASCuePoint(tmpGenericObject);


// OR you could call the addASCuePoint method and pass the required

// parameters.

myVideoPlayer.addASCuePoint(2, "slideCue");
So that covers the minimum requirements for using ActionScript to create a cue point, but don't forget about parameters. They are the secret to storing information related to that point in time for use at runtime. Consider the following bold code:
// Here we create an object with name value pairs of our choosing.
var parametersObj:Object = {pOne:"aValue", pTwo:aVariable, pThree:

"you should always have three"};


var tmpGenericObject:Object;

tmpGenericObject.time = 2;  // in seconds

tmpGenericObject.name = "slideCue";

tmpGenericObject.parameters = parametersObj;


// the object ('tmpGenericObject') is then passed as a single parameter

// to add the cue point to the FLVPlayback instance.

// myVideoPlayer is the name of our FLVPlayback instance


myVideoPlayer.addASCuePoint(tmpGenericObject);


// OR you could call the addASCuePoint method and pass the required

// info separately.

myVideoPlayer.addASCuePoint(2, "slideCue", parametersObject);
So now not only can you direct an event to be dispatched at a given time in video, you're also able to store information related to that event as well. Next we'll look at handling those events and accessing the related information.
Handling the CUE_POINT event and reading cue point parameters
So now you know how to create cue points, but how do you use them exactly? In this section we look at how to listen for the CUE_POINT event and access the parameters object.
Listening for CUE_POINT events is similar to listening for video events, but keep in mind that the CUE_POINT event is a MetadataEvent, so in order to listen for such events, you need to import the MetadataEvent into your class, like this:
import fl.video.MetadatEvent;
and add an event listener like so:
// whenever a cue point is reached, the doCue function is called.

myVideoPlayer.addEventListener(MetadataEvent.CUE_POINT, doCue);


// this is the handler function we created for the CUE_POINT event

private function doCue(e: MetadataEvent)  {

  // your code goes here

}
With this code, every time a cue point is reached during the playback of the video, the doCue function will be called, passing with it an event object.
When an event of any type is broadcast in Flash, the event handler receives an event object as a parameter. In the case of the CUE_POINT event, we are interested in the info property of that event object. Here's an example of info:
private function doCue(e: MetadataEvent)  {

  // e is user defined - you can name it whatever you like - but it

  // represents the eventObject being passed to this function.


  // We look at the properties of e using dot notation.

  trace("1: "+e.info); // 1: [object Object]

}
The info property of the event object is where you find the cue point's name, time, parameters, and type properties.
private function doCue(e: MetadataEvent)  {

  // your code goes here

  trace("1: "+e.info); // 1: [object Object]

  trace("2: "+e.info.name); // 2: slideCue

  trace("3: "+e.info.parameters); // 3: [object Object]

  trace("4: "+e.info.type); // 4: actionscript

}


// recall that our parameters object looked like this:

var parametersObj:Object = {pOne:"aValue", pTwo:aVariable, pThree: "you

should always have three"};
The parameters property of the info object is where you access the parameter values of your parametersObj, as shown here:
// this is the handler function for the CUE_POINT event

private function doCue(e: MetadataEvent)  {  // your code goes here

  trace("1: "+e.info); // 1: [object Object]

  trace("2: "+e.info.name); // 2: slideCue

  trace("3: "+e.info.parameters); // 3: [object Object]

  trace("4: "+e.info.parameters.pThree); // 4: you should always

have three

}
With the ability to respond to events of the FLVPlayback component and an understanding of the CuePoint class, you could create a whole range of interactivity tied to the playback of video—including a framework for closed captioning; on the other hand, you could use the built-in FLVPlaybackCaptioning component, which we introduce next.
Adding captions to the FLVPlayback component
More and more, captioning video is becoming a requirement in the development of video for the Web. Fortunately, the requirement to caption video is not a secret, and now Flash comes with a component to do just that: the FLVPlaybackCaptioning component.
Use of the FLVPlaybackCaptioning component itself is fairly straightforward and is covered shortly; however, preparing the caption file itself is a nontrivial task at best. Adobe Premiere and Adobe Soundbooth both have speech-to-text transcription services that come with the software and allow you to export the transcripts to XML, but do not use the XML Schema the FLVPlaybackCaptioning component requires.
We'll look at how to apply the FLVPlaybackCaptioning component to an FLVPlayback component and explore the Timed Text XML Schema that the FLVPlaybackCaptioning component uses. We'll also show you how to use the FLVPlaybackCaptioning component.
Timed Text XML Schema for the FLVPlaybackCaptioning component
The FLVPlaybackCaptioning component needs XML source files that use the W3C Timed Text (TT) Authoring Format 1.0—Distribution Format Exchange Profile (DFXP) for the source file for captioning. This standard provides a robust set of options for styling your captions but goes far beyond the scope of this chapter and this book. We will create a sample file as part of showing you how to use the FLVPlaybackCaptioning component, however.
The root node of the Timed Text XML Schema used by the FLVPlayback captioning is the <tt> element, with two required child nodes, the <head> and <body> elements, like so:
<?xml version="1.0" encoding="UTF-8"?>

<tt xml:lang="en" xmlns="http://www.w3.org/2006/04/ttaf1"

xmlns:tts="http://www.w3.org/2006/04/ttaf1#styling">

  <head>

    <!-- there will be more here shortly -->

  </head>

  <body>

    <!-- there will be more here shortly -->

  </body>

</tt>
Within the head element you can add the <styling> element for setting CSS 2 styles using <style> elements as shown here in bold:
<?xml version="1.0" encoding="UTF-8"?><tt xml:lang="en"

xmlns=http://www.w3.org/2006/04/ttaf1

xmlns:tts="http://www.w3.org/2006/04/ttaf1#styling">

  <head>

    <styling>

      <style id="1" tts:textAlign="right"/>

      <style id="2" tts:color="transparent"/>

      <!--notice here that the id attribute from the previous node is

used to help define this node's style -->

      <style id="3" style="2" tts:backgroundColor="white"/>

      <style id="4" style="2 3" tts:fontSize="20"/>

    </styling>

  </head>

  <body>

    <!-- there will be more here shortly -->

  </body>

</tt>
This is all well and good, but let's get into the timed part of "timed text," shall we? Consider the following XML added into the body elements of our XML:
<?xml version="1.0" encoding="UTF-8"?><tt xml:lang="en"

xmlns="http://www.w3.org/2006/04/ttaf1"

xmlns:tts="http://www.w3.org/2006/04/ttaf1#styling">

  <head>

    <styling>

      <style id="1" tts:textAlign="right"/>

      <style id="2" tts:color="transparent"/>

      <style id="3" style="2" tts:backgroundColor="white"/>

      <style id="4" style="2 3" tts:fontSize="20"/>

    </styling>

  </head>

  <body>

    <div xml:lang="en">

      <p begin="00:00:00.00" dur="00:00:04.07">This is some text</p>

      <p begin="00:00:04.07" dur="00:00:03.85">for captioning.</p>

      <p begin="00:00:07.92" dur="00:00:03.08">It will be displayed</p>

      <p begin="00:00:11.00" dur="00:00:01.44">on the video.</p>

    </div>

  </body>

</tt>
Within the body we added a <div> element. This is considered a logical collection of content by the Timed Text standard. Within the <div> element are the <p> elements; these contain text information used as the actual caption but also use the begin and dur attributes, which ultimately tell Flash when to show text and how long to leave it on screen.
As you might imagine, creating an XML file for captioning video of any length would be quite a task, so if this is your bread and butter, we highly recommend building yourself a tool that lets you record the start time and duration of captions and that then writes the XML for you.
Now that you have a basic understanding of the XML required to power the FLVPlaybackCaptioning component, you'll next put it together with the component. Save the preceding code as myCaptionSource.xml. In the same location, save a new FLA called Video Player_understanding.fla.
Understanding the FLVPlaybackCaptioning component
The FLVPlaybackCaptioning component allows you to apply the external Timed Text XML Schema file as captions on an instance of the FLVPlayback component. In order to use the FLVPlaybackCaptioning component, you have to tell it which FLVPlayback component it belongs to. If you don't tell it which playback component to apply captions to, the FLVPlaybackCaptioning component will look in its own display object to find one. If it finds more than one FLVPlayback component, it will assume it belongs to the first one it finds. You also need to tell it where to find the captioning information—the file we created in the previous section.
To add the FLVPlaybackCaptioning component to an FLVPlayback component, open Video Player_understanding.fla and follow these steps:
- Open
Video Player_understanding.fla(created earlier in this chapter) and drag an instance of theFLVPlaybackcomponent to the stage. Name the instancemyVideoPlayer. - Create a new layer (optional) named
caption component(or name of your choosing) and drag an instance of theFLVPlaybackCaptioningcomponent from theComponentspanel to the new layer. TheFLVPlaybackCaptioningcomponent will look as it does in Figure 17-20 when you drop it on stage; this component has no physical appearance when the movie is published, so it doesn't matter where you drop it. - Name your
FLVPlaybackCaptioninginstance. What you name it is up to you—we usedmyCaptionfor this example. - With your
FLVPlaybackCaptioningcomponent selected, open theComponent inspectorand set thesourceproperty tomyCaptionSource.xml. - With
myVideoPlayer(the instance of ourFLVPlaybackcomponent) selected, set thesourceproperty in theComponent inspector. - Test the movie and enjoy the captioned goodness.
Figure 17-20. What the placeholder FLVPlaybackCaptioning component looks like on stage. Once the FLA is published, the component is not visible at all.
The FLVPlaybackCaption component class comes with a healthy API for use at runtime for more control over your application. As with everything, we encourage you to explore it further.
Summary
Even though we covered a lot of ground in this chapter, we assure you that this was just the tip of the iceberg that is video in Flash. Our goal in this chapter was to teach you the core concepts integral to the day-to-day integration of video into Flash. We talked about
- Using the Video Import Wizard
- Understanding the
FLVPlaybackcomponent - Understanding and customizing the
FLVPlaybackcomponent skins - Customizing the play control components
- The core concepts behind synchronizing text and other media with your video playback
- The types of cue points in Flash and how to handle them when they occur
- Adding captions to the
FLVPlaybackcomponent using theFLVPlaybackCaptioningcomponent