CHAPTER 18
PUBLISHING, EXPORTING, AND DEBUGGING YOUR FLASH PROJECT

This chapter is all about the things you need to do with your project before you present it to the world. While debugging happens throughout the various stages of development, exporting and publishing usually happen at or near completion. In this chapter we'll talk about the following:
- Publishing your project
- Exporting your content to various file formats
- Identifying types of errors
- Using the debugger
Let's begin with the various ways you can prepare your work for the world with the Publish Settings window.
Understanding the Publish Settings window
Publishing your work means turning it into file formats that can be consumed by your users. Whether they are watching through a web browser or a stand-alone projector or mobile device, your source files must be compiled into something the playback environment understands.
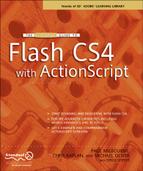
Flash has to know as much about the environment your users will be viewing your work in as possible in order to create a compatible file or set of files for them.To do this you will need to understand the publish settings of Flash. The Publish Settings window's Formats tab, shown in Figure 18-1, is where you decide what types of files Flash needs to create when you publish. You can also adjust format-specific options that impact the file's quality and behavior as well as its name and where it will be created on your computer.
There are three main functions of the Publish Settings window:
- Create and manage publish profiles using the profile management area.
- Select output file formats to be created during publishing.
- Choose settings for each format.
At the top of the Publish Settings window is the profile management area. It contains a drop-down menu for selecting profiles and a series of buttons for managing them. Please see Chapter 2 and later in this chapter for further discussion of publish profiles.
Below the profile management area is a row of tabs that will change to reflect the file types you have selected for publishing. The order of these tabs is determined by the order in which you select the file type to be published.
Beneath that is the Type area where you will find check boxes to select or deselect formats to be created during publishing. The File area lets you select the location and file name for your published files.
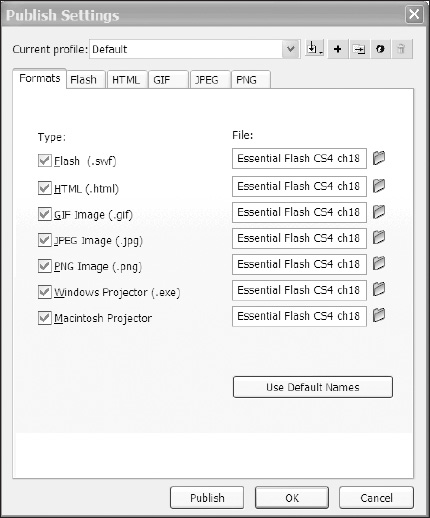
Figure 18-1. The Publish Settings window's Formats tab
To select the file name and location of a published file, either enter the path and file name into the text input box directly or click the folder icon to the right of the text input field and browse to the location where you would like your published file to be written on your computer. Enter a file name of your choosing and click OK. If things change (and they always do) and you need to reset all of the file names and paths, click the Use Default Names button under the format selection list.
To leave the Publish Settings dialog without saving any changes, click the Cancel button. To begin publishing with the current settings, click the Publish button.
Selecting publish formats
While the primary output file format of Flash is SWF, Flash will let you output your work in a variety of additional formats including
- HTML
- GIF
- JPEG
- PNG
- Projectors for Mac (APP) and PC (EXE)
Most of these formats stand alone. However, it important to know that the HTML and SWF formats are closely intertwined during publishing because the choices you make about the options for SWF impact the HTML that gets written when you add the HTML format.
Setting Flash publishing options
Each format comes with a laundry list of options. To change the options for a given file type, make sure the check box for the file type is selected for publishing, and then click the tab above the list for that format. This will take you to a screen with the file type's publish options. Figure 18-2 shows the publish options for the Flash format.
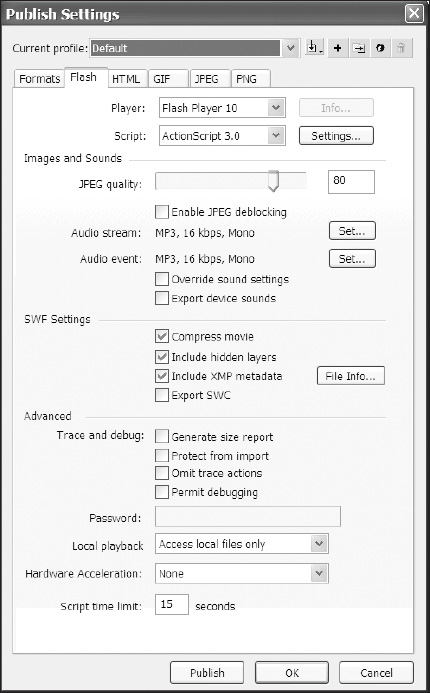
Figure 18-2. The Flash settings tab
The Flash output settings window is broken into four main sections:
- An area showing the player version and ActionScript version
Images and SoundsSWF SettingsAdvanced
There's a lot here so let's just work our way down from top to bottom.
Targeting player version and ActionScript version
This is where you decide which version of the Flash Player and ActionScript to target. If you are building an application for a customer that is slower to adopt new versions of technology, you may not be able to develop and publish for the latest version player. Making changes here has an impact on which ActionScript settings options are available to you.
Targeting player versions On the Flash tab, use the Player drop-down menu to target Flash Player versions 1 through 10—you can only target one player version, so choose the version that supports all of the code and other features you plan to use in your project. You also use the Player drop-down to target the Adobe Integrated Runtime (AIR) version 1.1 as well as Flash Lite players 1 through 3.
If you target AIR 1.1 using the Player drop-down, the Settings button to the right of the drop-down will become active. Clicking the Settings button will open the AIR—Application & Installer Settings window.
If you target any of the Flash Lite players using the Player drop-down, the Info button will become active, and clicking it will open an information dialog that tells you the subset of ActionScript that the selected Flash Lite player supports.
Targeting ActionScript versions Use the Script drop-down menu to select a version of ActionScript to target. The script versions available for selection are dictated by the player version selection. Table 18-1 shows ActionScript support for player versions.
Table 18-1. ActionScript support for player versions
| Player version | ActionScript support |
| 1–5 | ActionScript 1.0 |
| 6–8 | ActionScript 1.0–2.0 |
| 9–10 | ActionScript 1.0–3.0 |
Images and Sounds area
As the name suggests, the Images and Sounds area is where you control output settings of images and sounds in the SWF. While you can also control the compression and quality settings of image and audio assets in the library individually, the settings here give you the option to override those settings with a global setting.
To adjust the amount of image compression used when publishing Flash files, use the JPEG quality slider in the Images and Sounds section of the Flash Publish Settings window. This setting dictates compression of bitmap assets in the library for use in the finished file and has a range of 1 to 100, with 1 being the lowest quality and 100 being the best quality; 80 is the default. Checking Enable JPEG deblocking will reduce compression artifacts on images using low-quality settings.
While authoring, you can direct audio assets in the timeline to be either event audio or stream audio. When publishing your SWF, you can apply different compression settings to each. This allows you the flexibility of exporting your shorter sounds—usually set as event sounds—at a higher quality and exporting your longer sounds—generally set as stream sounds—at a lower quality to reduce bandwidth requirements.
Click the Set button next to Audio stream to choose compression settings for audio in your FLA that is set to sync type Stream. Figure 18-3 shows the Sound Settings dialog. Click the Set button next to Audio event to choose compression settings for audio in your FLA that is set to sync type Event.
Figure 18-3. The Sound Settings dialog lets you set audio compression settings globally.
To override any export settings made to individual audio assets in the library, check the Override sound settings check box.
SWF Settings area
The SWF Settings area shown in Figure 18-2 allows you to decide whether or not to compress your movie, include hidden layers, and include XMP metadata about your movie as well as indicate whether or not to publish your file as a SWC.
Whether you have selected Include XMP metadata in your SWF Publish Settings or not, the File Info button will be active so that you may add information about your file such as when the file was created, who created it, or what content may be found within it. See Chapter 15 for more information about XMP metadata.
Advanced area
The Advanced settings section comes last and includes a variety of options. The Trace and debug options allow you to do the following:
- Generate a size report for your movie: Choose the
Generate size reportoption for a text file that lists the size of each frame, shape, text, sound, video, and ActionScript script by frame. This will let you see how the total file size is distributed over frames of your movie. - Protect your movie from being imported into Flash: Choose the
Protect from importoption to require a password when importing your SWF into Flash. This will help prevent other folks from reusing your SWF files within their own FLAs. When you check this option, thePasswordfield below will become active. Enter the password you will require for importing your SWF into Flash. - Omit trace actions: Choose the
Omit trace actionsoption to have the compiler skip over any trace actions in your application. This can reduce the amount of work the Flash Player has to do while running your program. - Permit debugging: Choose the
Permit debuggingoption if you wish to publish a SWF that can be debugged remotely.
The next setting in the Advanced area, Local playback, is an either/or proposition. By default, SWF files can access local files and networks but cannot communicate with or send files or information to remote networks. Choose Access network only to reverse this and give the SWF file the ability to communicate and send files but not the ability to access local files or the local network.
The Hardware Acceleration menu dictates whether or not the published SWF takes advantage of any graphics processing power of the computer it is being played on. You can choose from these three options:
None: Select this option if you do not wish for your published SWF to take advantage of the host computer's graphics hardware.Level 1 Direct: Select this option if you want the Flash Player to use the most direct method available on the host machine to render—bypassing the browser's rendering for instance.Level 2 GPU: Take special care when selecting this option, as there are specific hardware requirements involved, and if your user's computer has an incompatible graphics card, you may run into performance issues. Content should be designed specifically to take advantage of GPU acceleration such as full-screen refreshes.
The final publish setting in the Flash options page is the Script time limit option. Enter a value in this input box to set a time limit on how long your published SWF is permitted to run a script before a timeout alert is shown to the user.
Setting HTML publishing options
The options on the HTML tab are used to determine what HTML and JavaScript need to be written to the published HTML document in order to display your SWF and support the functionality you need. Refer to Figure 18-4 as you read through the settings presented in this section.
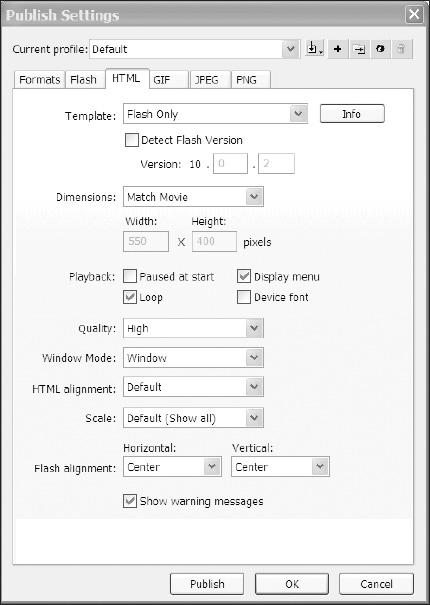
Figure 18-4. The HTML settings tab
Choosing a template
HTML templates are used to quickly generate HTML that properly supports Flash for various purposes, each specific to a particular template as outlined in the template's description, like adding support for AICC tracking or for use with HTTPS. To read a template's description, select the template from the Template drop-down menu, and then click the Info button that appears to the right of it. The Flash Only template, for instance, creates HTML that supplies only the necessary elements to include SWF content on an HTML document.
To create code in your published HTML that compares the version of the Flash plug-in version of your user's system against a version of your choosing, check the Detect Flash Version check box.
Once the Detect Flash Version check box is checked, you may enter major revision and minor revision numbers in the available text input boxes, but you cannot change the player version. The player version is set on the Flash tab of the Publish Settings window.
Setting dimensions
The Dimensions setting changes the dimensions of your SWF as it is embedded in the HTML document. It does not change the stage dimensions of your FLA or your published SWF. Change the dimensions of the stage of your document itself by using the Document Properties dialog. To do so, select Modify ![]()
Document.
Using the Dimensions setting is akin to setting dimensions of an image in HTML. Your options are as follows:
Match Movieuses the document dimensions to dictate the size reflected in the HTML as shown in Figure 18-4.Pixelslets you manually enter the dimensions you want your published SWF to have in the HTML as shown in Figure 18-4.Percentmakes the dimensions of your Flash movie a percentage of the available area in the HTML document.
Changing Playback options
Use the Playback options to determine how your SWF will behave once it is downloaded into the browser. Your options are as follows:
Paused at startwill stop the main timeline of your SWF on the first frame. This is unchecked by default.Display menuwill allow the user to right-click (Ctrl+click on a Mac) anywhere over the embedded Flash movie to see the extended shortcut menu. This menu gives the user the ability to zoom in and out as well as control playback of the timeline.Loopwill cause the SWF to repeat. This is checked by default.Device fontallows the Flash Player to replace any fonts used in the SWF that are not installed on the user's computer with a font that is on the user's system. This option applies only to the Windows version of the Flash Player.
Changing quality
Use the Quality drop-down menu to determine how the Flash Player prioritizes the rendering quality of its visual assets. The default value is High, but your options are as follows:
Lowturns off all anti-aliasing, making it easier for slower computers to render the SWF but at a much lower quality.Auto Lowstarts with low-quality rendering but will switch to higher quality if the user's system is powerful enough to maintain playback using high-quality-processing.Auto Highstarts with high-quality rendering but will switch to low quality if the user's system cannot keep up with the high-quality processing requirements.Mediumuses anti-aliasing when rendering vector graphics but at a lower resolution than theHighquality setting.Highuses a higher-resolution anti-aliasing when rendering vector graphics than the Medium quality setting. If the SWF contains animation, bitmaps are not smoothed. Otherwise, bitmaps are smoothed.Bestis the same asHighwith the exception that bitmap graphics are smoothed whether there is animation or not.
Changing window mode
The Window Mode setting determines how the SWF interacts visually with its container in the HTML document. You have the following options:
In Windowmode, which is the default, the HTML cannot render on top (in front) of or under (behind) the SWF, and the SWF will use the HTML background color.In Opaque Windowlessmode, the background of the SWF will be opaque (hiding anything behind it on the page) but will allow HTML to render on top of it.In Transparent Windowlessmode, the background of the SWF will be transparent. This is the mode for those "appear anywhere" ads that move around on your browser.
Changing HTML alignment
The HTML alignment setting positions the SWF file window in the browser window. You have the following options:
Defaultwill center the SWF in the browser window. This will crop the edges if the browser window is smaller than the SWF dimensions.Left, Right, Top, orBottomoptions will align the SWF file along the selected edge of the browser window. This will crop the other sides of the SWF as needed.
Changing scale behavior
The Scale setting places the SWF within certain boundaries if you've changed the SWF's original width and height. Your options here are as follows:
Default (Show all)will show the entire SWF in the HTML with the original aspect ratio of the SWF.No Borderwill scale the SWF to the specified area while maintaining the SWF file's original aspect ratio.Exact Fitresizes the SWF; however, if it needs to stretch or compress the SWF horizontally and vertically in order to fill the available area, it may cause distortion.No Scaleprevents the SWF from scaling when the Flash Player window is resized.
Changing Flash alignment
The Flash alignment setting works with the Dimensions and Scale settings. If cropping occurs due to the other settings, the Flash alignment setting determines how the Flash content will be cropped. You can control the vertical and horizontal options for this setting independently according to the following options:
HorizontalLeftaligns Flash content left in the player, cropping the right side.Centerhorizontally centers Flash content in the player, cropping the left and right sides.Rightaligns Flash content right in the player, cropping the left side.
VerticalToptop-aligns Flash content in the player, cropping the bottom.Centervertically centers Flash content in the player, cropping the top and-bottom.Bottombottom-aligns Flash content in the player, cropping the top.
Setting GIF publishing options
Flash offers you the full range of settings for outputting the GIF file format as part of publishing your movie. Use Figure 18-5 as reference as we go over these options. Usually this image would be used in place of your SWF in an HTML document if the user does not have the Flash Player.
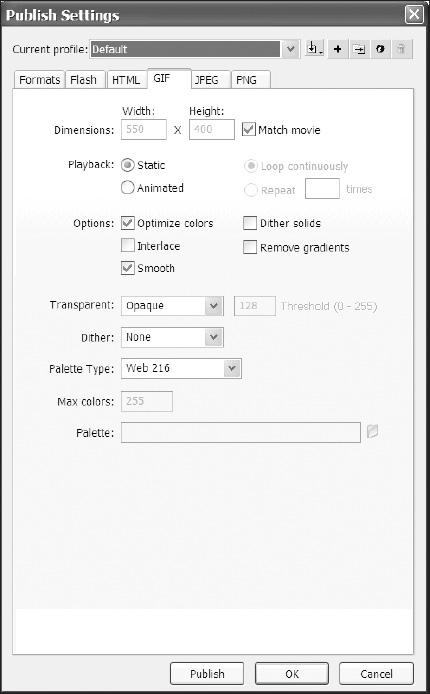
Figure 18-5. The GIF settings tab
Setting image dimensions
Use the Dimensions options to determine the dimensions of the GIF file. The Match movie check box is selected by default and will create a GIF that has the same dimensions as your FLA document. To change the dimensions, uncheck the Match movie check box and manually enter the dimensions you want.
Changing playback behavior
Flash can generate a static or animated GIF. A static GIF is a single image created from the first frame of your FLA. If you wish to publish an animated GIF, click the Animated radio button. This will enable the Loop continuously and Repeat options. Leaving Loop continuously (the default) selected will obviously create an animated GIF that loops over and over without end. Alternatively, you could select the Repeat radio button and enter the number of times you wish the animation to loop.
Other options
The Options settings control a variety of appearance settings for the published GIF. You have the following choices:
Optimize colorswill remove any unused colors from a GIF file's color table.Dither solidswill apply dithering (the process of using pixels of two or more different colors to approximate an in-between color) to solid colors of the published GIF.Interlaceshows the published GIF incrementally as it downloads.Remove gradientswill convert all gradient fills in the published SWF to solid colors using the first color in the gradient. This option is disabled by default.Smoothwill apply anti-aliasing to a published GIF. This will produce a higher-quality image and may improve the readability of text. Beware of artifacts around the edge of your image.
Changing transparency
The Transparent settings determine if and how transparency will be applied to your published GIF. These are your options:
Opaquewill create a GIF with a solid background.Transparentwill make the background of the Flash document transparent.Alphawill make everything in your Flash document whose alpha value is below the threshold in theThresholdsetting completely transparent. For instance, if yourThresholdis set to128, anything in your Flash document with an alpha of 50 percent or lower will be 100 percent transparent in the published GIF. This is the only transparency option to which the threshold can be applied.
Changing dither
The Dither option determines how pixels in the GIF's color table are combined to simulate colors that are not in the color table. Your options for dithering are as follows:
Noneturns off dithering and replaces colors not in the basic color table with the solid color from the table closest to it.Orderedis good-quality dithering with little increase in file size.Diffusionwill give you the highest-quality results. This option only works if the Web 216 color palette (discussed next) is selected.
Changing palette type and other color settings
The Palette Type setting determines the GIF file's color palette. You can choose from one of the following palette types:
Web 216will use the standard 216-color, web-safe palette to create the GIF image.Adaptivewill have Flash analyze the colors in the image and create a color table based on the content in your movie. This creates the best palette for your image but increases file size.Web Snap Adaptivewill also have Flash analyze your image but will replace colors that are not in the Web 216 color palette with similar colors of the Web 216 color palette.Customlets you determine the palette for your image. To select a custom palette, click thefoldericon next to thePalettetext field at the bottom of theGIFtab, and then select a palette file.
If you selected the Adaptive or Web Snap Adaptive palette options, you can enter a value for Max colors to set the number of colors actually used in the GIF image. Reducing the number of colors can produce a smaller file but, of course, may cost you in quality.
Setting PNG publishing options
The PNG file format is another image format available for publishing from your Flash file.
Many of the settings for PNG (shown in Figure 18-6) behave in a similar fashion to the settings for the GIF file format, which we just discussed. Please refer to the publishing options for the GIF file format for explanations of the following settings:
DimensionsOptionsDitherPalette Type
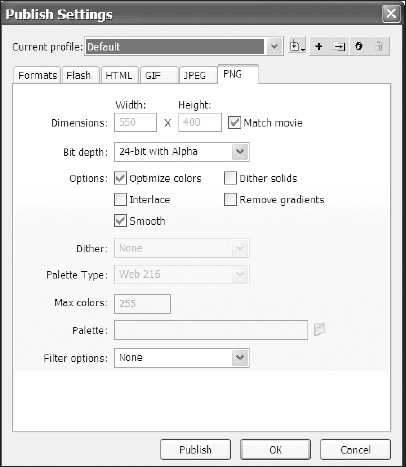
Figure 18-6. The PNG settings tab
Bit depth
PNG files can be published at two different bit depths from Flash, 8 bit and 24 bit. There is a third option, 24 bit with alpha, which is technically 32 bits per channel (bpc). Use the Bit depth drop-down menu to set the number of bits per pixel and colors to use while publishing the PNG. (The higher the bit depth, the larger the file.) These are your options:
8-bitwill create a 256-color image.24-bitwill create an image with thousands of colors.24-bit with Alphawill create an image with thousands of colors and transparency (32 bpc).
Filter options
The Filter options settings for publishing a PNG file determine what type of algorithm and/or processing is applied to your image. Select from the following options:
Noneturns off filtering. Files with this setting might be larger than they need to be.Subuses information from comparing one pixel to the previous pixel-(horizontally).Upuses information from comparing one pixel to the pixel that is immediately above it.Averageuses information from comparing one pixel to two neighboring pixels (left and above).Pathuses information from the three neighboring pixels (left, above, upper left) to help predict a pixel's color.Adaptiveanalyzes all of the colors in an image and creates a unique color table. This will create the most accurate result but generate the largest file size.
Setting JPEG publishing options
Another option for publishing a bitmap from your movie is the JPEG file format. The JPEG settings tab is shown in Figure 18-7.
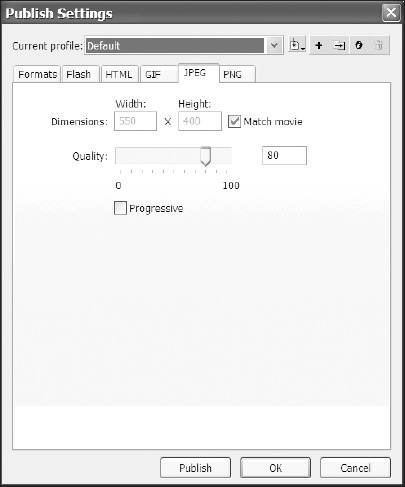
Figure 18-7. The JPEG settings tab
Dimensions
Use the Dimensions options to determine the dimensions of the JPEG file. The Match movie check box is selected by default and will create a JPEG that has the same dimensions as your FLA document. To change the dimensions, uncheck the Match movie check box and manually enter the dimensions you want.
Quality
To adjust the amount of compression applied to the published JPEG, drag the slider or enter a value. Select the Progressive check box to publish a JPEG that shows incrementally in a web browser. This can make your image appear faster when loading with a slow network connection (but at a lower quality at first). This option has a similar effect to that of interlacing in GIF and PNG images.
Managing publish profiles
Flash will let you save a selection of output formats and their settings as a single profile. Publish profiles are a great way to repeatedly and consistently generate files for specific situations or clients.
The five controls across the top of the Publish Settings window help you manage publish profiles. These controls are shown in Figure 18-8.
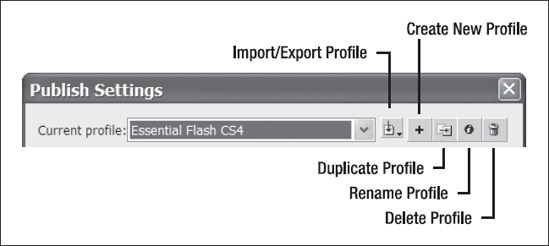
Figure 18-8. You can save and manage sets of selections and settings as publish profiles.
Importing and exporting profiles
Importing and exporting profiles can be useful when trying to maintain standards while working on a team. Taking advantage of this capability allows a standard to be created and exported to a file, which can then be imported by other members of the team.
To import your current selections and settings as a publish profile, click the Import/Export Profile button and select Import. Browse to the publish profile file and click OK. To export your current selections and settings as a publish profile, click the Import/Export Profile button and select Export. Browse to the location where you wish to save your publish profile, name the file, and save.
Creating publish profiles
After carefully selecting all the right settings for all of your output formats, you'll want to create a publish profile for yourself that you can use quickly and easily. To add a publish profile to your drop-down list of available profiles, click the Create New Profile button shown in Figure 18-8. Name your profile and click OK. The current set of selections and settings will be immediately available as a profile in the Current profile drop-down menu.
Duplicating publish profiles
Duplicating publish profiles might be a handy feature if you decide you need to create slight variations on a profile. Simply select a profile from the Current profile drop-down menu and click the Duplicate Profile button (shown in Figure 18-8).
Use the Rename Profile button shown in Figure 18-8 to quickly rename the currently selected profile.
Deleting publish profiles
Of course, you don't want to have a bunch of old stale profiles stinking up the joint, so to delete a publish profile, select a profile from the Current profile drop-down menu and click the Delete Profile button (shown in Figure 18-8).
While the Publish Settings window offers many options for preparing your content for the world to see, there may be times when you need less control and more convenience or perhaps a format or two not supported under the Publish Settings window. For this we have the ability to quickly export various files from Flash, which we'll cover next.
Exporting file formats
To export a single file format from Flash without having to publish it, you can use the Export menu from the File menu (File ![]()
Export). You can choose to either export an image file or a movie file and image sequence. Although the movie file and image sequence options are listed together, exporting your FLA as a movie file creates a single video or SWF file, while exporting your FLA as an image sequence will create many image files.
Exporting an image
To export an image from your Flash file, select File ![]()
Export ![]()
Export Image. This will open the Export Image dialog, shown in Figure 18-9. This dialog works just like a standard Save As dialog, with a Save as type drop-down menu from which to select a file format to export to. Use this dialog to choose a file name and location. Then from the Save as type drop-down menu, select what image format you want to create.
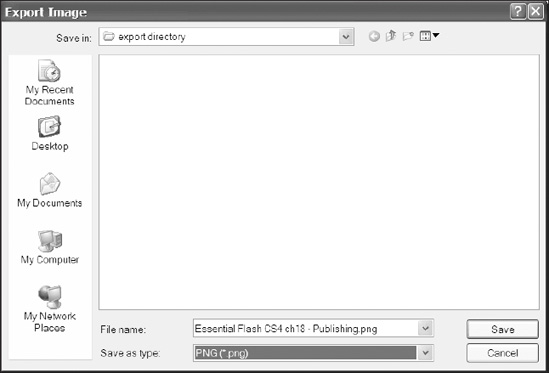
Figure 18-9. Exporting an image begins with a Save as type dialog
Exporting your FLA as a movie or image sequence
To export your FLA as a movie or image sequence, select File ![]()
Export ![]()
Export Movie. This will open the Export Movie dialog shown in Figure 18-10. Again, this dialog works just like a standard Save As dialog, with a Save as type drop-down menu from which to select a file format to export to. Use this dialog to choose a file name and location. Then from the Save as type drop-down menu, select a movie format or image sequence format.

Figure 18-10. You can choose from many image sequence or video formats using Export Movie.
QuickTime
Selecting QuickTime (*.mov) from the Save as type drop-down menu will open the QuickTime Export Settings dialog shown in Figure 18-11. This dialog has some options for controlling the disk process of exporting such as the following:
Stop exportingallows you to choose to stop exporting at the last frame of the FLA or at a specified time.Store temp dataallows you to choose between storing temporary data to memory or to a specified place on your system's hard disk.
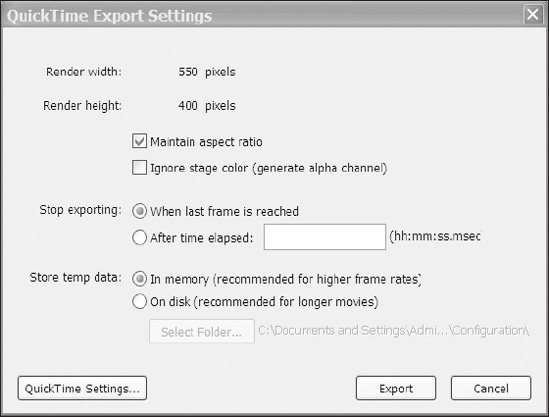
Figure 18-11. The QuickTime Export Settings dialog
At the bottom of the QuickTime Export Settings dialog is a button labeled QuickTime Settings. Click this button for extended control over the QuickTime video settings used to export your FLA as a video. The options and dialogs brought up by QuickTime Settings fall outside the scope of this book. We recommend you refer to the documentation provided with Apple QuickTime Pro for detailed information.
Windows AVI
If you are on a Windows system, you will have the additional capability of selecting Windows AVI (*.avi) from the Save as type drop-down menu. If you select this format, clicking Save will open the Export Windows AVI dialog box, which you see in Figure 18-12.
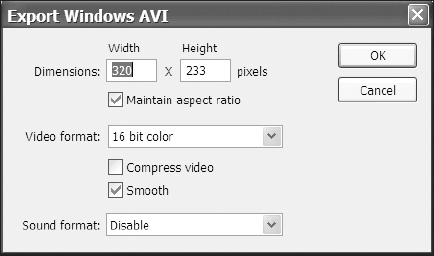
Figure 18-12. The Export Windows AVI dialog
Dimensionschanges the dimensions of the video file. Uncheck the Maintain aspect ratio check box to control the height and width values independently.Video formatcontrols the bit depth of the AVI.Compress video, if unchecked, will cause Flash to export the AVI when you click theOKbutton. Checking this option will open theVideo Compressiondialog shown in Figure 18-13 when you click theOKbutton. Some of CODECs listed in theCompressordrop-down list box are configurable; further discussion of this falls outside the scope of this book.Smoothwill apply anti-aliasing to the frames of the video.
- Sound format lets you select a format for the audio of your video.
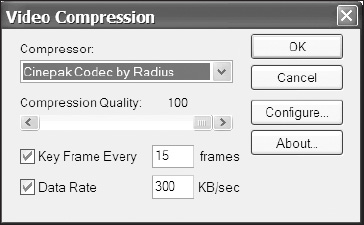
Figure 18-13. If you choose to compress your AVI, you can choose what compressor to use.
Long before you are ready to publish or export your work for the world, you will no doubt encounter some issues in getting your project to work as intended. To help exterminate the errors in your application, continue on for some strategies for debugging in Flash.
Debugging in Flash
Whether you are just writing your first few lines of code or wrapping up a project, there are usually some things that don't work in the way that you expect them to. Technically speaking, that's what a bug is. In order to find the bugs, you need to be able to determine what kinds of errors are happening. We're concerned with the three following types of errors:
- Compile-time errors
- Runtime errors
- Syntax errors
Compile-time errors occur as the code in your application is compiled.
Technically speaking, syntax errors are a type of compiler error. Syntax errors result when the text that makes up the code in your project does not follow the rules of the programming language—just as if we were to leave the period off of the end of this sentence.
Syntax errors are usually the easiest type of bug to find and fix—and not that hard to make either! Runtime errors are errors that happen as your application is running.
Here is one example of a syntax error since the variable declaration is missing:
example:String = "this won't work";
The code should be as follows:
var example:String = "this will work";
You can check the syntax of your code in the Actions panel as you work by pressing Ctrl+T (or Cmd+T on the Mac) at any time. If there are syntax errors in your code, you will see the alert window shown in Figure 18-14.
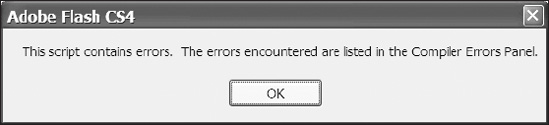
Figure 18-14. You'll see this alert if you check the syntax of a script and have errors.
Finding other types of compiler errors is almost as easy as finding syntax errors, the difference being that you will need to test your movie to expose them. To do so, press Ctrl+Enter (or Cmd+Enter on a Mac). If there are compiler errors, you will not necessarily receive an alert. You will need to check the Compiler Errors panel to see if there were any errors. Let's take a closer look at that panel right now.
Using the Compiler Errors panel
It's important to understand that although Flash tries really hard to tell you what errors are occurring, you will need to understand ActionScript in order to properly interpret the errors. Consider the following code:
package {

  import flash.display.MovieClip;

  public class ErrorExample extends MovieClip{

    private var bigBoy:String = "The Big Boy is a steam locomotive";

    public function ErrorExample()

    {

      trace("sometimes errors need interpretation")

  }

}
Type the preceding code in the Actions panel and then press Ctrl+T (Cmd+T on the Mac) to check the syntax. Click OK to close the alert and look at the Compiler Errors panel, which should appear similar to what you see in Figure 18-15.
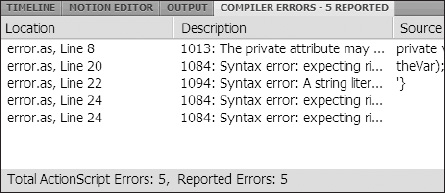
Figure 18-15. Most of your debugging happens in the Compiler errors panel (shown) and the Output panel (tabbed).
The columns in the Compiler Errors panel show the following information:
Locationwill indicate what file, layer (if in an FLA), and line of code the error is on.Descriptionwill show you the error code and a prescribed text description of your error.Sourceshows the actual source code where the error is occurring.
The only one thing missing from the script is a right brace (}) to close the class definition code block. However, there are five errors, because those errors are created with that one thing missing.
If you look at the bold line of code in the preceding example, you'll see that there's nothing wrong with it by itself; however, it violates the rule stated in error 1013, part of which is shown in Figure 18-15. The entire rule is as follows:
1013: The private attribute may be used only on class property

definitions
The error is generated because of how that line of code (in bold) appears within the rest of the code. Therefore, since the line by itself is good, you would have to interpret the error description to mean that the code you have written does not properly define a class.
Adding the right brace (}) as shown next completes the class definition and eliminates all of the errors.
package {

  import flash.display.MovieClip;

  public class ErrorExample extends MovieClip{

    public function ErrorExample()

    {

      trace("sometimes errors need interpretation");

      var bigBoy:String = "The Big Boy is a steam locomotive";

    }

  }

}
You can navigate directly to the source code that is indicated in an error by clicking the Go to Source button on the bottom-right corner of the panel.
Using the Output window—strategies for tracing
In our experience, 90 percent of bugs in ActionScript come from programming the following kinds of errors:
- Scope errors
- Typos
- Timing errors
Because Flash can only tell you the errors that result from your code and not necessarily how to fix them, you may need to get creative in looking for what's causing the problem.
Hunting scope errors
As we defined in Chapter 8, the term scope refers to what parts of a program's code have the ability to reference a variable. To find an error in scope using the trace statement, simply try to trace the variable in question where you are trying reference it, and then look in the Output window to see if it has the value you expect it to have—or any value at all. If it has an unexpected value, you can move on to finding out why; if it has no value, most likely you are attempting to use a variable that does not exist within the scope of the code block where it is being referenced.
Running the following code will result in an error:
function varFunc(){

  var theVar:String = "this string will only be available in this

function because it was declared here using the var keyword";

}


function scopeErrorFunction(){

  trace(theVar);

}

varFunc();

scopeErrorFunction();
The error description 1120: Access of undefined property theVar simply means that the compiler does not know about an object (variable) called the Var within the context of the function that's trying to use it. To correct the error, you would need to declare the variable in a place where the varFunc function would have access to it as shown in the following code:
var theVar:String;


function varFunc(){

  theVar = "this string will now be available elsewhere

because it was declared elsewhere";

}


function scopeErrorFunction(){

  trace(theVar);

}

varFunc();

scopeErrorFunction();
Finding typos
Typos are usually exposed when checking syntax but can sometimes result in a scope error or the code not compiling at all. The following code will result in an error because theBar (shown in bold) does not exist. These are easy mistakes to make but can cause a significant amount of hair loss.
var theVar:String;


function varFunc(){

  theVar = "this string will now be available elsewhere

because it was declared elsewhere";

}


function scopeErrorFunction(){

  trace(theBar);

}

varFunc();

scopeErrorFunction();
Tracking timing errors
Timing errors occur when trying to reference objects or values that don't exist yet. If we continue with our previous example (correcting our typo) and switch the last two lines of code as shown next, we will see null in our Output window because the value of the variable has not been set yet.
var theVar:String;


function varFunc(){

  theVar = "this string will only be available in this

function because it was declared here using the var keyword";

}


function scopeErrorFunction(){

  trace(theVar); //null

}

scopeErrorFunction();

varFunc();
This is an extremely simplified example, as you can plainly see the functions being called in the wrong order. Most timing errors occur because Flash executes your code in a way that you may not expect. In these cases, tracing to the Output window may not give you enough information to track down exactly where or when the error is occurring. To track down this type of issue, you will want to use the Flash debugger. You might want to pay particular attention to the discussion of the call stack in the section "Understanding the call stack" later in this chapter.
Using the debugger
It may not seem like it on the surface, but as you use ActionScript to create your applications, you are actually taking advantage of a lot of ActionScript written as part of the language itself. Because of this, you may not always be aware of how Flash is executing your part of the code in turn with its own internal processes.
Additionally, you may find yourself on a project where you lack the benefit of having written the application code yourself and therefore may not know exactly where to start when attempting to fix bugs. Flash debugger helps give you this insight.
To use the Flash debugger, select Debug ![]()
Debug Movie from the application menu. This will compile your application for debugging and change your workspace to the Debug workspace shown in Figure 18-16. You can also enter the Debug workspace by using the workspace menu explained in Chapter 2.
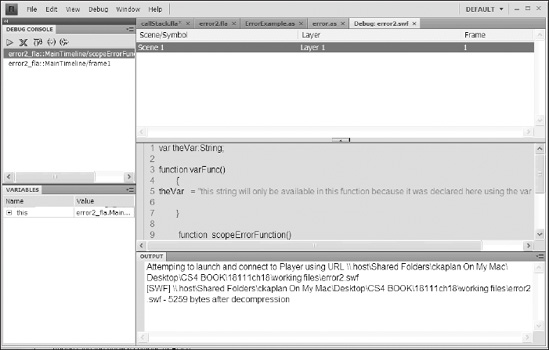
Figure 18-16. The Flash Debug workspace includes the Debug Console panel, Variables panel, script pane, and Output panel.
Setting and removing breakpoints
A breakpoint is a point you set during authoring where the debugger will stop executing code normally and wait for you to advance the program. To set a breakpoint, click in the margin of the Actions panel to the left of the line numbers. If the line numbers are not visible, click to the left of the hairline to add a breakpoint. Figure 18-17 shows a breakpoint that has been set at line 7.
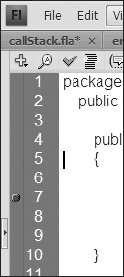
Figure 18-17. The dot (which appears red onscreen) to the left of the code line numbers is a breakpoint. The debugger will stop here during a debug session.
To turn line numbers off and on in an ActionScript document, click View ![]()
Line Numbers. If you're using the Actions panel of an FLA, click Line Numbers in the panel menu.
To remove all of the breakpoints in a given script at once, click Debug ![]()
Remove Breakpoints in This File in an ActionScript document or select Debug ![]()
Remove All Breakpoints when working in the Actions panel of an FLA. Now when you debug your movie, you'll notice that the execution of code has been stopped at your breakpoint. Figure 18-18 shows the script pane with an arrow next to the line of code where the Flash Player is paused.

Figure 18-18. The script pane with an arrow (which appears yellow onscreen) next to the line of code where the Flash Player is paused.
Understanding the call stack
While the player has stopped executing code temporarily is when you can look around and see what's going on in your program. The call stack is a list, or "stack," of all the function calls that have been made but not yet completed. This list is key in identifying timing errors, as in the example in "Tracking timing errors" earlier in this chapter, and shows what functions are being called and in what order.
You'll find the call stack in the Debug Console panel, which is shown in Figure 18-19. The topmost item in the stack is the function executed most recently.
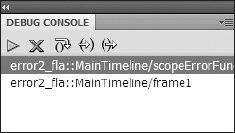
Figure 18-19. The call stack during a debug session
Now, consider the following code:
function one(){

  trace("function one");

  three();

}


function two(){

  trace("function two will be called first");

}


function three(){

  trace("this is called as function one executes");

}


two();

one();
Figure 18-19 shows the call stack as function three in the preceding code (highlighted in the call stack) is executed. Notice that after it begins execution, function one takes a second spot on the call stack while it waits for function three to complete.
This example is much easier to understand as you step through the code. So do just that. What we have are three function declarations followed by two function calls. The functions are executed in the order in which they are called. Use the call stack and breakpoints to observe the execution order.
Navigating code while debugging
At this point you want to carefully go through the execution of code one line at a time. To execute one line of code at a time, click the Step In button at the top of the Debug Console panel shown in Figure 18-20. As you step through the code, the arrow that you saw in Figure 18-18 will point to the line of code that will execute when you click the Step In button.
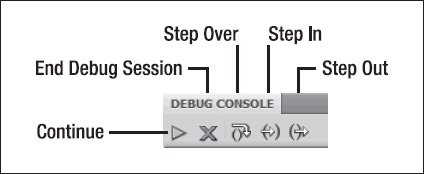
Figure 18-20. The Debug Console panel controls
As you go through the code, you may wish to skip a line altogether. To do this click the Step Over button at the top of the Debug Console panel. You can also choose to step out of the current function by clicking the Step Out button. This will take you to the line of code that would have executed after that function.
Resuming normal code execution
When you want the application to run normally until the next breakpoint is reached, click the Continue button (see Figure 18-20). And of course when you are done debugging, click the End Debug Session button (also shown in Figure 18-20).
Using the Variables panel
Understanding the call stack and knowing how to step in and out of code will only get you so far unless you can inspect the value of the variables in your code. For this we have the Variables panel. Figure 18-21 shows the Variables panel during debugging.

Figure 18-21. The Variables panel shown with main timeline (this) variables expanded. These are really the properties of the display container that is the main timeline.
To change the value of a variable during debugging, simply click the Value column next to the variable you wish to change, type in the new value, and press Enter. Changing the value of a variable as the application is running is a good way to test theories about what might be broken or to deliberately make some code function by changing the outcome of a conditional evaluation (if...then). To see the values of variables in a given function, select the function in the call stack and look in the Variables panel.
Summary
There's a lot to do before you can set your creations free on the Web, CD, DVD, or mobile device; and with so many possibilities come many, many options to consider and bugs to look out for. In this chapter we talked about the following:
- Choosing options in the
Publish Settingswindow - Managing publish profiles as well as importing and exporting profiles
- Exporting images, image sequences, and video from Flash
- Finding different types of errors in our code
- Using the
Compiler Errorspanel,Outputpanel, and debugger to track down and-correct errors