
In this chapter, the structure of the user interface of NetBeans Platform applications is discussed. You'll learn about menu construction, toolbar creation, and window system usage. As well, this chapter shows how windows and components are created, integrated, and displayed within the window system.
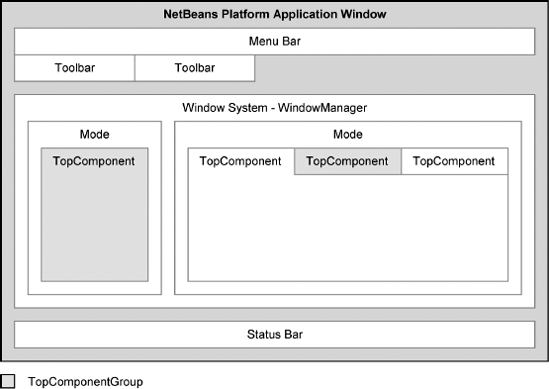
The NetBeans Platform provides a window system, which is a container that manages the menu bar, toolbars, and status bar, as well as the windows your modules make available (see Figure 5-1). The following sections discuss these components in detail.
The menu bar of an application based on the NetBeans Platform is created by the NetBeans Platform via the System Filesystem. Every menu (as well as the menu entries) is defined in a module layer file. This allows each module to declaratively add its menu entries to the menu bar. They implement the action performed when selecting a menu entry.
As an example, we will add a menu entry to the menu. The simplest way to do so is to use the Action wizard as described in Chapter 4. The class shown in Listing 5-1 is used to show how an action is added to the menu bar.
Example 5.1. Creating an action class for a menu entry
import java.awt.event.ActionEvent;
import java.awt.event.ActionListener;

public class MyFirstMenuAction implements ActionListener {
   public void actionPerformed(ActionEvent evt) {
      // do something
   }
}
The action class is registered in the layer file (see Listing 5-2), as shown in the "Always Enabled Actions" and "Registering Actions" sections in Chapter 4.
Example 5.2. Adding a menu entry in the layer file
<filesystem>
  <folder name="Actions">
    <folder name="Edit">
      <file name="com-galileo-netbeans-module-MyFirstMenuAction.instance">
         <attr name="SystemFileSystem.localizingBundle"
                 stringvalue="com.galileo.netbeans.module.Bundle"/>
         <attr name="delegate"
                 newvalue="com.galileo.netbeans.module.MyFirstMenuAction"/>
         <attr name="displayName"
                 bundlevalue="com.galileo.netbeans.module#CTL_MyFirstMenuAction"/>
         <attr name="iconBase" stringvalue="com/galileo/netbeans/module/icon.gif"/>
         <attr name="instanceCreate"
                 methodvalue="org.openide.awt.Actions.alwaysEnabled"/>
         <attr name="noIconInMenu" stringvalue="false"/>
      </file>
    </folder>
  </folder>
  <folder name="Menu">
    <folder name="Edit">
      <file name="MyFirstMenuAction.shadow">
<attr name="originalFile" stringvalue="
Actions/Edit/com-galileo-netbeans-module-MyFirstMenuAction.instance"/>
</file>
</folder>
</folder>
</filesystem>The preceding listing adds a menu entry to the Edit menu. A folder element named Edit appears in the default folder Menu. In this folder, a file element is added, which in turn adds the menu entry. The attribute originalFile references the action class declared in the default folder Actions. Since the module system combines all layer files, all menu entries declared in the Edit folder are displayed in the Edit menu. Basically, a menu is created by the simple act of declaring a folder element. This allows arbitrarily cascaded menus. It is possible to move the preceding action to a submenu of Edit (see Figure 5-2). The resulting layer file looks like Listing 5-3.
Example 5.3. Creating a submenu
<folder name="Menu">
    <folder name="Edit">
      <folder name="My Actions">
        <file name="MyFirstMenuAction.shadow">
          <attr name="originalFile" stringvalue="
            Actions/Edit/com-galileo-netbeans-module-MyFirstMenuAction.instance"/>
        </file>
      </folder>
    </folder>
  </folder>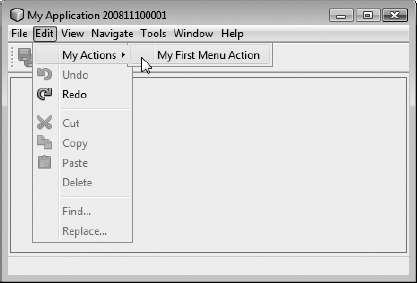
The order of menus and menu entries is defined in the layer tree. It allows the developer to drag and drop entries into desired positions. Doing that defines the entries' positions via the position attribute in the layer file. For further information, see Chapter 3.
Separators are displayed between menu entries and added directly in the layer file. To add a separator below the menu entry of the preceding section, a layer file is modified as shown in Listing 5-4.
Example 5.4. Inserting a separator in the menu
<file name="MyFirstMenuAction.shadow">
   <attr name="originalFile" stringvalue="
          Actions/Edit/com-galileo-netbeans-module-MyFirstMenuAction.instance"/>
   <attr name="position" intvalue="10"/>
</file>
<file name="javax-swing-JSeparator.instance">
   <attr name="position" intvalue="20"/>
</file>
When creating an action with the help of the Action wizard (see Chapter 4), the developer has the option of letting the wizard add a separator above as well as below the menu entry. The wizard then modifies the layer file accordingly.
To hide existing menus or menu entries originating from either the NetBeans Platform or other application modules, simply use the layer tree (see Chapter 3). Open the Important Files
Example 5.5. Hiding menu entries
<folder name="Menu">
  <folder name="View_hidden"/>
  <folder name="Edit">
    <file name="org-openide-actions-FindAction.instance_hidden"/>
  </folder>
</folder>
The suffix _hidden was added to the corresponding entries. To make these hidden entries available again, the entries are simply removed from the layer file.
When creating a menu bar to be used in a module, use the NetBeans APIs. The Data Systems API provides the MenuBar class, which is a subclass of JMenubar, and has the ability to create its content from a DataFolder object. This enables the developer to define custom menus the same way as default menus in the layer file.
To do that, create a DataFolder. The System Filesystem is accessed with the method getDefaultFileSystem() (see Listing 5-6) and searched for the root folder of the menu, in this case MyModuleMenu. Then a DataFolder object is created for the root folder by calling the static method findFolder() and passing it directly to the MenuBar constructor.
The application window of the NetBeans Platform contains a toolbar area. There you can place your own toolbars. How to create, configure, and modify toolbars is described in the following sections.
Adding actions to the toolbar is accomplished the same way actions are added to the menu bar. Toolbars are defined in the default Toolbars folder in the layer file, as shown in Listing 5-7.
Example 5.7. Creating a toolbar and adding an action
<folder name="Toolbars">
  <folder name="MyToolbar">
    <file name="MyFirstMenuAction.shadow">
      <attr name="originalFile" stringvalue="
        Actions/Edit/com-galileo-netbeans-module-MyFirstMenuAction.instance"/>
    </file>
  </folder>
</folder>
Using this entry, the new toolbar MyToolbar is defined, and a reference to the previously created and declared action in the Actions folder is added.
Which and in what order toolbars are displayed is configured in a toolbar configuration file. The DTD for that XML format is found in this book's Appendix. By default, there are three toolbars. These are defined in the Standard.xml file of the Core-UI module and look like Listing 5-8.
Example 5.8. Default NetBeans Platform toolbar configuration: Standard.xml
<Configuration>
   <Row>
      <Toolbar name="File"/>
      <Toolbar name="Edit"/>
      <Toolbar name="Memory"/>
</Row> </Configuration>
A custom configuration can be created. For example, this allows the hiding of toolbars based on context. In the configuration in Listing 5-9, the previously created toolbar named MyToolbar and the default Edit toolbar are displayed. The File toolbar is hidden. The resulting configuration looks like Listing 5-9.
Example 5.9. Custom toolbar configuration
<!DOCTYPE Configuration PUBLIC
"-//NetBeans IDE//DTD toolbar//EN"
"http://www.netbeans.org/dtds/toolbar.dtd">
<Configuration>
<Row>
<Toolbar name="Edit"/>
<Toolbar name="MyToolbar"/>
</Row>
<Row>
<Toolbar name="File" visible="false"/>
</Row>
</Configuration>This newly created configuration can be stored under any given name. The configuration is referenced in the layer file to announce its existence to the NetBeans Platform. There, the storage path relative to the layer file is declared in an attribute named url, as shown in Listing 5-10.
Example 5.10. Registering a toolbar configuration
<folder name="Toolbars">
   <file name="MyToolbarConfig.xml" url="Toolbars/MyToolbarConfig.xml"/>
</folder>
What remains to be done is to insert a line into the source code to activate the configuration displaying the desired toolbars. The module UI Utilities provides a practical API for that purpose:
ToolbarPool.getDefault().setConfiguration("MyToolbarConfig");This call happens when a window is selected displaying a context-based toolbar. That is done in the "Window: TopComponent" section, when a custom window is created.
The class ToolbarPool is responsible for managing toolbars registered in the System Filesystem. Via the call to getDefault(), you get the ToolbarPool object created by the system. It is responsible for toolbars registered in the default folder Toolbars. The provided methods are described in Table 5-1. Additionally, you can create a separate ToolbarPool object to manage toolbars registered in a separate folder. The constructor simply requires a DataFolder object. How that is achieved is shown in the "Creating Custom Toolbars" section.
Table 5.1. Useful methods of the ToolbarPool class
Method | Functionality |
|---|---|
| Returns a specific toolbar |
| Returns all toolbars available in this pool |
| Returns the name of the currently active configuration |
| Returns an array of all available configurations |
| Changes the current toolbar configuration |
| Allows sizing icons in the toolbar; valid values are 16 and 24 pixels |
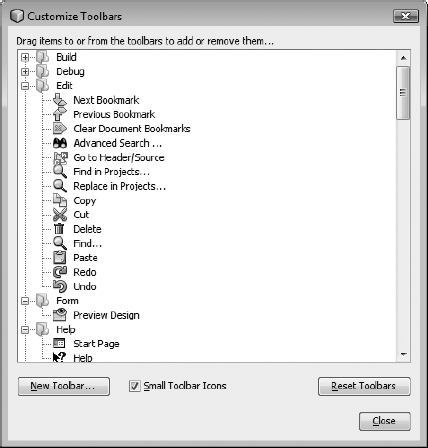
Clicking the right mouse button in the application's toolbar opens a context menu allowing the user to toggle the visibility of a toolbar (see Figure 5-3). Additionally, toolbars can be configured at runtime via the View
Like the menu bar (see the previous "Creating a Custom menu Bar" section), developers can create a custom toolbar—even a pool of toolbars. For example, these toolbars can be used in a TopComponent. The ToolbarPool class therefore offers (like the MenuBar class) a constructor to pass in a DataFolder object representing a folder of toolbars in the System Filesystem. That allows the developer to define toolbars in the same way as default toolbars. The necessary steps are shown in Listing 5-11.
Example 5.11. Creating toolbars with content read from the System Filesystem
FileSystem  sfs  = Repository.getDefault().getDefaultFileSystem();
FileObject  tbs  = sfs.findResource("MyToolbars");
ToolbarPool pool = new ToolbarPool(DataFolder.findFolder(tbs));
Further information about what components can be added to the toolbars via the System Filesystem is located in the API documentation of the ToolbarPool class.
In Chapter 4, the NetBeans superclasses for actions implementing Presenter interfaces were shown. These interfaces specify methods providing graphic representations for menus, toolbars, and pop-up menus. These representations (menu entries or buttons) are regularly provided by the CallableSystemAction superclass. If a representation other than the default toolbar action is required, the method getToolbarPresenter() from the Presenter.Toolbar interface can be overridden. Listing 5-12 shows an action class utilizing a combo box as a control element to, for example, set a zoom level.
Example 5.12. User-defined control item for the toolbar action
public class MyComboBoxAction extends CallableSystemAction {
   JComboBox box = new JComboBox(new String[]{"100%", "200%"});
   public MyComboBoxAction() {
      box.setMaximumSize(box.getPreferredSize());
      box.setAction(this);
   }
   public void performAction() {
      System.out.print("Adjust zoom to: ");
      System.out.println(box.getSelectedItem());
   }
   ...
   public Component getToolbarPresenter() {
      return box;
   }
}
The action class extends from either CallableSystemAction or from CookieAction. The custom control item is added as a private field. The maximum size of the combo box is set to its preferred size to avoid taking over the entire space of the toolbar. The connection between the action and the control item is important. That connection is achieved via the method setAction(), while passing a reference to the instance with the operator this. Upon activating the combo box, the action is executed. Lastly, the method getToolbarPresenter() returns the combo box. This way, rather than a default button, the combo box is displayed.
The window system is a framework provided by the NetBeans Platform. It is responsible for the administration and display of all application windows. It allows the user to customize the layout of the user interface.
The window system is document based. That means the central section—that is, the editor section—is all about the display of several files in tabs. View sections are placed around the editor section. Components are arranged within the view sections. Usually, these supporting windows offering edit functionality to the documents. In the case of the NetBeans IDE, these windows provide the structure of the project, the Properties dialog, and the Output window.
By default, all windows are displayed in the NetBeans main application window. Since version 6 of the NetBeans Platform, undocking windows by using the context menu or dragging the window from the application window is possible. What that looks like is shown in Figure 5-4, where the project window is undocked. Docking and undocking allows for flexible window positioning. The floating window feature is especially useful when you are using multiple monitors.
The window system is comprised of modes. A mode is a NetBeans Platform class that provides a container for windows, displayed like a tab. The windows must be subclasses of TopComponent. Every displayed window is managed by the WindowManager. Windows can be grouped as well. The assembly of the window system is described in the layer file. This entails a description of the available modes, the windows that are displayed within them, and a definition of which window belongs to which group of windows. In the following sections, these windows are described in detail. How a developer uses these is illustrated.
A module configures its windows, modes, and groups in the layer file, within the folder Windows2, as outlined in Listing 5-13.
Example 5.13. A window system configuration in the layer file
<folder name="Windows2">
   <folder name="Components">
      <file name="MyTopComponent.settings" url="MyTopComponent.settings"/>
      <file name="MyTopComponent2.settings" url="MyTopComponent2.settings"/>
   </folder>
   <folder name="Modes">
      <folder name="explorer">
         <file name="MyTopComponent.wstcref" url="MyTopComponent.wstcref"/>
      </folder>
      <file name="MyMode.wsmode" url="MyMode.wsmode"/>
      <folder name="MyMode">
         <file name="MyTopComponent2.wstcref" url="MyTopComponent2.wstcref"/>
      </folder>
   </folder>
   <folder name="Groups">
      <file name="MyGroup.wsgrp" url="MyGroup.wsgrp"/>
      <folder name="MyGroup">
<file name="MyTopComponent.wstcgrp" url="MyTopComponent.wstcgrp"/>
<file name="MyTopComponent2.wstcgrp" url="MyTopComponent2.wstcgrp"/>
</folder>
</folder>
</folder>Definitions for the windows
MyTopComponentandMyTopComponent2in theComponentsfolderA declaration that the window
MyTopComponentis associated with the Modeexplorermode, which is defined by the platformA declaration that the window
MyTopComponent2is associated with the newly created modeMyModeA group of windows named
MyGroupthat were added to the windowsMyTopComponentandMyTopComponent2
This way, a module defines its windows, associates them with modes, and groups them together. In the following sections, further details concerning different reference file types will be shown.
This configuration is the default configuration a module defines. The default configuration is used by the window system upon the first start. When exiting the application, any changes made to the layout of the application (e.g., moving a window to another mode or closing a window group) are stored in the user directory folder config/Windows2Local in a hierarchy identical to the layer file (see Figure 5-5). Upon restarting, the application settings are read first. If none exist (as is the case when starting the application for the very first time), the settings are read from the layer file.

From NetBeans Platform 6.5 onward, you have the possibility to customize the window system. You can disable several features to prevent undesired changes by the end user, such as the undocking or closing of windows.
To enable or disable these window system features, go to the Properties dialog of your NetBeans Platform Application (or Module Suite) and open the category Build
Table 5.2. Window system features and the effects of disabling them
Feature | Effect |
|---|---|
| The position of all windows is fixed. The user cannot move them to another position. |
| The Undocking feature is disabled. The user cannot move windows out of the main window. |
| The windows cannot be minimized to the left/right side or to the bottom. |
| The windows cannot be maximized (neither by double-clicking nor via the context menu). |
|
|
|
|
| The size of all windows/modes is fixed and cannot be resized by the user. |
| Windows can be resized to less than their minimum size. |
This new feature of window system customization allows you to define a consistent application layout. While in NetBeans Platform 6.5, the previously described features apply to the window system as a whole, you will be able to define them at the TopComponent level in the next NetBeans Platform release.
The Window System API provides the class TopComponent for windows that integrate into the NetBeans Platform. A subclass of JComponent, it provides optional support for window interactions with the window system. A TopComponent always exists inside a mode, and as such is dockable, is automatically managed by the WindowManager, and receives lifecycle events.
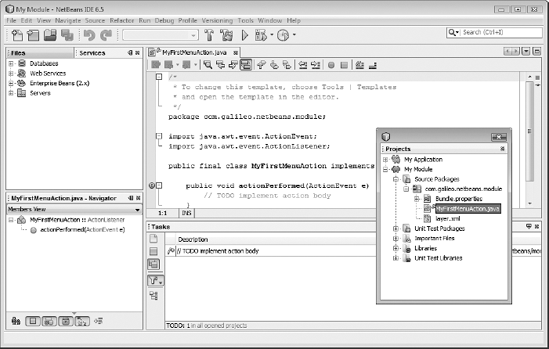
The NetBeans IDE provides a wizard for creating TopComponents. It creates a basic framework for new TopComponents and registers them in the layer file. It is started by calling File
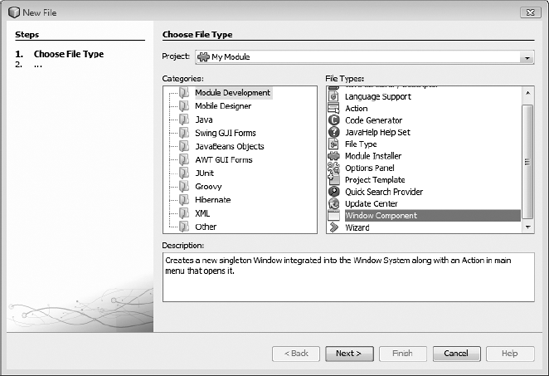
Next (step 2), the wizard prompts developers to select the mode in which the TopComponent will display. Additionally, TopComponent display can be declared upon launching the application. Initially, only modes provided by the NetBeans Platform can be selected. That selection can be replaced in the layer file by custom modes. The last step (see Figure 5-7) of the wizard has the developer declare a prefix for the class name and select an icon for the TopComponent.
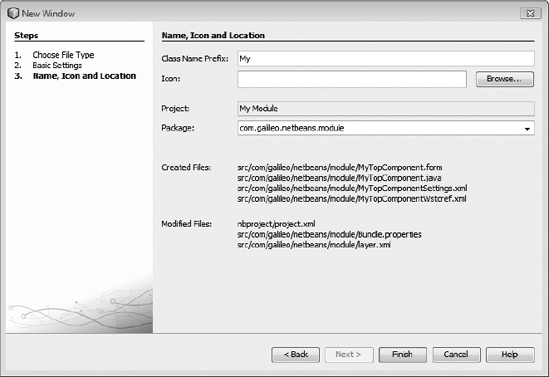
The files the wizard creates are displayed in this dialog. These files comprise the TopComponent itself and two XML files that associate the TopComponent with a mode. Those files can be examined further once the wizard is finished. Clicking Finish prompts the wizard to initiate creation of the files.
Once the wizard finishes, everything necessary has been done. The developer is free to edit the TopComponent with the Form Editor to fit the TopComponent to its desired functionality. The component can be tested by selecting Run
Examine the files the wizard created and the entries made to the layer file. First, the TopComponent is defined in the folder Windows2/Components (see Listing 5-14). This required mapping to a mode. The mapping is done in the folder Windows2/Modes.
Example 5.14. Definition and mapping of a TopComponent in the layer file
<folder name="Windows2">
   <folder name="Components">
      <file name="MyTopComponent.settings" url="MyTopComponentSettings.xml"/>
   </folder>
   <folder name="Modes">
      <folder name="editor">
         <file name="MyTopComponent.wstcref" url="MyTopComponentWstcref.xml"/>
      </folder>
   </folder>
</folder>
Defining a TopComponent in the folder Windows2/Components necessitates a .settings file. Information required by the window system to create the TopComponent is in that file. Listing 5-15 defines the method getDefault() to create an instance of the TopComponent.
Example 5.15. Settings file to declaratively add a TopComponent
<!DOCTYPE settings PUBLIC
 "-//NetBeans//DTD Session settings 1.0//EN"
 "http://www.netbeans.org/dtds/sessionsettings-1_0.dtd">
<settings version="1.0">
   <module name="com.galileo.netbeans.module" spec="1.0"/>
   <instanceof class="org.openide.windows.TopComponent"/>
   <instanceof class="com.galileo.netbeans.module.MyTopComponent"/>
   <instance class="
      com.galileo.netbeans.module.MyTopComponent" method="getDefault"/>
</settings>
Mapping a TopComponent to a mode is done using a TopComponent Reference file (see Listing 5-16). This file is created by the wizard.
Example 5.16. TopComponent Reference file mapping a TopComponent to a mode
<!DOCTYPE tc-ref PUBLIC
 "-//NetBeans//DTD Top Component in Mode Properties 2.0//EN"
 "http://www.netbeans.org/dtds/tc-ref2_0.dtd">
<tc-ref version="2.0" >
   <module name="com.galileo.netbeans.module" spec="1.0"/>
   <tc-id id="MyTopComponent"/>
   <state opened="true"/>
</tc-ref>
This file contains only the unique identifier that references the TopComponent. This identifier correlates with the name given in Windows2/Components (MyTopComponent.settings) and the PREFERRED_ID. The stated element attribute opened specifies whether the TopComponent must be opened.
With NetBeans Platform 6.5, there is no need for a separate action class to open the TopComponent. Instead, the TopComponent class has the new static method openAction(). This method can be used in the same way as the Actions.alwaysEnabled() method (described in Chapter 4). This is a very nice approach because there is no need for even a single line of code. Instead, some tags need to be added in the layer file. If you create the TopComponent with the wizard as shown previously, the necessary tags (see Listing 5-17) are added automatically.
Example 5.17. Definition of an action for opening a TopComponent
<file name="com-galileo-netbeans-module-MyAction.instance">
   <attr name="SystemFileSystem.localizingBundle"
           stringvalue="com.galileo.netbeans.module.Bundle"/>
   <attr name="component"
           methodvalue="com.galileo.netbeans.module.MyTopComponent.findInstance"/>
<attr name="displayName"
bundlevalue="com.galileo.netbeans.module.Bundle#CTL_MyAction"/>
<attr name="iconBase" stringvalue="com/galileo/netbeans/module/icon.gif"/>
<attr name="instanceCreate"
methodvalue="org.openide.windows.TopComponent.openAction"/>
</file>When looking at these tags in the layer file, it is evident that the TopComponent instance is created via the method findInstance(). This method first queries the WindowManager to check whether an instance of the TopComponent is opened. In that case, the previously created instance is returned. By default, a TopComponent is implemented as a singleton instance by the wizard. To create multiple instances of the TopComponent, it is easiest to use the wizard to create a JPanel form and change the superclass from JPanel to TopComponent. A TopComponent can be created via its constructor as well. Opening and activating remains the same as before:
TopComponent tc = new MyTopComponent();
tc.open();
tc.requestActive();
With the call to open(), the TopComponent is opened and added to the WindowManager for administration purposes. This mainly entails the process of storing and restoring the TopComponent when exiting or starting the application. The call to requestActive() leaves the TopComponent focused.
A TopComponent can dock into a specific mode directly, as outlined in Listing 5-18.
A TopComponent can have several states, as outlined in Table 5-3.
Table 5.3. Different states of a TopComponent
State | Condition |
|---|---|
| A |
| A |
| If a |
| If one |
| A |
| A |
Entering a specific state is announced via a call to one of the methods shown in Table 5-4. If a window has to perform an action in a specific state, the corresponding method simply has to be overridden.
Table 5.4. Methods for the different states
State | Method |
|---|---|
|
|
|
|
|
|
|
|
|
|
|
|
The "Configuring Toolbars" section earlier in the chapter showed how to create toolbar configurations, using them to display application-specific toolbars. Display on the currently active TopComponent is done by using two previously described methods (see Listing 5-19).
Example 5.19. Displaying and hiding toolbars based on context
public class MyTopComponent extends TopComponent {
   private String origConfig = "Standard";
   private String myConfig   = "MyToolbarConfig";

   protected void componentActivated() {
      origConfig = ToolbarPool.getDefault().getConfiguration();
      ToolbarPool.getDefault().setConfiguration(myConfig);
   }

   protected void componentDeactivated() {
      ToolbarPool.getDefault().setConfiguration(origConfig);
   }
}
If the TopComponent is focused, the method componentActivated() is called. The current configuration is stored for later reactivation. Then the toolbar configuration MyToolbarConfig (from the "Configuring Toolbars" section of the chapter) is set. When another TopComponent is selected, the TopComponent loses focus and the method componentDeactivated() is called. The stored configuration is set there to restore previous toolbars.
When clicking with the right mouse button on the title bar of a TopComponent, a context menu is displayed, with actions like, e.g., Undock Window or Close Window. These actions are obtained from the TopComponent class via its getActions() method. To add actions to this context menu, override this method (see Listing 5-20). It is useful to add the actions declaratively. In Chapter 3, we mentioned possibly adding a folder and extension points to the layer file. That is done here. The actions are declared in the layer file and read on demand in the getActions() method.
Example 5.20. Reading actions for a context menu from the layer file
public class MyTopComponent extends TopComponent {
   private List<Action> ca = null;
   @Override
   public Action[] getActions() {
      if (ca == null) {
         ca = new ArrayList<Action>(Arrays.asList(super.getActions()));
         ca.add(null); /* add separator */
         Lookup lkp = Lookups.forPath("ContextActions/MyTC");
         ca.addAll(lkp.lookupAll(Action.class));
      }
      return ca.toArray(new Action[ca.size()]);
   }
}
Firstly, the superclass's getActions() method is called to obtain default actions. With the help of the method Lookups.forPath(), a Lookup for the declared folder ContextActions/MyTC is created. The method lookupAll() then obtains all registered actions implementing the Action interface. When creating the menu, a null value is automatically replaced by a separator in the platform. The assembled list is returned as an array. The entry with the declared folder in the layer file looks like Listing 5-21.
Example 5.21. Defining context menu actions in the layer file
<folder name="ContextActions">
  <folder name="MyTC">
    <file name="MyAction1.shadow">
      <attr name="originalFile"
         stringvalue="Actions/Edit/com-galileo-netbeans-module-MyAction1.instance"/>
    </file>
    <file name="MyAction2.shadow">
<attr name="originalFile"
stringvalue="Actions/Edit/com-galileo-netbeans-module-MyAction2.instance"/>
</file>
</folder>
</folder>This method creates an extension point. Other modules add actions to the context menu by adding actions to the layer files folder ContextActions/MyTC. That allows flexibly extending the context menu from different modules without dependency.
The window system is capable of storing opened TopComponents upon exiting the application and restoring them upon restart. But there are use cases where storing the TopComponents is undesired. Defining a stored TopComponent is done via the method getPersistenceType(). This method should always be overridden. The constants listed in Table 5-5 are available as return values.
Table 5.5. Possible persistence types of a TopComponent
Constant | Property |
|---|---|
| When returning this constant, the |
| This constant defines a |
| With this constant, the |
The window system calls the Externalizable interface methods writeExternal() and readExternal() upon storing or restoring a TopComponent. Override these methods to inject TopComponent -specific data for persistence. Don't forget to call the corresponding methods from the superclass. Admittedly, this is not the preferred way of making application data persistent. A far more flexible way is offered by the Preferences API in the form of the class NbPreferences. In Chapter 9, this approach is dealt with in detail in connection with administering options and settings.
Every TopComponent from the window system is centrally managed in a registry. The interface of this registry is specified by the TopComponent.Registry interface. An instance of this registry is obtained either directly via the TopComponent class:
TopComponent.Registry registry = TopComponent.getRegistry();
or via the WindowManager:
TopComponent.Registry registry = WindowManager.getDefault().getRegistry();
This registry will return, e.g., the currently activated TopComponents via getActivated() or all opened TopComponents via getOpened(). Further, a PropertyChangeListener can be registered to globally react to, e.g., state changes of a TopComponent (see Table 5-6).
Table 5.6. Publicly accessing a TopComponent's state
Property | Condition |
|---|---|
| If a |
| If a |
| If a |
The code in Listing 5-22 adds a listener to the registry to react if a TopComponent is opened.
Example 5.22. Globally following changes of TopComponent states
public class MyTopComponent
   extends TopComponent implements PropertyChangeListener {

   private MyTopComponent() {
      TopComponent.Registry reg = TopComponent.getRegistry();
      reg.addPropertyChangeListener(WeakListeners.propertyChange(this, reg));
   }

   public void propertyChange(PropertyChangeEvent evt) {
      if(evt.getPropertyName().equals(TopComponent.Registry.PROP_OPENED))
         // TopComponent opened
   }
}The entire window system of the NetBeans Platform comprises sections, where multiple components are displayed docked in tabs. These are the previously mentioned editor and view sections. Such a section is called a mode. A mode as such is not a displayed component, but acts as controller and container for those components displayed therein. These components are of the type TopComponent. A mode is defined by the interface Mode from the Window System API.
A mode is not a fixed section, but can be defined individually via an XML file. Some important sections (e.g., the central editor section or the section where the NetBeans IDE usually opens the project view) are defined in NetBeans Platform modules. Any and all user-defined modes can be defined and added. The configuration file for a mode has the structure shown in Listing 5-23.
Example 5.23. Mode configuration file: MyMode.wsmode
<!DOCTYPE mode PUBLIC
 "-//NetBeans//DTD Mode Properties 2.3//EN"
 "http://www.netbeans.org/dtds/mode-properties2_3.dtd">
<mode version="2.3">
   <module name="com.galileo.netbeans.module" spec="1.0"/>
   <name   unique="MyMode"/>
   <kind   type="view"/>
   <state  type="joined"/>
   <constraints>
      <path orientation="vertical" number="0" weight="0.2"/>
      <path orientation="horizontal" number="0" weight="1.0"/>
   </constraints>
   <empty-behavior permanent="true"/>
</mode>
First of all, a module element declares the module to which the mode belongs. Most important is the name element, whose value is a unique identifier and matches the file name. Additionally, the way the mode displays its components is specified in the kind element. There are three different kinds: editor, view, and sliding. Figure 5-8 displays the appearance of each kind via the NetBeans IDE.
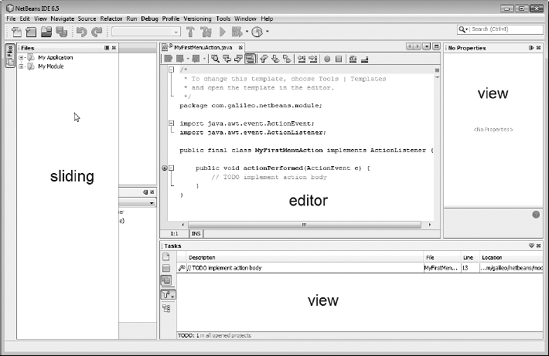
A mode of the type editor is usually centrally arranged in the application. The TopComponents arranged surrounding this editor mode are typically displayed in modes of the type view.
These windows are often called helper windows, because they offer features to, e.g., edit documents in the editor mode. Aside from differently displaying the tabs in the modes, the editor and view modes differ in that the editor type has control elements in the top-right corner for easier navigation between documents and TopComponents.
Further, there is the type sliding. The window system moves or minimizes TopComponents to the right, left, or bottom border of the application window. This is often useful when working with windows that are seldom or sporadically used. When hovering above the button of a minimized TopComponent, it opens above the opened windows and hides automatically when exiting the control element. Those windows are in a mode of the type sliding.
A mode of the type sliding additionally defines the element slidingSide. It selects borders upon which the mode is located. The following values are allowed:
<slidingSide side="left"/>
<slidingSide side="right"/>
<slidingSide side="bottom"/>
The element state defines whether the mode is docked in the application window or undocked in a separate window. Admissible values are joined for docked and separated for undocked display. When a TopComponent is undocked, its mode changes to separated.
The constraints element allows definition of dimension and position in relation to other modes. The preceding example would display the mode on the top border of the application window. Should it be on the bottom border, a bigger number (e.g., 30) is put into the attribute number. Since this number controls the position of all modes, it is helpful to take a look at the configuration files of the predefined modes for the NetBeans Platform. Some of them are in the module Core-UI.
This configuration file is added to the platform via the module's layer file. The .wsmode file is referenced in the folder Windows2/Modes (see Listing 5-24).
Example 5.24. Adding a new mode to the layer file
<folder name="Windows2">
   <folder name="Modes">
      <file name="MyMode.wsmode" url="MyMode.wsmode"/>
      <folder name="MyMode">
         <file name="MyTopComponent.wstcref" url="MyTopComponentWstcref.xml"/>
      </folder>
   </folder>
</folder>
The TopComponent is added to the new mode via the TopComponent Reference file the wizard created. This allows for flexible declarative change in the arrangement of TopComponents.
Maximize TopComponent by double-clicking the title bar in the application window. By default, all other components are changed to a sliding mode. If a component must stay in place and not move to the border, an attribute can be added to the corresponding TopComponent Reference file (.wstcref):
<docking-status maximized-mode="docked">
At runtime, the user retains ability to move TopComponents to different modes or change the dimension of a mode. The changes are stored in the user directory and restored upon restarting the application (as shown in "Configuration" subsection of the "Window System" section earlier in this chapter). Configurations are read from the layer file and the module's configuration files only if no data was stored. Invoke the Clean & Build Project command when changing configuration files during development, to refresh the user directory.
Usually, more than one window is required for certain tasks. One such case is creation of a GUI inside the NetBeans IDE. The Inspector, Palette, and Properties windows are displayed. Upon leaving the Form Editor mode, these windows are hidden. The NetBeans Platform provides the ability to assemble TopComponents into a group that enables toggling the visibility of them all. The Window System API provides the interface TopComponentGroup for this purpose. Though a group does not change the layout of the windows, nor the assembly or dimension of modes, it is responsible for opening and closing the groups' windows.
Groups manage windows in accordance with user settings, allowing the following cases:
When a group is opened, all windows not already open will be opened, if the
openattribute is set totrue.Upon closing a group, all windows will be closed that were not open prior to opening the group, and their
closeattribute will be set totrue. That means windows the user had open prior to opening the group will remain open.If a window of a group is closed by the user, the
openattribute is set tofalsewhen closing the group. When the group is reopened, the window will not be opened.If during the time a group is open, the user opens a window from the group he previously closed, the
openattribute is set totrue, opening the window when the group is reopened.
The user influences the content of a group. The preceding describes the logic behind groups somewhat confusingly, but it is more easily understood with a bit of experimenting.
Groups are defined via a Group Configuration file. They are declared in the layer file in the folder Windows2/Groups, announcing its existence to the platform. A configuration looks like Listing 5-25.
Example 5.25. The Group Configuration file: MyGroup.wsgrp
<!DOCTYPE group PUBLIC
 "-//NetBeans//DTD Group Properties 2.0//EN"
 "http://www.netbeans.org/dtds/group-properties2_0.dtd">
<group version="2.0">
<module name="com.galileo.netbeans.module" spec="1.0"/>
   <name unique="MyGroup"/>
   <state opened="false"/>
</group>
The optional module attribute declares the module groups belong to. The name attribute defines unique identifiers that must correspond to the file name. Whether the group is currently displayed is set in the state attribute. Creating the group in the layer file and referencing it to the Group Configuration file looks like Listing 5-26.
Example 5.26. Adding a group to the layer file
<folder name="Windows2">
   <folder name="Groups">
      <file name="MyGroup.wsgrp" url="MyGroup.wsgrp"/>
      <folder name="MyGroup">
         <file name="MyTopComponent.wstcgrp" url="MyTopComponent.wstcgrp"/>
      </folder>
   </folder>
</folder>
Observe that this chapter's TopComponent was added to the newly created group. It was done by declaring a Group Reference Configuration file (.wstcgrp), where the behavior of the TopComponent inside the group is declared as shown in Listing 5-27.
Example 5.27. The Group Reference Configuration file: MyTopComponent.wstcgrp
<!DOCTYPE tc-group PUBLIC
 "-//NetBeans//DTD Top Component in Group Properties 2.0//EN"
 "http://www.netbeans.org/dtds/tc-group2_0.dtd">
<tc-group version="2.0">
   <module name="com.galileo.netbeans.module" spec="1.0" />
   <tc-id id="MyTopComponent"/>
   <open-close-behavior open="true" close="true" />
</tc-group>
This file references a TopComponent via its unique identifier. The TopComponent must be declared in the layer file in the folder Windows2/Components with a .settings file, as occurs automatically when using the wizard from the "Window: TopComponent" section to create TopComponents. Behaviors considered when opening and closing are defined. Those are attributes covered in the previous section.
For each window added to the group, create such a file and make an entry in the folder of your group in the layer file. The WindowManager obtains the group, as shown in Listing 5-28.
The WindowManager is the central component of the window system. It manages modes, components, and groups, and provides an API to access its administrated components. The methods for locating components, as described in Table 5-7, are very useful.
Table 5.7. Methods locating components from the window system
Method | Description |
|---|---|
| Find a mode via its name. |
| Find the mode into which the |
| Find a |
| Get a |
| Find a |
A PropertyChangeListener can be added to the WindowManager allowing notification events when, e.g., a mode is activated. Additionally, a set of all available modes in the window system can be obtained via a call to getModes(). The main application window is accessed via the following call:
Frame main = WindowManager.getDefault().getMainWindow();
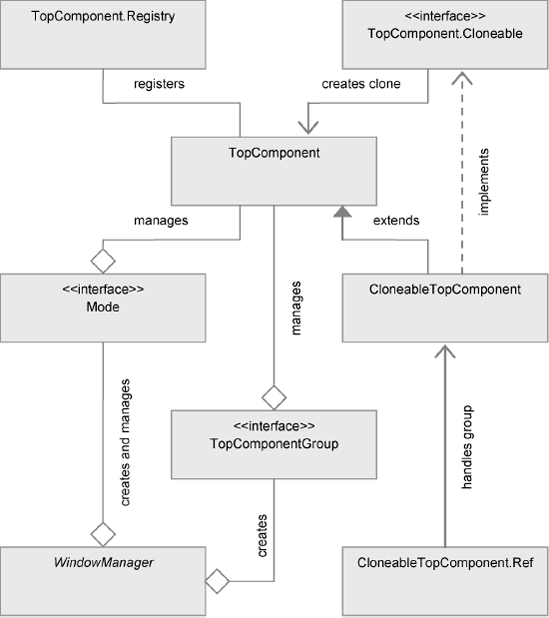
The architecture of the window system classes is outlined in Figure 5-9.
The application window of the NetBeans Platform has an integrated status bar. It can be used over a global service class. Additionally, the status bar can be extended with your own components.
The status bar is accessed via the abstract class StatusDisplayer. Obtain the default implementation via the method getDefault(). If there is none provided, the default NetBeans Platform status bar is returned. To provide a custom implementation of a status bar, see Chapter 6.
The method setStatusText() displays text on the status bar:
StatusDisplayer.getDefault().setStatusText("my first status");To react to changes concerning the status bar, a ChangeListener can be registered with the status bar.
When working with a status bar, declare a module dependency to the module UI Utilities.
To extend the status bar, use the service interface StatusLineElementProvider from the UI Utilities API. The interface declares the method getStatusLineElement(), which returns the component added to the status bar.
The service implementation is accessed via, e.g., the folder META-INF/services. The service provider implementation is shown in Chapter 6. Setting the position of the component via the attribute #position is shown as well. The code in Listing 5-29 adds a clock to the status bar.
Example 5.29. Extending the status bar with a clock
public class MyStatusLineClock
   implements StatusLineElementProvider {
   private static DateFormat format =
      DateFormat.getTimeInstance(DateFormat.MEDIUM);
   private static JLabel time = new JLabel(" " + format.format(new Date()) + " ");
   private JPanel panel = new JPanel(new BorderLayout());
   public MyStatusLineClock() {
      Timer t = new Timer(1000, new ActionListener() {
         public void actionPerformed(ActionEvent event) {
            time.setText(" " + format.format(new Date()) + " ");
         }
      });
      t.start();
      panel.add(new JSeparator(SwingConstants.VERTICAL), BorderLayout.WEST);
      panel.add(time, BorderLayout.CENTER);
   }
   public Component getStatusLineElement() {
      return(panel);
   }
}
The implementation must be made known publicly to be found by the status bar. Create a file with the name of the interface in the folder META-INF/services:
org.openide.awt.StatusLineElementProvider
Add the name of the implementation to that file:
com.galileo.netbeans.module.MyStatusLineClock
This adds the clock to the Lookup by declaratively allowing the status bar to find and add it.
By default, the NetBeans status bar has an integrated progress bar. It is used via the Progress API. There are classes available for visualizing the progress of simple tasks as well as monitoring multiple tasks that have their progress displayed as one. The progress of separate tasks can be monitored as well.
There are three displays available for a progressing task (see Figure 5-10):
A finite display of percentile progress until completion, if the number of required steps is known
A finite display of remaining seconds until completion, if the number of required steps and their total duration are known
An infinite display if neither the number nor the total duration of required steps are known

The most basic use case entails the use of ProgressHandleFactory, creating an instance of ProgressHandle for a specific task (see Listing 5-30). The ProgressHandle provides control of the display of progress.
Example 5.30. Using the progress bar for separate tasks
Runnable run = new Runnable() {
   public void run() {
      ProgressHandle p = ProgressHandleFactory.createHandle("My Task");
      p.start(100);
         // do some work
      p.progress("Step 1", 10);
         // do some more work
      p.progress(100);
      p.finish();
   }
};
Thread t = new Thread(run);
t.start(); // start the task and progress visualization
There are three different ways to start the display of a progress bar. These are outlined in Table 5-8.
Table 5.8. Methods starting the different display types
Method | Description |
|---|---|
| Lets the progress bar run until a call to the |
| Displays the progress of execution in percentiles |
| Displays the remaining time in seconds |
The methods shown in Table 5-9 allow switching between finite and infinite progress bars during runtime.
Table 5.9. Methods changing the display type
Method | Description |
|---|---|
| Switches to percentile progress display |
| Switches to time progress display |
| Switches to infinite mode |
There are several methods for creating a ProgressHandle with ProgressHandleFactory. One of these allows passing the Cancellable service interface, allowing the user to abort the task with a button displayed next to the progress bar.
createHandle(String displayName, Cancellable allowToCancel)
The suspend(String message) method pauses the progress bar and displays a message.
Additionally, the Progress API provides an extended method for monitoring progress. An AggregateProgressHandle is created via the AggregateProgressFactory. With its help, you can assemble the progress of multiple tasks and display them in a single progress bar. The class ProgressContributor is additionally required. Every task requires an instance of it to communicate current progress to the AggregateProgressHandle.
The following example shows the use of this type of progress display. A number of tasks with different durations are created for execution and display in the progress bar.
The abstract class AbstractTask extending from Thread is created. This allows the parallel execution of tasks. Executing tasks sequentially requires not extending from Thread. This abstract class takes care of creating and managing the instance of ProgressContributor and communicating current progress.
public abstract class AbstractTask extends Thread {
   protected ProgressContributor p = null;
   public AbstractTask(String id) {
      p = AggregateProgressFactory.createProgressContributor(id);
   }
   public ProgressContributor getProgressContributor() {
      return p;
   }
}
The class MyTask (which creates an example task that takes ten steps to finish) is created. The run() method is implemented, in which the task is executed and progress communicated.
public class MyTask extends AbstractTask {
   public MyTask(String id) {
      super(id);
   }
   public void run() {
      p.start(10);
      // do some work
      p.progress(5);
      // do some work
      p.progress(10);
      p.finish();
   }
}
With the MyTask2 class, another example task is created that takes more steps to finish than class MyTask.
public class MyTask2 extends AbstractTask {
   public MyTask2(String id) {
      super(id);
   }
   public void run() {
      p.start(30);
      // do some more work
      p.progress(2);
// do some more work
p.progress(15);
p.finish();
}
}Located in the MyProgram class are a list of the tasks and the processTaskList() method to execute the tasks. The constructor creates a showcase of three tasks, adding them to the task list. By calling the method processTaskList() via, e.g., a button, an array of ProgressContributor is created, and every task's ProgressContributor is added to that array. The array is then passed to the createHandle() method of AggregateProgressFactory, creating an AggregateProgressHandle. When started, the progress bar is displayed and ready to receive progress notifications from the tasks. What remains is to start the tasks. The progress bar automatically terminates when the last task is finished.
public class MyProgram {
   private Vector<AbstractTask> tasks = new Vector<AbstractTask>();
   public MyProgram() {
      tasks.add(new MyTask("Task1"));
      tasks.add(new MyTask2("Task2"));
      tasks.add(new MyTask2("Task3"));
   }
   public void processTaskList() {
      ProgressContributor cps[] = new ProgressContributor[tasks.size()];
      int i = 0;
      for(AbstractTask task : tasks) {
         cps[i] = task.getProgressContributor();
         i++;
      }
      AggregateProgressHandle aph =
         AggregateProgressFactory.createHandle(
            "MyTasks", // displayed name
            cps,       // progress contributors
            null,      // not cancelable
            null);     // no output
      aph.start();
      for(AbstractTask task : tasks) {
         task.start();
      }
   }
}
If notification events of a task's execution are required, a monitor is passed to the instance of AggregateProgressHandle. Therefore, the interface ProgressMonitor has to be implemented (see Listing 5-31) and one of its instances passed to the AggregateProgressHandle.
Example 5.31. Examining tasks via a ProgressMonitor
public class MyProgressMonitor implements ProgressMonitor {
   public void started(ProgressContributor pc) {
      System.out.println(pc.getTrackingId() + " started");
}
public void progressed(ProgressContributor pc) {
System.out.println(pc.getTrackingId() + " progressed");
}
public void finished(ProgressContributor pc) {
System.out.println(pc.getTrackingId() + " finished");
}
}
AggregateProgressHandle aph = AggregateProgressFactory.create...
aph.setMonitor(new MyProgressMonitor());When integrating a progress bar into a component, ProgressHandleFactory and AggregateProgressFactory offer three methods to get a label with the name, a label with the details, and the progress bar for a certain ProgressHandle or AggregateProgressHandle:
JLabel     createMainLabelComponent(ProgressHandle ph)
JLabel     createDetailLabelComponent(ProgressHandle ph)
JComponent createProgressComponent(ProgressHandle ph)
In this chapter, we examined user interface design on the NetBeans Platform. We began with a birds-eye view of available components, the first of which was the menu bar. You added your own menu items to the menu bar and learned to hide those available by default. Similarly, you now understand that the toolbar can also be customized via configuration files.
Looking at the window system in detail, you can understand it to be the most important part of the user interface of the NetBeans Platform, and you'll continue to encounter it throughout this book. You learned what a TopComponent is and how to work with it. In this context, we looked at modes and TopComponentGroups.
Finally, the chapter discussed usage of the status bar and progress bar, as well as their related APIs.