
In this chapter, you'll learn some of the core topics that every ASP.NET developer must master.
You'll begin by taking a closer look at the ASP.NET application model, and considering what files and folders belong in a web application. Next, you'll take a closer look at server controls, the basic building block of any web form. You'll study a simple currency converter page that demonstrates how to convert ordinary HTML into a dynamic ASP.NET-powered web page. You'll then explore the web page model, and pick up the skills you need to create controls on the fly, navigate from one page to another, and handle special characters in HTML. Finally, you'll consider the ASP.NET configuration model.
It's sometimes difficult to define exactly what a web application is. Unlike a traditional desktop program (which users start by running a stand-alone EXE file), ASP.NET applications are almost always divided into multiple web pages. This division means a user can enter an ASP.NET application at several different points or follow a link from the application to another part of the website or another web server. So, does it make sense to consider a website as an application?
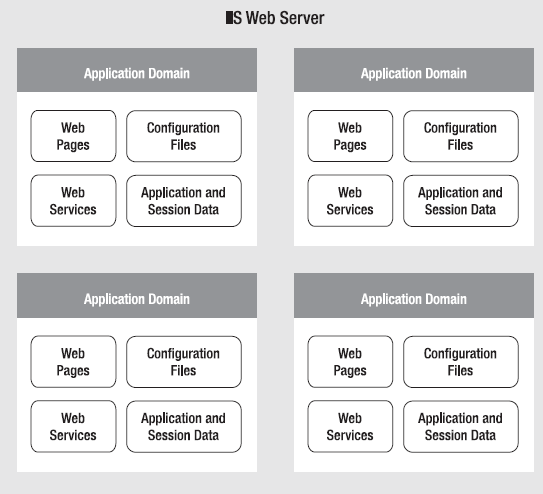
In ASP.NET, the answer is yes. Every ASP.NET application shares a common set of resources and configuration settings. Web pages from other ASP.NET applications don't share these resources, even if they're on the same web server. Technically speaking, every ASP.NET application is executed inside a separate application domain. Application domains are isolated areas in memory, and they ensure that even if one web application causes a fatal error, it's unlikely to affect any other application that is currently running on the same computer (in this case, that's the web server). Similarly, application domains restrict a web page in one application from accessing the in-memory information of another application. Each web application is maintained separately and has its own set of cached, application, and session data.
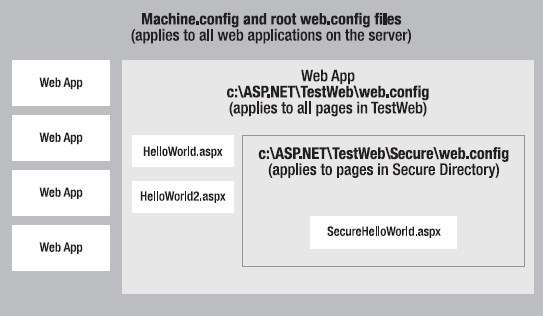
The standard definition of an ASP.NET application describes it as a combination of files, pages, handlers, modules, and executable code that can be invoked from a virtual directory (and, optionally, its subdirectories) on a web server. In other words, the virtual directory is the basic grouping structure that delimits an application. Figure 5-1 shows a web server that hosts four separate web applications.
Note
A virtual directory is a directory that's exposed to the public on a web server. As you'll discover in Chapter 26, you deploy your perfected ASP.NET web application by copying it to a virtual directory.
ASP.NET applications can include many types of files. Table 5-1 introduces the essential ingredients.
Table 5.1. ASP.NET File Types
File Name | Description |
|---|---|
Ends with .aspx | These are ASP.NET web pages (the .NET equivalent of the .asp file in an ASP application). They contain the user interface and, optionally, the underlying application code. Users request or navigate directly to one of these pages to start your web application. |
Ends with .ascx | These are ASP.NET user controls. User controls are similar to web pages, except that the user can't access these files directly. Instead, they must be hosted inside an ASP.NET web page. User controls allow you to develop a small piece of user interface and reuse it in as many web forms as you want without repetitive code. You'll learn about user controls in Chapter 11. |
web.config | This is the XML-based configuration file for your ASP.NET application. It includes settings for customizing security, state management, memory management, and much more. You'll get an introduction to the web.config file in this chapter, and you'll explore its settings throughout this book. |
global.asax | This is the global application file. You can use this file to define global variables (variables that can be accessed from any web page in the web application) and react to global events (such as when a web application first starts). You'll learn about it later in this chapter. |
Ends with .vb | These are code-behind files that contain VB code. They allow you to separate the application logic from the user interface of a web page. We'll introduce the code-behind model in this chapter and use it extensively in this book. |
In addition, your web application can contain other resources that aren't special ASP.NET files. For example, your virtual directory can hold image files, HTML files, or CSS style sheets. These resources might be used in one of your ASP.NET web pages, or they might be used independently. A website could even combine static HTML pages with dynamic ASP.NET pages.
Every web application should have a well-planned directory structure. For example, you'll probably want to store images in a separate folder from where you store your web pages. Or you might want to put public ASP.NET pages in one folder and restricted ones in another so you can apply different security settings based on the directory. (See Chapter 19 for more about how to create authorization rules like this.)
Along with the directories you create, ASP.NET also uses a few specialized subfolders, which it recognizes by name (see Table 5-2). Keep in mind that you won't see all these subfolders in a typical application. Visual Studio will prompt you to create them as needed.
Table 5.2. ASP.NET Directories
Directory | Description |
|---|---|
App_Browsers | Contains .browser files that ASP.NET uses to identify the browsers that are using your application and determine their capabilities. Usually, browser information is standardized across the entire web server, and you don't need to use this folder. For more information about ASP.NET's browser support—which is an advanced features that most ordinary web developers can safely ignore—refer to Pro ASP.NET 4 in VB 2010 (Apress). |
App_Code | Contains source code files that are dynamically compiled for use in your application. |
App_GlobalResources | Stores global resources that are accessible to every page in the web application. This directory is used in localization scenarios, when you need to have a website in more than one language. Localization isn't covered in this book, although you can refer to Pro ASP.NET 4 in VB 2010 (Apress) for more information. |
App_LocalResources | Serves the same purpose as App_GlobalResources, except these resources are accessible to a specific page only. |
App_WebReferences | Stores references to web services, which are remote code routines that a web application can call over a network or the Internet. |
App_Data | Stores data, including SQL Server Express database files (as you'll see in Chapter 14). Of course, you're free to store data files in other directories. |
App_Themes | Stores the themes that are used to standardize and reuse formatting in your web application. You'll learn about themes in Chapter 12. |
Bin | Contains all the compiled .NET components (DLLs) that the ASP.NET web application uses. For example, if you develop a custom component for accessing a database (see Chapter 22), you'll place the component here. ASP.NET will automatically detect the assembly, and any page in the web application will be able to use it. This seamless deployment model is far easier than working with traditional COM components, which must be registered before they can be used (and often reregistered when they change). |
ASP.NET introduces a remarkable new model for creating web pages. In old-style web development, programmers had to master the quirks and details of HTML before they could design a dynamic web page. Pages had to be carefully tailored to a specific task, and the only way to generate additional content was to generate raw HTML tags.
ASP.NET solves this problem with a higher-level model of server controls. These controls are created and configured as objects. They run on the web server and they automatically provide their own HTML output. Even better, server controls behave like their Windows counterparts by maintaining state and raising events that you can react to in code.
In the previous chapter, you built an exceedingly simple web page that incorporated a few controls you dragged in from the Visual Studio Toolbox. But before you create a more complex page, it's worth taking a step back to look at the big picture. ASP.NET actually provides two sets of server-side controls that you can incorporate into your web forms. These two different types of controls play subtly different roles:
- HTML server controls:
These are server-based equivalents for standard HTML elements. These controls are ideal if you're a seasoned web programmer who prefers to work with familiar HTML tags (at least at first). They are also useful when migrating ordinary HTML pages or ASP pages to ASP.NET, because they require the fewest changes.
- Web controls:
These are similar to the HTML server controls, but they provide a richer object model with a variety of properties for style and formatting details. They also provide more events and more closely resemble the controls used for Windows development. Web controls also feature some user interface elements that have no direct HTML equivalent, such as the GridView, Calendar, and validation controls.
You'll learn about web controls in the next chapter. In this chapter, you'll take a detailed look at HTML server controls.
Note
Even if you plan to use web controls exclusively, it's worth reading through this section to master the basics of HTML controls. Along the way, you'll get an introduction to a few ASP.NET essentials that apply to all kinds of server controls, including view state, postbacks, and event handling.
HTML server controls provide an object interface for standard HTML elements. They provide three key features:
- They generate their own interface:
You set properties in code, and the underlying HTML tag is created automatically when the page is rendered and sent to the client.
- They retain their state:
Because the Web is stateless, ordinary web pages need to do a lot of work to store information between requests. HTML server controls handle this task automatically. For example, if the user selects an item in a list box, that item remains selected the next time the page is generated. Or, if your code changes the text in a button, the new text sticks the next time the page is posted back to the web server.
- They fire server-side events:
For example, buttons fire an event when clicked, text boxes fire an event when the text they contain is modified, and so on. Your code can respond to these events, just like ordinary controls in a Windows application. In ASP code, everything is grouped into one block that executes from start to finish. With event-based programming, you can easily respond to individual user actions and create more structured code. If a given event doesn't occur, the event handler won't be executed.
HTML server controls are ideal when you're performing a quick translation to add server-side code to an existing HTML page. That's the task you'll tackle in the next section, with a simple one-page web application.
Figure 5-2 shows a currency converter web page. It allows the user to convert a number of U.S. dollars to the equivalent amount of euros—or at least it would, if it had the code it needed to do the job. Right now, it's just a plain, inert HTML page. Nothing happens when the button is clicked.

The following listing shows the markup for this page. To make it as clear as possible, this listing omits the style attribute of the <div> element used for the border. This page has two <input> elements: one for the text box and one for the submit button. These elements are enclosed in a <form> tag, so they can submit information to the server when the button is clicked. The rest of the page consists of static text. The character entity is used to add an extra space to separate the controls. A doctype at the top of the page declares that it's written according to the strict markup rules of XHTML 1.1.
<!DOCTYPE html PUBLIC "-//W3C//DTD XHTML 1.1//EN"
 "http://www.w3.org/TR/xhtml11/DTD/xhtml11.dtd">
<html xmlns="http://www.w3.org/1999/xhtml">
  <head>
    <title>Currency Converter</title>
  </head>
  <body>
<form method="post">
<div>
Convert:
<input type="text" />
U.S. dollars to Euros.
<br /><br />
<input type="submit" value="OK" />
</div>
</form>
</body>
</html>Note
In HTML all input controls are represented with the <input> element. You set the type attribute to indicate the type of control you want. The <input type="text"> tag is a text box, while <input type="submit"> creates a submit button for sending the web page back to the web server. This is quite a bit different than the web controls you'll see in Chapter 6, which use a different element for each type of control.
As it stands, this page looks nice but provides no functionality. It consists entirely of the user interface (HTML elements) and contains no code. It's an ordinary HTML page—not a web form.
The easiest way to convert the currency converter to ASP.NET is to start by generating a new web form in Visual Studio. To do this, select Website
In the new web form, delete everything that's currently in the .aspx file, except the page directive. The page directive gives ASP.NET basic information about how to compile the page. It indicates the language you're using for your code and the way you connect your event handlers. If you're using the code-behind approach, which is recommended, the page directive also indicates where the code file is located and the name of your custom page class.
Finally, copy all the content from the original HTML page, and paste it into the new page, right after the page directive. Here's the resulting web form, with the page directive (in bold) followed by the HTML content that's copied from the original page:
<%@ Page Language="VB" AutoEventWireup="false"CodeFile="CurrencyConverter.aspx.vb" Inherits="CurrencyConverter" %><!DOCTYPE html PUBLIC "-//W3C//DTD XHTML 1.1//EN" "http://www.w3.org/TR/xhtml11/DTD/xhtml11.dtd"> <html xmlns="http://www.w3.org/1999/xhtml"> <head> <title>Currency Converter</title> </head> <body> <form method="post"> <div> Convert: <input type="text" /> U.S. dollars to Euros. <br /><br /> <input type="submit" value="OK" /> </div> </form> </body> </html>
Now you need to add the attribute runat="server" to each tag that you want to transform into a server control. You should also add an ID attribute to each control that you need to interact with in code. The ID attribute assigns the unique name that you'll use to refer to the control in code.
In the currency converter application, it makes sense to change the input text box and the submit button into HTML server controls. In addition, the <form> element must be processed as a server control to allow ASP.NET to access the controls it contains. Here's the complete, correctly modified page:
<%@ Page Language="VB" AutoEventWireup="false"
CodeFile="CurrencyConverter.aspx.vb" Inherits="CurrencyConverter" %>
<!DOCTYPE html PUBLIC "-//W3C//DTD XHTML 1.1//EN"
"http://www.w3.org/TR/xhtml11/DTD/xhtml11.dtd">
<html xmlns="http://www.w3.org/1999/xhtml">
<head>
<title>Currency Converter</title>
</head>
<body>
<form runat="server">
<div>
Convert:
<input type="text" ID="US" runat="server" />
U.S. dollars to Euros.
<br /><br />
<input type="submit" value="OK" ID="Convert" runat="server" />
</div>
</form>
</body>
</html>Note
Most ASP.NET controls must be placed inside the <form> section in the page. The <form> element is a part of the standard for HTML forms, and it allows the browser to send information to the web server.
The web page still won't do anything when you run it, because you haven't written any code. However, now that you've converted the static HTML elements to HTML server controls, you're ready to work with them.
To try this page, launch it in Visual Studio by pressing F5. Remember, the first time you run your web application you'll be prompted to let Visual Studio modify your web.config file to allow debugging. Click OK to accept its recommendation and launch your web page in the browser. Then, select View
The first thing you'll notice is that the HTML that was sent to the browser is slightly different from the information in the .aspx file. First, the runat="server" attributes are stripped out (because they have no meaning to the client browser, which can't interpret them). Second, and more important, an additional hidden field has been added to the form. Here's what you'll see (in a slightly simplified form):
<!DOCTYPE html PUBLIC "-//W3C//DTD XHTML 1.1//EN"
"http://www.w3.org/TR/xhtml11/DTD/xhtml11.dtd">
<html xmlns="http://www.w3.org/1999/xhtml">
<head>
<title>Currency Converter</title>
</head>
<body><form id="form1" method="post" action="CurrencyConverter.aspx">
<div>
<input type="hidden" ID="__VIEWSTATE" name="__VIEWSTATE"
value="dDw3NDg2NTI5MDg7Oz4=" />
</div>
<div>
Convert:
<input type="text" ID="US" name="US" />
U.S. dollars to Euros.
<br /><br />
<input type="submit" value="OK" ID="Convert" name="Convert" />
</div>
</form>
</body>
</html>This hidden field stores information, in a compressed format, about the state of every control in the page. It allows you to manipulate control properties in code and have the changes automatically persisted across multiple trips from the browser to the web server. This is a key part of the web forms programming model. Thanks to view state, you can often forget about the stateless nature of the Internet and treat your page like a continuously running application.
Even though the currency converter program doesn't yet include any code, you'll already notice one change. If you enter information in the text box and click the submit button to post the page, the refreshed page will still contain the value you entered in the text box. (In the original example that uses ordinary HTML elements, the value will be cleared every time the page is submitted.) This change occurs because ASP.NET controls automatically retain their state.
Before you can continue any further with the currency converter, you need to know about the control objects you've created. All the HTML server controls are defined in the System.Web.UI.HtmlControls namespace. Each kind of control has a separate class. Table 5-3 describes the basic HTML server controls and shows you the related HTML element.
Table 5.3. The HTML Server Control Classes
Class Name | HTML Element | Description |
|---|---|---|
HtmlForm | <form> | Wraps all the controls on a web page. All ASP.NET server controls must be placed inside an HtmlForm control so that they can send their data to the server when the page is submitted. Visual Studio adds the <form> element to all new pages. When designing a web page, you need to ensure that every other control you add is placed inside the <form> section. |
HtmlAnchor | <a> | A hyperlink that the user clicks to jump to another page. |
HtmlImage | <img> | A link that points to an image, which will be inserted into the web page at the current location. |
HtmlTable, HtmlTableRow, and HtmlTableCell | <table>, <tr>, <th>, and <td> | A table that displays multiple rows and columns of static text. |
HtmlInputButton, HtmlInputSubmit, and HtmlInputReset | <input type="button">, <input type="submit">, and <input type="reset"> | A button that the user clicks to perform an action (HtmlInputButton), submit the page (HtmlInputSubmit), or clear all the user-supplied values in all the controls (HtmlInputReset). |
HtmlButton | <button> | A button that the user clicks to perform an action. This is not supported by all browsers, so HtmlInputButton is usually used instead. The key difference is that the HtmlButton is a container element. As a result, you can insert just about anything inside it, including text and pictures. The HtmlInputButton, on the other hand, is strictly text-only. |
HtmlInputCheckBox | <input type="checkbox"> | A check box that the user can check or clear. Doesn't include any text of its own. |
HtmlInputRadioButton | <input type="radio"> | A radio button that can be selected in a group. Doesn't include any text of its own. |
HtmlInputText and HtmlInputPassword | <input type="text"> and <input type="password"> | A single-line text box where the user can enter information. Can also be displayed as a password field (which displays bullets instead of characters to hide the user input). |
HtmlTextArea | <textarea> | A large text box where the user can type multiple lines of text. |
HtmlInputImage | <input type="image"> | Similar to the <img> tag, but inserts a "clickable" image that submits the page. Using server-side code, you can determine exactly where the user clicked in the image—a technique you'll consider later in this chapter. |
HtmlInputFile | <input type="file"> | A Browse button and text box that can be used to upload a file to your web server, as described in Chapter 17. |
HtmlInputHidden | <input type="hidden"> | Contains text information that will be sent to the server when the page is posted back but won't be visible in the browser. |
HtmlSelect | <select> | A drop-down or regular list box where the user can select an item. |
HtmlHead and HtmlTitle | <head> and <title> | Represents the header information for the page, which includes information about the page that isn't actually displayed in the page, such as search keywords and the web page title. These are the only HTML server controls that aren't placed in the <form> section. |
HtmlGenericControl | Any other HTML element. | This control can represent a variety of HTML elements that don't have dedicated control classes. For example, if you add the runat="server" attribute to a <div> element, it's provided to your code as an HtmlGenericControl object. You can identify the type of element by reading the TagName property, which stores a string (for example, "div"). |
Remember, there are two ways to add any HTML server control. You can add it by hand to the markup in the .aspx file (simply insert the ordinary HTML element, and add the runat="server" attribute). Alternatively, you can drag the control from the HTML tab of the Toolbox, and drop it onto the design surface of a web page in Visual Studio. This approach doesn't work for every HTML server control, because they don't all appear in the HTML tab.
So far, the currency converter defines three controls, which are instances of the HtmlForm, HtmlInputText, and HtmlInputButton classes, respectively. It's useful to know the class names if you want to look up information about these classes in the Visual Studio Help. Table 5-4 gives a quick overview of some of the most important control properties.
Table 5.4. Important HTML Control Properties
Control | Most Important Properties |
|---|---|
HtmlAnchor | HRef, Name, Target, Title |
HtmlImage | Src, Alt, Align, Border, Width, Height |
HtmlInputCheckBox and HtmlInputRadioButton | Checked |
HtmlInputText | Value |
HtmlTextArea | Value |
HtmlInputImage | Src, Alt, Align, Border |
HtmlSelect | Items (collection) |
HtmlGenericControl | InnerText and InnerHtml |
To actually add some functionality to the currency converter, you need to add some ASP.NET code. Web forms are event-driven, which means every piece of code acts in response to a specific event. In the simple currency converter page example, the most useful event occurs when the user clicks the submit button (named Convert). The HtmlInputButton allows you to react to this action by handling the ServerClick event.
Before you continue, it makes sense to add another control that can display the result of the calculation. In this case, you can use a <p> element named Result. The <p> element is one way to insert a block of formatted text into a web page. Here's the HTML that you'll need:
<p style="font-weight: bold" ID="Result" runat="server">/p>
The style attribute applies the CSS properties used to format the text. In this example, it merely applies a bold font.
The example now has the following four server controls:
A form (HtmlForm object). This is the only control you do not need to access in your code-behind class.
An input text box named US (HtmlInputText object).
A submit button named Convert (HtmlInputButton object).
A <p> element named Result (HtmlGenericControl object).
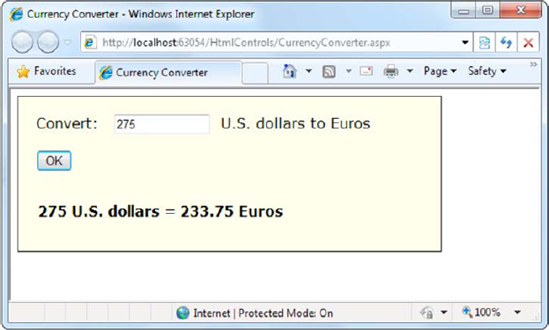
Listing 5-1 shows the revised web page (CurrencyConverter.aspx), but leaves out the doctype to save space. Listing 5-2 shows the code-behind class (CurrencyConverter.aspx.vb). The code-behind class includes an event handler that reacts when the convert button is clicked. It calculates the currency conversion and displays the result.
Example 5.1. CurrencyConverter.aspx
<%@ Page Language="VB" AutoEventWireup="false"
CodeFile="CurrencyConverter.aspx.vb" Inherits="CurrencyConverter" %>
<html xmlns="http://www.w3.org/1999/xhtml">
<head>
<title>Currency Converter</title>
</head>
<body>
<form runat="server">
<div>
Convert:
<input type="text" ID="US" runat="server" />
U.S. dollars to Euros.
<br /><br />
<input type="submit" value="OK" ID="Convert" runat="server" />
<br /><br />
<p style="font-weight: bold" ID="Result" runat="server"></p>
</div>
</form>
</body>
</html>Example 5.2. CurrencyConverter.aspx.vb
Public Partial Class CurrencyConverter
    Inherits System.Web.UI.Page

    Protected Sub Convert_ServerClick(ByVal sender As Object, _
      ByVal e As System.EventArgs) Handles Convert.ServerClick
        Dim USAmount As Double = Val(US.Value)
        Dim EuroAmount As Double = USAmount * 0.85
        Result.InnerText = USAmount.ToString() & " U.S. dollars = "
        Result.InnerText &= EuroAmount.ToString() & " Euros."
    End Sub
End Class
The code-behind class is a typical example of an ASP.NET page. You'll notice the following conventions:
The page class is defined with the Partial keyword. That's because your class code is merged with another code file that you never see. This extra code, which ASP.NET generates automatically, defines all the server controls that are used on the page. This allows you to access them by name in your code.
The page defines a single event handler. This event handler retrieves the value from the text box, converts it to a numeric value, multiplies it by a preset conversion ratio (which would typically be stored in another file or a database), and sets the text of the <p> element. You'll notice that the event handler accepts two parameters (sender and e). This is the .NET standard for all control events. It allows your code to identify the control that sent the event (through the sender parameter) and retrieve any other information that may be associated with the event (through the e parameter). You'll see examples of these advanced techniques in the next chapter, but for now, it's important to realize that you won't be allowed to handle an event unless your event handler has the correct, matching signature.
The event handler is connected to the control event using the Handles keyword in the event handler declaration. Usually, you'll let Visual Studio add this code in automatically, as described in the previous chapter.
Note
Unlike with web controls, you can't create event handlers for HTML server controls using the Properties window. Instead, you must type the method in by hand, making sure to include the Handles clause at the end. Another option is to use the two drop-down lists at the top of the code window. To take this approach, choose the control in the list on the left (for example, Convert), and then choose the event you want to handle in the list on the right (for example, ServerClick). Visual Studio will create the corresponding event handler.
The
&=operator is used to quickly add information to the end of the label, without replacing the existing text.The event handler uses ToString() to convert the numeric value to text. You can perform the conversion without using ToString(), because VB is kind enough to implicitly convert a number to text as needed. However, it's always a good idea to handle these conversions explicitly to prevent unexpected errors. (For example, adding the strings "2" and "1" can produce a result of 3 or 21, depending on whether the conversion is made before or after the addition.)
You can launch this page to test your code. When you enter a value and click the OK button, the page is resubmitted, the event handling code runs, and the page is returned to you with the conversion details (see Figure 5-3).
So, what really happens when ASP.NET receives a request for the CurrencyConverter.aspx page? The process actually unfolds over several steps:
First, the request for the page is sent to the web server. If you're running a live site, the web server is almost certainly IIS, which you'll learn more about in Chapter 26. If you're running the page in Visual Studio, the request is sent to the built-in test server.
The web server determines that the .aspx file extension is registered with ASP.NET. If the file extension belonged to another service (as it would for .asp or .html files), ASP.NET would never get involved.
If this is the first time a page in this application has been requested, ASP.NET automatically creates the application domain. It also compiles all the web page code for optimum performance, and caches the compiled files. If this task has already been performed, ASP.NET will reuse the compiled version of the page.
The compiled CurrencyConverter.aspx page acts like a miniature program. It starts firing events (most notably, the Page.Load event). However, you haven't created an event handler for that event, so no code runs. At this stage, everything is working together as a set of in-memory .NET objects.
When the code is finished, ASP.NET asks every control in the web page to render itself into the corresponding HTML markup.
Tip
In fact, ASP.NET performs a little sleight of hand and may customize the output with additional client-side JavaScript or DHTML if it detects that the client browser supports it. In the case of CurrencyConverter.aspx, the output of the page is too simple to require this type of automatic tweaking.
The final page is sent to the user, and the application ends.
The description is lengthy, but it's important to start with a good understanding of the fundamentals. When you click a button on the page, the entire process repeats itself. However, in step 4 the ServerClick event fires for the HtmlInputButton right after the Page.Load event, and your code runs.
Figure 5-4 illustrates the stages in a web page request.
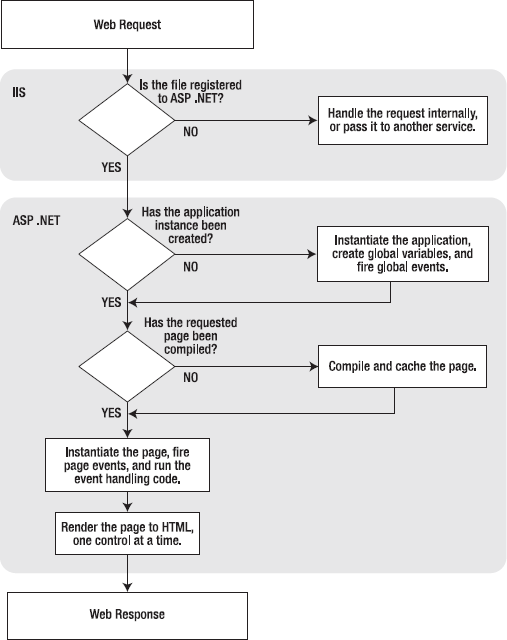
The most important detail is that your code works with objects. The final step is to transform these objects into the appropriate HTML output. A similar conversion from objects to output happens with a Windows program in .NET, but it's so automatic that programmers rarely give it much thought. Also, in those environments, the code always runs locally. In an ASP.NET application, the code runs in a protected environment on the server. The client sees the results only once the web page processing has ended and the web page object has been released from memory.
Now that you've looked at the basic server controls, it might seem that their benefits are fairly minor compared with the cost of learning a whole new system of web programming. In the next section, you'll start to extend the currency converter application. You'll see how you can "snap in" additional functionality to the existing program in an elegant, modular way. As the program grows, ASP.NET handles its complexity easily, steering you away from the tangled and intricate code that would be required in old-style ASP applications.
The first task is to allow the user to choose a destination currency. In this case, you need to use a drop-down list box. In HTML, a drop-down list is represented by a <select> element that contains one or more <option> elements. Each <option> element corresponds to a separate item in the list.
To reduce the amount of HTML in the currency converter, you can define a drop-down list without any list items by adding an empty <select> tag. As long as you ensure that this <select> tag is a server control (by giving it an ID and adding the runat="server" attribute), you'll be able to interact with it in code and add the required items when the page loads.
Here's the revised HTML for the CurrencyConverter.aspx page:
<%@ Page Language="VB" AutoEventWireup="false"
CodeFile="CurrencyConverter.aspx.vb" Inherits="CurrencyConverter" %>
<html xmlns="http://www.w3.org/1999/xhtml">
<head>
<title>Currency Converter</title>
</head>
<body>
<form runat="server">
<div>
Convert:
<input type="text" ID="US" runat="server" />
U.S. dollars to
<select ID="Currency" runat="server" />
<br /><br />
<input type="submit" value="OK" ID="Convert" runat="server" />
<br /><br />
<p style="font-weight: bold" ID="Result" runat="server"></p>
</div>
</form>
</body>
</html>Note
Up until this point, the samples in this book have included an XHTML doctype. Now that you're familiar with this ingredient, there's no reason to keep repeating it. In the rest of this book, the doctype is left out of the web page markup to save space. Of course, you'll still see it if you download the sample code.
The currency list can now be filled using code at runtime. In this case, the ideal event is the Page.Load event, which is fired at the beginning of the page processing sequence. Here's the code you need to add to the CurrencyConverter page class:
Protected Sub Page_Load(ByVal sender As Object, ByVal e As System.EventArgs) _
  Handles Me.Load
    If Me.IsPostBack = False Then
        Currency.Items.Add("Euro")
        Currency.Items.Add("Japanese Yen")
        Currency.Items.Add("Canadian Dollar")
    End If
End SubThis example illustrates two important points:
You can use the Items property to get items in a list control. This allows you to append, insert, and remove <option> elements (which represent the items in the list). Remember, when generating dynamic content with a server control, you set the properties, and the control creates the appropriate HTML tags.
Before adding any items to this list, you need to make sure this is the first time the page is being served to this particular user. Otherwise, the page will continuously add more items to the list or inadvertently overwrite the user's selection every time the user interacts with the page. To perform this test, you check the IsPostBack property of the current Page. In other words, IsPostback is a property of the CurrencyConverter class, which CurrencyConverter inherits from the generic Page class. If IsPostBack is False, the page is being created for the first time, and it's safe to initialize it.
Of course, if you're a veteran HTML coder, you know that each item in a list also provides a value attribute that you can use to store a value for each item in the list. Because the currency converter uses a short list of hard-coded currencies, this is an ideal place to store the currency conversion rate.
To set the value attribute, you need to create a ListItem object for every item in the list and add that to the HtmlSelect control. The ListItem class provides a constructor that lets you specify the text and value at the same time that you create it, thereby allowing condensed code like this:
Protected Sub Page_Load(ByVal sender As Object, ByVal e As System.EventArgs) _
Handles Me.Load
If Me.IsPostBack = False Then
' The HtmlSelect control accepts text or ListItem objects.
Currency.Items.Add(New ListItem("Euros", "0.85"))
Currency.Items.Add(New ListItem("Japanese Yen", "110.33"))
Currency.Items.Add(New ListItem("Canadian Dollars", "1.2"))
End If
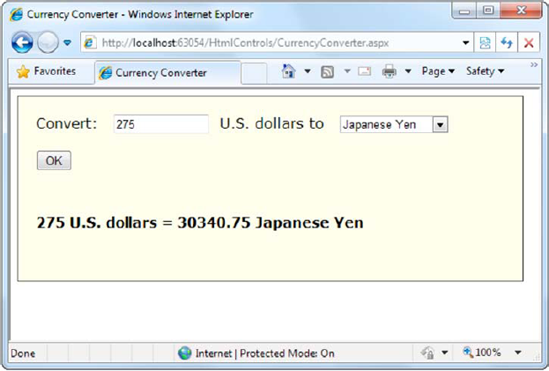
End SubTo complete the example, you must rewrite the calculation code to take the selected currency into account, as follows:
Protected Sub Convert_ServerClick(ByVal sender As Object, _
ByVal e As System.EventArgs) Handles Convert.ServerClick
Dim oldAmount As Double = Val(US.Value)
' Retrieve the selected ListItem object by its index number.
Dim item As ListItem = Currency.Items(Currency.SelectedIndex)
Dim newAmount As Double = oldAmount * Val(item.Value)
Result.InnerText = oldAmount.ToString() & " U.S. dollars = "
Result.InnerText &= newAmount.ToString() & " " & item.Text
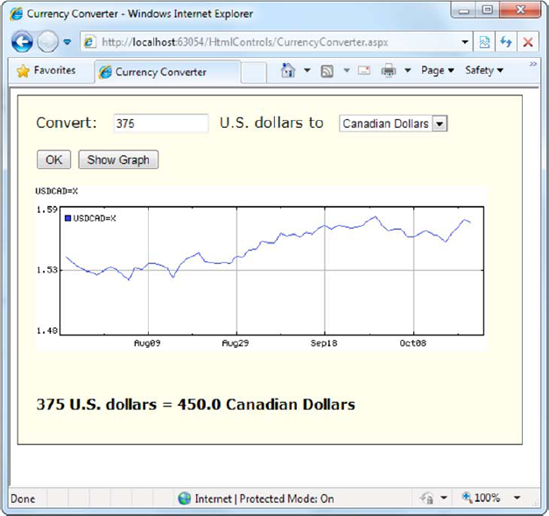
End SubFigure 5-5 shows the revamped currency converter.
All in all, this is a good example of how you can store information in HTML tags using the value attribute. However, in a more sophisticated application, you probably wouldn't store the currency rate. Instead, you would just store some sort of unique identifying ID value. Then, when the user submits the page, you would retrieve the corresponding conversion rate from a database or some other storage location (such as an in-memory cache).
Adding other functionality to the currency converter is just as easy as adding a new button. For example, it might be useful for the utility to display a currency conversion rate graph. To provide this feature, the program would need an additional button and image control.
Here's the revised HTML:
<%@ Page Language="VB" AutoEventWireup="false"
CodeFile="CurrencyConverter.aspx.vb" Inherits="CurrencyConverter" %>
<html xmlns="http://www.w3.org/1999/xhtml">
<head>
<title>Currency Converter</title>
</head>
<body>
<form runat="server">
<div>
Convert:
<input type="text" ID="US" runat="server" />
U.S. dollars to
<select ID="Currency" runat="server" />
<br /><br />
<input type="submit" value="OK" ID="Convert" runat="server" />
<input type="submit" value="Show Graph" ID="ShowGraph" runat="server" />
<br /><br />
<img ID="Graph" src="" alt="Currency Graph" runat="server" />
<br /><br />
<p style="font-weight: bold" ID="Result" runat="server"></p>
</div>
</form>
</body>
</html>As it's currently declared, the image doesn't refer to a picture. For that reason, it makes sense to hide it when the page is first loaded by using this code:
Protected Sub Page_Load(ByVal sender As Object, ByVal e As System.EventArgs) _
  Handles Me.Load
    If Me.IsPostBack = False Then
        Currency.Items.Add(New ListItem("Euros", "0.85"))
        Currency.Items.Add(New ListItem("Japanese Yen", "110.33"))
        Currency.Items.Add(New ListItem("Canadian Dollars", "1.2"))

        Graph.Visible = False
    End If
End Sub
Interestingly, when a server control is hidden, ASP.NET omits it from the final HTML page.
Now you can handle the click event of the new button to display the appropriate picture. The currency converter has three possible picture files—pic0.png, pic1.png, and pic2.png. It chooses one based on the index of the selected item (so it uses pic0.png if the first currency is selected, pic1.png for the second, and so on). Here's the code that shows the chart:
Protected Sub ShowGraph_ServerClick(ByVal sender As Object, _
  ByVal e As System.EventArgs) Handles ShowGraph.ServerClick
    Graph.Src = "Pic" & Currency.SelectedIndex.ToString() & ".png"
    Graph.Visible = True
End Sub
You'll also need to change the graph picture when the currency is changed, using this line of code in the Convert_ServerClick()method:
Graph.Src = "Pic" & Currency.SelectedIndex.ToString() & ".png"
If this were a more complex task (for example, one that required multiple lines of code), it would make sense to put it in a separate private method. You could then call that method from both the ShowGraph_ServerClick() and Convert_ServerClick() event handling methods, making sure you don't duplicate your code.
Already the currency converter is beginning to look more interesting, as shown in Figure 5-6.
In addition to a limited set of properties, each HTML control also provides access to the CSS attributes through its Style collection. To use this collection, you need to specify the name of the CSS style attribute and the value you want to assign to it. Here's the basic syntax:
ControlName.Style("AttributeName") = "AttributeValue"For example, you could use this technique to emphasize an invalid entry in the currency converter with the color red. In this case, you'll also need to reset the color to its original value for valid input, because the control uses view state to remember all its settings, including its style properties:
Protected Sub Convert_ServerClick(ByVal sender As Object, _
  ByVal e As System.EventArgs) Handles Convert.ServerClick

    Dim oldAmount As Double = Val(US.Value)

    If oldAmount <= 0 Then
        Result.Style("color") = "Red"
        Result.InnerText = "Specify a positive number"
    Else
        Result.Style("color") = "Black"

        ' Retrieve the selected ListItem object by its index number.
        Dim item As ListItem = Currency.Items(Currency.SelectedIndex)

        Dim newAmount As Double = oldAmount * Val(item.Value)
        Result.InnerText = oldAmount.ToString() & " U.S. dollars = "
        Result.InnerText &= newAmount.ToString() & " " & item.Text
    End If

End Sub
Tip
The Style collection sets the style attribute in the HTML tag with a list of formatting options such as font family, size, and color. You'll learn more in Chapter 12. But if you aren't familiar with CSS styles, you don't need to learn them now. Instead, you could use web controls, which provide higher-level properties that allow you to configure their appearance and automatically create the appropriate style attributes. You'll learn about web controls in the next chapter.
This concludes the simple currency converter application, which now boasts automatic calculation, linked images, and dynamic formatting. In the following sections, you'll look at the building blocks of ASP.NET interfaces more closely.
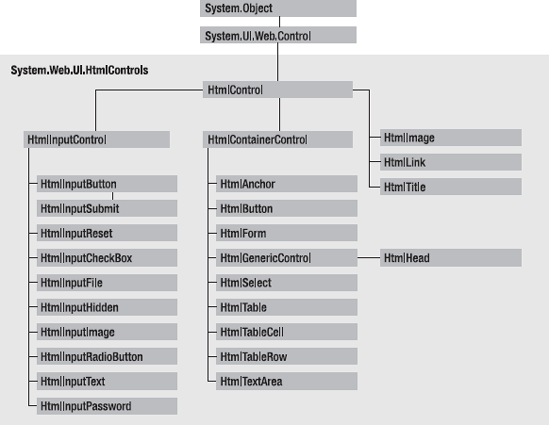
Related classes in the .NET Framework use inheritance to share functionality. For example, every HTML control inherits from the base class HtmlControl. The HtmlControl class provides essential features every HTML server control uses. Figure 5-7 shows the inheritance diagram.
The next few sections dissect the ASP.NET classes that are used for HTML server controls. You can use this material to help understand the common elements that are shared by all HTML controls. For the specific details about each HTML control, you can refer to the class library reference in the Visual Studio Help.
HTML server controls generally provide properties that closely match their tag attributes. For example, the HtmlImage class provides Align, Alt, Border, Src, Height, and Width properties. For this reason, users who are familiar with HTML syntax will find that HTML server controls are the most natural fit. Users who aren't as used to HTML will probably find that web controls (described in the next chapter) have a more intuitive set of properties.
HTML server controls also provide one of two possible events: ServerClick or ServerChange.
The ServerClick is simply a click that's processed on the server side. It's provided by most button controls, and it allows your code to take immediate action. For example, consider the HtmlAnchor control, which is the server control that represents the common HTML hyperlink (the <a> element).
There are two ways to use the HtmlAnchor control. One option is to set its HtmlAnchor.HRef property to a URL, in which case the hyperlink will behave exactly like the ordinary HTML <a> element (the only difference being that you can set the URL dynamically in your code). The other option is to handle the HtmlAnchor.ServerClick event. In this case, when the link is clicked it will actually post back the page, allowing your code to run. The user won't be redirected to a new page unless you provide extra code to forward the request.
The ServerChange event responds when a change has been made to a text or selection control. This event isn't as useful as it appears because it doesn't occur until the page is posted back (for example, after the user clicks a submit button). At this point, the ServerChange event occurs for all changed controls, followed by the appropriate ServerClick. The Page.Load event is the first to fire, but you have no way to know the order of events for other controls.
Table 5-5 shows which controls provide a ServerClick event and which ones provide a ServerChange event.
Chapter 4 introduced the .NET event standard, which dictates that every event should pass exactly two pieces of information. The first parameter identifies the object (in this case, the control) that fired the event. The second parameter is a special object that can include additional information about the event.
In the examples you've looked at so far, the second parameter (e) has always been used to pass an empty System.EventArgs object. This object doesn't contain any additional information—it's just a glorified placeholder. Here's one such example:
Protected Sub Convert_ServerClick(ByVal sender As Object, _
  ByVal e As EventArgs) Handles Convert.ServerClick
    ...
End Sub
In fact, only one HTML server control sends additional information: the HtmlInputImage control. It sends an ImageClickEventArgs object (from the System.Web.UI namespace) that provides X and Y properties representing the location where the image was clicked. You'll notice that the definition for the HtmlInputImage.ServerClick event handler is a little different from the event handlers used with other controls:
Protected Sub ImgButton_ServerClick(ByVal sender As Object, _
  ByVal e As ImageClickEventArgs) Handles ImgButton.ServerClick
    ...
End Sub
Using this additional information, you can replace multiple button controls and image maps with a single, intelligent HtmlInputImage control.
Here's the markup you need to create the HtmlInputImage control for this example:
<input type="image" ID="ImgButton" runat="server" src="button.png" />
The sample ImageTest.aspx page shown in Figure 5-8 puts this feature to work with a simple graphical button. Depending on whether the user clicks the button border or the button surface, a different message is displayed.
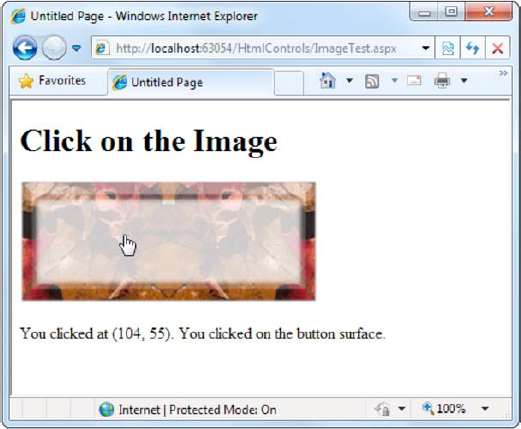
The page code examines the click coordinates provided by the ImageClickEventArgs object and displays them in another control. Here's the page code you need:
Public Partial Class ImageTest
    Inherits System.Web.UI.Page

    Protected Sub ImgButton_ServerClick(ByVal sender As Object, _
      ByVal e As ImageClickEventArgs) Handles ImgButton.ServerClick

        Result.InnerText = "You clicked at (" & e.X.ToString() & _
          ", " & e.Y.ToString() & "). "

        If e.Y < 100 And e.Y > 20 And e.X > 20 And e.X < 275 Then
            Result.InnerText &= "You clicked on the button surface."
        Else
            Result.InnerText &= "You clicked the button border."
        End If
    End Sub
End ClassEvery HTML control inherits from the base class HtmlControl. This relationship means that every HTML control will support a basic set of properties and features. Table 5-6 shows these properties.
Table 5.6. HtmlControl Properties
Property | Description |
|---|---|
Attributes | Provides a collection of all the attributes that are set in the control tag, and their values. Rather than reading or setting an attribute through the Attributes, it's better to use the corresponding property in the control class. However, the Attributes collection is useful if you need to add or configure a custom attribute or an attribute that doesn't have a corresponding property. |
Controls | Provides a collection of all the controls contained inside the current control. (For example, a <div> server control could contain an <input> server control.) Each object is provided as a generic System.Web.UI.Control object so that you may need to cast the reference to access control-specific properties. |
Disabled | Disables the control when set to True, thereby ensuring that the user cannot interact with it, and its events will not be fired. |
EnableViewState | Disables the automatic state management for this control when set to False. In this case, the control will be reset to the properties and formatting specified in the control tag every time the page is posted back. If this is set to True (the default), the control stores its state in a hidden input field on the page, thereby ensuring that any changes you make in code are remembered. (For more information, see the "View State" section earlier in this chapter.) |
Page | Provides a reference to the web page that contains this control as a System.Web.UI.Page object. |
Parent | Provides a reference to the control that contains this control. If the control is placed directly on the page (rather than inside another control), it will return a reference to the page object. |
Style | Provides a collection of CSS style properties that can be used to format the control. |
TagName | Indicates the name of the underlying HTML element (for example, img or div). |
Visible | Hides the control when set to False and will not be rendered to the final HTML page that is sent to the client. |
The HtmlControl class also provides built-in support for data binding, which you'll examine in Chapter 15.
Note
To set the initial value of a property, you can configure the control in the Page.Load event handler, or you can adjust the control tag in the .aspx file by adding attributes. Note that the Page.Load event occurs after the page is initialized with the default values and the tag settings. This means your code can override the properties set in the tag (but not vice versa).
Any HTML control that requires a closing tag inherits from the HtmlContainer class (which in turn inherits from the more basic HtmlControl class). For example, elements such as <a>, <form>, and <div> always use a closing tag, because they can contain other HTML elements. On the other hand, elements such as <img> and <input> are used only as stand-alone tags. Thus, the HtmlAnchor, HtmlForm, and HtmlGenericControl classes inherit from HtmlContainerControl, while HtmlInputImage and HtmlInputButton do not.
The HtmlContainer control adds two properties to those defined in HtmlControl, as described in Table 5-7.
Table 5.7. HtmlContainerControl Properties
Property | Description |
|---|---|
InnerHtml | The HTML content between the opening and closing tags of the control. Special characters that are set through this property will not be converted to the equivalent HTML entities. This means you can use this property to apply formatting with nested tags such as <b>, <i>, and <h1>. |
InnerText | The text content between the opening and closing tags of the control. Special characters will be automatically converted to HTML entities and displayed like text (for example, the less-than character (<) will be converted to |
The HtmlInputControl class inherits from HtmlControl and adds some properties (shown in Table 5-8) that are used for the <input> element. As you've already learned, the <input> element can represent different controls, depending on the type attribute. The <input type="text"> element is a text box and <input type="submit"> is a button.
Table 5.8. HtmlInputControl Properties
Property | Description |
|---|---|
Type | Provides the type of input control. For example, a control based on <input type="file"> would return file for the type property. |
Value | Returns the contents of the control as a string. In the simple currency converter, this property allowed the code to retrieve the information entered in the text input control. |
One control we haven't discussed in detail yet is the Page class. As explained in the previous chapter, every web page is a custom class that inherits from System.Web.UI.Page. By inheriting from this class, your web page class acquires a number of properties and methods that your code can use. These include properties for enabling caching, validation, and tracing, which are discussed throughout this book.
Table 5-9 provides an overview of some of the more fundamental properties, which you'll use throughout this book.
Table 5.9. Basic Page Properties
Property | Description |
|---|---|
IsPostBack | This Boolean property indicates whether this is the first time the page is being run (False) or whether the page is being resubmitted in response to a control event, typically with stored view state information (True). You'll usually check this property in the Page.Load event handler to ensure that your initial web page initialization is only performed once. |
EnableViewState | When set to False, this overrides the EnableViewState property of the contained controls, thereby ensuring that no controls will maintain state information. |
Application | This collection holds information that's shared between all users in your website. For example, you can use the Application collection to count the number of times a page has been visited. You'll learn more in Chapter 8. |
Session | This collection holds information for a single user, so it can be used in different pages. For example, you can use the Session collection to store the items in the current user's shopping basket on an e-commerce website. You'll learn more in Chapter 8. |
Cache | This collection allows you to store objects that are time-consuming to create so they can be reused in other pages or for other clients. This technique, when implemented properly, can improve performance of your web pages. Chapter 23 discusses caching in detail. |
Request | This refers to an HttpRequest object that contains information about the current web request. You can use the HttpRequest object to get information about the user's browser, although you'll probably prefer to leave these details to ASP.NET. You'll use the HttpRequest object to transmit information from one page to another with the query string in Chapter 8. |
Response | This refers to an HttpResponse object that represents the response ASP.NET will send to the user's browser. You'll use the HttpResponse object to create cookies in Chapter 8, and you'll see how it allows you to redirect the user to a different web page later in this chapter. |
Server | This refers to an HttpServerUtility object that allows you to perform a few miscellaneous tasks. For example, it allows you to encode text so that it's safe to place it in a URL or in the HTML markup of your page. You'll learn more about these features in this chapter. |
User | If the user has been authenticated, this property will be initialized with user information. Chapter 19 describes this property in more detail. |
In the following sections, you'll learn about two tasks that use these properties—redirecting the user to a new page, and encoding text that may contain special characters so it can be inserted into web page HTML.
In the currency converter example, everything took place in a single page. In a more typical website, the user will need to surf from one page to another to perform different tasks or complete a single operation.
There are several ways to transfer a user from one page to another. One of the simplest is to use an ordinary <a> anchor element, which turns a portion of text into a hyperlink. In this example, the word here is a link to another page:
Click <a href="newpage.aspx">here</a> to go to newpage.aspx.
Another option is to send the user to a new page using code. This approach is useful if you want to use your code to perform some other work before you redirect the user. It's also handy if you need to use code to decide where to send the user. For example, if you create a sequence of pages for placing an order, you might send existing customers straight to the checkout while new visitors are redirected to a registration page.
To perform redirection in code, you first need a control that causes the page to be posted back. In other words, you need an event handler that reacts to the ServerClick event of a control such as HtmlInputButton or HtmlAnchor. When the page is posted back and your event handler runs, you can use the HttpResponse.Redirect() method to send the user to the new page.
Remember, you can get access to the current HttpResponse object through the Page.Response property. Here's an example that sends the user to a different page in the same website directory:
Response.Redirect("newpage.aspx")When you use the Redirect() method, ASP.NET immediately stops processing the page and sends a redirect message back to the browser. Any code that occurs after the Redirect() call won't be executed. When the browser receives the redirect message, it sends a request for the new page.
You can use the Redirect() method to send the user to any type of page. You can even send the user to another website using an absolute URL (a URL that starts with http://), as shown here:
Response.Redirect("http://www.prosetech.com")ASP.NET gives you one other option for sending the user to a new page. You can use the HttpServerUtility.Transfer() method instead of Response.Redirect(). An HttpServerUtility object is provided through the Page.Server property, so your redirection code would look like this:
Server.Transfer("newpage.aspx")The advantage of using the Transfer() method is the fact that it doesn't involve the browser. Instead of sending a redirect message back to the browser, ASP.NET simply starts processing the new page as though the user had originally requested that page. This behavior saves a bit of time, but it also introduces some significant limitations. You can't use Transfer() to send the user to another website or to a non-ASP.NET page (such as an HTML page). The Transfer() method only allows you to jump from one ASP.NET page to another, in the same web application. Furthermore, when you use Transfer() the user won't have any idea that another page has taken over, because the browser will still show the original URL. This can cause a problem if you want to support browser bookmarks. On the whole, it's much more common to use HttpResponse.Redirect() than HttpServerUtility.Transfer().
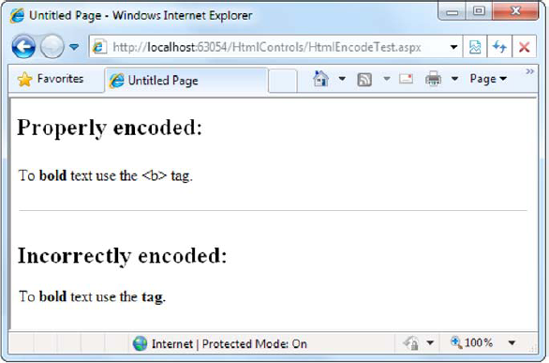
As you already know, there are certain characters that have a special meaning in HTML. For example, the angle brackets (< >) are always used to create tags. This can cause problems if you actually want to use these characters as part of the content of your web page.
For example, imagine you want to display this text on a web page:
Enter a word <here>
If you try to write this information to a page or place it inside a control, you end up with this instead:
Enter a word
The problem is that the browser has tried to interpret the <here> as an HTML tag. A similar problem occurs if you actually use valid HTML tags. For example, consider this text:
To bold text use the <b> tag.
Not only will the text <b> not appear, but the browser will interpret it as an instruction to make the text that follows bold. To circumvent this automatic behavior, you need to convert potential problematic values to their HTML equivalents. For example, < becomes < in your final HTML page, which the browser displays as the < character. Table 5-10 lists some special characters that need to be encoded.
Table 5.10. Common HTML Special Characters
Result | Description | Encoded Entity |
|---|---|---|
Nonbreaking space | | |
< | Less-than symbol | < |
> | Greater-than symbol | > |
& | Ampersand | & |
" | Quotation mark | " |
You can perform this transformation on your own, or you can circumvent the problem by using the InnerText property of an HTML server control. When you set the contents of a control using InnerText, any illegal characters are automatically converted into their HTML equivalents. However, this won't help if you want to set a tag that contains a mix of embedded HTML tags and encoded characters. It also won't be of any use for controls that don't provide an InnerText property, such as the Label web control you'll examine in the next chapter. In these cases, you can use the HttpServerUtility.HtmlEncode() method to replace the special characters. (Remember, an HttpServerUtility object is provided through the Page.Server property.)
Here's an example:
' Will output as "Enter a word <here>" in the HTML file, but the
' browser will display it as "Enter a word <here>".
ctrl.InnerHtml = Server.HtmlEncode("Enter a word <here>")
Or consider this example, which mingles real HTML tags with text that needs to be encoded:
ctrl.InnerHtml = "To <b>bold</b> text use the "
ctrl.InnerHtml &= Server.HtmlEncode("<b>") & " tag."
Figure 5-9 shows the results of successfully and incorrectly encoding special HTML characters. You can refer to the HtmlEncodeTest.aspx page included with the examples for this chapter.
The HtmlEncode() method is particularly useful if you're retrieving values from a database and you aren't sure whether the text is valid HTML. You can use the HtmlDecode() method to revert the text to its normal form if you need to perform additional operations or comparisons with it in your code.
Along with the HtmlEncode() and HtmlDecode() methods, the HttpServerUtility class also includes UrlEncode() and UrlDecode() methods. Much as HtmlEncode() allows you to convert text to valid HTML with no special characters, UrlEncode() allows you to convert text into a form that can be used in a URL. This technique is particularly useful if you want to pass information from one page to another by tacking it onto the end of the URL. You'll see this technique demonstrated in Chapter 8.
In this chapter, you've seen how ASP.NET controls fire events that you can handle in your code. Although server controls are the most common source of events, there's another type of event that you'll occasionally encounter: application events. Application events aren't nearly as important in an ASP.NET application as the events fired by server controls, but you might use them to perform additional processing tasks. For example, using application events you can write logging code that runs every time a request is received, no matter what page is being requested. Basic ASP.NET features like session state and authentication use application events to plug into the ASP.NET processing pipeline.
You can't handle application events in the code behind for a web form. Instead, you need the help of another ingredient: the global.asax file.
The global.asax file allows you to write code that responds to global application events. These events fire at various points during the lifetime of a web application, including when the application domain is first created (when the first request is received for a page in your website folder).
To add a global.asax file to an application in Visual Studio, choose Website
The global.asax file looks similar to a normal .aspx file, except that it can't contain any HTML or ASP.NET tags. Instead, it contains event handlers that respond to application events. When you add the global.asax file, Visual Studio inserts several ready-made application event handlers. You simply need to fill in some code.
For example, the following global.asax file reacts to the EndRequest event, which happens just before the page is sent to the user:
<%@ Application Language="VB" %>

<script runat="server">

    Sub Application_EndRequest(ByVal sender As Object, ByVal e As EventArgs)
        ' Code that runs at the end of every request.
        Response.Write("<hr />This page was served at " & DateTime.Now.ToString())
    End Sub

</script>
This event handler uses the Write() method of the built-in Response object to write a footer at the bottom of the page with the date and time that the page was created (see Figure 5-10).
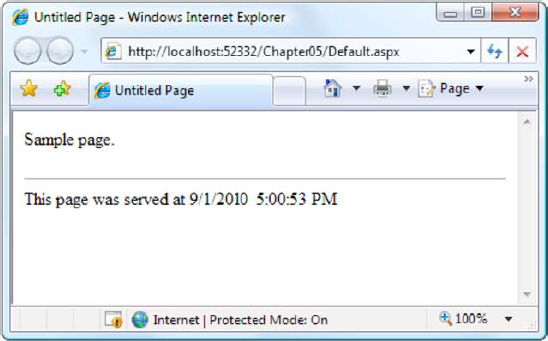
Each ASP.NET application can have one global.asax file. Once you place it in the appropriate website directory, ASP.NET recognizes it and uses it automatically. For example, if you add the global.asax file shown previously to a web application, every web page in that application will include a footer.
Note
This technique—responding to application events and using the Response.Write() method—isn't the best way to add a footer to the pages in your website. A better approach is to add a user control that creates the footer (Chapter 11) or define a master page template that includes a footer (Chapter 12).
Application.EndRequest is only one of more than a dozen events you can respond to in your code. To create a different event handler, you simply need to create a subroutine with the defined name. Table 5-12 lists some of the most common application events that you'll use.
Table 5.11. Basic Application Events
Event Handling Method | Description |
|---|---|
Application_Start() | Occurs when the application starts, which is the first time it receives a request from any user. It doesn't occur on subsequent requests. This event is commonly used to create or cache some initial information that will be reused later. |
Application_End() | Occurs when the application is shutting down, generally because the web server is being restarted. You can insert cleanup code here. |
Application_BeginRequest() | Occurs with each request the application receives, just before the page code is executed. |
Application_EndRequest() | Occurs with each request the application receives, just after the page code is executed. |
Session_Start() | Occurs whenever a new user request is received and a session is started. Sessions are discussed in detail in Chapter 8. |
Session_End() | Occurs when a session times out or is programmatically ended. This event is only raised if you are using in-process session state storage (the InProc mode, not the StateServer or SQLServer modes). |
Application_Error() | Occurs in response to an unhandled error. You can find more information about error handling in Chapter 7. |
The last topic you'll consider in this chapter is the ASP.NET configuration file system.
Every web application includes a web.config file that configures fundamental settings—everything from the way error messages are shown to the security settings that lock out unwanted visitors. You'll consider the settings in the web.config file throughout this book. (And there are many more settings that you won't consider in this book, because they're used much more rarely.)
The ASP.NET configuration files have several key advantages:
- They are never locked:
You can update web.config settings at any point, even while your application is running. If there are any requests currently under way, they'll continue to use the old settings, while new requests will get the changed settings right away.
- They are easily accessed and replicated:
Provided you have the appropriate network rights, you can change a web.config file from a remote computer. You can also copy the web.config file and use it to apply identical settings to another application or another web server that runs the same application in a web farm scenario.
- The settings are easy to edit and understand:
The settings in the web.config file are human-readable, which means they can be edited and understood without needing a special configuration tool.
In the following sections, you'll get a high-level overview of the web.config file and learn how ASP.NET's configuration system works.
The web.config file uses a predefined XML format. The entire content of the file is nested in a root <configuration> element. Inside this element are several more subsections, some of which you'll never change, and others which are more important.
Here's the basic skeletal structure of the web.config file:
<?xml version="1.0" ?>
<configuration>
    <appSettings>...</appSettings>
    <connectionStrings>...</connectionStrings>
    <system.web>...</system.web>
</configuration>
Note that the web.config file is case-sensitive, like all XML documents, and starts every setting with a lowercase letter. This means you cannot write <AppSettings> instead of <appSettings>.
Tip
To learn more about XML, the format used for the web.config file, you can refer to Chapter 18.
As a web developer, there are three sections in the web.config file that you'll work with. The <appSettings> section allows you to add your own miscellaneous pieces of information. You'll learn how to use it in the next section. The <connectionStrings> section allows you to define the connection information for accessing a database. You'll learn about this section in Chapter 14 . Finally, the <system.web> section holds every ASP.NET setting you'll need to configure.
Inside the <system.web> element are separate elements for each aspect of website configuration. You can include as few or as many of these as you want. For example, if you want to control how ASP.NET's security works, you'd add the <authentication> and <authorization> sections.
When you create a new website, there's just one element in the <system.web> section, named <compilation>:
<?xml version="1.0" ?>
<configuration>
    <system.web>
      <compilation debug="true" targetFramework="4.0">
      </compilation>
    </system.web>
</configuration>
The <compilation> element specifies two settings using two attributes:
- debug:
This attribute tells ASP.NET whether to compile the application in debug mode so you can use Visual Studio's debugging tools. As you saw in Chapter 4, Visual Studio asks you if you want to switch on debugging mode the first time you run a new application (and you should always choose yes).
Note
The disadvantage of debugging support is that it slows your application down ever so slightly, and small slowdowns can add up to big bottlenecks in a heavily trafficked web application in the real world. For that reason, you should remove the
debug="true"attribute when you're ready to deploy your application to a live web server.- targetFramework:
This attribute tells Visual Studio what version of .NET you're planning to use on your web server (which determines what features you'll have access to in your web application). As you learned in Chapter 4, you set the target framework when you create your website, and you can change it at any time after.
You'll consider the different elements that you can add to the <system.web> section throughout this book.
ASP.NET uses a multilayered configuration system that allows you to set settings at different levels.
Every web server starts with some basic settings that are defined in a directory such as c:WindowsMicrosoft.NETFramework[Version]Config. The [Version] part of the directory name depends on the version of .NET that you have installed. At the time of this writing, the latest build was v4.0.30319, which makes the full folder name c:WindowsMicrosoft.NETFrameworkv4.0.30319 Config.
Note
This path assumes that you're using the Visual Studio test web server, or you're running the IIS web server in 32-bit mode. If you're running IIS in 64-bit mode, the path changes to c:WindowsMicrosoft.NETFramework64[Version]Config.
The Config folder contains two files, named machine.config and web.config. Generally, you won't edit either of these files by hand, because they affect the entire computer. Instead, you'll configure the web.config file in your web application folder. Using that file, you can set additional settings or override the defaults that are configured in the two system files.
More interestingly, you can use different settings for different parts of your application. To use this technique, you need to create additional subdirectories inside your virtual directory. These subdirectories can contain their own web.config files with additional settings.
Subdirectories inherit web.config settings from the parent directory. For example, imagine you create a website in the directory c:ASP.NETTestWeb. Inside this directory, you create a folder named Secure. Pages in the c:ASP.NETTestWebSecure directory can acquire settings from three files, as shown in Figure 5-11.
Any machine.config or web.config settings that aren't explicitly overridden in the c:ASP.NETTestWebSecureweb.config file will still apply to the SecureHelloWorld.aspx page. In this way, subdirectories can specify just a small set of settings that differ from the rest of the web application. One reason you might want to use multiple directories in an application is to apply different security settings. Files that need to be secured would then be placed in a dedicated directory with a web.config file that defines more stringent security settings.
ASP.NET also allows you to store your own settings in the web.config file, in an element called <appSettings>. Note that the <appSettings> element is nested in the root <configuration> element. Here's the basic structure:
<?xml version="1.0" ?>
<configuration>
    <appSettings>
        <!-- Custom application settings go here. -->
    </appSettings>
    <system.web>
        <!-- ASP.NET Configuration sections go here. -->
    </system.web>
</configuration>
Note
This example adds a comment in the place where you'd normally find additional settings. XML comments are bracketed with the <!-- and --> character sequences. You can also use XML comments to temporarily disable a setting in a configuration file.
The custom settings that you add are written as simple string variables. You might want to use a special web.config setting for several reasons:
- To centralize an important setting that needs to be used in many different pages:
For example, you could create a variable that stores a database query. Any page that needs to use this query can then retrieve this value and use it.
- To make it easy to quickly switch between different modes of operation:
For example, you might create a special debugging variable. Your web pages could check for this variable and, if it's set to a specified value, output additional information to help you test the application.
- To set some initial values:
Depending on the operation, the user might be able to modify these values, but the web.config file could supply the defaults.
You can enter custom settings using an <add> element that identifies a unique variable name (key) and the variable contents (value). The following example adds a variable that defines a file path where important information is stored:
<appSettings>
    <add key="DataFilePath"
     value="e:NetworkShareDocumentsWebAppShared" />
</appSettings>
You can add as many application settings as you want, although this example defines just one.
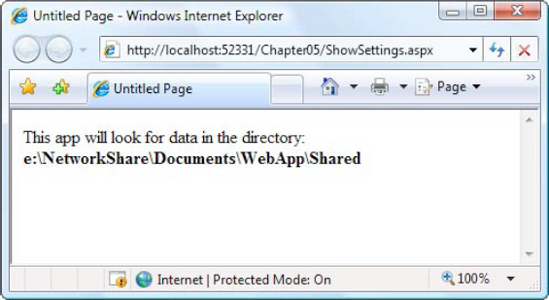
You can create a simple test page to query this information and display the results, as shown in the following example (which is provided with the sample code as ShowSettings.aspx and ShowSettings.aspx.vb). You retrieve custom application settings from web.config by key name, using the WebConfigurationManager class, which is found in the System.Web.Configuration namespace. This class provides a shared property called AppSettings with a collection of application settings.
Imports System.Web.Configuration

Public Partial Class ShowSettings
    Inherits System.Web.UI.Page

    Protected Sub Page_Load(ByVal sender As Object, _
      ByVal e As System.EventArgs) Handles Me.Load
        Results.InnerHtml = "This app will look for data in the directory:<br /><b>"
        Results.InnerHtml &= WebConfigurationManager.AppSettings("DataFilePath")
        Results.InnerHtml &= "</b>"
    End Sub

End Class
Tip
Notice that this code formats the text by inserting HTML tags into the label alongside the text content, including bold tags (<b>) to emphasize certain words, and a line break (<br />) to split the output over multiple lines. This is a common technique.
Later, in Chapter 17, you'll learn how to get file and directory information and read and write files. For now, the simple application just displays the custom web.config setting, as shown in Figure 5-12.
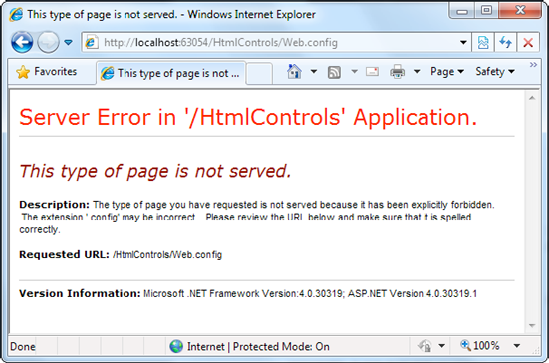
ASP.NET is configured, by default, to deny any requests for .config files. This means remote users will not be able to access the file. Instead, they'll receive the error message shown in Figure 5-13.
Editing the web.config file by hand is refreshingly straightforward, but it can be a bit tedious. To help alleviate the drudgery, ASP.NET includes a graphical configuration tool called the Website Administration Tool (WAT), which lets you configure various parts of the web.config file using a web page interface. To run the WAT to configure the current web project in Visual Studio, select Website
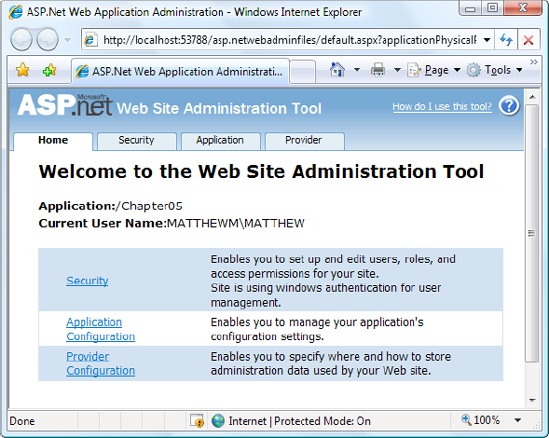
You can use the WAT to automate the web.config changes you made in the previous example. To try this, click the Application tab. Using this tab, you can create a new setting (click the Create Application Settings link). If you click Manage Application Settings, you'll see a list with all the applications settings that are defined in your application (Figure 5-15). You can then choose to remove or edit any one of them.
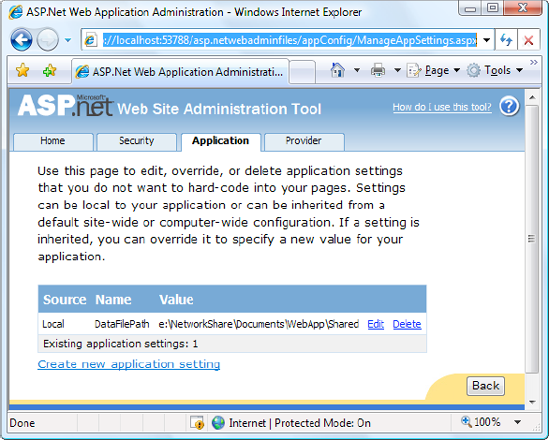
This is the essential idea behind the WAT. You make your changes using a graphical interface (a web page), and the WAT generates the settings you need and adds them to the web.config file for your application behind the scenes. Of course, the WAT has a number of settings for configuring more complex ASP.NET settings, and you'll use it throughout this book.
Note
The WAT works only while you're developing a web application. In other words, you can't deploy a website to a live web server and then attempt to use the WAT. However, if you need to reconfigure an already-deployed application, you can use the graphical IIS Manager tool, which provides some of the same features as the WAT (and many additional ones). You'll learn more about IIS configuration in Chapter 26.
This chapter presented you with your first look at web applications, web pages, and configuration. You should now understand how to create an ASP.NET web page and use HTML server controls.
HTML controls are a compromise between ASP.NET web controls and traditional HTML. They use the familiar HTML elements but provide a limited object-oriented interface. Essentially, HTML controls are designed to be straightforward, predictable, and automatically compatible with existing programs. With HTML controls, the final HTML page that is sent to the client closely resembles the original .aspx page.
In the next chapter, you'll learn about web controls, which provide a more sophisticated object interface that abstracts away the underlying HTML. If you're starting a new project or need to add some of ASP.NET's most powerful controls, web controls are the best option.