
You can store information for the users of your website in a variety of ways. In Chapter 8, you learned how to use techniques such as view state, session state, and cookies to keep track of information for a short period of time. But if you need to store information between visits, the only realistic option is a server-side database. Using the ADO.NET skills you've learned so far, it's fairly easy to save information such as customer addresses and user preferences in a database and retrieve it later.
The only problem with the database approach is that it's up to you to write all the code for retrieving information and updating records. This code isn't terribly complex—Chapter 14 covers everything you need to know—but it can be tedious. ASP.NET includes a feature that allows you to avoid this tedium, if you're able to work within certain limitations. This feature is called profiles, and it's designed to keep track of user-specific information automatically.
When you use profiles, ASP.NET handles the unglamorous work of retrieving the information you need and updating the database when it changes. You don't need to write any ADO.NET code, or even design the appropriate database tables, because ASP.NET takes care of all the details. Best of all, the profiles feature integrates with ASP.NET authentication so the information for the currently logged-in user (referred to as that user's profile) is always available to your web page code.
The only drawback to the profiles feature is that it forces you to use a preset database structure. This prevents you from using tables you've already created to store user-specific details, and it poses a new challenge if you want to use the same information in other applications or reporting tools. If the locked-in structure is too restricting, your only choice is to create a custom profile provider that extends the profiles feature (which is a more challenging task outside the scope of this book) or forego profiles altogether and write your own ADO.NET code by hand.
In this chapter, you'll learn how to use profiles, how the profile system works, and when profiles make the most sense.
One of the most significant differences between profiles and other types of state management is that profiles are designed to store information permanently, using a back-end data source such as a database. Most other types of state management are designed to maintain information for a series of requests occurring in a relatively short space of time (such as session state) or in the current browser session (such as view state and nonpersistent cookies) or to transfer information from one page to another (such as the query string and cross-page posting). If you need to store information for the longer term in a database, profiles simply provide a convenient model that manages the retrieval and persistence of this information for you.
Before you begin using profiles, you need to assess them carefully. In the following sections, you'll learn how they stack up.
The goal of ASP.NET's profiles feature is to provide a transparent way to manage user-specific information, without forcing you to write custom data access code using the ADO.NET data classes. Unfortunately, many features that seem convenient suffer from poor performance or scalability. This is particularly a concern with profiles, because they involve database access, and database access can easily become a scalability bottleneck for any web application.
So, do profiles suffer from scalability problems? This question has no simple answer. It all depends on how much data you need to store and how often you plan to access it. To make an informed decision, you need to know a little more about how profiles work.
Profiles plug into the page life cycle in two ways:
The first time you access the Profile object in your code, ASP.NET retrieves the complete profile data for the current user from the database. If you read the profile information more than once in the same request, ASP.NET reads it once and then reuses it, saving your database from unnecessary extra work.
If you change any profile data, the update is deferred until the page processing is complete. At that point (after the PreRender, PreRenderComplete, and Unload events have fired for the page), the profile is written back to the database. This way, multiple changes are batched into one operation. If you don't change the profile data, no extra database work is incurred.
Overall, the profiles feature could result in two extra database trips for each request (in a read-write scenario) or one extra database trip (if you are simply reading profile data). The profiles feature doesn't integrate with caching, so every request that uses profile data requires a database connection.
From a performance standpoint, profiles work best when the following is true:
You have a relatively small number of pages accessing the profile data.
You are storing small amounts of data.
They tend to work less well when the following is true:
You have a large number of pages needing to use profile information.
You are storing large amounts of data. This is particularly inefficient if you need to use only some of that data in a given request (because the profile model always retrieves the full block of profile data).
Of course, you can combine profiles with another type of state management. For example, imagine your website includes an order wizard that walks the user through several steps. At the beginning of this process, you could retrieve the profile information and store it in session state. You could then use the Session collection for the remainder of the process. Assuming you're using the in-process or out-of-process state server to maintain session data, this approach is more efficient because it saves you from needing to connect to the database repeatedly.
The most significant limitation with profiles doesn't have anything to do with performance—instead, it's a limitation of how the profiles are serialized. The default profile provider included with ASP.NET serializes profile information into a block of data that's inserted into a single field in a database record. For example, if you serialize address information, you'll end up with something like this:
Marty Soren315 Southpart DriveLompocCalifornia93436U.S.A.
Another field indicates where each value starts and stops, using a format like this:
Name:S:0:11:Street:S:11:19:City:S:30:6:State:S:36:10:ZipCode:S:46:5:Country:S:51:6
Essentially, this string identifies the value (Name, Street, City, and so on), the way it's stored (S for string), the starting position, and the length. So the first part of this string
Name:S:0:11
indicates that the first profile property is Name, which is stored as a string, starts at position 0, and is 11 characters long.
Although this approach gives you the flexibility to store just about any combination of data, it makes it more difficult to use this data in other applications. You can write custom code to parse the profile data to find the information you want, but depending on the amount of data and the data types you're using, this can be an extremely tedious process. And even if you do this, you're still limited in the ways you can reuse this information. For example, imagine you use profiles to store customer address information. Because of the proprietary format, it's no longer possible to generate customer lists in an application such as Microsoft Word or perform queries that filter or sort records using this profile data. (For example, you can't easily perform a query to find all the customers living in a specific city.)
This problem has two solutions:
Use your own custom ADO.NET code instead of profiles.
Create a custom profile provider that's designed to store information using your database schema.
Of the two options, creating a custom data access component is easier, and it gives you more flexibility. You can design your data component to have any interface you want, and you can then reuse that component with other .NET applications.
The second option is interesting because it allows your page to keep using the profile model. In fact, you could create an application that uses the standard profile serialization with the SqlProfileProvider and then switch it later to use a custom provider. To make this switch, you don't need to change any code. Instead, you simply modify the profile settings in the web.config file. As it becomes more common for websites to use the profiles features, custom profile providers will become more attractive.
Note
It's also important to consider the type of data that works best in a profile. As with many other types of state management, you can store any serializable types into a profile, including simple types and custom classes.
One significant difference between profiles and other types of state management is that profiles are stored as individual records, each of which is uniquely identified by user name. This means profiles require you to use some sort of authentication system. It makes no difference what type of authentication system you use (Windows, forms, or a custom authentication system)—the only requirement is that authenticated users are assigned a unique user name. That user name is used to find the matching profile record in the database.
Note
Later in this chapter (in the section "Anonymous Profiles"), you'll learn how the anonymous identification feature lets you temporarily store profile information for users who haven't logged in.
When deciding whether to use profiles, it's natural to compare the profiles feature with the kind of custom data access code you wrote in Chapter 14 (and the database components you'll learn to build in Chapter 22). Clearly, writing your own ADO.NET code is far more flexible. It allows you to store other types of information and perform more complex business tasks. For example, an e-commerce website could realistically use profiles to maintain customer address information (with the limitations discussed in the previous section). However, you wouldn't use a profile to store information about previous orders. Not only is it far too much information to store efficiently, it's also awkward to manipulate.
The SqlProfileProvider allows you to store profile information in a SQL Server database. You can choose to create the profile tables in any database. However, you can't change any of the other database schema details, which means you're locked into specific table names, column names, and serialization format.
From start to finish, you need to perform the following steps to use profiles:
Enable authentication for a portion of your website.
Configure the profile provider. (This step is optional if you're using SQL Server Express. Profiles are enabled by default.)
Create the profile tables. (This step isn't required if you're using SQL Server Express.)
Define some profile properties.
Use the profile properties in your web page code.
You'll tackle these steps in the following sections.
Because profiles are stored in a user-specific record, you need to authenticate the current user before you can read or write profile information. You can use any type of authentication system, including Windows-based authentication and forms-based authentication. The profile system doesn't care—it simply stores the user-specific information in a record that's identified based on the user name. Seeing as every authentication system identifies users uniquely by user name, any authentication system will work.
The following web.config file uses Windows authentication:
<configuration>
  <system.web>
    <authentication mode="Windows"/>
    <authorization>
<deny users="?"/>
</authorization>
...
</system.web>
</configuration>Because this example uses Windows authentication, you don't need to create a record for each user. Instead, you'll use the existing Windows user accounts that are defined on the web server. This approach also saves you from creating a login page, because the browser handles the login process. (For more information about Windows authentication, refer to Chapter 19.)
If you decide to use forms authentication instead, you'll need to decide whether you want to perform the authentication using your own custom user list (Chapter 19) or in combination with the membership features (Chapter 20). In most cases, the membership and profiles features are used in conjunction—after all, if you're using the profiles feature to store user-specific information automatically, why not also store the list of user credentials (user names and passwords) automatically in the same database?
Tip
The downloadable examples for this chapter show profiles in action in one site that uses forms authentication, and in another site that uses Windows authentication.
Once you've chosen your authentication system (and taken care of any other chores that may be necessary, such as creating a user list and generating your login page), you're ready to use profiles. Remember, profiles store user-specific information, so the user needs to be authenticated before their profile is available. In the web.config file shown previously, an authorization rule ensures this by denying all anonymous users.
In the previous chapter, you learned that no special steps are required to configure a web application to use membership with SQL Server Express (the free version of SQL Server that's included with Visual Studio). The same is true of profiles.
When using SQL Server Express, ASP.NET stores profile information in an automatically generated database file named aspnetdb.mdf. If this file doesn't exist, it's created the first time you use any membership or profiles features, and it's placed in the App_Data subdirectory of your web application. The best part is that you don't need to go through any additional configuration steps, because ASP.NET is configured, by default, to use SQL Server with profiles.
This automatic-database creation feature relies on SQL Server Express. If you're using a non-Express version of SQL Server, you must create the database you need manually and explicitly configure the profiles feature in the web.config file.
By default, the connection string that is used with profiles is named LocalSqlServer. You can edit this connection string directly in the machine.config file. However, if you just need to tweak a single application, it's better to adjust the web.config file for your web application.
To do so, you need to remove all the existing connection strings using the <clear> element in your web application's web.config file. Then, add the LocalSqlServer connection string again—but this time with the right value:
<configuration>
    <connectionStrings>
        <clear />
        <add name="LocalSqlServer" providerName="System.Data.SqlClient"
connectionString="Data Source=localhost;Integrated Security=SSPI;
Initial Catalog=aspnetdb" />
    </connectionStrings>
    ...
</configuration>
This is the same process you used in Chapter 20, because both the membership feature and the profiles feature use the LocalSqlServer connection string. In this example, the new connection string is for the full version of SQL Server. It uses a database named aspnetdb on the local computer.
You'll then need to create the aspnetdb database using the aspnet_regsql.exe command-line utility. This is the same tool that allows you to generate databases for other ASP.NET features, such as SQL Server–based session state, membership, roles, database cache dependencies, and Web Parts personalization. You can find the aspnet_regsql.exe tool in the c:WindowsMicrosoft.NET Framework[Version] folder (where [Version] is the version of ASP.NET that's installed, like v4.0.30319).
To create the tables, views, and stored procedures required for profiles, you use the -A p command-line option. The other details you may need to supply include the server location (-S), database name (-d), and authentication information for connecting to the database (use -U and -P to supply a password and user name, or use -E to use the current Windows account). If you leave out the server location and database name, aspnet_regsql.exe uses the default instance on the current computer and creates a database named aspnetdb.
The easiest way to use aspnet_regsql is to open the Visual Studio command prompt. To do so, open the Start menu and choose All Programs
aspnet_regsql.exe -S (local) -E -A all
If you want to use a different database, you must specify the database name using the -d parameter. Either way, you should use a new, blank database that doesn't include any other custom tables. That's because aspnet_regsql.exe creates several tables for profiles (see Table 21-1 in the next section), and you shouldn't risk confusing them with business data.
Note
This command line uses the -A all option to create tables for all of ASP.NET's database features, including profiles and membership. You can also choose to add tables for just one feature at a time. For more information about -A and the other command-line parameters you can use with aspnet_regsql, refer to Table 20-2 in Chapter 20.
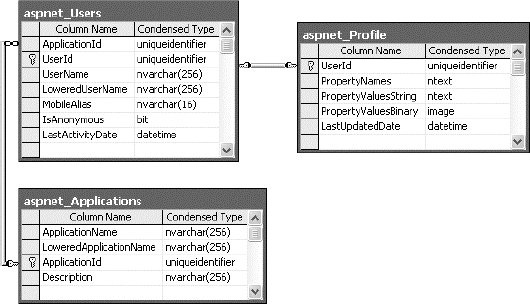
Whether you use aspnet_regsql to create the profile databases on your own or you use SQL Server Express and let ASP.NET create them automatically, you'll wind up with the same tables. Table 21-1 briefly describes them. (The rather unexciting views aren't included.)
If you want to look at the data in these tables, you can peer into this database in the same way that you peered into the membership database in Chapter 20. However, the contents aren't of much interest, because ASP.NET manages them automatically. All the information you store in a profile is combined into one record and quietly placed in a field named PropertyValuesString in a table named aspnet_Profile.
Table 21.1. Database Tables Used for Profiles
Table Name | Description |
|---|---|
aspnet_Applications | Lists all the web applications that have records in this database. It's possible for several ASP.NET applications to use the same aspnetdb database. In this case, you have the option of separating the profile information so it's distinct for each application (by giving each application a different application name when you register the profile provider) or sharing it (by giving each application the same application name). |
aspnet_Profile | Stores the user-specific profile information. Each record contains the complete profile information for a single user. The PropertyNames field lists the property names, and the PropertyValuesString and PropertyValuesBinary fields list all the property data, although you'll need to do some work if you want to parse this information for use in other non-ASP.NET programs. Each record also includes the last update date and time (LastUpdatedDate). |
aspnet_SchemaVersions | Lists the supported schemas for storing profile information. In the future, this could allow new versions of ASP.NET to provide new ways of storing profile information without breaking support for old profile databases that are still in use. |
aspnet_Users | Lists user names and maps them to one of the applications in aspnet_Applications. Also records the last request date and time (LastActivityDate) and whether the record was generated automatically for an anonymous user (IsAnonymous). You'll learn more about anonymous user support later in this chapter (in the section "Anonymous Profiles"). |
Figure 21-1 shows the relationships between the most important profile tables.
Before you can store any profile information, you need to specifically define what you want to store. You do this by adding the <properties> element inside the <profile> section of the web.config file. Inside the <properties> element, you place one <add> tag for each user-specific piece of information you want to store. At a minimum, the <add> element supplies the name for the property, like this:
<configuration>
  <system.web>
  ...
    <profile>
      <properties>
        <add name="FirstName"/>
        <add name="LastName"/>
      </properties>
    </profile>
  </system.web>
  ...
</configuration>
Usually, you'll also supply the data type. (If you don't, the property is treated as a string.) You can specify any serializable .NET data type, as shown here:
<add name="FirstName" type="System.String"/>
<add name="LastName" type="System.String"/>
<add name="DateOfBirth" type="System.DateTime"/>
You can set a few more property attributes to create the more advanced properties shown in Table 21-2.
Table 21.2. Profile Property Attributes
Attribute (for the <add> Element) | Description |
|---|---|
name | The name of the property. |
type | The fully qualified class name that represents the data type for this property. By default, this is System.String. |
serializeAs | The format to use when serializing this value (String, Binary, Xml, or ProviderSpecific). You'll look more closely at the serialization model in the section "Profile Serialization." |
readOnly | A Boolean value that determines whether a value is changeable. If true, the property can be read but not changed. (Attempting to change the property will cause a compile-time error.) By default, this is false. |
defaultValue | A default value that will be used if the profile doesn't exist or doesn't include this particular piece of information. The default value has no effect on serialization—if you set a profile property, ASP.NET will commit the current values to the database, even if they match the default values. |
allowAnonymous | A Boolean value that indicates whether this property can be used with the anonymous profiles feature discussed later in this chapter. By default, this is false. |
provider | The profile provider that should be used to manage just this property. By default, all properties are managed using the provider specified in the <profile> element, but you can assign different properties to different providers. |
With these details in place, you're ready to access the profile information using the Profile property of the current page. When you run your application, ASP.NET creates a new class to represent the profile by deriving from System.Web.Profile.ProfileBase, which wraps a collection of profile settings. ASP.NET adds a strongly typed property to this class for each profile property you've defined in the web.config file. These strongly typed properties simply call the GetPropertyValue() and SetPropertyValue() methods of the ProfileBase base class to retrieve and set the corresponding profile values.
For example, if you've defined a string property named FirstName, you can set it in your page like this:
Profile.FirstName = "Henry"
Figure 21-2 presents a complete test page that allows the user to display the profile information for the current user or set new profile information.
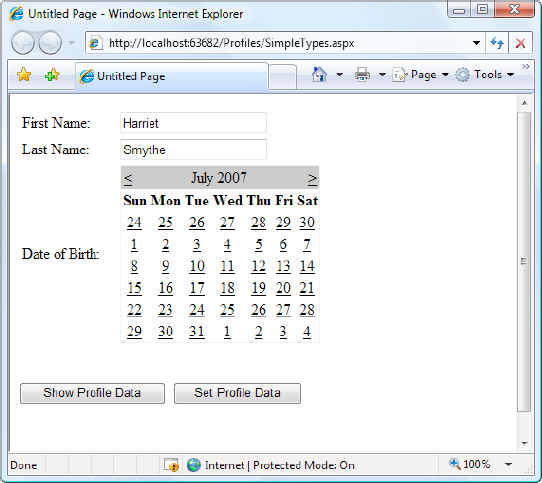
The first time this page runs, no profile information is retrieved, and no database connection is used. However, if you click the Show Profile Data button, the profile information is retrieved and displayed on the page:
Protected Sub cmdShow_Click(ByVal sender As Object, _
  ByVal e As System.EventArgs) Handles cmdShow.Click

    lbl.Text = "First Name: " & Profile.FirstName & "<br />" & _
      "Last Name: " & Profile.LastName & "<br />" & _
      "Date of Birth: " & Profile.DateOfBirth.ToString("D")
End Sub
At this point, an error will occur if the profile database is missing or the connection can't be opened. Otherwise, your page will run without a hitch, and you'll see the newly retrieved profile information. Technically, the complete profile is retrieved when your code accesses the Profile.FirstName property in the first line and is used for the subsequent code statements.
Note
Profile properties behave like any other class member variable. This means if you read a profile value that hasn't been set, you'll get a default initialized value (such as an empty string or 0).
If you click the Set Profile Data button, the profile information is set based on the current control values:
Protected Sub cmdSet_Click(ByVal sender As Object, _
  ByVal e As System.EventArgs) Handles cmdSet.Click

    Profile.FirstName = txtFirst.Text
    Profile.LastName = txtLast.Text
    Profile.DateOfBirth = Calendar1.SelectedDate
End Sub
Now the profile information is committed to the database when the page request finishes. If you want to commit some or all of the information earlier (and possibly incur multiple database trips), just call the Profile.Save() method. As you can see, the profiles feature is unmatched for simplicity.
Tip
The Profile object doesn't just include the properties you've defined. It also provides the properties LastActivityDate (the last time this profile was used) and LastUpdatedDate (the last time this profile was changed), using information drawn from the database.
Earlier, you learned how properties are serialized into a single string. For example, if you save a FirstName of Harriet and a LastName of Smythe, both values are crowded together in the PropertyValuesString field of the aspnet_Profile table in the database, like so:
HarrietSmythe
The PropertyNames field (also in the aspnet_Profile table) gives the information you need to parse each value from the PropertyValuesString field. Here's what you'll see in the PropertyNames field in this example:
FirstName:S:0:7:LastName:S:7:6:
The colons (:) are used as delimiters. The basic format is as follows:
PropertyName:StringOrBinarySerialization:StartingCharacterIndex:Length:
Something interesting happens if you create a profile with a DateTime data type, like this:
<add name="DateOfBirth" type="System.DateTime" serializeAs="String"/>
<add name="FirstName" type="System.String" serializeAs="Xml"/>
<add name="LastName" type="System.String" serializeAs="Xml"/>
Now, when you look at the PropertyValuesString field, you'll see something like this:
<?xml version="1.0" encoding="utf-16"?><dateTime>2007-07-12T00:00:00-04:00
</dateTime>HarrietSmythe
Initially, it looks like the profile data is serialized as XML, but the PropertyValuesString clearly doesn't contain a valid XML document (because of the text at the end). What has actually happened is that the first piece of information, the DateTime, is serialized (by default) as XML. The following two profile properties are serialized as ordinary strings.
The PropertyNames field makes it slightly clearer:
DateOfBirth:S:0:81:FirstName:S:87:7:LastName:S:94:6:
Interestingly, you have the ability to change the serialization format of any profile property by adding the serializeAs attribute to its declaration in the web.config file. Table 21-3 lists your choices.
Table 21.3. Serialization Options
SerializeAs | Description |
|---|---|
String | Converts the type to a string representation. Requires a type converter that can handle the job. |
Xml | Converts the type to an XML representation, which is stored in a string, using the System.Xml.XmlSerialization.XmlSerializer (the same class that's used with web services). |
Binary | Converts the type to a proprietary binary representation that only .NET understands using the System.Runtime.Serialization.Formatters.Binary. BinaryFormatter. This is the most compact option but the least flexible. Binary data is stored in the PropertyValuesBinary field instead of the PropertyValues. |
ProviderSpecific | Performs customized serialization that's implemented in a custom provider. |
For example, here's how you can change the serialization for the profile settings:
<add name="DateOfBirth" type="System.DateTime" serializeAs="String"/> <add name="FirstName" type="System.String"serializeAs="Xml"/> <add name="LastName" type="System.String"serializeAs="Xml"/>
Now the next time you set the profile, the serialized representation in the PropertyValuesString field will store information for FirstName and LastName. It takes this form:
2007-06-27<?xml version="1.0" encoding="utf-16"?><string>Harriet</string>
<?xml version="1.0" encoding="utf-16"?><string>Smythe</string>
If you use the binary serialization mode, the property value will be placed in the PropertyValuesBinary field instead of the PropertyValuesString field. Here's an example where the FirstName property is serialized in the PropertyValuesBinary field:
<add name="DateOfBirth" type="System.DateTime" serializeAs="String"/>
<add name="FirstName" type="System.String" serializeAs="Binary"/>
<add name="LastName" type="System.String" serializeAs="String"/>
The only indication of this shift is the use of the letter B instead of S in the PropertyNames field (and the fact that fewer bytes of are required):
DateOfBirth:S:0:9:FirstName:B:0:31:LastName:S:9:64:All of these serialization details raise an important question—what happens when you change profile properties or the way they are serialized? Profile properties don't have any support for versioning. However, you can add or remove properties with relatively minor consequences. For example, ASP.NET will ignore properties that are present in the aspnet_Profile table but not defined in the web.config file. The next time you modify part of the profile, these properties will be replaced with the new profile information. Similarly, if you define a profile in the web.config file that doesn't exist in the serialized profile information, ASP.NET will just use the default value. However, more dramatic changes—such as renaming a property, changing its data type, and so on, are likely to cause an exception when you attempt to read the profile information. Even worse, because the serialized format of the profile information is proprietary, you have no easy way to migrate existing profile data to a new profile structure.
Tip
Not all types are serializable in all ways. For example, classes that don't provide a parameterless constructor can't be serialized in Xml mode. Classes that don't have the Serializable attribute can't be serialized in Binary mode. You'll consider this distinction when you contemplate how to use custom types with profiles (see the "Profiles and Custom Data Types" section), but for now just keep in mind that you may run across types that can be serialized only if you choose a different serialization mode.
If you have a large number of profile settings, and some settings are logically related to each other, you may want to use profile groups to achieve better organization.
For example, you may have some properties that deal with user preferences and others that deal with shipping information. Here's how you could organize these profile properties using the <group> element:
<profile>
  <properties>
    <group name="Preferences">
      <add name="LongDisplayMode" defaultValue="true" type="Boolean" />
      <add name="ShowSummary" defaultValue="true" type="Boolean" />
    </group>
    <group name="Address">
      <add name="Name" type="String" />
      <add name="Street" type="String" />
      <add name="City" type="String" />
      <add name="ZipCode" type="String" />
      <add name="State" type="String" />
      <add name="Country" type="String" />
    </group>
  </properties>
</profile>
Now you can access the properties through the group name in your code. For example, here's how you retrieve the country information:
lblCountry.Text = Profile.Address.Country
Groups are really just a poor man's substitute for a full-fledged custom structure or class. For instance, you could achieve the same effect as in the previous example by declaring a custom Address class. You'd also have the ability to add other features (such as validation in the property procedures). The next section shows how.
Using a custom class with profiles is easy. You need to begin by creating the class that wraps the information you need. In your class, you can use public member variables or full-fledged property procedures. The latter choice, though longer, is the preferred option because it ensures your class will support data binding, and it gives you the flexibility to add property procedure code later.
Here's a Address class that ties together the same information you saw in the previous example, using automatic properties to reduce the amount of code:
<Serializable()> _
Public Class Address

    Public Property Name() As String
    Public Property Street() As String
    Public Property City() As String
    Public Property ZipCode() As String
    Public Property State() As String
    Public Property Country() As String

    Public Sub New(ByVal name As String, ByVal street As String, _
      ByVal city As String, ByVal zipCode As String, _
      ByVal state As String, ByVal country As String)

        Me.Name = name
        Me.Street = street
        Me.City = city
        Me.ZipCode = zipCode
        Me.State = state
        Me.Country = country
    End Sub

    Public Sub New()
    End Sub

End Class
You can place this class in the App_Code directory. The final step is to add a property that uses it:
<properties>
  <add name="Address" type="Address" />
</properties>
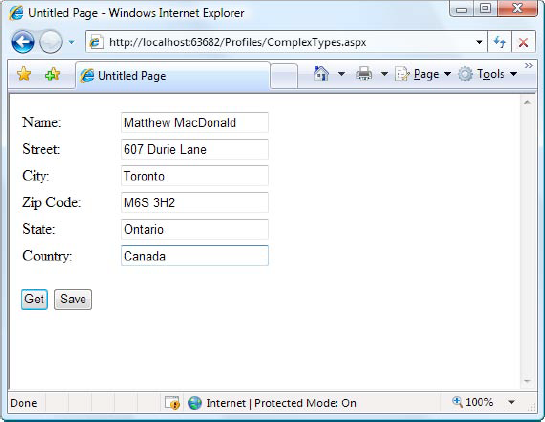
Now you can create a test page that uses the Address class. Figure 21-3 shows an example that simply allows you to load, change, and save the address information in a profile.
Here's the page class that makes this possible:
Public Partial Class ComplexTypes
    Inherits System.Web.UI.Page

    Protected Sub Page_Load(ByVal sender As Object, _
      ByVal e As System.EventArgs) Handles Me.Load
        If Not Page.IsPostBack Then
            LoadProfile()
        End If
    End Sub

    Protected Sub cmdGet_Click(ByVal sender As Object, _
      ByVal e As System.EventArgs) Handles cmdGet.Click
        LoadProfile()
    End Sub

    Private Sub LoadProfile()
        txtName.Text = Profile.Address.Name
        txtStreet.Text = Profile.Address.Street
        txtCity.Text = Profile.Address.City
        txtZip.Text = Profile.Address.ZipCode
txtState.Text = Profile.Address.State
txtCountry.Text = Profile.Address.Country
End Sub
Protected Sub cmdSave_Click(ByVal sender As Object, _
ByVal e As System.EventArgs) Handles cmdSave.Click
Profile.Address = new Address(txtName.Text, _
txtStreet.Text, txtCity.Text, txtZip.Text, _
txtState.Text, txtCountry.Text)
End Sub
End ClassWhen the page loads (and when the user clicks the Get button), the profile information is copied from the Profile.Address object into the various text boxes. A private LoadProfile() method handles this task.
The user can make changes to the address values in the text boxes. However, the change isn't committed until the user clicks the Save button.
When the Save button is clicked, a new Address object is created using the constructor that accepts name, street, city, zip code, state, and country information. This object is then assigned to the Profile.Address property. Instead of using this approach, you could modify each property of the current Profile.Address object to match the text values.
The content of the Profile object is saved to the database automatically when the request ends. No extra work is required.
You need to keep in mind a few points, depending on how you decide to serialize your custom class. By default, all custom data types use XML serialization with the XmlSerializer. This class is relatively limited in its serialization ability. It simply copies the value from every public property or member variable into a straightforward XML format like this:
<Address>
  <Name>...</Name>
  <Street>...</Street>
  <City>...</City>
  <ZipCode>...</ZipCode>
  <State>...</State>
  <Country>...</Country>
</Address>
When deserializing your class, the XmlSerializer needs to be able to find a parameterless public constructor. In addition, none of your properties can be read-only. If you violate either of these rules, the deserialization process will fail.
If you decide to use binary serialization instead of XmlSerialization, .NET uses a completely different approach:
<add name="Address" type="Address" serializeAs="Binary"/>
In this case, ASP.NET enlists the help of the BinaryFormatter. The BinaryFormatter can serialize the full public and private contents of any class, provided the class is decorated with the <Serializable()> attribute. Additionally, any class it derives from or references must also be serializable.
The profiles feature isn't able to detect changes in complex data types (anything other than strings, simple numeric types, Boolean values, and so on). This means if your profile includes complex data types, ASP.NET saves the complete profile information at the end of every request that accesses the Profile object.
This behavior obviously adds unnecessary overhead. To optimize performance when working with complex types, you have several choices. One option is to set the corresponding profile property to be read-only in the web.config file (if you know that property never changes). Another approach is to disable the autosave behavior completely by adding the automaticSaveEnabled attribute on the <profile> element and setting it to false, as shown here:
<profile defaultProvider="SqlProvider" automaticSaveEnabled="false">...</profile>If you choose this approach, it's up to you to call Profile.Save() to explicitly commit changes. Generally, this approach is the most convenient, because it's easy to spot the places in your code where you modify the profile. Just add the Profile.Save() call at the end:
Profile.Address = New Address(txtName.Text, txtStreet.Text, _
  txtCity.Text, txtZip.Text, txtState.Text, txtCountry.Text)
Profile.Save()
For instance, you could modify the earlier example (shown in Figure 21-3) to save address information only when it changes. The easiest way to do this is to disable automatic saves, but call Profile.Save() when the Save button is clicked. You could also handle the TextBox.TextChanged event to determine when changes are made, and save the profile immediately at this point.
Although your page automatically gets the profile information for the current user, this doesn't prevent you from retrieving and modifying the profiles of other users. In fact, you have two tools to help you—the ProfileBase class and the ProfileManager class.
The Profile object (provided by the Page.Profile property) includes a useful GetProfile() method that retrieves the profile information for a specific user by user name. Figure 21-4 shows an example with a Windows-authenticated user.

Here's the code that gets the profile:
Protected Sub cmdGet_Click(ByVal sender As Object, _
  ByVal e As System.EventArgs) Handles cmdGet.Click

    Dim currentProfile As ProfileCommon
    currentProfile = Profile.GetProfile(txtUserName.Text)
    lbl.Text = "This user lives in " & currentProfile.Address.Country
End Sub
GetProfile() returns a ProfileCommon object. However, you won't find ProfileCommon in the .NET class library. That's because ProfileCommon is a dynamically generated class that ASP.NET creates to hold the profile information for your web application. In this example, the profile defines a property named Address, so that you can retrieve this information using the ProfileCommon.Address property.
Notice that once you have a ProfileCommon object, you can interact with it in the same way you interact with the profile for the current user (after all, it's the same object type). You can even make changes. The only difference is that changes aren't saved automatically. If you want to save a change, you need to call the Save() method of the ProfileCommon object. ProfileCommon also adds the LastActivityDate and LastUpdatedDate properties, which you can use to determine the last time a specific profile was accessed and modified.
If you try to retrieve a profile that doesn't exist, you won't get an error. Instead, you'll simply end up with blank data (for example, empty strings). If you change and save the profile, a new profile record will be created.
You can test for this condition by examining the ProfileCommon.LastUpdatedDate property. If the profile hasn't been created yet, this value will be a zero-date value (in other words, day 1 on month 1 in year 0001). Here's the code you'd use:
Protected Sub cmdGet_Click(ByVal sender As Object, _
  ByVal e As System.EventArgs) Handles cmdGet.Click

    Dim currentProfile As ProfileCommon
    currentProfile = Profile.GetProfile(txtUserName.Text)
    If profile.LastUpdatedDate = DateTime.MinValue Then
        lbl.Text = "No user match found."
    Else
lbl.Text = "This user lives in " & currentProfile.Address.Country
End If
End SubIf you need to perform other tasks with profiles, you can use the ProfileManager class in the System.Web.Profile namespace, which exposes the useful shared methods described in Table 21-4. Many of these methods work with a ProfileInfo class, which provides information about a profile. The ProfileInfo includes the user name (UserName), last update and last activity dates (LastUpdatedDate and LastActivityDate), the size of the profile in bytes (Size), and whether the profile is for an anonymous user (IsAnonymous). It doesn't provide the actual profile values.
Table 21.4. ProfileManager Methods
Method | Description |
|---|---|
DeleteProfile() | Deletes the profile for the user you specify. |
DeleteProfiles() | Deletes multiple profiles at once. You supply a collection of user names. |
DeleteInactiveProfiles() | Deletes profiles that haven't been used since a time you specify. You also must supply a value from the ProfileAuthenticationOption enumeration to indicate what type of profiles you want to remove (All, Anonymous, or Authenticated). |
GetNumberOfProfiles() | Returns the number of profile records in the data source. You must supply a value from the ProfileAuthenticationOption enumeration that indicates whether you also want to see authenticated profiles (Authenticated), anonymous profiles (Anonymous), or both (All). |
GetNumberOfInactive Profiles() | Returns the number of profiles that haven't been used since the time you specify. You must supply a value from the ProfileAuthenticationOption enumeration. |
GetAllInactiveProfiles() | Retrieves profile information for profiles that haven't been used since the time you specify. You must supply a value from the ProfileAuthenticationOption enumeration. The profiles are returned as ProfileInfo objects. |
GetAllProfiles() | Retrieves all the profile data from the data source as a collection of ProfileInfo objects. You can choose what type of profiles you want to retrieve (All, Anonymous, or Authenticated). You can also use an overloaded version of this method that uses paging and retrieves only a portion of the full set of records based on the starting index and page size you request. |
FindProfilesByUser Name() | Retrieves a collection of ProfileInfo objects matching a specific user name. The SqlProfileProvider uses a LIKE clause when it attempts to match user names, which means you can use wildcards such as the % symbol. For example, if you search for the user name user%, you'll return values such as user1, user2, user_guest, and so on. You can use an overloaded version of this method that uses paging. |
FindInactiveProfilesByUserName() | Retrieves profile information for profiles that haven't been used since the time you specify. You can also filter out certain types of profiles (All, Anonymous, or Authenticated) or look for a specific user name (with wildcard matching). The return value is a collection of ProfileInfo objects. |
For example, if you want to remove the profile for the current user, you need only a single line of code:
ProfileManager.DeleteProfile(User.Identity.Name)
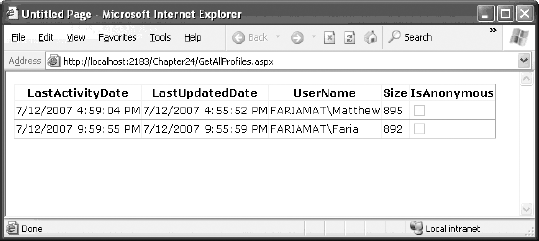
And if you want to display the full list of users in a web page (not including anonymous users), just add a GridView with AutoGenerateColumns set to True and use this code:
Protected Sub Page_Load(ByVal sender As Object, _
  ByVal e As System.EventArgs) Handles Me.Load

    gridProfiles.DataSource = ProfileManager.GetAllProfiles( _
      ProfileAuthenticationOption.Authenticated)
    gridProfiles.DataBind()
End Sub
Figure 21-5 shows the result.
So far, all the examples have assumed that the user is authenticated before any profile information is accessed or stored. Usually, this is the case. However, sometimes it's useful to create a temporary profile for a new, unknown user. For example, most e-commerce websites allow new users to begin adding items to a shopping cart before registering. If you want to provide this type of behavior and you choose to store shopping cart items in a profile, you'll need some way to uniquely identify anonymous users.
Note
It's worth asking whether it makes sense to store a shopping cart in a profile. It's a reasonable, workable design, but many developers find it easier to explicitly control how this type of information is stored in their database using custom ADO.NET code instead of the profile feature.
ASP.NET provides an anonymous identification feature that fills this gap. The basic idea is that the anonymous identification feature automatically generates a random identifier for any anonymous user. This random identifier stores the profile information in the database, even though no user name is available. The user name is tracked on the client side using a cookie (or in the URL, if you've enabled cookieless mode). Once this cookie disappears (for example, if the anonymous user closes and reopens the browser), the anonymous session is lost and a new anonymous session is created.
Anonymous identification has the potential to leave a lot of abandoned profiles, which wastes space in the database. For that reason, anonymous identification is disabled by default. However, you can enable it using the <anonymousIdentification> element in the web.config file, as shown here:
<configuration>
  ...
  <system.web>
    <anonymousIdentification enabled="true" />
    ...
  </system.web>
</configuration>
You also need to flag each profile property that will be retained for anonymous users by adding the allowAnonymous attribute and setting it to true. This allows you to store just some basic information and restrict larger objects to authenticated users.
<properties>
  <add name="Address" type="Address" allowAnonymous="true" />
  ...
</properties>
If you're using a complex type, the allowAnonymous attribute is an all-or-nothing setting. You configure the entire object to support anonymous storage or not support it.
The <anonymousIdentification> element also supports numerous optional attributes that let you set the cookie name and timeout, specify whether the cookie will be issued only over an SSL connection, control whether cookie protection (validation and encryption) is used to prevent tampering and eavesdropping, and configure support for cookieless ID tracking. Here's an example:
<anonymousIdentification enabled="true" cookieName=".ASPXANONYMOUS"
  cookieTimeout="43200" cookiePath="/" cookieRequireSSL="false"
  cookieSlidingExpiration="true" cookieProtection="All"
  cookieless="UseCookies"/>
For more information, refer to the Visual Studio Help.
Tip
If you use anonymous identification, it's a good idea to delete old anonymous sessions regularly using the aspnet_Profile_DeleteInactiveProfiles stored procedure, which you can run at scheduled intervals using the SQL Server Agent. You can also delete old profiles using the ProfileManager class, as described in the previous section.
One challenge that occurs with anonymous profiles is what to do with the profile information when a previously anonymous user logs in. For example, in an e-commerce website a user might select several items and then register or log in to complete the transaction. At this point, you need to make sure the shopping cart information is copied from the anonymous user's profile to the appropriate authenticated (user) profile.
Fortunately, ASP.NET provides a solution through the ProfileModule.MigrateAnonymous event. This event fires whenever an anonymous identifier is available (either as a cookie or in the URL if you're using cookieless mode) and the current user is authenticated. To handle the MigrateAnonymous event, you need to add an event handler to the file that handles all application events—the Global.asax file, which you learned about in Chapter 5.
The basic technique when handling the MigrateAnonymous event is to load the profile for the anonymous user by calling Profile.GetProfile() and passing in the anonymous ID, which is provided to your event handler through the ProfileMigrateEventArgs.
Once you've loaded this data, you can then transfer the settings to the new profile manually. You can choose to transfer as few or as many settings as you want, and you can perform any other processing that's required. Finally, your code should remove the anonymous profile data from the database and clear the anonymous identifier so the MigrateAnonymous event won't fire again. For example:
Public Sub Profile_OnMigrateAnonymous(sender As Object, _
 e As ProfileMigrateEventArgs)

    ' Get the anonymous profile.
    Dim anonProfile As ProfileCommon = Profile.GetProfile(e.AnonymousID)

    ' Copy information to the authenticated profile
    ' (but only if there's information there).
    If Not anonProfile.IsNullOfEmpty() Then
        If anonProfile.Address.Name <> "" Then
            Profile.Address = anonProfile.Address
        End If
    End If

    ' Delete the anonymous profile from the database.
    ' (You could decide to skip this step to increase performance
    '  if you have a dedicated job scheduled on the database server
    '  to remove old anonymous profiles.)
    System.Web.Profile.ProfileManager.DeleteProfile(e.AnonymousID)

    ' Remove the anonymous identifier.
    AnonymousIdentificationModule.ClearAnonymousIdentifier()
End Sub
You need to handle this task with some caution. If you've enabled anonymous identification, the MigrateAnonymous event fires every time a user logs in, even if the user hasn't entered any information into the anonymous profile. That's a problem—if you're not careful, you could easily overwrite the real (saved) profile for the user with the blank anonymous profile. The problem is further complicated by the fact that complex types (such as the Address object) are created automatically by ASP.NET, so you can't just check for a null reference to determine whether the user has anonymous address information.
In the previous example, the code tests for a missing Name property in the Address object. If this information isn't part of the anonymous profile, no information is migrated. A more sophisticated example might test for individual properties separately or might migrate an anonymous profile only if the information in the user profile is missing or outdated.
In this chapter, you learned how to use profiles and how they store information in the database. Many ASP.NET developers will prefer to write their own ADO.NET code for retrieving and storing user-specific information. Not only does this allow you to use your own database structure, it allows you to add your own features, such as caching, logging, validation, and encryption. But profiles are handy for quickly building modest applications that don't store a lot of user-specific information and don't have special requirements for how this information is stored.