
The .NET Framework makes it almost painless to deploy any type of application, including ASP.NET websites. Often, you won't need to do much more than copy your web application directory to the web server and then configure it as a virtual directory. The headaches of the past—registering components and troubleshooting version conflicts—are gone. This simplicity makes it practical to deploy websites by manually copying files, rather than relying on a dedicated setup tool.
In this chapter, you'll begin by learning about Internet Information Services (IIS), the Windows operating system component that acts as a web server. You'll explore how to create virtual directories for your web applications, making them available to other clients on the network or on the Internet. Finally, you'll consider the tools in Visual Studio that simplify website deployment.
ASP.NET applications always work in conjunction with a web server—a specialized piece of software that accepts requests over Hypertext Transport Protocol (HTTP) and serves content. When you're running your web application in Visual Studio, you use the test web server that's built in. When you deploy your website to a broader audience, you need a real web server, such as IIS.
Web servers run special software to support mail exchange, FTP and HTTP access, and everything else clients need in order to access web content. Before you can go any further, you need to understand a little more about how web servers work.
The easiest job a web server has is to provide ordinary HTML pages. When you request such a file, the web server simply reads it off the hard drive (or retrieves it from an in-memory cache) and sends the complete document to the browser, which displays it. In this case, the web server is just a glorified file server that waits for network requests and dishes out the corresponding documents.
When you use a web server in conjunction with dynamic content such as an ASP.NET page, something more interesting takes place. On its own, the web server has no idea how to process ASP.NET tags or run VB code. However, it's able to enlist the help of the ASP.NET engine to perform all the heavy lifting. Figure 26-1 diagrams how this process works for ASP and ASP.NET pages. For example, when you request the page Default.aspx, the web server sends the request over to the ASP.NET engine (which starts automatically if needed). The ASP.NET engine loads the requested page, runs the code it contains, and then creates the final HTML document, which it passes back to IIS. IIS then sends the HTML document to the client.
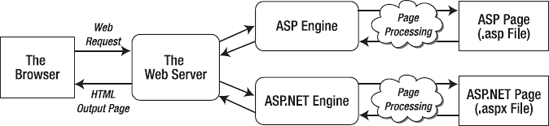
At this point, you might be wondering how the web server knows when it needs to get the ASP or ASP.NET engine involved. Essentially, the web server looks at the file extension of the requested page (such as .asp or .aspx) to determine the type of content. The web server compares this extension against a list to determine what program owns this file type. For example, the web server's list indicates that the .aspx extension is owned by the aspnet_isapi.dll component in a folder like c:WindowsMicrosoft.NETFramework64v4.0.30319 directory (assuming you're using version 4.0.3319 of .NET on a 64-bit system).
All web servers perform the same task as that shown in Figure 26-1. However, when you run an ASP.NET application in Visual Studio, you don't need to worry about deployment and file type registration. That's because Visual Studio includes a built-in web server. It receives the requests for the pages in your web application and then runs the corresponding code. This test web server has a significant limitation—it only accepts requests from the local computer. In other words, there's no way for other people on other computers to access your website.
To run your web application outside the development environment, you need a more powerful web server. The web server software runs continuously on your computer (or, more likely, a dedicated server). This means it's ready to handle HTTP requests at any time and provide your pages to clients who connect from the same network or over the Internet. On Microsoft Windows operating systems, the web server you'll use is IIS.
In most cases, you won't be developing on the same computer you use to host your website. If you do, you will hamper the performance of your web server by tying it up with development work. You will also frustrate clients if a buggy test application crashes the computer and leaves the website unavailable or if you accidentally overwrite the deployed web application with a work in progress. Generally, you'll perfect your web application on another computer and then copy all the files to the web server.
When you deploy your web application to a web server, it's exposed through something called a virtual directory. A virtual directory is simply the public face of your website directory.
For example, your website might exist in a directory on the server named c:MySite. To allow remote users to access this website through their browsers, you could expose it as a virtual directory. The virtual directory name might match the real directory name (in this case, MySite), or it might be something different. When the user requests a page in a virtual directory (say, http://WebServer/MySite/Checkout.aspx), the web server looks for the corresponding file in the corresponding physical directory (c:MySiteCheckout.aspx). You'll learn more about this process—how URL requests are processed by the web server—in the next section.
You can use ASP.NET applications in a variety of different environments, including local area networks (LANs) and over the Internet. To understand the difference, it helps to review a little about how web servers work with networks and the Internet.
A network is defined simply as a group of devices connected by communication links. A traditional LAN connects devices over a limited area, such as within a company site or an individual's house. Multiple LANs are connected into a wide area network (WAN) using a variety of technologies. In fact, the Internet is nothing more than a high-speed backbone that joins millions of LANs.
The cornerstone of the Internet is Internet Protocol (IP). On an IP network, each computer is given a unique number called an IP address. An IP address is typically written as four numbers from 0 to 255 separated by periods (as in 192.145.0.1) or as six hexadecimal values separated by colons (as in 2001:db8:85a3::8a2e:370:7334). The difference depends on the version of the IP standard that you're using—the older, more common IPv4 standard uses the first approach, while the newer IPv6 uses the second. Either way, to access another computer over a network, you need to use its IP address.
Of course, IP addresses aren't easy to remember and don't make for great marketing campaigns. To make life easier, web servers on the Internet usually register unique domain names such as www.microsoft.com. This domain name is mapped to the IP address by a special catalog, which is maintained by a network of servers on the Internet. This network, called the Domain Name Service (DNS), is a core part of the infrastructure of the Internet. When you type http://www.microsoft.com in a web browser, the browser contacts a DNS server, looks up the IP address that's mapped to www.microsoft.com, and contacts it.
So, what effect does all this have on the accessibility of your website? To be easily reached over the Internet, the web server you use needs to be in the DNS registry. To get in the DNS registry, you must have a fixed IP address. Commercial Internet service providers won't give you a fixed IP address unless you're willing to pay a sizable fee. In fact, most will place you behind a firewall or some type of network address translation (NAT), which will hide your computer's IP address. The same is true in most company networks, which are shielded from the outside world.
ASP.NET applications don't need to be accessible over the Internet. Many are useful within an internal network. In this case, you don't need to worry about registered domain names. Other computers can access your website using either the IP address of your machine or, more likely, the network computer name.
For example, imagine you deploy an application to a virtual directory named MyWebApp. On the web server, you can access it like this:
http://localhost/MyWebApp
Tip
Remember, localhost is a special part of the URL called a loopback alias. It always points to the current computer, whatever its name is. Technically, the loopback alias is mapped to something called the loopback address, which is the IP address 127.0.0.1. You can use the alias or the numeric address interchangeably.
Assuming the computer is named MyWebServer, here's how you can access the virtual web directory on another computer on the same LAN:
http://MyWebServer/MyWebApp
Tip
If you don't know the name of your computer, right-click the Computer icon either on your desktop or in Windows Explorer, and select Properties. This shows a system information page that includes your current computer name.
Now, assume that MyWebServer is registered in the DNS as www.MyDomain.com and is exposed to the Internet. You could then use the following URL:
http://www.MyDomain.com/MyWebApp
Finally, you can always use the computer's IP address, provided the computer is on the same network or visible on the Internet. Assuming the IP address is 123.5.123.4, here's the URL you would use:
http://123.5.123.4/MyWebApp
Because internal networks often use dynamic IP addresses and because DNS registration changes, using the computer name or domain name to access a website is almost always the best approach.
If you study the URLs that the built-in web server in Visual Studio uses, you'll notice they're a little different than what you usually see when surfing the Internet. Namely, they include a port number. That means instead of requesting a page like this:
http://localhost/MyWebApp/Default.aspx
you might request a page like this:
http://localhost:2040/MyWebApp/Default.aspx
That's because the Visual Studio web server watches requests on a dynamically chosen port number. (In this example, the port number is 2040, but you'll see that it changes each time you run Visual Studio.) By using a dynamic port number, Visual Studio makes sure its built-in web server doesn't infringe on any other web server software you have on the computer.
Real web servers are almost always configured to monitor port 80 (and port 443 for encrypted traffic). If you don't type in a port number for a URL, the browser assumes you're using port 80 for ordinary web access and port 443 for secure connections.
Some applications run on web farms, a group of server computers that share the responsibility of handling requests. Usually web farms are reserved for high-powered web applications that need to be able to handle heavy loads, because multiple computers can deal with more simultaneous surfers than a single web server. However, web farms are overkill for many small and midsized websites.
The way a web farm works is deceptively simple. Essentially, instead of placing web application files on a single web server, you place a copy on several separate web servers. When a request is received for your website, it's directed to one of these web servers (based on which one has the lightest load). That web server then deals with the request. Obviously, if you decide to update your application, you need to make sure you update each web server in the web farm with the same version to prevent discrepancies.
Some web hosting companies use web farms to host multiple websites. For example, your website might be running on more than one web server, but each of these web servers might also host multiple websites. This provides a flexible deployment model that lets different web applications share resources. However, web farms also introduce a few new challenges. If you're setting up a web farm of your own, you'll need to make sure each computer uses the same machine key, as described later in this chapter in the section "The Machine Key."
As you've probably guessed by now, deploying a web application is just the process of copying your web application files to a web server. By taking this step, you accomplish three things:
You ensure your web applications are available even when Visual Studio isn't running.
You allow users on other computers to run your web applications. (The Visual Studio web server handles only local requests.)
Your web application URLs will no longer need a port number (assuming your web server is configured to use port 80, which is the standard port for HTTP traffic).
Depending on your organization, you may be in charge of deploying web applications, or a dedicated web administrator may handle the process. Either way, it's worth learning the deployment process, which is quite straightforward.
IIS exists in several different versions. The version of IIS you use depends on the operating system you're using:
Windows Server 2003 uses IIS 6, which isn't covered in this book.
Windows Vista and Windows Server 2008 use IIS 7.
Windows 7 and Windows Server 2008 R2 use IIS 7.5
As a general rule, when you want to publish your website, you should use a server version of Windows to host it. Desktop versions, such as Windows Vista and Windows 7, are fine for development testing, but they implement a connection limit, which makes them less suitable for real-world use. Most editions of Windows 7 and Windows Vista limit IIS to ten simultaneous connections, including Business, Professional, Enterprise, and Ultimate. The Home Premium edition of both operating systems ratchets the limit down to three simultaneous requests, while the Home Basic and Starter editions don't support IIS at all.
Before you can start using IIS, you need to make sure the web server computer has the required IIS software. The following sections provide a high-level overview of the process. They tell you where to go to find IIS and switch it on, depending on the version of Windows that you're using.
Tip
Remember, if you just want to learn about IIS and practice using its administrative tools and configuring web applications, you can install IIS on your own local computer and use it there.
The process for enabling IIS 7.5 (in Windows 7) or IIS 7 (in Windows Vista) is the same. In both versions of Windows, IIS is included but not initially installed. To switch it on, you need to follow these steps:
Click Start, and then click Control Panel.
Choose Programs and Features.
In the task list (on the left), click the "Turn Windows features on or off" link. Now you'll need to wait while Windows examines your system.
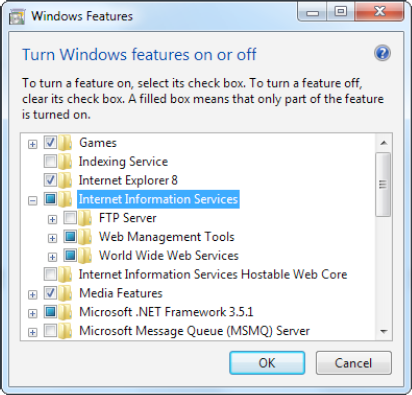
Find the Internet Information Services item near the top of the list (see Figure 26-2), and click it (so that the square next to the item becomes filled in).
Windows allows you to individually enable many additional IIS features. To see them, click the plus box to the left of the Internet Information Services item. This shows a tree of optional items (some of which are shown in Figure 26-2), including an FTP server, additional management tools, backward compatibility with IIS 6, performance features, and quite a bit more. Most of these optional features are outside the scope of this book (although you'll use some of the security features later in this chapter). To learn more about these settings and IIS administration in general, consult a dedicated book about IIS.
Note
If you want to use Visual Studio's IIS support, which allows you to create IIS virtual directories directly from the New Web Site dialog, you need to select the IIS 6 Management Compatibility item. You'll find it listed as one of the optional items under Internet Information Services

Once you've chosen the IIS options you want, click OK to complete your configuration change.
If you haven't already installed Visual Studio, you will need to install the .NET 4 runtime after you install IIS. You can hunt it down on the Web or use the Windows Update feature. The easiest approach is to use the Web Platform Installer, which you can download from
http://msdn.microsoft.com/netframework/aa569263.aspx.
Tip
As a quick test to find out whether IIS is installed, try firing up a browser and requesting http://localhost on the current computer. The exact welcome page you see depends on the version of IIS, but as long as you don't receive an error, you'll know that IIS is installed.
The initial release of Windows Server 2008 used IIS 7, just like Windows Vista. However, Windows Server 2008 was soon replaced by Window Server 2008 R2—a refreshed edition with performance enhancements, bug fixes, and a few new features. One of those features is IIS 7.5.
The setup and configuration of IIS is essentially the same in both releases of Windows Server 2008 (and with both versions of IIS). You use the Server Manager to configure the server computer. The basic process is as follows:
Click the Start button, and choose All Programs
Choose the Roles node in the tree on the left.
Click the Add Roles link in the right section of the window. This opens a wizard that allows you to add a new role to your server.
Follow the steps within the wizard until you reach the Select Server Roles step. Check the Web Server role in the list of roles, and click Next. You'll probably be prompted to install additional required roles—if so, just accept the operation and continue.
After you've installed any additional roles you need, you'll be prompted to configure the Web Server role. As in Windows 7 and Windows Vista, you can choose the specific features of IIS 7 that should be enabled.
Eventually, you'll end up at a summary page. IIS is now installed with the .NET 3.5 runtime.
Now you need to install the .NET 4 runtime. The easiest approach is to use the Web Platform Installer, which you can download from
http://msdn.microsoft.com/netframework/aa569263.aspx.
Tip
For a little bit more hand-holding, you can refer to Microsoft's walk-through at http://tinyurl.com/3y5xqyo. Although the details are the same, it includes a number of screen captures that show the steps of the IIS installation process.
When IIS is installed, it automatically creates a directory named c:inetpubwwwroot, which represents your website. Any files in this directory will appear as though they're in the root of your web server.
To add more pages to your web server, you can copy HTML, ASP, or ASP.NET files directly to the c:inetpubwwwroot directory. For example, if you add the file TestFile.html to this directory, you can request it in a browser through the URL http://localhost/TestFile.html. You can even create subdirectories to group related resources. For example, you can access the file c:inetpubwwwrootMySiteMyFile.html through a browser using the URL http://localhost/MySite/MyFile.html.
Using the wwwroot directory is straightforward, but it makes for poor organization. To properly use ASP or ASP.NET, you need to make your own virtual directory for each web application you create. With a virtual directory, you can expose any physical directory (on any drive on your computer) on your web server as though it were located in the c:inetpubwwwroot directory.
Before you get started, you need to launch IIS Manager. To do so, open the Start menu, and type "IIS Manager" in the search box. When the Internet Information Services (IIS) Manager shortcut appears, click it.
The first thing you'll notice about IIS Manager is the tree structure on the left side. Initially, this tree shows a single item—your computer. Underneath are two groups, named Application Pools and Sites, respectively. If you expand the Sites group and then expand the Default Web Site item inside, you'll see all the virtual directories that are currently configured on the computer. Each one represents a separate web application.
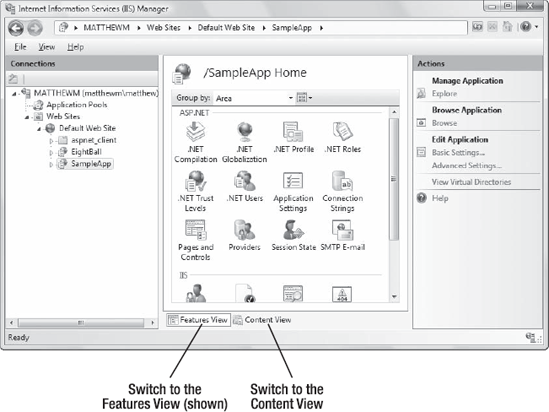
Figure 26-3 shows the IIS Manager window. It's divided into three parts:
On the left side is the website tree. In Figure 26-3, there are two web applications in the website tree: EightBall and SampleApp.
In the middle is a useful set of icons that allow you to perform various configuration tasks with the currently selected item in the tree, which is usually a website folder. These icons are part of Features View. Alternatively, you can switch to Content View by clicking the Content View button at the bottom of the pane. In this case, you'll simply see the contents of the selected folder. Click Features View to switch back.
On the right side is the Actions pane, which includes links that let you quickly perform a few of the most common tasks (again, based on the currently selected item in the tree). This is a standard design that's used in several Windows management tools.
Now that you've taken your first look at IIS Manager, you're ready to get started managing your websites. In the next section, you'll learn how to create your first virtual directory.
When you're ready to deploy a website on a computer that has IIS, the first step you'll usually take is to create the physical directory where the pages will be stored (for example, c:MySite). The second step is to expose this physical directory as a virtual directory through IIS. This means the website becomes publicly visible to other computers that are connected to your computer. Ordinarily, a remote computer won't be allowed to access your c:MySite directory. However, if you map c:MySite to a virtual directory, the remote user will be able to request the files in the directory through IIS.
Before going any further, choose the directory you want to expose as a virtual directory. You can use any directory you want, on any drive, and you can place it as many levels deep as makes sense. You can use a directory that already has your website files, or you can copy these files after you create the virtual directory. Either way, the first step is to register this directory with IIS.
The easiest and most flexible way to create a virtual directory is to use the IIS Manager utility. Here's what you need to do:
To create a new virtual directory for an existing physical directory, expand the node for the current computer, and expand the Sites node underneath.
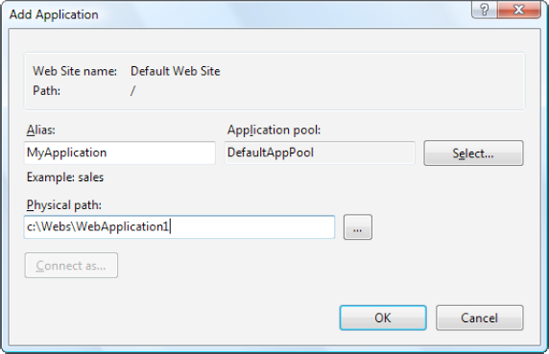
Right-click the Default Web Site item, and choose Add Application. The Add Application dialog box appears, which requests several pieces of information (Figure 26-4).
The first piece of information you need to supply is the alias—the name a remote client will use to access the files in this virtual directory. For example, if your alias is MyApp and your computer is MyServer, you can request pages using URLs such as
http://MyServer/MyApp/MyPage.aspx.Next, you need to choose the physical path. This is the directory on your hard drive that will be exposed as a virtual directory. For example, c:inetpubwwwroot is the physical directory that is used for the root virtual directory of your web server. IIS will provide access to all the allowed file types in this directory.
Next, you need to specify the application pool. An application pool is a group of settings that applies to one or more web applications (as described in the next section). Although the standard DefaultAppPool option seems compelling, it actually isn't what you want, because it relies on ASP.NET 2.0. To give your virtual directory the ability to host ASP.NET 4, you need to explicitly choose the application pool named ASP.NET v4.0. To do so, click the Select button, pick it from the "Application pool" list, and then click OK.
To finish the process, click OK in the Add Virtual Directory dialog box.
When you finish these steps, you'll see your new virtual directory appear in the list in IIS Manager.
You can remove an existing virtual directory by selecting it and pressing the Delete key, or you can change its settings by selecting it and using the icons in the Features View on the right.
Once you've created your virtual directory, fire up a browser to make sure it works. For example, if you've created the virtual directory with the alias MyApp and it contains the page MyPage.aspx, you should be able to request http://localhost/MyApplication/MyPage.aspx.
One of the slightly unusual details of website management is that some settings are set on the website itself (on the virtual directory), while others are applied through a feature called application pools. This two-part design allows for more efficient management, because you don't need to duplicate the application pool settings (which very rarely need to be changed) for each new web application. Instead, you can reuse a single application pool for all your websites. And if you modify the application pool later, all the linked web applications are affected.
Before you examine how to create and change application pools, you need to understand that application pools are quite limited in scope. Most web application configuration is performed through the virtual directory. The web application pool sets a small group of low-level settings that apply only to ASP.NET applications, such as the maximum number of requests to put on hold before sending a "Service Unavailable" response to new clients (by default, it's 1000) and the number of times the website should be allowed to crash catastrophically before being shut down altogether (by default, 5). Although these settings are interesting, most shouldn't be touched by anyone but a seasoned network administrator. In most cases, the default values are the best bet.
However, application pools include two settings that are uniquely important and may require your customization:
The version of ASP.NET that IIS runs to process the requests in your website
The Windows account that IIS uses to run your website
To take a look at the application pools defined on your computer, expand the IIS Manager tree, and click the Application Pools item that's nested under your computer name, before the Sites group (Figure 26-5).
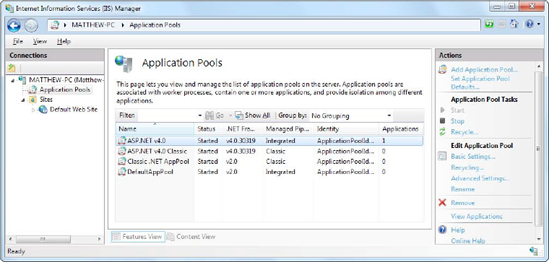
When you first install IIS, you start with a couple of basic application pools named DefaultAppPool and Classic .NET AppPool. When you install ASP.NET, the installation program creates two more IIS application pools—ASP.NET v4.0 and ASP.NET v4.0 Classic.
Note
The "Classic" in an application pool name indicates that the application uses a slightly different way of interacting with IIS (which matches IIS 6 and earlier versions). Generally, the only reason to use classic mode is if you've created a component that extends the ASP.NET request processing system in an old version of IIS and you need backward compatibility to make sure it keeps working in newer versions.
When you look at the application pool list, you can quickly pick out several details, such as the version of .NET that the application pool uses, whether it runs in classic mode or the more modern integrated mode, and how many applications are currently assigned to that pool. For example, in Figure 26-5, one application is assigned to the ASP.NET v4.0 pool, while the other pools have no web applications at all.
Here's a quick rundown of the essential tasks you can perform when viewing application pools in IIS Manager:
- Change basic settings for a pool:
Select the pool, and click Basic Settings in the Actions pane on the right. The basic settings let you change just three details (see Figure 26-6). These are the version of .NET, whether the pool uses classic or integrated mode, and whether the pool starts automatically when the computer boots up (so as to prevent an unnecessary delay when the web server receives the first request for your website).
- Change advanced settings for a pool:
Select the pool, and click Advanced Settings in the Actions pane on the right. The Advanced Settings window appears, with a property grid of options. You'll use the Advanced Settings window to change the application pool account in the next section.
- Create a new pool:
Click Add Application Pool in the Actions pane. This is the best approach if you want to create a pool with new, customized settings (such as a different Windows account). That way, you can keep your application pool separate from the standard, default pools. This also makes sense if you want some applications to use your pool and the rest to use one of the standard pools.
- See what applications are in a pool:
Select the pool, and click View Applications in the Actions pane. This way, you'll know what websites will be affected if you decide to tweak application pool settings.

Some of the subtlest issues with ASP.NET deployment involve security. When the web server runs your web application, it performs all its work under a specific Windows user account that has a carefully limited set of privileges. The actual account that's used depends on the web server you're using:
If you're using the integrated test server in Visual Studio, the server runs under your account. That means it has all your permissions, and as a result, you generally won't run into permission problems while you're testing your application. This can be very misleading, because you might not realize that there are potential permission problems waiting for you once you deploy the application.
If you're using IIS 7, it's the network service account. This is a special account that Windows creates when you first install it. It's not allowed to do much, but it can access network locations.
If you're using IIS 7.5, it's an account that's based on the application pool. For example, an application pool named ASP.NET v4.0 will use an account named IIS AppPoolASP.NET v4.0, which IIS generates automatically.
Note
The network service and the application pool identify have the same privileges and restrictions. However, by adding the application pool identity feature, IIS 7.5 makes it easier to set up web servers that host several web applications. If all these web applications were to use the network service, they'd get exactly the same permissions—which means an added permission that's given to one application will become available to all other web applications, even though it might not be appropriate for them. Although this problem can be avoided by explicitly creating separate application domains that use different accounts, the application pool identity feature does the job automatically.
New ASP.NET programmers often ask why ASP.NET code doesn't run under another account—say, the account of the user who is making the request from the browser. However, if you consider this situation, you'll quickly realize the problems. It's almost certain that the end user doesn't have a Windows account defined on the web server. Even if the user has a corresponding user account, that account shouldn't have the same rights as the ASP.NET engine.
The trick is to use an account that's limited enough that it can't be abused by attackers but still has the required permissions to run your code. Both the application pool account and the network account achieve that goal, because they have a set of carefully limited privileges.
By default, the ASPNET account won't be allowed to perform tasks such as reading the Windows registry, retrieving information from a database, or writing to most locations on the local hard drive. On the other hand, it will have the permissions that are essential for normal functioning. For example, the ASPNET account is allowed to access the c:WindowsMicrosoft.NETFramework64 v4.0.30319Temporary ASP.NET Files directory so it can compile and cache web pages.
The limited security settings of the ASPNET and network service accounts are designed to prevent attacks on your web server. In most cases, the goal is to prevent any attacks that could exploit flaws in your application and trick it into undertaking actions that it's technically allowed to do (such as deleting a file) but should never perform. Although this is a worthwhile goal, you'll probably find that your applications require some additional permissions beyond those given to the ASPNET and network service accounts. For example, you might need access to a specific file or a database. To make this possible, you grant additional permissions to these accounts in the same way you would grant them to any other Windows user account. However, the process isn't always obvious—so you might want to consult a good handbook about Windows system administration before you take these steps.
Alternatively, you might want to change the account that's used to run the worker process to a different account with the required permissions. The following sections explain how.
Note
Before changing the account used to run ASP.NET code, make sure you fully understand the effects. If you use an account with more permissions than you need, you open the door to a wide range of potential hacks and attacks. It's always best to use a dedicated account for running ASP.NET code and to restrict what it can do to the bare minimum.
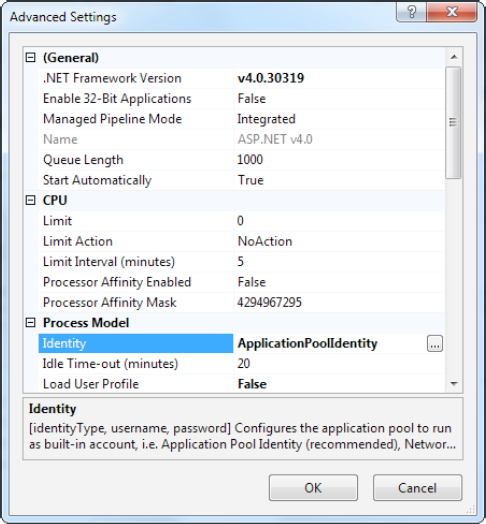
The Windows account is one of the advanced settings that's associated with an application pool. To change it, select the appropriate application pool, and click Advanced Settings in the Actions pane on the right. The setting you need to change is Identity (Figure 26-7).
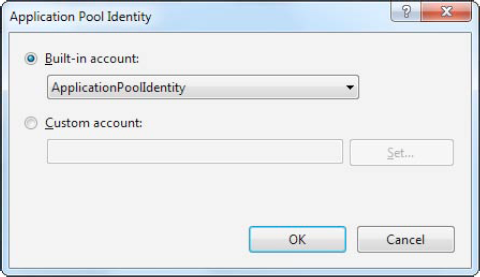
To change the Identity setting, select it, and then click the ellipsis (...) button on the right side of the property box. The Application Pool Identity window will appear (Figure 26-8). It gives you two choices:
- Use a built-in account:
Choose one of the predefined account types from the "Built-in account" list, including ApplicationPoolIdentity (in IIS 7.5 only), Network Service (the low-privileged account used by default in IIS 7), Local Service (which is similar to network service, but without the ability to access network locations), or Local System (which runs as an administrator with extensive privileges).
- Use a custom account:
Choose "Custom account," click Set, and then supply a user name and password for a specific account. If you take this approach, the information you enter is encrypted on the web server, so it can't be dug up by crafty hackers.
When you make your change in this way, you affect all the web applications that use the application pool. Another option is to create a new application pool first, using the Add Application Pool command from the Actions pane. You can then configure this application pool to use a specific user account.
Changing the account that ASP.NET uses is a risky step. If you're not careful, you'll end up using an account that has more permissions than it should. It then becomes easier for a malicious user to perform an attack that damages your web server or its data.
For example, imagine you create a web page that allows users to upload files. If you don't design this page carefully, the user might be able to trick your application into uploading a file into a location it shouldn't, such as the c:Windows directory. If your web application is running with elevated permissions, it might be allowed to overwrite a Windows system file in this directory—which allows the attacker to cause much more damage with this exploit.
For this reason, security experts recommend giving your web applications the smallest set of permissions that still allows them to function properly. One of the easiest ways to implement this design is to start with a strictly limited account (such as the network service account or the application pool identity) and then gradually give it the additional permissions it needs (but nothing more). There's no magic to this approach, but you might need the help of an experienced Windows administrator to figure out how to set permissions for various Windows resources.
Tip
It's often better to assign permissions to a group, not a specific user. This makes some administrative tasks easier, and it makes your entire setup more flexible. No matter what version of IIS you're using, you can use the IIS_IUSRS group. In IIS 7, the network service is a member of this group. In IIS 7.5, all the application pool identities are members of this group.
The application pool allows you to modify a small number of low-level settings. But the vast majority of tweakable options are set directly on your website. To see these, select the web application in the IIS Manager tree, and look at the array of icons that appears in the Feature view on the right (Figure 26-9).

The website configuration settings are split into three broad groups, which are arranged alphabetically: ASP.NET, IIS, and Management.
The ASP.NET group includes ASP.NET-specific settings. Technically, these settings are simply a nice graphical wrapper over various sections in the web.config file. In other words, you use the convenient graphical interface IIS provides, and IIS updates the corresponding configuration elements in your web.config file. This is similar to the way that the Website Administration Tool allows you to modify the web.config file while you're developing your web application. It also means that you'll already be familiar with most of the configuration options, because you've learned about them (and the associated web.config elements) throughout this book.
Here's are the highlights in the ASP.NET group:
- .NET Authorization:
Use this to add the web.config authorization rules you learned about in Chapter 19. Each authorization rule tells ASP.NET to grant or deny website access to a specific user or user role.
- .NET Compilation:
This allows you to set various low-level settings that control show ASP.NET compiles web page code before it's executed. Most users steer clear of this icon.
- .NET Error Pages:
This setting allows you to designate custom error pages that will be shown when problems occur (for example, when the user requests a page that doesn't exist or when the server is too busy to handle a request). However, these settings are overridden by the Error Pages icon in the IIS group.
- .NET Globalization:
This allows you to configure how ASP.NET determines the culture information it passes to your code. (For example, you could configure it to get culture information from the requesting browser.) These settings have an effect only if are using this culture information—for example, to vary the language of text in a page.
- .NET Profile:
Use this feature to add or modify the <profile> section of the web.config file. This element defines user-specific data that you want ASP.NET to store in a database automatically (as described in Chapter 21).
- .NET Trust Levels:
This allows you to lock down your website to a lower trust level so code won't be allowed to perform certain actions, regardless of the permissions you've granted to the ASP.NET account. Generally, this is an advanced option used only by web hosting companies.
- Application Settings:
Use this to add or modify custom pieces of information that will be stored as application settings in the web.config file (as described in Chapter 5).
- Connection Strings:
Use this to add or modify the connection strings that are stored in your web.config file. Your code can then use one of these connection strings to connect to a database (as described in Chapter 14).
- Machine Key:
This allows you to set the unique web server key that's used for cryptographic tasks (such as signing the view state field and encrypting the forms authentication cookie). You'll learn more in the section "The Machine Key" later in this chapter.
- Pages and Controls:
This allows you to configure the <pages> element and set various defaults. For example, you can set an application-wide master page and theme or turn off view state. Usually, you won't use this icon. Instead, if you need to apply any of these settings, you'll implement them while designing and coding your web application.
- Session State:
Use this to configure the <sessionState> element that controls how session state works. For example, you can set the timeout, turn on cookieless sessions, and choose where session information is stored (in server memory, a separate process, or a custom database). Chapter 8 has more about these options.
- SMTP E-mail:
This tells IIS how to handle e-mail messages that you send programmatically from inside your web application. These messages can be stored in a set directory or passed along to a dedicated SMTP server.
Note
Although the discussion so far assumes that you're configuring the root website directory, you can also configure many of these settings for individual subfolders. For example, you can give separate subfolders different authorization rules or error pages. As always, IIS respects any information that already exists in that folder's web.config file, if one exists.
The IIS settings are more general than the ASP.NET settings. They apply to any virtual directory, including those that contain ordinary HTML pages and no ASP.NET content. However, many of the IIS settings also have an important effect on the way ASP.NET works, such as those that configure security. Although there's no way to cover all the options in a single chapter, here's a rundown of the highlights:
- Authentication:
This configures the protocols that IIS uses to authenticate people, if your website uses Windows authentication (Chapter 19). You'll learn about this in the "Windows Authentication" section later in this chapter.
- Default Document:
This sets the page that IIS will return by default, if it receives a request for a virtual directory with no page specified (for example,
http://localhost/MySite). You'll learn how this work in the "The Default Page" section.- Directory Browsing:
Use this to allow directory browsing (which is generally appropriate only for a test web server, not a live web server with your deployed application). To turn on directory browsing, double-click this icon, and then click the Enable link in the Actions pane. Now, if you request the virtual directory with no page information (for example,
http://localhost/MySite) and there's no default document in that directory, IIS will return an automatically generated HTML page with a directory listing. You can browse the page you want by clicking it (see Figure 26-10), as you can with the Visual Studio test server. This convenience may make testing easier.- Error Pages:
Use this to designate custom error pages that IIS will show when it encounters common problems. You'll see how they work in the "Custom Error Pages" section, later in this chapter.
- Request Filtering:
This specifies the file types that IIS won't serve. For example, if IIS receives a request for .config, .cs, .vb, or .mdf file, it denies it based on this list of excluded file extensions. You can add new restricted file extensions or remove those that don't apply (however, this must be done carefully, or you risk opening up a security vulnerability in your application).
- SSL Settings:
Use this to configure your website to require secure SSL connections. You'll learn more about SSL in the "Confidentiality with SSL and Certificates" section later in this chapter.

Note
A few IIS features apply to the entire computer. The icons for these features appear only when you select your computer in the IIS tree. One example is the Server Certificates icon described in the "Confidentiality with SSL and Certificates" section.
Consider the virtual directory http://localhost/MySite. A user can request a specific page in this directory using a URL such as http://localhost/MySite/MyPage1.aspx. But what happens if the user simply types http://localhost/MySite into a web browser?
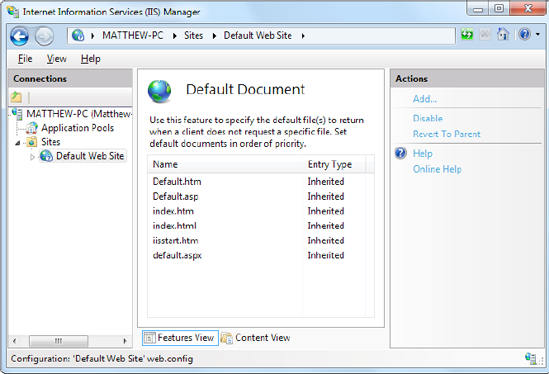
In this case, IIS will examine the list of default documents that are defined for that virtual directory. To see the default documents, select the virtual directory, and double-click the Default Document icon (in the IIS section).
IIS scans the default document list from top to bottom and returns the first matching page. Using the list in Figure 26-11, IIS will check first for a Default.htm file and then for Default.asp, index.htm, index.html, iisstart.asp, and default.aspx, which is the home page that most ASP.NET applications use. If IIS doesn't find any of these pages, either it will return an error message or, if you've enabled the Browse permission (which usually you won't), it will provide a file list.
You can easily modify the default document list using the links in the Actions pane on the right. Click Add to insert a new default document, click Remove to remove an existing one, and use the Move Up and Move Down links to rearrange the order IIS uses when checking for default documents.
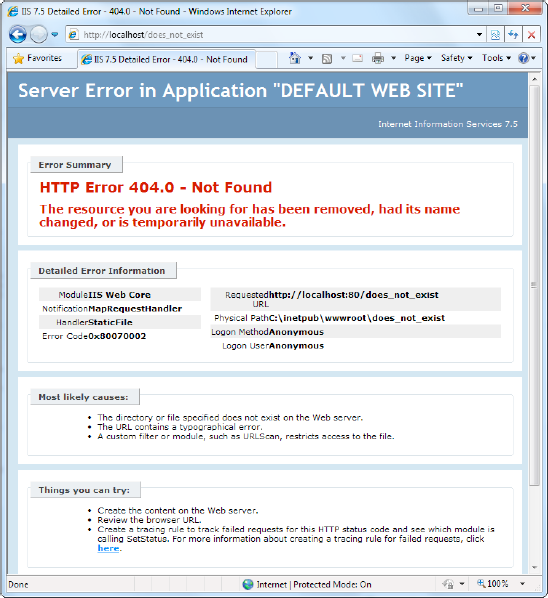
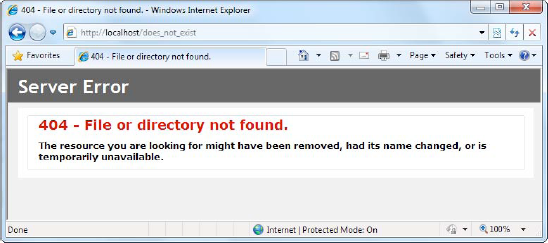
In any web page request, there are a number of errors that can occur. The user may attempt to request a restricted file, the file may not exist, the server may be too busy, or the page itself may generate an unhandled exception. Ordinarily, IIS deals with these errors in one of ways. If you're requesting the page locally (from a browser that's actually running on the web server), it returns the rich error page shown in Figure 26-12. If you're making the request from another computer, IIS keeps good security in mind and returns a much terser description of the problem, as shown in Figure 26-13.
Custom error pages allow you to replace the standard server-generated pages with something a bit nicer. For example, you can show an apologetic, user-friendly error messages that describes the problem, provides an e-mail link to contact the administrator, or just looks generally less intimidating than the terse computer jargon of a standard error message.
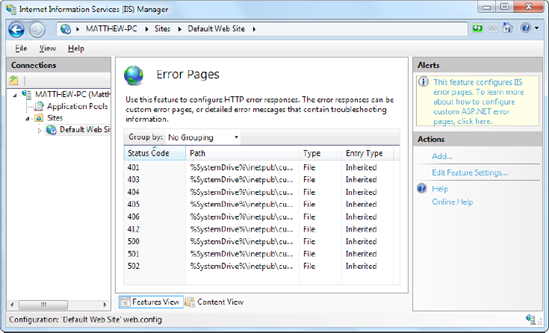
To configure custom error pages, select the virtual directory, and double-click the Error Pages icon (in the IIS section). You'll see a list of HTTP errors that are mapped to specific HTML error pages (as shown in Figure 26-14). You can add or remove items or double-click an error to choose a different HTML file. You can also click the Edit Feature Settings link in the Actions pane to set a default error page (which is used when no other list entry applies).
By default, IIS keeps showing rich error pages (like the one in Figure 26-12) for local requests. But if you want to test your rich error pages, you can turn off this feature. Just click the Edit Feature Settings link, and choose the "Custom error pages" option, instead of "Detailed errors for local requests and custom error pages for remote requests."
As you learned earlier in this chapter, some organizations use groups of web servers that work together to host web applications. This arrangement, called a web farm, has some side effects.
For example, if you decide to use session state in a web farm, you must use StateServer or SQLServer mode, as described in Chapter 9. Otherwise, a user's session information might get trapped on one server. If a subsequent request is directed to another server, the information will be lost, and a new session will be created. Another wrinkle occurs with view state (discussed in Chapter 9) and forms authentication (Chapter 18). The problem in both cases is the same—ASP.NET encodes some information to prevent tampering and verifies the information later. For example, with view state, ASP.NET adds a hash code, which double-checks the next time the page is posted back to make sure the user hasn't changed the hidden view state field (in which case the request is rejected). The problem that can happen with web farms is that the hash code one web server creates might not match the hash code expected by another web server that uses a different secret key. As a result, if a page is posted back to a web farm and a different web server gets involved, an error can occur.
To resolve this problem, you must configure each web server in the web farm to use the same key. With a web hosting provider, this detail should already be configured. If you have your own web farm, it won't be—the default is for each server to create its own random key. So, obviously, these keys won't match.
To configure web servers to use the same key, select the website, and double-click the Machine Key icon (in the ASP.NET section). Then, clear all the four check boxes (which tell IIS to automatically generate application-specific keys). Finally, enter the validation key and decryption key in the two provided text boxes (Figure 26-15), and then click the Apply link in the Actions pane.
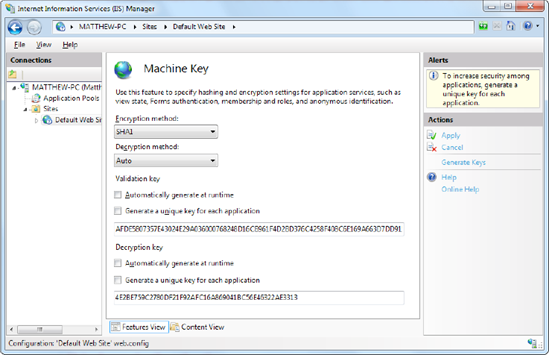
As long as you set all the servers in the web farm to use the same key, they can share view state and use other features, such as forms authentication. Of course, you can't create the key string on your own and have it be sufficiently random. (To the human eye, the validation key and decryption key simply look like longs strings of meaningless characters.) Instead, on the first web server, you can ask IIS to generate two sufficiently random keys by clicking the Generate Keys link in the Actions pane on the right side.
In Chapter 19, you learned two different ways to restrict unknown users from accessing your website choice. The first choice is to use ASP.NET's built-in forms security system, which uses a login page to authenticate a new user (usually, by comparing a user name and password against a database record) and an authentication cookie to keep track of each logged-in user. The second choice is to use Windows authentication to force each person to supply the credentials of a valid Windows account that's defined on the web server (or another server on the network). This technique is more specialized and less common, but it's sometimes used inside small companies, especially when creating internal web applications that have a small set of known users.
It's easy enough to test a website that uses Windows authentication, because the Visual Studio web server automatically logs in the current user under the current Windows account. But on a real web server, you need to configure IIS before it can perform the same task. That's because IIS supports several different protocols that it can use when authenticating a user with Windows authentication. Depending on your network and the level of security you want, you need to choose the right one. Table 26-1 describes your options.
Table 26.1. Windows Authentication Methods
The IIS documentation has more about these different authentication methods. However, choosing the one that's right for your network environment may involve a long discussion with your friendly neighborhood network administrator.
Before you can use any type of Windows authentication, you need to install the appropriate support for IIS. (By default, it's an optional feature that isn't included.) To add support, open the Control Panel, choose Programs and Features, and then click the link "Turn Windows features on or off." Head to the Internet Information Services
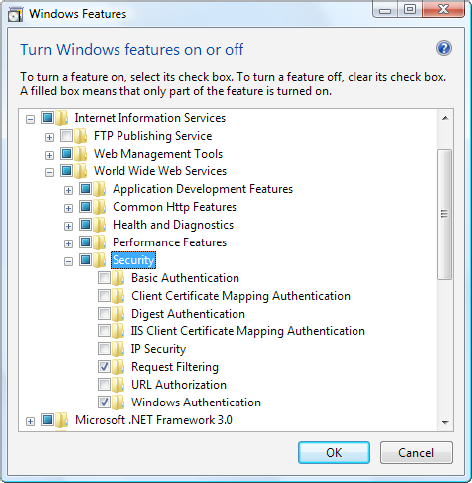
Note
Not all operating systems include all the options for Windows authentication. If you're using Windows Server 2008 or the Business or Ultimate edition of Windows 7 or Windows Vista, you'll have everything you need. But if you're using another version of Windows 7 or Windows Vista, you won't have support for two of the most useful authentication methods: Digest authentication and Integrated Windows authentication.
Once you have the authentication features you need installed, you simply need to select your website in IIS manager and double-click the Authentication icon (in the IIS group). Now you'll see whatever authentication options you've installed. Figure 26-17 shows an example on a web server that supports Integrated Windows authentication.
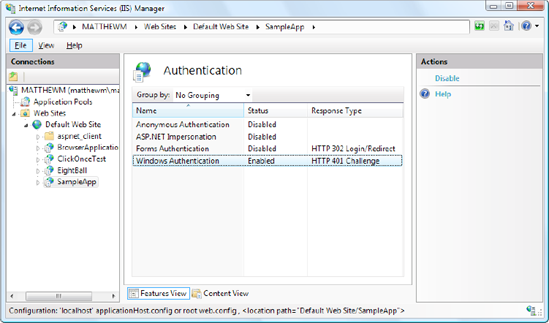
You can enable more than one authentication method. In this case, the client will use the strongest authentication method it supports, as long as anonymous access is not enabled. If anonymous access is enabled, the client will automatically access the website anonymously, unless the web application explicitly denies anonymous users with this rule in the web.config file:
<deny users="?" />
A certificate allows you to demonstrate that your site and your organization information are registered and verified with a certificate authority. This generally encourages customer confidence, although it doesn't guarantee the company or organization acts responsibly or fairly. A certificate is a little like a driver's license—it doesn't prove you can drive, but it demonstrates that a third party (in this case, a department of the government) is willing to attest to your identity and your qualifications. Your web server also requires a certificate in order to use SSL, which automatically encrypts all the information sent between the client and server.
To add a certificate to your site, you first need to purchase one from a certificate authority. These are some well-known certificate authorities:
VeriSign (
http://www.verisign.com)GeoTrust (
http://www.geotrust.com)GlobalSign (
http://www.globalsign.com)Thawte (
http://www.thawte.com)
The first step in the process of getting a certificate is to e-mail a certificate request for your web server. IIS Manager allows you to create a certificate request automatically. To do so, choose your computer in the IIS Manager tree, and double-click the Server Certificates icon. Then, click Create Certificate Request in the Actions pane to start the Request Certificate Wizard (shown in Figure 26-18).
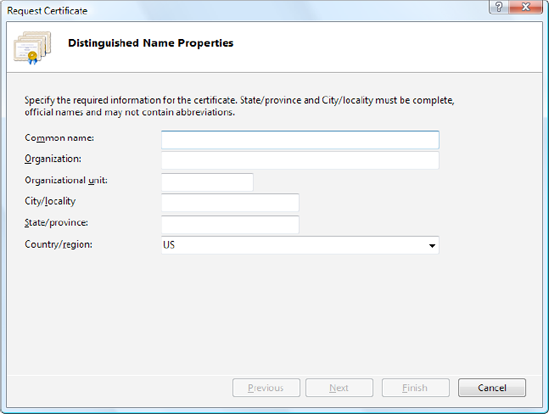
The Request Certificate Wizard collects some basic information, such as your address, the strength of encryption key you would like (the higher the bit length, the stronger the key), and so on. At the end of the process, you'll create a key request. You can save the generated file as a text file, but you must ultimately e-mail it to a certificate authority. The certificate authority will return a certificate, which you can install by clicking Complete Certificate Request in the Actions pane.
Tip
If you don't want to go to the trouble of buying a certificate, you can create a test certificate to use with your application. However, test certificates aren't suitable for real, live websites, because they lead to lots of browser security warnings (which is sure to scare away your users). To create a test certificate of your own, check out the instructions at http://tinyurl.com/2hndyq.
SSL technology encrypts communication between a client and a website. Although it slows performance, it's often used when private or sensitive information needs to be transmitted between an authenticated user and a web application. Without SSL, any information that's sent over the Internet, including passwords, credit card numbers, and employee lists, is easily viewable to an eavesdropper with the right network equipment.
Even with the best encryption, you have another problem to wrestle with—just how can a client be sure a web server is who it claims to be? For example, consider a clever attacker who uses some sort of IP spoofing to masquerade as Amazon.com. Even if you use SSL to transfer your credit card information, the malicious web server on the other end will still be able to decrypt all your information seamlessly. To prevent this type of deception, SSL uses certificates. The certificate establishes the identity, and SSL protects the communication. If a malicious user abuses a certificate, the certificate authority can revoke it.
To use SSL, you need to install a valid certificate. You can then set IIS directory settings specifying that individual folders require an SSL connection. To do so, select the website in IIS Manager, double-click the SSL Settings icon (in the IIS group), and put a check mark in the Require SSL check box.
To access a page over SSL, the client simply types the URL with a preceding https instead of http at the beginning of the request. In your ASP.NET code, you can check whether a user is connecting over a secure connection using code like this:
Protected Sub Page_Load(ByVal sender As Object, _
  ByVal e As System.EventArgs) Handles Me.Load

    If Request.IsSecureConnection Then
        lblStatus.Text = "This page is running under SSL."
    Else
        lblStatus.Text = "This page isn't secure.<br />"
        lblStatus.Text &= "Please request it with the "
        lblStatus.Text &= "prefix https:// instead of http://"
    End If
End SubYou now know enough to deploy an ordinary ASP.NET website. All you need to do is follow these two simple steps:
Create the virtual directory on the web server.
Copy the entire site (including subdirectories) to the virtual directory.
How you transfer these files depends on the Internet hosting service you're using. Usually, you'll need to use an FTP program to upload the files to a designated area. However, if both your computer and the web server are on the same internal network, you might just use Windows Explorer or the command prompt to copy files.
If you're using a commercial web host, the virtual directory will already be created for you, and you'll simply need to transfer the files.
Before you transfer your application files, you should make sure debug mode isn't enabled in the deployed version. To do so, find the debug attribute in the compilation tag, if it is present, and set it to false, as shown here:
<configuration>
  <system.web>
    <compilation debug="false" targetFramework="4.0">
    </compilation>
<!-- Other settings omitted. --> </system.web> <configuration>
When debugging is enabled, the compiled ASP.NET web page code will be larger and execute more slowly. For that reason, you should use debugging only while testing your web application.
It's just as straightforward to deploy web applications that use other components. That's because any custom components your website uses are copied into the Bin subdirectory when you add a reference in Visual Studio. No additional steps are required to register assemblies or to copy them to a specific system directory.
Note
Private assemblies are quite a boon for web hosting companies that need to host dozens, hundreds, or thousands of web applications on the same computer. Their web servers can't install risky components into a system directory just because one website requires it—especially when the version that one site requires might conflict with the version needed by another site on the same computer.
Of course, this principle doesn't hold true if you're using shared assemblies, which are stored in a special system location called the global assembly cache (GAC). Usually, you won't store components in this location, because it complicates development and offers few benefits. The core .NET assemblies are located in the GAC because they're large and likely to be used in almost every .NET application. It doesn't make sense to force you to deploy the .NET assemblies with every website you create. However, this means it's up to the administrator of the web server to install the version of the .NET Framework you require. This detail just isn't in your website's control.
The simple model of deployment you've seen so far is often called zero-touch deployment, because you don't need to manually configure web server resources. (It's also sometimes called XCopy deployment, because transferring websites is as easy as copying directories.) However, some applications are more difficult to set up on a web server. Here are some common factors that will require additional configuration steps:
- Databases:
If your web application uses a database, you'll need to transfer the database to the web server. You can do this by generating a SQL script that will automatically create the database and load it with data.
- Windows account permissions:
Usually, a web server will run web page code under a restricted account. This account might not be allowed to perform the tasks you rely on, such as writing to files or the Windows event log, or connecting to a database. In this case, an administrator needs to specifically grant the permissions you need to the account that runs the ASP.NET engine for your website.
- IIS security settings:
If your website uses SSL encryption or Windows authentication (as described in Chapter 18), the virtual directory settings will need to be tweaked. This also requires the help of an administrator.
To solve these problems in the most effective way, it helps to work with an experienced Windows administrator.
By default, when you deploy an application you've created with Visual Studio, you deploy the uncompiled source files. The first time a page is requested, it is compiled dynamically and cached in a temporary directory for reuse. The advantage of this approach is that it's easy to make last-minute changes directly to your files without needing to go through any compilation steps. However, this approach has some clear disadvantages:
The first request for a page is slow. After a page has been requested more than once, this problem disappears.
The web server contains all your source code and is clearly visible to anyone who has access to the server. Even though visitors can't see your code, website administrators can (and they could even change it).
To improve performance and prevent other people from seeing your code, you have another option—you can use ASP.NET's precompilation feature. Essentially, you use a command-line tool named aspnet_compiler.exe, which is stored in the familiar c:WindowsMicrosoft.NET Framework64[Version] directory. You use this compiler on your development machine before you deploy the application. It compiles the entire website into binary files.
Here's the syntax for the aspnet_compiler tool:
aspnet_compiler -m metabasePath targetDirectory
Essentially, you need to specify the source (where the web application resides) and the target directory (where the compiled version of the application should be copied).
To specify the source, you use the -m option and specify the metabase path in the form W3SVC/1/ROOT/[VirtualDirectoryName], just as you would with aspnet_regiis. Here's an example:
aspnet_compiler -m W3SVC/1/ROOT/MyApp C:MyAppDeploy
You can then copy the files from the target directory to your web server (or if you're really crafty, you can use aspnet_compiler to send the compiled files straight to the target directory as part of your build process).
If you use the command line shown previously, the c:MyAppDeploy directory will contain all the .aspx files but no .vb files—meaning all the source code is compiled into assemblies in the Bin directory and hidden. Even more interestingly, the information in the .aspx files has also been removed. If you open a web page, you'll find that it doesn't contain any tags. Instead, it just contains the statement "This is a marker file generated by the precompilation tool and should not be deleted!" All the tags have been moved into the compiled files in the Bin directory, along with the source code. The aspnet_compiler just keeps the .aspx files so you can remember what web pages there are.
Note
The aspnet_compiler compiles a web application to prepare it for deployment. However, you can compile a website after it's transferred to the web server. This is called in-place compilation, and it won't remove your code. Instead, it simply creates and caches the compiled versions of your web pages so there won't be any delay for the first set of requests. In-place compilation is useful when you want to optimize performance but don't want (or need) to hide the code. To perform an in-place compilation, omit the target directory when you use aspnet_compiler.
Visual Studio aims to simplify web application deployment in the same way it simplifies the task of designing rich web pages. Although you need to understand how IIS works in order to manage virtual directories effectively (and fix the inevitable configuration problems), Visual Studio includes features that integrate with IIS and allow you to create virtual directories without leaving the comfort of your design-time environment.
Visual Studio has several deployment-related features:
You can create a virtual directory when you create a new project.
You can use the Copy Web Site feature to transfer an existing website to a virtual directory.
You can use the Publish Web Site feature to compile your website and transfer it to another location.
If you use web projects (not projectless websites), you can use the web package feature to bundle IIS settings, security certificates, and SQL scripts, with the actual files of your application, into a single convenient package.
In the following sections, you'll examine the first three features. To learn more about web projects and the web package feature, refer to Pro ASP.NET 4 in VB 2010 (Apress).
When you create a website in Visual Studio, you can simultaneously create a virtual directory for that website. If you choose to do so, Visual Studio won't use its built-in web server. Instead, all your requests will flow through IIS. (Happily, you'll still see the same behavior and have access to the same debugging tools.)
To try this, you must first start Visual Studio as an administrator. To do so, right-click the Visual Studio shortcut, and choose Run As Administrator.
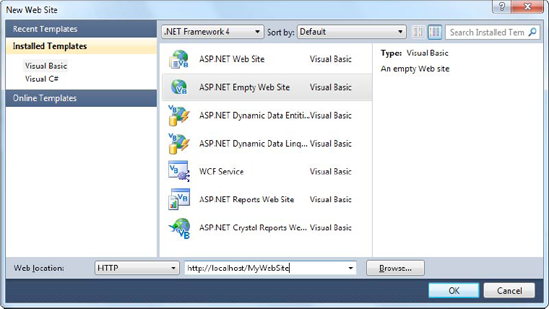
Now, choose File
Note
If you specify a virtual directory that already exists, Visual Studio won't create it—it will just use the existing directory. This is convenient because it allows you to set up the virtual directory ahead of time with exactly the options you want and then create the website in it. If the virtual directory doesn't already exist, Visual Studio creates the virtual directory in the c:Inetpubwwwroot directory.
This approach often isn't the best way to create a virtual directory. It has several limitations:
It forces you to set up the virtual directory when you first create the application. If you've already created an application, you can't use this approach for creating a virtual directory.
You can't configure other settings, such as default pages, custom errors, and virtual directory permissions.
Any change you make and debugging you perform act on the live version of your application that's running on the web server. If you're using a production web server, this is an unacceptable risk. If you're using a test web server, you may have opened potential security issues, because remote users can request pages in your application from other computers.
For these reasons, it's more common for developers to create their application using the built-in web server in Visual Studio and then create a virtual directory by hand when they're ready to deploy it to a test or production web server.
Visual Studio doesn't give you the full options of IIS Manager, but you can get a little more control. In the New Web Site dialog box, type http://localhost (for the current computer), and click the Browse button. You'll see all the virtual directories that are defined in IIS, just as in IIS Manager (see Figure 26-20).
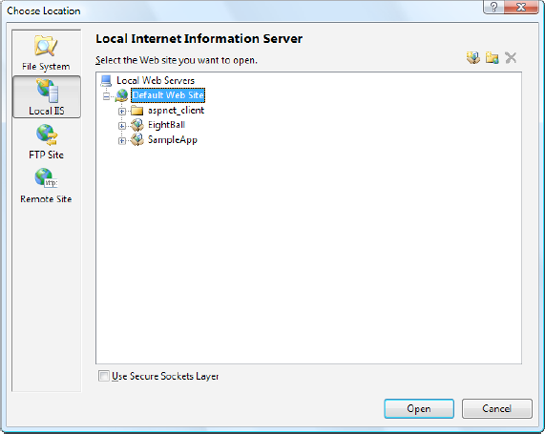
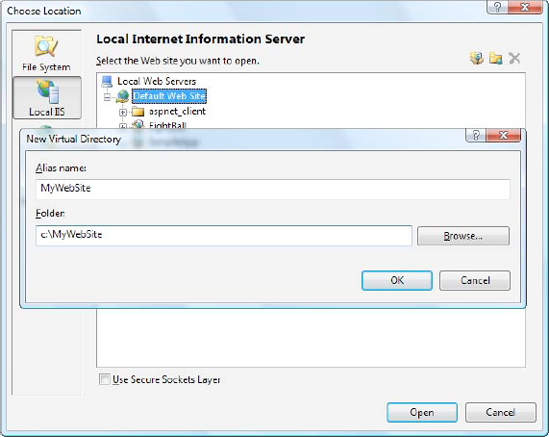
You can't view or change their properties, but you can choose an existing virtual directory where you want to create your application. You can also use the Create New Virtual Directory button in the top-right corner of the window (it appears as a folder icon with a globe). Click this button, and you'll get the chance to supply the virtual directory alias and its physical file path (see Figure 26-21).
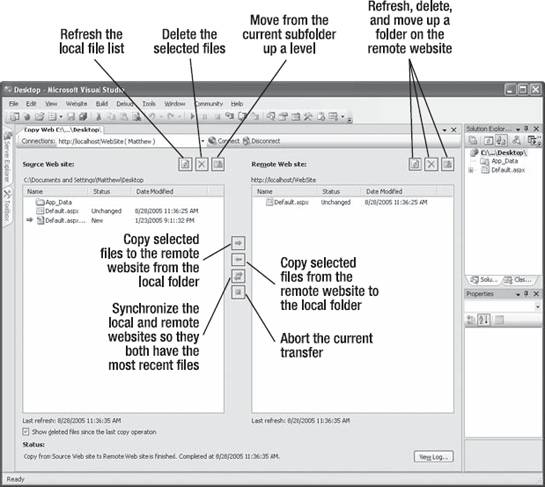
Visual Studio also includes a quick and easy way to transfer your web application files without using a separate program or leaving the design environment. You simply need to open your web project and select Website
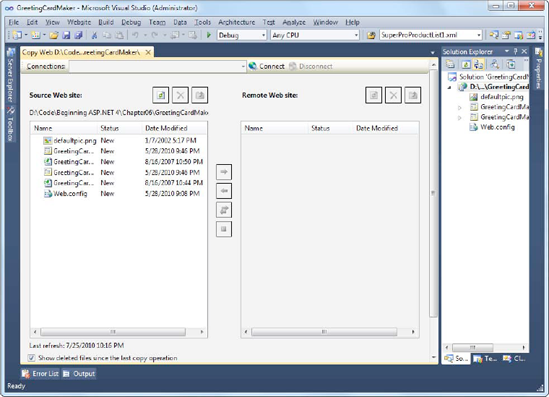
This window includes two file lists. On the left are the files in the current project (on your local hard drive). On the right are the files on the target location (the remote web server). When you first open this window, you won't see anything on the right, because you haven't specified the target. You need to click the Connect button at the top of the window to supply this information.
When you click Connect, Visual Studio shows a familiar dialog box—it looks almost the same as what you see when you create a virtual directory for a new project. Using this window, you can specify one of the following types of locations:
- File System:
This is the easiest choice—you simply need to browse through a tree of drives and directories or through the shares provided by other computers on the network. If you want to create a new directory for your application, just click the Create New Folder icon above the top-right corner of the directory tree.
- Local IIS:
This choice allows you to browse the virtual directories made available on the local computer through IIS. To create a new virtual directory for your web application, click the Create New Web Application icon or the Create New Virtual Directory icon at the top-right corner of the virtual directory tree, as you learned earlier.
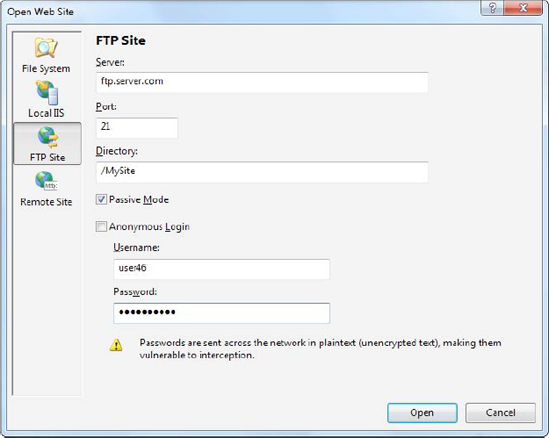
- FTP Site:
This option isn't quite as convenient as browsing for a directory—instead, you'll need to enter all the connection information, including the FTP site, port, directory, and a user name and password before you can connect (see Figure 26-23).
- Remote Web Server:
This option accesses a website at a specified URL using HTTP. For this to work, the web server must have the FrontPage Extensions installed. When you connect, you'll be prompted for a user name and password.
Once you choose the appropriate destination, click Open. Visual Studio will attempt to connect to the remote site and retrieve a list of its files.
The Copy Web Site feature is particularly useful for updating a web server. That's because Visual Studio compares the file list on the local and remote websites, and it flags files that exist in one location only (with the status New) or those that are newer versions (with the status Changed). You can then select the files you want to transfer and click one of the arrow buttons to transfer them from one location to the other (see Figure 26-24).
The website copying feature is great for transferring files to a test server. However, it doesn't give you the option of precompiling your code. If you're deploying your application to a live web server and you want to keep the source code tightly locked down, you'll want something more.
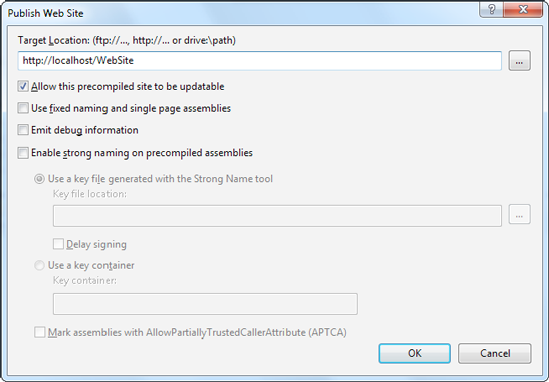
As described earlier in this chapter, you can use the aspnet_compiler command-line utility to compile ASP.NET applications. This functionality is also available in Visual Studio through the website publishing feature. While the website copying feature is designed to let you update individual files (which is ideal when updating a test server), the publishing feature is intended to transfer your entire website in compiled form with a couple of clicks.
Here's what you need to do:
Select Build
Enter a file path or a URL for an FTP site or a FrontPage-enabled site in the Target Location text box. To get some help, click the ellipsis (...) next to the Target Location text box. This opens the familiar dialog box with options for choosing (or creating) a virtual directory, file path, FTP site, or remote server.
Leave the other check boxes unselected. You can choose to allow updates, in which case the code-behind files are compiled but the .aspx files with the HTML and tags aren't compiled. This option allows you to make only limited changes (and it increases the potential for accidental changes or tampering), so it isn't terribly useful.
Click OK. Your website files will be compiled with aspnet_compiler and then transferred to the target location.
This chapter covered IIS (the web server that powers ASP.NET websites) and the deployment model for ASP.NET. You learned how to use IIS Manager to configure a web server, by adjusting both ASP.NET and IIS settings. You learned how to control the user account that your code executes under, how to customize the default pages and error pages, and how to set up Windows authentication and SSL. Finally, you considered the tools that Visual Studio includes to make deployment easier, such as its built-in Copy Web Site and Build Web Site features.