.NET is thoroughly object-oriented. Not only does .NET allow you to use objects, but it demands it. Almost every ingredient you'll need to use to create a web application is, on some level, really a kind of object.
So, how much do you need to know about object-oriented programming to write web pages in .NET? It depends on whether you want to follow existing examples and cut and paste code samples or have a deeper understanding of the way .NET works and gain more control. This book assumes that if you're willing to pick up a thousand-page book, then you're the type of programmer who excels by understanding how and why things work the way they do. It also assumes you're interested in some of the advanced ASP.NET programming tasks that will require class-based design, such as creating your own database component (see Chapter 22).
This chapter explains objects from the point of view of the .NET Framework. It doesn't rehash the typical object-oriented theory, because countless excellent programming books cover the subject. Instead, you'll see the types of objects .NET allows, how they're constructed, and how they fit into the larger framework of namespaces and assemblies.
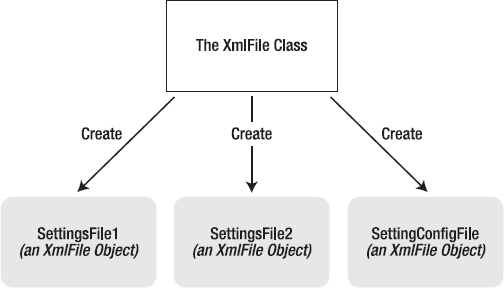
As a developer you've probably already created classes or at least heard about them. Classes are the code definitions for objects. The nice thing about a class is that you can use it to create as many objects as you need. For example, you might have a class that represents an XML file, which can be used to read some data. If you want to access multiple XML files at once, you can create several instances of your class, as shown in Figure 3-1. These instances are called objects.
Classes interact with each other with the help of three key ingredients:
Properties: Properties allow you to access an object's data. Some properties may be read-only, so they cannot be modified, while others can be changed. For example, the previous chapter demonstrated how you can use the read-only Length property of a string object to find out how many characters are in a string.
Methods: Methods allow you to perform an action on an object. Unlike properties, methods are used for actions that perform a distinct task or may change the object's state significantly. For example, to open a connection to a database, you might call the Open() method of a Connection object.
Events: Events provide notification that something has happened. If you've ever programmed an ordinary desktop application in Visual Basic, you know how controls can fire events to trigger your code. For example, if a user clicks a button, the Button object fires a Click event, which your code can react to. ASP.NET controls also provide events.
Classes contain their own code and internal set of private data. Classes behave like black boxes, which means that when you use an object, you shouldn't waste any time wondering how it works internally or what low-level information it's using. Instead, you need to worry only about the public interface of a class, which is the set of properties, methods, and events available for you to use. Together, these elements are called class members.
In ASP.NET, you'll create your own custom classes to represent individual web pages. In addition, you'll create custom classes if you design separate components. For the most part, however, you'll be using prebuilt classes from the .NET class library, rather than programming your own.
One of the tricks about .NET classes is that you really use them in two ways. You can use some class members without creating an object first. These are called shared members, and they're accessed by class name. For example, you can use the shared property DateTime.Now to retrieve a DateTime object that represents the current date and time. You don't need to create a DateTime object first.
On the other hand, the majority of the DateTime members require a valid instance. For example, you can't use the AddDays() method or the Hour property without a valid object. These instance members have no meaning without a live object and some valid data to draw on.
The following code snippet uses shared and instance members:
' Get the current date using a shared property.
' Note that you use the type name DateTime.
Dim myDate As DateTime = DateTime.Now

' Use an instance method to add a day.
' Note that you need to use the object name myDate.
myDate = myDate.AddDays(1)

' The following code makes no sense.
' It tries to use the instance method AddDays() with the class name DateTime!
myDate = DateTime.AddDays(1)
Both properties and methods can be designated as shared. Shared properties and methods are a major part of the .NET Framework, and you will use them frequently in this book. Some classes may consist entirely of shared members (such as the Math class shown in the previous chapter), and some may use only instance members. Other classes, such as DateTime, provide a combination of the two.
The next example, which introduces a basic class, will use only instance members. This is the most common design and a good starting point.
To create a class, you must define it in a class block:
Public Class MyClass
    ' Class code goes here.
End Class
You can define as many classes as you need in the same file. However, good coding practices suggest that in most cases you use a single file for each class.
Classes exist in many forms. They may represent an actual thing in the real world (as they do in most programming textbooks), they may represent some programming abstraction (such as a rectangle or color structure), or they may just be a convenient way to group related functionality (like with the Math class). Deciding what a class should represent and breaking down your code into a group of interrelated classes are part of the art of object-oriented programming.
In the next example, you'll see how to construct a .NET class piece by piece. This class will represent a product from the catalog of an e-commerce company. The Product class will store product data, and it will include the built-in functionality needed to generate a block of HTML that displays the product on a web page. When this class is complete, you'll be able to put it to work with a sample ASP.NET test page.
Once you've defined the basic skeleton for your class, the next step is to add some basic data members. This example defines three member variables that store information about the product—namely, its name, its price, and a URL that points to an image file:
Public Class Product
    Private name As String
    Private price As Decimal
    Private imageUrl As String
End Class
A local variable exists only until the current method ends. On the other hand, a member variable (or field) is declared as part of a class. It's available to all the methods in the class; it's created when the object is created; and it lives as long as the containing object lives.
When you declare a member variable, you set its accessibility. The accessibility determines whether other parts of your code will be able to read and alter this variable. For example, if ClassA contains a private variable, the code in ClassB will not be able to read or modify it. Only the code in ClassA will have that ability. On the other hand, if ClassA has a public variable, any other object in your application is free to read and alter the information it contains. Local variables don't support any accessibility keywords, because they can never be made available to any code outside of the current method. Generally, in a simple ASP.NET application, most of your member variables will be private because the majority of your code will be self-contained in a single web page class. As you start creating separate components to reuse functionality, however, accessibility becomes much more important. Table 3-1 explains the access levels you can use.
Table 3.1. Accessibility Keywords
Keyword | Accessibility |
|---|---|
Public | Can be accessed by any class |
Private | Can be accessed only by members inside the current class |
Friend | Can be accessed by members in any of the classes in the current assembly (the file with the compiled code) |
Protected | Can be accessed by methods in the current class or in any class that inherits from this class |
Protected Friend | Can be accessed by members in the current application (as with Friend) and by the members in any class that inherits from this class (as with Protected). |
The accessibility keywords don't just apply to member variables. They also apply to methods, properties, and events, all of which will be explored in this chapter.
Tip
By convention, all the public pieces of your class (the class name, public events, properties and methods, and so on) should use Pascal case. This means the name starts with an initial capital. (The function name DoSomething() is one example of Pascal case.) On the other hand, private member variables can use any case you want. Usually, private members will adopt camel case. This means the name starts with an initial lowercase letter. (The variable name myInformation is one example of camel case.)
When creating an object, you need to specify the New keyword. For example, the following code snippet creates a Product object (that is, an instance of the Product class) and then stores a reference to the object in the saleProduct variable:
Dim saleProduct As New Product()

' Optionally you could do this in two steps:
' Dim saleProduct As Product
' saleProduct = new Product()
If you omit the New keyword, you'll declare the variable, but you won't create the object. Here's an example:
Dim saleProduct As Product
In this case, your saleProduct variable doesn't point to any object at all. (Technically, it's Nothing, which is the VB keyword that represents a null reference.) If you try to use the saleProduct variable, you'll receive the common "null reference" error, because no object exists for you to use. When you're finished using an object, you can release it by removing all references to the object. In the previous code snippet, there is only one variable that points to the Product object—the saleProduct variable. Here's how you release the saleProduct reference:
saleProduct = Nothing
In .NET, you almost never need to use this code. That's because objects are automatically released when the appropriate variable goes out of scope. For example, if you declare the saleProduct variable inside a method, the object is released once the method ends.
Tip
Just because an object is released doesn't mean the memory it uses is immediately reclaimed. The CLR uses a background task (called the garbage collection service) that periodically scans for released objects and reclaims the memory they hold.
In some cases, you will want to declare an object variable without actually creating an object. For example, you might want to call a function that generates an object for you, and then use the object that's returned from the function.
In order to do this, declare your variable without using the New keyword, and then assign the object to your variable. Here's an example:
' Declare but don't create the product.
Dim saleProduct As Product

' Call a function that accepts a numeric product ID parameter,
' and returns a Product object.
' Assign the Product object to the saleProduct variable.
saleProduct = FetchProduct(23)
Once you understand the concept, you can compress this code into one statement:
Dim saleProduct As Product = FetchProduct(23)
In these cases, when you aren't actually creating an object, you shouldn't use the New keyword.
The simple Product class is essentially useless because your code cannot manipulate it. All its information is private and unreachable. Other classes won't be able to set or read this information.
To overcome this limitation, you could make the member variables public. Unfortunately, that approach could lead to problems because it would give other objects free access to change everything, even allowing them to apply invalid or inconsistent data. Instead, you need to add a "control panel" through which your code can manipulate Product objects in a safe way. You can do this by adding property accessors.
Accessors usually have two parts. The Get accessor allows your code to retrieve data from the object. The Set accessor allows your code to set the object's data. In some cases, you might omit one of these parts, such as when you want to create a property that can be examined but not modified.
Accessors are similar to any other type of method in that you can write as much code as you need. For example, your Set accessor could raise an error to alert the client code of invalid data and prevent the change from being applied. Or your Set accessor could change multiple private variables at once, thereby making sure the object's internal state remains consistent. In the Product class example, this sophistication isn't required. Instead, the property accessors just provide straightforward access to the private variables. For example, the Name property simply gets or sets the value of the _name private member variable.
Here's a revised version of the Product class that renames its private member variables (giving them an underscore at the beginning of the name) and adds three public properties to provide access to them:
Public Class Product
    Private _name As String
    Private _price As Decimal
    Private _imageUrl As String

    Public Property Name() As String
        Get
            Return _name
        End Get
        Set(ByVal value As String)
            _name = value
        End Set
    End Property

    Public Property Price() As Decimal
        Get
            Return _price
        End Get
        Set(ByVal value As Decimal)
            _price = value
        End Set
    End Property

    Public Property ImageUrl() As String
Get
Return _imageUrl
End Get
Set(ByVal value As String)
_imageUrl = value
End Set
End Property
End ClassProperty accessors, like any other public piece of a class, should start with an initial capital. Usually, the private variable will have a similar name, but prefixed with an underscore (as in the previous code example), or the m_ prefix (which means "member variable"). Although it's technically possible, it's not recommended to use the same name for a property as for a private variable, because it's too easy to make a mistake and refer to one when you want the other.
The client can now create and configure an instance of the class by using its properties and the familiar dot syntax. For example, if the object variable is named saleProduct, you can set the product name using the saleProduct.Name property. Here's an example:
Dim saleProduct As New Product()
saleProduct.Name = "Kitchen Garbage"
saleProduct.Price = 49.99D
saleProduct.ImageUrl = "http://mysite/garbage.png"
Note
Visual Basic treats all literal decimal values (hard-coded numbers such as 49.99) as the Double data type. In the preceding code, this doesn't cause a problem because Visual Basic is able to seamlessly convert a Double into a Decimal, which is the required data type for the Product.Price property. However, if you've switched on Option Strict, this implicit conversion isn't allowed, so you need to replace 49.99 with 49.99D. The D character at the end of any number tells Visual Basic to interpret the number as a Decimal data type straight off.
Usually, property accessors come in pairs—that is, every property has both a Get accessor and a Set accessor. But this isn't always the case. You can create properties that can be read but not set (which are called read-only properties), and you can create properties that can be set but not retrieved (called write-only). All you need to do is include either the ReadOnly or the WriteOnly keyword in the property declaration, and then leave out whichever part of the property you don't need. Here's an example:
Public ReadOnly Property Price() As Decimal
    Get
        Return _price
    End Get
End Property
This technique is particularly handy if you want to create properties that don't correspond directly to a private member variable. For example, you might want to use properties that represent calculated values, or properties that are based on other properties.
If you have really simple properties—properties that do nothing except set or get the value of a private member variable—you can simplify your code using a VB 2010 language feature called automatic properties.
Automatic properties are properties without any code. When you use an automatic property, you declare it, but you don't supply the code for the get and set accessors, and you don't declare the matching private variable. Instead, the VB compiler adds these details for you.
Because the properties in the Product class simply get and set member variables, you can replace any of them (or all of them) with automatic properties. Here's an example:
Public Property Price As Decimal
You don't actually know what name the VB compiler will choose when it creates the corresponding private member variable. However, it doesn't matter, because you'll never need to access the private member variable directly. Instead, you'll always use the public Price property.
Here's a complete, condensed Product class that uses only automatic properties:
Public Class Product
    Public Property Name As String
    Public Property Price As Decimal
    Public Property ImageUrl As String
End Class
The only disadvantage to automatic properties is that you'll need to switch them back to normal properties if you want to add some more specialized code after the fact. For example, you might want to add code that performs validation or raises an event when a property is set.
The current Product class consists entirely of data, which is exposed by a small set of properties. This type of class is often useful in an application. For example, you might use it to send information about a product from one function to another. However, it's more common to add functionality to your classes along with the data. This functionality takes the form of methods.
Methods are simply procedures or functions that are built into your class. When you call a method on an object, the method does something useful, such as return some calculated data. In this example, we'll add a GetHtml() method to the Product class. This method will return a string representing a formatted block of HTML based on the current data in the Product object. This HTML includes a heading with the product name, the product price, and an <img> element that shows the associated product picture. (You'll explore HTML more closely in Chapter 4.)
Public Class Product
    ' (Additional class code omitted for clarity.)

    Public Function GetHtml() As String
        Dim htmlString As String = "<h1>" & Name & "</h1><br />" &
          "<h3>Costs: " & Price.ToString() & "</h3><br />" &
          "<img src='" & ImageUrl & "' />"
        Return htmlString
    End Function
End Class
All the GetHtml() method does is read the private data and format it in some attractive way. You can take this block of HTML and place it on a web page to represent the product. This really targets the class as a user interface class rather than as a pure data class or "business object."
Currently, the Product class has a problem. Ideally, classes should ensure that instances are always in a valid state. However, unless you explicitly set all the appropriate properties, the Product object won't correspond to a valid product. This could cause an error if you try to use a method that relies on some of the data that hasn't been supplied. To solve this problem, you need to equip your class with one or more constructors.
A constructor is a method that automatically runs when an instance is created. In VB, the constructor is always a method with the name New().
The next code example shows a new version of the Product class. It adds a constructor that requires the product price and name as arguments.
Public Class Product
    ' (Additional class code omitted for clarity.)

    Public Sub New(ByVal name As String, ByVal price As Decimal)
        Me.Name = name
        Me.Price = price
    End Sub
End Class
This example introduces a potential problem: overlapping variables that share the same name. For example, if you type Price somewhere inside the constructor, Visual Basic has no way of knowing whether you want to refer to the Product.Price property or the price parameter. The VB compiler isn't case-sensitive, so it treats these two names as one and the same.
VB deals with this sort of ambiguity by assuming that you're always referring to the variable with the narrowest scope. So if you type Price, it assumes you mean the price parameter, not the Price property. To access the Price property, you need to use the Me keyword, which explicitly refers to the top-level class that contains your code. In other words, Me.Price automatically refers to the Price property that's defined in the Product class. There are other possible solutions—for example, you could change the parameter names (say, renaming price to initialPrice), or set the private member variable instead of the class property (in this case, that's _price). But the Me keyword is the simplest fix, and it keeps working even if you're using automatic properties and you don't have direct access to the member variables.
Now that you have a constructor, you can use it to create a new object instance. Here's an example of the code you need to use the Product class constructor:
Dim saleProduct As New Product("Kitchen Garbage", 49.99D)This code is much leaner than the code that was required to create and initialize an instance of the previous, no-constructor Product class. With the help of the constructor, you can create a Product object and configure it with the basic data it needs in a single line.
If you don't create a constructor, .NET supplies a default public constructor that does nothing. If you create at least one constructor, .NET will not supply a default constructor. Thus, in the preceding example, the Product class has exactly one constructor, which is the one that is explicitly defined in code. To create a Product object, you must use this constructor. This restriction prevents a client from creating an object without specifying the bare minimum amount of data that's required:
' This will not be allowed, because there is
' no zero-argument constructor.
Dim saleProduct As New Product()
Note
To create an instance of a class, you need to use a constructor. The preceding code fails because it attempts to use a zero-argument constructor, which doesn't exist in the Product class.
Most of the classes you use will have constructors that require parameters. As with ordinary methods, constructors can be overloaded with multiple versions, each providing a different set of parameters:
Public Class Product
    ' (Additional class code omitted for clarity.)

    Public Sub New(ByVal name As String, ByVal price As Decimal)
        Me.Name = name
        Me.Price = price
    End Sub

    Public Sub New(ByVal name As String, ByVal price As Decimal, _
      ByVal imageUrl As String)
        Me.Name = name
        Me.Price = price
        Me.ImageUrl = imageUrl
    End Sub
End Class
When creating an object, you can choose the constructor that suits you best based on the information that you have available. The .NET Framework classes use overloaded constructors extensively.
Classes can also use events to notify your code. To define an event in VB, you use the Event keyword, followed by the name of the event, and a list of parameters that the event will use. As with properties and methods, events can be declared with different accessibilities, although public events are the default. Usually, this is what you want, because you'll use the events to allow one object to notify another object that's an instance of a different class. Once you've defined your event, you can fire it anytime using the RaiseEvent statement.
As an illustration, the Product class example has been enhanced with a PriceChanged event that occurs whenever the price is modified through the property procedure. This event won't fire if code inside the class changes the underlying private price variable without going through the property.
Public Class Product
    ' (Additional class code omitted for clarity.)

    ' Define the event.
Public Event PriceChanged()Public Property Price() As Decimal Get Return _price End Get Set(ByVal value As Decimal) _price = value' Fire the event to all listeners.RaiseEvent PriceChanged()End Set End Property End Class
ASP.NET uses an event-driven programming model, so you'll soon become used to writing code that reacts to events. But unless you're creating your own components, you won't need to fire your own custom events. For an example where custom events are useful, refer to Chapter 11, which discusses how you can add an event to a user control you've created.
It's quite possible that you'll create dozens of ASP.NET applications without once defining a custom event. However, you'll be hard-pressed to write a single ASP.NET web page without handling an event. To handle an event, you first create a method called an event handler. The event handler contains the code that should be executed when the event occurs. Then, you connect the event handler to the event.
To handle the PriceChanged event, you need to create an event handler. Usually, this event handler will be placed in another class, one that needs to respond to the change. The event handler needs to have the same signature as the event it's handling. In the Product example, the PriceChanged event has no parameters, so the event handler would look like the simple subroutine shown here:
Private Sub ChangeDetected()
    ' This code executes in response to the PriceChanged event.
End Sub
The next step is to hook up the event handler to the event. There are two ways to connect an event handler. The first option is to connect an event handler at runtime using the AddHandler statement. Here's an example:
Dim saleProduct As New Product("Kitchen Garbage", 49.99D)

' This connects the saleProduct.PriceChanged event to an event handling
' method called ChangeDetected.
AddHandler saleProduct.PriceChanged, AddressOf ChangeDetected

' Now the event will occur in response to this code:
saleProduct.Price = saleProduct.Price * 2
This code attaches an event handler to a method named ChangeDetected. This method is in the same class as the event hookup code shown here, and for that reason you don't need to specify the object name when you attach the event handler. If you want to connect an event to a different object, you'd need to use the dot syntax when referring the event handler method, as in myObject.ChangeDetected.
You'll notice that this code is quite similar to the delegate example in the previous chapter. In fact, events use delegates behind the scenes to keep track of the event handlers they need to notify.
Tip
You can also detach an event handler using the RemoveHandler statement.
Instead of connecting events at runtime using code statements (as described in the previous section), you can connect them declaratively. This approach is often more convenient because it requires less code.
The first step is to declare the event-firing object at the class level. Here's an example that takes this step with the saleProduct variable:
Public Class EventTester

    Private saleProduct As New Product("Kitchen Garbage", 49.99D)

    Private Sub ChangeDetected()
        ' This code executes in response to the PriceChanged event.
    End Sub

    ...
End Class
By declaring saleProduct at the class level (rather than inside a method), you make it available for declarative event handling. Note that it isn't necessary to use the New keyword to create the object immediately, as this example does. Instead, you could create the object somewhere else in your code, as long as it's defined at the class level.
Once you have this basic design, the next step is to hook up your event handler. In this case, you won't use the AddHandler statement. Instead, you'll use the WithEvents keyword and the Handles clause.
The WithEvents keyword is added to the declaration of the object that raises the event, like so:
Private WithEvents saleProduct As New Product("Kitchen Garbage", 49.99D)The Handles clause is added to the end the declaration for your event handler. It specifies the event you want to handle:
Private Sub ChangeDetected() Handles saleProduct.PriceChangedHere's the complete code:
Public Class EventTester

    Private WithEvents saleProduct As New Product("Kitchen Garbage", 49.99D)

    Private Sub ChangeDetected() Handles saleProduct.PriceChanged
        ' This code executes in response to the PriceChanged event.
End Sub
...
End ClassThe difference between the declarative and the programmatic approaches to event handling is just skin deep. When you use WithEvents and Handles, the VB compiler will generate the necessary AddHandler statements to link up your event handler automatically. This approach is often more convenient than the programmatic approach, but it doesn't give you quite the same flexibility. For example, you won't have the ability to attach and detach event handlers while your program is running, which is useful in some specialized scenarios.
Visual Studio uses declarative event handling, so you'll see this technique in the web form examples in the next few chapters. However, it's worth noting that you don't need to add the WithEvents and Handles keywords yourself. Instead, Visual Studio adds the necessary code to connect all the event handlers you create.
Note
In traditional Visual Basic programming, events were connected to event handlers based on the method name. In .NET, this clumsy system is abandoned. Your event handler can have any name you want, and it can even be used to handle more than one event, provided they pass the same type of information in their parameters.
To learn a little more about how the Product class works, it helps to create a simple web page. This web page will create a Product object, get its HTML representation, and then display it in the web page. To try this example, you'll need to use the three files that are provided with the online samples in the Chapter03Website folder:
Product.vb: This file contains the code for the Product class. It's in the Chapter03 WebsiteApp_Code subfolder, which allows ASP.NET to compile it automatically.
Garbage.jpg: This is the image that the Product class will use.
Default.aspx: This file contains the web page code that uses the Product class.
The easiest way to test this example is to use Visual Studio. Here are the steps you need to perform the test:
Start Visual Studio.
Select File

In the Open Web Site dialog box, browse to the Chapter03 folder, double-click it, select the Website folder inside, and click Open. This loads your project into Visual Studio.
Choose Debug
When the Default.aspx page executes, it creates a new Product object, configures it, and uses the GetHtml() method. The HTML is written to the web page using the Response.Write() method. Here's the code:
<%@ Page Language='VB' %>
<script runat='server'>
    Protected Sub Page_Load(ByVal sender As Object, ByVal e As EventArgs)
        Dim saleProduct As New Product("Kitchen Garbage", 49.99D, "garbage.jpg")
        Response.Write(saleProduct.GetHtml())
    End Sub
</script>

<html>
    <head>
        <title>Product Test</title>
    </head>
    <body></body>
</html>
The <script> block uses the runat="server" attribute setting to run the code on the web server, rather than in the user's web browser. The <script> block holds a subroutine named Page_Load. This subroutine is triggered when the page is first created. Once this code is finished, the HTML is sent to the client. Figure 3-2 shows the web page you'll see.
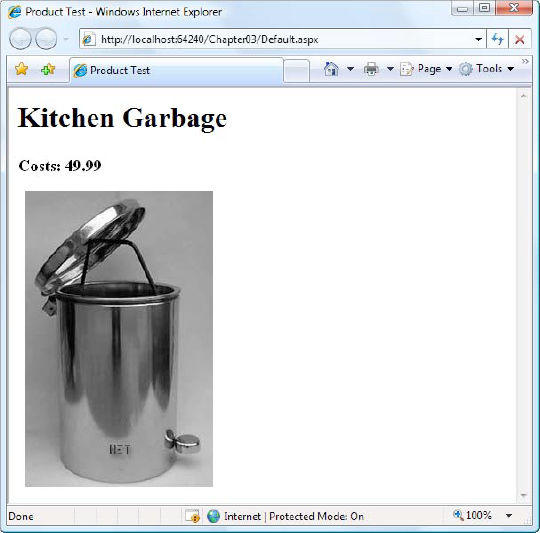
Interestingly, the GetHtml() method is similar to how an ASP.NET web control works, but on a much cruder level. To use an ASP.NET control, you create an object (explicitly or implicitly) and configure some properties. Then ASP.NET automatically creates a web page by examining all these objects and requesting their associated HTML (by calling a hidden GetHtml() method or by doing something conceptually similar).[1] It then sends the completed page to the user. The end result is that you work with objects, instead of dealing directly with raw HTML code.
When using a web control, you see only the public interface made up of properties, methods, and events. However, understanding how class code actually works will help you master advanced development.
Now that you've seen the basics of classes and a demonstration of how you can use a class, it's time to introduce a little more theory about .NET objects and revisit the basic data types introduced in the previous chapter.
In Chapter 2, you learned how simple data types such as dates and integers are actually objects created from the class library. This allows some impressive tricks, such as built-in string handling and date calculation. However, simple data types differ from more complex objects in one important way. Simple data types are value types, while classes are reference types.
This means a variable for a simple data type contains the actual information you put in it (such as the number 7). On the other hand, object variables actually store a reference that points to a location in memory where the full object is stored. In most cases, .NET masks you from this underlying reality, and in many programming tasks you won't notice the difference. However, in three cases you will notice that object variables act a little differently than ordinary data types: in assignment operations, in equality testing, and when passing parameters.
When you assign a simple data variable to another simple data variable, the contents of the variable are copied:
integerA = integerB   ' integerA now has a copy of the contents of integerB.
                      ' There are two duplicate integers in memory.
Reference types work a little differently. Reference types tend to deal with larger amounts of data. Copying the entire contents of a reference type object could slow down an application, particularly if you are performing multiple assignments. For that reason, when you assign a reference type you copy the reference that points to the object, not the full object content:
' Create a new Product object.
Dim productVariable1 As New Product("Kitchen Garbage", 49.99D)

' Declare a second variable.
Dim productVariable2 As Product
productVariable2 = productVariable1

' productVariable1 and productVariable2 now both point to the same thing.
' There is one object and two ways to access it.
The consequences of this behavior are far ranging. This example modifies the Product object using productVariable2:
productVariable2.Price = 25.99D
You'll find that productVariable1.Price is set to 25.99. Of course, this only makes sense because productVariable1 and productVariable2 are two variables that point to the same in-memory object.
If you really do want to copy an object (not a reference), you need to create a new object and then initialize its information to match the first object. Some objects provide a Clone() method that allows you to easily copy the object. One example is the DataSet, which is used to store information from a database.
A similar distinction between reference types and value types appears when you compare two variables. When you compare value types (such as integers), you're comparing the contents:
If integerA = integerB Then
    ' This is true as long as the integers have the same content.
End If
When you compare reference type variables, you're actually testing whether they're the same instance. In other words, you're testing whether the references are pointing to the same object in memory, not if their contents match. VB emphasizes this difference by forcing you to use the Is keyword to compare reference types. Using the equals (=) sign will generate a compile-time error.
If productVariable1 Is productVariable2 Then
    ' This is True if both productVariable1 and productVariable2
    ' point to the same thing.
    ' This is False if they are separate objects, even if they have
    ' identical content.
End IfYou can use two types of method parameters. The standard type is pass-by-value. When you use pass-by-value parameters, the method receives a copy of the parameter data. That means if the method modifies the parameter, this change won't affect the calling code. By default, all parameters are pass-by-value. (Visual Studio also inserts the ByVal keyword automatically to make that fact explicit.)
The second type of parameter is pass-by-reference. With pass-by-reference, the method accesses the parameter value directly. If a method changes the value of a pass-by-reference parameter, the original object is also modified.
To get a better understanding of the difference, consider the following code, which shows a method that uses a parameter named number. This code uses the ByVal keyword to indicate that number should be passed by value:
Private Sub ProcessNumber(ByVal number As Integer)
    number *= 2
End Sub
Here's how you can call ProcessNumber():
Dim num As Integer = 10
ProcessNumber(num)        ' When this call completes, num will still be 10.
Here's what happens. When this code calls ProcessNumber() it passes a copy of the num variable. This copy is multiplied by two. However, the variable in the calling code isn't affected at all.
This behavior changes when you use the ByRef keyword, as shown here:
Private Sub ProcessNumber(ByRef number As Integer)
    number *= 2
End Sub
Now when the method modifies this parameter (multiplying it by 2), the calling code is also affected:
Dim num As Integer = 10
ProcessNumber(num)        ' Once this call completes, Num will be 20.
The difference between ByVal and ByRef is straightforward when you're using value types, such as integers. However, if you use reference types, such as a Product object or an array, you won't see this behavior. The reason is because the entire object isn't passed in the parameter. Instead, it's just the reference that's transmitted. This is much more efficient for large objects (it saves having to copy a large block of memory), but it doesn't always lead to the behavior you expect.
To understand the difference, consider this method:
Private Sub ProcessProduct(ByVal prod As Product)
    prod.Price *= 2
End Sub
This code accepts a Product object and increases the price by a factor of 2. Because the Product object is passed by value, you might reasonably expect that the ProcessProduct() method receives a copy of the Product object. However, this isn't the case. Instead, the ProcessProduct() method gets a copy of the reference. However, this new reference still points to the same in-memory Product object. That means that the change shown in this example will affect the calling code.
So far, the discussion has focused on simple data types and classes. The .NET class library is actually composed of types, which is a catchall term that includes several object-like relatives:
- Classes:
This is the most common type in .NET Framework. Strings and arrays are two examples of .NET classes, although you can easily create your own.
- Structures:
Structures, like classes, can include fields, properties, methods, and events. Unlike classes, they are value types, which alters the way they behave with assignment and comparison operations. Structures also lack some of the more advanced class features (such as inheritance) and are generally simpler and smaller. Integers, dates, and characters are all structures.
- Enumerations:
An enumeration defines a set of integer constants with descriptive names. Enumerations were introduced in the previous chapter.
- Delegates:
A delegate is a method pointer that allows you to invoke a method indirectly. Delegates are the foundation for .NET event handling and were introduced in the previous chapter.
- Interfaces:
They define contracts to which a class must adhere. Interfaces are an advanced technique of object-oriented programming, and they're useful when standardizing how objects interact. Interfaces aren't discussed in this book.
Occasionally, a class can override its behavior to act more like a value type. For example, the String type is a full-featured class, not a simple value type. (This is required to make strings efficient, because they can contain a variable amount of data.) However, the String type overrides its equality and assignment operations so that these operations work like those of a simple value type. This makes the String type work in the way that programmers intuitively expect. Arrays, on the other hand, are reference types through and through. If you assign one array variable to another, you copy the reference, not the array (although the Array class also provides a Clone() method that returns a duplicate array to allow true copying).
Table 3-2 sets the record straight and explains a few common types.
Table 3.2. Common Reference and Value Types
Data Type | Nature | Behavior |
|---|---|---|
Int32, Decimal, Single, Double, and all other basic numeric types | Value Type | Equality and assignment operations work with the variable contents, not a reference. |
DateTime, TimeSpan | Value Type | Equality and assignment operations work with the variable contents, not a reference. |
Char, Byte, and Boolean | Value Type | Equality and assignment operations work with the variable contents, not a reference. |
String | Reference Type | Equality and assignment operations appear to work with the variable contents, not a reference. |
Array | Reference Type | Equality and assignment operations work with the reference, not the contents. |
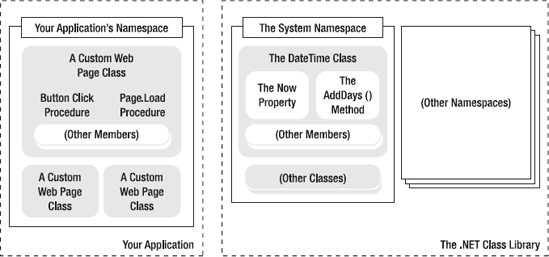
Whether you realize it at first, every piece of code in .NET exists inside a .NET type (typically a class). In turn, every type exists inside a namespace. Figure 3-3 shows this arrangement for your own code and the DateTime class. Keep in mind that this is an extreme simplification—the System namespace alone is stocked with several hundred classes. This diagram is designed only to show you the layers of organization.
Namespaces can organize all the different types in the class library. Without namespaces, these types would all be grouped into a single long and messy list. This sort of organization is practical for a small set of information, but it would be impractical for the thousands of types included with .NET.
Many of the chapters in this book introduce new .NET classes and namespaces. For example, in the chapters on web controls, you'll learn how to use the objects in the System.Web.UI namespace. In the chapters about web services, you'll study the types in the System.Web.Services namespace. For databases, you'll turn to the System.Data namespace. In fact, you've already learned a little about one namespace: the basic System namespace that contains all the simple data types explained in the previous chapter.
To continue your exploration after you've finished the book, you'll need to turn to the Visual Studio Help reference, which painstakingly documents the properties, methods, and events of every class in every namespace (see Figure 3-4). If you have Visual Studio installed, you can view the Visual Studio Help by selecting Start
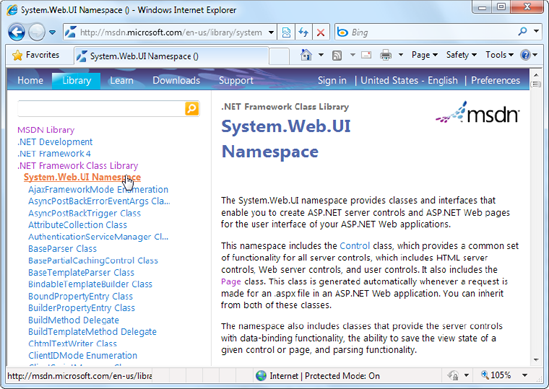
To browse the class library reference, begin by choosing a namespace from the left side of the page (like System.Web.UI). When you do, the page shows a list with all the classes in that namespace, as shown in Figure 3-4. Next, click a class name (like Page). Now the page shows an overview of the Page class and additional links that let you view the different types of class members. For example, click Page Properties to review all the properties of the Page class, or Page Events to explore its events.
Often when you write ASP.NET code, you'll just use the namespace that Visual Studio creates automatically. If, however, you want to organize your code into multiple namespaces, you can define the namespace using a simple block structure, as shown here:
Namespace MyCompany

    Namespace MyApp

        Public Class Product
            ' Code goes here.
End Class
End Namespace
End NamespaceIn the preceding example, the Product class is in the namespace MyCompany.MyApp. Code inside this namespace can access the Product class by name. Code outside it needs to use the fully qualified name, as in MyCompany.MyApp.Product. This ensures that you can use the components from various third-party developers without worrying about a name collision. If those developers follow the recommended naming standards, their classes will always be in a namespace that uses the name of their company and software product. The fully qualified name of a class will then almost certainly be unique.
Namespaces don't take an accessibility keyword and can be nested as many layers deep as you need. Nesting is purely cosmetic—for instance, in the previous example, no special relationship exists between the MyCompany namespace and the MyApp namespace. In fact, you could create the namespace MyCompany.MyApp using this syntax without using nesting:
Namespace MyCompany.MyApp

    Public Class Product
        ' Code goes here.
    End Class

End Namespace
You can declare the same namespace in various code files. In fact, more than one project can even use the same namespace. Namespaces are really nothing more than convenient, logical containers that help you organize your classes.
Having to type long, fully qualified names is certain to tire your fingers and create overly verbose code. To simplify matters, it's standard practice to import the namespaces you want to use. When you import a namespace, you don't need to type the fully qualified type names. Instead, you can use the types in that namespace as though they were defined locally.
To import a namespace, you use the Imports statement. These statements must appear as the first lines in your code file, outside of any namespaces or classes (and after any Option statements, such as Option Strict):
Imports MyCompany.MyApp
Consider the situation without importing a namespace:
Dim salesProduct As New MyCompany.MyApp.Product(...)
It's much more manageable when you import the MyCompany.MyApp namespace. Once you do, you can use this shortened syntax instead:
Dim salesProduct As New Product(...)
Importing namespaces is really just a convenience. It has no effect on the performance of your application. In fact, whether you use namespace imports, the compiled IL code will look the same. That's because the language compiler will translate your relative class references into fully qualified class names when it generates an EXE or a DLL file.
You might wonder what gives you the ability to use the class library namespaces in a .NET program. Are they hardwired directly into the language? The truth is that all .NET classes are contained in assemblies. Assemblies are the physical files that contain compiled code. Typically, assembly files have the extension .exe if they are stand-alone applications, or .dll if they're reusable components.
Tip
The .dll extension is also used for code that needs to be executed (or hosted) by another type of program. When your web application is compiled, it's turned into a DLL file, because your code doesn't represent a stand-alone application. Instead, the ASP.NET engine executes it when a web request is received.
A strict relationship doesn't exist between assemblies and namespaces. An assembly can contain multiple namespaces. Conversely, more than one assembly file can contain classes in the same namespace. Technically, namespaces are a logical way to group classes. Assemblies, however, are a physical package for distributing code.
The .NET classes are actually contained in a number of assemblies. For example, the basic types in the System namespace come from the mscorlib.dll assembly. Many ASP.NET types are found in the System.Web.dll assembly. In addition, you might want to use other, third-party assemblies. Often, assemblies and namespaces have the same names. For example, you'll find the namespace System.Web in the assembly file System.Web.dll. However, this is a convenience, not a requirement.
When compiling an application, you need to tell the language compiler what assemblies the application uses. By default, a wide range of .NET assemblies are automatically made available to ASP.NET applications. If you need to use additional assemblies, you need to define them in a configuration file for your website. Visual Studio makes this process seamless, letting you add assembly references to the configuration file using the Website
Part of the art of object-oriented programming is determining object relations. For example, you could create a Product object that contains a ProductFamily object or a Car object that contains four Wheel objects. To create this sort of object relationship, all you need to do is define the appropriate variable or properties in the class. This type of relationship is called containment (or aggregation).
For example, the following code shows a ProductCatalog class, which holds an array of Product objects:
Public Class ProductCatalog
    Private _products() As Product

    ' (Other class code goes here.)
End Class
In ASP.NET programming, you'll find special classes called collections that have no purpose other than to group various objects. Some collections also allow you to sort and retrieve objects using a unique name. In the previous chapter, you saw an example with the ArrayList from the System.Collections namespace, which provides a dynamically resizable array. Here's how you might use the ArrayList to modify the ProductCatalog class:
Public Class ProductCatalog
    Private _products As New ArrayList()

    ' (Other class code goes here.)
End Class
This approach has benefits and disadvantages. It makes it easier to add and remove items from the list, but it also removes a useful level of error checking, because the ArrayList supports any type of object. You'll learn more about this issue later in this chapter (in the "Generics" section).
In addition, classes can have a different type of relationship known as inheritance.
Inheritance is a form of code reuse. It allows one class to acquire and extend the functionality of another class. For example, you could create a class called TaxableProduct that inherits (or derives) from Product. The TaxableProduct class would gain all the same fields, methods, properties, and events of the Product class. (However, it wouldn't inherit the constructors.) You could then add additional members that relate to taxation.
Here's an example that adds a read-only property named TotalPrice:
Public Class TaxableProduct
    Inherits Product

    Private _taxRate As Decimal = 1.15D

    Public ReadOnly Property TotalPrice() As Decimal
        Get
            ' The code can access the Price property because it's
            ' a public member of base Product class.
            Return (Price * _taxRate)
            ' The code cannot access the private _price variable, however,
            ' because it's a private member of the base class.
        End Get
    End Property

    Public Sub New(ByVal name As String, ByVal price As Decimal, _
      ByVal imageUrl As String)
        MyBase.New(name, price, imageUrl)
    End Sub

End Class
There's an interesting wrinkle in this example. With inheritance, constructors are never inherited. However, you still need a way to initialize the inherited details (in this case, that's the Name, Price, and ImageUrl properties).
The only way to handle this problem is to add a constructor in your derived class (TaxableProduct) that calls the right constructor in the base class (Product) using the MyBase keyword. In the earlier example, the TaxableProduct class uses this technique. It includes a single constructor that requires the familiar three arguments and calls the corresponding three-argument constructor from the Product class to initialize the Name, Price, and ImageUrl properties. The TaxableProduct constructor doesn't contain any additional code, but it could; for example, you could use it to initialize other details that are specific to the derived class.
Inheritance is often less useful than you might expect. In an ordinary application, most classes use containment and other relationships instead of inheritance, because inheritance can complicate life needlessly without delivering many benefits. Dan Appleman, a renowned .NET programmer, once described inheritance as "the coolest feature you'll almost never use."
However, you'll see inheritance at work in ASP.NET in at least one place. Inheritance allows you to create a custom class that inherits the features of a class in the .NET class library. For example, when you create a custom web form, you actually inherit from a basic Page class to gain the standard set of features. Similarly, when you create a custom web service, you inherit from the WebService class. You'll see this type of inheritance throughout this book.
There are many more subtleties of class-based programming with inheritance. For example, you can override parts of a base class, prevent classes from being inherited, or create a class that must be used for inheritance and can't be directly created. However, these topics aren't covered in this book, and they aren't required to build ASP.NET applications. For more information about these language features, consult a more detailed book that covers the Visual Basic language, like Andrew Troelsen's Pro VB 2010 and the .NET 4 Platform (Apress, 2010).
The beginning of this chapter introduced the idea of shared properties and methods, which can be used without a live object. Shared members are often used to provide helper functionality (such as conversion routines, validation tests, or miscellaneous pieces of information) that you'll want to access without being forced to create an object. The .NET class library uses shared members heavily (as with the System.Math class explored in the previous chapter).
Shared members have a wide variety of possible uses. Sometimes they provide basic conversions and utility functions that support a class. To create a shared property or method, you just need to use the Shared keyword right after the accessibility keyword.
The following example shows a TaxableProduct class that contains a shared TaxRate property and private variable. This means there is one copy of the tax rate information, and it applies to all TaxableProduct objects.
Public Class TaxableProduct
    Inherits Product

    ' (Additional class code omitted for clarity.)

    Private Shared _taxRate As Decimal = 1.15D

    ' TaxRate is shared, which means that you can call
    ' TaxableProduct.TaxRate, even without an object.
    Public Shared Property TaxRate() As Decimal
        Get
            Return _taxRate
        End Get
        Set(ByVal value As Decimal)
            _taxRate = value
        End Set
    End Property

End Class
You can now get or set the tax rate information directly from the class, without needing to create an object first:
' Change the TaxRate. This will affect all TotalPrice calculations for any
' TaxableProduct object.
TaxableProduct.TaxRate = 1.24D
Shared data isn't tied to the lifetime of an object. In fact, it's available throughout the life of the entire application. This means shared members are the closest thing .NET programmers have to global data.
A shared member can't access an instance member. To access a nonshared member, it needs an actual instance of your object.
Object variables can be converted with the same syntax that's used for simple data types. This process is called casting. When you perform casting, you don't actually change anything about an object; in fact, it remains the exact same blob of binary data floating somewhere in memory. What you change is the variable that points to the object—in other words, the way your code "sees" the object. This is important, because the way your code sees an object determines what you can do with that object.
An object variable can be cast into one of three things: itself, an interface that it supports, or a base class from which it inherits. You can't cast an object variable into a string or an integer. Instead, you need to call a conversion method, if it's available, such as ToString() or Parse().
As you've already seen, the TaxableProduct class derives from Product. That means you cast a TaxableProduct reference to a Product reference, as shown here:
' Create a TaxableProduct.
Dim theTaxableProduct As TaxableProduct
theTaxableProduct = New TaxableProduct("Kitchen Garbage", 49.99D, "garbage.jpg")

' Cast the TaxableProduct reference to a Product reference.
Dim theProduct As Product
theProduct = theTaxableProduct
You don't lose any information when you perform this casting. There is still just one object in memory (with two variables pointing to it), and this object really is a TaxableProduct. However, when you use the variable theProduct to access your TaxableProduct object, you'll be limited to the properties and methods that are defined in the Product class. That means code like this won't work:
' This code generates a compile-time error.
Dim TotalPrice As Decimal = theProduct.TotalPrice
Even though theProduct actually holds a reference that points to a TaxableProduct and even though the TaxableProduct has a TotalPrice property, you can't access it through theProduct. That's because theProduct treats the object it refers to as an ordinary Product.
You can also cast in the reverse direction—for example, cast a Product reference to a TaxableProduct reference. The trick here is that this only works if the object that's in memory really is a TaxableProduct. This code is correct:
Dim theProduct As New TaxableProduct(...)

Dim theTaxableProduct As TaxableProduct
theTaxableProduct = CType(theProduct, TaxableProduct)
But this code generates a runtime error when the last line is executed:
Dim theProduct As New Product(...)

Dim theTaxableProduct As TaxableProduct
theTaxableProduct = CType(theProduct, TaxableProduct)
Note
When casting an object from a base class to a derived class, as in this example, you must use the CType() function that you learned about in Chapter 2. This is a safeguard designed to highlight the fact that casting is taking place. It's required because this casting operation might fail.
Incidentally, you can check if you have the right type of object before you attempt to cast with the help of the TypeOf keyword:
Dim theTaxableProduct As TaxableProduct

If TypeOf theProduct Is TaxableProduct Then
    ' It's safe to cast the reference.
    theTaxableProduct = CType(theProduct, TaxableProduct)
End If
Another option is the TryCast() function, which attempts to cast an object to the type you request. If it can't it returns a null reference (Nothing) rather than cause a runtime error. Here's how it works:
Dim theProduct As New TaxableProduct(...)
Dim theTaxableProduct As TaxableProduct = TryCast(theProduct, TaxableProduct)
If theTaxableProduct IsNot Nothing Then
    ' (It's safe to use the object.)
Else
    ' (Either the conversion failed or theTaxableProduct was null to begin with.)
End If
Keep in mind that this approach may simply postpone the problem, by replacing an immediate casting error with a null-reference error later in your code, when you attempt to use the null object. However, you can use this technique in much the same way that you use the TypeOf keyword—to cast an object if possible or just to keep going if it's not.
Note
One of the reasons casting is used is to facilitate more reusable code. For example, you might design an application that uses the Product object. That application is actually able to handle an instance of any Product-derived class. Your application doesn't need to distinguish between all the different derived classes (TaxableProduct, NonTaxableProduct, PromoProduct, and so on); it can work seamlessly with all of them.
At this point, it might seem that being able to convert objects is a fairly specialized technique that will be required only when you're using inheritance. This isn't always true. Object conversions are also required when you use some particularly flexible classes.
One example is the ArrayList class introduced in the previous chapter. The ArrayList is designed in such a way that it can store any type of object. To have this ability, it treats all objects in the same way—as instances of the root System.Object class. (All classes in .NET inherit from System.Object at some point, even if this relationship isn't explicitly defined in the class code.) The end result is that when you retrieve an object from an ArrayList collection, you need to cast it from a System.Object to its real type, as shown here:
' Create the ArrayList.
Dim products As New ArrayList()

' Add several Product objects.
products.Add(product1)
products.Add(product2)
products.Add(product3)

' Retrieve the first item, with casting.
Dim retrievedProduct As Product = CType(products(0), Product)

' This works.
Response.Write(retrievedProduct.GetHtml())

' Retrieve the first item, as an object. This doesn't require casting,
' but you won't be able to use any of the Product methods or properties.
Dim retrievedObject As Object = products(0)

' This generates an error. There is no Object.GetHtml() method.
Response.Write(retrievedObject.GetHtml())
As you can see, if you don't perform the casting, you won't be able to use the methods and properties of the object you retrieve. You'll find many cases like this in .NET code, where your code is handed one of several possible object types and it's up to you to cast the object to the correct type in order to use its full functionality.
Note
Occasionally, you might run into a custom method that "converts" an object to another data type. For example, you can use the ToString() method in many objects to get a string that's based on that object. However, this process isn't really a conversion—instead, you're generating a representation of your object. This representation probably doesn't preserve all the data of your original object, and usually the conversion is one-way only.
Partial classes give you the ability to split a single class into more than one source code (.vb) file. For example, if the Product class becomes particularly long and intricate, you might decide to break it into two pieces, as shown here:
' This part is stored in file Product1.vb. PublicPartialClass Product Public Property Name() As String Private _price As Decimal Public Property Price() As Decimal Get Return _price End Get Set(ByVal value As Decimal) _price = value ' Fire the event to all listeners. RaiseEvent PriceChanged() End Set End Property Public Property ImageUrl() As String Public Sub New(ByVal name As String, ByVal price As Decimal, _ ByVal imageUrl As String) Me.Name = name Me.Price = price Me.ImageUrl = imageUrl End Sub End Class ' This part is stored in file Product2.vb. PublicPartialClass Product Public Function GetHtml() As String Dim htmlString As String = "<h1>" & Name & "</h1><br />" & "<h3>Costs: " & Price.ToString() & "</h3><br />" & "<img src='" & ImageUrl & "' />" Return htmlString End Function End Class
A partial class behaves the same as a normal class. This means every method, property, and variable you've defined in the class is available everywhere, no matter which source file contains it. When you compile the application, the compiler tracks down each piece of the Product class and assembles it into a complete unit. It doesn't matter what you name the source code files, so long as you keep the class name consistent.
Partial classes don't offer much in the way of solving programming problems, but they can be useful if you have extremely large, unwieldy classes. The real purpose of partial classes in .NET is to hide automatically generated designer code by placing it in a separate file from your code. Visual Studio uses this technique when you create web pages for a web application and forms for a Windows application.
Tip
Technically, you only need to use the Partial keyword on one of the class declarations. As long as the compiler finds one partial definition, it assumes all the others are partial as well.
Generics are a more subtle and powerful feature than partial classes. Generics allow you to create classes that are parameterized by type. In other words, you create a class template that supports any type. When you instantiate that class, you specify the type you want to use, and from that point on, your object is "locked in" to the type you chose.
To understand how this works, it's easiest to consider some of the .NET classes that support generics. In the previous chapter (and earlier in this chapter), you saw how the ArrayList class allows you to create a dynamically sized collection that expands as you add items and shrinks as you remove them. The ArrayList has one weakness, however—it supports any type of object. This makes it extremely flexible, but it also means you can inadvertently run into an error. For example, imagine you use an ArrayList to track a catalog of products. You intend to use the ArrayList to store Product objects, but there's nothing to stop a piece of misbehaving code from inserting strings, integers, or any arbitrary object in the ArrayList. Here's an example:
' Create the ArrayList.
Dim products As New ArrayList()

' Add several Product objects.
products.Add(product1)
products.Add(product2)
products.Add(product3)

' Notice how you can still add other types to the ArrayList.
products.Add("This string doesn't belong here.")
The solution is a new generic List collection class. Like the ArrayList, the List class is flexible enough to store different objects in different scenarios. But because it uses generics, you must lock it into a specific type whenever you instantiate a List object. To do this, you specify the class you want to use in parentheses, preceded by the word "Of." So if you want to create a collection of products, you need this code statement:
' Create the List for storing Product objects.
Dim products As New List(Of Product)()
Now you can add only Product objects to the collection:
' Add several Product objects.
products.Add(product1)
products.Add(product2)
products.Add(product3)

' This line fails. In fact, it won't even compile.
products.Add("This string can't be inserted.")
You can find the List class, and many more collections that use generics, in the System.Collections.Generic namespace. (The original ArrayList resides in the System.Collections namespace.)
Note
Now that you've seen the advantage of the List class, you might wonder why .NET includes the ArrayList at all. In truth, the ArrayList is still useful if you really do need to store different types of objects in one place (which isn't terribly common). However, the real answer is that generics weren't implemented in .NET until version 2.0, so many existing classes don't use them because of backward compatibility.
You can also create your own classes that are parameterized by type, such as the List collection. Creating classes that use generics is beyond the scope of this book, but you can find a solid overview in the Visual Studio Help. Look for the "generics [Visual Basic]" index entry.
At its simplest, object-oriented programming is the idea that your code should be organized into separate classes. If followed carefully, this approach leads to code that's easier to alter, enhance, debug, and reuse. Now that you know the basics of object-oriented programming, you can take a tour of the premier ASP.NET development tool: Visual Studio.
Note
In the previous two chapters, you learned the essentials about VB and object-oriented programming. The VB language continues to evolve, and there are many more advanced language features that you haven't seen in these two chapters. If you want to continue your exploration of VB and become a language guru, you can visit Microsoft's VB Developer Center online at http://msdn2.microsoft.com/vbasic, or you can refer to a more in-depth book about VB, such as the excellent and very in-depth Pro VB 2010 and the .NET 4 Platform (Apress, 2010).