
For line-of-business applications or portal solutions, the implementation of business processes or simple automated workflows is a crucial and demanding task. When implementing business processes, various stakeholders are involved, and it is a challenge to present workflows in a medium that is comprehensible to both developers and the business.
One of the basic building blocks of SharePoint is its support for workflows on any SharePoint item, such as a list, a site, or a content type. Workflows are an integral asset that can be developed using a variety of tools: Visio 2010, SharePoint Designer 2010, or Visual Studio 2010. All these tools leverage the ability to graphically design workflows that can be enriched using declarative descriptions or code to achieve the desired behavior.
This chapter examines different approaches for constructing workflows within the Microsoft solution stack. Commencing by describing general workflow behavior in SharePoint, we go on to show how to develop and extend workflows using SharePoint Designer. We describe Windows Workflow Foundation (WF) 3.5—the foundation layer for SharePoint workflows—and demonstrate developing custom workflows using Visual Studio. At the end of this chapter, we describe how InfoPath forms can be used to gather workflow-relevant data during workflow execution.
SharePoint is a platform that supports collaboration among different people across the enterprise. Within any enterprise, processes are defined to describe the interaction between staff, based on appropriate information. For example, when a new employee is hired, several departments such as HR and IT administration are involved to configure the user's work environment before they can commence work. Equipment needs to be bought, accounts have to be created, and contracts require signatures. All these steps are based on such data as the employee's name, location, and seniority. The process can be completed successfully only if the people involved in the processes collaborate efficiently.
SharePoint contains large quantities of information, stored in lists, libraries, and documents, that is used by various stakeholders to do their work according to the enterprise's processes. To this end, SharePoint supports workflows to organize and execute multiple steps within a business process. Since SharePoint aims at user interaction, most of these workflows tend to be collaborative workflows built around the information made available through SharePoint. This can encompass almost any item in SharePoint, including its complete life cycle within SharePoint.
To inspire you regarding how you can use SharePoint workflows to achieve your business processes, the following section describes the basics of SharePoint workflows. After that, you will see how you can work with SharePoint workflows, and finally the different tools for developing workflows are presented and explained.
SharePoint 2010 workflows are based on Windows Workflow Foundation 3.5—the same version that underpins the SharePoint 2007 workflows. Therefore, no significant changes have been made to the underlying workflow architecture or the basic workflow functionality. However, many improvements have been made to the way workflows can be developed and used. Furthermore, the tool support for workflows has been enhanced, making porting workflows from previous versions easier. Unfortunately, the new and redesigned WF 4.0 with numerous promising features will not be available to SharePoint 2010 developers.
Before studying the details of the SharePoint workflow architecture, it is important to understand the basic building blocks of .NET 3.5 workflows and to comprehend what is special about SharePoint workflows.
Workflows are constructed from activities. Activities are the basic building blocks for every workflow. Each activity can be regarded as an atomic unit that encapsulates a certain behavior and is designed to fulfill a defined purpose. Some activities, called composite activities, contain other activities. They are responsible for the execution of their child activities. Composition of activities brings great flexibility and extensibility to the workflow concept.
During workflow design and creation, you can combine activities by putting them into a sequence or nesting them within each other. This creates the flow of actions that defines your workflow behavior. Depending on the tool you are using for workflow creation, you can specify certain parameters for the activities and even add custom code to influence the behavior of the activities.
Each tool used for workflow creation provides a set of out-of-the-box activities available for inclusion in workflow design. According to the level of abstraction provided by the tool, such activities will either offer very low-level access to WF and SharePoint workflows as in case of Visual Studio workflows, or they offer high-level activities as, for example, in SharePoint Designer. We will show a list of available activities in the following sections where we describe workflow development in detail.
In SharePoint Designer, activities are further classified as actions and conditions. Whereas conditions are used for activities that contain conditional behavior, such as If-Else statements, actions describe any activity that performs any kind of action. However, both types are implemented as WF activities.
SharePoint, by design, works with different contents, such as list items, documents, and sites. You can create content types that aid with structuring the contents within your SharePoint applications. Thus, it is no surprise that workflows are also aimed at dealing with contents. Each workflow you create needs to be assigned to content in your SharePoint application. For any workflow that you use or create, you need to specify a content that your workflow will be assigned to.
A workflow can be directly assigned to a list, to a library, or—new in SharePoint 2010— to a site. To design more flexible workflows and to increase reusability, you can also assign a workflow to a content type. SharePoint Designer 2010 also has the ability to create reusable workflows that are attached to a content type.
A running workflow instance is always tied to one instance of your assigned content type, and you are able to easily access the current content item from within your workflow. For example, when you associate a workflow template with a list, the workflow is connected to one item in that list at runtime.
Any kind of process, especially a SharePoint workflow, requires some sort of user interaction during workflow execution. Since SharePoint offers a standard user interface that is used for collaboration across the enterprise, these existing facilities are also used for human interaction in workflows.
SharePoint tasks are used for user interaction between workflows and humans because they already provide the required functionality. From SharePoint workflows, you can easily assign tasks to users and cause a workflow to wait until these tasks are finished. SharePoint workflows already contain several activities that work with tasks. Using standard SharePoint tasks for user interaction also ensures a tight integration with the SharePoint user experience, since many facilities are aimed at displaying relevant content to the user, such as Web Parts showing the user's tasks. In addition, these tasks also integrate well with Outlook.
SharePoint Foundation 2010 workflows are based on the Windows Workflow Foundation 3.5 to offer workflow support within the SharePoint environment. WF provides a programming model, runtime engine, and tools for building and executing workflow-enabled applications. SharePoint uses the Workflow Designer in Visual Studio for custom workflow development and uses the WF runtime engine to host workflows inside SharePoint.
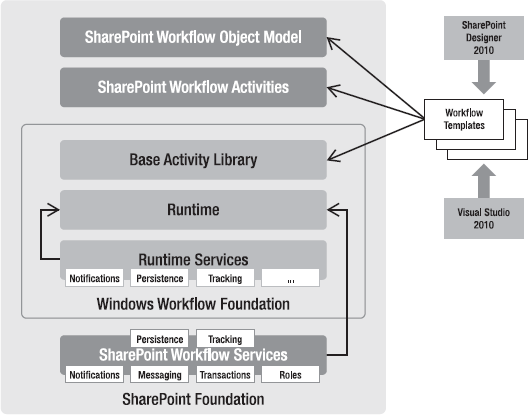
WF allows any process or application to run workflows by hosting the WF runtime engine, which provides standard services required by any workflow solution, such as persistence, state management, tracking, and transactions. SharePoint also hosts the WF runtime engine, but because of the SharePoint-specific behavior such as its data-centric nature and wide support for human interaction, some implementations of standard WF services have been replaced with custom implementations in SharePoint: transactions, persistence, notifications, roles, tracking, and messaging. Figure 16-1 shows the relationships between WF and SharePoint Foundation. You can use SharePoint Designer and Visual Studio to develop workflow templates that are based on special SharePoint Workflow Activities and work with the SharePoint Workflow Object Model. In addition, these workflow templates are based on the Basic Activity Library of WF. SharePoint Workflow Services uses the WF Runtime and WF Runtime Services to provide a custom workflow runtime environment.
The custom implementation of workflow services results in a specific behavior for SharePoint workflows that requires special attention. Since workflows in SharePoint usually incorporate substantial user interaction, persistence of workflows is particularly important. To avoid long-running workflows wasting valuable computing resources, workflows waiting for user input are dehydrated. This means that the workflow object is serialized and stored into the SharePoint database. Hence, the workflow is not wasting memory. Whenever an event occurs, such as when a user updates a task, the dehydrated workflow instance will be reactivated and loaded into the memory to continue its work. To find and associate events to workflows, SharePoint uses correlation tokens along with GUIDs. (Refer to the "Custom Workflows with Visual Studio" section for more details on correlation tokens.)
Another important aspect to understand is the way that SharePoint uses transactions to process workflow activities. SharePoint executes a series of workflow activities until a commit point is reached. Changes made in the activities are committed only at the commit point, which is essentially a point where the workflow is serialized to wait for an event to occur. This behavior was chosen to pack all activities into a single batch for increased performance and to allow a rollback if errors occur—but it could result in unexpected behavior. The described batching feature applies only to SharePoint-specific workflow activities, whereas custom code activities will be processed immediately.
Workflow Foundation supports two different styles of workflow:
Sequential workflows
State machine workflows
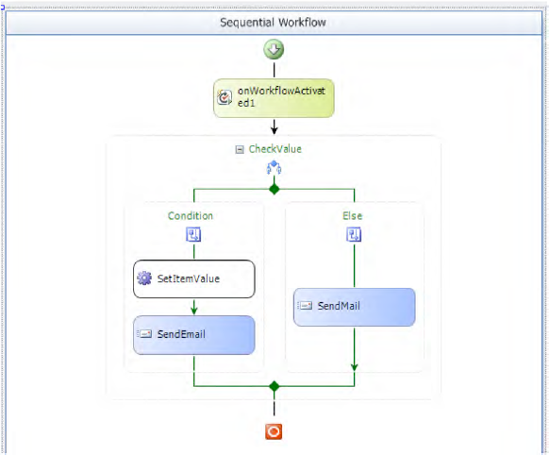
A sequential workflow contains a series of steps that will be executed in the specified order, from the start of the workflow to the end. The individual steps of the workflow will be executed one after the other. To control the flow within a sequential workflow, events and flow structures such as If-Else, loops, and parallel branches can modify the workflow execution order. Figure 16-2 shows a simple example that was modeled using the Visual Studio 2010 Workflow Designer. You can see the flow of events from the start, represented by the green arrow symbol at the top, down to the end, which is depicted by the red symbol. Depending on the result of the CheckValue shape, either the left or right branch is executed. Sequential workflows are supported by SharePoint Designer workflows as well as by workflows created with Visual Studio.
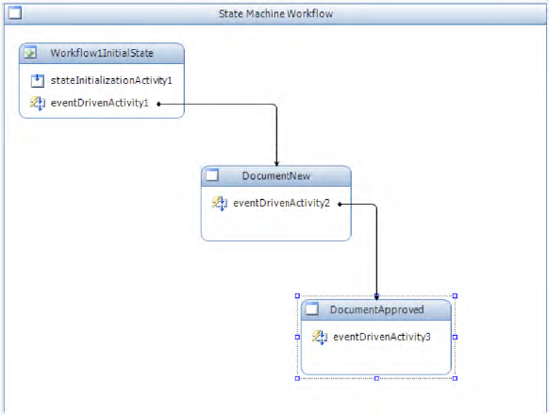
A state machine workflow adopts a different approach, because it does not model the flow of activities but instead defines several states that represent the system. It describes the events that transition from one state to another state. Figure 16-3 shows a very simple state machine workflow. You can see the different states represented by rectangles and the arrows denoting transitions from one state to another. SharePoint Designer workflows do not support this workflow type, and thus, state machine workflows can be developed only as custom workflows using Visual Studio.
Workflows for WF consist of several files that contain all the required information about a workflow so that it can be hosted by WF. Similar to ASP.NET, the declarative workflow description can be separated from the code, which encapsulates business logic. The XML dialect Extensible Application Markup Language (XAML) can be used to describe declarative metadata of a workflow within a .xoml file. This can be enriched using a separate code-behind file, containing the business logic, or it can be solely used for declarative workflows without additional business logic, as is done by SharePoint Designer. Of course, code files that contain both declarative description as well as business logic can also be used by WF.
Whenever you use code files to develop your workflows, the resulting code will be deployed as a compiled assembly and executed by the WF runtime. Declarative workflows that only use XAML will be deployed as .xoml files and compiled at runtime, every time a workflow instance is created. To sum up the options for creating workflows in SharePoint:
A
.xomlfile containing the declarative description of the workflow. This is used by SharePoint Designer 2010.A
.xomlfile in combination with business logic in a separate code-behind file. This is used by Visual Studio 2010 by default.Code files that contain declarative and business logic for a workflow.
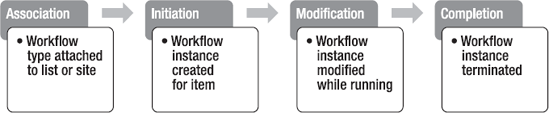
The life cycle of SharePoint workflows is very specific to SharePoint, because of its focus on content and the way user interaction is handled. Figure 16-4 illustrates the four stages of the SharePoint workflow life cycle. These stages allow for the assignment of workflows to content type, handle the different ways for starting workflows, and keep the workflow infrastructure flexible during execution. This custom life cycle is provided by the SharePoint-specific workflow hosting environment. During some of the following stages, forms can be used to gather additional user input as parameters, which are required for this stage to execute.
Workflows that have already been deployed to the SharePoint server, as so-called workflow templates, must first be associated with a list, library, content type, or site before they can be run. The site administrator performing the association can also enter various advanced settings for the workflow association: a name, the task list used to store tasks for this particular workflow, and when the workflow should be executed. The resulting association information is stored in the farm-wide workflow association table used by SharePoint to determine the associated workflows for a content item such as lists and sites.
It is possible for workflow developers to assign a workflow association form to a workflow, which will be displayed to the site administrator who performs the association. This form can gather additional workflow-specific data such as default values that have to be entered by the site administrator during association. Later, when an instance of the workflow is started, SharePoint loads the association information from the association table, and this information can be used by the workflow during execution.
As soon as a workflow is started—either manually or automatically, depending on its association parameters—it will be initiated. During initiation, a new instance of the workflow is created and assigned to a concrete item, either a list item, a document in a library, or a site. As with the association event shown earlier, workflow developers can add an initiation form to a workflow that will be displayed to the user who triggered the workflow. Parameters entered during initiation can be used to overwrite default parameters or to provide additional information.
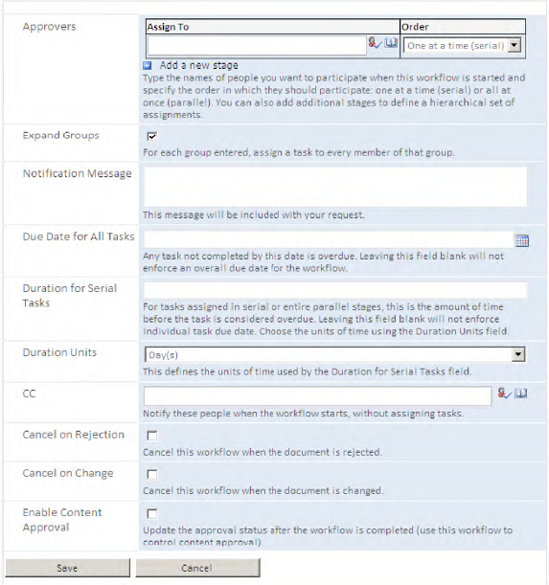
Both association and initiation forms can be implemented using either ASP.NET (as an .aspx file) or an InfoPath form. We demonstrate how to integrate InfoPath forms into your workflow solutions later in this chapter. Figure 16-5 shows an example form that is used as both an association and an initiation form, for the approval workflow that ships with SharePoint. (This form is based on InfoPath Forms Services; see Chapter 15.)
Warning
If a workflow is started automatically, such as when a new item is created or when an existing item is updated, the initiation form will not be displayed to the user. You should keep this in mind when creating your own workflows. Thus, initiation forms should be used in combination with workflows that are started manually and therefore will always show the initiation form, or they should contain only optional parameters for a workflow.
While the workflow is running, it processes the different activities and follows the flow by evaluating certain conditions according to the workflow definition. During the execution of a workflow, there are basically two ways for interaction with users:
Workflow modification forms: Modification allows a user to alter the workflow while it is running, such as to delegate their task to someone else. You can add modification forms to your workflow similar to association and initiation forms.
Workflow task forms: Whenever user interaction is required as part of the standard workflow execution, user interaction is handled using tasks. If a workflow requires additional information that should be entered by the user, a task form can be used. You can add a task form to your workflow, which will be displayed to the user when they edit the task.
Warning
Workflows created with SharePoint Designer do not support modification forms, since those workflows cannot be modified at runtime.
During workflow execution, SharePoint users can view the current status of the workflow in a separate column that is added to the list on which the workflow is running. The first time a workflow of a certain workflow template is started on a list, SharePoint automatically adds a column to that list, which displays the current status for that workflow. All currently running workflow instances will be shown in the workflow overview page of the site or list in the "Running Workflows" section.
Finally, when all workflow activities are finished or when an activity to stop the workflow is reached, the workflow instance will be terminated. The workflow is then completed, and the workflow status will be updated accordingly and marked as closed. You will be able to view a list of completed workflows in the Workflows Overview page of a list or site. Once a workflow has been completed, you will not be able to make changes to this workflow. You can only start a new instance of that workflow on the same item.
SharePoint supports different ways to design and build your workflows. However, the result will always be a workflow based on Windows Workflow Foundation that will be hosted in SharePoint. Thus, the way you can use your workflows within SharePoint to leverage the full potential of your SharePoint application is independent of the tool you choose for developing your workflows. Nevertheless, there a number of differences in the way workflows will be treated internally and in the way you can develop and deploy your workflows, which will be shown later in this section. We will also demonstrate some of the basic tasks for working with live workflows, during the different stages of a workflow.
This chapter is aimed at developers who want to build their own SharePoint workflows using either SharePoint Designer or Visual Studio. However, SharePoint also provides a small collection of canned out-of-the-box workflows that are shipped with the different versions of SharePoint Foundation and SharePoint Server. Before starting to develop a new workflow from scratch, it is a good idea to examine these workflows first. Even if they do not meet the requirements completely, they might be a head start for development. Since SharePoint 2010, it is possible to edit these out-of-the-box workflows and customize them to meet special requirements. Most of these workflows also offer some additional configuration options through the workflow association form. Table 16-1 lists the available workflows together with the SharePoint version that offers the workflow.
Table 16.1. SharePoint Out-of-the-Box Workflows
Workflow Name | Description | Availability |
|---|---|---|
Approval | Routes a document for approval. Approvers can approve or reject the document, reassign the approval task, or request changes to the document. | SharePoint Server 2010 |
Collect Feedback | Routes a document for review. Reviewers can provide feedback, which is compiled and sent to the document owner when the workflow has completed. | SharePoint Server 2010 |
Collect Signatures | Gathers signatures needed to complete a Microsoft Office document. | SharePoint Server 2010 |
Disposition Approval | Manages document expiration and retention by allowing participants to decide whether to retain or delete expired documents. | SharePoint Server 2010 |
Publishing Approval | Routes a page for approval. Approvers can approve or reject the page, reassign the approval task, or request changes to the page. | SharePoint Server 2010 |
Three-state | Use this workflow to track items in a list. | SharePoint Foundation 2010 |
Using some of the out-of-the-box workflows, we demonstrate in the following sections how to use workflows in SharePoint and how to develop your own custom workflows.
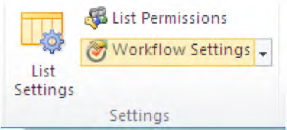
To add a workflow to your SharePoint environment and associate it with a list or library, use the Workflow Settings page (shown in Figure 16-7), which is available through the ribbon bar by selecting List Tools
To associate a workflow to a content type, navigate to the content type under "Site Settings" and you will also find the "Workflow settings" dialog. (This is analogous to associating a workflow to a site—you find the workflow settings from the Site Settings dialog.)
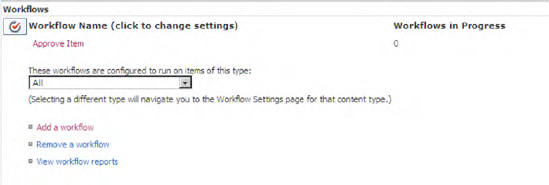
On the Workflow Settings page, shown in Figure 16-7, is a summary of the workflows that are currently associated with your list, including the number of currently running workflow instances for each workflow template. You can add workflows to your list, which means associating the workflow to your current list. When you select "Add a workflow" to associate a workflow template with your current list, you will see a dialog similar to Figure 16-8.
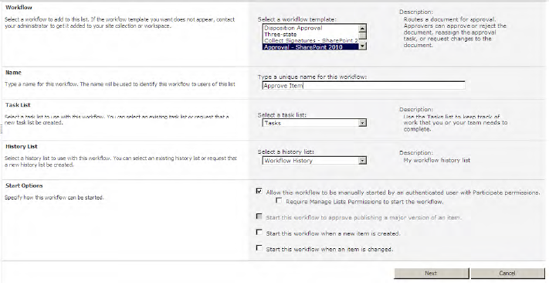
In the Add a Workflow dialog are some important settings for workflow association:
Workflow: In this section are all the workflows that are deployed to the site collection and available to this list. When you build your own workflow and deploy it to the server, it will be added to this list. Select the workflow template that you want to associate with your content from this list.
Name: Give your workflow association a meaningful name, since this name will be displayed in all the pages used to manage the workflow—from starting up a workflow to the workflow history.
Task List: Specify the task list to be used by the workflow to create tasks for users to complete. You can either use an existing task list or have SharePoint create a new one.
History List: As for the task list, you can specify a history list to be used by the workflow to record information using special activities that write to the workflow history.
Start Options: This option defines which events trigger the workflow to start. You can choose whether you want your workflow to be started manually by users who have at least Participate permission on the list or whether your workflow should start automatically. You could also specify that only users with Manage List permissions are able to manually start a workflow. For automatic workflows, you can choose whether the workflow should start when a new item is created or every time an item is updated. In site workflows, these automatic options are not available. The option that is disabled in Figure 16-8, "Start this workflow to approve publishing a major version of an item," is only available in document libraries where the option "Create major and minor versions" is activated in the Versioning Settings section of the library settings. In addition, it requires either the Approval or the Publishing Approval workflow to be selected.
If an association for the workflow has been specified, this form will be displayed after clicking the Next button. In the case of the Approval workflow in the previous example, the association form as shown in Figure 16-5 will be displayed.
After a workflow is associated with a list, library, content type, or site, it may be necessary to manually start the workflow on a specific item, if this option was selected during association. The workflow overview page allows you to start a new workflow and shows you currently running or already finished workflows for an item. It can be reached in different ways:
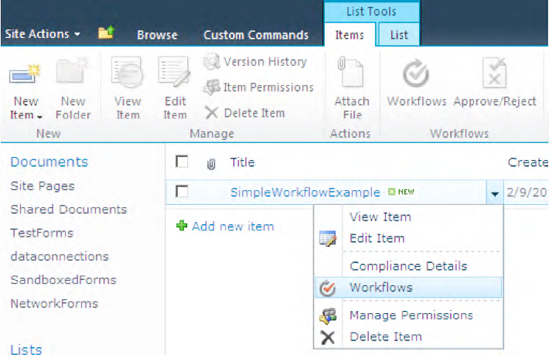
For a list or library, you can use the drop-down list of each list item and select workflow as depicted in Figure 16-9, or you can use the Workflow item in the ribbon bar, when the item is selected.
For a site, use the Site Actions menu and also select Workflows.
For workflows that are associated to a content type, you will find the workflow in the list or library to which your content type is assigned. You will always need an item of a list or library to start your content type workflow.
Tip
When developing your own workflow, we recommend you check the box that allows the workflow to be started manually. This way, you can stop and restart your workflow in case of an error. After you have finished developing your workflow, you can switch off this option if your workflow should only be started automatically.
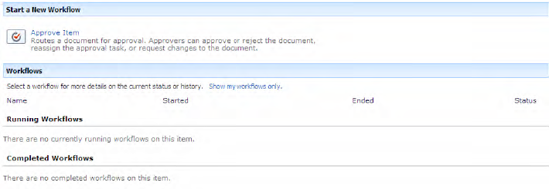
The workflow overview page of an item is shown in Figure 16-10. If you have one or more workflows associated, as in the figure, you can start a new workflow instance by simply clicking the workflow. This will set up the workflow, and if an initiation form has been defined, this form will be displayed to the user who started the workflow.
After you have started the workflow, it will appear under Running Workflows. You will not be able to start another instance of this workflow until the running instance has finished. SharePoint allows only one running instance of a workflow template on an item at a time.
SharePoint has many facilities for managing and monitoring running workflows, providing users insight into the current status of their workflows and allowing them to interact with running instances. This information is also helpful to workflow developers. The first place to look for the current status of a workflow is the list or library on which the workflow has been started. Since for each item in the list, a column for each workflow has been added, you can immediately see the status of the workflow in the corresponding column.
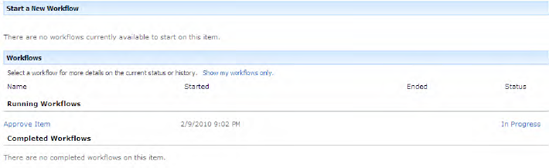
From here, or via one of the different ways to access the workflow overview page, you can then reach the workflow overview. If you have running workflow instances for your item, you will see a page similar to the one shown in Figure 16-11.
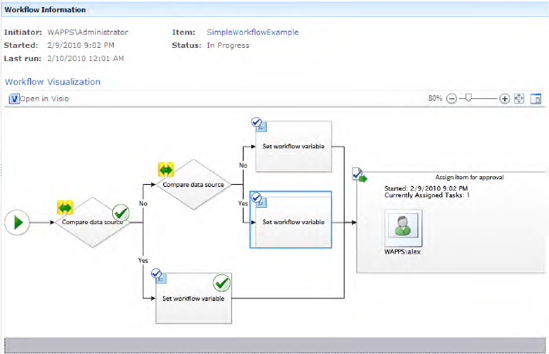
It displays again the current workflow status and by clicking the link on either the workflow name or the status, you navigate to the detailed workflow information for this workflow instance. The Workflow Information page (see the example in Figure 16-12) lists basic information about the initiator, the time the workflow was started, the current status, and a link to the item on which the workflow is executed.
Below this is a graphical visualization of the workflow, rendered using Visio Web Access. This diagram not only shows a static representation of the workflow but also mirrors the current state of the workflow. Each activity that has been processed is marked by a special symbol. The green tick symbols in Figure 16-12 indicate that the first "Compare date source" activity and the "Set workflow variable" activity at the bottom have already been processed.
Since Visio 2010 supports shapes for SharePoint 2010 workflows and an import for SharePoint workflows into Visio 2010 has been implemented, this is a great example of converting workflows from SharePoint to Visio 2010. Unfortunately, this feature is available only with SharePoint Server 2010 and not with SharePoint Foundation.
Beneath the workflow visualization, additional information about this workflow is displayed, shown in Figure 16-13. Immediately above the Tasks section are additional commands that can be used to modify the Approval task.
The link "Terminate this workflow now" is displayed in any workflow to users with the required permission. Clicking the link terminates the workflow instance, stopping the workflow in the current state and setting the workflow status to Aborted. This command is useful during workflow development when your workflow errors. Workflows in Error state are incomplete, and you can use this link to terminate your instance, before rerunning the workflow with a new version where your error is fixed. Remember, that you can have only one instance of a workflow running at the same time, so you need to terminate the running instance before you a start a new one.
The Tasks section lists all tasks that have been assigned by this workflow instance. You can see the user assigned to the task, the current status, and the outcome of the tasks. This is a view of the task list that was specified during workflow association that shows all tasks that are related to the current item and the current workflow.
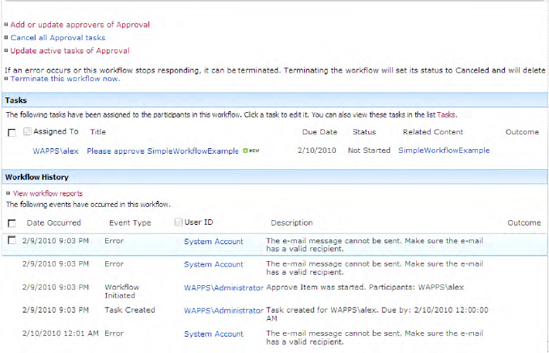
Finally, the last section of the workflow information page displays the workflow history list containing all entries for this workflow instance. This list summarizes the different actions that were taken throughout this workflow execution and shows you errors and other audit information that is written to the history. You can add activities to your workflow and write information to this history to share information about workflow progress with users and administrators. This is also a good method to debug your workflow during development.
As already mentioned, user interaction during workflow execution is accomplished using tasks. They can be assigned to a user by the workflow and will integrate seamlessly with any other tasks in SharePoint. You can use, for example, the User Tasks Web Part on your page to display all tasks that are assigned to the current user. This allows you to create intuitive solutions that follow your business processes with very little development effort by leveraging existing components.
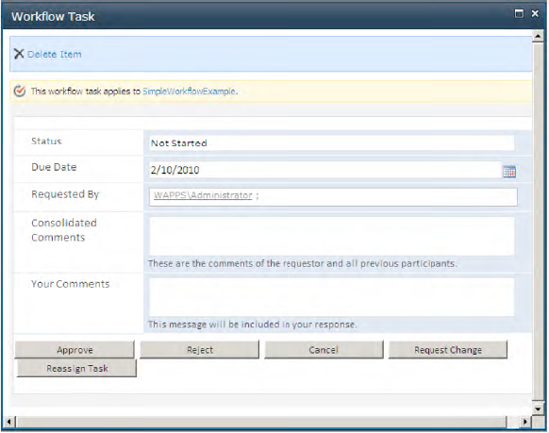
To gather additional information from users required for your workflow, you can build task forms to display to the user on task completion. Independent of the tool you are using for workflow development, you can use either standard ASP.NET forms or even InfoPath forms as task forms. This again shows the broad application for InfoPath forms and how well they have been integrated into SharePoint 2010. Figure 16-14 shows a sample InfoPath-based workflow task form, which is used in the out-of-the-box Approval workflow.
The out-of-the-box workflows supplied with SharePoint are very flexible and easy to use, but in most cases they don't fit the diverse and complex business processes in the real world. With SharePoint 2010, the support for constructing custom workflows that exactly fit the business requirements has been greatly improved. In previous versions, developing custom workflows was far more challenging. One of the reasons this task has become much easier lies in the improved tool support.
Not only have the tools been improved to make developing workflow solutions more straightforward, they have also been integrated to allow scalability and extensibility. In contrast, in SharePoint 2007 developing a workflow in SharePoint Designer could lead to a dead end. If you realized at some point that the capabilities of SharePoint Designer were inadequate for your requirements, you would lose all your work, because there was no way of importing a Designer workflow into Visual Studio. This is now possible with SharePoint 2010.
Workflow design usually involves specific knowledge about the business processes, which is only available within business units. Therefore, in Visio 2010, SharePoint workflow shapes have been added that allow business units to design a workflow skeleton, which can be imported into SharePoint Designer. This bridges the gap between business and IT and enables a common understanding of the desired workflows.
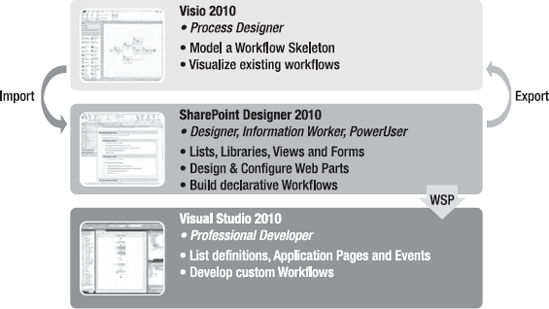
Figure 16-15 outlines the tools available across an enterprise to design and develop custom workflows. As you can see, it is possible to import Visio 2010 workflow diagrams into SharePoint Designer and use this skeleton as the basis for workflow development. Further, SharePoint Designer workflows can be exported as Visio 2010 diagrams and thus allow visualization of existing workflows.
Finally, you can now package SharePoint Designer workflows into a WSP solution file, open this solution from Visual Studio 2010, and develop these workflows into custom workflows.
Visio 2010 offers process designers the prospect of designing workflows for SharePoint that can be used directly to develop custom workflows in SharePoint Designer. To design a SharePoint workflow, start a new Visio diagram by selecting the Microsoft SharePoint Workflow template in the Flowchart category. From that, you can design your workflow in the familiar Visio interface using the special SharePoint workflow shapes: SharePoint workflow actions and SharePoint workflow conditions. Figure 16-16 shows an example Visio workflow diagram.
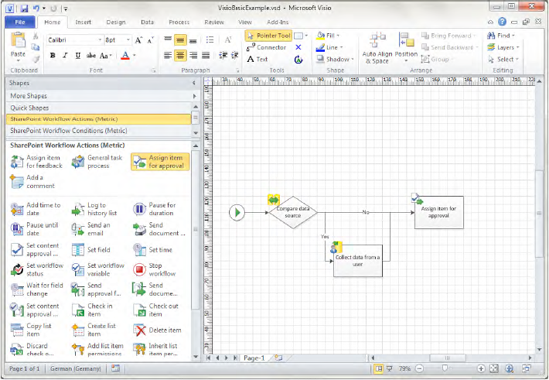
Visio offers the Check Diagram feature in the Process ribbon. This check reports whether your workflow is correctly modeled or if you missed any connections or important shapes. You will also find an option to import and export SharePoint workflows.
SharePoint Designer 2010 allows you to create workflows without writing code, using a declarative workflow description. Usually SharePoint Designer is aimed at designers, information workers, and power users, but since it is now possible to export SharePoint Designer workflows and use them in Visual Studio, SharePoint Designer can also be a useful starting point for developers—especially for prototyping or for simple workflow scenarios. You can even use Visio to design your workflows in cooperation with the business units, import the workflow into the Designer, and later use this workflow to start developing with Visual Studio.
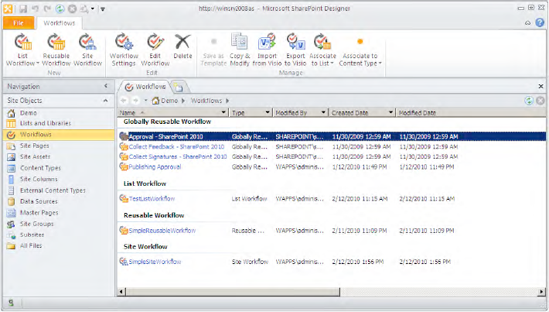
After opening a site in SharePoint Designer 2010, you will see all the items of the site in the navigation pane. If you select the Workflows navigation tab, you will see all the workflows that are available to the site. Figure 16-17 shows a sample list of different workflows that are currently available. The workflows are categorized as follows:
List Workflow: These workflows are developed for a particular list and are directly associated with that list. These workflows cannot be reused for any other list because they have direct access to all the columns of the list and thus are strongly tied to that list. Furthermore, list workflows cannot be saved as a template to be imported into Visual Studio, for the same reasons.
Site Workflow: Instead of creating a workflow for a list or a library, with SharePoint 2010 you can also create workflows that can be executed on a site. In SharePoint Designer, you will always be working in the context of a site. When you add a site workflow, it will automatically be available only for the site on which you are working. Like list workflows, site workflows cannot be saved as a template for Visual Studio.
Reusable Workflow: These workflows are not developed for a particular list or library. Instead, they can be associated with any list or library but not to a site. As they are not tied to a list, you can use the option Save as Template to save a reusable workflow to a WSP file, which can be opened in Visual Studio. Because these workflows are independent of lists and content types, you will not have access to any columns other than the base columns inside the workflow. You can use the options Associate to List or Associate to Content Type to associate the workflow from SharePoint Designer, rather than the SharePoint user interface. Reusable workflows, however, are available only to lists within the current site. To make them available to the entire site collection, you can use the option Convert to Globally Reusable.
Globally Reusable: These workflows are reusable workflows that are available to the entire site collection instead of just the site. Unfortunately, these workflows cannot be saved to a template WSP file.
The ribbon bar of the workflows page contains buttons for creating new workflows and editing existing workflows (see Figure 16-17). In addition, the Manage section allows you to export the selected workflow to a WSP template file and to import and export Visio 2010 workflow diagrams. You can also associate workflows to a list or to a content type.
Clicking a workflow in the overview will take you to the Workflow Settings page for this workflow, as illustrated in Figure 16-18. This page presents all the relevant settings for a workflow, at a glance. Here you can alter similar settings to those exposed in the SharePoint user interface, such as start options and the workflow name. Using the ribbon or the Edit workflow link in the customization section, you can start editing the workflow. In addition to this, you can manage all the variables that are used by the workflow:
Initiation Form Parameters: This allows you to specify variables that will be collected during workflow initiation or association. If not already present, SharePoint Designer will create an initiation form for you, which will appear in the Forms section of the Workflow Settings page. You can access these initiation parameters (and association parameters) within your workflow within conditions and actions.
Local Variables: You can create variables that are available inside the workflow to store information. These variables are accessible throughout the workflow and can be used for conditions and actions. When you add task forms to your workflow, the results can be reached through such variables.
Association Columns: These allow you to add fields to your list or library, when the workflow is associated with this list or library. Association columns enable you to store workflow-related data in the list. This is especially important for reusable workflows because this ensures that required columns are made available in the list to which the workflow will be associated later. Naturally, this is not available to site workflows.
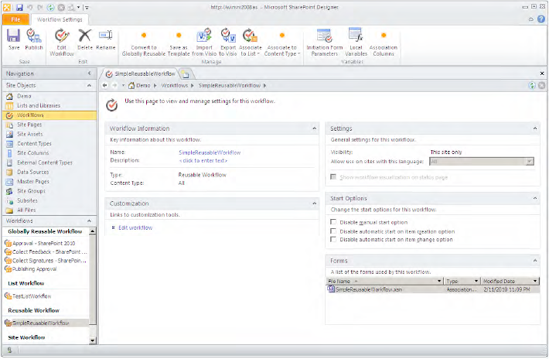
The Forms section contains all the forms used by this workflow, including the initiation form and association form, as well as any task forms. These forms are created automatically by SharePoint Designer as soon as the workflow is published. When InfoPath is available to your SharePoint environment, XSN forms will automatically be created. Otherwise, ASPX forms are produced.
Warning
On the Workflow Settings page, the start options for Reusable workflows are different from all other dialogs where you can set the start options. In this section they are negated, which means you have to disable the options you don't want to be available.
To create and edit declarative workflows, SharePoint Designer 2010 uses the Workflow Editor page. You can reach this page by clicking Edit Workflow on the ribbon bar, using the link in the Workflow Settings page when editing a workflow, or using one of the buttons for creating a new workflow from various pages in SharePoint Designer. As you see in Figure 16-19, the layout of the workflow editor has been completely redesigned compared to previous versions.
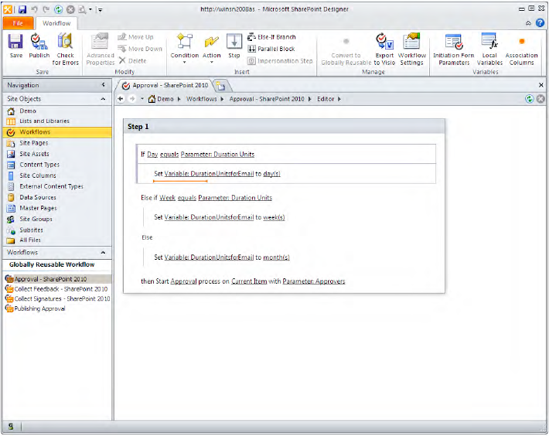
Workflows are structured using steps that are represented by gray boxes with a heading that can be renamed by clicking the text. You can add actions and conditions to your workflow at any location within a step.
Every action or condition is represented by a sentence that consists of several parameters. These parameters either can be set by the workflow editor to constant values or can be filled from workflow variables or item properties.
We will show how workflow can be designed with SharePoint Designer in more detail in the "Workflows with SharePoint Designer" section.
To leverage the full potential of SharePoint workflows, you can create custom workflows using Visual Studio. Although this allows full control and flexibility over workflows in SharePoint, the approach requires a thorough knowledge of SharePoint development and is solely aimed at professional developers familiar with .NET. Fortunately, Visual Studio 2010 contains project templates for SharePoint workflows and integrates well with SharePoint, which alleviates development complexity.
To get started with developing a custom workflow, create a new project in Visual Studio and select either Sequential Workflow or State Machine Workflow from the SharePoint 2010 templates (as displayed in Figure 16-20). Both templates will result in similar solutions, except for the type of workflow integrated into the project.
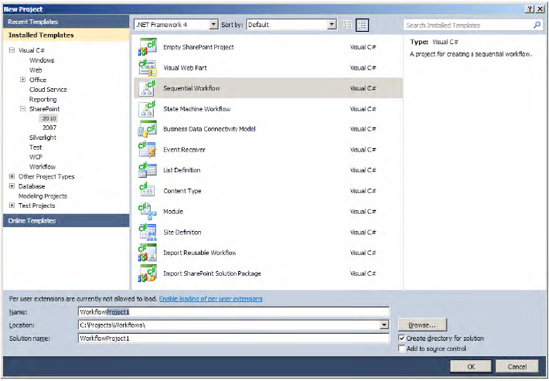
Note
Don't be confused if .NET Framework 4.0 is selected by default when choosing the SharePoint 2010 workflow templates. Although you can select this option, you won't be able to work with 4.0 Workflow facilities. Even if you select 4.0, the resulting project will still be using .NET Framework 3.5.
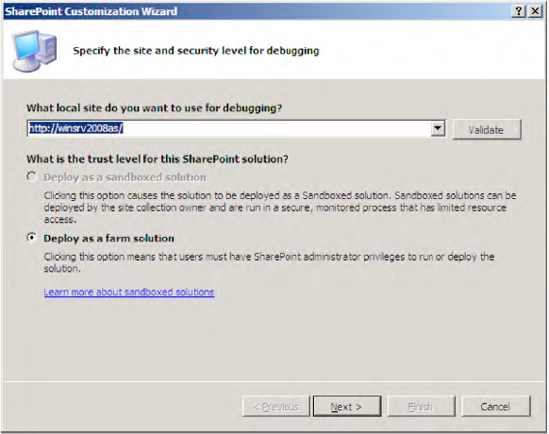
Once you have started your project creation, wizards are used to gather basic settings for your project. At first you will be asked to enter a local site for debugging (see Figure 16-21). This SharePoint site is used when you debug your workflow (Microsoft often calls this the "F5 experience," since you are able to debug SharePoint solutions directly from within Visual Studio). In this dialog, the option to deploy as a sandboxed solution is disabled, because custom workflows always need to be deployed as a farm solution.
In the subsequent wizards, you can specify various settings that are used for debugging. These are the same settings as already described in SharePoint user interface in the "Using Workflows in SharePoint" section. They include a workflow name, the workflow template (list or site workflow), the list to which the workflow is associated, the task list and history list, and, finally, the options surrounding when the workflow should be started.
Once the solution is created, you should see a Visual Studio solution similar to Figure 16-22, depending on your Visual Studio configuration. In the central window is the graphical workflow designer, showing the sequential flow (or the states for a state machine workflow). The toolbox on the left side contains all the available shapes that you can drag on the designer surface to model your workflow. The shapes are categorized into the standard Windows Workflow Foundation shapes and the SharePoint-specific shapes. In the Solution Explorer are all the relevant items for a SharePoint solution including your workflow. The project structure created by the template builds a SharePoint solution including a feature that will be deployed to the local SharePoint when you debug or deploy your solution.
(We will show how to develop custom workflows using Visual Studio in detail in the "Custom Workflows with Visual Studio" section.)

Both tools, SharePoint Designer and Visual Studio, support developing elaborate workflows for the SharePoint environment. Visio 2010, on the other hand, can be used only for designing workflows—to finally create a workflow, you always have to use either SharePoint Designer or Visual Studio. Table 16-2 compares the salient features of these two tools for creating workflows:
Table 16.2. Comparing Workflow Facilities in SharePoint Designer 2010 and Visual Studio 2010
Facility | SharePoint Designer 2010 | Visual Studio 2010 |
|---|---|---|
Intended audience | Designer/power users | Professional developer |
Workflow development | Declarative description | Code based |
Supported workflows | Sequential | Sequential and state machine |
Reusability | Within the site or site collection, export to WSP | Reusable throughout farm |
Reusable workflows | For lists, libraries, and content types | For lists, libraries, content types, and sites |
Deployment | Automatically to the site into the workflows list | Using SharePoint feature |
Debugging | Not supported | Debugging using Visual Studio |
Remote deployment | Supported | Not possible |
Workflow type | XOML markup files | Compiled into assembly |
Forms | Automatically selected: InfoPath or ASP.NET | Both can be specified in feature |
Activities | Built-in activities, custom activities can be developed | Built-in activities, custom activities can be developed |
Association | Lists, libraries, content types, and sites | Lists, libraries, content types, and sites |
Association and initiation forms | Both supported | Both supported |
Modification | Not supported | Modification supported |
Import Visio diagrams | Directly supported | Only via Designer to export WSP |
The previous section covered the fundamentals of SharePoint workflows and a quick overview of the tools that you can use to develop workflows with SharePoint. In this section, we explain how you can use SharePoint Designer to create declarative workflow solutions. We start by showing how you can create a workflow using only SharePoint Designer, as well as the available actions and conditions.
Later in this chapter, we describe how you can create custom activities with Visual Studio that can be integrated in SharePoint Designer to extend the existing actions and conditions. This approach is especially interesting since these actions can be shared with workflow designers who are not capable of SharePoint workflow development. Therefore, you will also learn a few essentials about the internals of SharePoint Designer workflows and how the actions and conditions are built.
SharePoint Designer has been completely redesigned in the 2010 version and offers an impressive interface for designing SharePoint workflows using a declarative approach. Although the interface is very intuitive, some of the concepts of declaring SharePoint Designer workflows need to be explained. To leverage the full potential of declarative workflows, all the available actions and conditions will be described in this chapter to give you a complete understanding of what is possible using the Workflow Designer.
To start declaring a workflow, open the Workflows page in SharePoint Designer and select one of the available workflow types from the ribbon bar in the Workflows page. In the ensuing dialog, enter a name for the workflow and a description. The workflow is created, and you are able to start developing your workflow in the Workflow Editor page.
What follows is a description of actions and conditions using an example action. The steps for all actions and condition in the example are similar and can easily be comprehended following the basic description.
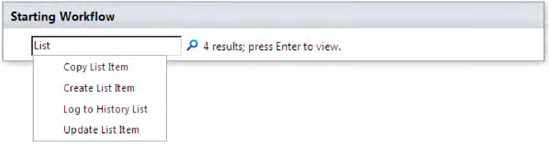
Looking at the editor window, you will notice a single, horizontal orange bar, which indicates the current cursor position. You can use the keyboard to control the cursor position and insert actions and conditions from the ribbon, or you can click the position where you want to insert an action and enter a part of the name of the action or condition you want to insert. SharePoint Designer will automatically show you a drop-down list of all available actions and conditions for your search, as shown in Figure 16-23.
After you select an action or condition, an entry will be created that describes the action or condition in one sentence. This sentence contains a number of editable parameters. They are underlined and can be edited by a simple click (Figure 16-24).

When you click a parameter, you will see different options for editing. You can directly enter a static value in the textbox, or you can click one of the buttons next to the text box. Depending on the parameter type, you may see the two buttons shown in Figure 16-25.

The left button with the ellipsis symbol (...) opens the String Builder dialog, which can be used to construct dynamic strings. The button with the function symbol opens the Lookup dialog (Figure 16-26), which enables you to lookup a value from one of the following sources:
Current Item: This is the item on which the workflow was started and to which the workflow instance belongs.
Workflow variables and constants: Select a value from one of the variables that you can define for your workflow. You can manage these variables using Local Variables from the ribbon.
Workflow context: This contains information about the workflow instance, such as the initiator, date, and time of workflow start or the current user.
Association: History List: You can select a value from an item in the associated history list. You can specify a condition composed of a field that you want to compare and a value to select a specific item.
Association: Task List: You can also select a value from an item in the associated task list. As for the history list, a field/value combination can be specified to select an item.
Current List: Select a value from an item in the current list, which is identified by a field together with the value to look for.
List within Site: You will see all available lists within the current site to look up a value. You can specify a condition to select a specific item within the list.
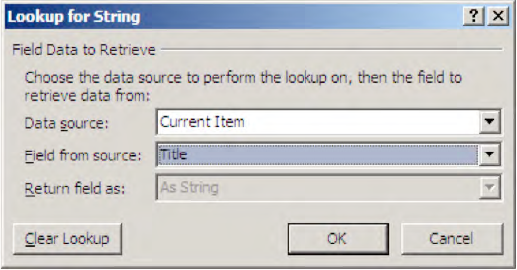
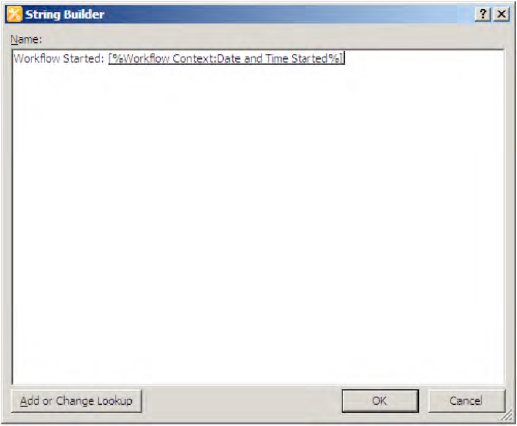
Figure 16-27 shows the String Builder dialog, used to create dynamic strings. Within the String Builder you can click the Add or Change Lookup button to invoke the Lookup dialog to insert dynamic values (described earlier). This dialog will be available whenever a string parameter is expected.
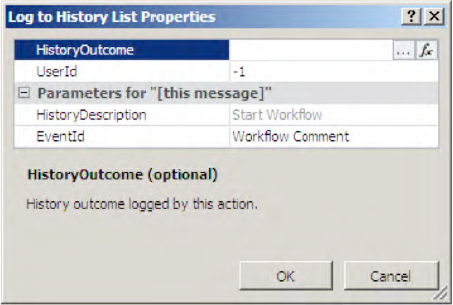
Instead of editing the properties of an activity by clicking the underlined parameters in the activity sentence, you can also select Advanced Properties from the ribbon to edit all the properties of an activity. For some activities, you will find additional parameters within the Properties windows, as shown in Figure 16-28. In this example, you can see that the action Log to History List shows additional parameters, whereas in the sentence shown earlier, you can only specify the text that should be logged.
SharePoint Designer offers a huge selection of actions that can be used to model elaborate declarative workflows. These actions are categorized according to their purpose and the items to which they apply. Table 16-3 lists all available actions and gives a short description for each of them.
Table 16.3. Workflow Actions in SharePoint Designer 2010
Category | Action Name | Platform | Description |
|---|---|---|---|
Core | Add a comment | Foundation | Similar to Log to History List. |
Core | Add Time to Date | Foundation | Adds a certain amount of time to a |
Core | Do Calculation | Foundation | Calculates the result of a mathematical operation on two parameters. Supported operations: plus, minus, multiply by, divide by, and mod. |
Core | Log to History List | Foundation | Logs a message to the History List. |
Core | Pause for Duration | Foundation | Pauses workflow execution for the specified amount of time. |
Core | Pause until Date | Foundation | Pauses workflow execution until the specified |
Core | Send an Email | Foundation | Sends an e-mail to the specified users. The dialog for sending an e-mail allows specifying the recipients, the subject, and the e-mail body with rich-text capabilities. |
Core | Set Time Portion of | Foundation | Sets the time value of a |
Core | Set Workflow Status | Foundation | Sets the custom workflow status. Instead of In Progress, Complete, or Error Occurred, a custom value that better describes the workflow's state can be supplied. |
Core | Set Workflow Variable | Foundation | Sets a workflow variable to the specified value. Depending on the type of the selected variable, different dialogs are available. |
Core | Stop Workflow | Foundation | Stops the workflow and logs the specified error message to the History List. |
Document Set | Capture a version of the Document Set | Server | Takes a snapshot of a document set specifying the versioning method. |
Document Set | Send Document Set to Repository | Server | Submits a document set to the specified destination using the specified action. |
Document Set | Set Content Approval Status for the Document Set | Server | Sets the content approval status for the document set. |
Document Set | Start Document Set Approval Process | Server | Starts the approval process for the document set. |
List | Add List Item Permissions | Foundation | Assigns permissions on the specified list item to the selected users. This action is only available in the impersonation step. |
List | Check In Item | Foundation | Performs check in on an item in a document library. The item can be selected using the Choose List Item dialog. |
List | Check Out Item | Foundation | Performs check out on an item in a document library. The item can be selected using the Choose List Item dialog. |
List | Copy List Item | Foundation | Copies a list item from one list into another list. |
List | Create List Item | Foundation | Creates a new list item in the specified list and allows you to set the field values for the new list item. The ID of the new list item is saved in a workflow variable. |
List | Declare Record | Server | Declares the current item as a record for records management. |
List | Delete Item | Foundation | Deletes a list item in a specified list. You can specify the list item using a condition in the Choose List Item dialog. |
List | Discard Check Out Item | Foundation | Discards a check out on an item in a document library. The list item can be selected using the Choose List Item dialog. |
List | Inherit List Item Parent Permissions | Foundation | Inherits permissions from the selected list item. This action is only available in the impersonation step. |
List | Remove List Item Permissions | Foundation | Removes permissions for the specified users from the selected list item. This action is only available in the impersonation step. |
List | Replace List Item Permissions | Foundation | Replaces permissions for the specified users on the selected list item. This action is only available in the impersonation step. |
List | Set Content Approval Status | Foundation | Sets the status of content approval on the current item to the specified value. |
List | Set Field in Current Item | Foundation | Sets the specified field in the current list item to the specified value. |
List | Undeclare Record | Server | Undeclares the current item as a record for records management. |
List | Update List Item | Foundation | Updates a list item in a list with the specified values. You can choose any of the available lists and specify a condition to select the list item, as in the Choose List Item dialog. Subsequently, you can specify a value for each of the fields in the list. |
List | Wait for Field Change in Current Item | Foundation | Waits until a condition on a field in the current item is met. |
Relational | Lookup Manager of a User | Server | Returns the manager of the specified user from its profile. |
Task | Assign a Form to a Group | Foundation | Creates a task with a survey form that will be assigned to a group of people. The values entered by the users will be stored in the task list. The workflow will wait for the task to complete before continuing execution. |
Task | Assign a To-do Item | Foundation | Creates a to-do task that will be assigned to the specified users, and the workflow will wait for all tasks to complete before continuing execution. |
Task | Collect Data from a User | Foundation | Assigns a task with a custom form to a user. The form fields can be specified, and the values will be stored in the task item. The task ID will be returned to the workflow to allow referencing the task from the workflow. The workflow will wait for the task to complete before continuing execution. |
Task | Start Approval Process | Server | Creates an approval task for all specified users on the specified item. The workflow waits for all approval tasks to be finished. Depending on the approval outcome, the workflow status is set accordingly. |
Task | Start Custom Task Process | Server | Similar to the approval process, except that you can customize the behavior of the entire process. You can edit all available events and react to individual task events and overall process events. |
Task | Start Feedback Process | Server | Similar to the approval process, except that instead of content approval, tasks are assigned to the specified users, and the workflow waits for them to be completed. |
Utility | Extract Substring from End of String | Foundation | Copies the last characters of the specified string into a new string variable. The parameter length defines the number of characters to be copied from the end of the string. |
Utility | Extract Substring from Index of String | Foundation | Copies a substring of a specified string into a new variable, starting at the specified index until the end of the string. |
Utility | Extract Substring from Start of String | Foundation | Copies the first characters of a specified string into a new variable. The parameter length defines the number of characters that should be copied from the start of the string. |
Utility | Extract Substring of String from Index with Length | Foundation | Copies a substring of a specified string into a new variable, starting at the specified index. The parameter length defines the number of characters that should be copied starting at the index. |
Utility | Find Interval Between Dates | Foundation | Returns the interval between two |
To control the flow of a workflow, several conditions are available that allow you to include decisions into your workflow based on If-Else statements. You can concatenate conditions using "and" and "or" statements by adding another condition directly underneath the If statement. Furthermore, you can use multiple Else-If branches, each containing conditions to be evaluated. Table 16-4 shows the available conditions in SharePoint Designer 2010.
Table 16.4. Workflow Conditions in SharePoint Designer 2010
Category | Condition Name | Description |
|---|---|---|
Common | If any value equals value | Compares two values using one of the available operands. Each of the values can be specified using the lookup dialog. |
Common | If current item field equals value | Similar to the condition "If any value equals value," except that for the first parameter only a field in the current item can be chosen. |
Other | Check list item permission levels | Checks if the specified users have at least the specified permission level on the selected list item. |
Other | Check list item permissions | Checks if the specified users have at least the specified permissions on the selected list item. |
Other | Created by a specific person | Checks whether the current item was created by the specified person. |
Other | Created in a specific date span | Checks whether the current item was created within the time span specified by two |
Other | Modified by a specific person | Checks whether the current item was modified by the specified person. |
Other | Modified in a specific date span | Checks whether the current item was modified within the time span specified by two |
Other | Person is a valid SharePoint user | Checks whether the user identified by their username is a valid user within SharePoint. |
Other | Title field contains keyword | Checks whether the field title in the current item contains the specified string as a substring. |
All available actions and conditions are defined within the following files in the SharePoint folder under TEMPLATE1033Workflow:
WSS.ACTIONS: This file contains all actions and conditions that are available in SharePoint Foundation. The name WSS stands for Windows SharePoint Services, which denoted the SharePoint Foundation functionality in previous SharePoint versions.MOSS.ACTIONS: This file contains all actions and conditions that are exclusively available to SharePoint Server installations.
To structure your workflow, you can use different workflow steps. Each step can contain any number of actions and conditions. A step is displayed as a box with a gray border and has a name that can be changed. You can use steps to structure your workflow and make it comprehensible to others. Steps can be nested within other steps, offering useful flexibility in organizing your workflows. It is even possible to insert steps within If-Else branches. Actions and conditions can only be added within a step.
A step is implemented as a SequenceActivity in the resulting workflow. This WF activity is a container that executes all child activities in a forward direction until its last activity is finished. Since even the sequential workflow is itself derived from SequenceActivity, there is no difference in the execution of your workflow when adding extra steps. They are merely used for logical structuring.
One step is special in its execution behavior: the Impersonation Step. You can use this step like any other step. The difference is small yet very powerful—the activities inside this step will be executed with the permissions of the workflow author. Usually, every workflow is executed using the privileges of the user who started the workflow. This can be a significant limitation for workflow development, when the action to be executed depends on the user's permissions. The user starting the workflow needs access to the current list the workflow will be started on, but what if the workflow needs to write information into another list, on which the user has no permission to write? This is where the impersonation step can be used to overcome this issue. In previous SharePoint versions, this problem drastically limited the use of SharePoint Designer workflows.
Another option to organize your workflow is the use of parallel blocks. Whenever you want multiple actions to be executed simultaneously, you can employ a parallel block. Within the parallel block, you can specify actions, conditions, and steps that will be executed in parallel.
Tasks in a workflow handle user interaction with the workflow. Whenever you use an action related to a task in your workflow, the workflow execution will be paused until the task is completed by the assigned user. Within SharePoint Foundation, there are three task-related activities available: Assign a Form to a Group, Assign a To-do Item, and Collect Data from a User. For all these task activities, SharePoint Designer will automatically create a task form to display to the users. The information entered by users into the task forms is stored inside the task. The Collect Data from a User activity is especially designed to access this information from the workflow.
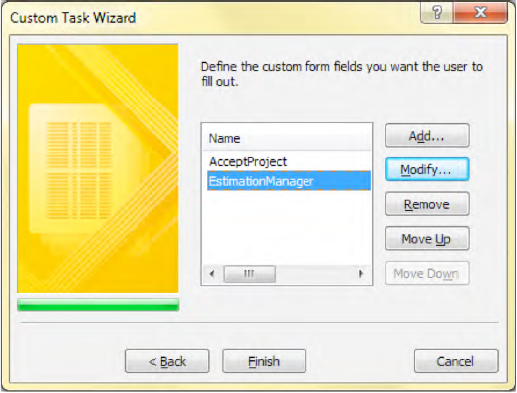
When you add this action to your workflow, a wizard is presented that lets you enter a name and description for that task. You can specify custom form fields for the user to fill in, as shown in Figure 16-29. You can define the field name, the data type, and the detailed settings depending on the data type, such as default values and constraints. The fields you enter in this dialog will be added as columns to the task list used by the workflow. When the workflow is published, SharePoint automatically creates a task form for that workflow. This form will be displayed to the user when they edit the task item.
To access the information that was entered by the users, the activity defines an output variable of type TaskId, which stores the list item ID of the task into a workflow variable. Using this ID, you can access the task item in your workflow that was edited by the user and access the fields, which were completed in the task form. To accomplish this, use a lookup within an action, for example Set Workflow Variable, and specify the Task List for your workflow as the data source and the field that was entered through the task form, as shown in Figure 16-30.
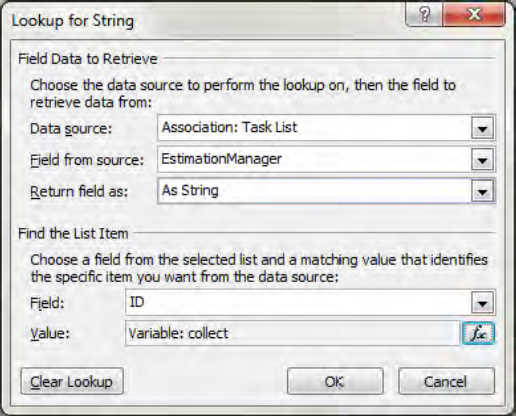
To identify the correct item in the task list, you need to specify the Find the List Item setting properly. Select ID as the field that is used for comparison, and set the value to the workflow property containing the result of the task action (which is "collect" in the previous example). Now the lookup will select the task item that has the ID of the task that was created by the workflow and returns the selected field value.
You can use this procedure to access any list item or item in a library and select the desired field using the Lookup dialog. All you need is the ID of the list item. Of course, you can also specify any other field value combination to select list items.
Note
When you specify field value combinations that do not return a single list item, the first list item that matches the condition will be returned. Unfortunately, you can only specify one field for comparison, and there is no option for advanced queries on the list.
As mentioned earlier, SharePoint Designer workflows are declarative workflows that are compiled at runtime. These workflows consist of the following files:
Workflow markup file .xoml: Contains the declarative description of the workflow
Workflow rules file .rules: Contains the rules that are used for conditions in the workflow
Workflow configuration file .xml: Contains general workflow configuration as well as the content types that are used for the forms in the workflow.
Forms for association, initiation, and tasks: Either InfoPath or ASPX forms used in the workflow
You can access these files via the All Files section in the SharePoint Designer navigation and then select Workflows. These files can be saved to a local disk using the Export File button in the ribbon bar.
SharePoint Designer 2010 offers a variety of actions and conditions to develop custom workflows to meet the business requirements. However, even with the advanced workflow activities in SharePoint Server, there will be requirements that cannot be implemented with the standard activities that are shipped with SharePoint. Whenever you encounter limitations in SharePoint Designer workflows, you have two options: either switch to Visual Studio to develop your workflow using code, or develop a custom activity for SharePoint Designer to enhance the facilities provided by the standard activities with your own activities. Both scenarios will require you to use Visual Studio, but by building a custom activity for SharePoint Designer, you will enable other users working with SharePoint Designer to also use this functionality for their workflows.
To construct custom activities for SharePoint Designer, you need to develop a Visual Studio solution that implements a workflow activity and makes it available to the SharePoint environment through configuration files. Breaking it down further, the following steps are required:
Create a Visual Studio solution based on the SharePoint 2010 Empty Project template.
Add a project using the Workflow Activity Library template to the solution.
Implement a class that is derived from
System.Worfklow.ComponentModel.Activitycontaining the business logic for your custom action.Describe the workflow behavior for SharePoint Designer within an
.ACTIONSfile.Configure settings in the
web.configfile for your web application.
Throughout the following subsections, these steps will be described in greater detail while developing a small yet useful example: a custom action will be built to select a list item based on a CAML query. The action will require, as input parameters, a SharePoint list—which can be selected from the available lists—and a CAML-based query string. It will return the ID of the first item in the specified list that matches the CAML query. The example shows how you can pass parameters to and from the custom action and how to access the context of a SharePoint Designer workflow. Of course, you will also learn how to develop an activity class containing the business logic of the workflow.
Before you can implement your custom action using .NET code, you first have to set up your solution. Select the SharePoint 2010 Empty Project template as the basis for a new solution. This project will be used to deploy all the necessary files and configurations to the SharePoint environment. Add another project to the solution by selecting the Workflow Activity Library template from the Workflows category. This template is not specific to SharePoint workflow development and can also be used to develop reusable activities for WF workflows.
The WF project will contain the code for the custom activity and will be compiled into an assembly. Since the assembly needs to be registered in the GAC, you need to supply a strong name key file to sign the assembly. Add references to the following assemblies to your workflow project:
Microsoft.SharePoint.dll: Required to work with the SharePoint object modelMicrosoft.SharePoint.WorkflowActions.dll: Will be used to access theWorkflowContextof the SharePoint Designer workflows
To deploy the solution to SharePoint, add a feature to the empty SharePoint project with its scope set to Web Application. This scope is required, because the feature needs to edit the web.config for the web application. In addition, the assembly that will be created by the workflow project needs to be added to the <SafeControl> section of the web.config file. You can do this by editing the properties of the package in the SharePoint project.
An additional file with the extension .actions needs to be deployed to the folder TEMPLATE/1033/Worfklow below the SharePoint 12 hive. This file is used by SharePoint Designer to gather all the relevant information about the custom action. (There are more details about this file later in this section.) To include the file, add a SharePoint-mapped folder to the SharePoint project, and select the target path for the file. Any subfolders created by Visual Studio can be removed. The .actions file will later be put into this mapped folder, which will cause this file to be deployed to the desired path during deployment.
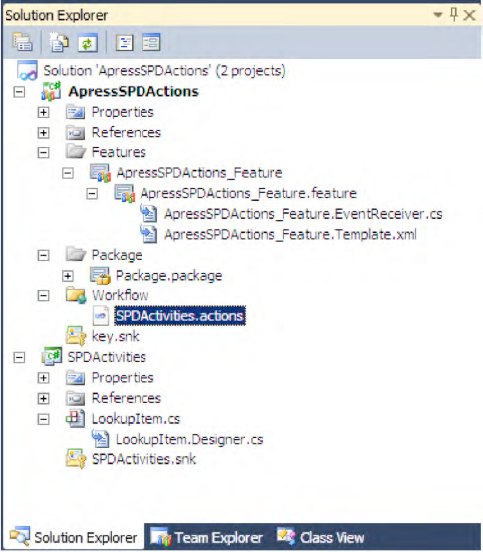
Figure 16-31 illustrates the solution structure, and you can see all the relevant elements required for a custom action.
To sum up, these are the essential steps for creating a solution:
Create a Visual Studio solution based on a SharePoint Empty Project template.
Add a feature to the project with web application scope.
Add the assembly of the workflow project to the safe controls in the package.
Add a SharePoint-mapped folder for the actions file.
Add a solution based on the Workflow Activity Library template.
Add a strong name key file.
Add references to the
Microsoft.SharePointassembly and theMicrosoft.SharePoint.WorkflowActions.
After the project has been set up, you can begin implementing the custom activity in the Workflow Library project.
In general, the following steps are important for implementing a custom activity class:
Create a class that is derived from
System.Workflow.ComponentModel.Activity.Define class properties.
Register class properties as dependency properties.
Implement the
Executemethod.
First add a new Activity to your project, and switch to the code view of the activity. Listing 16-1 contains the code for the example activity. (A detailed explanation follows, later.)
The namespaces Microsoft.SharePoint and Microsoft.SharePoint.WorkflowActions should be included via suitable using statements to work with the SharePoint object model and to use the workflow context. The class can be implemented as a subclass of System.Workflow.ComponentModel.Activity. The Activity class already defines and handles the required events for interacting with the workflow. You only need to define the properties for your workflow activity and override the Execute method to define your business logic for this activity.
To access properties from the workflow environment, the DependencyProperty object must be used. In the Custom Workflows with Visual Studio section, dependency properties will be described in more detail. The DependencyProperty allows loose coupling between workflow activities and the workflow instances. Workflows store their properties in a dictionary, which can be accessed by the activities via dependency properties. The workflow runtime engine makes these properties available to all activities and manages all dependency properties from the activities within a workflow. To register a DependencyProperty with the workflow, you first have to define a static variable in your class of type DependencyProperty. Then you can call the static Register method on DependencyProperty, providing a name for the property, the type of the property, and the type of the activity class, and assign the result to your variable.
public static DependencyProperty ListIdProperty = DependencyProperty.Register(
                                "ListId", typeof(string), typeof(LookupItem));
Once the dependency property is registered, you can add a property to your class with the name that was registered with the dependency property earlier. This property is defined like any other property, except that instead of storing the value to a local variable, the getter and setter method will use the dependency property to access the value. The GetValue and SetValue methods are inherited from DependencyObject and can be accessed using the base keyword. Both methods require the DependencyProperty as a parameter and will store a new value or retrieve the current value from the dependency property in the workflow instance.
[BrowsableAttribute(true)]
[DesignerSerializationVisibilityAttribute( DesignerSerializationVisibility.Visible)]
[ValidationOption(ValidationOption.Required)]
public string ListId
{
    get
    {
        return (string)base.GetValue(LookupItem.ListIdProperty);
    }
    set
    {
        base.SetValue(LookupItem.ListIdProperty, value);
} }
The properties exposed as dependency properties can be made available to SharePoint Designer as parameters for the workflow action.
All the properties in the example are built in the same way, though one property requires special attention: __Context. This property holds an object of type WorkflowContext, containing useful information about the context in which the workflow is running. This includes the current item on which the workflow was started and information about the workflow instance such as the WorkflowInstanceId or the StartedDateTime. SharePoint sets several parameters during workflow activation, and some of them are exposed by the SharePoint Designer workflow environment, like __Context. These parameters are automatically set to a certain value and are available to every workflow. You simply specify a property with the correct name and bind it correctly to the workflow using the .actions file. The parameters shown in Table 16-5 are made available.
Table 16.5. Properties That Are Available to All Custom Workflow Actions
Property | Type | Description |
|---|---|---|
|
| Contains information about the workflow instance and useful helper methods |
|
| The GUID (as a String) of the list on which the workflow has been started |
|
| The ID within the list, of the item on which the workflow has been started |
|
|
With the dependency properties implemented, it is time to write the business logic of the Action. Override the Execute method of the Activity class. This method is called by the workflow runtime environment when the activity is executed. Within the Execute method, you can access the properties of the action and create your own business logic. At the end of the Execute method, you need to return the appropriate ActivityExecutionStatus. This status can take several values throughout the life cycle of an activity. For the Execute method in custom SharePoint Designer actions, the status Closed should be used. It indicates that the activity has finished as expected.
Example 16.1. Implementing a Custom SharePoint Designer Action
using System; using System.ComponentModel; using System.Workflow.ComponentModel; using System.Workflow.ComponentModel.Compiler;using Microsoft.SharePoint;using Microsoft.SharePoint.WorkflowActions;namespace Apress.SP2010.Workflows.SPDActivities {
public partial class LookupItem : Activity{ public LookupItem() { InitializeComponent(); } // Bind Dependency Properties public static DependencyProperty __ContextProperty = DependencyProperty.Register("__Context", typeof(WorkflowContext), typeof(LookupItem));public static DependencyProperty ListIdProperty =DependencyProperty.Register("ListId", typeof(string),typeof(LookupItem));private static DependencyProperty SearchQueryProperty = DependencyProperty .Register("SearchQuery", typeof(string), typeof(LookupItem)); public static DependencyProperty ResultItemIdProperty = DependencyProperty.Register("ResultItemId", typeof(int), typeof(LookupItem));[BrowsableAttribute(true)][DesignerSerializationVisibilityAttribute(DesignerSerializationVisibility.Visible)][ValidationOption(ValidationOption.Required)]public string ListId{get{return (string)base.GetValue(LookupItem.ListIdProperty);}set{base.SetValue(LookupItem. ListIdProperty, value);}}[BrowsableAttribute(true)] [DesignerSerializationVisibilityAttribute( DesignerSerializationVisibility.Visible)] [ValidationOption(ValidationOption.Required)] public string SearchQuery { get { return (string)base.GetValue(LookupItem.SearchQueryProperty); } set { base.SetValue(LookupItem.SearchQueryProperty, value); } }
[BrowsableAttribute(true)]
[DesignerSerializationVisibilityAttribute(
DesignerSerializationVisibility.Visible)]
[ValidationOption(ValidationOption.Required)]
public int ResultItemId
{
get
{
return (int)base.GetValue(LookupItem.ResultItemIdProperty);
}
set
{
base.SetValue(LookupItem.ResultItemIdProperty, value);
}
}
[ValidationOption(ValidationOption.Required)]
public WorkflowContext __Context
{
get
{
return (WorkflowContext)base.GetValue(
LookupItem.__ContextProperty);
}
set
{
base.SetValue(LookupItem.__ContextProperty, value);
}
}
// Override the Execute method of the Activity
protected override ActivityExecutionStatus Execute(
ActivityExecutionContext executionContext)
{
// Retrieve the listGuid using a Helper class in the WorkflowActions
// namespace
Guid listGuid = Helper.GetListGuid(this.__Context, this.ListId);
if ((this.__Context != null))
{
SPWeb web = this.__Context.Web;
if (null != web)
{
SPList list = web.Lists[listGuid];
SPQuery query = new SPQuery();
query.Query = this.SearchQuery;
SPListItemCollection items = list.GetItems(query);
if (items.Count > 0)
{
ResultItemId = items[0].ID;
}
}}
return ActivityExecutionStatus.Closed;
}
}
}In the example in Listing 16-1, the Execute method runs a CAML query on the list to be searched. The ListId property is used to get access to the list that is selected in SharePoint Designer from the available lists. The __Context property provides access to the current web object. After the CAML query is processed, the first record of the query response is used to assign the ResultItemId parameter.
After the class has been implemented, there are further things to do in order to use the new Action in SharePoint Designer. You need to inform SharePoint about the new action and link the parameters in SharePoint Designer to the properties in the Activity class.
Workflow activities are defined in a special XML file, with the file extension of .ACTIONS. We mentioned previously the WSS.ACTIONS and MOSS.ACTIONS files in the SharePoint subfolder 14TEMPLATE1033Workflow, which describe the available actions and conditions for SharePoint Designer in SharePoint Foundation and SharePoint Server. SharePoint Designer parses this folder and reads all the files with the .ACTIONS extension to gather the available actions and conditions for the workflow designer.
Additional actions can be exposed to SharePoint Designer either by adding the relevant information into one of the existing files or by inserting your own .ACTIONS file to the folder. However, it is best practice to add a separate .ACTIONS file to the folder to avoid changes to the standard SharePoint functionality and to keep the system maintainable.
Listing 16-2 shows an example of an .ACTIONS file. The root element is defined as <WorkflowInfo>, which can enclose <Actions> and <Conditions> elements (along with some rather specific elements, which are used in the WSS.ACTIONS file). The two attributes, Sequential and Parallel, of the <Actions> element define the word that will precede the sentence whenever the custom action is placed in a parallel or sequential step. To add a custom action, an <Action> element needs to be inserted inside the <Actions> element.
The <Action> element requires the Name of the action, the full name of the Assembly, and the ClassName of the custom activity. Further, a Category can be specified that defines under which category in the Action ribbon this action will be listed. If a new name is supplied, a new category will be added.
Example 16.2. Describing Custom Activities in the .ACTIONS File
<?xml version="1.0" encoding="utf-8" ?>
<WorkflowInfo>
  <Actions Sequential="then" Parallel="and">
    <Action Name="Lookup Item By Title"
      ClassName=" Apress.SP2010.Workflows.SPDActivities.LookupItem"
      Assembly="SPDActivities, Version=1.0.0.0, Culture=neutral,
                PublicKeyToken=07ca925dce31cf11"
      AppliesTo="all"
      Category="List Actions">
      <RuleDesigner Sentence="Find item in %1 with Query %2 (Output to %3)">
        <FieldBind Field="ListId" Text="this list" Id="1"
                   DesignerType="ListNames" />
        <FieldBind Field="SearchQuery" Text="CAML" Id="2"
                   DesignerType="StringBuilder" />
<FieldBind Field="ResultItemId"
DesignerType="ParameterNames" Text="result" Id="3"/>
</RuleDesigner>
<Parameters>
<Parameter Name="__Context"
Type="Microsoft.SharePoint.WorkflowActions.WorkflowContext"
Direction="In" DesignerType="Hide" />
<Parameter Name="ListId"
Type="System.String, mscorlib"
Direction="In"
Description="Canonical form of the list GUID
used by this action." />
<Parameter Name="SearchQuery" Type="System.String, mscorlib"
Direction="In"
Description="Used to search for an item using CAML." />
<Parameter Name="ResultItemId"
Type="System.Int32, mscorlib"
Direction="Out"
Description="ID of first item matching the search." />
</Parameters>
</Action>
</Actions>
</WorkflowInfo>The <RuleDesigner> element contains information necessary to render the declarative sentence that is used to describe and configure the action in SharePoint Designer. The mandatory attribute Sentence holds the text that is displayed in the workflow editor within the workflow declaration. This string can contain any number of dynamic variables, which are denoted with %1, %2, and so forth. They behave similarly to the dynamic placeholders you use with String.Format. Figure 16-32 displays the sentence that is created according to the specification in the previously shown .ACTIONS file.

To substitute the placeholders with dynamic values during workflow runtime, the element <RuleDesigner> can hold any number of <FieldBind> elements as children. Each <FieldBind> element describes one of the variables that were defined in the Sentence of the RuleDesigner. They are associated using the Id attribute of <FieldBind>, which is connected to the corresponding variable in the Sentence. For example, the FieldBind element with Id="1" is bound to the variable %1 in the Sentence.
The <FieldBind> element also requires the attribute Text to be set. This is the text that is displayed as a link in the sentence within workflow designer. More importantly, the Field attribute references a <Parameter> element, which defines input and output parameters to the custom activity.
Another important attribute of the <FieldBind> element is DesignerType. This defines the control that will be presented to the user in the workflow editor of SharePoint Designer. Table 16-6 lists the different designer types that are available and gives a short description of each. If no DesignerType attribute is provided, a text box will be displayed by default.
Table 16.6. Different Designer Types
DesignerType | Description |
|---|---|
AddPermission | An advanced control that lets you choose a permission to be assigned to users. |
Bool | Drop-down box with |
ChooseDoclibItem | Selector for a document library. |
ChooseListItem | The default list item selector. |
CreateListItem | An advanced control that allows you to select a list and specify the properties to set, when creating a new list item. |
Date | Selector for a date/time value. |
Dependent | This control is rendered depending on the type of another field. Use the |
DropDown | A custom drop-down list box control. You can add entries using |
An advanced control that lets you specify standard e-mail fields, such as To, From, CC, Subject, and Body. | |
FieldNames | A drop-down list box control with all the field names of the current list or library. |
Float | A text box that accepts floating point values. |
Hyperlink | A URL browser that builds a link by selecting a local or remote resource. |
Integer | A text box that allows positive integer values. |
ListNames | A drop-down list box control with all the available lists in the current web. |
Operator | Performs an operation on the left and right operands. |
ParameterNames | A drop-down list box control with all workflow variables. |
Person | A selector for a user or group from the built-in local or domain users and groups. |
RemovePermission | An advanced control that lets you select the permission that should be removed. |
ReplacePermission | An advanced control that lets you choose the permission that should be replaced. |
SinglePerson | A selector for one user or group from the built-in local or domain users and groups. |
StatusDropdown | A drop-down list box to select the status of the workflow. |
Stringbuilder | A text box to create simple strings. |
Survey | Creates a custom workflow task form for user input using a wizard. |
Text | The default input text box. |
TextBox | The default input text box. |
TextArea | The default input text box. |
UpdateListItem | An advanced control to select the list item to update and the parameters to set. |
WritableFieldNames | A drop-down list box control with all the field names of the current list or library that are editable. |
To connect fields that are configured in the workflow editor and are populated with concrete values during workflow execution to the Activity class, <Parameter> elements are used. They are defined in the <Parameters> container following the <RuleDesigner> element. Each <Parameter> describes a parameter for the rule sentence and references a DependencyProperty that is defined in the Activity class. The Name attribute specifies the name of the dependency property and must exactly match to the name that was used in the Register method in the code. The Type attribute defines the data type of that parameter and the Description can be used to further describe the parameter.
The attribute Direction indicates whether a parameter is used as an input or output parameter for the activity class. Specifying Direction="In" will cause the runtime to set the value for the corresponding DependencyProperty. Conversely, Direction="Out" will return the value to the workflow runtime after the activity has completed.
Configuring custom activities for the workflow editor in SharePoint Designer involves the following actions:
Create an
.ACTIONSfile in the SharePoint folder...14TEMPLATE1033Workflow.Add an
<Action>element that specifies theClassandAssemblyfor the implementation of the custom activity.Define the
<RuleDesigner>, and specify the sentence and the dynamic variables.Supply the
<Parameters>that map the properties from the workflow designer to the assembly code.
Tip
An XML schema definition for some of the elements that are used in the .ACTIONS file can be found in the file WorkflowActions.xsd, which is located in the SharePoint folder ...14TEMPLATEXML.
After the solution has been set up, the custom action has been implemented, and declarations for the workflow editor have been made, there is only one outstanding task: allow the assembly to be used as a custom activity in SharePoint. Because of security constraints, only custom activities with permission to be called as custom activities can be used. To allow your custom activity to be used in SharePoint Designer, you need to add an entry to the web.config file of your web application.
In the web.config file, the element <authorizedTypes> specified by the XPath expression configuration/System.Workflow.ComponentModel.WorkflowCompiler contains a list of <authorizedType> elements. Each defines one type, together with an assembly, that is allowed to be used in workflows. Besides the Assembly, the Namespace and the TypeName must also be supplied. Either the TypeName contains a class name or it can be set to * to authorize all classes within the namespace.
To make the required changes to the configuration, use a feature that is set to the web application scope. Within the SPFeatureReceiver event, these changes can be made during feature activation via the FeatureActivated event. Listing 16-3 shows how these changes can be made to the web.config file for the web application. The SPFeatureReceiver will add this string to the configuration:
<authorizedType Assembly="SPDActivities, Version=1.0.0.0, Culture=neutral, PublicKeyToken=07ca925dce31cf11" Namespace="SPDActivities" TypeName="*" Authorized="True" />
Example 16.3. Applying Required Settings in web.config Using a FeatureReceiver
[Guid("e72495ca-9fdf-4d9b-8bf4-99df050b577d")]
public class ApressSPDActions_FeatureEventReceiver : SPFeatureReceiver
{
    public override void FeatureActivated(SPFeatureReceiverProperties properties)
    {
        // Get current web application.
        SPWebApplication wappCurrent = (SPWebApplication)properties.Feature.Parent;

        // Create a configuration object and set the parameters as required.
        SPWebConfigModification modAuthorizedType = new SPWebConfigModification();
        modAuthorizedType.Name = "AuthType";
        modAuthorizedType.Owner = "SPDActivities";
        modAuthorizedType.Path = "configuration/System.Workflow.ComponentModel.
                                  WorkflowCompiler/authorizedTypes";
        modAuthorizedType.Type = SPWebConfigModification.
                                 SPWebConfigModificationType.EnsureChildNode;
        modAuthorizedType.Value = "<authorizedType Assembly="SPDActivities, " +
        "Version=1.0.0.0, Culture=neutral, PublicKeyToken=07ca925dce31cf11" " +
        "Namespace="SPDActivities" TypeName="*" Authorized="True" />";

        // Perform the modification to the web.config file.
        wappCurrent.WebConfigModifications.Add(modAuthorizedType);
        wappCurrent.WebService.ApplyWebConfigModifications();
    }
}One of the most advanced tasks in SharePoint workflow development is creating custom workflows using Visual Studio. Whenever your requirements exceed the capabilities of SharePoint Designer or when you want to include your workflow as a part of a complex solution, you will need to deal with custom workflows. With Visual Studio 2010, the support for SharePoint workflow development has improved, and thus tackling custom workflows is easier than ever. For anyone familiar with .NET development, this approach provides the largest amount of freedom in workflow development.
This section begins by describing various primary Workflow Foundation building blocks that you need to grasp to develop SharePoint workflows. These include the fundamental WF classes that are also used in SharePoint. We examine the SharePoint workflow object model and explain in detail how to develop custom workflows using Visual Studio. Further, we will show how to develop custom ASPX forms that are used in workflows and how to use InfoPath forms as workflow forms.
Earlier in this chapter we introduced some of the basic concepts of WF—activities are the basic building blocks—and described the two basic workflow types: sequential and state machine. This section aims for a more detailed understanding about the object model of WF and about some advanced concepts that are essential for workflow development.
Since this book is not about Workflow Foundation, the coverage of the WF object model is broad and concentrates on the most important objects for working with SharePoint workflows. For WF, the System namespace was extended with the Workflow namespace. This namespace consists of three namespaces each contained in a separate library with the matching name. Table 16-7 introduces these namespaces.
Table 16.7. System.Workflow Namespaces
Namespace | Description |
|---|---|
| This namespace contains all the base classes, interfaces, and constructs that are used to create workflow activities and workflows. It contains the |
| This namespace contains the implementation of extended activities that can be used in a workflow. You will find activities that are derived from |
| This namespace contains classes and interfaces that control the workflow runtime engine and workflow instances. |
Workflows are constructed from different activities. All those activities share a common base class: System.Workflow.ComponentModel.Activity. The Activity class is a subclass of DependencyObject, which is an abstract base class for all objects that use DependencyProperties. Figure 16-33 shows many of the basic activities in the workflow namespace and their relationships.
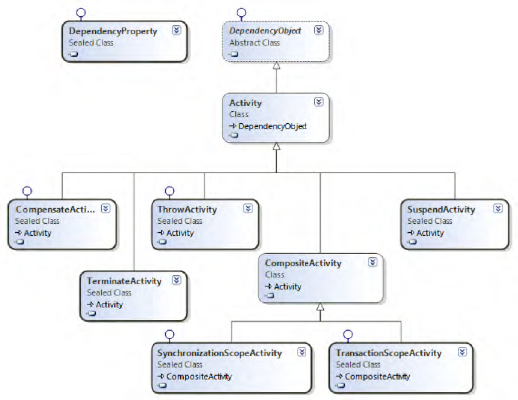
An Activity defines properties for storing information about the runtime environment, such as the WorkflowInstanceId. In addition, an Activity defines methods that will be called by the runtime environment and that can be overridden in a derived class to provide custom behavior for an Activity. They are as follows:
Cancel: Called to cancel the execution of the current activity instance.Execute: Contains the execution logic of an activity. It will be called by the runtime to execute the activity. For custom activities, this is the most important method to override.HandleFault: Called when an error is raised during execution of this activity. The default implementation simply calls theCancelmethod.
These methods return the ActivityExecutionStatus indicating the current state of the activity in the workflow instance. It can take any of the following values—this list illustrates the life cycle of an activity:
Initialized
Executing
Canceling
Closed
Compensating
Faulting
Activities can also be enhanced with additional components that define a specific behavior component. This can be a validator, a serializer, a code generator, or a designer. Such components are attached to an activity using attributes. For example, you can add a custom designer for an activity by implementing a custom class that inherits from System.Workflow.ComponentModel.Design.ActivityDesigner. You can attach this designer to an activity via the following attribute:
[System.ComponentModel.Designer(typeof(MyCustomDesigner), typeof(System.ComponentModel.Design.IDesigner))]
Public partial class MyActivity : Activity
{
}
Both namespaces, System.Workflow.ComponentModel and especially System.Workflow.Activities, define a number of different activities offering common workflow behavior. These activities can be used by any workflow, including, of course, by SharePoint workflows. Table 16-8 lists all the activities that are available through the toolbox in the WF 3.0 and WF 3.5 sections, respectively.
Table 16.8. Available WF Activities in Visual Studio Workflow Designer
Activity Name | Workflow Type | Description |
|---|---|---|
| Both | Calls a method through a local service. You must specify the interface type and the method that should be invoked. Depending on the selected method, you can specify several other properties. |
| Both | Synchronously executes a method in the code-beside class. Thus, this activity should not depend on external resources. This activity allows you to write custom code. |
| Both | To handle failure and rollback activities that were already completed when an error occurs, you can use the Compensate activity. It can be used only with the |
| Both | A |
| Both | This activity allows conditional execution of a collection of child activities. You can specify an |
| Both | Pauses workflow execution for the specified amount of time. |
| Both | A |
| Both | This |
| Both | Similar to a |
| Both | This activity handles an external event that is raised by a local service. The activity blocks the execution of the workflow until the event occurs. |
| Both | Similar to an |
InvokeWebService | Both | You can use this activity to invoke a web service. |
| Both | This activity asynchronously calls another workflow. |
| Both | This |
| Both | This |
| Both | Using the Rule Set Editor, this activity allows you to add a set of separate business rules to the workflow. |
| Both | This activity creates multiple instances of the activity that is specified as the child activity. As in a |
| Both | This |
| State machine | Sets the next state in a state-machine workflow for the transition to the next |
| State machine | This activity represents a state in a state-machine workflow. |
| State machine | This |
| State machine | This |
| Both | Suspends the current workflow instance and saves all the state information of the workflow, which will be loaded again when the workflow continues. |
| Both | This |
| Both | This activity terminates the execution of the workflow instance. Terminated instances cannot be resumed. |
Throw | Both | Similar to the |
TransactionScope | Both | This |
CompensatableTransactionScope | Both | This |
WebServiceInput | Both | Receives data from a web service. |
WebServiceOutput | Both | Sends data to a web service as a response to a corresponding |
WebServiceFault | Both | Sends an error to the web service as a response to a corresponding |
ReceiveActivity | Both | This |
SendActivity | Both | This activity synchronously calls a WCF service operation and waits for the result or an error before workflow execution continues. |
This list of activities should summarize the capabilities and the application of each of the activities. If you need more detailed information on any of these activities, please refer to the MSDN online documentation.
Dependency properties were mentioned earlier regarding SharePoint Designer workflows. We touched on using a DependencyProperty to share properties among different activities. To reiterate, dependency properties allow loose coupling of properties in a workflow, because the other properties do not need to know about the concrete object and can instead get the required properties from the workflow runtime. These properties are stored in a dictionary that is maintained by the workflow, and the propagation of the value of a DependencyProperty is managed by the workflow.
When an Activity is developed, properties can be exposed to the workflow using a DependencyProperty. But how can they be consumed and used by another Activity? The answer is simply by accessing the property of the activity like any other property. But there is more to it. You can use the ActivityBind class to bind the property of one activity to the property of another activity. Since even the workflow itself is derived from Activity, this concept can be used throughout the workflow. ActivityBind creates a connection between two properties using the Name and Path members. The Name specifies the activity, and the Path represents the member to bind to. The following snippet shows an example of how to bind the property sourceProperty of the activity SourceActivity to MyActivityProperty in myActivity:
using System.Workflow.ComponentModel;

ActivityBind activitybind1 = new ActivityBind();
activitybind1.Name = "SourceActivity";
activitybind1.Path = "sourceProperty";
// Call the SetBinding method on the object and pass the static DependencyProperty
// of the class as first parameter.
this.myActivity.SetBinding(MyActivity.MyActivityProperty, activitybind1);
This means that at runtime MyActivityProperty gets its value from the SourceActivity.sourceProperty. The SetBinding method that is used to apply the binding is inherited from System.Workflow.ComponentModel.DependencyObject, which is a base class for all activity objects.
Activity binding becomes particularly interesting, since it can be configured using a dialog in Visual Studio to apply bindings. When a DependencyProperty is shown in the properties of an activity, you can select the ellipsis button (...), and the dialog for activity binding is displayed, as shown in Figure 16-34. Simply select the property of your class to bind the property of the existing activity to your property.

One of the important concepts in workflow development is the concept of correlation tokens. Improper use of correlation tokens can result in unpredictable workflow behavior and a great deal of effort to find the origin of such problems.
Because of the loose coupling in the WF infrastructure, a mapping is required between items within a concrete workflow instance and the hosting environment. The workflow runtime environment offers communication capabilities that allow communication between workflow instances and external systems (such as SharePoint). To ensure the communication is addressed to the correct workflow instance and to the correct item within the instance, correlation tokens are used as an identifier.
Consider a correlation token as a meta-variable that defines a common variable across the workflow, such as a specific task that can be used by several activities, for example CreateTask, EditTask, or FinishTask. When multiple activities are working with the same task, they all need the same correlation token. Usually one token is required for the workflow itself and one token for each task that is used inside the workflow.
Correlation tokens can be set in the properties window of an activity, as shown in Figure 16-35. You can either specify an existing token or define a new correlation token.
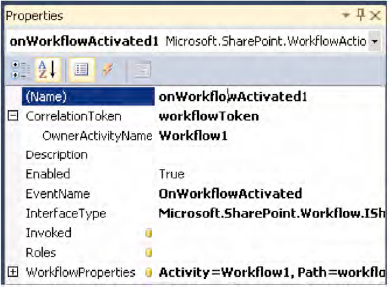
The OwnerActivityName defines the activity that owns the correlation token. This is especially important within composite activities, such as a sequence within a while loop. In this situation, you need to specify the sequence as the OwnerActivityName to ensure that for each new sequence a new correlation token will be created on each loop.
SharePoint provides its own hosting environment for workflows based on WF. Therefore, SharePoint extends the capabilities of WF and provides its own classes and objects that are specific to the SharePoint workflow life cycle. SharePoint workflow classes employ the following namespaces:
Microsoft.SharePoint.Workflow: Contains the base classes and main entry points for SharePoint workflows.Microsoft.SharePoint.Workflow.Application: Contains the Three-State workflow classes that are built into SharePoint.Microsoft.SharePoint.WorkflowActions: Contains the workflow actions or activities that are included with SharePoint. This includes actions for SharePoint Designer as well as activities for custom workflows.Microsoft.SharePoint.WorkflowActions.WithKey: Contains mirror classes that access list items by using a string identifier.
Since WorkflowActions is described in the section about writing custom SharePoint Designer workflows or in the section about custom workflows, they will not be described any further here. The Application namespace only contains the class for the implementation of the Three-State workflow and is also not of interest for the SharePoint object model. WorkflowActions.WithKey contains mirror classes that already exist in the WorkflowActions namespace and have been adapted to work with string identifiers, which are required for working with the new external data sources. In fact, all the base classes that define the SharePoint object model are contained in the Microsoft.SharePoint.Workflow namespace. Figure 16-36 shows the most important objects.
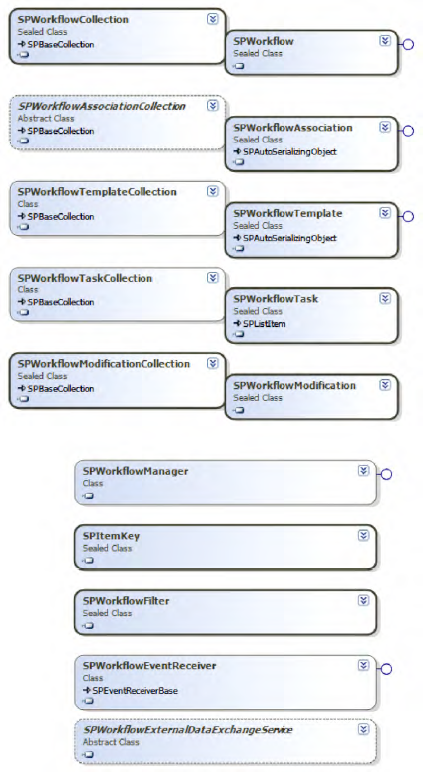
The SPWorkflow object is one of the central objects in the SharePoint.Workflow namespace. It represents a workflow instance that is currently running or has already finished running on an item. SPWorkflow has many properties containing detailed information about the workflow instance, including the current state, associated objects such as tasks and lists, and information about users involved in that particular workflow.
Since SPWorkflow represents actual workflow instances, you cannot create new object instances. You always need to provide the workflow instance ID, which will create a SPWorkflow object for this existing instance. You can get SPWorkflow objects as a result of querying an SPListItem for its workflows or by using the SPWorkflowManager to start or cancel workflows.
The following listing retrieves all the workflow instances of an SPListItem and illustrates some of the more significant properties for each workflow:
foreach (SPWorkflow wf in listItem.Workflows)
{
    // the ID of the WorkflowAssocation
    GUID associationId = wf.AssociationId;

    // State of the workflow
    SPWorkflowState state = wf.InternalState;

    // Lists for History and Tasks
    SPList historyList = wf. HistoryList;
    SPList taskList = wf.TaskList;

    // All tasks that belong to this instance
    SPWorkflowTaskCollection tasks = wf.Tasks;

    // The name of the SPListItem on which the workflow was created
    String itemName = wf.ItemName;
}The SPWorkflowTemplate represents a workflow template that is deployed to a SharePoint site. It contains several members that return information about the template, such as the AssociationUrl and the InitiationUrl, which return the URLs of the forms that will be used for association and initiation, respectively. Furthermore, you can set various parameters affecting the start behavior of workflows based on this template. You can use the SPWorkflowTemplate and associate it with a SharePoint list or site. The following code selects one specific template from the template collection for a site:
// web is the instance of the current SPWeb object
SPWorkflowTemplate template = web.WorkflowTemplates[new GUID("workflowGUID")];The SPWorkflowAssociation class represents the association of a workflow template with a list, content type, or site. Members of this class contain information about the associated template. You can use the BaseTemplate to get the associated template, the HistoryListId, or the TaskListId for the association. The properties AllowManual, AutoStartChange, and AutoStartCreate control the starting options for the workflow. These properties are exposed for workflow associations via the web interface, described earlier in this chapter. The following snippet selects a collection of SPWorkflowAssociation objects for a list and interrogates several interesting properties:
SPWorkflowAssociationCollection associationCollection =
                       parentList.WorkflowAssociations;
foreach (SPWorkflowAssociation association in associationCollection)
{
    // The template on which the association is based
    SPWorkflowTemplate template = association.BaseTemplate;

    // The number of currently running workflow instances that are based on this
    // association
    int runningInstances = association.RunningInstances;

    // The data that was entered during assoication in the association form
    string associationData = association.AssociationData;

    // Whether the workflow is based on declarative description - as a result of
    // SharePoint Designer - or a compiled assembly - the result of Visual Studio.
    bool isDeclarative = association.IsDeclarative;
}
To associate a workflow template to a list, content type, or site, you need to create an association object first and then add this object to the list, content type, or site. The creation of a new SPWorkflowAssociation object is handled by the following static methods of the class:
CreateListAssociation: Creates an association object that can be associated with anSPListobjectCreateListContentTypeAssociation: Creates an association object that can be associated with anSPContentType, of a listCreateWebAssocation: Creates an association object that can be associated with anSPWebobjectCreateWebContentTypeAssociation: Creates an association object that can be associated with a site-levelSPContentType, which is available through theContentTypescollection of anSPWeb
The following snippet shows how you can add a workflow association to an SPList by creating a new SPWorkflowAssociation and adding it to the SPWorkflowAssociationCollection of the SPList:
SPWorkflowTemplate template = web.WorkflowTemplates[new GUID("workflowGUID")];
SPList historyList = web.Lists["HistoryList"];
SPList taskList = web.Lists["TaskList"];
SPWorkflowAssociation association = SPWorkflowAssociation.CreateListAssociation(
    template, template.Name, taskList, historyList);
// Set the start option for the association
association.AllowManual = true;
association.AutoStartChange = false;
association.AutoStartCreate = true;

// Add the association to the list of WorkflowAssociation in the SPList
myList.WorkflowAssociations.Add(assocation);The SPWorkflowManager class is used to control workflow templates and instances. It exposes several members that administer workflow instances across a site collection. You can start or cancel workflows and perform further administrative operations on workflows.
To start a workflow, use the StartWorkflow method—it creates a new workflow instance and starts it. It requires an SPWorkflowAssociation object, a string with event parameters, and either an SPListItem or an Object representing the object on which the workflow should run. Since workflows can be attached to sites, the overloaded method that takes an Object as a parameter has been added to be able to attach workflows to sites as well as to list items.
// Create SPSite and SPWeb objects
SPSite site = new SPSite("http://server/site");
SPWeb web = site.RootWeb;

// Get SPList and SPListItem
SPList list = web.Lists[0];
SPListItem listItem = list.Items[0];

// Get the workflow association
SPWorkflowAssociation association = list.WorkflowAssociations[0];

// Get the SPWorkflowManager from the site
SPWorkflowManager manager = site.WorkflowManager;

// Start the workflow on the ListItem
manager.StartWorkflow(listItem, association, association.AssociationData);
You can also use the SPWorkflowManager to access several workflow objects for an SPListItem, such as GetWorkflowTasks, GetItemActiveWorkflows, or GetItemWorkflows.
As mentioned earlier, workflows in SharePoint use tasks for user interaction. Task lists in SharePoint contain all the tasks that need to be completed by users. Those tasks are well integrated into SharePoint. You can use Web Parts to display all the open tasks to the current user or filter the task list to only display all tasks for the current user.
SPWorkflowTask is a special type of SPListItem that is used in task lists, since it is derived from SPListItem. In addition to the members that are inherited from SPListItem, SPWorkflowTask has a property WorkflowId for the GUID of the workflow instance to which the task is assigned. You can use the following snippet to obtain the workflow instance from a task:
GUID workflowId = task.WorkflowId;
SPWorkflow workflow = new SPWorkflow(web, workflowId);
The SPWorkflowModification class represents a workflow modification. When workflow modification occurs, the modification form is displayed to the user, and the workflow is modified accordingly. The SPWorkflowModification holds the ContextData, which is a string representation of the data that the user submitted with the modification form. Another useful property is the TypeId. This is the ID of the workflow template on which the modification is based.
You can use the SPWorkflowManager to execute the workflow modification by calling the ModifyWorkflow method, as shown in the following snippet:
SPSite site = new SPSite("http://server/site");
SPWeb web = site.RootWeb;
SPList list = web.Lists[0];
SPListItem listItem = list.Items[0];

SPWorkflow workflow = listItem.Workflows[0];
SPWorkflowModification wfModification = workflow.Modifications[0];
String contextString = "<contextData><Value>test</Value></contextData>";
Site.WorkflowManager.ModifyWorkflow(workflow, wfModification, contextString);
This code is usually added to the ASPX modification form. The contextString is exposed to the workflow in the ContextData.
The SPWorkflowEventReceiver class handles workflow events throughout the lifetime of a workflow.
Starting: Occurs when a workflow is starting
Started: Occurs when a workflow is started
Postponed: Occurs when a workflow is postponed
Completed: Occurs when a workflow is completed
You can register the SPWorkflowEventReceiver with any site, list, or content type.
In SharePoint 2010, external data sources can be tightly integrated with SharePoint and used like any other SharePoint resource. It is even possible to execute workflows on these data sources, since they appear like a regular SharePoint list. Because list elements of external data source cannot be guaranteed to have an identifier of type Integer, like the Id of a list item in SharePoint, the SPItemKey was introduced. It encapsulates the identification of a list item and therefore contains an Integer value Id for internal lists and a string identifier called Key for external lists. Depending on the concrete list instance, it will offer the correct identification. Some of the activities for SharePoint Designer have been rewritten to support this new type.
Using the Visual Studio 2010 templates for SharePoint 2010 workflow solutions enables a rapid start into custom workflow development. You can choose between a sequential workflow template and a state machine workflow template for your workflow.
The first step in workflow development should always be the design of a proper workflow model, containing all the workflow steps. This model equips you to decide which workflow template to choose. If your workflow becomes very complicated, with many backward connections and conditions to decide the current state of the workflow, you should consider using a state machine workflow.
After designing your workflow, create a Visual Studio project, and lay out your workflow using the workflow activities from the toolbox. Specify the required properties, and bind activity properties to your workflow properties. Once you implement the workflow activities, you can finally deploy your workflow to your SharePoint server. If your workflow contains errors or does not behave as expected, you might also need to debug your workflow.
Before starting to develop your workflow, you should always construct a detailed model for your workflow and describe what your workflow will do. This involves identifying the stakeholders involved in your business process, the flow of data, and the flow of activities. You can, of course, use Visio 2010 and its SharePoint workflow shapes to model the workflow or any other suitable graphical representation. More important than the tool you use is that you consider everything that is involved in your workflow before you start programming. Otherwise, you might encounter problems during development that necessitate changing the entire process and consequently losing a lot of time.
To demonstrate how to develop a workflow with Visual Studio 2010, the following simple scenario is used. Imagine a technical department for product development. Within this department different types of projects are initiated. To allow employees to request a new project and to view a summary of all the projects in the department, a project list should be introduced. Furthermore, a workflow is needed to handle the estimation and approval of new projects. Figure 16-37 shows a graphical representation of this workflow.
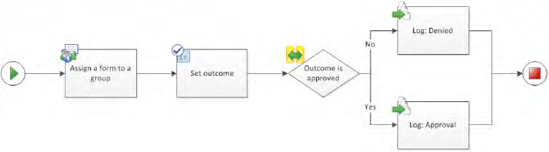
Users can add new entries to the projects lists using the list edit form. After the project has been saved, the workflow will start automatically, and a task will be assigned to an estimation manager. The estimation manager has to decide whether to accept the new project and estimate the project costs. Depending on the outcome, an entry will be written to the history list.
To achieve this solution, the following items need to be developed:
A project list with the required fields to store all relevant information. Since this is not within the scope of this example, we will assume that this list already exists.
A sequential workflow including the following:
An association form to select the manager for the department
A task form for the estimation
To start developing the workflow, create a new project in Visual Studio 2010 using the SharePoint 2010 Sequential Workflow project template. Specify your workflow name, and select a List workflow in the resultant wizard. Further, specify the debugging options and the settings for starting the workflow in the development environment in the subsequent steps of the wizard.
Once the project is created, you should see an empty project, like the one shown in Figure 16-38. The template automatically creates a feature and a solution package to deploy the workflow. Under the workflow node in the Solution Explorer is an Elements.xml manifest file, together with the workflow file. (The feature and manifest, which are required to deploy the workflow, will be described in more detail in the "Developing the Workflow" section.)
When you select the workflow code file, the Visual Studio Workflow Designer opens and shows a basic workflow that consists of one activity, called onWorkflowActivated. This activity is required as the first activity in every workflow. It initializes the correlation token for the workflow and binds the WorkflowProperties to make them available throughout the workflow.
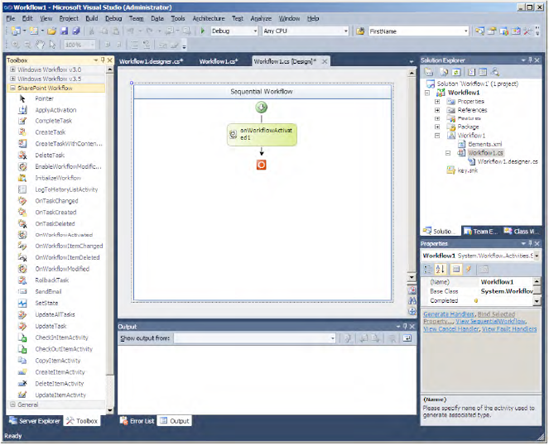
You can start to develop your workflow by dragging activities from the toolbox—displayed on the left side in Figure 16-38—onto the Workflow Designer surface. Every workflow activity has a set of properties that can be managed in the Properties dialog. Assign values to the properties or use activity binding to bind them to properties within your code. You can access the code that is called through event handlers by double-clicking an activity, or you can edit the entire workflow code by selecting View Code from the context menu on the workflow file in the Solution Explorer.
The toolbox contains all the available activities for creating a SharePoint workflow. In addition to the basic WF activities described earlier, you can also choose the SharePoint-specific workflow activities. The different toolbox entries are separated into different categories according to their origin. Table 16-9 lists the available activities for the SharePoint Workflow category and gives a short description for each.
Table 16.9. Available SharePoint Workflow Activities in Visual Studio 2010
Activity Name | Description |
|---|---|
| Updates initial workflow properties with information using |
| Updates a task and marks it as completed. The task is referenced using the |
| Creates a new SharePoint task item in the Task list. Using the property |
| Creates a SharePoint task item based on a specific content type. When working with different task forms based on ASPX, you need to use this activity to specify the content type that should be used to display the correct task edit form. |
| Deletes a SharePoint task item. |
| Enables a workflow modification form for the workflow. This allows users to perform workflow modifications. |
| Initializes a new instance of the workflow. |
| Adds a new entry to the history list that is associated with the workflow. This information can be viewed by users via the workflow information in the workflow settings. |
| This activity responds to the event that is raised when an associated workflow task is modified. |
| This activity responds to the event that is raised when an associated workflow task is created. |
| This activity responds to the event that is raised when an associated workflow task is deleted. |
| This activity is called when a new workflow instance is initiated. This is the first activity in a workflow. |
| This activity is called when the item to which the workflow instance is bound is changed. |
| This activity is called when the item to which the workflow instance is bound is deleted. |
| This activity is called when a user submits a workflow modification form. |
| This activity performs a rollback of changes made to a task since the last changes were committed. |
| Sends an e-mail to the specified users. |
| Sets the status of the workflow. This status is displayed in the status column of a workflow that is attached to a list and in the workflow status page. |
| Updates all tasks that are assigned to a workflow instance and are not yet finished. |
| Updates a task with the specified properties. |
| This activity performs a check-in of the specified document into its document library. |
| This activity performs a check-out of the specified document from its document library. |
| Copies the specified document from its document library to the specified document library. |
| Creates a new item in the specified list or document library. |
| Deletes an item in the specified list or document library. |
| Updates an item in the specified list or document library with the specified properties. |
As you lay out the flow of activities on the design surface, whenever important settings for an activity are missing, the designer indicates this with a red exclamation mark in the upper-right corner of the shape or in the Properties window at the affected property. For example, if you place a CreateTask activity after the onWorkflowActivated activity, you are notified that the correlation token needs to be specified.
To implement the example workflow, drag the following activities to the design surface resulting in the sequential workflow, as shown in Figure 16-39 (the names of the activities have already been changed to reflect the flow of activities):
CreateTaskWithContentType: Place this activity right after theOnWorkflowActivatedshape. This will create a new task that uses a custom ASPX form. When working with only one task type, you could also use theCreateTaskactivity, but since theCreateTaskWithContentTypeis more complex to use, we will show you how to use this activity.WhileActivity: Place this shape after the activity to create the task. Thewhileloop is necessary, to wait until the task has been correctly completed.OnTaskChanged: Place this shape inside theWhileActivity. This activity is executed whenever the task is changed, and theWhileActivityholds a condition to wait for the task to be completed and retrieves the information from the task form.CompleteTask: Places this shape after theWhileActivity. It sets the outcome of the task and finishes it.IfElseActivity: Places this shape below theCompleteTaskactivity and adds a Declarative Rule Condition to the left branch using the Properties window. This rule stipulates that, to enter the left branch in the example workflow, the outcome of the task must equal Approved.LogToHistoryListActivity: Place one into theifbranch and another one into theelsebranch to log a custom message to the history log, reflecting the result of the task.
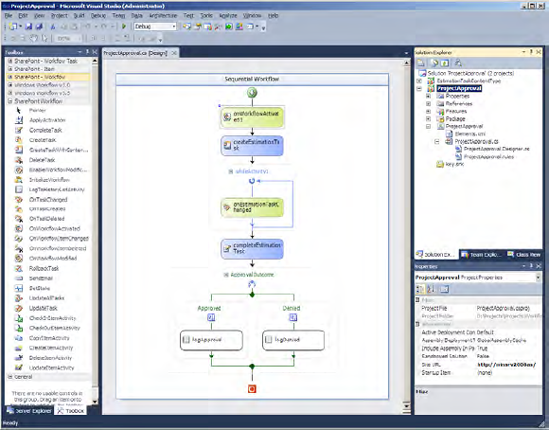
After the workflow flow is completed, you need to set the properties for the previous activities. To accomplish this, either you can define the required properties in the workflow code and bind them using the Properties window or you can select "Bind to a new member" from the binding dialog. In this case, enter a name for the new member, and select the option Create Field to have Visual Studio create and bind the member for you.
Specify the following properties for the activities in the workflow:
CreateTaskWithContentType: Analogous to Figure 16-26, you need to set the following properties:CorrelationToken: Specify a token for the task by entering a token that is different from the workflow token.ContentTypeId: You need to define aContentTypefor the task form and assign the ID of theContentTypeto this property. The definition of theContentTypeis described in the "Using ASPX Workflow Forms" section.TaskId: Bind this property to a new member that holds theGuidfor this task.TaskProperties: Bind this property to a new member of typeSPWorkflowTaskPropertiesthat holds the properties of this task.
WhileActivity: To define the condition for thewhileloop, you need to specify the following property:Condition: Select Code Condition, and choose the methodtaskNotFinished, defined in the workflow code shown in Listing 16-4.
OnTaskChanged: Specify the following properties:CorrelationToken: Define the same correlation token as in theCreateTaskWithContentTypeactivity.AfterProperties: To access the properties of the task after the change, bind this property to a new member of typeSPWorkflowTaskProperties, as shown in Figure 16-40.BeforeProperties: To access the properties of the task before the change, bind this property to a new member of typeSPWorkflowTaskProperties.TaskId: Binding theTaskIdto the existing member that was used in theCreateTaskWithContentTypeactivity connects theOnTaskChangedactivity with the right task.
LogToHistoryList:For both activities, you need to specify the result that should be logged:
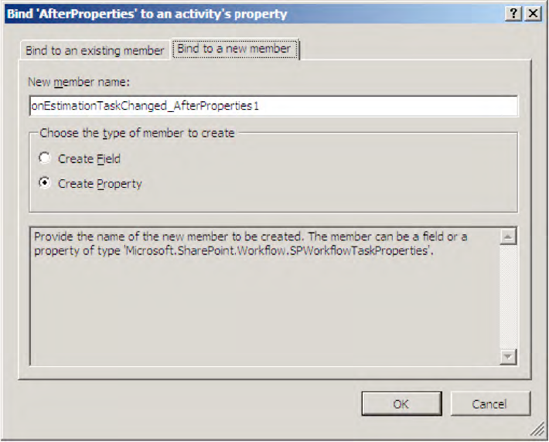
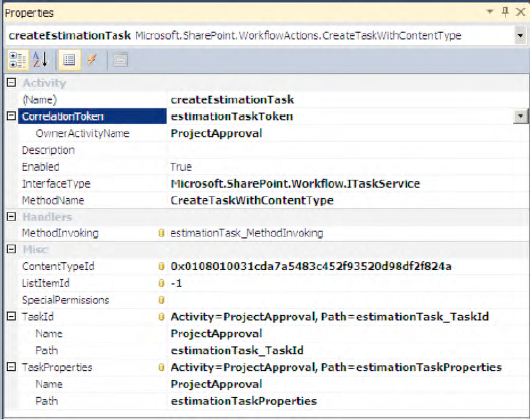
After the properties for the activities have been bound, further programming is needed to achieve the desired workflow behavior. Listing 16-4 shows the complete workflow code for the example. As you can see, the ProjectApproval class is derived from SequentialWorkflowActivity, which manages the execution of its child activities and is used for sequential workflows. The class contains all the members that were defined automatically when the properties of the different activities were bound to new members.
Furthermore, various methods for the activities are created when you double-click the activity shapes in the workflow designer. You can write code to be executed by the activity.
The method estimationTask_MethodInvoking is called when a new task is created. At first, a new Guid is assigned to the estimationTask_TaskId, which has been bound to the TaskId of the activity. Additional properties for the task are set, including the name of the user the task is AssignedTo and the Title of the task. The title is assembled using the workflowProperties and gets the title of the item on which the workflow is running.
The method taskNotFinished is used as a Code Condition for the WhileActivity. It assigns false to the ConditionalEventArgs that are passed as a parameter to the method, as long as the task has not been finished appropriately. The variable isTaskComplete is set to true in the method onTaskChanged1_Invoked as soon as the task is finished.
Finally, the onTaskChanged1_Invoked method saves two task properties that have been set in the task form into local variables. You can use the afterProperties to access all the properties of the task. Special properties that are not part of the task ContentType are stored by the task form in a HashTable called ExtendedProperties. Use a String key, such as _EstimatedCosts and _Outcome in the example code, to access the corresponding stored values.
Example 16.4. Workflow Code
using System;
using System.Workflow.Activities;
using Microsoft.SharePoint.Workflow;

namespace ProjectApproval
{
    public sealed partial class ProjectApproval : SequentialWorkflowActivity
    {
        public ProjectApproval()
        {
            InitializeComponent();
        }

        public Guid workflowId = default(System.Guid);
        public SPWorkflowActivationProperties workflowProperties = new
                                              SPWorkflowActivationProperties();
        public SPWorkflowTaskProperties estimationTaskProperties = new
                                                    SPWorkflowTaskProperties();
        public Guid estimationTask_TaskId = default(System.Guid);
        public SPWorkflowTaskProperties estimationTask_BeforeProperties = new
                                                    SPWorkflowTaskProperties();
        public SPWorkflowTaskProperties estimationTask_AfterProperties = new
                                                    SPWorkflowTaskProperties();
        bool isTaskComplete = false;

        public string costs = default(System.String);
        public string outcome = default(System.String);

        private void onWorkflowActivated1_Invoked(object sender,
                                                       ExternalDataEventArgs e)
        {
            workflowId = workflowProperties.WorkflowId;
        }

        private void estimationTask_MethodInvoking(object sender, EventArgs e)
        {
            estimationTask_TaskId = Guid.NewGuid();
            estimationTaskProperties.AssignedTo = "wapps\administrator";
            estimationTaskProperties.Title = "Approve_" +
                                                 workflowProperties.Item.Title;
        }

        private void taskNotFinished(object sender, ConditionalEventArgs e)
        {
e.Result = !isTaskComplete;}private void onTaskChanged1_Invoked(object sender, ExternalDataEventArgs e) {isTaskComplete = true;costs = estimationTask_AfterProperties.ExtendedProperties["_EstimatedCosts"].ToString();outcome = estimationTask_AfterProperties.ExtendedProperties["_Outcome"].ToString();} } }
As with any other SharePoint artifact, a workflow is deployed to SharePoint via a feature. The feature definition for a workflow is relatively straightforward, as you can see in Listing 16-5. Apart from the Title, Description, Id, and Scope attributes, the main aspect of the feature is the manifest file in the ElementManifest element.
Example 16.5. Feature Definition for Example Workflow
<?xml version="1.0" encoding="utf-8"?>
<Feature xmlns="http://schemas.microsoft.com/sharepoint/"
    Title=" ProjectApproval Workflow"
    Description="Feature for ProjectApproval Workflow "
    Id="44f1409b-8578-4657-8810-bcf06aba7dfa"
    Scope="Site">
    <Properties>
        <Property Key="GloballyAvailable" Value="true" />
    </Properties>
    <ElementManifests>
        <ElementManifest Location="ProjectApprovalElements.xml" />
    </ElementManifests>
</Feature>
The manifest file describes a workflow, within a <Workflow> element, as shown in Listing 16-6. The Name, Description, and Id are similar to elements in a feature. CodeBesideClass and CodeBesideAssembly reference the workflow class that implements the workflow, which is ProjectApproval in our example.
To specify custom ASPX pages for association, initiation, modification, or task forms, use the following attributes of the <Workflow> element:
AssociationUrl: As in the example, supply the path to a custom ASPX page, which can be used to gather additional information during workflow association.InstantiationUrl: Enter the path to a custom ASPX form to provide a custom initiation form.ModificationUrl: In the same vein, a custom modification form can also be defined by providing the path to a custom ASPX page.TaskListContentTypeId: Unlike the previous forms, a custom task form can only be specified using a separate content type. The ID of this content type can be entered here. When only one task form is required, theTaskListContentTypeIdcan be used in conjunction with theCreateTaskactivity. For multiple different task forms, the ID must be specified directly with eachCreateTaskWithContentTypeactivity.
To stipulate the kind of SharePoint item to which the workflow will be assigned, enter a value (List, Site, or ContentType) for the element <AssociationCategories>.
Example 16.6. Workflow Manifest File
<?xml version="1.0" encoding="utf-8" ?> <Elements xmlns="http://schemas.microsoft.com/sharepoint/"><WorkflowName="ProjectApprovalWorkflow"Description="My SharePoint Workflow"Id="5d2fd6e5-996a-43c9-b8c1-5b1a27e9af33"CodeBesideClass="ProjectApproval.ProjectApproval"CodeBesideAssembly="$assemblyname$"AssociationUrl="_layouts/ProjectApprovalForms/ProjectApprovalAssociationForm.aspx"InstantiationUrl="..."ModificationUrl="..."TaskListContentTypeId="..."><Categories/> <MetaData><AssociationCategories>List</AssociationCategories><StatusPageUrl>_layouts/WrkStat.aspx</StatusPageUrl> </MetaData> </Workflow> </Elements>
After you deployed your workflow together with the missing forms, described next, you can test your workflow.
SharePoint uses either ASPX or InfoPath forms for user interaction in a workflow. However, in SharePoint Foundation, only ASPX forms are available. You can use APSX forms for association, initiation, and modification of a workflow. In addition, you can indicate custom task forms to be used to edit a task and thus collect additional information from users.
Listing 16-6 already showed how a custom association form can be specified for a workflow. You need to construct the custom association form and deploy it to the server. Unfortunately, developing custom workflow forms is a complex task, because the form needs to perform the association. When using the standard association form, described at the beginning of this chapter, you can select several settings, such as the task list and the starting options, and then associate the workflow to the list or site. If SharePoint detects a custom association form, this form is displayed after the standard form to gather additional input. Since all the relevant information must be collected before the association can be performed, this requires the custom form to read the information entered in the standard form and then perform the association itself.
However, the good news is that Visual Studio 2010 includes a template for association and initiation forms that already contains the necessary code to handle the parameters entered in the standard forms and performs the association or initiation. The following example demonstrates how to develop a custom association form. (An initiation form works in the same manner.)
Before you begin, add a SharePoint-mapped folder to the Layouts directory. This controls the deployment of the form to the _layouts folder in SharePoint and will be the path to the form that you need to enter in the workflow manifest file. Once done, add a new association form to this folder, selecting the appropriate template.
The template generates an ASPX file that already contains the markup for a SharePoint application page and provides a code-behind file that handles the association. In the markup code, the buttons to trigger the association or to cancel the association are already inserted. You can add controls to the placeholder PlaceHolderMain and thus create your own form. Of course, you can change the entire page, but to keep the example simple, only a TextBox to enter the username of the estimation manager was added, as shown in Listing 16-7.
Example 16.7. Markup Code for Association Form
<asp:Content ID="Main" ContentPlaceHolderID="PlaceHolderMain" runat="server">
    <br />
Approver: <asp:TextBox runat="server" ID="EstimationManager"></asp:TextBox><br /> <br /><asp:Button ID="AssociateWorkflow" runat="server"OnClick="AssociateWorkflow_Click" Text="Associate Workflow" /> <asp:Button ID="Cancel" runat="server" Text="Cancel" OnClick="Cancel_Click" /></asp:Content>
In the autogenerated code, you can use the methods PopulateFormFields and GetAssociationData to fill your controls with existing values and to pass the values in your controls to the association. The code will create or update an SPWorkflowAssociation object and assign it to the corresponding SharePoint list, site, or content type. This SPWorkflowAssociation object has a member called AssociationData, which is a string that holds additional association data like the data that is entered into the controls on the custom association form. The AssociationData is usually XML to allow for multiple parameters.
Therefore, the GetAssociationData method in the example shown in Listing 16-8 creates an XML string containing an element named EstimationManager, which holds the estimation manager that was entered into the TextBox.
When the PopulateFormFields method is called, a SPWorkflowAssociation object is passed as a parameter, which represents an existing association. In case an association is already present, the AssociationData string will be parsed, and the TextBox for the EstimationManager is populated with the existing value.
You can access the AssociationData in your workflow and process the XML in a similar way.
At the end of the autogenerated code is a section containing all the standard code that should normally be left unchanged.
Example 16.8. Code-Behind for Association Form
using System;
using System.Globalization;
using System.Web;
using System.Web.UI;
using Microsoft.SharePoint;
using Microsoft.SharePoint.Utilities;
using Microsoft.SharePoint.WebControls;
using Microsoft.SharePoint.Workflow;
using System.Xml;
using System.IO;
using System.Text;

namespace EstimationTaskContentType.Layouts.ProjectApprovalForms
{
    public partial class ProjectApprovalAssociationForm : LayoutsPageBase
    {
        private const int CreateListTryCount = 100;
        private string historyListDescription = "Custom History List";
        private string taskListDescription = "Custom Task List";
        private string listCreationFailed = "Failed to create list {0} as a
                                           list with same name already exists";
        private string workflowAssociationFailed = "Error occured while
                                           associating Workflow template. {0}";

        protected void Page_Load(object sender, EventArgs e)
{
InitializeParams();
}
// This method is called during form load and is used to populate form
// fields with existing values when an existing association is edited.
private void PopulateFormFields(SPWorkflowAssociation existingAssociation)
{
string data = existingAssociation.AssociationData;
if (!string.IsNullOrEmpty(data))
{
XmlDocument doc = new XmlDocument();
doc.LoadXml(data);
XmlNamespaceManager nsmgr = new XmlNamespaceManager(
doc.NameTable);
nsmgr.AddNamespace("my",
"http://schemas.microsoft.com/office/infopath/2003/myXSD");
XmlNode node = doc.SelectSingleNode(
"/my:myFields/my:EstimationManager", nsmgr);
EstimationManager.Text = node.InnerText;
}
}
// This method is called when the user clicks the button to associate the
// workflow.
private string GetAssociationData()
{
StringBuilder sb = new StringBuilder();
XmlTextWriter writer = new XmlTextWriter(new StringWriter(sb));
writer.WriteStartElement("my", "myFields",
"http://schemas.microsoft.com/office/infopath/2003/myXSD");
writer.WriteElementString("EstimationManager",
"http://schemas.microsoft.com/office/infopath/2003/myXSD",
EstimationManager.Text);
writer.WriteEndElement();
writer.Flush();
return sb.ToString();
}
protected void AssociateWorkflow_Click(object sender, EventArgs e)
{
// Optionally, add code here to perform additional steps before
// associating your workflow
try
{
CreateTaskList();
CreateHistoryList();
HandleAssociateWorkflow();
// Redirect to the default SharePoint page for workflow settings
SPUtility.Redirect("WrkSetng.aspx", SPRedirectFlags.
RelativeToLayoutsPage, HttpContext.Current,Page.ClientQueryString);
}
catch (Exception ex)
{
SPUtility.TransferToErrorPage(String.Format(
CultureInfo.CurrentCulture, workflowAssociationFailed,
ex.Message));
}
}
protected void Cancel_Click(object sender, EventArgs e)
{
// Redirect to the default SharePoint page for workflow settings
SPUtility.Redirect("WrkSetng.aspx",
SPRedirectFlags.RelativeToLayoutsPage, HttpContext.Current,
Page.ClientQueryString);
}
#region Workflow Association Code - Typically,
the following code should not be changed
...
#endregion
}
}After deploying your workflow and custom form to SharePoint, you can test your association form. Instead of an OK button at the bottom of the workflow association form, a Next button is displayed that navigates to your custom association form. When you click Associate Workflow, the association is performed.
Creating a custom ASPX task form requires a separate content type for each task form. Such a content type defines fields to store the values entered into the form and defines the forms that are used to edit and display the task.
To define and deploy this content type, add a project to the solution, based on the Empty SharePoint Project template. Add a SharePoint-mapped Layouts folder and a content type to this project. The Layouts folder will contain the task form, and the Content Type folder will specify the additional fields and the content type itself, as shown in Figure 16-42.
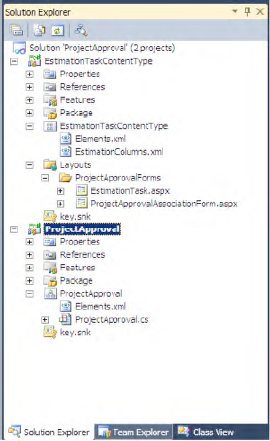
Add a second XML file to the Content Type folder, which is used to define the fields for the content type. (In the example, it is named EstimationColumns.xml.) In this file, define your columns, as shown in Listing 16-9. (For more details on this, please refer to Chapter 7.)
For the example, two fields are defined for the estimation task: EstimatedCosts and Outcome. These columns are used in the content type definition for the workflow task form.
Example 16.9. Field Definitions for Custom Task
<?xml version="1.0" encoding="utf-8" ?>
<Elements xmlns="http://schemas.microsoft.com/sharepoint/">
  <Field ID="{6CBABC50-4BC1-4399-BDC0-7C0155F2CC89}"
         Name="EstimatedCosts"
         DisplayName="Estimated Costs"
         StaticName="EstimatedCosts"
         Description="The estimated costs for the project"
Type="Number"
></Field>
<Field ID="{074AE023-34DD-4C2A-AA67-F9B88063C2BC}"
Name="Outcome"
DisplayName="Outcome"
StaticName="Outcome"
Description="The estimated costs for the project"
Type="Text"
></Field>
</Elements>In the content type definition shown in Listing 16-10, define an ID for the content type that inherits from Workflow Task, which has the ID 010801 in the following form: 0x010801 + 00 + < GUID>, where you have to generate a new GUID for your content type.
Add references to the fields that were defined in the Custom Columns definition earlier using <FieldRef> elements.
Finally, add an <XmlDocument> element to the <XmlDocuments> and indicate the custom form you want to use for the Edit, Show, and New forms.
Example 16.10. Content Type Definition for Custom Task
<?xml version="1.0" encoding="utf-8"?> <Elements xmlns="http://schemas.microsoft.com/sharepoint/"> <!-- Parent ContentType: WorkflowTask (0x01080100) --><ContentType ID="0x0108010031cda7a5483c452f93520d98df2f824a"Name="EstimationTaskContentType" Group="Project Approval" Description="Custom Task for ProjectApproval" Version="0"> <FieldRefs><FieldRef ID="{6CBABC50-4BC1-4399-BDC0-7C0155F2CC89}" DisplayName="EstimatedCosts" Name="EstimatedCosts"/><FieldRef ID="{074AE023-34DD-4C2A-AA67-F9B88063C2BC}" DisplayName="Outcome" Name="Outcome"/></FieldRefs> <XmlDocuments><XmlDocument NamespaceURI="http://schemas.microsoft.com/sharepoint/v3/contenttype/forms/url"><FormUrls xmlns="http://schemas.microsoft.com/sharepoint/v3/contenttype/forms/url"><Edit>_layouts/ProjectApprovalForms/EstimationTask.aspx</Edit><Show>_layouts/ProjectApprovalForms/EstimationTask.aspx</Show></FormUrls></XmlDocument> </XmlDocuments> </ContentType> </Elements>
To create the task form, add a new application page to the layouts folder that was mapped to the project earlier. In the markup code of the form, add the required controls within the PlaceHolderMain content placeholder. In the example shown in Listing 16-11, the controls are a TextBox for the estimated costs and a RadioButtonList for the outcome of the approval.
Example 16.11. Markup Code for Estimation Task Form
<asp:Content ID="Main" ContentPlaceHolderID="PlaceHolderMain" runat="server">
    <div>
        Task Title:
        <asp:Label ID="lblTitle" runat="server"></asp:Label>
        <br /><br />

        Please estimate the project costs:
        <asp:TextBox runat="server" ID="EstimatedCosts"></asp:TextBox>
        <asp:RequiredFieldValidator id="valRequired" runat="server"
             ControlToValidate="EstimatedCosts" ErrorMessage="* Enter Number"
             Display="dynamic" type="Integer">
        </asp:RequiredFieldValidator>

        <asp:radiobuttonlist id="Outcome" runat="server">
            <asp:listitem id="Approve" runat="server" value="Approve" />
            <asp:listitem id="Deny" runat="server" value="Deny" />
        </asp:radiobuttonlist>

        <br /><br />

<asp:Button runat="server" ID="btnSubmit" OnClick="btnSubmit_Click" Text="Submit" />
</div>
</asp:Content>
The code-behind for the task form is responsible for passing the information from the form to the workflow. This is done via the AlterTask method of the SPWorkflowTask class. This method requires a reference to the current SPListItem in the task list and a Hashtable containing the new values of the fields that should be set for the task.
SharePoint passes relevant information to the form through request parameters. This way, you can access the Guid of the list and the ID of the item in the list, allowing you to load the correct SPListItem.
The Hashtable can be created using the information from the form to set values in the task item. It is passed to the AlterTask method for processing. If a key matches one the task fields, this field will be populated with the corresponding value in the Hashtable. All the entries in the Hashtable are also available in the workflow through the ExtendedProperties collection of the SPWorkflowTaskProperties object of the task. Only keys that are available through the standard task content type can be accessed directly from the SPWorkflowTaskProperties object.
Listing 16-12 shows how to access the request parameters in the Page_Load method and how to use the AlterTask method in the btnSubmit_Click method.
The final lines of code in Listing 16-12 are responsible for closing the custom task form. Since the form is shown in a modal dialog using the SharePoint dialog framework, you need to close the dialog using JavaScript.
Example 16.12. Code-Behind for Task Form
using System;
using Microsoft.SharePoint;
using Microsoft.SharePoint.WebControls;
using Microsoft.SharePoint.Workflow;
using System.Collections;
using System.Globalization;
namespace EstimationTaskContentType.Layouts.ProjectApprovalForms
{
    public partial class EstimationTask : LayoutsPageBase
    {
        protected SPList _taskList;
        protected SPListItem _taskListItem;
        protected Guid _workflowGuid;
        protected string _listGuid;
        protected string _listItemId;

        protected void Page_Load(object sender, EventArgs e)
        {
            this._listGuid = Request.Params["List"];
            this._listItemId = Request.Params["ID"];

            using (SPWeb web = SPContext.Current.Site.OpenWeb())
            {
                this._taskList = web.Lists[new Guid(this._listGuid)];
                this._taskListItem = this._taskList.GetItemById(Convert.ToInt32(this._listItemId));
            }
        }

        protected void btnSubmit_Click(object sender, EventArgs e)
        {
            Hashtable hashTable = new Hashtable();
            hashTable["EstimatedCosts"] = EstimatedCosts.Text;
            hashTable["_EstimatedCosts"] = EstimatedCosts.Text;
            hashTable["Outcome"] = Outcome.SelectedValue;
            hashTable["_Outcome"] = Outcome.SelectedValue;
            hashTable["TaskStatus"] = "complete";
            hashTable["PercentComplete"] = "1";

            SPWorkflowTask.AlterTask(this._taskListItem, hashTable, true);
            this.Page.Response.Clear();
         this.Page.Response.Write(
                 string.Format(CultureInfo.InvariantCulture,
                   @"<script type="text/javascript">
                    window.frameElement.commonModalDialogClose(1, '{0}'),
                    </script>",
                   null));
            this.Page.Response.End();
        }
    }
}
Note
In the assignment of the Hashtable values, the two fields from the custom content type are defined twice. The second time, the field name is prefixed with an underscore, but the value is the same as before. The reason for this approach is that SharePoint allows you to access known columns in the ExtendedProperties collection only by the Guid of the column, if the key matches an existing column. Therefore, this workaround allows you to set the value in your task using the column name in the Hashtable and access the field by its name using the leading underscore. You can see that in Listing 16-4, the key with an underscore prefix is used to access the properties.
In SharePoint Server 2010, InfoPath forms can be used as workflow forms instead of ASPX forms. The type of forms you choose does not influence the overall workflow behavior, but working with InfoPath forms is slightly different at some points. In general, InfoPath forms are a little easier, because you don't need to build a separate content type for each task form, and you don't need to program the forms. The forms are rendered by existing application pages that already do some of the work, which needs to be done manually in the case of custom ASPX pages. The following description is based on the previous example for ASPX forms, and thus only the differences are noted.
The first step is to build the InfoPath forms similar to the ASPX forms: an association form with a field for the estimation manager and a task form with one field for the estimated costs and a second field for the outcome of the approval. Both forms need to be published to the local disk using the Publish to a Network Location Wizard. (For details on form publishing, refer to Chapter 15.)
To include these InfoPath forms into the workflow feature, you need to adjust your feature definition file as follows:
Add the
ReceiverAssemblyandReceiverClassas described in Listing 16-13. This feature receiver will also upload your forms so they can be used in the workflow.Add a
<Property>with the attribute key set toRegisterFormswith the value*.xsn. This will tell the feature receiver to process all.xsnfiles.Add an
<ElementFile>element to the<ElementManifests>for each form, and use theLocationattribute to specify the form relative to the feature definition file.
These settings include your forms into the feature, and the feature receiver will deploy them appropriately.
Example 16.13. Feature Definition with InfoPath Forms
<?xml version="1.0" encoding="utf-8" ?> <Feature xmlns="http://schemas.microsoft.com/sharepoint/"ReceiverAssembly="Microsoft.Office.Workflow.Feature, Version=14.0.0.0,Culture=neutral, PublicKeyToken=71e9bce111e9429c"ReceiverClass="Microsoft.Office.Workflow.Feature.WorkflowFeatureReceiver"Title="ProjectApproval Workflow IP"
Description="My SharePoint Workflow Feature"
    Id="cb83bf08-3423-4c45-9396-ac5ff6b5043d" Scope="Site">
    <Properties>
        <Property Key="GloballyAvailable" Value="true" />
        <Property Key="RegisterForms" Value="*.xsn" />
    </Properties>
    <ElementManifests>
        <ElementManifest Location="ProjectApprovalElements.xml" />
        <ElementFile Location="ProjectApprovalAssociationForm.xsn" />
        <ElementFile Location="ProjectApprovalEstimationTaskForm.xsn" />
    </ElementManifests>
</Feature>
In the element manifest file, all that needs to be done is to change the URLs for the forms. The AssociationUrl, InitiationUrl, and ModificationUrl need to be set to special SharePoint application pages that work with InfoPath forms. Listing 16-14 shows how to set these attributes.
To specify the actual InfoPath association form to be used, add an <Association_FormURN> element to the <MetaData>. As the text for this element, enter the URN of the association form. You can get this number from the InfoPath Designer in the Form Template Properties dialog in the field called ID.
Task forms are specified using the <Task[X]_FormURN>, where [X] is the number of the task, starting at zero. Again, the content of the element needs to be set to the URN of the relevant InfoPath form.
Example 16.14. Manifest File with InfoPath Forms
<?xml version="1.0" encoding="utf-8" ?>
<Elements xmlns="http://schemas.microsoft.com/sharepoint/">
    <Workflow
        Name="ProjectApprovalWorkflowIP"
        Description="My SharePoint Workflow with InfoPath"
        Id="0AE6882C-C69E-4455-A2E5-463DA0957B19"
        CodeBesideClass="ProjectApprovalIP.ProjectApprovalIP"
        CodeBesideAssembly="$assemblyname$"
        AssociationUrl="_layouts/CstWrkflIP.aspx"
        ModificationUrl="_layouts/ModWrkflIP.aspx"
        InstantiationUrl="_layouts/IniWrkflIP.aspx"
        StatusUrl="_layouts/WrkStat.aspx">

        <Categories/>
        <MetaData>
            <AssociationCategories>List</AssociationCategories>
            <Association_FormURN>urn:schemas-microsoft-com:office:infopath
                                   :AssociationForm:-myXSD-2010-04-09T13-56-22
            </Association_FormURN>
            <Task0_FormURN>urn:schemas-microsoft-com:office:infopath
                                :EstimationTaskForm:-myXSD-2010-04-09T15-40-32
            </Task0_FormURN>
            <StatusPageUrl>_layouts/WrkStat.aspx</StatusPageUrl>
        </MetaData>
    </Workflow>
</Elements>
In the workflow code, working with InfoPath forms is similar to working with ASPX forms. You can access the form fields through the ExtendedProperties collection when using task forms. Association and Initiation forms store the InfoPath form as an XML string in the AssociationData property of the SPWorkflowAssociation.
When creating task forms, one additional property needs to be set to define which form is created, since the manifest file supports multiple task forms that are identified by an index, as shown in Listing 16-14. Use the CreateTask activity, and specify the index of the task in the TaskType property of the SPWorkflowTaskProperties object. For example, in Listing 16-15 the TaskType is set to 0, because only one task is specified in the manifest using the <Task0_FormURN> element.
Warning
To access the InfoPath fields in your code, you should use only a flat structure of your form data. If you employ group elements in your schema, SharePoint won't be able to associate the fields to the ExtendedProperties collection.
Example 16.15. Creating Task with InfoPath Task Form in a Workflow
private void createTask1_MethodInvoking(object sender, EventArgs e)
{
    estimationTask_TaskId = Guid.NewGuid();
    estimationTaskProperties.TaskType = 0;
    estimationTaskProperties.AssignedTo = "wapps\administrator";
    estimationTaskProperties.Title = "Approve_" + workflowProperties.Item.Title;
    estimationTaskProperties.ExtendedProperties["Title"] =
                                                  workflowProperties.Item.Title;
}
To pass parameters from your workflow to the InfoPath task edit form, you can use a special schema file called ItemMetadata.xml. This file is defined as shown in Listing 16-16. It contains only one element, <z:row>, and an attribute for every task property that should be passed to the form. The attributes are named with the prefix ows_ followed by the name of the attribute. For instance, ows_Title in the example will be used to pass the Title attribute to the form using the ExtendedProperties collection, as shown in Listing 16-15.
The ItemMetadata.xml file must be added to the InfoPath form as a secondary data source that is loaded when the form is opened and included as a resource file. You can then select the fields from the secondary data source as default values for the fields in your form.
SharePoint passes the task data to the InfoPath task form during form load. The ItemMetadata schema enables the form to process this data and makes the data accessible to the form.
Warning
Since SharePoint always passes the task information during the form load event, the ItemMetadata.xml file is mandatory for every InfoPath task form. If this is not specified as a secondary data source—even if you don't use task data in the form—an error will be generated.
This chapter described the immense variety of possibilities for creating elaborate workflows in the SharePoint environment. SharePoint workflows are unique because they operate on SharePoint items, such as lists and sites, and involve human interaction.
Starting with SharePoint workflow basics, this chapter gave an overview of how to work with workflows in SharePoint and which tools can be used in workflow development. With SharePoint 2010, workflow development has greatly improved for codeless workflows that can be described using SharePoint Designer 2010. In addition, Visio 2010 can now be used to design workflows, and the integration of tools has been greatly improved.
Declarative workflows with SharePoint Designer were explained, together with the opportunities to enhance their functionality with custom actions. Custom workflows can be developed using Visual Studio 2010. These workflows are very powerful, exposing a wide scope for customization by skilled developers and overcoming certain limitations of declarative workflows. Forms based on ASP.NET or InfoPath can be integrated into workflows to allow the workflow to interact with users.