

This chapter focuses on the activities that enable you to work with collections of data. Windows Workflow Foundation (WF) includes a ForEach<T> activity that iterates over each element in a collection, executing the same activity for each element. WF also includes a parallel version of this activity and a set of activities that allow you to manipulate collections, adding and removing elements and so on. After a brief summary of these activities, this chapter presents an example that demonstrates their use.
The standard activities provided with WF are designed to work with simple collections, not dictionaries. To demonstrate one way to work with dictionaries, this chapter presents a set of custom activities. It then presents the original example workflow again using a dictionary instead of a collection.
Finally, the chapter ends with a discussion and demonstration of the InvokeMethod activity. This activity allows you to declaratively invoke an instance or static method.
Understanding the ForEach<T> Activity
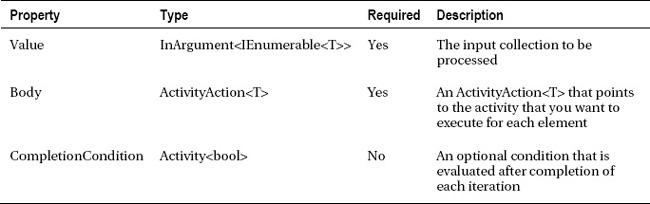
The first collection-related activity that I’ll cover is ForEach<T>. Conceptually, it is designed to operate in a similar way to the foreach C# keyword. The foreach keyword allows you to iterate over the elements in a collection, executing the same block of code for each element. In a similar way, the ForEach<T> activity iterates over a collection (defined as either an argument or a variable) and executes a child activity for each element in the collection.
Here are the most important properties of the ForEach<T> activity:

To use the generic ForEach<T> activity, you first specify the generic type that identifies the type of elements in the collection. You then set the ForEach.Values property to an argument or variable that is a collection of the correct type. Finally, you add an activity to the ForEach.Body property. This activity will be executed once for each element in the collection. Of course, this activity can be a composite activity like Sequence that contains other child activities to execute.
The activity that you specify for the Body property has access to a named argument that represents the element to process. For more information on the plumbing that WF uses to make this work, please see the “Supplying Arguments with an ActivityAction” sidebar in this chapter.
![]() Note When the
Note When the ForEach<T> activity executes, a single instance of the Body activity is constructed. That same instance is used to process all elements in the collection.
WF also includes a ParallelForEach<T> activity, which is used in the same way as ForEach<T> with one big exception. The ForEach<T> activity processes one element from the collection at a time. It schedules execution of the activity specified in the ForEach.Body property for each element. Execution of the Body activity isn’t scheduled for the next element until execution for the first element has completed.
In contrast with this, the ParallelForEach<T> activity immediately processes all the elements in the collection by scheduling execution of the Body activity for each of them. This means that depending on the type of work done by the Body activity, you may experience simultaneous execution of the Body activity.
The following are the most important properties of the ParallelForEach<T> activity:
The ParallelForEach<T> activity also includes an optional CompletionCondition property. Normally, the ParallelForEach<T> activity completes when all elements in the collection have been processed. By supplying a Boolean condition for this property, you can short-circuit the normal completion logic. If defined, this condition is evaluated each time the Body activity is completed for one of the elements. If the condition evaluates to true, no additional processing takes place for the other elements. Any work that has already been scheduled is canceled.
Supplying Arguments with an ActivityAction
You will see the ForEach<T> and ParallelForEach<T> activities in action later in the chapter. But before I can present the first example, you need to learn about the other collection-related activities.
Understanding the Collection Activities
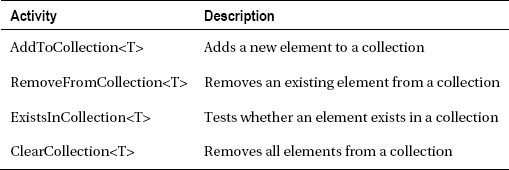
The ForEach<T> and ParallelForEach<T> activities allow you to iterate over the elements in a collection. WF also includes a set of standard activities that enable you to perform common operations on a collection. Here is a quick recap of the available activities and their purpose:
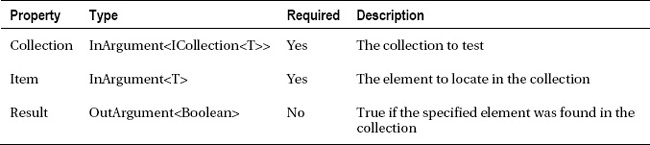
All of these activities are generics, requiring you to specify the type of object that is contained within the collection. These activities reference the target collection using the Collection property. This property is typed as InArgument<ICollection<T>>; therefore, any collection that implements the ICollection<T> generic interface can be used. The collection that you reference can be a variable or argument.
Here are the most important properties of the AddToCollection<T> activity:

The AddToCollection.Item property is used to supply the new element that you want to add to the collection. It can reference a variable or argument, or you can construct the new object directly in an expression.
The RemoveFromCollection<T> activity supports a similar set of properties:
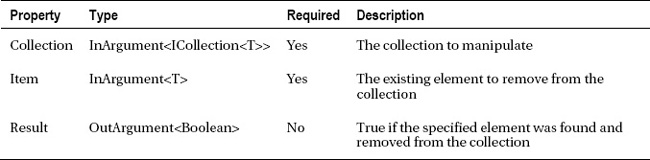
In addition to the Collection and Item properties, the RemoveFromCollection activity also includes a Boolean Result property. This property can be checked to determine whether the remove operation was successful.
The ExistsInCollection<T> doesn’t update the collection but is instead used to determine whether an element exists in the collection. These are the most important properties supported by the ExistsInCollection activity:
Finally, the ClearCollection<T> activity can be used to remove all elements from a collection. Here is the most important property for this activity:

![]() Tip Missing from this set of activities is the ability to find and retrieve an existing element from a collection. The
Tip Missing from this set of activities is the ability to find and retrieve an existing element from a collection. The ExistsInCollection<T> activity can be used to determine whether an element exists in the collection, but it doesn’t provide a way to retrieve the element when it does exist. This may not be important if you are working with a collection of simple intrinsic types, but it seems like a glaring omission if you are working with more complex types and need the ability to retrieve or update an existing object in a collection. To solve this, you will implement a custom FindInCollection<T> activity in the example that follows.
These activities make it very easy to declaratively work with collections. However, be aware of the potential performance implications of using activities such as ExistsInCollection<T> and RemoveFromCollection<T>. The actual mechanism used to locate the specified element in the collection depends on the implementation of the particular collection. Of course, these same performance concerns also apply when you are working with collections directly in code. For example, if your collection is a List<T>, a default comparer is used to locate the element in the collection. This will likely mean iterating over the entire collection to find the element that you want to process. In a very large collection, that may result in a performance penalty.
The examples that are presented in the next few sections demonstrate how to use several of these collection-related activities.
Using the ForEach<T> and Collection Activities
The example that follows demonstrates the use of the ForEach<T> activity along with several of the collection-related activities that were just discussed. The scenario for this example is an inventory update workflow. The workflow is passed two collections as arguments. The first collection contains the available inventory for several items and is the collection that is updated by the workflow. The second collection contains individual item sales. The quantity for each item sold is used to reduce the available inventory for that item.
The workflow also handles the peculiar situation where an item has been sold but is not in the collection representing the available inventory. In cases like this, the updated inventory is a negative amount.
Here are the steps that you will follow to implement this example:
- Implement simple C# classes to represent the item inventory and sales history.
- Implement a new custom activity to locate and retrieve an element in a collection.
- Declare a workflow to update a collection of item inventory elements.
- Host and test the workflow.
Creating the ActivityLibrary Project
To begin this example, create a new project named ActivityLibrary using the Activity Library template. Add it to a new solution that is named for this chapter. You can delete the Activity1.xaml file since it won’t be needed. This project will be used throughout this chapter and will house several custom activities as well as classes to define the item inventory and sales structures.
Implementing Item Structures
Add a new C# class to the ActivityLibrary project, and name it ItemInventory. This should be a normal C# class, not a workflow activity or class. This class defines the item inventory structure for a single sales item. A collection of these objects will be updated by the example workflow. Here is the code that you need for this class:
using System;


namespace ActivityLibrary

{

    public class ItemInventory : IEquatable<ItemInventory>

    {

        public Int32 ItemId { get; set; }

        public Int32 QuantityOnHand { get; set; }


        public bool Equals(ItemInventory other)

        {

            if (other == null)

            {

                return false;

            }

            else

            {

                return (this.ItemId == other.ItemId);

            }

        }

    }

}
I’ve chosen to have this class implement the IEquatable interface. This interface represents a type-safe way to check for the equality of two objects of the same type. If an object implements this interface, the Equals method that is defined by the interface is used by the collection-related activities to determine object equality.
If you don’t provide this interface or override the default Object.Equals method, the default behavior is a reference equality check (both objects referencing the same instance). For this example, you need the ability to determine whether two of these objects are the same based on the value of their ItemId.
You also need to implement a class that defines the individual sales that are applied to the inventory collection. Add another C# class to the same project, and name it SalesHistory. Here is the code you need for this class:
using System;


namespace ActivityLibrary

{

    public class SalesHistory

    {

        public Int32 ItemId { get; set; }

        public Int32 Quantity { get; set; }

    }

}
Implementing the FindInCollection<T> Activity
This example requires the ability to find and update an existing ItemInventory object in a collection. You can use the ExistsInCollection<T> activity to determine whether the object is in the collection, but it doesn’t provide a way to retrieve the object when it does exist. To remedy this situation, you will implement a custom activity that locates a requested object and returns it as a output argument that can be assigned to a workflow variable.
Add a new custom activity to the ActivityLibrary project, and name it FindInCollection. This is a code-based activity, so use the Code Activity new item template. Here is the code for this new activity:
using System;

using System.Activities;

using System.Collections.Generic;


namespace ActivityLibrary

{

    public class FindInCollection<T> : CodeActivity<Boolean>

    {
I follow the pattern established by the standard collection activities and define properties named Collection and Item. The Item property is the element that you want to find in the collection. The FoundItem property is an output argument that will reference the element that was found in the collection. The activity uses the generic form of CodeActivity as its base, so it also supports a Boolean Result property. This property is set to true if the requested element is found in the collection.
Note that I’ve added the RequiredArgument attribute to two of the properties. This presents an error to the developer if they fail to set values for these properties in the workflow designer.
        [RequiredArgument]

        public InArgument<ICollection<T>> Collection { get; set; }

        [RequiredArgument]

        public InArgument<T> Item { get; set; }

        public OutArgument<T> FoundItem { get; set; }


        protected override Boolean Execute(CodeActivityContext context)

        {

            Boolean result = false;

            FoundItem.Set(context, default(T));

            ICollection<T> collection = Collection.Get(context);

            T item = Item.Get(context);


            if (collection != null)

            {

                foreach (T entry in collection)

                {
The check for equality first determines whether the object implements the IEquatable interface. If it does, it calls the IEquatable.Equals method defined by that interface. If not, the standard Equals method that is defined by the Object class is invoked to test equality.
                    if (entry is IEquatable<T>)

                    {

                        if (((IEquatable<T>)entry).Equals(item))

                        {

                            FoundItem.Set(context, entry);

                            result = true;

                            break;

                        }

                    }

                    else if (entry.Equals(item))

                    {

                        FoundItem.Set(context, entry);

                        result = true;

                        break;

                    }

                }

            }

            return result;

        }

    }

}
If you haven’t done so already, you should build the ActivityLibrary project to ensure that everything builds correctly and that this activity is made available in the Toolbox.
Declaring the InventoryUpdate Workflow
Add a new project named InventoryUpdate to the solution using the Workflow Console Application template. You can delete the Workflow1.xaml file that was generated for you since it won’t be needed. Add a project reference to the ActivityLibrary project that should be in the same solution. You will be using a number of types that are defined in the ActivityLibrary namespace, so you might want to add this namespace to the Imports list for the workflow. Doing this avoids the need to fully qualify the types contained in this namespace.
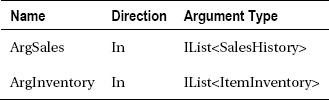
Add a new workflow named InventoryUpdate to the project using the Activity template. This workflow will process two collections that are passed as arguments. The ArgSales argument is a collection of SalesHistory objects representing new sales that should be used to reduce the available inventory. The ArgInventory collection represents the available inventory for multiple items. Start the workflow declaration by adding these arguments to the workflow:
You can follow these steps to declare the remainder of workflow:
- Add a
Sequenceactivity to the empty workflow, and then add aForEach<T>activity to theSequenceactivity. SelectActivityLibrary.ItemInventoryas the generic type for this activity. The purpose of this activity is to display the starting values for the inventory collection, so change theDisplayNameproperty toPrintInventory. Set theForEach.Valuesproperty toArgInventory. Note that the default name ofitemwill be used for the argument that represents each element in the collection. This argument can be referenced by any child activities.- Add a
WriteLineas the child of theForEachactivity, and set itsTextproperty toString.Format("Item {0} beginning inventory: {1}", item.ItemId, item.QuantityOnHand). Figure 6-1 shows the completedForEachactivity.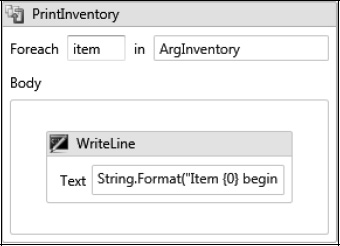
Figure 6-1. PrintInventory activity
- Add another
ForEach<T>activity to theSequenceactivity, directly under the firstForEachactivity (PrintInventory). This is the mainForEach<T>activity that will process updates to the inventory. Set the generic type toActivityLibrary.SalesHistory. Set theForEach.Valuesproperty toArgSales.- Add a
Sequenceactivity as the child of theForEach. Add a Boolean variable to theSequenceactivity that you just added, and name itIsItemExists.- Add a
WriteLineactivity to theSequenceactivity (the one that is the child of theForEach<T>activity) to display the individual sales transactions as they are processed. Set theTextproperty toString.Format("Sales item: {0} quantity: {1}", item.ItemId, item.Quantity).- Add an
ExistsInCollection<T>activity under theWriteLineactivity. Set the generic type toActivityLibrary.ItemInventory. Set theCollectionproperty toArgInventory, theResultproperty toIsItemExists, and theItemproperty to this expression:New ActivityLibrary.ItemInventory With {.ItemId = item.ItemId}. This expression creates a newItemInventoryobject using theItemIdfrom the current sales element. The new object is necessary only because an object of this type must be passed to the activity to determine whether the object already exists in the collection.- Add an
Ifactivity directly under theExistsInCollection<T>activity. Set theConditionproperty toIsItemExists. AddSequenceactivities to theIf.ThenandIf.Elseproperties. Change theDisplayNameof theIf.ThenSequenceactivity toExistsSequenceand theDisplayNameof theIf.ElseSequenceactivity toNotExistsSequenceto make it easier to distinguish these activities from others of the same type.- Add a new variable to the
ExistsSequenceactivity namedFoundItemwith a type ofActivityLibrary.ItemInventory. This variable will reference the existing element in the collection that has been found.- Add an instance of the custom
FindInCollection<T>activity to theExistsSequenceactivity. Set the generic type toActivityLibrary.ItemInventory. Set theCollectionproperty toArgInventory, theFoundItemproperty toFoundItem, and theItemproperty toNew ActivityLibrary.ItemInventory() With {.ItemId = item.ItemId}.- Add an
Assignactivity directly below theFindInCollection<T>activity. This activity will reduce the inventory of the existing element that was just found. Set theAssign.Toproperty toFoundItem.QuantityOnHandand theAssign.Valueproperty toFoundItem.QuantityOnHand - item.Quantity.- Navigate to the
NotExistsSequenceactivity that was added to theIf.Elseproperty. Add anAddToCollection<T>activity to thisSequenceactivity. Set the generic type toActivityLibrary.ItemInventory. Set theCollectionproperty toArgInventoryand theItemproperty toNew ActivityLibrary.ItemInventory() With {.ItemId = item.ItemId, .QuantityOnHand = (0 - item.Quantity)}. This adds a newItemInventoryobject to the collection with a negative available quantity.
Figure 6-2 shows the child Sequence activity of the ForEach<T> activity, while Figure 6-3 shows the main ForEach<T> activity. Figure 6-4 is a top-level view of the entire workflow.
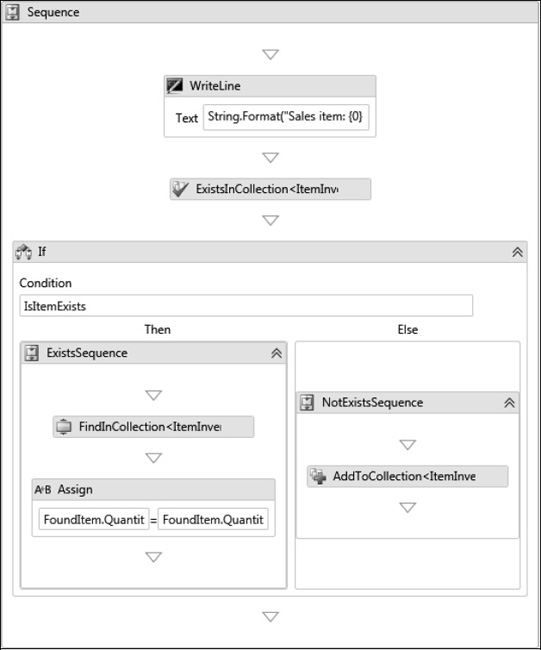
Figure 6-2. ForEach Sequence activity
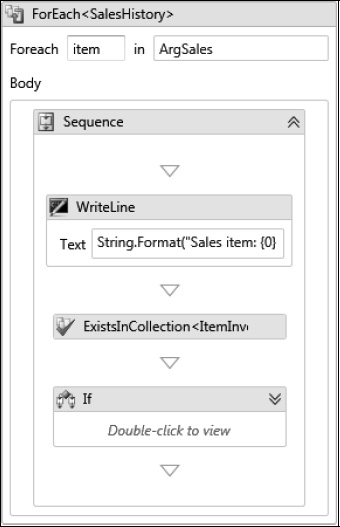
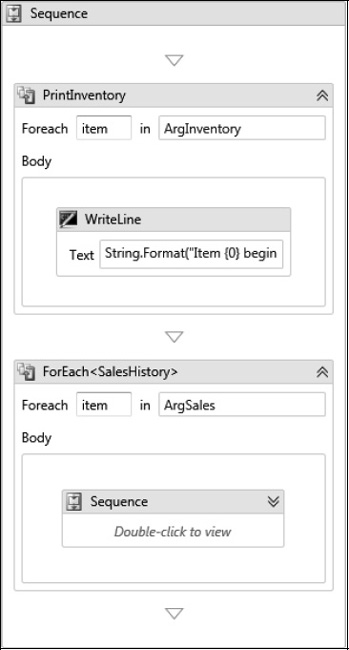
Figure 6-4. InventoryUpdate workflow
Hosting the Workflow
To host the workflow, open the Program.cs file in the InventoryUpdate project, and modify it to look like this:
using System;

using System.Activities;

using System.Collections.Generic;

using ActivityLibrary;


namespace InventoryUpdate

{

    class Program

    {

        static void Main(string[] args)

        {

            Console.WriteLine("Test InventoryUpdate...");

            RunWorkflow(new InventoryUpdate());


            Console.WriteLine("Press any key to exit");

            Console.ReadKey();

        }
The code to run the workflow creates two collections, one containing the available inventory by item and another containing individual item sales. Note that the sales history contains multiple sales for two of the items (ItemId 100 and 300). The final inventory for these two items should be reduced by all the sales history objects for each item. Also note that ItemId 300 doesn’t currently exist in the collection of available inventory. Therefore, any sales posted against that item should result in a negative amount for the available inventory. Both of these collections are passed as arguments to the workflow.
        private static void RunWorkflow(Activity workflow)

        {

            List<SalesHistory> salesHist = new List<SalesHistory>

            {

                new SalesHistory{ItemId = 100, Quantity = 5},

                new SalesHistory{ItemId = 200, Quantity = 25},

                new SalesHistory{ItemId = 100, Quantity = 7},

                new SalesHistory{ItemId = 300, Quantity = 75},

                new SalesHistory{ItemId = 100, Quantity = 30},

                new SalesHistory{ItemId = 300, Quantity = 26},

            };


            List<ItemInventory> inventory = new List<ItemInventory>

            {

                new ItemInventory{ItemId = 100, QuantityOnHand = 100},

                new ItemInventory{ItemId = 200, QuantityOnHand = 200},

            };


            WorkflowInvoker.Invoke(workflow,

                new Dictionary<string, object>

                {

                    {"ArgSales", salesHist},

                    {"ArgInventory", inventory}

                });
After running the workflow, the ending item inventory is displayed in order to determine whether the workflow applied the updates correctly.
            foreach (ItemInventory item in inventory)

            {

                Console.WriteLine("Item {0} ending inventory: {1}",

                    item.ItemId, item.QuantityOnHand);

            }

        }

    }

}
Testing the Workflow
You should now be able to build the solution and run the InventoryUpdate project. Here are my results when I run this project:
Test InventoryUpdate...


Item 100 beginning inventory: 100


Item 200 beginning inventory: 200


Sales item: 100 quantity: 5


Sales item: 200 quantity: 25


Sales item: 100 quantity: 7


Sales item: 300 quantity: 75


Sales item: 100 quantity: 30


Sales item: 300 quantity: 26


Item 100 ending inventory: 58


Item 200 ending inventory: 175


Item 300 ending inventory: -101


Press any key to exit
The results indicate that the updates were correctly applied to the available inventory. Since the inventory collection did not originally contain an object for item 300, a new instance was added with a negative inventory value.
Using the ParallelForEach<T> Activity
The ParallelForEach<T> activity works in a similar way as the ForEach<T> activity and supports the same properties. Therefore, the easiest way to see the ParallelForEach<T> activity in action is to modify the InventoryUpdate workflow from the previous example.
![]() Note The instructions for this example assume that you are modifying the workflow from the previous example. If you prefer being able to compare the results from the two workflows side by side, you can make a copy of the
Note The instructions for this example assume that you are modifying the workflow from the previous example. If you prefer being able to compare the results from the two workflows side by side, you can make a copy of the InventoryUpdate workflow, rename it, and modify the copy.
Follow these steps to modify the InventoryUpdate workflow:
- Open the
InventoryUpdate.xamlfile in Code View. This should open the file in the XML editor instead of the workflow designer. This file is located in theInventoryUpdateproject.- The top level of this workflow contains two
ForEach<T>activities. The first one displays the beginning inventory, and the second one processes the sales history and applies it to the inventory. Locate eachForEach<T>activity under the rootSequenceactivity, and change the activity name toParallelForEach. Make sure you also change the closing element name for each activity.
Here is an abbreviated copy of the revised Xaml file showing the location of the ParallelForEach<T> activities:
<Activity>
…
<Sequence>
<ParallelForEach x:TypeArguments="a:ItemInventory"
DisplayName="PrintInventory" Values="[ArgInventory]">
…
</ParallelForEach>
<ParallelForEach x:TypeArguments="a:SalesHistory"
DisplayName="ParallelForEach<SalesHistory>" Values="[ArgSales]">
…
</ParallelForEach>
</Sequence>
</Activity>
If you close the workflow in the XML editor and open it in the designer, it should look like Figure 6-5.
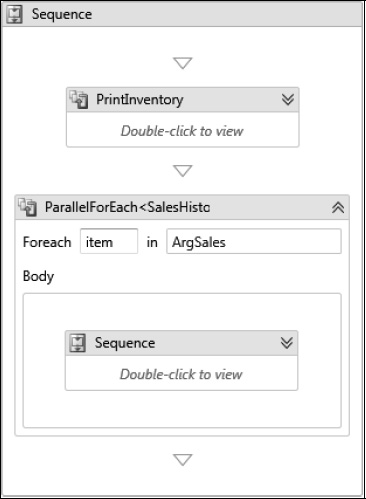
Figure 6-5. InventoryUpdate workflow using ParallelForEach
Testing the Revised Workflow
After building the solution, you should be ready to run the InventoryUpdate project. Here are the results that I see when the ParallelForEach activity is used:
Test InventoryUpdate...


Item 200 beginning inventory: 200


Item 100 beginning inventory: 100


Sales item: 300 quantity: 26


Sales item: 100 quantity: 30


Sales item: 300 quantity: 75


Sales item: 100 quantity: 7


Sales item: 200 quantity: 25


Sales item: 100 quantity: 5


Item 100 ending inventory: 58


Item 200 ending inventory: 175


Item 300 ending inventory: -101


Press any key to exit
The only difference between these results and those from the original version of the workflow is the sequence of the "beginning inventory" and "Sales item" lines. The difference in sequence is because of the way the ParallelForEach<T> activity immediately schedules execution of the child activity for all elements in the collection. The ForEach<T> activity schedules execution for the next element only after the current one has finished processing.
![]() Tip Remember that the actual sequence in which the children of parallel activities are executed greatly depends on the type of work that they perform. In this case, none of the work was asynchronous or would have otherwise caused the workflow to become idle. If this was not the case, the actual execution sequence would have been much different. Please refer to the discussion of the
Tip Remember that the actual sequence in which the children of parallel activities are executed greatly depends on the type of work that they perform. In this case, none of the work was asynchronous or would have otherwise caused the workflow to become idle. If this was not the case, the actual execution sequence would have been much different. Please refer to the discussion of the Parallel activity in Chapter 5 for more information.
Working with Dictionaries
The standard WF activities provide good support for working with simple collections. However, they don’t directly address the more specialized needs when you are working with dictionaries. The primary reason you would use a dictionary instead of a simple collection is the requirement to quickly locate any particular element based on its unique key. Of course, you can search for a particular element in a simple collection, but that search is likely implemented by iterating through all the elements. That can quickly become a performance problem if the collection contains thousands of elements.
Fortunately, it is fairly easy to implement a set of custom activities that work with dictionaries instead of simple collections. In this section, I present a set of custom activities that work in a similar way as the standard collection-related activities. After implementing the activities, I present a revised version of the InventoryUpdate workflow that uses a dictionary.
![]() Tip The goal of this section is not to present a set of production-ready dictionary-related activities. I’m sure you will be able to easily improve on my code. These activities are presented to once again drive home the point that you should create your own custom activities. You should never feel that you are limited to using only the out-of-the-box activities provided with WF. If Microsoft hasn’t provided an activity that meets your needs, just build it yourself.
Tip The goal of this section is not to present a set of production-ready dictionary-related activities. I’m sure you will be able to easily improve on my code. These activities are presented to once again drive home the point that you should create your own custom activities. You should never feel that you are limited to using only the out-of-the-box activities provided with WF. If Microsoft hasn’t provided an activity that meets your needs, just build it yourself.
Here are the steps that you will follow to implement this example:
- Implement a set of custom dictionary-related activities.
- Declare a workflow to update a dictionary of item inventory elements instead of a simple collection.
- Host and test the workflow.
![]() Note The downloadable code for this book includes a set of simple unit tests for these custom activities. I’ve omitted those tests from the book to keep the focus of this chapter on implementing and using the activities.
Note The downloadable code for this book includes a set of simple unit tests for these custom activities. I’ve omitted those tests from the book to keep the focus of this chapter on implementing and using the activities.
Implementing the Dictionary-Related Activities
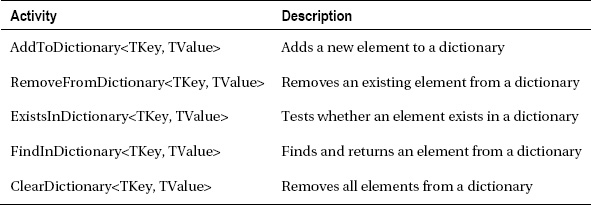
Here is a quick recap of the custom dictionary-related activities that you will implement:
You will add all of these activities to the ActivityLibrary project that you created earlier in the chapter. They are all implemented in code, so you should use the Code Activity add item template when adding them to the ActivityLibrary project. Since the activities are very similar to each other, you’ll find that copying part of the code from the first activity is a great way to implement the others.
Implementing AddToDictionary<TKey, TValue>
Here is the code to implement the AddToDictionary<TKey, TValue> activity:
using System;

using System.Activities;

using System.Collections.Generic;


namespace ActivityLibrary

{

    public class AddToDictionary<TKey, TValue> : CodeActivity

    {

        [RequiredArgument]

        public InArgument<IDictionary<TKey, TValue>> Dictionary { get; set; }

        [RequiredArgument]

        public InArgument<TKey> Key { get; set; }

        [RequiredArgument]

        public InArgument<TValue> Item { get; set; }


        protected override void Execute(CodeActivityContext context)

        {

            IDictionary<TKey, TValue> dictionary = Dictionary.Get(context);

            TKey key = Key.Get(context);

            TValue item = Item.Get(context);

            if (dictionary != null)

            {

                dictionary.Add(key, item);

            }

        }

    }

}
Notice that in addition to the Item argument, which was also implemented in the standard collection-related activities, a Key argument is included. This is needed since a dictionary requires you to set a unique key for each element. You’ll see this additional argument in most of these custom activities.
Implementing RemoveFromDictionary<TKey, TValue>
Here is the code to implement the RemoveFromDictionary<TKey, TValue> activity:
using System;

using System.Activities;

using System.Collections.Generic;


namespace ActivityLibrary

{

    public class RemoveFromDictionary<TKey, TValue> : CodeActivity<Boolean>

    {

        [RequiredArgument]

        public InArgument<IDictionary<TKey, TValue>> Dictionary { get; set; }

        [RequiredArgument]

        public InArgument<TKey> Key { get; set; }


        protected override Boolean Execute(CodeActivityContext context)

        {

            Boolean result = false;

            IDictionary<TKey, TValue> dictionary = Dictionary.Get(context);

            TKey key = Key.Get(context);

            if (dictionary != null)

            {

                if (dictionary.ContainsKey(key))

                {

                    result = dictionary.Remove(key);

                }

            }

            return result;

        }

    }

}
Implementing ExistsInDictionary<TKey, TValue>
Here is the code to implement the ExistsInDictionary<TKey, TValue> activity:
using System;

using System.Activities;

using System.Collections.Generic;


namespace ActivityLibrary

{

    public class ExistsInDictionary<TKey, TValue> : CodeActivity<Boolean>

    {

        [RequiredArgument]

        public InArgument<IDictionary<TKey, TValue>> Dictionary { get; set; }

        [RequiredArgument]

        public InArgument<TKey> Key { get; set; }


        protected override Boolean Execute(CodeActivityContext context)

        {

            Boolean result = false;

            IDictionary<TKey, TValue> dictionary = Dictionary.Get(context);

            TKey key = Key.Get(context);

            if (dictionary != null)

            {

                result = dictionary.ContainsKey(key);

            }

            return result;

        }

    }

}
Implementing FindInDictionary<TKey, TValue>
Here is the code to implement the FindInDictionary<TKey, TValue> activity:
namespace ActivityLibrary

{

    using System;

    using System.Activities;

    using System.Collections.Generic;


    public class FindInDictionary<TKey, TValue> : CodeActivity<Boolean>

    {

        [RequiredArgument]

        public InArgument<IDictionary<TKey, TValue>> Dictionary { get; set; }

        [RequiredArgument]

        public InArgument<TKey> Key { get; set; }

        public OutArgument<TValue> FoundItem { get; set; }


        protected override Boolean Execute(CodeActivityContext context)

        {

            Boolean result = false;

            FoundItem.Set(context, default(TValue));

            IDictionary<TKey, TValue> dictionary = Dictionary.Get(context);

            TKey key = Key.Get(context);

            if (dictionary != null)

            {

                if (dictionary.ContainsKey(key))

                {

                    FoundItem.Set(context, dictionary[key]);

                    result = true;

                }

            }

            return result;

        }

    }

}
Implementing ClearDictionary<TKey, TValue>
Here is the code to implement the ClearDictionary<TKey, TValue> activity:
using System;

using System.Activities;

using System.Collections.Generic;


namespace ActivityLibrary

{

    public class ClearDictionary<TKey, TValue> : CodeActivity

    {

        [RequiredArgument]

        public InArgument<IDictionary<TKey, TValue>> Dictionary { get; set; }


        protected override void Execute(CodeActivityContext context)

        {

            IDictionary<TKey, TValue> dictionary = Dictionary.Get(context);

            if (dictionary != null)

            {

                dictionary.Clear();

            }

        }

    }

}
![]() Note Since a dictionary is technically also a collection, you can use the standard
Note Since a dictionary is technically also a collection, you can use the standard ClearCollection<T> activity to clear it. However, I’ve included the ClearDictionary<TKey, TValue> activity to round out a uniform set of dictionary-related activities. As an alternate implementation of the ClearDictionary<TKey, TValue> activity, you could use composition to wrap the ClearCollection<T> activity.
Declaring the InventoryUpdateDictionary Workflow
After building the solution to ensure that everything builds correctly, you are ready to implement a workflow that uses these new activities. The structure of this workflow will be similar to the InventoryWorkflow that you declared earlier in the chapter, and many of the steps needed to declare the workflow will be the same. The difference is that the collection of ItemInventory objects has been replaced with a dictionary of these objects. The collection-related activities that were previously used to manipulate this collection have now been replaced with the new dictionary-related activities that you just implemented. Most of the dictionary-related activities require an additional Key argument.
Instead of creating a new project, add a new workflow named InventoryUpdateDictionary to the existing InventoryUpdate project using the Activity add item template. Add these arguments to the workflow:

Follow these steps to declare the remainder of workflow:
- Add a
Sequenceactivity to the empty workflow, and then add aForEach<T>activity to theSequenceactivity. SelectActivityLibrary.ItemInventoryas the generic type for this activity. Change theDisplayNameproperty toPrintInventory. Set theForEach.Valuesproperty toArgInventory.Values. Notice that you are iterating over theValuesproperty of theArgInventorydictionary instead of the dictionary itself. TheValuesproperty of a dictionary is exposed as a simple collection.- Add a
WriteLineas the child of theForEachactivity, and set itsTextproperty toString.Format("Item {0} beginning inventory: {1}", item.ItemId, item.QuantityOnHand). ThePrintInventoryactivity should look just like the one that you declared for the previous example that is shown in Figure 6-1.- Add another
ForEach<T>activity to theSequenceactivity, directly under the firstForEach<T>activity. This is the mainForEach<T>activity that will process updates to the inventory. Set the generic type toActivityLibrary.SalesHistory. Set theForEach.Valuesproperty toArgSales.- Add a
Sequenceactivity as the child of theForEach<T>. Add a Boolean variable to theSequenceactivity namedIsItemExists.- Add a
WriteLineactivity to theSequenceactivity to display the individual sales transactions as they are processed. Set theTextproperty toString.Format("Sales item: {0} quantity: {1}", item.ItemId, item.Quantity).- Add an
ExistsInDictionary<TKey,TValue>activity under theWriteLineactivity. Set the generic types toInt32andActivityLibrary.ItemInventory. Set theResultproperty toIsItemExists, theDictionaryproperty toArgInventory, and theKeyproperty toitem.ItemId. This passes theItemIdof the current sales element to the activity for direct lookup based on the unique key.- Add an
Ifactivity directly under theExistsInDictionary<TKey,TValue>activity. Set theConditionproperty toIsItemExists. AddSequenceactivities to theIf.ThenandIf.Elseproperties. Change theDisplayNameof theIf.ThenSequenceactivity toExistsSequenceand theDisplayNameof theIf.ElseSequencetoNotExistsSequence.- Add a new variable to the
ExistsSequenceactivity with a name ofFoundItemand a type ofActivityLibrary.ItemInventory. This variable will reference the existing element in the collection that has been found.- Add an instance of the
FindInDictionary<TKey,TValue>activity to theExistsSequence. Set the generic types toInt32andActivityLibrary.ItemInventory. Set theDictionaryproperty toArgInventory, theFoundItemproperty toFoundItem, and theKeyproperty toitem.ItemId.- Add an
Assignactivity directly below theFindInDictionary<TKey,TValue>activity. This activity will update the inventory of the existing element that was just found. Set theAssign.Toproperty toFoundItem.QuantityOnHandand theAssign.Valueproperty toFoundItem.QuantityOnHand - item.Quantity.- Navigate to the
NotExistsSequenceactivity that was added to theIf.Elseproperty. Add a genericAddToDictionary<TKey,TValue>activity to theSequenceactivity. Set the generic types toInt32andActivityLibrary.ItemInventory. Set theDictionaryproperty toArgInventory, theKeyproperty toitem.ItemId, and theItemproperty toNew ActivityLibrary.ItemInventory() With {.ItemId = item.ItemId, .QuantityOnHand = (0 - item.Quantity)}.
Hosting the Workflow
To host this new workflow, you can revise the Program.cs file in the InventoryUpdate project. Instead of changing the existing code that executes the InventoryUpdate workflow, you can add a method that runs the new InventoryUpdateDictionary workflow and passes it a dictionary argument instead of a simple collection. Here is the revised code for the Program.cs file:
namespace InventoryUpdate

{

    class Program

    {

        static void Main(string[] args)

        {

…
Add these lines to execute the new workflow after the existing call to the RunWorkflow method:
            Console.WriteLine("
Test InventoryUpdateDictionary...");

            RunDictionaryWorkflow(new InventoryUpdateDictionary());

…

        }

…
Add this new method to run the new workflow that uses a dictionary instead of a collection. You can copy the existing RunWorkflow method and change the definition of the inventory variable to a dictionary.
        private static void RunDictionaryWorkflow(Activity workflow)

        {

            List<SalesHistory> salesHist = new List<SalesHistory>

            {

                new SalesHistory{ItemId = 100, Quantity = 5},

                new SalesHistory{ItemId = 200, Quantity = 25},

                new SalesHistory{ItemId = 100, Quantity = 7},

                new SalesHistory{ItemId = 300, Quantity = 75},

                new SalesHistory{ItemId = 100, Quantity = 30},

                new SalesHistory{ItemId = 300, Quantity = 26},

            };


            Dictionary<Int32, ItemInventory> inventory

                = new Dictionary<int, ItemInventory>

            {

                { 100, new ItemInventory{ItemId = 100, QuantityOnHand = 100}},

                { 200, new ItemInventory{ItemId = 200, QuantityOnHand = 200}},

            };


            WorkflowInvoker.Invoke(workflow,

                new Dictionary<string, object>

                {

                    {"ArgSales", salesHist},

                    {"ArgInventory", inventory}

                });


            foreach (ItemInventory item in inventory.Values)

            {

                Console.WriteLine("Item {0} ending inventory: {1}",

                    item.ItemId, item.QuantityOnHand);

            }

        }

    }

}
Testing the Workflow
After building the solution, you can run the InventoryUpdate project. It will first execute the current version of the InventoryUpdate workflow (which should be the one that uses the ParallelForEach<T> activity), followed by the new InventoryUpdateDictionary workflow. Here are the results that I see when I run the revised project:
Test InventoryUpdate...


Item 200 beginning inventory: 200


Item 100 beginning inventory: 100


Sales item: 300 quantity: 26


Sales item: 100 quantity: 30


Sales item: 300 quantity: 75


Sales item: 100 quantity: 7


Sales item: 200 quantity: 25


Sales item: 100 quantity: 5


Item 100 ending inventory: 58


Item 200 ending inventory: 175


Item 300 ending inventory: -101


Test InventoryUpdateDictionary...


Item 100 beginning inventory: 100


Item 200 beginning inventory: 200


Sales item: 100 quantity: 5


Sales item: 200 quantity: 25


Sales item: 100 quantity: 7


Sales item: 300 quantity: 75


Sales item: 100 quantity: 30


Sales item: 300 quantity: 26


Item 100 ending inventory: 58


Item 200 ending inventory: 175


Item 300 ending inventory: -101


Press any key to exit
Understanding the InvokeMethod Activity
In the previous examples, the updates to the item inventory were accomplished using an expression that was entered in an Assign activity like this: FoundItem.QuantityOnHand - item.Quantity. Although this is a fine solution, WF also supports other mechanisms to accomplish the same goal. For example, WF allows you to declaratively invoke a public method on an object using the InvokeMethod activity. You can also use this activity to invoke a public static method that is defined for a type.
![]() Note The
Note The InvokeMethod activity isn’t directly related to the processing of data in collections and, as such, doesn’t really follow the theme of this chapter. However, the examples in this chapter present an opportunity for improvement by using this activity, so I’ve presented this activity here.
Here are the most important properties of the InvokeMethod activity:
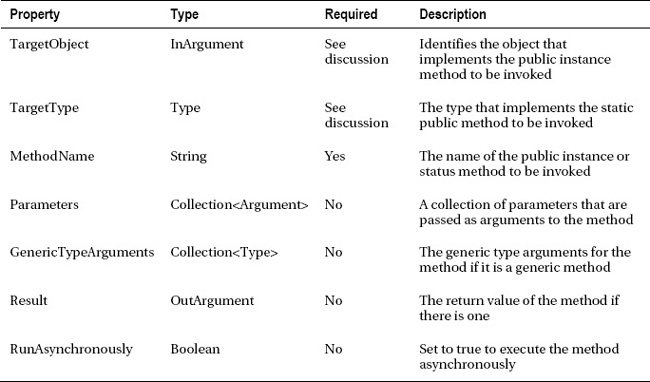
The properties that you set for the InvokeMethod activity vary depending on whether you are invoking an instance or static method. If you are invoking an instance method, you must set the TargetObject property and the MethodName. If you are invoking a static method, you must set the TargetType and the MethodName. The TargetObject must not be set when you are invoking a static method. In either case, you set values for the arguments that are passed to the method using the Parameters property. Method arguments must be added to the Parameters collection in the same order as they are defined in the method signature. If the method is a generic method, you also need to identify types for each generic type defined by the method.
Using the InvokeMethod Activity
To demonstrate the InvokeMethod activity, you will revise the InventoryUpdateDictionary workflow that you declared in the previous example. Instead of reducing the inventory for an item using an expression, you will invoke a new method that you add to the ItemInventory class. And instead of creating a new ItemInventory object in an expression, you will invoke a new static factory method to create the object.
Revising the ItemInventory Class
Before you can invoke the new methods, they must be added to the ItemInventory class that you previously implemented (located in the ActivityLibrary project). Here are the additional methods that you should add to this class:
using System;


namespace ActivityLibrary

{

    public class ItemInventory : IEquatable<ItemInventory>

    {

…

        public void ReduceInventory(Int32 adjustment)

        {

            QuantityOnHand -= adjustment;

        }


        public static ItemInventory Create(Int32 itemId, Int32 quantity)

        {

            return new ItemInventory

            {

                ItemId = itemId,

                QuantityOnHand = quantity

            };

        }

    }

}
Build the solution before proceeding with the next steps.
Modifying the Workflow
Open the InventoryUpdateDictionary workflow in the designer, and follow these steps:
- Navigate to the
Ifactivity that determines whether an existing inventory element should be updated or a new one is added.- Navigate to the
Sequenceactivity under theIf.Thenproperty (namedExistsSequence). Delete theAssignactivity that immediately follows theFindInDictionaryactivity since it is no longer needed.- Add an
InvokeMethodactivity where theAssignactivity was located. Set theTargetObjectproperty toFoundItemand theMethodNameproperty toReduceInventory. Add a singleInArgumentto theParameterscollection, using a type ofInt32and a value ofitem.Quantity. Figure 6-6 shows the revisedExistsSequenceactivity with theInvokeMethodactivity.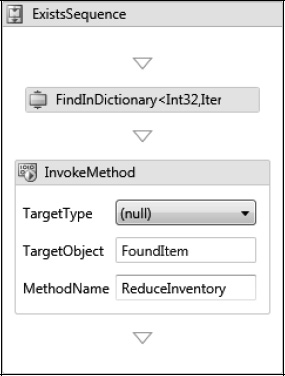
- Navigate to the
NotExistsSequenceactivity under theIf.Elseproperty. Add a new variable to thisSequenceactivity. Name the variableNewItemwith a type ofActivityLibrary.ItemInventory.- Add an
InvokeMethodactivity as the first activity in theSequenceactivity. Set theTargetTypetoActivityLibrary.ItemInventoryand theMethodNametoCreate. Set theResultproperty toNewItem. Add twoInArgumentsto theParametersproperty. The first argument is anInt32and has a value ofitem.ItemId. The second argument is also anInt32and has a value of0 - item.Quantity.- Make one change to the properties of the
AddToDictionaryactivity. Set the expression for theItemproperty toNewItem. This will add theItemInventoryobject that was constructed by theInvokeMethodactivity to the collection. Figure 6-7 shows the revisedNotExistsSequencewith theInvokeMethodactivity.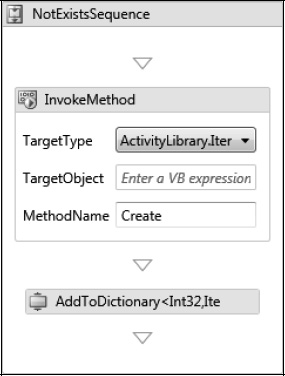
Testing the Workflow
After rebuilding the solution, you should be ready to test the revised workflow. When I run the InventoryUpdate project, I see the same results as before:
Test InventoryUpdate...


Item 200 beginning inventory: 200


Item 100 beginning inventory: 100


Sales item: 300 quantity: 26


Sales item: 100 quantity: 30


Sales item: 300 quantity: 75


Sales item: 100 quantity: 7


Sales item: 200 quantity: 25


Sales item: 100 quantity: 5


Item 100 ending inventory: 58


Item 200 ending inventory: 175


Item 300 ending inventory: -101


Test InventoryUpdateDictionary...


Item 100 beginning inventory: 100


Item 200 beginning inventory: 200


Sales item: 100 quantity: 5


Sales item: 200 quantity: 25


Sales item: 100 quantity: 7


Sales item: 300 quantity: 75


Sales item: 100 quantity: 30


Sales item: 300 quantity: 26


Item 100 ending inventory: 58


Item 200 ending inventory: 175


Item 300 ending inventory: -101


Press any key to exit
In this particular case, I think the use of the InvokeMethod activity makes a lot of sense. This is especially true when creating a new ItemInventory instance. Although you can construct a simple object like this using an expression, it seems more intuitive to implement a factory method to create new object instances. Doing so allows you to hide any initialization details in the code rather than having to deal with them in an expression.
Summary
The focus of this chapter was the activities that enable you to work with collections of data. The ForEach<T> and ParallelForEach<T> activities iterate over the elements in a collection, while the collection-related activities such as AddToCollection<T> and ExistsInCollection<T> work with the elements in the collection. The use of these activities was demonstrated in a series of example workflows and activities.
This chapter also presented a set of custom activities that are designed to work with dictionaries of data instead of simple collections. Using a dictionary provides potential performance improvements over a simple collection, especially when individual elements from a large collection must be located and updated.
The chapter concluded with a demonstration of the InvokeMethod activity. This activity allows you to invoke an instance method on an object or a static method defined for a type.
In the next chapter, you will learn about the flowchart modeling style and the activities that are provided to implement this style.