
The focus of this chapter is direct communication between the host application and a workflow instance. The chapter begins with an overview of long-running workflows and the bookmark mechanism used to implement them. Bookmarks provide a way to temporarily suspend execution of a workflow instance while it is waiting for external input. They also provide a way to pass data to a waiting instance as the bookmark is resumed.
But bookmarks only permit data to be passed into a workflow instance, not in the other direction to the host application. The use of workflow extensions for sending data to a host application is discussed and demonstrated next.
The ActivityAction and ActivityFunc activities are a general-purpose extensibility mechanism. They allow you to execute activities that are provided outside the workflow declaration. The chapter continues with a discussion and demonstration of using an ActivityAction as a way to communicate between a workflow instance and the host application.
The chapter ends with coverage of the Pick and PickBranch activities. These activities allow you to model workflows that can create and wait for multiple bookmarks at the same time.
![]() Note This chapter discusses bookmark concepts and focuses on ways to implement direct communication between a workflow instance and the application that hosts it. Another mechanism for communication is Windows Communication Foundation (WCF) messaging, which is covered in Chapter 9.
Note This chapter discusses bookmark concepts and focuses on ways to implement direct communication between a workflow instance and the application that hosts it. Another mechanism for communication is Windows Communication Foundation (WCF) messaging, which is covered in Chapter 9.
The Need for Long-Running Workflows
Some workflows operate solely on the arguments that are passed to them when they are started. They may perform calculations, make decisions based on those arguments, and then return a result. However, workflows of this type are likely in the minority. To solve real problems, many workflows require some interaction with other systems or resources. The interaction may take the form of a WCF message to another application, a query to a database or other resource, or direct interaction with the application that is hosting the workflow. These interactions enable the running workflow to work with additional data that has been received (or retrieved) after it has begun execution.
These interactions always involve a degree of uncertainty. This is especially true if you are communicating with another application. The actual work that is done by the other application, and the length of time it will take, may be completely out of your control. If you are communicating directly with the host application, you may have much better control over the performance requirements of the interaction.
But you have little or no control if the interaction involves real human beings. For example, you may be processing a mortgage loan workflow that requires multiple approvals from the credit department, account managers, and loan officers to complete the workflow. Each of these approvals must come from a real human being. The workflow will likely signal that it is waiting for these external inputs, but then it must wait until they are received before it can continue processing.
When an activity in a workflow does need to reach out and touch some other system, you have a choice. You can choose to handle the interaction just like any other atomic unit of work, or you can implement a long-running activity. The correct choice is to model the interaction with a long-running activity. But why is this so? Remember that activities within a workflow are executed on a single workflow thread. If that thread is occupied waiting for external input, it can’t be used for any other purpose. You’re wasting a valuable resource (a workflow thread) that could be used to execute other activities in the same workflow (perhaps to process other external input as it is received). Equally important, you’ve locked the workflow in memory—it can’t be unloaded since the thread is occupied waiting for external input. The workflow runtime doesn’t know that you’re waiting for external input and that external input might take minutes, hours, or days before it is received.
In contrast with this, a long-running activity is designed to yield control of the workflow thread when it requires some external interaction. When the interaction is complete, the activity continues processing. While the workflow is waiting for external input, it can use the workflow thread to process other activities (if it was modeled to take advantage of parallel processing), or the entire workflow can become idle. When it is idle, it is no longer occupying a workflow thread, and it is a candidate to be persisted and unloaded from memory. Long-running activities are implemented using a concept called bookmarks, which are discussed in the next section.
![]() Note Chapter 11 covers workflow persistence.
Note Chapter 11 covers workflow persistence.
To recap, you should keep these two guidelines in mind when an activity is required to interact with an external application or resource:
- Make no assumptions concerning the duration of the interaction. By default, you should assume that the interaction will be long-running.
- Don’t occupy a workflow thread for the interaction. Use a long-running activity that is designed to yield control of the workflow thread.
Understanding Bookmarks
WF supports long-running activities using a concept called bookmarks. A WF bookmark serves the same purpose as a real bookmark that you would use in a book. It marks your place when you need to temporarily do something else. When you are ready to continue reading a book, you locate the bookmark and resume reading at the exact point where you stopped. In a similar manner, a WF bookmark enables you to resume processing of the activity at the point where you stopped.
To use bookmarks, an activity must derive from NativeActivity (or the generic version NativeActivity<TResult>). This is the only base activity class that supports the ability to create and resume bookmarks. You create a bookmark within the Execute method of the activity. This method is passed a NativeActivityContext object that supports the CreateBookmark method. There are several overloads of this method that allow you to create a bookmark in slightly different ways. Bookmarks must be uniquely named within a workflow since the string name is used by the host application to resume execution at the bookmark. Optionally, you can specify a callback that is executed when the bookmark is resumed. The callback must match the BookmarkCallback delegate signature. You can use this callback to retrieve any data that was passed from the host application when the bookmark was resumed. The data is likely the external input that the workflow requires in order to continue processing.
Any custom activity that creates a bookmark must also override the virtual CanInduceIdle property. This Boolean property returns a value indicating whether the activity is capable of causing the workflow to become idle.
When the host application is ready to resume a bookmark, it uses the ResumeBookmark method of the WorkflowApplication instance. This method accepts the string name of the bookmark to resume along with any data that you want to pass back to the waiting activity. The WorkflowInvoker class does not support the resumption of bookmarks.
Figure 8-1 illustrates this interaction between the long-running activity and the hosts application.

Figure 8-1. Bookmark processing overview
![]() Note Don’t confuse long-running bookmark processing with asynchronous processing. Asynchronous processing operates on a separate thread, but it is assumed that it will complete without waiting for external stimulus. It is also assumed that an asynchronous activity will complete in a relatively short period of time, while a long-running activity may take an extraordinarily long period of time before it is resumed.
Note Don’t confuse long-running bookmark processing with asynchronous processing. Asynchronous processing operates on a separate thread, but it is assumed that it will complete without waiting for external stimulus. It is also assumed that an asynchronous activity will complete in a relatively short period of time, while a long-running activity may take an extraordinarily long period of time before it is resumed.
Using Bookmarks
To demonstrate how to use a bookmark, you will revisit a familiar example: the command-line calculator. You first saw this example in Chapter 1 but last worked with it in Chapter 7 when you implemented it using the flowchart modeling style. In that example, the host application passed the arithmetic expression to process as an argument when the workflow was started.
In this example, you will revise the workflow and the host application to use bookmarks. A new custom activity will be developed that creates a bookmark in order to wait for input from the host application. The host application uses the named bookmark to pass the arithmetic expression to the waiting workflow.
You will complete these tasks to implement this example:
- Implement a custom
GetStringactivity that uses bookmark processing to retrieve the arithmetic expression.- Copy the
ParseCalculatorArgsactivity from Chapter 7.- Declare the
BookmarkCalculatorworkflow.- Implement the host application code to resume the bookmark.
Implementing the GetString Activity
This new custom activity will demonstrate how to create and use a bookmark. To begin this example, create a new project named ActivityLibrary using the Activity Library template. Add it to a new solution that is named for this chapter. Delete the Activity1.xaml file since it is not needed.
Add a new activity named GetString to the project using the Code Activity add item template. Here is the complete code to implement this activity:
using System;

using System.Activities;


namespace ActivityLibrary

{

    public sealed class GetString : NativeActivity<String>

    {
The code in the Execute method immediately creates a new bookmark, assigning it a name of GetString. It registers a callback method named Resumed that will be invoked when the host application resumes the bookmark.
When the new bookmark is created, this informs the workflow runtime that the activity is not yet complete but that it requires some external stimulus in order to continue processing. This allows the runtime to use the workflow thread for other work while this activity is waiting for resumption of the bookmark.
        protected override void Execute(NativeActivityContext context)

        {

            context.CreateBookmark("GetString", Resumed);

        }
When the bookmark is resumed, the Resumed method is invoked since it was identified as the callback method. Any data passed from the host application is passed in the value parameter to this method. In this example, the activity is expecting this data to be a string containing the arithmetic expression. The value of that expression is used to set the Result property of this activity.
        private void Resumed(NativeActivityContext context,

            Bookmark bookmark, object value)

        {

            if (value != null && value is String)

            {

                Result.Set(context, value as String);

            }

        }
The CanInduceIdle property is overridden in order to indicate that the activity is capable of causing the workflow to become idle.
        protected override bool CanInduceIdle

        {

            get { return true; }

        }

    }

}
Implementing the ParseCalculatorArgs Activity
This example workflow also uses the ParseCalculatorArgs activity that you used in Chapter 7. You can copy the code that you used in that chapter to the ActivityLibrary project without any changes. Here is the code for this activity:
using System;

using System.Activities;


namespace ActivityLibrary

{

    public sealed class ParseCalculatorArgs : CodeActivity

    {

        [RequiredArgument]

        public InArgument<String> Expression { get; set; }

        public OutArgument<Double> FirstNumber { get; set; }

        public OutArgument<Double> SecondNumber { get; set; }

        public OutArgument<String> Operation { get; set; }


        protected override void Execute(CodeActivityContext context)

        {

            FirstNumber.Set(context, 0);

            SecondNumber.Set(context, 0);

            Operation.Set(context, "error");


            String line = Expression.Get(context);

            if (!String.IsNullOrEmpty(line))

            {

                String[] arguments = line.Split(’ ’);

                if (arguments.Length == 3)

                {

                    Double number = 0;

                    if (Double.TryParse(arguments[0], out number))

                    {

                        FirstNumber.Set(context, number);

                    }

                    Operation.Set(context, arguments[1]);

                    if (Double.TryParse(arguments[2], out number))

                    {

                        SecondNumber.Set(context, number);

                    }

                }

            }

        }

    }

}
Creating the Console Project
Create a new project to host the calculator workflow. Name the project BookmarkCalculator, and use the Workflow Console Application template. Add the new project to the current solution for this chapter. Delete the Workflow1.xaml file that was created for you since you won’t use it. Add a project reference to the ActivityLibrary project, which should be in the same solution.
The workflow for this example is almost exactly the same as the one you implemented in Chapter 7. The most efficient way to implement this example is to copy the FlowchartCalculator.xaml file from the FlowchartCalculator project in Chapter 7. Name the copied workflow BookmarkCalculator.xaml, and add it to the BookmarkCalculator project that you just created. Open the copied BookmarkCalculator.xaml file in Code View, which should open the XML editor. Change both the namespace and the workflow name in the root element to BookmarkCalculator. Here is an abbreviated copy of the modified Xaml file showing the changes:
<Activity x:Class="BookmarkCalculator.BookmarkCalculator">

…

</Activity>
![]() Note I prefer to rename activities and workflows directly in the Xaml file as I indicated here. However, you can also change the namespace and workflow name in designer view. If you make sure that the workflow itself is highlighted (rather than one of the activities within it), you should be able to change the namespace and name in the Properties window.
Note I prefer to rename activities and workflows directly in the Xaml file as I indicated here. However, you can also change the namespace and workflow name in designer view. If you make sure that the workflow itself is highlighted (rather than one of the activities within it), you should be able to change the namespace and name in the Properties window.
After closing the XML editor, rebuild the solution and then open the workflow in Design View. Follow these steps to modify the workflow:
- Delete the
ArgExpressionargument that is defined for this workflow. This was previously used to pass the arithmetic expression to the workflow but will no longer be needed.- Add a new string variable named
Expressionto the workflow, scoped by the rootFlowchartactivity.- Add an instance of the new
GetStringactivity to the top of the workflow. Set theGetString.Resultproperty toExpression. This will populate the newExpressionvariable with the value that is passed to the activity when its bookmark is resumed.- Modify one of the property values of the
ParseCalculatorArgsactivity. Change theExpressionproperty fromArgExpressiontoExpressionto use the value of the new variable instead of the argument that was previously used.- Modify the flowchart connections so that the
GetStringactivity is now executed first, followed by theParseCalculatorArgsactivity. Previously, theParseCalculatorArgsActivity was executed first.
Figure 8-2 shows the revised workflow.
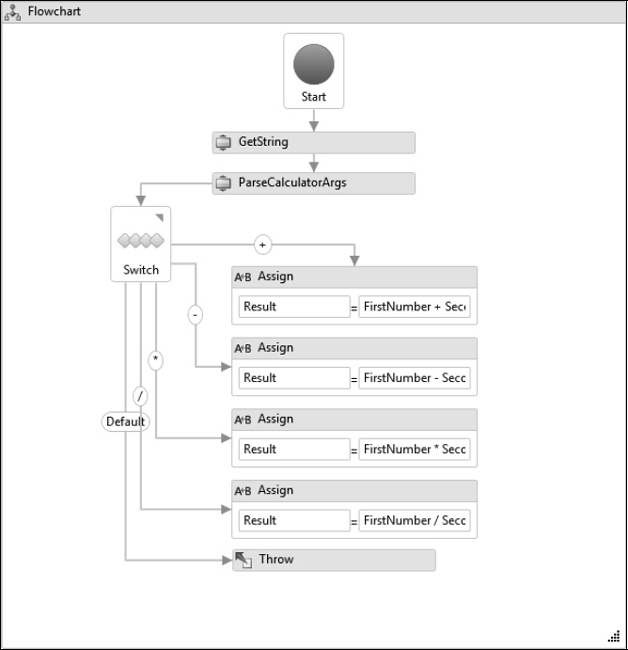
Figure 8-2. BookmarkCalculator workflow
Hosting the Workflow
To host this revised workflow, you need to make significant changes to the Program.cs file compared to previous versions of the calculator example. The major changes are the use of WorkflowApplication instead of WorkflowInvoker and the code to validate and resume a bookmark. Here is the complete Program.cs file that you need for this example:
using System;

using System.Activities;

using System.Linq;

using System.Threading;


namespace BookmarkCalculator

{

    class Program

    {

        static void Main(string[] args)

        {

            Boolean isRunning = true;

            while (isRunning)

            {

                try

                {
The WorkflowApplication class is used to host the workflow instead of WorkflowInvoker that was used in the previous calculator examples. Since this invokes the workflow on a separate thread, an AutoResetEvent is created in order to notify the host application when the workflow completes. After creating a WorkflowApplication instance for the workflow, handlers are added to the Completed, Idle, and OnUnhandledException delegates. The handler code for the Completed delegate retrieves and displays the workflow result.
                    AutoResetEvent syncEvent = new AutoResetEvent(false);

                    WorkflowApplication wfApp =

                        new WorkflowApplication(new BookmarkCalculator());


                    wfApp.Completed = delegate(

                        WorkflowApplicationCompletedEventArgs e)

                    {

                        if (e.CompletionState == ActivityInstanceState.Closed)

                        {

                            Console.WriteLine("Result = {0}", e.Outputs["Result"]);

                        }

                        syncEvent.Set();

                    };
The code that is assigned to the Idle delegate is executed when the workflow becomes idle. This helps to confirm that the workflow thread isn’t occupied while the workflow is waiting for the resumption of the bookmark.
                    wfApp.Idle = delegate(WorkflowApplicationIdleEventArgs e)

                    {

                        Console.WriteLine("Workflow is idle");

                    };


                    wfApp.OnUnhandledException = delegate(

                        WorkflowApplicationUnhandledExceptionEventArgs e)

                    {

                        Console.WriteLine(e.UnhandledException.Message.ToString());

                        return UnhandledExceptionAction.Terminate;

                    };


                    wfApp.Run();
After starting the workflow instance, the code prompts the user to enter an arithmetic expression. If the user indicates that they want to quit the application, the Cancel method is called on the WorkflowApplication instance. Otherwise, the ResumeBookmark method of the WorkflowApplication is called, passing the bookmark name and the arithmetic expression as arguments.
Prior to calling the ResumeBookmark method, the bookmark is validated using a private IsBookmarkValid method.
                    Console.WriteLine("Enter an expression or 'quit' to exit");

                    String expression = Console.ReadLine();


                    if ((String.IsNullOrEmpty(expression)) ||

                        (!String.IsNullOrEmpty(expression) &&

                         expression.Trim().ToLower() == "quit"))

                    {

                        wfApp.Cancel();

                        Console.WriteLine("Exiting program");

                        isRunning = false;

                    }

                    else if (IsBookmarkValid(wfApp, "GetString"))

                    {

                        wfApp.ResumeBookmark("GetString", expression);

                    }


                    syncEvent.WaitOne();

                }

                catch (Exception exception)

                {

                    Console.WriteLine("Error: {0}", exception.Message);

                }

            }

        }
The IsBookmarkValid method is used to validate a bookmark prior to calling the ResumeBookmark method. A bookmark may be validated by calling the GetBookmarks method of the WorkflowApplication instance. This method returns a collection of BookmarkInfo objects, one for each bookmark that is currently active. Calling ResumeBookmark with an invalid bookmark name will cause an exception to be thrown.
        private static Boolean IsBookmarkValid(

            WorkflowApplication wfApp, String bookmarkName)

        {

            Boolean result = false;

            var bookmarks = wfApp.GetBookmarks();

            if (bookmarks != null)

            {

                result =

                    (from b in bookmarks

                     where b.BookmarkName == bookmarkName

                     select b).Any();

            }

            return result;

        }

    }

}
![]() Note If your application is multithreaded, you may need to guard against a race condition where another thread has already resumed a bookmark. Standard .NET locking and thread synchronization techniques should be used within a multithreaded application to protect against this.
Note If your application is multithreaded, you may need to guard against a race condition where another thread has already resumed a bookmark. Standard .NET locking and thread synchronization techniques should be used within a multithreaded application to protect against this.
Testing the Workflow
After building the solution, you should be ready to run the BookmarkCalculator project and exercise the application. Here are some representative results when I run the project:
Enter an expression or 'quit' to exit


Workflow is idle


5 + 3


Result = 8


Workflow is idle


Enter an expression or 'quit' to exit


100 - 75


Result = 25


Workflow is idle


Enter an expression or 'quit' to exit


8 * 7.56


Result = 60.48


Workflow is idle


Enter an expression or 'quit' to exit


123 / 2


Result = 61.5


Workflow is idle


Enter an expression or 'quit' to exit


1+1


Operation Invalid


Workflow is idle


Enter an expression or 'quit' to exit


quit


Exiting program


Press any key to continue . . .
Understanding Workflow Extensions
The previous example illustrated the use of bookmarks to resume processing and to pass data from the host application to a running workflow instance. However, it didn’t address communication in the opposite direction: from the workflow instance to the host application. You will frequently need to communicate in both directions.
For example, in the BookmarkCalculator project that you just completed, the host application immediately resumes the bookmark after the expression is read from the console. It can safely do this because it has intimate knowledge that the workflow has created the bookmark and is awaiting input. The design could be improved if the workflow could notify the host application when it is waiting for input.
You can enable communication between a workflow instance and the host application in a number of ways. One way to accomplish this is to implement WCF messaging at the host and invoke the WCF services from the workflow. Although that is a viable (and perhaps even preferred) approach, a much simpler solution is to use a workflow extension.
![]() Note Chapter 9 covers the use of WCF messaging.
Note Chapter 9 covers the use of WCF messaging.
Workflow extensions are ordinary C# classes that you implement to provide needed functionality to workflow instances. Exactly what functionality they provide is completely up to you. For example, Microsoft provides an out-of-the-box extension that you can use for event tracking (EtwTrackingParticipant).
Extensions are added to a WorkflowApplication instance using the Add method of the Extensions property. Extensions can be added after the WorkflowApplication instance is created but before you begin execution of the workflow. You can also add extensions using the WorkflowInvoker class in a similar manner. Once an extension is added to an instance, it can be retrieved by a custom code activity using the GetExtension method of the activity context. Once the extension has been retrieved, the activity can then invoke any public methods or properties of the extension.
![]() Note Even though the
Note Even though the WorkflowInvoker class supports extensions, it doesn’t support the ability to resume a bookmark. That makes sense since WorkflowInvoker runs the workflow just as if it were a method on the host thread. Because of this, the WorkflowInvoker class is not a suitable way to host a workflow if a bookmark must be resumed from the host application.
A workflow extension solves the problem of workflow-to-host communication because it is accessible by both the host and any workflow instances that have the extension. You can think of it as a communication bridge between the host and a workflow instance. A custom activity can invoke a method on the extension to provide a simple signal (with or without additional data) that can be consumed by the host. The signal itself can be implemented in a number of ways. You can use a C# event, a delegate, a queue, a thread synchronization object such as an AutoResetEvent, and so on.
The GetExtension method of the activity context accepts a single Type parameter that identifies the extension that you want to retrieve. You can specify the extension class, an interface that it implements, or an abstract class that it derives from. The only requirement is that the Type you provide to GetExtension uniquely identifies the extension to retrieve. The advantage to using an interface or abstract class is that it decouples the extension implementation from the contract that is referenced by the custom activity. This allows you to swap out the extension implementation without changing the custom activity. You’ll see an example of this later in the chapter. You can retrieve and use an extension regardless of the base class of your custom code activity (CodeActivity, AsyncCodeActivity, or NativeActivity).
A different instance of an extension can be added to each workflow instance, or a single extension instance can be shared by multiple workflow instances. You might need to share an instance when the extension provides access to common state data that must be shared by multiple workflows.
![]() Caution If a single extension instance is designed to be shared by multiple workflow instances, you need to ensure that any public methods invoked by the workflow instances are thread-safe. Remember that each workflow instance executes on its own thread, so the danger of multiple threads accessing the same method is real.
Caution If a single extension instance is designed to be shared by multiple workflow instances, you need to ensure that any public methods invoked by the workflow instances are thread-safe. Remember that each workflow instance executes on its own thread, so the danger of multiple threads accessing the same method is real.
WF provides the IWorkflowInstanceExtension interface that your extensions can optionally implement. This interface provides your extension class with the ability to reference the current workflow instance and to also add additional extensions to the instance. Here are the members that your extension class must implement if you choose to use this interface:

The SetInstance method is useful if the extension has the need to reference or otherwise identify the current workflow instance. For example, if an extension needs the workflow instance ID it can be obtained from the object that is passed with the SetInstance method. The GetAdditionalExtensions method provides an extension with the opportunity to create and return additional extensions, acting as an extension factory. If a single instance of an extension is shared by multiple workflow instances, these methods are called for each workflow instance.
Using Workflow Extensions
In the example that follows, you will enhance the BookmarkCalculator application that you implemented in the previous example. The goal for this example is to notify the host application when the workflow is waiting for input. To accomplish this, you will implement a simple workflow extension and a custom activity that uses it. The extension supports a single public method that raises an event. The event is handled by the host and signals that the workflow is waiting for input. The host code will be modified to wait for the signal before attempting to resume the bookmark.
You will complete these tasks to implement this example:
- Declare an interface that defines the extension method that is used by a custom activity.
- Implement an extension class that provides a notification to the host application using a C# event.
- Implement a custom activity that calls the
Notifymethod on the extension.- Modify the
BookmarkCalculatorworkflow to use the new custom activity.- Implement the code to host the workflow and react to the notification.
Declaring the Extension Interface
To begin this example, you need to declare a C# interface that defines the public extension method. I prefer to use an interface to define the contract of an extension since it allows you to swap out the extension implementation if necessary.
Add a new C# interface to the ActivityLibrary project for this chapter, and name it IHostNotification. Here is the code for this interface:
using System;


namespace ActivityLibrary

{

    public interface IHostNotification

    {

        void Notify(String message, String bookmarkName);

    }

}
![]() Note I’m using the
Note I’m using the ActivityLibrary project for this interface and the extension that you will implement in the next section. You could argue that these new types really don’t belong in this project since they are not WF activities. If you prefer, you can place them in a different project, as long as it is referenced by all the other projects in this example. In this example, I’m simply using the ActivityLibrary project as a convenience.
Implementing the HostEventNotifier Extension
Next, add a new C# class to the ActivityLibrary project, and name it HostEventNotifier. This is the workflow extension that implements the IHostNotification interface you just declared. Here is the code that you need to implement this class:
using System;

using System.Threading;


namespace ActivityLibrary

{

    public class HostEventNotifier : IHostNotification

    {
The class defines a public C# event that will be handled by the host application. When the Notify method is invoked by a custom activity (implemented in the next section), the event is raised.
Most importantly, the event is raised on a different thread. For convenience, I’m using the thread pool for this purpose. The assumption is that the host application will take a considerable amount of time before it responds to this notification. You don’t want to occupy the workflow thread while you’re waiting for the host to process this event. Raising the event on a different thread allows the Notify method to return immediately.
Since the host may take an unknown amount of time to respond, you could argue that it would be better to use a dedicated thread rather than the thread pool. Thread pool threads are another limited resource that you generally shouldn’t use for long-running tasks. Although I generally agree with that thinking, I used the thread pool since it was easier to implement. I didn’t want to divert your attention to aspects of the code that don’t directly contribute to the example.
        public event EventHandler<HostNotifyEventArgs> Notification;


        public void Notify(string message, String bookmarkName)

        {

            if (Notification != null)

            {

                ThreadPool.QueueUserWorkItem(delegate(Object state)

                {

                    Notification(this,

                        new HostNotifyEventArgs(state as String, bookmarkName));

                }, message);

            }

        }

    }
The HostNotifyEventArgs class defines the event arguments that are used when the event is raised. In this example, the string message and the bookmark name are passed as properties of this class. In your code, you could easily pass any other data that is meaningful to your application.
    public class HostNotifyEventArgs : EventArgs

    {

        public String Message { get; private set; }

        public String BookmarkName { get; private set; }

        public HostNotifyEventArgs(String message, String bookmarkName)

            : base()

        {

            Message = message;

            BookmarkName = bookmarkName;

        }

    }

}
Implementing the NotifyHost Activity
The next step is to implement a new custom activity that will retrieve and use the extension that you just implemented. Add a new activity named NotifyHost to the ActivityLibrary project using the Code Activity add item template. Here is the code for this activity:
using System;

using System.Activities;


namespace ActivityLibrary

{

    public sealed class NotifyHost : CodeActivity

    {

        public InArgument<string> Message { get; set; }

        public InArgument<string> BookmarkName { get; set; }
The code in the Execute method first retrieves the extension, identifying it by the interface that it implements rather than by the concrete class name. Once the extension is retrieved, the Notify method is invoked, passing the value of the string Message and BookmarkName arguments.
        protected override void Execute(CodeActivityContext context)

        {

            IHostNotification extension =

                context.GetExtension<IHostNotification>();

            if (extension != null)

            {

                extension.Notify(Message.Get(context),

                    BookmarkName.Get(context));

            }

        }

    }

}
You should build the solution at this point to make sure that everything builds correctly. This also makes the new custom activity available in the Toolbox.
Declaring the BookmarkCalculatorExtension Workflow
The workflow for this example is almost exactly like the BookmarkCalculator workflow from the previous example. In fact, the only real change is the addition of the new NotifyHost activity.
Create a new project named BookmarkCalculatorEvent using the Workflow Console Application template, and delete the Workflow1.xaml file. Add the new project to the current solution for this chapter. Add a project reference to the ActivityLibrary project.
You can follow these steps to prepare the revised workflow:
- Copy the
BookmarkCalculator.xamlfile from theBookmarkCalculatorproject (the previous example) to this new project. Name the copied workflowBookmarkCalculatorExtension.xamlto indicate that this version uses the workflow extension.- Open the copied workflow in the XML editor, and revise the namespace and workflow names at the top of the Xaml file.
- Reopen the workflow in the designer, and add an instance of the
NotifyHostactivity to the top of the workflow.- Set the
NotifyHost.Messageproperty to"Enter an expression or ’quit’ to exit". Set theNotifyHost.BookmarkNameproperty to"GetString".- Modify the flowchart connections so that the
NotifyHostactivity is executed first, followed by theGetStringactivity.
Figure 8-3 is the modified workflow.
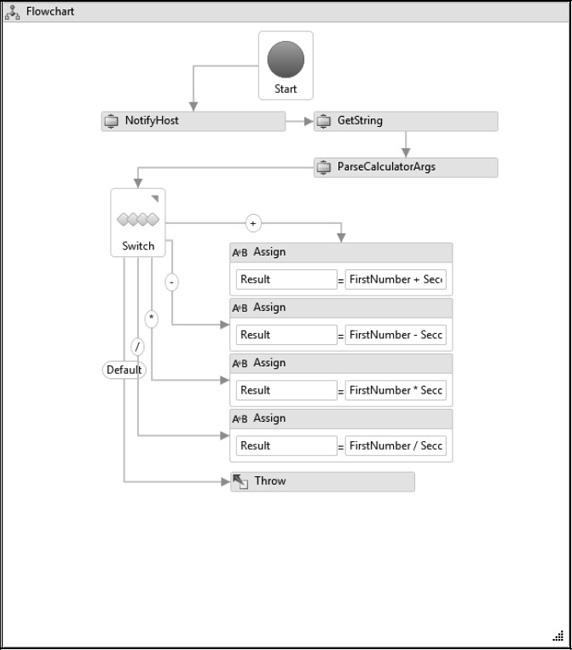
Figure 8-3. BookmarkCalculatorExtension workflow
Hosting the Workflow
The code to host this revised workflow is similar to the code in the BookmarkCalculator project. The primary differences are the code to create and add the workflow extension and to react to the event when it is raised by the workflow. Here is the complete code that you need for the Program.cs file of the BookmarkCalculatorEvent project:
using System;

using System.Activities;

using System.Linq;

using System.Threading;

using ActivityLibrary;


namespace BookmarkCalculatorEvent

{

    class Program

    {

        static void Main(string[] args)

        {

            Boolean isRunning = true;

            while (isRunning)

            {

                try

                {

                    AutoResetEvent syncEvent = new AutoResetEvent(false);


                    WorkflowApplication wfApp =

                        new WorkflowApplication(new BookmarkCalculatorExtension());


                    wfApp.Completed = delegate(

                        WorkflowApplicationCompletedEventArgs e)

                    {

                        if (e.CompletionState == ActivityInstanceState.Closed)

                        {

                            Console.WriteLine("Result = {0}", e.Outputs["Result"]);

                        }

                        syncEvent.Set();

                    };


                    wfApp.Idle = delegate(WorkflowApplicationIdleEventArgs e)

                    {

                        Console.WriteLine("Workflow is idle");

                    };


                    wfApp.OnUnhandledException = delegate(

                        WorkflowApplicationUnhandledExceptionEventArgs e)

                    {

                        Console.WriteLine(e.UnhandledException.Message.ToString());

                        return UnhandledExceptionAction.Terminate;

                    };
Just prior to running the workflow instance, the custom extension is created and added to the WorkflowApplication instance using the Extensions.Add method. The code that resumes the bookmark has been moved into a handler for the Notification event of the extension. When the event is raised by the workflow, the host displays the prompt string that is received with the event, reads a line from the console, and then resumes the bookmark.
                    HostEventNotifier extension = new HostEventNotifier();

                    extension.Notification += delegate(

                        Object sender, HostNotifyEventArgs e)

                    {

                        Console.WriteLine(e.Message);

                        String expression = Console.ReadLine();


                        if ((String.IsNullOrEmpty(expression)) ||

                            (!String.IsNullOrEmpty(expression) &&

                             expression.Trim().ToLower() == "quit"))

                        {

                            wfApp.Cancel();

                            Console.WriteLine("Exiting program");

                            isRunning = false;

                        }

                        else if (IsBookmarkValid(wfApp, e.BookmarkName))

                        {

                            wfApp.ResumeBookmark(e.BookmarkName, expression);

                        }

                    };


                    wfApp.Extensions.Add(extension);

                    wfApp.Run();

                    syncEvent.WaitOne();

                }

                catch (Exception exception)

                {

                    Console.WriteLine("Error: {0}", exception.Message);

                }

            }

        }


        private static Boolean IsBookmarkValid(

            WorkflowApplication wfApp, String bookmarkName)

        {

            Boolean result = false;

            var bookmarks = wfApp.GetBookmarks();

            if (bookmarks != null)

            {

                result =

                    (from b in bookmarks

                     where b.BookmarkName == bookmarkName

                     select b).Any();

            }

            return result;

        }

    }

}
![]() Tip In this example, the host application was passed the bookmark name with the event arguments. This helps reduce the need for the host application to have intimate knowledge of the workflow’s inner workings. Instead of maintaining the string literal for the bookmark name in the workflow and the host application, it is now only defined in the workflow. This design could be improved even further by modifying the
Tip In this example, the host application was passed the bookmark name with the event arguments. This helps reduce the need for the host application to have intimate knowledge of the workflow’s inner workings. Instead of maintaining the string literal for the bookmark name in the workflow and the host application, it is now only defined in the workflow. This design could be improved even further by modifying the GetString activity to retrieve the bookmark name from an argument. This would remove the definition of the bookmark name from all code and push it all the way to the workflow declaration.
Testing the Workflow
At this point you can build the solution and run the BookmarkCalculatorEvent project. Here are my results, which are similar to the previous example:
Workflow is idle


Enter an expression or 'quit' to exit


5 + 3


Result = 8


Workflow is idle


Enter an expression or 'quit' to exit


100 - 75


Result = 25


Workflow is idle


Enter an expression or 'quit' to exit


8 * 7.56


Result = 60.48


Workflow is idle


Enter an expression or 'quit' to exit


123 / 2


Result = 61.5


Workflow is idle


Enter an expression or 'quit' to exit


1 + 1


Result = 2


Workflow is idle


Enter an expression or 'quit' to exit


quit


Exiting program


Press any key to continue . . .
Using an Alternate Extension
One of the key benefits of workflow extensions is the ability to swap out the implementation without changing the workflows that use the extension. You’ll realize this benefit only if the custom activity that uses the extension retrieves it using an interface or base class.
To demonstrate this benefit, you can modify the previous example to use a different workflow extension. This new extension will provide an alternate communication mechanism between the workflow instance and the host application. The previous application used a C# event to notify the host when the workflow was waiting for a bookmark to be resumed. In this alternate example, you will implement the communication using the Queue class instead of an event. Depending on the exact needs of your application, this might actually provide a better communication mechanism. The benefit of a queue is that the host can determine when to process a message from the queue rather than reacting to an event immediately as it is raised. The queue also provides a way to throttle the processing of multiple messages, which might be important if you are hosting multiple workflow instances.
You will complete these tasks to implement this example:
- Implement a new
HostQueueNotifierextension class.- Modify the host application code to use the new extension class and retrieve notification messages using a queue.
Implementing the HostQueueNotifier Extension
To implement the new extension, add a new C# class to the ActivityLibrary project, and name it HostQueueNotifier. Here is the complete code for this class:
using System;

using System.Collections.Generic;

using System.Threading;


namespace ActivityLibrary

{

    public class HostQueueNotifier : IHostNotification

    {
The extension has two public properties that will be used by the host application. The MessageQueue property is the queue containing the messages to be processed. The MessageAvailableEvent property is an AutoResetEvent that provides a signaling mechanism to notify the host that a new message is available for processing.
        public Queue<HostNotifyMessage> MessageQueue { get; private set; }

        public AutoResetEvent MessageAvailableEvent { get; private set; }


        public HostQueueNotifier()

        {

            MessageQueue = new Queue<HostNotifyMessage>();

            MessageAvailableEvent = new AutoResetEvent(false);

        }
The Notify method is similar to the HostEventNotifier that you implemented in the previous example. The primary difference is that the code adds a message to a queue rather than raising an event. This implementation does not need to use a separate thread to add the message since the host application will retrieve the message from the queue using its own thread. The workflow thread has completed its work once the message is added to the queue.
        public void Notify(string message, String bookmarkName)

        {

            lock (MessageQueue)

            {

                MessageQueue.Enqueue(

                    new HostNotifyMessage(message, bookmarkName));

                MessageAvailableEvent.Set();

            }

        }

    }


    public class HostNotifyMessage

    {

        public String Message { get; private set; }

        public String BookmarkName { get; private set; }

        public HostNotifyMessage(String message, String bookmarkName)

        {

            Message = message;

            BookmarkName = bookmarkName;

        }

    }

}
Hosting the Workflow
The only remaining task is to modify the code in the BookmarkCalculatorEvent host application. You need to add the new HostQueueNotifier extension to the workflow instance instead of the HostEventNotifier used in the previous example. You also need to update the code to retrieve the notification from the queue instead of immediately reacting to the event.
Here are the revised sections of code in the Program.cs file:
namespace BookmarkCalculatorEvent

{

    class Program

    {

        static void Main(string[] args)

        {

            Boolean isRunning = true;

            while (isRunning)

            {

                try

                {

…


                    HostQueueNotifier extension = new HostQueueNotifier();

                    wfApp.Extensions.Add(extension);

                    wfApp.Run();
After starting the workflow instance, the host application waits for the MessageAvailableEvent property of the extension (an AutoResetEvent) to be signaled. A signal means that a new message has arrived in the queue. This code assumes that only one message arrives for each signal, but this could easily be modified to process multiple messages from the queue if your application requires that.
                    if (extension.MessageAvailableEvent.WaitOne())

                    {

                        HostNotifyMessage msg = null;

                        lock (extension.MessageQueue)

                        {

                            if (extension.MessageQueue.Count > 0)

                            {

                                msg = extension.MessageQueue.Dequeue();

                            }

                        }


                        if (msg != null)

                        {

                            Console.WriteLine(msg.Message);

                            String expression = Console.ReadLine();

                            if ((String.IsNullOrEmpty(expression)) ||

                                (!String.IsNullOrEmpty(expression) &&

                                 expression.Trim().ToLower() == "quit"))

                            {

                                wfApp.Cancel();

                                Console.WriteLine("Exiting program");

                                isRunning = false;

                            }

                            else if (IsBookmarkValid(wfApp, msg.BookmarkName))

                            {

                                wfApp.ResumeBookmark(

                                    msg.BookmarkName, expression);

                            }

                        }

                    }


                    syncEvent.WaitOne();

                }

                catch (Exception exception)

                {

                    Console.WriteLine("Error: {0}", exception.Message);

                }

            }

        }

…

    }

}
Testing the Workflow
You should now be able to build the solution and run the BookmarkCalculatorEvent project that you just modified. The results that you see should be consistent with the previous example.
This example illustrates a couple of points. First, workflow extensions are a flexible way to provide additional functionality to workflow instances. Second, there are multiple ways to provide communication between a workflow instance and the host application.
Understanding the ActivityAction
Since the overall theme of this chapter is communication between the host application and workflow instances, there is one additional mechanism that I will present: the ActivityAction class. This class (along with the closely related ActivityFunc class) provides a general-purpose extensibility point for workflows that can be used for much more than simple communication. This section and the subsequent example will focus only on its use as a communication mechanism.
The ActivityAction class provides a way to defer the choice of activity to execute until runtime. It declares a planned hole that must be filled at runtime before the workflow can be executed. Within the workflow model, an InvokeAction activity can be declared that executes an ActivityAction activity with a defined signature. Just like a C# method, the signature consists of the number and type of input parameters. At design time, the InvokeActivity is not aware of the exact type of activity that it is invoking. It is only aware of the signature of that activity. The activity to execute is supplied externally at runtime from outside the workflow model. When the InvokeAction is executed, the ActivityAction that is assigned to it is executed. In turn, the ActivityAction identifies a handler activity that is executed.
![]() Tip Remember that the
Tip Remember that the ActivityAction isn’t the final activity that you’re attempting to execute. The real goal is to execute the activity that is assigned to the ActivityAction.Handler property.
The general concept is no different from a C# delegate or event (or even late binding in the COM world). In all of these cases, the invoking code is working with a method signature, not the actual concrete method. The assignment of the concrete method to execute is made at runtime, not design time. You can think of the ActivityAction and ActivityFunc classes as the way to declaratively execute a delegate to an activity.
![]() Note If you require only a simple way to notify the host of an event, one of the previous implementations that used a workflow extension and an event or queue is a much simpler approach. The
Note If you require only a simple way to notify the host of an event, one of the previous implementations that used a workflow extension and an event or queue is a much simpler approach. The ActivityAction mechanism is a powerful, yet somewhat complicated, way to implement host communication.
The ActivityAction class is used when you need to execute an activity that does not return a result. The ActivityFunc class works in a similar manner, but it supports execution of an activity with a result value.
The ActivityAction and ActivityFunc classes are really a family of related generic classes designed to support a varying number of input arguments. For example, ActivityAction<T> supports a single input argument, while ActivityAction<T1,T2> supports two input arguments. Likewise, ActivityFunc<T, TResult> supports a single input and output argument, while ActivityFunc<T1, T2, TResult> supports two input arguments and one output argument. WF provides variations of these classes to support up to 16 input arguments.
Within the workflow model, you declaratively use the InvokeAction or InvokeFunc activity to execute an ActivityAction or ActivityFunc, respectively. Just like the activities they execute, there are variations of these classes that support up to 16 input arguments. The version of InvokeAction or InvokeFunc that you use must match the signature of the ActivityAction or ActivityFunc that you want to execute. For example, you would need to use an InvokeAction<T1, T2, T3> to execute an ActivityAction<T1, T2, T3>.
![]() Note The
Note The InvokeAction and InvokeFunc classes are activities, but they lack enhanced designer support and are not currently added to the Toolbox by default. Therefore, before you use them, you need to first add them to the Visual Studio Toolbox. The alternative is to implement a declarative custom activity in code that includes these activities.
If you are implementing a custom activity that derives from NativeActivity (or NativeActivity<TResult), you have an additional way to execute an ActivityAction or ActivityFunc. The NativeActivityContext provides a set of overloaded methods named ScheduleAction and ScheduleFunc. Just like everything else associated with these classes, there are overloads that allow you to pass up to 16 typed input arguments. These methods do essentially the same thing as InvokeAction and InvokeFunc but do so entirely in code instead of declaratively.
Here is a representative sample of the most important properties of ActivityAction. It is only a representative sample since there are so many variations of this class to support a varying number of input arguments. The properties for an ActivityAction<T> that supports a single input argument would look like this:

If you are using the ActivityAction<T1,T2,T3> version, which supports three arguments, the properties would look like this:
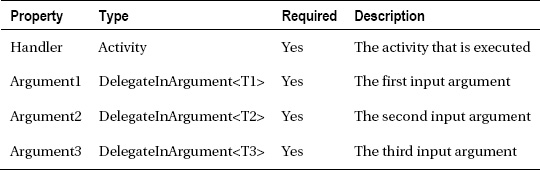
The ActivityFunc class supports a similar set of properties. Here are the most important properties for the ActivityFunc<T, TResult> that supports a single input and output argument:
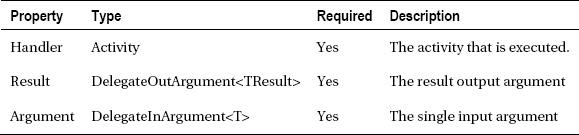
If you use the ActivityFunc<T1, T2, T3, TResult> that supports three input arguments and one output argument, the properties would look like this:

The ActivityAction mechanism is flexible and can be implemented and used in several different ways. Figure 8-4 illustrates one way to use it that corresponds to the way it is used in the following example.
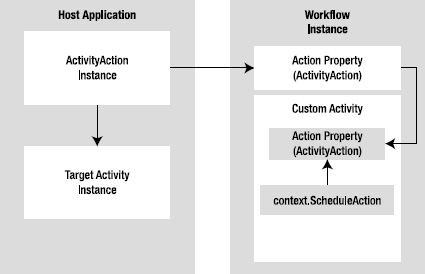
Figure 8-4. ActivityAction usage
In Figure 8-4, a custom code activity is developed that executes an ActivityAction. This custom activity has a public property of type ActivityAction named Action. The activity code uses the ScheduleAction method of the activity context to schedule execution of the ActivityAction that is assigned to the Action property. The workflow also declares an Action property of the same type (ActivityAction). The value of this property is bound to the Action property of the custom activity.
At runtime, the host application creates an instance of an ActivityAction. The Action property of the workflow instance is set to this activity. The ActivityAction references an instance of another activity that is the real target activity to be executed.
Putting it all together, when the workflow is started, the custom activity executes and schedules execution of the ActivityAction that was assigned to the workflow by the host application. The ActivityAction executes the activity that was constructed by the host application and assigned to the ActivityAction.Handler property.
Using the ActivityAction
In the example that follows, you will implement yet another version of the BookmarkCalculator application. This time, you will use an ActivityAction as a communication mechanism between the workflow instance and the host application.
The host application code will create an ActivityAction and assign it to a property of the workflow. That property will, in turn, be bound to a similar property of a custom activity. The custom activity will schedule execution of the ActivityAction that was set for the property. In this example, the ActivityAction that is created by the host application will use InvokeMethod to execute a method in the host class.
You will complete these tasks to complete this example:
- Implement a new
NotifyHostWithActioncustom activity.- Declare the
BookmarkCalculatorActionworkflow.- Manually modify the workflow Xaml file to bind the workflow property to the custom activity.
- Implement the code to host the workflow.
Implementing the NotifyHostWithAction Activity
Add a new Code Activity to the ActivityLibrary project, and name it NotifyHostWithAction. This new custom activity schedules execution of the ActivityAction that is exposed as a property. Here is the complete code for this class:
using System;

using System.Activities;


namespace ActivityLibrary

{
Two string input arguments are defined. The first is used to provide a prompt that is passed to the target activity, and the second is used to pass the bookmark name that should be resumed by the host application. The Action property is the ActivityAction to be executed. It defines two string arguments, which correspond to the two input arguments of this custom activity (Prompt and BookmarkName).
It is critical to note that the ActivityAction to be executed is declared as a normal C# property instead of a workflow argument. This is necessary since the InvokeAction activity must work with a direct reference to an ActivityAction instance.
Also note that the ContentProperty attribute has been applied to this class. This attribute identifies the property that is associated with the contents of this activity when it is declared in a Xaml document. The contents value is the one that is declared without specifying the property name as an attribute. You will use this feature when you manually modify the Xaml file for the workflow that uses this activity.
    [System.Windows.Markup.ContentProperty("Action")]

    public sealed class NotifyHostWithAction : NativeActivity

    {

        public InArgument<String> Prompt { get; set; }

        public InArgument<String> BookmarkName { get; set; }

        public ActivityAction<String, String> Action { get; set; }


        protected override void Execute(NativeActivityContext context)

        {
The NativeActivityContext provides the ScheduleAction method, which is used to schedule execution of the ActivityAction that is assigned to the Action property. The overload of this method that supports two input arguments is used to pass the two string arguments.
            if (Action != null)

            {

                context.ScheduleAction(Action,

                    Prompt.Get(context), BookmarkName.Get(context));

            }

        }

    }

}
Declaring the BookmarkCalculatorAction Workflow
Create a new project named BookmarkCalculatorAction using the Workflow Console Application template. Add the new project to the solution for this chapter, and add a project reference to the ActivityLibrary project in the same solution.
Delete the Workflow1.xaml file that was created with the project since it won’t be needed. Instead, copy the BookmarkCalculatorExtension.xaml file from the previous example to this new project. Name the copied file BookmarkCalculatorAction.xaml. Open the Xaml file in the XML editor (Code View), and change the namespace and class entries at the top of the file to correspond with the new name. Rebuild the solution before proceeding with the remaining steps.
Open the workflow in Design View, and follow these steps to complete the declaration of the workflow:
- Open the argument editor for the workflow, and add a new property named
Actionwith a type ofActivityAction<String,String>. Most importantly, make sure that you specify the type of argument as Property. This must not be an input or output argument.- Remove the
NotifyHostactivity from the workflow since it is no longer needed.- Replace the
NotifyHostwith an instance of the newNotifyHostWithActionactivity. Set thePromptproperty to"Enter an expression or ’quit’ to exit"and theBookmarkNameproperty to"GetString". TheActionproperty cannot be directly set within the designer and will be handled in the next section.- Drag a connection from the start of the flowchart to the
NotifyHostWithActionactivity so this activity is executed first. Drag another connection from this activity to theGetStringactivity.
The workflow should look like Figure 8-5.
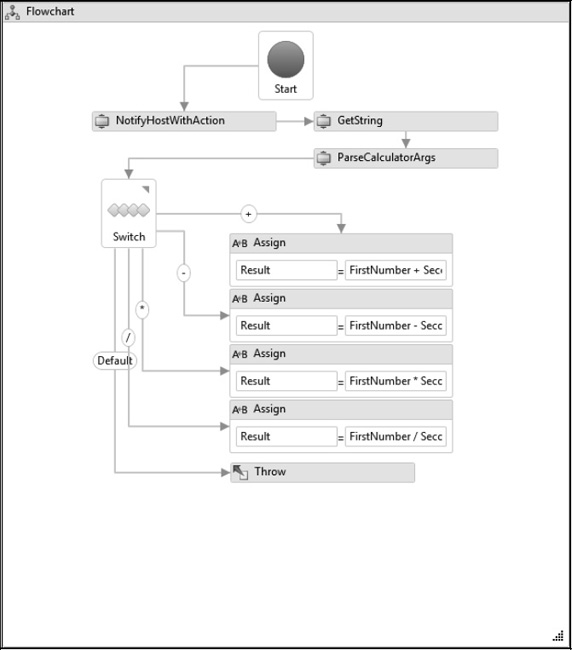
Figure 8-5. BookmarkCalculatorAction workflow
Binding the Action Property
There is one remaining step before the workflow declaration is complete. The Action property of the NotifyHostWithAction activity must reference the Action property of the workflow. To accomplish this, a PropertyReference must be used. This is a specialized type of activity that enables the binding of two properties to each other. However, the use of the PropertyReference is not supported by the workflow designer. You’ll need to manually edit the Xaml file to add this binding element.
After saving your changes, close the Design View for the workflow, and reopen it using the XML editor (Code View). Find the reference to the NotifyHostWithAction activity in the file. Add the PropertyReference element shown here, which binds the Action property of the activity to the Action property of the workflow. Here is the revised NotifyHostWithAction element:
        <a:NotifyHostWithAction Prompt="Enter an expression or 'quit' to exit"

            BookmarkName="GetString" >

          <PropertyReference x:TypeArguments="ActivityAction(x:String,x:String)"

              PropertyName="Action" />

        </a:NotifyHostWithAction>
The property name (Action) of the activity is not specified since this property was identified as the ContentProperty in the activity.
![]() Warning One unfortunate by-product of this manual change is that the workflow designer doesn’t know how to handle it. You can open the workflow in the designer and make additional changes, but when the workflow is saved, an additional entry containing
Warning One unfortunate by-product of this manual change is that the workflow designer doesn’t know how to handle it. You can open the workflow in the designer and make additional changes, but when the workflow is saved, an additional entry containing <x:Null /> is added under the PropertyReference. Ideally, Microsoft will eventually provide a better way to add and maintain a PropertyReference. If you do need to open this workflow in the designer, you will need to remove the offending <x:Null /> line after you save your changes.
Hosting the Workflow
The code that hosts the workflow must supply an ActivityAction to the Action property of the workflow after it has been constructed. The ActivityAction is really just a generalized way to execute another activity, so another activity must be created and assigned to the ActivityAction.Handler property. For this example, an InvokeMethod activity is created and assigned to the ActivityAction as the activity to execute. The InvokeMethod will execute a static method of the Program class to handle the notification from the workflow.
Here is the complete code for the Program.cs file in the BookmarkCalculatorAction project:
using System;

using System.Activities;

using System.Activities.Statements;

using System.Linq;

using System.Threading;


namespace BookmarkCalculatorAction

{

    class Program

    {

        private static Boolean isRunning = true;

        private static WorkflowApplication wfApp;


        static void Main(string[] args)

        {

            while (isRunning)

            {

                try

                {

                    AutoResetEvent syncEvent = new AutoResetEvent(false);

                    BookmarkCalculatorAction wf = new BookmarkCalculatorAction();
After constructing an instance of the workflow, an ActivityAction<T1,T2> activity is constructed and assigned to the Action property of the workflow. An InvokeMethod activity is created and assigned to the ActivityAction.Handler property. The properties of the InvokeMethod activity are set to execute the static ReceivedNotification method of this class, which is defined to accept two string arguments. The string argument values that are passed into the ActivityAction<T1,T2> are passed as parameters to this static method. The InArgument constructor that provides access to the activity context is used to retrieve the current value of each argument.
                    wf.Action = new ActivityAction<String, String>

                    {

                        Argument1 = new DelegateInArgument<String>(),

                        Argument2 = new DelegateInArgument<String>(),

                        Handler = new InvokeMethod

                        {

                            TargetType = typeof(Program),

                            MethodName = "ReceivedNotification",

                            Parameters =

                            {

                                new InArgument<String>(

                                    ac => wf.Action.Argument1.Get(ac)),

                                new InArgument<String>(

                                    ac => wf.Action.Argument2.Get(ac))

                            }

                        }

                    };


                    wfApp = new WorkflowApplication(wf);

                    wfApp.Completed = delegate(

                        WorkflowApplicationCompletedEventArgs e)

                    {

                        if (e.CompletionState == ActivityInstanceState.Closed)

                        {

                            Console.WriteLine("Result = {0}", e.Outputs["Result"]);

                        }

                        syncEvent.Set();

                    };


                    wfApp.Idle = delegate(WorkflowApplicationIdleEventArgs e)

                    {

                        Console.WriteLine("Workflow is idle");

                    };


                    wfApp.OnUnhandledException = delegate(

                        WorkflowApplicationUnhandledExceptionEventArgs e)

                    {

                        Console.WriteLine(e.UnhandledException.Message.ToString());

                        return UnhandledExceptionAction.Terminate;

                    };


                    wfApp.Run();

                    syncEvent.WaitOne();

                }

                catch (Exception exception)

                {

                    Console.WriteLine("Error: {0}", exception.Message);

                }

            }

        }


        private static Boolean IsBookmarkValid(

            WorkflowApplication wfApp, String bookmarkName)

        {

            Boolean result = false;

            var bookmarks = wfApp.GetBookmarks();

            if (bookmarks != null)

            {

                result =

                    (from b in bookmarks

                     where b.BookmarkName == bookmarkName

                     select b).Any();

            }

            return result;

        }
The static ReceivedNotification method is the target of the InvokeMethod activity that was constructed earlier in the code. It is invoked when the NotifyHostWithAction activity is executed from within the workflow. The string prompt and bookmark name arguments that are passed as parameters to this method originated as the Prompt and BookmarkName properties of the NotifyHostWithAction activity.
This method has now become an externally defined extension of the workflow instance that is executed on the workflow thread. Because you shouldn’t occupy the workflow thread for longer than is necessary, the actual work of this method is performed using the thread pool. An Action<T1,T2> delegate is used as a convenient way to execute this code on a thread pool thread. The code to resume the bookmark is similar to the previous examples.
        public static void ReceivedNotification(

            String prompt, String bookmarkName)

        {

            Action<String, String> asyncWork = (msg, bm) =>

            {

                Console.WriteLine(msg);

                String expression = Console.ReadLine();


                if ((String.IsNullOrEmpty(expression)) ||

                    (!String.IsNullOrEmpty(expression) &&

                     expression.Trim().ToLower() == "quit"))

                {

                    wfApp.Cancel();

                    Console.WriteLine("Exiting program");

                    isRunning = false;

                }

                else if (IsBookmarkValid(wfApp, bm))

                {

                    wfApp.ResumeBookmark(bm, expression);

                }

            };


            asyncWork.BeginInvoke(prompt, bookmarkName,

                ar => { ((Action<String, String>)ar.AsyncState).EndInvoke(ar); },

                asyncWork);

        }

    }

}
Testing the Workflow
You should be able to build the entire solution and run the BookmarkCalculatorAction project. The results should be consistent with the previous calculator examples.
Using an ActivityAction is the most complex way to provide a simple notification to the host application. The real power of this approach is in the flexibility that it provides. In this example, you executed a simple static method of the host class. But this extension point is extremely flexible, and you could have just as easily executed another type of activity that contained additional business logic. This mechanism allows you to defer the decision as to which activity to execute until runtime when the workflow is executed. The ultimate in declarative late binding!
Using the InvokeAction Activity
As an alternative to developing the custom NotifyHostWithAction activity, you can use the InvokeAction activity to declaratively execute an ActivityAction. If you want to see this in action, you can follow these steps to modify the BookmarkCalculatorAction workflow that you declared for the previous example:
- You first need to add the
InvokeAction<T1,T2>activity to the Visual Studio Toolbox if it is not already there. To accomplish this, follow the steps outlined in the “Adding Activities to the Toolbox” sidebar.- Open the
BookmarkCalculatorActionworkflow in the designer.- Delete the
NotifyHostWithActionactivity from the workflow.- Add an instance of the
InvokeAction<T1,T2>activity to the workflow to replace theNotifyHostWithActionactivity that you just deleted. SelectSystem.Stringas the type for theT1andT2generic parameters. Set theArgument1property to"Enter an expression or ’quit’ to exit"and theArgument2property to"GetString".- Drag a connection from the start of the flowchart to the
InvokeAction<String,String>activity so this activity is executed first. Drag another connection from this activity to theGetStringactivity.
Structurally, the workflow looks the same as the previous example shown in Figure 8-5. The only difference is that the NotifyHostWithAction activity has been replaced with an InvokeAction<String,String>.
After saving your changes, close and reopen the workflow in the XML editor. Locate the InvokeAction in the Xaml file, and add the same PropertyReference that you previously added to the NotifyHostWithAction activity. Here is the updated InvokeAction element with the PropertyReference:
        <InvokeAction x:TypeArguments="x:String, x:String"

            Argument1="Enter an expression or 'quit' to exit"

            Argument2="GetString">

          <PropertyReference x:TypeArguments="ActivityAction(x:String, x:String)"

              PropertyName="Action" />

        </InvokeAction>
Since you haven’t made any changes to the overall signature of the workflow, there are no changes necessary to the host application code. After building the project, you should be able to execute the BookmarkCalculatorAction project and see the same consistent results.
Adding Activities to the Toolbox
Understanding the Pick Activity
In the previous examples, the workflow waited for a single bookmark to be resumed. Another frequently used pattern is to wait for multiple bookmarks at the same time. Each bookmark may be associated with a different type of external event. When one of the events is received (its bookmark is resumed), the other bookmarks are canceled.
Since this is a frequently used pattern, Microsoft provides the Pick and PickBranch activities that you can use to implement it in your workflows. The Pick activity is the container for a collection of PickBranch activities. Each PickBranch activity represents one possible path of execution that is triggered by the resumption of a unique bookmark.
Here is the most important property of the Pick activity:

And here are the most important properties of the PickBranch activity:

The Pick activity immediately schedules execution of all of its PickBranch activities. Each PickBranch immediately schedules execution of its Trigger activity. The job of the Trigger activity is to create a bookmark. When one of the bookmarks is resumed, the Trigger activity of that PickBranch completes, and execution of the Action activity for that PickBranch is scheduled. Once one of the Trigger activities completes, all other PickBranch Trigger activities are canceled.
It is worth noting that the PickBranch activity supports variables. This allows you to define private workflow variables that are scoped to a single path of execution and are not shared with other branches.
![]() Note You can use any custom activity that creates a bookmark as the
Note You can use any custom activity that creates a bookmark as the Trigger of a PickBranch. In addition to custom activities, you can also use the WCF messaging activities provided with WF. These activities use bookmarks as the underlying mechanism to handle incoming WCF messages. The Delay activity can also be used as a trigger.
Using the Pick Activity
To demonstrate the use of the Pick and PickBranch activities, I’ve chosen a simple problem reporting workflow. Each workflow instance represents a problem that has been reported and must be researched and resolved. The workflow supports a small set of bookmarks that mimic status changes to the problem as it is being reviewed and corrected. Just as you saw in an earlier example, the workflow uses an extension to raise an event that is handled by the host application. The event is used to notify the host that the status has changed and that the workflow is waiting for resumption of one of the bookmarks. The workflow really doesn’t accomplish any useful work, other than to notify the host of the status changes as they occur.
To add a small twist to this example, I’ve chosen to filter the set of bookmarks that are created based on the current status. A set of If activity instances is used to perform the filtering. The workflow starts with a status of Triage, assuming that a problem is first reviewed to determine whether further investigation is necessary. From this status, the workflow can progress to the Active status or directly to Closed. From the Active status, it can move to the Resolved status. And finally, from Resolved, it can move to Closed.
You will complete these tasks to implement this example:
- Implement a custom
WaitForBookmarkactivity.- Implement the
ProblemReportingworkflow.- Implement a host application that allows you to enter a new status to resume one of the available bookmarks.
Implementing the WaitForBookmark Activity
This example uses a simple custom activity to create a bookmark. The activity doesn’t perform any real work other than to create the named bookmark. But it satisfies the requirements of this example and allows each PickBranch to be externally triggered with a different named bookmark.
To implement this activity, add a new Code Activity to the ActivityLibrary project, and name it WaitForBookmark. Here is the code for this activity:
using System;

using System.Activities;


namespace ActivityLibrary

{

    public sealed class WaitForBookmark : NativeActivity

    {

        [RequiredArgument]

        public InArgument<String> BookmarkName { get; set; }
Unlike the previous activities that created a bookmark, this activity does not provide a callback to execute when the bookmark is resumed. The callback is needed when you need to retrieve data that is passed when the bookmark is resumed. In this case, no additional data will be passed with the bookmark. The bookmark is created as a trigger mechanism only.
        protected override void Execute(NativeActivityContext context)

        {

            context.CreateBookmark(BookmarkName.Get(context));

        }


        protected override bool CanInduceIdle

        {

            get { return true; }

        }

    }

}
Rebuild the solution to ensure that the WaitForBookmark activity builds successfully and is added to the Toolbox.
Creating the Console Project
Create a new Workflow Console Application project, and name it ProblemReporting. Add the new project to the current solution for this chapter, and delete the Workflow1.xaml file that was created. Add a project reference to the ActivityLibrary project in the same solution. Add a new workflow named ProblemReporting to the project, and add a Flowchart as the root activity of the workflow.
Defining Variables
The ProblemReporting workflow requires a single variable that maintains the current status. You can add this variable immediately since it is scoped by the root Flowchart activity. Here is the variable that you should add:

Please note that the variable requires a default string value.
Declaring the ProblemReporting Workflow
You should follow these steps to complete the workflow declaration:
- Add a
NotifyHostactivity to the top of the rootFlowchartactivity. This activity was implemented and used in the previous examples in this chapter. Set theNotifyHost.Messageproperty toString.Format("New status: {0}", Status).- Add a connection from the starting point of the flowchart to the
NotifyHostactivity.- Add a
Pickactivity directly below theNotifyHost. Add a connection from theNotifyHostto thePickactivity. ThePickactivity initially has twoPickBranchactivities. You will need a total of threePickBranchactivities, so you can add an additional one now. You may need to drill down into thePickactivity by double-clicking it before you can add a new branch.- Add an
Ifactivity as theTriggerof the leftmostPickBranch. Set theIf.Conditionproperty toStatus = "Triage". The purpose of theIfactivity is to use the value of theStatusvariable to determine whether the bookmark should be created.- Add a
WaitForBookmarkactivity to theIf.Thenproperty. Set theWaitForBookmark.BookmarkNameproperty to"Active".- Add a
Delayactivity to theIf.Elseproperty. Set theDelay.Durationproperty toTimeSpan.MaxValue. TheDelayactivity is needed to balance both sides of theIfactivity. Even if theWaitForBookmarkis not executed (the condition is false), you still need to execute an activity that creates a bookmark. TheDelayactivity with itsDurationset to the maximum possible value satisfies that requirement.- Add an
Assignactivity to theActionof the leftmostPickBranch. Set theAssign.Toproperty toStatusand theAssign.Valueproperty to"Active". This completes the firstPickBranch, which is shown in Figure 8-6.- The second and third
PickBranchinstances have the same structure as the first. Add anIfactivity to thePickBranch.Targetand anAssignactivity to thePickBranch.Action. Add aWaitForBookmarkto theIf.Thenand aDelayto theIf.Else. Instead of declaring these branches step by step, you can choose to copy and paste the firstPickBranchand then delete the unused defaultPickBranchinstances.- Set the property values for all the activities in the second and third
PickBranchinstances. Please refer to the property values in the following tables. Figure 8-7 shows the completedPickactivity with threePickBranchinstances.- Return to the top level of the flowchart, and add a
FlowDecisiondirectly below thePickactivity. Add a connection from the bottom of thePickactivity to the top of theFlowDecision.- Set the
FlowDecision.Conditionproperty toStatus = "Closed". Drag a connection from the right side of theFlowDecision(the false side) to the side of theNotifyHostactivity. This causes the workflow to loop until theStatusis equal to"Closed". Figure 8-8 shows the completed top-level view of the workflow.

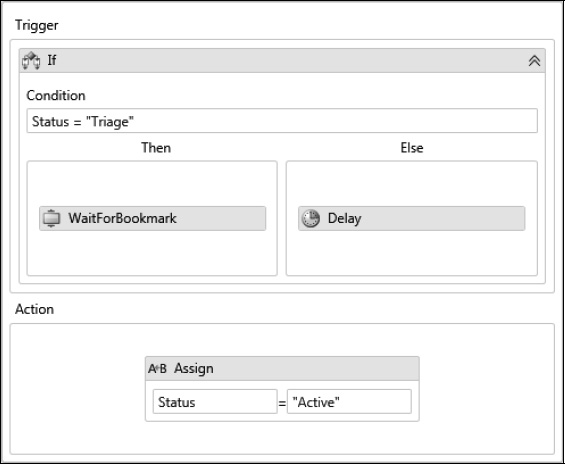
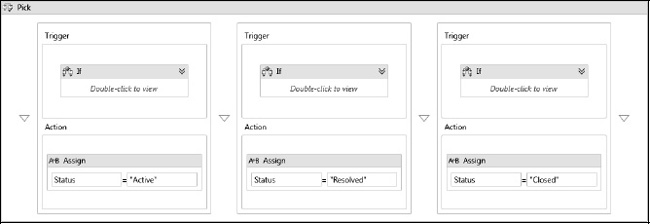
Figure 8-7. Completed Pick activity
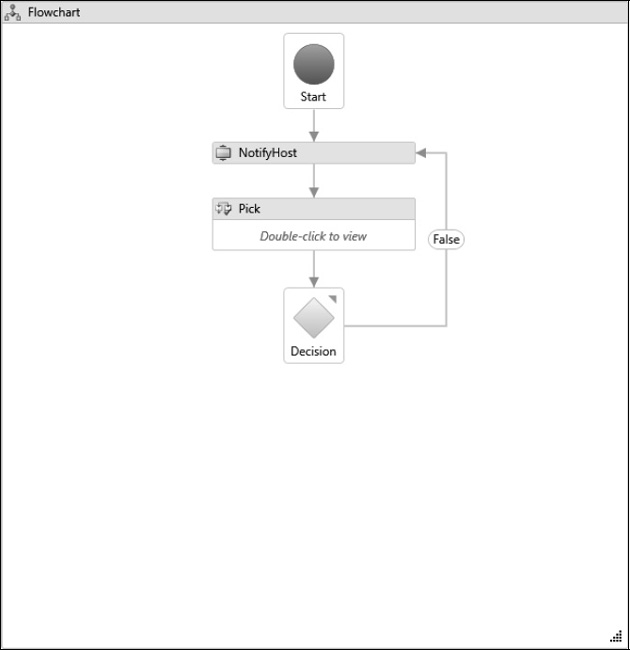
Figure 8-8. Completed ProblemReporting workflow
Hosting the Workflow
The code to host the workflow uses the HostEventNotifier extension developed earlier in the chapter. Here is the completed Program.cs file in the ProblemReporting project:
using System;

using System.Activities;

using System.Activities.Hosting;

using System.Linq;

using System.Threading;

using ActivityLibrary;


namespace ProblemReporting

{

    class Program

    {

        static void Main(string[] args)

        {

            try

            {

                AutoResetEvent syncEvent = new AutoResetEvent(false);


                WorkflowApplication wfApp =

                    new WorkflowApplication(new ProblemReporting());


                wfApp.Completed = delegate(

                    WorkflowApplicationCompletedEventArgs e)

                {

                    syncEvent.Set();

                };


                wfApp.Idle = delegate(WorkflowApplicationIdleEventArgs e)

                {

                    Console.WriteLine("Workflow is idle");

                };


                wfApp.OnUnhandledException = delegate(

                    WorkflowApplicationUnhandledExceptionEventArgs e)

                {

                    Console.WriteLine(e.UnhandledException.Message.ToString());

                    return UnhandledExceptionAction.Terminate;

                };


                HostEventNotifier extension = new HostEventNotifier();

                extension.Notification += delegate(

                    Object sender, HostNotifyEventArgs e)

                {

                    Console.WriteLine(e.Message);
When an event is received from the workflow, the collection of all available bookmarks is displayed on the console. This prompts the user with a list of available actions.
                    var bookmarks = wfApp.GetBookmarks();

                    if (bookmarks != null && bookmarks.Count > 0)

                    {

                        Console.WriteLine("Select one of these available actions:");

                        foreach (BookmarkInfo bookmark in bookmarks)

                        {

                            Console.WriteLine("->{0}", bookmark.BookmarkName);

                        }

                    }


                    Boolean isWaitingForChoice = true;

                    while (isWaitingForChoice)

                    {

                        String newAction = Console.ReadLine();

                        if (IsBookmarkValid(wfApp, newAction))

                        {

                            isWaitingForChoice = false;

                            wfApp.ResumeBookmark(newAction, null);

                        }

                        else

                        {

                            Console.WriteLine("Incorrect choice!");

                        }

                    }

                };


                wfApp.Extensions.Add(extension);

                wfApp.Run();

                syncEvent.WaitOne();

            }

            catch (Exception exception)

            {

                Console.WriteLine("Error: {0}", exception.Message);

            }

        }


        private static Boolean IsBookmarkValid(

            WorkflowApplication wfApp, String bookmarkName)

        {

            Boolean result = false;

            var bookmarks = wfApp.GetBookmarks();

            if (bookmarks != null)

            {

                result =

                    (from b in bookmarks

                     where b.BookmarkName == bookmarkName

                     select b).Any();

            }

            return result;

        }

    }

}
Testing the Workflow
After building the solution, run the ProblemReporting project. Here is a representative sample of my results:
Workflow is idle


New status: Triage


Select one of these available actions:


->Active


->Closed


Active


Workflow is idle


New status: Active


Select one of these available actions:


->Resolved


Resolved


Workflow is idle


New status: Resolved


Select one of these available actions:


->Closed


Closed
From these results you can see that the list of available actions (bookmarks) varies depending on the current status. For example, when the workflow first begins, the status is Triage, and the available actions are Active and Closed. This was accomplished using the If activity as the trigger for each PickBranch. If you used the WaitForBookmark directly as the trigger, all bookmarks would be available regardless of the current status.
Summary
This chapter focused on the various ways to implement direct communication between the host application and a running workflow instance. The chapter began with a discussion of the bookmark mechanism. Bookmarks are the WF mechanism that support long-running workflows. Long-running workflows are temporarily suspended while they are waiting for external input. Bookmarks also allow you to pass data back to the workflow as the bookmark is resumed. The first example of the chapter revisited the command-line calculator and revised it to use the bookmark mechanism.
Workflow extensions are a general-purpose mechanism used to provide additional functionality to workflow instances and were covered next. They can serve a wide variety of purposes, but their use as a communication mechanism for sending data back to the host application was demonstrated in the next few examples. The ActivityAction activity was also demonstrated as a possible way to send data from a running workflow instance to the host application.
One common workflow pattern is to wait for multiple external events, continuing with the execution of the workflow when one of the events is received. The Pick and PickBranch activities are used to support this pattern and were demonstrated in the final sections of the chapter.
In the next chapter, you will learn how to implement message-based communication using the WCF integration features of WF.