

One of the most important capabilities of Windows Workflow Foundation (WF) is the ability to persist workflow instances (save and reload them at a later time). Without persistence, the lifetime of your workflows is limited. When the host application is shut down, any workflow instances simply cease to exist. Without workflow persistence, the development of long-running workflow applications would be difficult, if not completely impossible.
The chapter begins with an overview of the workflow persistence support in WF. The discussion includes information on how to enable persistence when you are using the WorkflowApplication class to host your workflows. Other sections describe how persistence is used with workflow services that are hosted by the WorkflowServiceHost class. Coverage of the SqlWorkflowInstanceStore, which supports persistence to a SQL Server database, is also included.
The chapter includes hands-on examples that demonstrate persistence with WorkflowApplication and WorkflowServiceHost.
![]() Note Chapter 12 continues with the example projects that you develop in this chapter to extend and customize workflow persistence.
Note Chapter 12 continues with the example projects that you develop in this chapter to extend and customize workflow persistence.
The Need for Workflow Persistence
Up to this point, you have seen workflows that perform only short-lived tasks. You have seen that multiple instances of a workflow can be started by an application, but each workflow exists only in memory. Although these in-memory workflows are very useful and can be used to accomplish many tasks, they are limited. When the host application is stopped, the workflow instances cease to exist. Their lifetime is tightly bound to a single host application.
Workflow persistence means to save the state of a workflow instance to a durable store such as a SQL database or file. Once persisted, the workflow can be removed from memory and reloaded at a later time. Here are some of the reasons to use persistence with your workflows:
- Human interaction tasks: Workflows that are designed to interact with humans are typically long running. They may take minutes, hours, days, or weeks to complete. It isn’t practical to keep such a workflow alive in memory for that length of time. Persistence of the workflow provides a way to unload it while it is waiting for the next human event and then reload it when the event is received.
- Scalability: In-memory workflows are limited to execution within a single application host. To provide scalability, some applications may require multiple hosts, perhaps running on multiple servers. A persisted workflow can be loaded and executed on a different server than the one that started it.
- Resource consumption: Without a persistence mechanism, workflows must stay in memory. They have nowhere else to go. If a workflow is waiting for an external input, it is actually idle. With a persistence mechanism in place, the idled workflow can be persisted and unloaded from memory. Once the external stimulus is received, the workflow is loaded back into memory, and processing can continue. Swapping workflows in and out of memory like this frees resources, making them available for workflows that are actively executing.
- Application flexibility: An in-memory workflow can be executed only by the application that started it. Perhaps you have a web-based application that starts a workflow, but you also want to use more traditional smart-client applications (for example, Windows Forms) to work with the workflow. Persisting the workflow allows it to be reloaded by an entirely different class of application.
Not every application requires persistence. If you require only short-lived workflows that execute within a single application, you can probably do without persistence. On the other hand, if your workflows model long-running tasks that are designed around human interactions or if you need the flexibility to tune the performance of your application, then you likely need persistence.
Understanding Workflow Persistence
Workflow persistence is supported by the primary self-hosting classes (WorkflowApplication and WorkflowServiceHost) included with WF. Persistence is not supported by WorkflowInvoker since this class wasn’t designed to handle long-running workflows. You can also use persistence when you use one of the Microsoft-provided hosting environments such as IIS to host workflow services.
Instance Stores
You enable persistence by creating and configuring an instance store and providing this store to the workflow host. The instance store implements the logic needed to save a workflow instance and reload it based on requests from the workflow host. The host uses a standard persistence API to communicate with the instance store, but it’s not aware of exactly how the workflow instances are persisted.
This pluggable architecture provides a great deal of flexibility. It allows you to change the way workflow instances are stored by simply providing a different instance store. They might be securely stored in a SQL Server database or as XML files stored in the file system.
All instance stores must derive from the base InstanceStore class (in the System.Runtime.DurableInstancing namespace). WF includes a ready-to-use instance store (System.Activities.DurableInstancing.SqlWorkflowInstanceStore) that persists workflow instances to a SQL Server database. The only prerequisite for its use is to first create a SQL Server database with the required schema.
Most of the time, you will want to use the SqlWorkflowInstanceStore since it is fully integrated with other WF components and is designed as a general-purpose persistence mechanism. However, you can also develop a custom instance store if you have specialized needs that are not addressed by SqlWorkflowInstanceStore. For example, your application might require the use of a different SQL database engine (for example Oracle or MySQL), a smaller footprint (SQL Server Compact Edition), or a completely different type of data store (XML files stored in the file system).
![]() Warning Remember that persisting workflow instances as files in the file system is inherently unsecure. Any instance data that is serialized to the files can be easily viewed with a text editor. For this reason, a secured environment like a database is recommended when you are working with any data that might be considered confidential. If you need to persist directly to files, you might want to consider encrypting the data during persistence.
Warning Remember that persisting workflow instances as files in the file system is inherently unsecure. Any instance data that is serialized to the files can be easily viewed with a text editor. For this reason, a secured environment like a database is recommended when you are working with any data that might be considered confidential. If you need to persist directly to files, you might want to consider encrypting the data during persistence.
Actions that Trigger Persistence
The most important feature of WF persistence is that persistence of workflow instances is generally automatic once an instance store has been added to the workflow host. You don’t need to add anything to your workflow definitions to take advantage of workflow persistence. For the most part, the responsibility for persisting workflow instances at the proper time falls on the workflow host classes that are provided with WF.
When an instance store has been provided, a workflow instance is persisted (and possibly unloaded) in these situations:
- Automatically when the workflow instance is idle
- Explicitly when a
Persistactivity is executed- Explicitly when the
WorkflowApplication.Persistmethod is invoked- Automatically at the completion of a
TransactionScopeorTransactedReceiveScope
The Persist activity allows you to declaratively request persistence at a particular point in the workflow. In most cases you can rely upon the automatic persistence behavior instead of using this activity. You only need to consider using the Persist activity when you need to save the workflow state at times that are outside of the normal persistence behavior. For example, you might want to declare a Persist activity immediately following a CPU-intensive calculation that would be expensive to execute again. The workflow instance could then be reloaded using this snapshot of the workflow state, thus avoiding a repeat of the expensive calculations.
An unloaded workflow instance remains in a persisted and unloaded state until it is reloaded by one of these actions:
- Automatically when a correlated service operation is invoked on an unloaded workflow service instance.
- Explicitly when the
WorkflowApplication.Loadmethod is invoked.- Automatically when a
Delayactivity expires. Note: Please see the “Understanding Durable Delay” section for more information on the limitations of this functionality.
![]() Note WF does provide options to control some aspects of persistence. For example, the
Note WF does provide options to control some aspects of persistence. For example, the WorkflowApplication host allows you to determine whether an idle workflow instance is persisted and unloaded from memory or is simply persisted. The available options vary by the type of workflow host and are covered later in the chapter when each type of workflow host is discussed.
Understanding Durable Delay
Workflow instances that contain a Delay activity are capable of being automatically reloaded when the elapsed time of the Delay activity expires. However, this capability is dependent on exactly how the workflow instance is hosted. These conditions must be met in order to utilize this feature:
- You must use IIS as your hosting environment or self-host the workflow service using the
WorkflowServiceHostclass.- You must load the
SqlWorkflowInstanceStoreBehavior, which provides the instance store.- The hosting environment (IIS or self-hosting application) must remain active while an unexpired delay is active.
What this means is that a functional durable delay is really limited to workflow services. The WorkflowApplication class does not support automatic reloading of workflows with an expired delay.
![]() Note You can execute workflows that have a
Note You can execute workflows that have a Delay activity using the WorkflowApplication class. However, you can’t unload them from memory and expect that they will be automatically reloaded when the delay expires.
If you are using the WorkflowApplication class to host workflows with a Delay activity, your choices are as follows:
- Don’t unload the workflow instances.
- Develop a custom instance store that supports the ability to reload workflow instances with an expired delay.
- Manage the reloading of instances in your host application.
- Switch to
WorkflowServiceHostand start new workflow instances with a WCF operation.
Preventing Persistence
WF persistence also supports the concept of no-persist zones. These are zones of execution in which the persistence of a workflow instance is suspended. One such zone is automatically created by the execution of an AsyncCodeActivity. WF doesn’t have visibility into the asynchronous work that you might perform within an AsyncCodeActivity. Since it can’t determine whether it is safe to persist the workflow instance, it temporarily suspends persistence while an AsyncCodeActivity is executing. Once the workflow exits the no-persist zone, the normal persistence behavior is resumed.
You can also manually create a no-persist zone within a code activity using the NoPersistHandle class. For example, you could write code like this:
NoPersistHandle handle = new NoPersistHandle();

handle.Enter(context);

//

//do work without persistence here

//

handle.Exit(context);
The context that is passed to the Enter and Exit methods is typed as NativeActivityContext. This means that you can use the NoPersistHandle class only within a custom code activity that derives from NativeActivity or NativeActivity<TResult>.
Persisted Data and Extension Mechanisms
When a workflow instance is persisted, all data that is currently in scope is persisted. This includes any workflow arguments and variables that are in scope. In addition to this application data, WF also saves runtime data related to the current state of the instance, including any active bookmarks. Some amount of metadata for the instance is also saved. This is needed in order to identify the workflow definition associated with the instance.
All serializable application data that is in scope is persisted. Any data that you do not want to persist should be marked with the NonSerialized attribute. As an alternative, you can use the DataContract and DataMember attributes to explicitly indicate the members of a class that should be serialized. The presence of these attributes on a class triggers an opt-in serialization to take place of only those members with the DataMember attribute.
Custom workflow extensions can also participate in persistence. To enable this, the extension must derive from the PersistenceParticipant class. By overriding members of this class, the extension can inject additional data to be persisted. If you are using the SqlWorkflowInstanceStore, you can also invoke its Promote method to save selected values to a queryable table in the database. The values are associated with the workflow instance, so they can be used to look up a particular workflow instance based on one or more key values.
Understanding WorkflowApplication Persistence
The WorkflowApplication class is one of the host classes that support persistence (the other being the WorkflowServiceHost class). To enable persistence with the WorkflowApplication class, you need to follow these steps:
After following these steps, the workflow instance is capable of being persisted. The instance store that you assign to the InstanceStore property can be the standard one that supports persistence to a SQL Server database (SqlWorkflowInstanceStore) or a custom instance store that you develop yourself. If you use the SqlWorkflowInstanceStore, there are additional properties that you can set to control aspects of its behavior. Please refer to the section following this one for more information on this instance store.
Like the other eventlike members of WorkflowApplication, the PersistableIdle member is actually a delegate that is defined like this:
Func<WorkflowApplicationIdleEventArgs, PersistableIdleAction> PersistableIdle
This member is similar to the Idle member that is executed whenever the workflow instance becomes idle. The main difference between the two members is that PersistableIdle is executed only when the workflow instance is capable of being persisted. For example, if you haven’t assigned an instance store to the InstanceStore property, the PersistableIdle member will never be executed. Also, if the current workflow is idle but is in a no-persist zone (perhaps it is executing an AsyncCodeActivity), the PersistableIdle member is not executed. When it is executed, the code assigned to the PersistableIdle member is executed immediately following any code assigned to the Idle member.
The PersistableIdle delegate member requires that you return a valid PersistableIdleAction value from any assigned code. The value that you return determines the persistence action that should take place. The valid values for this enum are as follows:
None. The instance is not persisted and not unloaded from memory.Unload. The instance is persisted and then unloaded from memory.Persist. The instance is persisted but is not unloaded from memory.
There are two ways to resume execution of a persisted instance. The ResumeBookmark method can be invoked if the workflow instance became idle because it was waiting for resumption of a bookmark. This is the most common way to resume execution of an instance and the one that is demonstrated in the first example of this chapter. Alternatively, if the workflow instance was aborted, the Run method can be invoked to resume execution at the last persistence point. Resumption of a workflow is not possible if it was terminated or canceled.
However, if the workflow instance was persisted and unloaded from memory, you must first call the Load method to load it back into memory. This method requires that you pass the workflow instance ID (a Guid) that uniquely identifies the instance.
The WorkflowApplication class also supports the Persist method. This method can be invoked by the host application to manually force persistence of the instance. You typically won’t need to use this method, but it is available for your use in situations where the host application needs to directly initiate persistence. Asynchronous versions of the Load and Persist methods are also supported (BeginLoad, EndLoad, BeginPersist, EndPersist).
Understanding the SqlWorkflowInstanceStore
The SqlWorkflowInstanceStore is an instance store that is designed to persist workflow instances to a SQL Server database. To use it, you can follow these simple steps:
- Prepare the SQL Server database using the SQL scripts provided with .NET Framework 4.
- In your host application, create an instance of the instance store, passing the constructor a connection string to the database that you prepared.
- Optionally set other properties of the instance store.
- Optionally execute the
CreateWorkflowOwnerCommandcommand to register the host application with the instance store. This step is required only when you are using this instance store withWorkflowApplication. TheDeleteWorkflowOwnerCommandshould be issued when the application is no longer using the instance store.
The database preparation step is an initial task that is performed only once. Please refer to the “SQL Server Instance Store Preparation” sidebar in this chapter for the steps needed to prepare the database.
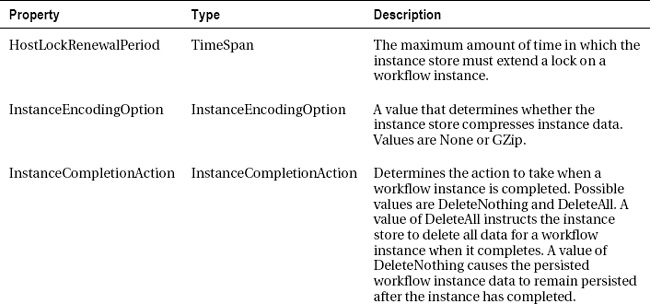
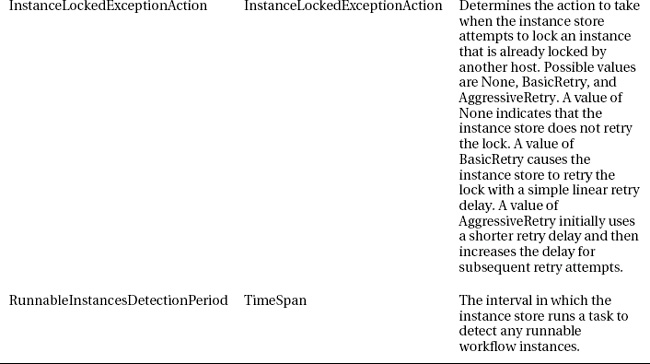
Here are the optional properties of the SqlWorkflowInstanceStore that you can set to control aspects of its behavior:
If you are sharing a single SqlWorkflowInstanceStore with multiple WorkflowApplication instances in a single host application, you need to execute the CreateWorkflowOwnerCommand against the instance store. Doing so registers the host application as an instance store owner and enables saving and loading of workflow instances. The code to accomplish this isn’t exactly intuitive, but it is demonstrated in the first example of this chapter. In addition, you also need to execute the DeleteWorkflowOwnerCommand against the instance store once the host application no longer requires it.
The requirement to manually execute CreateWorkflowOwnerCommand and DeleteWorkflowOwnerCommand applies only to the WorkflowApplication class. The WorkflowServiceHost class takes care of this bit of housekeeping for you.
If you are self-hosting workflow services using the WorkflowServiceHost class, you should use the SqlWorkflowInstanceStoreBehavior class to enable persistence instead of the SqlWorkflowInstanceStore class. The SqlWorkflowInstanceStoreBehavior class is added to the WorkflowServiceHost as a standard WCF behavior. It supports the same set of properties that were described in the previous table.
The SqlWorkflowInstanceStore supports locking of workflow instances. This allows you to deploy a server farm of workflow hosts that all work with the same persistence database. As a host loads a previously persisted instance, it checks for an existing lock on the instance. If it isn’t already locked by another host, it obtains the lock, thus preventing another host from working with the instance.
This instance store also supports durable delays. A delay is considered durable if an unloaded workflow instance is automatically reloaded when the delay expires. The workflow instance does not have to remain resident in memory for the delay to work properly. When a workflow containing a Delay activity is persisted and unloaded, the instance store monitors the scheduled time for the delay to expire. When the delay does expire, the instance store signals to the workflow host that the instance should be reloaded. This allows processing to continue after the Delay activity.
While the SqlWorkflowInstanceStoreBehavior supports this type of delay, there are limitations to its design. This functionality is supported only for workflow services that are hosted by IIS or self-hosted using the WorkflowServiceHost class. Workflows that are hosted by the WorkflowApplication class are not automatically reloaded when their delay expires.
SQL Server Instance Store Preparation
Using the SqlWorkflowInstanceStore with WorkflowApplication
This first example demonstrates how to use the SqlWorkflowInstanceStore when you are using the WorkflowApplication class as the workflow host. The scenario for this example (as well as the other examples in this chapter and Chapter 12) is an e-commerce shopping cart workflow. Each workflow instance represents an order. Consumers add one or more items to the order and then retrieve all the items once the order is complete. As each item is added to the order, the price and current inventory of the item is retrieved.
This example aptly illustrates the need for workflow persistence. The consumer controls the number of new items added as well as the frequency between new items. While the workflow is waiting for the consumer to make their next selection, the workflow is effectively idle and can be persisted to an instance store and unloaded from memory. When the next item is added, the workflow instance is reloaded and the appropriate bookmark resumed.
![]() Note Most of the tasks that you will complete for this example are related to the implementation of the example workflow itself. A relatively small amount of the work is actually directly related to workflow persistence.
Note Most of the tasks that you will complete for this example are related to the implementation of the example workflow itself. A relatively small amount of the work is actually directly related to workflow persistence.
You will complete these tasks to implement this example:
- Implement simple C# classes that are related to sales items.
- Implement a custom extension.
- Implement custom activities that reference the extension.
- Implement bookmark-related custom activities.
- Declare the
OrderEntryworkflow.- Implement the code to host the workflow including the creation of the instance store.
Creating the ActivityLibrary Project
Create a new project using the Activity Library template. Name the new project ActivityLibrary, and delete the Activity1.xaml file since it won’t be used. Add the project to a new solution that is named for this chapter. Add these additional .NET assembly references to the project:
System.Runtime.DurableInstancingSystem.Runtime.Serialization
![]() Note Some of the references that you will add to projects in this chapter are not immediately required. I generally provide you with a list of all the references up front to simplify the instructions. In this project, the reference to
Note Some of the references that you will add to projects in this chapter are not immediately required. I generally provide you with a list of all the references up front to simplify the instructions. In this project, the reference to System.Runtime.DurableInstancing is not actually required for this first example but will be needed for subsequent examples.
Implementing the Item-Related Classes
You need to define two classes that are related to sellable items. The Item class represents a sellable item that a consumer adds to the shopping cart. The ItemDefinition class is used to define a price and available inventory for each sellable item.
Add a new C# class to the ActivityLibrary project, and name it Item. Here is the implementation for the Item class:
using System;


namespace ActivityLibrary

{

    public class Item

    {

        public Int32 ItemId { get; set; }

        public Int32 Quantity { get; set; }

        public Decimal UnitPrice { get; set; }

        public Decimal TotalPrice { get; set; }

    }

}
Add another C# class named ItemDefinition to the same project. Here is the implementation for this class:
using System;


namespace ActivityLibrary

{

    public class ItemDefinition

    {

        public Int32 ItemId { get; set; }

        public Int32 QtyAvailable { get; set; }

        public Decimal Price { get; set; }

    }

}
Implementing the Custom Extension
This example uses a custom workflow extension to provide price lookup and inventory management functionality. To implement this extension, first add a new C# interface to the ActivityLibrary project, and name it IItemSupport. Here is the definition of this interface:
using System;

using System.Collections.Generic;


namespace ActivityLibrary

{

    public interface IItemSupport

    {

        Decimal GetItemPrice(Int32 itemId);

        Boolean UpdatePendingInventory(

            Int32 orderId, Int32 itemId, Int32 quantity);

        List<ItemDefinition> GetItemDefinitions();

    }

}
Now add a new C# class to the ActivityLibrary project, and name it ItemSupportExtension. This class implements the IItemSupport interface and provides the necessary item-related functionality that will be used by the workflow.
![]() Note The use of a custom extension is not absolutely necessary to complete this particular example. The example could have easily been implemented in another way without the use of an extension. But using an extension provides an opportunity to later illustrate how an extension can participate in workflow persistence. This is demonstrated in Chapter 12 when this extension is enhanced.
Note The use of a custom extension is not absolutely necessary to complete this particular example. The example could have easily been implemented in another way without the use of an extension. But using an extension provides an opportunity to later illustrate how an extension can participate in workflow persistence. This is demonstrated in Chapter 12 when this extension is enhanced.
Here is the implementation of this class:
using System;

using System.Collections.Generic;

using System.Linq;


namespace ActivityLibrary

{

    public class ItemSupportExtension : IItemSupport

    {

        private Dictionary<Int32, ItemDefinition> _items =

            new Dictionary<Int32, ItemDefinition>();

        private Int32 _orderId;


        #region IItemSupport Members
        public Decimal GetItemPrice(int itemId)

        {

            Decimal price = 0;

            ItemDefinition def = null;

            if (_items.TryGetValue(itemId, out def))

            {

                price = def.Price;

            }

            return price;

        }


        public bool UpdatePendingInventory(

            Int32 orderId, int itemId, int quantity)

        {

            Boolean result = false;

            ItemDefinition def = null;

            lock (_items)

            {

                if (_items.TryGetValue(itemId, out def))

                {

                    if (quantity <= def.QtyAvailable)

                    {

                        Int32 origQuantity = def.QtyAvailable;

                        def.QtyAvailable -= quantity;

                        Console.WriteLine(

                            "Update: ItemId={0}, QtyBefore={1}, QtyAfter={2}",

                            def.ItemId, origQuantity, def.QtyAvailable);

                        _orderId = orderId;

                        result = true;

                    }

                }

            }

            return result;

        }


        public List<ItemDefinition> GetItemDefinitions()

        {

            return _items.Values.ToList();

        }


        #endregion


        #region Host Members


        public void AddItemDefinition(Int32 itemId, Decimal price,

            Int32 qtyAvailable)

        {
            if (!_items.ContainsKey(itemId))

            {

                ItemDefinition def = new ItemDefinition

                {

                    ItemId = itemId,

                    Price = price,

                    QtyAvailable = qtyAvailable

                };

                _items.Add(def.ItemId, def);

            }

        }


        #endregion

    }

}
Implementing Activities that use the Extension
You also need to implement two custom activities that invoke methods of the workflow extension. The first custom activity invokes the GetItemPrice method of the extension to retrieve the configured price for an item. To implement this activity, add a new Code Activity to the ActivityLibrary project, and name it GetItemPrice. Here is the complete implementation for this activity:
using System;

using System.Activities;


namespace ActivityLibrary

{

    public sealed class GetItemPrice : CodeActivity<Decimal>

    {

        [RequiredArgument]

        public InArgument<Int32> ItemId { get; set; }


        protected override Decimal Execute(CodeActivityContext context)

        {

            Decimal price = 0;

            IItemSupport extension = context.GetExtension<IItemSupport>();

            if (extension != null)

            {

                price = extension.GetItemPrice(ItemId.Get(context));

            }

            return price;

        }

    }

}
You also need another custom activity that invokes the UpdatePendingInventory method of the extension. This method determines whether there is sufficient inventory available to satisfy the request. If there is, the current inventory is decremented by the requested quantity for the item. Add another Code Activity to the ActivityLibrary project, and name it CheckInventory. Here is the implementation of this activity:
using System;

using System.Activities;


namespace ActivityLibrary

{

    public sealed class CheckInventory : CodeActivity<Boolean>

    {

        public InArgument<Int32> OrderId { get; set; }

        [RequiredArgument]

        public InArgument<Int32> ItemId { get; set; }

        [RequiredArgument]

        public InArgument<Int32> Quantity { get; set; }


        protected override Boolean Execute(CodeActivityContext context)

        {

            Boolean result = false;

            IItemSupport extension = context.GetExtension<IItemSupport>();

            if (extension != null)

            {

                result = extension.UpdatePendingInventory(OrderId.Get(context),

                    ItemId.Get(context), Quantity.Get(context));

            }

            return result;

        }

    }

}
Implementing Bookmark-Related Activities
This first example uses bookmarks to communicate between the host application and the workflow instance. To facilitate this, you need two custom activities that create bookmarks and handle the input of data as each bookmark is resumed. Add a new Code Activity to the ActivityLibrary project, and name it WaitForAddItem. This is the activity that supports the addition of new items to the shopping cart. Here is the implementation for this activity:
using System.Activities;


namespace ActivityLibrary

{

    public sealed class WaitForAddItem : NativeActivity<Item>

    {

        protected override void Execute(NativeActivityContext context)

        {

            context.CreateBookmark("AddItem", Resumed);

        }


        private void Resumed(NativeActivityContext context,

            Bookmark bookmark, object value)

        {

            if (value is Item)

            {

                Result.Set(context, value as Item);

            }

        }


        protected override bool CanInduceIdle

        {

            get { return true; }

        }

    }

}
You also need an activity that allows the user to signal that all items have been entered and that the order is now complete. Add another Code Activity to the ActivityLibrary project, and name it WaitForOrderComplete. Here is the implementation of this activity:
using System.Activities;


namespace ActivityLibrary

{

    public sealed class WaitForOrderComplete : NativeActivity

    {

        protected override void Execute(NativeActivityContext context)

        {

            context.CreateBookmark("OrderComplete");

        }


        protected override bool CanInduceIdle

        {

            get { return true; }

        }

    }

}
You should build the solution at this point. This ensures that it builds correctly and adds the custom activities to the Visual Studio Toolbox.
Declaring the OrderEntry Workflow
Create a new Workflow Console project, and name it OrderEntry. Add this project to the solution that you created for this chapter and delete the Workflow1.xaml file since it won’t be used. Add these references to the project:
ActivityLibrary(project reference)System.Activities.DurableInstancingSystem.ConfigurationSystem.Runtime.DurableInstancingSystem.Runtime.Serialization
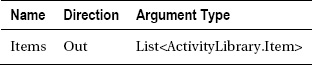
Add a new Activity to the project, and name it OrderEntry. Add this output argument to the workflow:
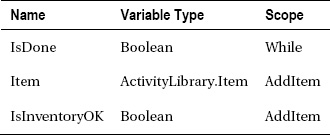
Here is a recap of the workflow variables that are used by the workflow. Please follow the step-by-step instructions to determine when each variable can be added:
Follow these steps to complete the workflow definition:
- Add a
Sequenceactivity as the root activity of the workflow.- Add an
Assignactivity to theSequenceactivity. Set theAssign.Toproperty toItemsand theAssign.Valueproperty toNew List(Of ActivityLibrary.Item). This initializes the output argument.- Add a
Whileactivity below theAssignactivity. Add theIsDonevariable that is scoped by theWhileactivity.- Set the
While.Conditionproperty toNot IsDone. This causes the activities within theWhileactivity to repeat until theIsDonevariable is set to true.- Add a
Pickactivity as the body of theWhileactivity. ThePickactivity should already have twoPickBranchinstances. ThePickBranchon the left side will handle the requests to add an item to the order, and thePickBranchon the right side handles completion of the order.- Change the
DisplayNameof thePickBranchon the left toAddItem. Add the variables that are scoped by theAddItemactivity (ItemandIsInventoryOK).- Add a
WaitForAddItemactivity as the trigger of theAddItem PickBranch. Set theResultproperty of this activity toItem.- Add a
Sequenceactivity to theActionportion of thePickBranch. Add aCheckInventoryactivity to this newSequenceactivity. Set theItemIdproperty toItem.ItemId, theQuantityproperty toItem.Quantity, and theResultproperty toIsInventoryOK.- Add an
Ifactivity directly under theCheckInventoryactivity. Set theIf.Conditionproperty toIsInventoryOK.- Add a
Sequenceactivity to theIf.Thenproperty. Add aGetItemPriceactivity to the newSequenceactivity. Set theItemIdproperty toItem.ItemIdand theResultproperty toItem.UnitPrice.- Add an
Assignactivity under theGetItemPriceactivity. Set theAssign.Toproperty toItem.TotalPriceand theAssign.Valueproperty toItem.UnitPrice * Item.Quantity.- Add an
AddToCollectionactivity under theAssignactivity. Set the generic type toActivityLibrary.Item. Set theCollectionproperty toItemsand theItemproperty toItem.- Add a
WriteLineactivity to theIf.Elseproperty. Set theTextproperty toString.Format("Quantity of {0} for Item {1} is unavailable", Item.Quantity, Item.ItemId). Figure 11-1 shows the completedAddItem PickBranch.
- Navigate back to the
Pickactivity, and change theDisplayNameof thePickBranchon the right side toOrderComplete.- Add a
WaitForOrderCompleteactivity to the trigger of theOrderComplete PickBranch.- Add an
Assignactivity to theActionportion of theOrderComplete PickBranch. Set theAssign.Toproperty toIsDoneand theAssign.Valueproperty toTrue. Figure 11-2 shows the completedOrderComplete PickBranch.
Figure 11-3 shows the completed top level of the workflow.
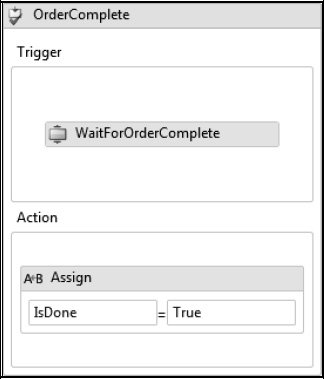
Figure 11-2. OrderComplete PickBranch
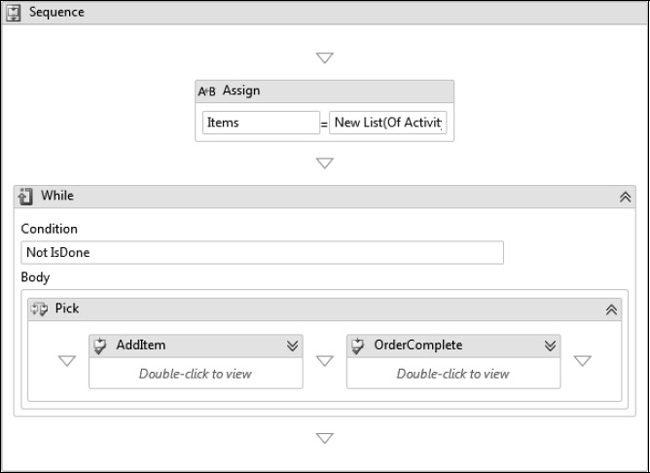
Figure 11-3. Completed OrderEntry workflow
Hosting and Persisting the Workflow
This example uses the WorkflowApplication class to host the workflow. The following host code should be added to the Program.cs file of the OrderEntry project:
using System;

using System.Activities;

using System.Activities.DurableInstancing;

using System.Collections.Generic;

using System.Configuration;

using System.Runtime.DurableInstancing;

using System.Threading;

using ActivityLibrary;
namespace OrderEntry

{

    class Program

    {

        static private AutoResetEvent _unloadedEvent = new AutoResetEvent(false);


        static void Main(string[] args)

        {
The first order of business is to create an instance store. The code executes the private CreateInstanceStore method (shown later in the code) to accomplish this. The custom extension is then created and populated with test data. The test data loaded here allows testing of the workflow using the item IDs shown here (101, 202, and 303).
            InstanceStore store = CreateInstanceStore();


            ItemSupportExtension extension = new ItemSupportExtension();

            extension.AddItemDefinition(101, 1.23M, 10);

            extension.AddItemDefinition(202, 2.34M, 20);

            extension.AddItemDefinition(303, 3.45M, 30);

            DisplayInventory("Before Execution", extension);
After starting a new instance of the workflow, the user is prompted to enter an item ID and the quantity that they want to order of that item (all on a single line). If any input is received, the AddItem method is executed. Otherwise, the order is assumed to be complete, and the OrderComplete method is invoked.
            Guid instanceId = Guid.Empty;

            StartNewInstance(ref instanceId, store, extension);

            Boolean isRunning = true;

            while (isRunning)

            {

                Console.WriteLine(

                    "Enter ItemId and Quantity (Ex: 101 1) or [Enter] to quit");

                String input = Console.ReadLine();

                if (!String.IsNullOrEmpty(input))

                {

                    AddItem(instanceId, store, extension, input);

                }

                else

                {

                    OrderComplete(instanceId, store, extension);

                    isRunning = false;

                }

            }


            DisplayInventory("After Execution", extension);


            Console.WriteLine("Press any key to exit");

            Console.ReadKey();
Before exiting the application, the DeleteWorkflowOwnerCommand is executed against the instance store. This notifies the instance store that this application is no longer an owner of workflow instances and that any locks that might have been placed by this owner can be removed.
            store.Execute(store.CreateInstanceHandle(),

                new DeleteWorkflowOwnerCommand(), TimeSpan.FromSeconds(10));

        }
The StartNewInstance method is used to create a new instance of the workflow. It is passed a reference to the instance store and the extension. The SetupInstance method is invoked to create the WorkflowApplication and set any properties, including the InstanceStore. After creating a new WorkflowApplication, the Run method is invoked. At this point, the workflow should immediately become idle since it is waiting for one of the bookmarks to be resumed.
        private static void StartNewInstance(

            ref Guid instanceId, InstanceStore store, IItemSupport extension)

        {

            WorkflowApplication wfApp = SetupInstance(

                ref instanceId, store, extension);

            wfApp.Run();

            _unloadedEvent.WaitOne(5000);

        }
The AddItem method parses the input from the user and determines whether the correct number and type of arguments were entered (an item ID and quantity). If so, a WorkflowApplication instance is created and the AddItem bookmark is resumed, passing an instance of the Item class that represents the item and quantity that were just ordered.
        private static void AddItem(Guid instanceId, InstanceStore store,

            IItemSupport extension, String input)

        {

            Int32 itemId = 0;

            Int32 quantity = 0;

            String[] parts = input.Split(' '),

            if (parts.Length != 2)

            {

                Console.WriteLine("Incorrect number of arguments entered!");

                return;

            }

            Int32.TryParse(parts[0], out itemId);

            Int32.TryParse(parts[1], out quantity);

            if (itemId == 0 || quantity == 0)

            {

                Console.WriteLine("Arguments in incorrect format!");

                return;

            }
            WorkflowApplication wfApp = SetupInstance(

                ref instanceId, store, extension);

            Item item = new Item

            {

                ItemId = itemId,

                Quantity = quantity

            };


            wfApp.ResumeBookmark("AddItem", item);

            _unloadedEvent.WaitOne(5000);

        }
The OrderComplete method is executed when the user presses Enter without any input. This signals completion of the current order. After creating a WorkflowApplication instance and assigning code to the Completed property, the OrderComplete bookmark is resumed. When the workflow completes, the Items output argument is used to display the line items that were added to the order.
        private static void OrderComplete(

            Guid instanceId, InstanceStore store, IItemSupport extension)

        {

            WorkflowApplication wfApp = SetupInstance(

                ref instanceId, store, extension);

            wfApp.Completed = (e) =>

            {

                Console.WriteLine("{0} Is Completed", e.InstanceId);

                List<Item> items = e.Outputs["Items"] as List<Item>;

                Console.WriteLine("
Ordered Items:");

                foreach (Item i in items)

                {

                    Console.WriteLine(

                        "ItemId={0}, Quantity={1}, UnitPrice={2}, Total={3}",

                        i.ItemId, i.Quantity, i.UnitPrice, i.TotalPrice);

                }

            };


            wfApp.ResumeBookmark("OrderComplete", null);

            _unloadedEvent.WaitOne(5000);

        }
The SetupInstance method is responsible for the creation of a WorkflowApplication instance. In addition to assigning code to the standard set of delegates, it also sets the InstanceStore and adds the custom workflow extension. If the method is passed a nonempty instanceId, the Load method is invoked to load the designated workflow instance from the instance store.
The code assigned to the PersistableIdle member returns a value of PersistableIdleAction.Unload. This instructs the WorkflowApplication to persist the idle workflow instance and then unload it from memory.
        private static WorkflowApplication SetupInstance(

            ref Guid instanceId, InstanceStore store, IItemSupport extension)

        {

            WorkflowApplication wfApp =

                new WorkflowApplication(new OrderEntry());


            wfApp.Idle = (e) =>

            {

                Console.WriteLine("{0} Is Idle", e.InstanceId);

            };

            wfApp.PersistableIdle = (e) =>

            {

                Console.WriteLine("{0} Is PersistableIdle", e.InstanceId);

                return PersistableIdleAction.Unload;

            };

            wfApp.Unloaded = (e) =>

            {

                Console.WriteLine("{0} Is Unloaded", e.InstanceId);

                _unloadedEvent.Set();

            };

            wfApp.OnUnhandledException = (e) =>

            {

                Console.WriteLine("{0} OnUnhandledException: {1}",

                    e.InstanceId, e.UnhandledException.Message);

                return UnhandledExceptionAction.Cancel;

            };


            wfApp.InstanceStore = store;

            wfApp.Extensions.Add(extension);


            if (instanceId == Guid.Empty)

            {

                instanceId = wfApp.Id;

            }

            else

            {

                wfApp.Load(instanceId);

            }

            return wfApp;

        }
The CreateInstanceStore method creates an instance of the SqlWorkflowInstanceStore. It retrieves the SQL Server connection string from the App.config file for this project. This method also executes the CreateWorkflowOwnerCommand against the instance store. The InstanceView that is returned is used to set the DefaultInstanceOwner property of the instance store. Doing this registers the application as an instance owner and allows multiple WorkflowApplication instances to use the same instance store.
        private static InstanceStore CreateInstanceStore()

        {

            string connectionString = ConfigurationManager.ConnectionStrings

                ["InstanceStore"].ConnectionString;

            InstanceStore store =

                new SqlWorkflowInstanceStore(connectionString);

            InstanceView view = store.Execute(

                store.CreateInstanceHandle(),

                new CreateWorkflowOwnerCommand(),

                TimeSpan.FromSeconds(30));

            store.DefaultInstanceOwner = view.InstanceOwner;

            return store;

        }


        private static void DisplayInventory(String desc, IItemSupport extension)

        {

            Console.WriteLine("
Item inventory {0}:", desc);

            foreach (ItemDefinition item in extension.GetItemDefinitions())

            {

                Console.WriteLine("ItemId={0}, QtyAvailable={1}",

                    item.ItemId, item.QtyAvailable);

            }

            Console.WriteLine("");

        }

    }

}
Configuring the Application
The code in Program.cs retrieves the SQL Server connection string from the App.config file. If the project doesn’t already have an App.config file, add one now. Here are the contents of the file:
<?xml version="1.0" encoding="utf-8" ?>

<configuration>

  <connectionStrings>

    <add name="InstanceStore"

        connectionString="Data Source=localhostSQLExpress;

           Initial Catalog=InstanceStore;Integrated Security=True;

           Asynchronous Processing=True"

        providerName="System.Data.SqlClient" />

  </connectionStrings>

</configuration>
If you have not already done so, you should now prepare the SQL Server database. You can follow the steps outlined in the “SQL Server Instance Store Preparation” sidebar.
The connection string shown here assumes that the persistence database is named InstanceStore and is located on your local development machine. You will need to make the necessary adjustments to this connection string if this is not the case.
Testing the Application
After building the solution, you should be able to run the OrderEntry project. When you are prompted for an item and quantity, enter the item ID and quantity on a single line, separated by a space. Valid item IDs are 101, 202, and 303. Here are representative results when I test this project:
Item inventory Before Execution:


ItemId=101, QtyAvailable=10


ItemId=202, QtyAvailable=20


ItemId=303, QtyAvailable=30


5576faf5-91da-4710-ae34-397ab3844ce8 Is Idle


5576faf5-91da-4710-ae34-397ab3844ce8 Is PersistableIdle


5576faf5-91da-4710-ae34-397ab3844ce8 Is Unloaded


Enter ItemId and Quantity (Ex: 101 1) or [Enter] to quit


101 1


Update: ItemId=101, QtyBefore=10, QtyAfter=9


5576faf5-91da-4710-ae34-397ab3844ce8 Is Idle


5576faf5-91da-4710-ae34-397ab3844ce8 Is PersistableIdle


5576faf5-91da-4710-ae34-397ab3844ce8 Is Unloaded


Enter ItemId and Quantity (Ex: 101 1) or [Enter] to quit


202 2


Update: ItemId=202, QtyBefore=20, QtyAfter=18


5576faf5-91da-4710-ae34-397ab3844ce8 Is Idle
5576faf5-91da-4710-ae34-397ab3844ce8 Is PersistableIdle


5576faf5-91da-4710-ae34-397ab3844ce8 Is Unloaded


Enter ItemId and Quantity (Ex: 101 1) or [Enter] to quit


5576faf5-91da-4710-ae34-397ab3844ce8 Is Completed


Ordered Items:


ItemId=101, Quantity=1, UnitPrice=1.23, Total=1.23


ItemId=202, Quantity=2, UnitPrice=2.34, Total=4.68


5576faf5-91da-4710-ae34-397ab3844ce8 Is Unloaded


Item inventory After Execution:


ItemId=101, QtyAvailable=9


ItemId=202, QtyAvailable=18


ItemId=303, QtyAvailable=30


Press any key to exit
Please make note of the messages that are written by the WorkflowApplication delegates. They indicate that as soon as the workflow starts, the Idle delegate is executed followed by the PersistableIdle. Since the code assigned to the PersistableIdle member returns a value of PersistableIdleAction.Unload, the workflow is persisted to the instance store and unloaded. This same behavior occurs after each item is added to the order. Finally, when I press Enter without entering an item and quantity, the workflow is completed, and the collection of Item objects that were added is retrieved as an output argument.
Note that the available inventory for each item is displayed at the beginning and end of the application and that the ending inventory has been reduced by the requested quantity for each item.
![]() Note This particular workflow does not attempt to handle orphaned workflow instances. This situation would occur when a new workflow instance is created but never completed. An example in Chapter 12 demonstrates how you can monitor for the existence of persisted instances. You can then use the
Note This particular workflow does not attempt to handle orphaned workflow instances. This situation would occur when a new workflow instance is created but never completed. An example in Chapter 12 demonstrates how you can monitor for the existence of persisted instances. You can then use the WorkflowControlEndpoint to cancel or terminate orphaned instances. Another way to handle orphaned workflow instances would be to add a Delay activity to an additional PickBranch in the workflow. The Delay activity could then be used to trigger completion of the workflow after some defined period of inactivity. However, both of these solutions really require the use of WorklfowServiceHost as the workflow host.
Understanding WorkflowServiceHost Persistence
You enable persistence with the WorkflowServiceHost in a similar way as you do with the WorkflowApplication class. Here are the steps that you follow when working with the WorkflowServiceHost class:
- Create and configure an instance store behavior.
- Add the newly created instance store behavior to the
Description.Behaviorsproperty of theWorkflowServiceHost.- Optionally, add a
WorkflowIdleBehaviorto control persistence behavior.
The WorkflowServiceHost class supports direct assignment of an instance store but also supports instance store creation using a WCF behavior. Generally, when you are working with the WorkflowServiceHost and using the SQL Service instance store that is supplied with WF, you will configure and add a behavior rather than directly assigning the instance store.
The SqlWorkflowInstanceStoreBehavior supports the same set of properties that I described for the SqlWorkflowInstanceStore class. A constructor is also available that allows you to pass the SQL Server connection string. After constructing and configuring the behavior, you add it to the Description.Behaviors property of the WorkflowServiceHost. This must be done prior to calling the Open method of the WorkflowServiceHost.
You can also add an instance of the SqlWorkflowInstanceStore class to a WorkflowServiceHost via the DurableInstancingOptions property. This member supports an InstanceStore property that can be set to a newly constructed instance store.
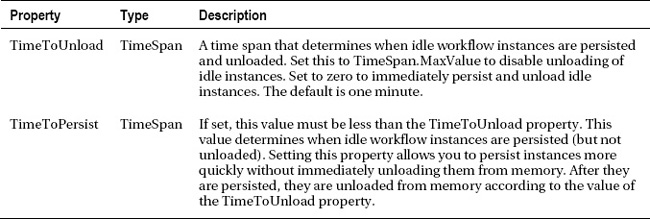
The WorkflowServiceHost does not support the PersistableIdle property as the WorkflowApplication class does. Therefore, you don’t have a direct way to specify whether an individual idle workflow instance should be persisted, unloaded, or otherwise left alone. Instead, WF does provide the WorkflowIdleBehavior. This WCF behavior supports these two properties:
After constructing and configuring a WorkflowIdleBehavior, you add it to the WorkflowServiceHost using the Description.Behaviors property.
You can also configure these behaviors using entries in the Web.config file. This is the mechanism used to configure workflow persistence when you are using IIS or another Microsoft-provided hosting environment to host your workflow services.
When you use the SqlWorkflowInstanceStore with the WorkflowServiceHost, there is no need to manually execute CreateWorkflowOwnerCommand and DeleteWorkflowOwnerCommand against the instance store. Unlike the WorkflowApplication class where you must execute these commands yourself, the WorkflowServiceHost takes care of those housekeeping tasks for you.
Using the SqlWorkflowInstanceStore with WorkflowServiceHost
In this example, you will implement the same shopping cart scenario using a workflow service. The workflow will reuse most of the custom classes, activities, and the extension that you developed for the previous example. The workflow will implement three service operations: StartOrder, AddItem, and OrderComplete. The StartOrder operation is capable of starting a new workflow instance. The other operations are designed to work with an existing instance. To accomplish this, content correlation is used. The assumption is that while the workflow is waiting for the next service operation to be invoked, it is safely persisted in the SQL Server instance store.
The initial goal of this workflow is to demonstrate how to use persistence with the WorkflowServiceHost. But this same example workflow will also be used throughout the remainder of this chapter and Chapter 12 to illustrate other persistence-related topics.
You will complete these tasks to implement this example:
- Declare the
OrderEntryServiceworkflow service.- Implement and configure an application that hosts the workflow service.
- Implement a console application that acts as a client of the workflow service.
Declaring the OrderEntryService Workflow
Create a new project using the WCF Workflow Service Application project template. Name the new problem ServiceLibrary, and add it to the solution for this chapter. You can delete the Service1.xamlx file since it won’t be used. Add these references to the project:
ActivityLibrary(project reference)System.Runtime.DurableInstancing
Add a new WCF Workflow Service to the project, and name it OrderEntryService. Delete the Sequence activity that is added for you along with all of its child messaging activities. Check the properties for the workflow, and verify that the Name and ConfigurationName are both set to OrderEntryService.
Here are the workflow variables that are used by the workflow. Please follow the step-by-step instructions to determine when each variable can be added:
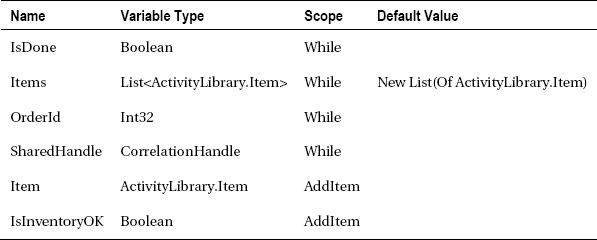
Please follow these steps to complete the workflow definition:
- Add a
Whileactivity as the root activity of the workflow. Define the variables that are scoped by theWhileactivity:IsDone,Items,OrderId, andSharedHandle. Note that the Items variable requires a Default Value. Set theWhile.Conditionproperty toNot IsDone.- Add a
Pickactivity to theBodyof theWhileactivity. ThePickactivity should initially have twoPickBranchinstances. Add another one to bring the total to three.- Set the
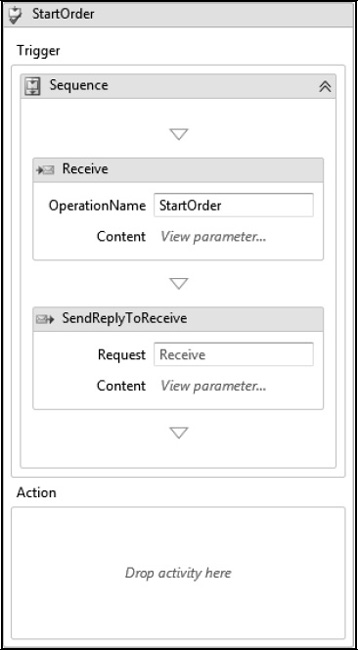
DisplayNameof the leftmostPickBranchtoStartOrder. This branch will contain the activities needed to declare theStartOrderservice operation. Add aReceiveAndSendReplyactivity template to the trigger of theStartOrder PickBranch. Set the properties and parameters of theReceiveactivity to the values shown in the following tables.
- Modify the CorrelationInitializers property of the Receive activity by clicking the ellipsis in the Properties window. Delete any correlation initializers that may already exist for the activity. Add a new QueryCorrelationInitializer by selecting Query correlation initializer from the list of available initializers. Enter SharedHandle as the handle variable to be initialized. In the XPath Queries section, select the orderId parameter from the drop-down list. This initializes the SharedHandle using the contents of the orderId request parameter. The SendReplyToReceive activity does not require you to set any properties or parameters. Figure 11-4 shows the completed StartOrder PickBranch.
- Set the
DisplayNameof the middlePickBranchtoAddItem. Define the two variables that are scoped by theAddItemactivity:ItemandIsInventoryOK.- Add a
ReceiveAndSendReplyactivity template to the trigger of theAddItemactivity. Set the properties ad parameters of theReceiveactivity to the values shown in the following tables.
- Set the
CorrelatesWithproperty of theReceiveactivity to theSharedHandlevariable. Set theCorrelatesOnproperty to theorderIdparameter.- Add a
CheckInventoryactivity below theReceiveactivity. Set theItemIdproperty toItem.ItemId, theOrderIdproperty toOrderId,QuantitytoItem.Quantity, andResulttoIsInventoryOK.- Add an
Ifactivity below theCheckInventoryactivity. Set theIf.Conditionproperty toIsInventoryOK.- Add a
Sequenceactivity to theIf.Thenproperty. Add aGetItemPriceactivity to the newSequenceactivity. Set theItemIdproperty toItem.ItemIdand theResulttoItem.UnitPrice.- Add an
Assignactivity below theGetItemPriceactivity. Set theAssign.Toproperty toItem.TotalPriceand theAssign.Valueproperty toItem.UnitPrice * Item.Quantity.- Add an
AddToCollectionactivity below theAssign. Set the generic type toActivityLibrary.Item. Set theCollectionproperty toItemsand theItemproperty toItem.- Add a
WriteLineactivity to theIf.Elseproperty. Set theTextproperty toString.Format("Quantity of {0} for Item {1} is unavailable", Item.Quantity, Item.ItemId).- Make sure that the
SendReplyToReceiveactivity hasn’t been deleted and is still within the trigger section of thePickBranch. You do not need to set any properties for this activity. Figure 11-5 shows the completeAddItem PickBranch.
- Set the DisplayName of the rightmost PickBranch to OrderComplete. Add a ReceiveAndSendReply activity template to the trigger of the OrderComplete PickBranch. Set the properties and parameters of the Receive activity to the values shown in the following tables. Set the CorrelatesOn property to the orderId parameter and the CorrelatesWith property to SharedHandle just as you did with the AddItem Receive activity.
- Set the parameters for the SendReplyToReceive activity to the values shown in this table.
- Add an Assign activity to the Action property of the OrderComplete PickBranch. Set the Assign.To property to IsDone and the Assign.Value property to True.
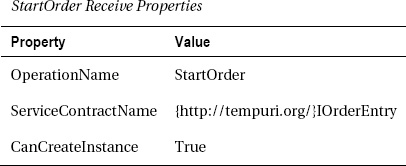
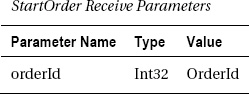
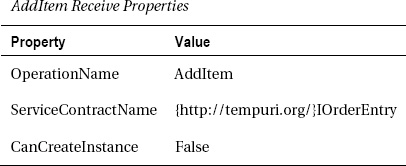
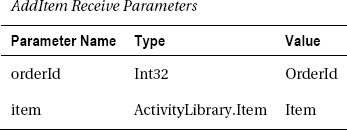
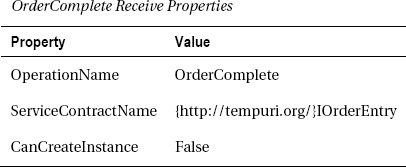
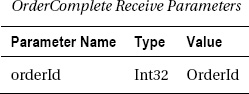
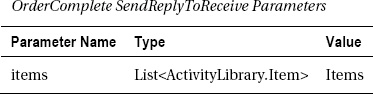
Figure 11-6 shows the completed OrderComplete PickBranch. Figure 11-7 shows the topmost view of the completed workflow.
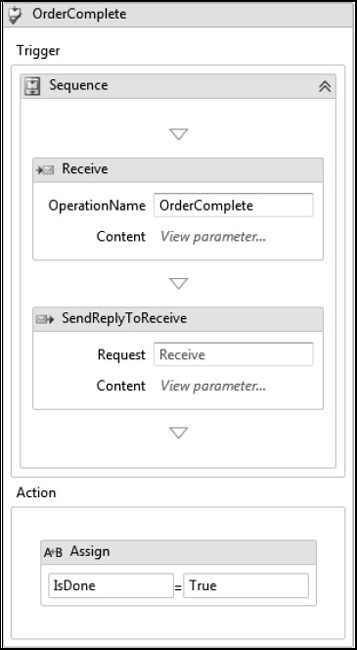
Figure 11-6. OrderComplete PickBranch
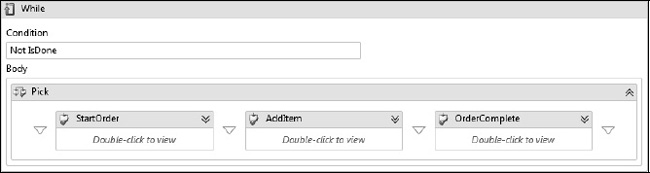
Figure 11-7. Complete OrderEntryService workflow
Hosting the Workflow Service
The next step in this example is to implement a project to self-host the OrderEntryService that you just declared. Create a new Workflow Console Application project, and name it ServiceHost. Add it to the solution for this chapter, and delete the Workflow1.xaml file that is created since it won’t be used.
By default, a Workflow Console Application project uses the .NET Framework 4 Client profile. Open the project settings, and change the target framework to .NET Framework 4 (the full .NET profile). Add these additional references to the project:
ActivityLibrarySystem.Activities.DurableInstancingSystem.ConfigurationSystem.Runtime.DurableInstancingSystem.Runtime.Serialization
Implementing the Service Host
Here is the complete code that you need to add to the Program.cs file to host the workflow service:
using System;

using System.Activities.DurableInstancing;

using System.Collections.Generic;

using System.Configuration;

using System.IO;

using System.Runtime.DurableInstancing;

using System.ServiceModel.Activities;

using System.ServiceModel.Activities.Description;

using System.Xaml;

using System.Xml.Linq;

using ActivityLibrary;
namespace ServiceHost

{

    class Program

    {

        private static List<WorkflowServiceHost> _hosts =

            new List<WorkflowServiceHost>();


        static void Main(string[] args)

        {

            try

            {
In a similar way as you saw with the WorkflowApplication example earlier in this chapter, an instance of the custom extension is created and populated with test item definitions. The private CreateServiceHost method is invoked to load and configure the WorkflowServiceHost. Finally, the Open method of the service host is called to enable it to receive incoming messages.
                ItemSupportExtension extension =

                    new ActivityLibrary.ItemSupportExtension();


                extension.AddItemDefinition(101, 1.23M, 10);

                extension.AddItemDefinition(202, 2.34M, 20);

                extension.AddItemDefinition(303, 3.45M, 30);

                DisplayInventory("Before Execution", extension);


                CreateServiceHost("OrderEntryService.xamlx", extension);


                foreach (WorkflowServiceHost host in _hosts)

                {

                    host.Open();

                    foreach (var ep in host.Description.Endpoints)

                    {

                        Console.WriteLine("Contract: {0}",

                            ep.Contract.Name);

                        Console.WriteLine("    at {0}",

                            ep.Address);

                    }

                }


                Console.WriteLine("Press any key to stop hosting and exit");

                Console.ReadKey();


                DisplayInventory("After Execution", extension);

            }

            catch (Exception exception)

            {

                Console.WriteLine("Service Exception: {0}", exception.Message);

            }

            finally

            {

                Console.WriteLine("Closing services...");
                foreach (WorkflowServiceHost host in _hosts)

                {

                    host.Close();

                }

                Console.WriteLine("Services closed");

                _hosts.Clear();

            }

        }
The CreateServiceHost method loads the workflow service directly from the Xamlx file. It uses the loaded WorkflowService to construct a WorkflowServiceHost instance. An instance of the SqlWorkflowInstanceStoreBehavior class is then constructed and configured. The property values used here are similar to those that were used in the WorkflowApplication example earlier in the chapter. Once it has been configured, the instance store behavior is added to the service host using the Description.Behaviors property.
        private static WorkflowServiceHost CreateServiceHost(

            String xamlxName, IItemSupport extension)

        {

            WorkflowService wfService = LoadService(xamlxName);

            WorkflowServiceHost host = new WorkflowServiceHost(wfService);


            string connectionString = ConfigurationManager.ConnectionStrings

                ["InstanceStore"].ConnectionString;

            SqlWorkflowInstanceStoreBehavior storeBehavior =

                new SqlWorkflowInstanceStoreBehavior(connectionString);

            storeBehavior.InstanceCompletionAction =

                InstanceCompletionAction.DeleteAll;

            storeBehavior.InstanceLockedExceptionAction =

                InstanceLockedExceptionAction.BasicRetry;

            storeBehavior.InstanceEncodingOption =

                InstanceEncodingOption.GZip;

            storeBehavior.HostLockRenewalPeriod =

                TimeSpan.FromMinutes(1);

            host.Description.Behaviors.Add(storeBehavior);
An instance of the WorkflowIdleBehavior class is also constructed and added to the service host. The TimeToUnload property is set to zero to force workflow instances to be immediately persisted and unloaded from memory as soon as they become idle. You probably don’t need to be this aggressive in a real application, but this does allow you to see actual persistence and unloading behavior when you test this example.
            WorkflowIdleBehavior idleBehavior = new WorkflowIdleBehavior()

            {

                TimeToUnload = TimeSpan.FromSeconds(0)

            };
            host.Description.Behaviors.Add(idleBehavior);

            if (extension != null)

            {

                host.WorkflowExtensions.Add(extension);

            }


            _hosts.Add(host);


            return host;

        }
The private LoadService method deserializes a WorkflowService instance from the named Xamlx file. The file is assumed to be located in a relative path under the ServiceLibrary project. This code assumes that these projects are located in the same solution. You will need to adjust this path if the Xamlx files are in a different location.
        private static WorkflowService LoadService(String xamlxName)

        {

            String fullFilePath = Path.Combine(

                @"......ServiceLibrary", xamlxName);

            WorkflowService service =

                XamlServices.Load(fullFilePath) as WorkflowService;

            if (service != null)

            {

                return service;

            }

            else

            {

                throw new NullReferenceException(String.Format(

                    "Unable to load service definition from {0}", fullFilePath));

            }

        }


        private static void DisplayInventory(String desc, IItemSupport extension)

        {

            Console.WriteLine("
Item inventory {0}:", desc);

            foreach (ItemDefinition item in extension.GetItemDefinitions())

            {

                Console.WriteLine("ItemId={0}, QtyAvailable={1}",

                    item.ItemId, item.QtyAvailable);

            }

            Console.WriteLine("");

        }

    }

}
Configuring the Service Host
If the ServiceHost project does not already have an App.config file, add one now. The App.config file requires WCF-related entries to define an endpoint for the workflow service and to also specify the SQL Server connection string for the instance store. Here is the complete App.config file that you need to execute this example:
<?xml version="1.0"?>

<configuration>

  <connectionStrings>

    <add name="InstanceStore"

        connectionString="Data Source=localhostSQLExpress;

           Initial Catalog=InstanceStore;Integrated Security=True;

           Asynchronous Processing=True"

        providerName="System.Data.SqlClient" />

  </connectionStrings>

  <system.serviceModel>

    <services>

      <service name="OrderEntryService">

        <host>

          <baseAddresses>

            <add baseAddress="http://localhost:9000/"/>

          </baseAddresses>

        </host>

        <endpoint contract="IOrderEntry"

          address="http://localhost:9000/OrderEntry"

          binding="wsHttpBinding" />

      </service>

    </services>

    <behaviors>

      <serviceBehaviors>

        <behavior>

          <serviceMetadata httpGetEnabled="true"/>

          <serviceDebug includeExceptionDetailInFaults="false"/>

        </behavior>

      </serviceBehaviors>

    </behaviors>

    <serviceHostingEnvironment multipleSiteBindingsEnabled="true" />

  </system.serviceModel>

  <startup>

    <supportedRuntime version="v4.0" sku=".NETFramework,Version=v4.0"/>

  </startup>

</configuration>
This configuration file uses port 9000 for hosting the workflow service. Feel free to change this port number if necessary, but you’ll also need to make a similar change to the configuration of the client project (developed next).
Loading the Instance Store from the Configuration File
The SqlWorkflowInstanceStoreBehavior can also be loaded from entries in the App.config file instead of entirely in code. For example, here is the section of the App.config file containing the additional entries to load the instance store:
<?xml version="1.0"?>

<configuration>

…

  <system.serviceModel>

…

    <behaviors>

      <serviceBehaviors>

        <behavior>

…

          <sqlWorkflowInstanceStore

            connectionStringName="InstanceStore"

            instanceCompletionAction="DeleteAll"

            instanceLockedExceptionAction="BasicRetry"

            instanceEncodingOption="GZip"

            hostLockRenewalPeriod="00:01:00" />

        </behavior>

      </serviceBehaviors>

    </behaviors>

…

</configuration>
If you load the instance store behavior from the configuration file like this, you can remove all references to the SqlWorkflowInstanceStoreBehavior in the hosting code. The same set of entries can be added to the Web.config file when you host your workflow services in IIS.
![]() Note The remaining examples in this chapter and Chapter 12 assume that you are loading the instance store in code (as shown in the
Note The remaining examples in this chapter and Chapter 12 assume that you are loading the instance store in code (as shown in the Program.cs file) rather than from the configuration file.
Testing the ServiceHost Project
After building the solution, you should be able to execute the ServiceHost project to ensure that the code to host the workflow service is working properly.
![]() Tip Before you run any WCF-related projects, you will need to start Visual Studio with elevated administrator privileges (the Run as Administrator option in Vista and Windows 7). Doing so avoids any security issues that you would otherwise encounter opening ports.
Tip Before you run any WCF-related projects, you will need to start Visual Studio with elevated administrator privileges (the Run as Administrator option in Vista and Windows 7). Doing so avoids any security issues that you would otherwise encounter opening ports.
When I run the ServiceHost project, I see these results:
Item inventory Before Execution:


ItemId=101, QtyAvailable=10


ItemId=202, QtyAvailable=20


ItemId=303, QtyAvailable=30


Contract: IOrderEntry


    at http://localhost:9000/OrderEntry


Press any key to stop hosting and exit


Item inventory After Execution:


ItemId=101, QtyAvailable=10


ItemId=202, QtyAvailable=20


ItemId=303, QtyAvailable=30


Closing services...


Services closed


Press any key to continue . . .
Admittedly, the results are not very exciting since you don’t yet have a client application that uses this service. You will develop a client application in the next section.
Implementing a Client Project
In this section, you will develop a Windows console client application that exercises the OrderEntryService workflow. Create a new Windows console project named OrderEntryConsoleClient, and add it to the solution for this chapter. Add these references to the project:
Add a service reference to the OrderEntryService that you declared and hosted in the previous sections. To accomplish this, you need to first run the ServiceHost project in order to retrieve the metadata for the service. While the ServiceHost project is running, select the Add Service Reference option for the OrderEntryConsoleClient project. You can use an address of http://localhost:9000 for the service (unless you decided to use a different port when you configured the ServiceHost project). Don’t immediately accept all of the default options for the service reference. Change the namespace to OrderEntryReference, and change the collection type to System.Collections.Generic.List (found under the Advanced options).
Next, add the code to the Program.cs file to interact with the user and to invoke the service operations of the workflow. Here is the complete Program.cs file:
using System;

using System.Collections.Generic;

using System.Configuration;

using System.Data.SqlClient;

using System.ServiceModel.Activities;

using OrderEntryConsoleClient.OrderEntryReference;


namespace OrderEntryConsoleClient

{

    class Program

    {
The initial version of this client application allows the user to start new workflow instances (new orders), add items to the order, and complete the order. In Chapter 12, you will build upon this client to also support querying for existing workflow instances and canceling them. To simplify the later examples, I’ve included some of the code that is related to this additional functionality in this initial version of the code. For example, the queriedInstances variable shown here at the top of the class is not used until the additional functionality is fully implemented.
        static private Int32 lastOrderId = 0;

        static private Dictionary<Int32, Guid> queriedInstances =

            new Dictionary<int, Guid>();
The Main method of the class prompts the user for the command that they want to execute and then invokes the appropriate private method to handle that command.
        static void Main(string[] args)

        {

            Boolean isDone = false;

            while (!isDone)

            {

                Console.WriteLine(

                  "Commands: start | add | complete | query | cancel | exit");

                String command = Console.ReadLine();

                if (String.IsNullOrEmpty(command))

                {

                    command = "exit";

                }

                switch (command.ToLower())

                {

                    case "start":

                        Start();

                        break;

                    case "add":

                        Add();

                        break;

                    case "complete":

                        Complete();

                        break;

                    case "query":

                        Query();

                        break;

                    case "cancel":

                        Cancel();

                        break;

                    case "exit":

                        Console.WriteLine("Exiting application...");

                        isDone = true;

                        break;

                    default:

                        Console.WriteLine("Invalid command");

                        break;

                }

            }

        }


        static Int32 GetOrderId(Boolean isPromptForEntry)

        {

            if (lastOrderId == 0 || isPromptForEntry)

            {

                Console.WriteLine("Enter an OrderId (int) for the order");

                String input = Console.ReadLine();

                Int32 value = 0;

                if (String.IsNullOrEmpty(input))

                {

                    Console.WriteLine("A value must be entered");

                    return value;

                }
                Int32.TryParse(input, out value);


                if (value == 0)

                {

                    Console.WriteLine("OrderId must not be zero");

                    return value;

                }


                lastOrderId = value;

            }


            return lastOrderId;

        }
The Start method is invoked to start a new order. This calls the StartOrder service operation, which creates a new workflow instance.
        static void Start()

        {

            try

            {

                Int32 orderId = GetOrderId(true);

                if (orderId == 0)

                {

                    return;

                }


                OrderEntryReference.OrderEntryClient client =

                    new OrderEntryReference.OrderEntryClient();

                client.StartOrder(orderId);

                lastOrderId = orderId;

                Console.WriteLine("New order {0} started", orderId);

            }

            catch (Exception exception)

            {

                lastOrderId = 0;

                Console.WriteLine("Start Unhandled exception: {0}",

                    exception.Message);

            }

        }
The Add method parses the item ID and quantity that was entered and invokes the AddItem service operation. This adds the requested item and quantity to the existing order. You may recall that the Receive activity for the AddItem operation has its CanCreateInstance property set to false. This means that this operation cannot create a new workflow instance but must instead correlate with an existing instance based on the order ID.
        static void Add()

        {

            try

            {

                Int32 orderId = GetOrderId(false);

                if (orderId == 0)

                {

                    return;

                }


                Console.WriteLine(

                    "Enter ItemId and Quantity (Ex: 101 1)");

                String input = Console.ReadLine();


                Int32 itemId = 0;

                Int32 quantity = 0;

                String[] parts = input.Split(' '),

                if (parts.Length != 2)

                {

                    Console.WriteLine("Incorrect number of arguments entered!");

                    return;

                }

                Int32.TryParse(parts[0], out itemId);

                Int32.TryParse(parts[1], out quantity);

                if (itemId == 0 || quantity == 0)

                {

                    Console.WriteLine("Arguments in incorrect format!");

                    return;

                }


                Item item = new Item

                {

                    ItemId = itemId,

                    Quantity = quantity

                };


                OrderEntryReference.OrderEntryClient client =

                    new OrderEntryReference.OrderEntryClient();

                client.AddItem(orderId, item);

                Console.WriteLine("Ordered {0} of ItemId {1} for OrderId {2}",

                    item.Quantity, item.ItemId, orderId);

            }

            catch (Exception exception)

            {

                lastOrderId = 0;

                Console.WriteLine("Add Unhandled exception: {0}",

                    exception.Message);

            }

        }
The Complete method invokes the OrderComplete operation of the existing workflow instance. Once the response is received, the collection of Item objects that were ordered is displayed.
        static void Complete()

        {

            try

            {

                Int32 orderId = GetOrderId(false);

                if (orderId == 0)

                {

                    return;

                }


                OrderEntryReference.OrderEntryClient client =

                    new OrderEntryReference.OrderEntryClient();

                List<Item> items = client.OrderComplete(orderId);

                lastOrderId = 0;

                Console.WriteLine("Order {0} Is Completed", orderId);

                if (items != null && items.Count > 0)

                {

                    Console.WriteLine("
Ordered Items:");

                    foreach (Item i in items)

                    {

                        Console.WriteLine(

                            "ItemId={0}, Quantity={1}, UnitPrice={2}, Total={3}",

                            i.ItemId, i.Quantity, i.UnitPrice, i.TotalPrice);

                    }

                }

            }

            catch (Exception exception)

            {

                lastOrderId = 0;

                Console.WriteLine("Complete Unhandled exception: {0}",

                    exception.Message);

            }

        }
I’ve included the empty Query and Cancel private methods in this initial version of the client code. You will add the implementation for these methods in later examples that are presented in Chapter 12.
        static void Query()

        {

        }


        static void Cancel()

        {

        }

    }

}
Configuring the Client Project
A fully configured App.config file should have been added to the project when you added a service reference. You should be able to use this file as is without any changes. Your App.config file should look similar to this:
<?xml version="1.0" encoding="utf-8" ?>

<configuration>

  <system.serviceModel>

    <bindings>

      <wsHttpBinding>

        <binding name="WSHttpBinding_IOrderEntry" closeTimeout="00:01:00"

            openTimeout="00:01:00" receiveTimeout="00:10:00"

            sendTimeout="00:01:00"

            bypassProxyOnLocal="false" transactionFlow="false"

            hostNameComparisonMode="StrongWildcard"

            maxBufferPoolSize="524288" maxReceivedMessageSize="65536"

            messageEncoding="Text" textEncoding="utf-8" useDefaultWebProxy="true"

            allowCookies="false">

          <readerQuotas maxDepth="32" maxStringContentLength="8192"

              maxArrayLength="16384"

              maxBytesPerRead="4096" maxNameTableCharCount="16384" />

          <reliableSession ordered="true" inactivityTimeout="00:10:00"

              enabled="false" />

          <security mode="Message">

            <transport clientCredentialType="Windows"

                proxyCredentialType="None" realm="" />

            <message clientCredentialType="Windows"

                negotiateServiceCredential="true"

                algorithmSuite="Default" />

          </security>

        </binding>

      </wsHttpBinding>

    </bindings>

    <client>

      <endpoint address="http://localhost:9000/OrderEntry"

          binding="wsHttpBinding"

          bindingConfiguration="WSHttpBinding_IOrderEntry"

          contract="OrderEntryReference.IOrderEntry"

          name="WSHttpBinding_IOrderEntry">

      </endpoint>

    </client>

  </system.serviceModel>

</configuration>
Testing the Client Project
After rebuilding the solution, you should be ready to these the OrderEntryService using the newly constructed client project. For this test, you need to start both the ServiceHost and OrderEntryConsoleClient projects. The easiest way to accomplish this is to set the startup project option to start multiple projects and select both of these projects.
Here is a representative sample of my results when I run the client project:
Commands: start | add | complete | query | cancel | exit


start


Enter an OrderId (int) for the order


1


New order 1 started


Commands: start | add | complete | query | cancel | exit


add


Enter ItemId and Quantity (Ex: 101 1)


101 1


Ordered 1 of ItemId 101 for OrderId 1


Commands: start | add | complete | query | cancel | exit


add


Enter ItemId and Quantity (Ex: 101 1)


202 2


Ordered 2 of ItemId 202 for OrderId 1
Commands: start | add | complete | query | cancel | exit


complete


Order 1 Is Completed


Ordered Items:


ItemId=101, Quantity=1, UnitPrice=1.23, Total=1.23


ItemId=202, Quantity=2, UnitPrice=2.34, Total=4.68


Commands: start | add | complete | query | cancel | exit


Exiting application...


Press any key to continue . . .
In this sample, I started order number 1 and then added two items to the order: Item 101 with a quantity of 1 and item 202 with a quantity of 2. Finally, I completed the order. Here is the corresponding output from the ServiceHost project:
Item inventory Before Execution:


ItemId=101, QtyAvailable=10


ItemId=202, QtyAvailable=20


ItemId=303, QtyAvailable=30


Contract: IOrderEntry


    at http://localhost:9000/OrderEntry


Press any key to stop hosting and exit
Update: ItemId=101, QtyBefore=10, QtyAfter=9


Update: ItemId=202, QtyBefore=20, QtyAfter=18


Item inventory After Execution:


ItemId=101, QtyAvailable=9


ItemId=202, QtyAvailable=18


ItemId=303, QtyAvailable=30


Closing services...


Services closed


Press any key to continue . . .
Although this works as expected, much more interesting results can be observed if you close and restart the projects in the middle of a test. For example, run the projects once again and start another order, adding one or two items to the order. Now, instead of immediately completing the order, close the projects and then restart them. You can now use the add command to add additional items to the same order (identified by the order ID) and then use the complete command to finish the order. You should see that the order contains all of the items that you entered, regardless of whether they were entered before or after the projects were restarted. This demonstrates that the current state of the workflow was safely persisted while the projects were restarted.
However, with this example, the current inventory values are maintained in memory and are not persisted. That will be remedied in Chapter 12 when you extend this example using a custom PersistenceParticipant class.
Summary
The focus of this chapter was workflow persistence. The chapter included coverage of persistence using the SqlWorkflowInstanceStore with the WorkflowApplication and WorkflowServiceHost classes. Both of these self-hosting classes were used in examples.
In the next chapter, you will learn how to extend the build-in workflow persistence and how to create your own custom instance store.