

This chapter focuses on the mechanisms provided by Windows Workflow Foundation (WF) to support the handling of exceptions and to ensure the consistency of work that is performed within a workflow.
The chapter begins with an overview of the default exception handling logic. Following that introduction, a preliminary example is developed that is used to illustrate the concepts throughout the chapter. Enhancements to the example workflow include using the TryCatch activity to handle exceptions, using the TransactionScope activity to provide transaction support, and using the CompensableActivity to execute compensation logic.
Understanding Default Exception Handling
WF builds upon the standard exception handling provided for all .NET applications. Within any C# code, for example within a custom activity or workflow extension, exceptions can be handled in the normal way using a try/catch code block. If the exception is handled within the code, no further action within the WF runtime environment is necessary.
However, your C# code can elect to not handle an exception, allowing it to bubble up to a higher level in the call stack until either it is handled or it reaches the top of the call stack. WF provides the TryCatch activity (discussed later in this chapter), which allows you to declaratively handle the exception within the workflow model. If the exception reaches the top of the activity call stack without being handled, it is an unhandled exception.
In a normal C# application, an unhandled exception usually causes the application to terminate. In a WF application, an unhandled exception causes the workflow to terminate, but this does not necessarily cause the entire application to terminate. It depends on how you are hosting the workflow.
If you are using the WorkflowInvoker class to execute a workflow, the unhandled exception will reach the host application where it is either handled or not. If you don’t handle it with a try/catch block of code in the host application, then the application will terminate. This makes sense since the WorkflowInvoker class is used to execute a workflow just like an ordinary C# method.
If you are using the WorkflowApplication class to execute a workflow, the unhandled exception is handled internally by the workflow runtime. By default, the workflow instance will terminate, but it won’t take down the entire application.
The WorkflowApplication class provides the OnUnhandledException member that allows you to be notified when an unhandled exception occurs. This member is defined as a Func< WorkflowApplicationUnhandledExceptionEventArgs, UnhandledExceptionAction>, so the code that is assigned to this member is expected to return an UnhandledExceptionAction value. The UnhandledExceptionAction value determines how the unhandled exception is handled. These are the possible values for UnhandledExceptionAction:
Terminate. The root activity of the workflow is scheduled for termination, and then the workflow is resumed. This is the default action if you don’t assign a handler for theOnUnhandledExceptiondelegate. Termination moves the workflow into the Faulted state, which prevents it from being resumed or restarted.Cancel. The root activity is scheduled for cancellation, and then the workflow is resumed. This option allows the workflow to gracefully transition to the Canceled state.Abort. The workflow is immediately aborted. No additional execution is scheduled.
If you return Terminate or Cancel, any code assigned to the WorkflowApplication.Complete delegate is executed when the workflow instance has completed. If Abort is returned, any code assigned to the Aborted delegate is executed.
![]() Note Chapter 10 covers exception handling when you are using the
Note Chapter 10 covers exception handling when you are using the WorkflowServiceHost class.
Implementing the Example Workflow
The first example in this chapter is designed to demonstrate the default processing for an unhandled exception. The remaining examples in this chapter will be variations of the same workflow, each one modified slightly to demonstrate a different aspect of exception handling, transactions, or compensation. But regardless of the actual implementation, the example scenario that you will model is the same: applying updates to product inventory.
The example workflows reference tables in the AdventureWorks SQL Server sample database. This database was chosen because it presents a fairly representative example of a SQL Server database and it is readily available for download from Microsoft. Using an existing database eliminates the need to create the database schema and populate it with sample data before it can be used.
The inventory update scenario that you will implement is fairly simple. The workflow will be passed an integer sales order ID, which identifies the single order to be processed. Any rows in the SalesOrderDetail table that match the specified sales order ID are retrieved. Each row in this table contains the quantity sold for an individual product in the order. These rows are used to drive updates to the ProductInventory table. Each row in this table represents the current inventory for a product at a given location. The current quantity in inventory for the product is reduced by the quantity of each SalesOrderDetail row. A new row is also added to the TransactionHistory table for each product being processed for the order.
It should be noted that this process could be executed for all rows in the SalesOrderDetail table. But the results from such a large update would be difficult to validate. It is much easier to validate the results when only a single sales order ID is processed.
The ultimate goal is to apply all updates to the database as a single atomic unit of work. If the ProductInventory table is updated, the inserts to the TransactionHistory table must also occur. If an exception occurs during the processing, any updates that have already been applied should be rolled back. To enforce consistency of the database updates, a TransactionScope activity will be introduced later in the chapter.
To add a wrinkle to the process, this contrived scenario calls for an external system to also be notified when each product is processed. This notification might be a Windows Communication Foundation (WCF) message to the warehouse to ship the product, an e-mail to a sales representative, or a low-level socket call to a legacy billing system. Regardless of the real purpose of the external system or the mechanism used to communicate, the examples in this chapter will use a simple custom activity to simulate this external system notification. This is sufficient to demonstrate the problem when external systems are included in the process. The problem that arises is that external systems also need to be notified when a problem occurs. And the notification to an external system typically can’t participate in a database transaction. This is where compensation comes to the rescue. The CompensableActivity will be introduced later in the chapter to solve this issue.
![]() Note The examples in this chapter are designed to demonstrate the exception handling, transaction, and compensation mechanisms provided with WF. The
Note The examples in this chapter are designed to demonstrate the exception handling, transaction, and compensation mechanisms provided with WF. The AdventureWorks database is used as a convenience because it is a readily available source of test data. No attempt has been made to accurately reproduce the business functionality of the sample Adventure Works application.
Before you begin the development of this first example, you’ll need to download and install the AdventureWorks sample database. Please refer to the “Preparing the AdventureWorks Sample Database” sidebar in this chapter for instructions.
You will complete these tasks to implement this example:
- Generate LINQ to SQL classes for the
AdventureWorksdatabase.- Implement the
GetOrderDetailactivity to retrieveSalesOrderDetailrows from the database.- Implement the
UpdateProductInventoryactivity to update theProductInventorytable.- Implement the
InsertTransactionHistoryactivity to insert rows into theTransactionHistorytable.- Implement the
ExternalUpdateactivity to simulate the notification to an external system for an order.- Implement the
DisplayProductInventoryactivity to display the current state of selected rows in the database.- Declare the
UpdateInventoryworkflow.- Declare the
DisplayInventoryworkflow.- Host the workflows in a console application.
Preparing the AdventureWorks Sample Database
Enabling LINQ Access to the AventureWorks Database
The examples in this chapter all use LINQ to SQL to access the AdventureWorks database. LINQ (Language INtegrated Query) is used for a couple of reasons. First, LINQ is a great tool for querying and updating tables in your database. Once you generate a data context for the tables that you want to reference, all operations are done in a type-safe way. No more hand-coding of SQL statements, hoping that you didn’t misspell a column or parameter name. Second, the examples all need to pass a collection of rows from one activity to another using workflow variables. The LINQ data context that is generated in the following steps produces a set of strongly typed classes that are perfect for this purpose.
![]() Note The examples in this chapter use simple LINQ statements that should be easily understood even if you have no previous exposure to LINQ. However, if these examples whet your appetite for more LINQ, I’d recommend the book Pro LINQ: Language Integrated Query in C# 2010 by Joseph C. Rattz Jr. and Adam Freeman, also published by Apress.
Note The examples in this chapter use simple LINQ statements that should be easily understood even if you have no previous exposure to LINQ. However, if these examples whet your appetite for more LINQ, I’d recommend the book Pro LINQ: Language Integrated Query in C# 2010 by Joseph C. Rattz Jr. and Adam Freeman, also published by Apress.
To begin, create a new project named AdventureWorksAccess using the C# Class Library project template. This is an ordinary class library, not a workflow-related project. Add this project to a new solution named for this chapter.
You can follow these steps to prepare the LINQ to SQL data context for the AdventureWorks database:
- Add a new LINQ to SQL class to the project, and name it
AdventureWorks.dbml. You can find the template for this new item under the Data category. After adding the file, the Design View should be shown. The designer canvas is used to add the tables that you want to use via LINQ to SQL and is initially empty.- From within Visual Studio, open the Server Explorer window. Right-click Data Connections, and select Add Connection.
- Select Microsoft SQL Server as the database type and Windows Authentication for the credentials unless you’ve configured SQL Server to use SQL Server authentication. In that case, you’ll need to provide a username and password. The server name should be the location of the server that is hosting the
AdventureWorksdatabase. In my case, I’m using a local instance of SQL Server Express, so the server name islocalhostSQLExpress. You’ll need to supply a different server name if you are not using a local SQL Server instance.- Once the server name has been entered, select the
AdventureWorksdatabase on the server. Expand the Tables category for the database. Select and drag all of the tables to the empty designer canvas.- After a few relatively brief moments (depending on the speed of your machine), the canvas will redisplay with all the tables in the database.
You can now save the AdventureWorks.dbml file and build the project. You won’t need to add anything else to this project. This project will be referenced by the other projects that you will create in the subsequent steps.
The process of generating the LINQ to SQL classes also adds an App.config file to the project. You will copy this file to another project in a later step.
Implementing the GetOrderDetail Activity
This example uses a series of custom activities to execute the LINQ queries and updates. Create a new project that will be used for all the custom activities in this chapter. Name the new project ActivityLibrary, and use the Activity Library template. Add this new project to the solution that you created for this chapter. Delete the Activity1.xaml file since will not be used.
Add a project reference to the AdventureWorksAccess project that you created in the previous step. You’ll also need to add a .NET assembly reference to System.Data.Linq and System.Transactions.
Add a new custom activity named GetOrderDetail to the project using the Code Activity template. The purpose of this activity is to retrieve selected SalesOrderDetail rows from the database and return them as a collection that can be consumed by other activities.
This activity is implemented as an asynchronous activity using AsyncCodeActivity as its base class. This allows the actual LINQ query to execute on a separate background thread, freeing the primary workflow thread for other work. Although this is not a strict requirement, it is generally good practice to execute database queries and updates on a separate thread. Your workflows won’t always take full advantage of the parallel processing that this enables. But implementing the custom activity to use asynchronous processing keeps your options open. It allows you to model the workflow to effectively use parallel processing in those situations where it would be beneficial.
Here is the code for the GetOrderDetail activity:
using System;

using System.Activities;

using System.Collections.Generic;

using System.Linq;

using AdventureWorksAccess;


namespace ActivityLibrary

{

    public sealed class GetOrderDetail : AsyncCodeActivity

    {
The SalesOrderId argument identifies the single sales order ID that you want to process. The OrderDetail output argument will contain the list of SalesOrderDetail rows that are retrieved. The SalesOrderDetail class was one of the classes that was generated when you prepared the AdventureWorksAccess project. This class mirrors the definition of the SalesOrderDetail table in the database and contains an individual property for each column in the table.
        public InArgument<Int32> SalesOrderId { get; set; }

        public OutArgument<List<SalesOrderDetail>> OrderDetail { get; set; }


        protected override IAsyncResult BeginExecute(

            AsyncCodeActivityContext context, AsyncCallback callback,

            object state)

        {
The LINQ query is executed on a separate thread using a Func generic delegate. The delegate is defined as requiring a single Int32 as its only input parameter and returning a List<SalesOrderDetail> as the result. The target of the delegate is set to the RetrieveOrderDetail private method of this class. After creating an instance of the delegate, the BeginInvoke method is called to begin the processing on a thread pool thread. Notice that the input argument (SalesOrderId) is accessed here in the main workflow thread since it cannot be accessed from a worker thread.
            Func<Int32, List<SalesOrderDetail>> asyncWork =

                orderId => RetrieveOrderDetail(orderId);

            context.UserState = asyncWork;

            return asyncWork.BeginInvoke(

                SalesOrderId.Get(context), callback, state);

        }
The EndExecute method is invoked on the workflow thread when the asynchronous work (the RetrieveOrderDetail method) completes. When this occurs, the EndInvoke method is called on the Func delegate, which was passed in the context.UserState. The call to EndInvoke returns the result from the Func delegate, which in this case is a List<SalesOrderDetail>. This result value is used to set the OrderDetail output argument.
        protected override void EndExecute(

            AsyncCodeActivityContext context, IAsyncResult result)

        {

            List<SalesOrderDetail> orderDetail =

                ((Func<Int32, List<SalesOrderDetail>>)

                    context.UserState).EndInvoke(result);

            if (orderDetail != null)

            {

                OrderDetail.Set(context, orderDetail);

            }

        }
The RetrieveOrderDetail method is where the actual LINQ query is executed on a worker thread. The AdventureWorksDataContext was one of the classes generated in the AdventureWorksAccess project and provides access to the tables in the database. The LINQ query syntax is then used to retrieve the rows that match the specified SalesOrderId.
You might notice that the code doesn’t specify a connection string for the database. The default constructor for the AdventureWorksDataContext class retrieves the database connection string from the app.config file. A sample app.config file containing the connection string was generated for the AdventureWorksAccess project. In a later step, you will copy this app.config to the console application that hosts the example workflow.
        private List<SalesOrderDetail> RetrieveOrderDetail(Int32 salesOrderId)

        {

            List<SalesOrderDetail> result = new List<SalesOrderDetail>();

            using (AdventureWorksDataContext dc =

                new AdventureWorksDataContext())

            {

                var salesDetail =

                    (from sd in dc.SalesOrderDetails

                     where sd.SalesOrderID == salesOrderId

                     select sd).ToList();


                if (salesDetail != null && salesDetail.Count > 0)

                {

                    result = salesDetail;

                }

            }

            return result;

        }

    }

}
Implementing the UpdateProductInventory Activity
Add a new custom activity named UpdateProductInventory to the ActivityLibrary project. This activity uses the properties from a single SalesOrderDetail row to update the ProductInventory table. Just like the GetOrderDetail activity that you just implemented, this activity is also coded to use asynchronous processing. Here is the code for this activity:
using System;

using System.Activities;

using System.Linq;

using System.Transactions;

using AdventureWorksAccess;


namespace ActivityLibrary

{

    public sealed class UpdateProductInventory : AsyncCodeActivity

    {
This activity has a single input argument containing a SalesOrderDetail object. This object represents a single row in the SalesOrderDetail table.
        public InArgument<SalesOrderDetail> SalesDetail { get; set; }


        protected override IAsyncResult BeginExecute(

            AsyncCodeActivityContext context,

            AsyncCallback callback, object state)

        {
The code to asynchronously execute the LINQ update is similar to what you have already seen in the GetOrderDetail activity. One major difference is that this code creates a DependentTransaction. Although this initial example doesn’t use a transaction, subsequent examples do, so it’s easier to implement the code to properly handle the transaction now rather than to revisit it later.
If you implemented this activity using the CodeActivity class and executed the LINQ update on the workflow thread, you wouldn’t need to create a DependentTransaction. In fact, the next activity that you’ll implement is implemented this way so you can see the contrast between the two coding styles.
In this activity, the DependentTransaction is needed because ambient transactions do not automatically flow to worker threads. If an ambient transaction exists (Transaction.Current is not null), the DependentClone method is called to create a DependentTransaction. The BlockCommitUntilComplete option is used when creating the DependentTransaction. This option causes the original transaction to block during commit processing until the DependentTransaction has signaled that its work is complete. This allows the worker thread to coordinate its work with the original thread.
The DependentTransaction that is created is passed to the private UpdateInventory method along with the SalesOrderDetail object.
            DependentTransaction dependentTran = null;

            if (Transaction.Current != null)

            {

                dependentTran = Transaction.Current.DependentClone(

                    DependentCloneOption.BlockCommitUntilComplete);

            }
            Action<DependentTransaction, SalesOrderDetail> asyncWork =

                (dt, sale) => UpdateInventory(dt, sale);

            context.UserState = asyncWork;

            return asyncWork.BeginInvoke(

                 dependentTran, SalesDetail.Get(context), callback, state);

        }


        protected override void EndExecute(

            AsyncCodeActivityContext context, IAsyncResult result)

        {

            ((Action<DependentTransaction, SalesOrderDetail>)

                context.UserState).EndInvoke(result);

        }


        private void UpdateInventory(DependentTransaction dt,

            SalesOrderDetail salesDetail)

        {

            try

            {

                using (AdventureWorksDataContext dc =

                    new AdventureWorksDataContext())

                {
The UpdateInventory method is invoked on the worker thread. A TransactionScope is created using the DependentTransaction (if it exists). Remember that a DependentTransaction is created in the previous code only if an ambient transaction already exists. If it doesn’t, a null value is passed to this method, and a new TransactionScope is created using the Suppress option. This suppresses creation of a transaction and allows this activity to be used with or without a transaction.
                    //use the dependent transaction if there is one,

                    //or suppress the creation of a new transaction

                    using (TransactionScope scope = (dt != null ?

                        new TransactionScope(dt) :

                        new TransactionScope(TransactionScopeOption.Suppress)))

                    {
The existing ProductInventory row is retrieved. If the row exists, the Quantity and ModifiedDate properties are updated. The call to SubmitChanges is the signal for LINQ to submit all changes to the database. Following this call, the local TransactionScope is completed, indicating that any changes should be committed to the database. But since the local TransactionScope is using the DependentTransaction (or no transaction at all), the actual commit is deferred until the original transaction is committed.
                        var inventoryRow =

                            (from pi in dc.ProductInventories

                             where pi.ProductID == salesDetail.ProductID

                                && pi.LocationID == 7 //finished goods storage

                             select pi).SingleOrDefault();
                        if (inventoryRow != null)

                        {

                            inventoryRow.Quantity -= salesDetail.OrderQty;

                            inventoryRow.ModifiedDate = DateTime.Now;

                            Console.WriteLine(

                                "Product {0}: Reduced by {1}",

                                inventoryRow.ProductID, salesDetail.OrderQty);

                            dc.SubmitChanges();

                        }


                        scope.Complete();

                    }

                }

            }

            finally

            {
Regardless of the success or failure of the LINQ operation, the DependentTransaction must be marked as complete. This is the signal to the original transaction that this worker thread has completed its work using the DependentTransaction. If this isn’t done, the original transaction will block its thread when it is committed.
                //the DependentTransaction must be completed otherwise

                //the ambient transaction will block on complete

                if (dt != null)

                {

                    dt.Complete();

                    dt.Dispose();

                }

            }

        }

    }

}
Implementing the InsertTranHistory Activity
Add another custom activity to the ActivityLibrary project using the Code Activity template. Name this activity InsertTranHistory. Its purpose is to insert a row into the TransactionHistory table for each product that is processed.
Unlike the two previous activities, this one is implemented using the synchronous CodeActivity as the base class. This was done to illustrate the differences in the code between the asynchronous and synchronous activities that update the database.
Here is the complete code for this activity:
using System;

using System.Activities;

using System.Linq;

using AdventureWorksAccess;

using System.Transactions;
namespace ActivityLibrary

{

    public sealed class InsertTranHistory : CodeActivity

    {

        public InArgument<SalesOrderDetail> SalesDetail { get; set; }


        protected override void Execute(CodeActivityContext context)

        {
You’ll immediately notice how much simpler this code is compared to the previous asynchronous activities. The code uses the properties of the SalesOrderDetail that is passed as an input argument to insert a new TransactionHistory row in the database.
Even though this activity is applying an update to the database (like the UpdateProductInventory activity just reviewed), there is no need for a DependentTransaction. A DependentTransaction is necessary only if the actual LINQ update is taking place on a worker thread. All of this code executes on the workflow thread, and any ambient transaction that exists when it is executed will be used.
            SalesOrderDetail salesDetail = SalesDetail.Get(context);


            using (AdventureWorksDataContext dc =

                new AdventureWorksDataContext())

            {

                var historyRow = new TransactionHistory();

                historyRow.ProductID = salesDetail.ProductID;

                historyRow.ModifiedDate = DateTime.Now;

                historyRow.Quantity = salesDetail.OrderQty;

                historyRow.TransactionDate = salesDetail.ModifiedDate;

                historyRow.TransactionType = 'S';

                historyRow.ReferenceOrderID = salesDetail.SalesOrderID;

                historyRow.ReferenceOrderLineID

                    = salesDetail.SalesOrderDetailID;


                dc.TransactionHistories.InsertOnSubmit(historyRow);

                dc.SubmitChanges();

                Console.WriteLine(

                    "Product {0}: Added history for Qty of {1} ",

                    salesDetail.ProductID, salesDetail.OrderQty);

            }

        }

    }

}
Implementing the ExternalUpdate Activity
You also need a custom activity to simulate a notification to an external system for the order. Add a new custom activity to the ActivityLibrary project using the Code Activity template. Name the new activity ExternalUpdate.
Unlike the previous activities, this one doesn’t really produce any useful results. It simply writes messages to the console to let us know that it is executing. After all, it is just a simulation. Here is the code that you’ll need to implement this class:
using System;

using System.Activities;

using System.Collections.Generic;

using AdventureWorksAccess;


namespace ActivityLibrary

{

    public sealed class ExternalUpdate : CodeActivity

    {

        public InArgument<Int32> SalesOrderId { get; set; }

        public InArgument<List<SalesOrderDetail>> OrderDetail { get; set; }


        protected override void Execute(CodeActivityContext context)

        {

            String operation = "record new sale";

            Console.WriteLine(

                "Order Id {0}: Notifying external system to {1}",

                SalesOrderId.Get(context), operation);

            foreach (SalesOrderDetail detail in OrderDetail.Get(context))

            {

                Console.WriteLine(

                    "Product {0}: {1}", detail.ProductID, operation);

            }

        }

    }

}
Implementing the DisplayProductInventory Activity
Since the example workflow updates the AdventureWorks database, you also need a way to independently verify the results of the update. To accomplish this, you will implement another custom activity that queries the database and displays the current state of selected rows on the console. This custom activity will be used in a second workflow that is executed during each round of tests.
Add a new Code Activity to the ActivityLibrary project, and name it DisplayProductInventory. Here is the complete code for this new activity:
using System;

using System.Activities;

using System.Linq;

using AdventureWorksAccess;


namespace ActivityLibrary

{

    public sealed class DisplayProductInventory : AsyncCodeActivity

    {
The Description property is used to display a message along with the current state of the database rows. The message will indicate whether this execution of the activity is displaying the state of the database before or after the inventory update test.
        public InArgument<String> Description { get; set; }

        public InArgument<SalesOrderDetail> SalesDetail { get; set; }


        protected override IAsyncResult BeginExecute(

            AsyncCodeActivityContext context, AsyncCallback callback,

            object state)

        {

            Action<SalesOrderDetail, String> asyncWork =

                (sale, desc) => DisplayInventory(sale, desc);

            context.UserState = asyncWork;

            return asyncWork.BeginInvoke(

                SalesDetail.Get(context), Description.Get(context),

                callback, state);

        }


        protected override void EndExecute(

            AsyncCodeActivityContext context, IAsyncResult result)

        {

            ((Action<SalesOrderDetail, String>)

                context.UserState).EndInvoke(result);

        }


        private void DisplayInventory(SalesOrderDetail salesDetail, String desc)

        {
The LINQ queries are similar to what you have already seen in previous activities. A selected ProductInventory row is retrieved along with a TransactionHistory row for the same product.
The plan is to run multiple tests against this same database using slightly different versions of the example workflow. Therefore, this code can’t simply test for the existence of a TransactionHistory row to determine whether the history was successfully added. History rows from previous test runs could already exist, thus skewing the results. For this reason, the query for the TransactionHistory table uses the ModifiedDate column of the table to filter the results, only looking for rows that were added within the last three seconds.
            using (AdventureWorksDataContext dc =

                new AdventureWorksDataContext())

            {

                var inventoryRow =

                    (from pi in dc.ProductInventories

                     where pi.ProductID == salesDetail.ProductID

                        && pi.LocationID == 7 //finished goods storage

                     select pi).SingleOrDefault();


                Boolean historyRowFound =

                    (from th in dc.TransactionHistories

                     where th.ProductID == salesDetail.ProductID

                      && (DateTime.Now - th.ModifiedDate < new TimeSpan(0, 0, 3))

                     select th).Any();
                if (inventoryRow != null)

                {

                    Console.WriteLine("Product {0}: {1} - {2} - {3}",

                        inventoryRow.ProductID, inventoryRow.Quantity, desc,

                        (historyRowFound ? "History Row Found" : "No History"));

                }

            }

        }

    }

}
Declaring the UpdateInventory Workflow
Before you continue with this example, you should build the solution. This ensures that all of the custom activities build correctly and are available for your use in the Toolbox.
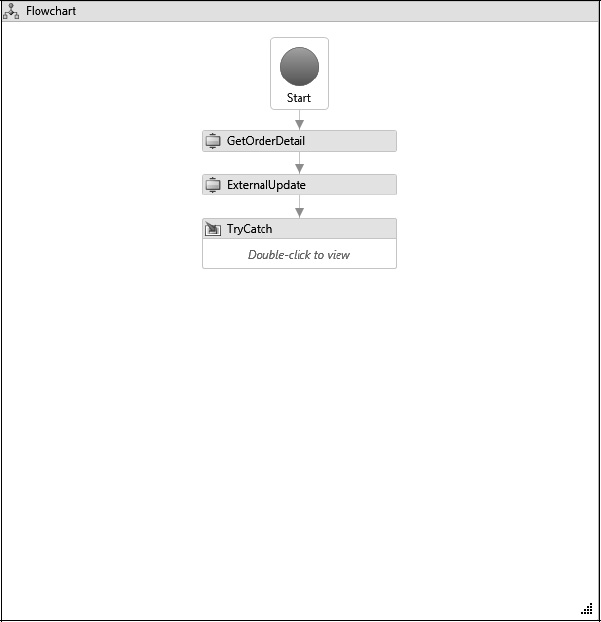
Create a new project to host the example workflow. Name the project UpdateInventory, and use the Workflow Console Application template. Add the new project to the solution for this chapter, and delete the Workflow1.xaml file since it won’t be used. Add these references to the project:
- Project reference to the
AdventureWorksAccessproject- Project reference to the
ActivityLibraryproject- .NET assembly reference to
System.Data.Linq- .NET assembly reference to
System.Transactions
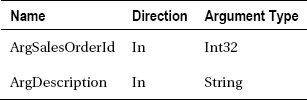
Add a new workflow to the project using the Activity template, and name it UpdateInventory. Begin the declaration of the workflow by adding a Flowchart activity to the empty workflow and then adding these arguments:

The workflow also requires this single variable:

Please follow these steps to complete the declaration of the workflow:
- Add a
GetOrderDetailactivity to the flowchart. Set theOrderDetailproperty toOrderDetailand theSalesOrderIdproperty toArgSalesOrderId. This activity will retrieve theSalesOrderDetailrows for the requestedArgSalesOrderIdand place the result in theOrderDetailvariable. Drag a connection from the start of the flowchart to the top of this activity.- Add an
ExternalUpdateactivity to the flowchart below theGetOrderDetail. Set theOrderDetailproperty toOrderDetailand theSalesOrderIdproperty toArgSalesOrderId. Drag a connection between theGetOrderDetailactivity and this activity.- Add a
ForEach<T>activity below theExternalUpdateactivity. Set the generic type toAdventureWorksAccess.SalesOrderDetail, and set theValuesproperty to theOrderDetailvariable. Change theDisplayNametoApplyUpdatesto better identify the purpose of this activity. Drag a connection from theExternalUpdateactivity to this activity.- Expand the
ApplyUpdatesactivity (theForEach<T>that you just added), and add anUpdateProductInventoryactivity as the only child. Set theSalesDetailproperty toitem. Figure 13-1 shows the completedApplyUpdatesactivity.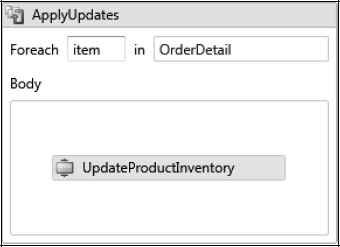
Figure 13-1. ApplyUpdates ForEach activity
- Navigate to the root
Flowchartactivity, and add aFlowDecisionbelow theApplyUpdatesactivity. Drag a connection from theApplyUpdatesto the top of theFlowDecision. Set theFlowDecision.Conditionproperty toArgIsDemoException. The purpose of theFlowDecisionis to model a contrived exception that can be triggered externally by setting theArgIsDemoExceptionargument to true. This allows the workflow to be executed first without any exception and then with a forced exception in order to compare the results.- Add a
Throwactivity below and to the left of theFlowDecision. Drag a connection from the left side of theFlowDecision(the true side) to theThrowactivity. Set theThrow.Exceptionproperty toNew DivideByZeroException("Throw a demo exception!").- Add a generic
ForEach<T>activity below and to the right of theFlowDecisionactivity. Set the generic type toAdventureWorksAccess.SalesOrderDetail, and set theValuesproperty to theOrderDetailvariable. Change theDisplayNameproperty toInsertHistory. Drag a connection from the right side of theFlowDecision(the false side) to the newForEachactivity.- Expand the
InsertHistoryactivity, and add anInsertTranHistoryactivity as the only child. Set theSalesDetailproperty toitem. Figure 13-2 shows the completedInsertHistoryactivity.
Figure 13-3 shows the completed workflow.
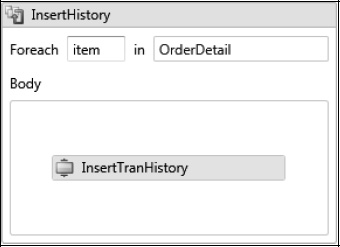
Figure 13-2. InsertHistory ForEach activity
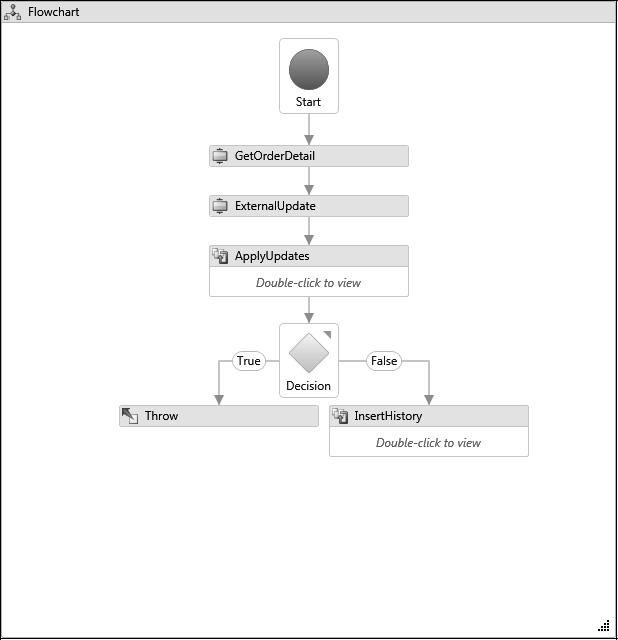
Figure 13-3. UpdateInventory workflow
Declaring the DisplayInventory Workflow
A second workflow is needed to verify the results of each test. This workflow uses the DisplayProductInventory custom activity that you implemented in a previous step to display the current state of the database.
Add a new workflow to the UpdateInventory project, and name it DisplayInventory. Start the declaration of this workflow by adding a Flowchart activity as the root and then adding these arguments:
The workflow also requires this single variable:

Please follow these steps to complete the declaration of the workflow:
- Add a
GetOrderDetailactivity to the flowchart. Set theOrderDetailproperty toOrderDetailand theSalesOrderIdproperty toArgSalesOrderId. Drag a connection from the start of the flowchart to the top of this activity.- Add a
ForEach<T>activity under theGetOrderDetailactivity. Set the generic type toAdventureWorksAccess.SalesOrderDetailand theValuesproperty toOrderDetail. Change theDisplayNameproperty toDisplay. Drag a connection from the bottom of theGetOrderDetailto this activity.- Expand the
Displayactivity, and add aDisplayProductInventoryactivity. Set theSalesDetailproperty toitemand theDescriptionproperty toArgDescription. You can see the completedDisplayactivity in Figure 13-4.
Figure 13-5 shows the completed workflow.
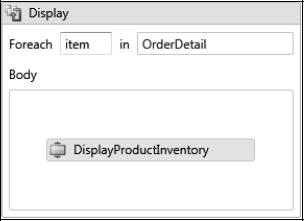
Figure 13-4. Display ForEach activity
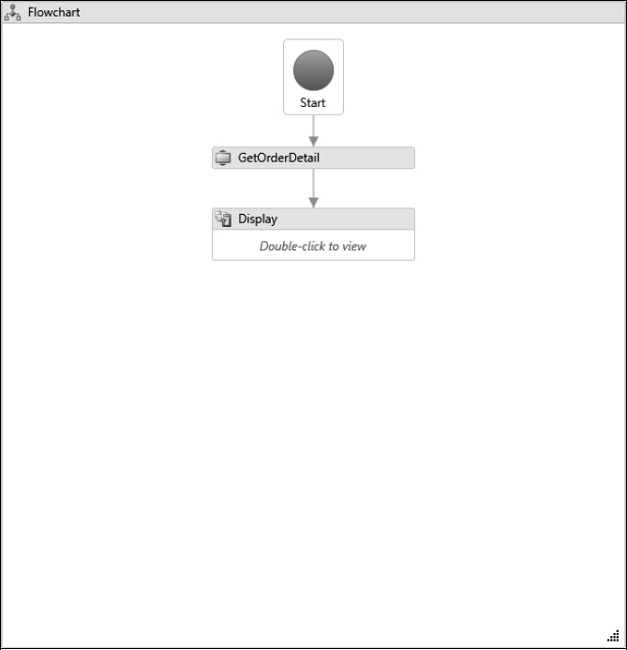
Figure 13-5. DisplayInventory workflow
Hosting the Workflow
The LINQ queries in the custom activities all use the default constructor for the generated data context class. This means that they will attempt to retrieve the database connection string from an app.config file. An app.config file containing the correct entries was created for you in the AdventureWorksAccess project when you first generated the LINQ classes. You should be able to copy the app.config file from that project and add the copy to the UpdateInventory project. If the UpdateInventory project already has an app.config file, you can safely replace its contents. Here is the app.config file that I’m using on my machine. Yours may be slightly different depending on your server name and database credentials.
<?xml version="1.0" encoding="utf-8" ?>

<configuration>

  <configSections>

  </configSections>

  <connectionStrings>

    <add name=

      "AdventureWorksAccess.Properties.Settings.AdventureWorksConnectionString"

        connectionString="Data Source=localhostSQLExpress;

           Initial Catalog=AdventureWorks;Integrated Security=True"

        providerName="System.Data.SqlClient" />

  </connectionStrings>

</configuration>
Modify the Program.cs file in the UpdateInventory project to host the workflow. Here is the complete Program.cs file:
using System;

using System.Activities;

using System.Collections.Generic;

using System.Threading;


namespace UpdateInventory

{

    class Program

    {

        static void Main(string[] args)

        {
The code to execute the workflow has been pushed off into a private RunWorkflow method. This allows you to easily run multiple instances of the example workflow with different parameters for each execution. For this example, the first execution passes false as the last parameter, and the second execution passes true. This parameter is passed to the workflow as the ArgIsDemoException argument. This means that the first execution should complete successfully while the second execution should throw an exception.
As you work through the remaining examples in this chapter, you will modify these lines in the Main method to execute enhanced versions of the example workflow.
The magic 43687 number is an order ID that can be found in the AdventureWorks database. It has no special meaning other than it provides a small amount of test data that can be used to exercise the example workflow.
Console.WriteLine("UpdateInventory without exception");

            RunWorkflow(new UpdateInventory(), 43687, false);

            Thread.Sleep(4000);


            Console.WriteLine("
UpdateInventory with exception");

            RunWorkflow(new UpdateInventory(), 43687, true);

            Thread.Sleep(4000);

        }


        private static void RunWorkflow(Activity wf,

            Int32 orderId, Boolean isDemoException)

        {

            try

            {
Before the example workflow is executed, the private DisplayInventory method is invoked. This method (defined toward the end of this listing) executes the DisplayInventory workflow that displays the current state of the database. It is also executed after the example workflow has completed. This allows you to compare the values before and after the execution of the example workflow to identify any changes that have been made to the data.
                DisplayInventory(orderId, "Starting");

                AutoResetEvent syncEvent = new AutoResetEvent(false);

                WorkflowApplication wfApp =

                    new WorkflowApplication(wf, new Dictionary<String, Object>

                        {

                            {"ArgSalesOrderId", orderId},

                            {"ArgIsDemoException", isDemoException}

                        });


                wfApp.Completed = delegate(

                    WorkflowApplicationCompletedEventArgs e)

                {

                    syncEvent.Set();

                };
Note that the handler for the OnUnhandledException delegate returns the Cancel action. This is necessary to execute any compensation logic that has been declared. It isn’t necessary for this first example but will be required later in the chapter when you are working through the compensation examples.
                wfApp.OnUnhandledException = delegate(

                    WorkflowApplicationUnhandledExceptionEventArgs e)

                {

                    Console.WriteLine("OnUnhandledException: {0}",

                        e.UnhandledException.Message);

                    return UnhandledExceptionAction.Cancel; //needed to compensate

                };


                wfApp.Run();
                syncEvent.WaitOne();

                DisplayInventory(orderId, "Ending");

            }

            catch (Exception exception)

            {

                Console.WriteLine("Exception: {0}", exception.Message);

            }

        }
Here is the private DisplayInventory method that is invoked before and after each workflow test. To simplify the execution of the DisplayInventory workflow, the WorkflowInvoker class is used.
        private static void DisplayInventory(Int32 orderId, String desc)

        {

            WorkflowInvoker.Invoke(

                new DisplayInventory(), new Dictionary<String, Object>

                    {

                        {"ArgSalesOrderId", orderId},

                        {"ArgDescription", desc}

                    });

        }

    }

}
Testing the Workflow
You should now be ready to build the solution and run the UpdateInventory project. Here are my results when I run the project:
UpdateInventory without exception


Product 768: 67 - Starting - No History


Product 765: 56 - Starting - No History


Order Id 43687: Notifying external system to record new sale


Product 768: record new sale


Product 765: record new sale


Product 768: Reduced by 1


Product 765: Reduced by 2


Product 768: Added history for Qty of 1


Product 765: Added history for Qty of 2
Product 768: 66 - Ending - History Row Found


Product 765: 54 - Ending - History Row Found


UpdateInventory with exception


Product 768: 66 - Starting - No History


Product 765: 54 - Starting - No History


Order Id 43687: Notifying external system to record new sale


Product 768: record new sale


Product 765: record new sale


Product 768: Reduced by 1


Product 765: Reduced by 2


OnUnhandledException: Throw a demo exception!


Product 768: 65 - Ending - No History


Product 765: 52 - Ending - No History
These results assume that this test was run against a fresh copy of the AdventureWorks database with no previous tests having been run against the data.
The starting inventory for the two products in the selected order was displayed prior to the execution of the workflow (quantity of 67 and 56, respectively). The “No History” message indicates that no history rows exist for these two products in the TransactionHistory table.
The first execution of the UpdateInventory workflow should have completed without any exception. The console entries show that a notification to an external system was simulated, followed by the updates to the ProductInventory table (reducing the quantity by one and two units, respectively) and by the insertion of TransactionHistory rows.
The DisplayInventory workflow was again executed to display the new state of the database. This time the results show that the inventory was correctly reduced (from 67 to 66 and from 56 to 54) and that the history rows were now found.
It’s not really a problem if your results are slightly different than these. In particular, if the beginning and ending inventory counts are different, it may mean that you have a slightly different version of the AdventureWorks database. What is important is the relative difference in inventory counts between the starting and ending values and the presence or absence of history rows.
The second execution of the UpdateInventory workflow should have generated an exception. The results show that the external system was notified and the inventory was reduced, but the history rows were not inserted due to the exception. As expected, the OnUnhandledException code in the host program was invoked to handle the exception.
This second workflow instance that threw an unhandled exception highlights several problems that will be solved in subsequent examples:
- The exception was unhandled by the workflow, deferring the responsibility of handling the exception to the host application. Handling the exception within the workflow may provide a better opportunity to correct the problem.
- The
ProductInventorytable was updated, but theTransactionHistorytable was not, leaving the database in an inconsistent state. To ensure consistency, the workflow should roll back the updates to theProductInventorytable or make sure that the inserts to theTransactionHistorytable always succeed.- The external system was notified of the order for the two products, but not notified when the update failed due to the exception. If the update is executed again, the external system will once again be notified, possibly causing duplicate processing of the order. Optimally, the external system should be notified of the failure and instructed to ignore the previous sales notification.
Understanding the TryCatch Activity
The mechanism that WF provides to declaratively catch and process an exception is the TryCatch activity. This activity is used in a similar way to the try and catch C# keywords. Here are the most important properties of the TryCatch activity:
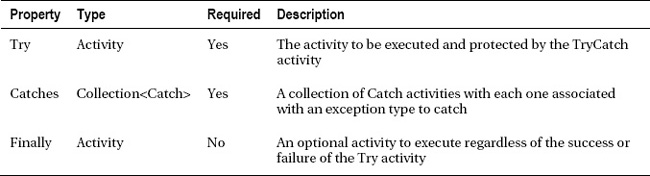
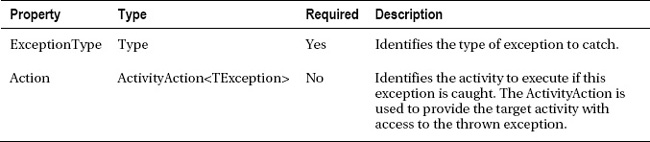
You use the TryCatch activity by declaring the activity that you want to execute in the Try property. You then declare one or more exceptions that you want to catch using the Catches property. Each exception is defined as a Catch<TException> activity, which supports these properties:
The TryCatch logic will always attempt to find the correct Catch<TException> regardless of the sequence in which the Catches are defined. This is in contrast with a C# try/catch block that requires you to order the individual exceptions from most specific to most general. For example, in a C# try/catch block, if you want to catch DivideByZeroException (the derived class) and ArithmeticException (the base class), you must declare the most specific exception first (DivideByZeroException). Although the TryCatch activity does process the Catches in the order in which they are specified, in most cases the sequence doesn’t matter. The TryCatch activity first looks for an exact match using the exception type. If an exact match is found, no additional searching is necessary. If an exact match is not found, the logic looks for the closest candidate exception type using the IsAssignableFrom and IsSubclassOf methods of the Type class.
You can also specify an optional activity to execute using the Finally property. If declared, the activity is executed immediately following the Try activity and any Catches. The TryCatch activity also supports the declaration of variables.
![]() Warning Under normal circumstances, any activity that you specify for the
Warning Under normal circumstances, any activity that you specify for the Finally property is executed following the Try activity and any Catches. However, if the Try activity throws an unhandled exception (one that is not caught by any of the Catches), the Finally activity might not execute. It depends on how the unhandled exception is ultimately handled. If the workflow is canceled (a graceful shutdown of the workflow), then the Finally activity is executed. But if the workflow is aborted or terminated, the Finally activity is never executed.
Using the TryCatch Activity
In this example, you will modify a copy of the UpdateInventory workflow from the previous example to add a TryCatch activity. The TryCatch activity will catch the exception locally within the workflow rather than allowing it to bubble up to the host application as an unhandled exception.
You will complete these tasks to implement this example:
- Make a copy of the
UpdateInventoryworkflow.- Modify the copied workflow to use a
TryCatchactivity.- Modify the host application to execute the new workflow.
Declaring the UpdateInventoryTryCatch Workflow
To begin this example, make a copy of the UpdateInventory.xaml file, and name the copy UpdateInventoryTryCatch.xaml. You can place the copy in the same UpdateInventory project as the original workflow. Open the copied UpdateInventoryTryCatch.xaml file in the XML editor (Code View), and modify the workflow name. Here is an abbreviated example of the Xaml file showing the changes that you need to make:
<Activity x:Class="UpdateInventory.UpdateInventoryTryCatch" />

…

</Activity>
Once you’ve renamed the workflow, you can save the changes and open the workflow in the designer view. Please follow these steps to modify the UpdateInventoryTryCatch workflow:
- Add a
TryCatchactivity to the flowchart.- Expand the
TryCatch, and add aFlowchartactivity to theTryproperty. Adding aFlowchartallows you to easily cut and paste selected activities from the top-levelFlowchartto theTryCatchactivity. Change theDisplayNameof the newFlowcharttoTCFlowchartto more easily distinguish it from the top-levelFlowchartof the workflow.- Return to the top-level
Flowchart, and select a group of four activities:ApplyUpdates,FlowDecision,Throw, andInsertHistory. Right-click and select the Cut option for these activities.- Expand the
TryCatchactivity and theTCFlowchartunder it. Select the Paste option to add the four activities that you moved from the top-levelFlowchart. These four activities should have been copied with their connections intact. But you will need to drag a new connection from the starting point of theTCFlowchartto the top of theApplyUpdatesactivity. Figure 13-6 shows the completedTCFlowchartactivity.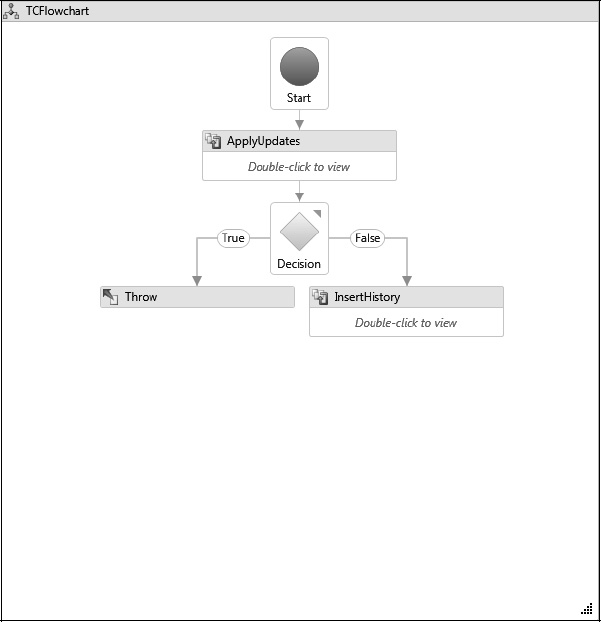
- Return to the
TryCatch, and select the Add new catch option. You will be prompted to select the type of exception that you want to catch. ChooseSystem.ArithmeticException.- Add a
WriteLineactivity to the newly added catch forSystem.ArithmeticException. Set theWriteLine.Textproperty toString.Format("Caught ArithmeticException: {0}", exception.Message)to display the exception message on the console. Figure 13-7 shows the completedTryCatchactivity.- Return to the top-level
Flowchart, and drag a new connection from theExternalUpdateto the top of theTryCatch. Figure 13-8 shows the completed top-level of the workflow.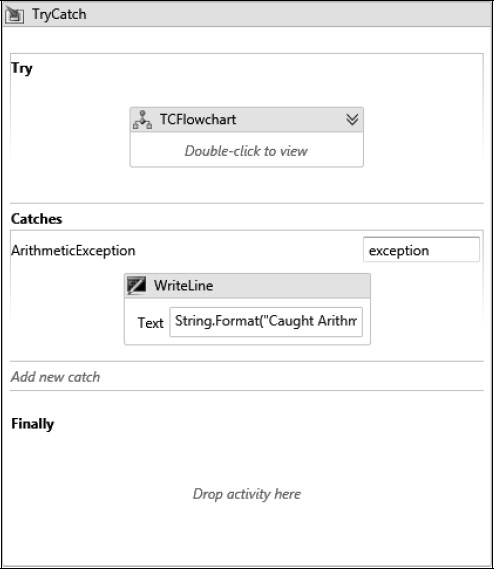
Figure 13-7. TryCatch activity
Hosting the Workflow
To execute this new workflow, you only have to revise a few lines in the Program.cs file. Replace the lines in the Main method that executed the UpdateInventory workflow with these lines:
using System;

using System.Activities;

using System.Collections.Generic;

using System.Threading;


namespace UpdateInventory

{

    class Program

    {

        static void Main(string[] args)

        {

            Console.WriteLine("UpdateInventoryTryCatch with exception");

            RunWorkflow(new UpdateInventoryTryCatch(), 43687, true);

            Thread.Sleep(4000);

        }

…

    }

}
Testing the Workflow
After building the solution, you should be able to run the UpdateInventory project. Here are my results:
UpdateInventoryTryCatch with exception


Product 768: 65 - Starting - No History


Product 765: 52 - Starting - No History


Order Id 43687: Notifying external system to record new sale


Product 768: record new sale


Product 765: record new sale


Product 768: Reduced by 1


Product 765: Reduced by 2


Caught ArithmeticException: Throw a demo exception!


Product 768: 64 - Ending - No History


Product 765: 50 - Ending - No History
The results indicate that the exception was caught by the TryCatch activity rather than the host application. These results assume that the workflow was executed immediately following the previous test. If you executed the previous example workflow more than once, the current inventory numbers for each product will be different.
Catching Multiple Exceptions
The previous example caught a single exception (ArithmeticExpression), but you can also declare a catch for multiple exceptions. In this example, you will revise the UpdateInventoryTryCatch workflow to catch an additional exception (DivideByZeroException). Catching multiple exceptions allows you to declare a different set of activities to handle each type of exception.
However, catching the exception doesn’t really solve any of the problems that are present with this workflow. In particular, the ProductInventory and TransactionHistory tables are still inconsistent after execution of the workflow. One solution is to modify the workflow so that the updates to the TransactionHistory table always occur, even when an exception has been thrown. In this example, you will use the Finally property of the TryCatch to accomplish this.
Please follow these steps to modify the existing UpdateInventoryTryCatch workflow:
- Expand the
TryCatchactivity, and add a new catch. SelectSystem.DivideByZeroExceptionas the type of exception to catch. The sequence of the new catch relative to the previous one does not matter.- Add a
WriteLineto the new catch. Set theWriteLine.Textproperty toString.Format("Caught DivideByZeroException: {0}", exception.Message).- Expand the
TCFlowchartactivity, and cut theInsertHistoryactivity from theFlowchart(removing it fromTCFlowchart).- Return to the
TryCatch, and paste theInsertHistoryactivity that you cut into theTryCatch.Finallyproperty. This will cause theInsertHistoryactivity to be executed even when an exception occurs. Figure 13-9 shows the modifiedTryCatchactivity.
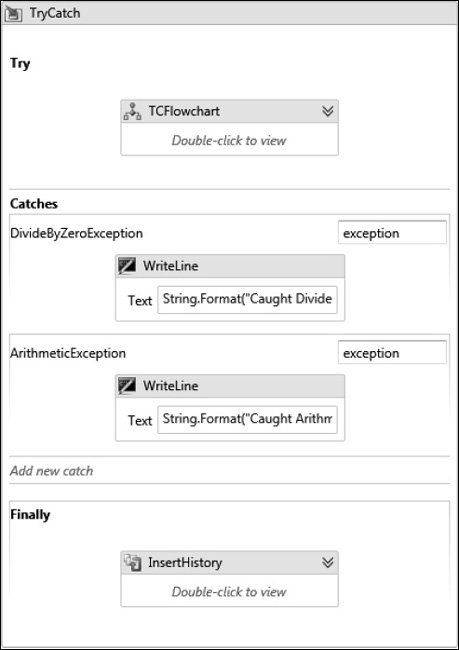
Figure 13-9. Revised TryCatch activity
![]() Note The workflow designer does not currently provide a way to reorder the individual catches in a
Note The workflow designer does not currently provide a way to reorder the individual catches in a TryCatch activity. Therefore, you’ll need to edit the Xaml file directly if you want to change the order. Most of the time the order of the individual catches does not matter. But the catches are processed in the sequence in which they are defined. If the TryCatch activity doesn’t find an exact match on exception type, the logic to find the closest match may be affected by the sequence.
Testing the Revised Workflow
After modifying the workflow, you should be ready to build the solution and run the UpdateInventory project. Here are my results:
UpdateInventoryTryCatch with exception


Product 768: 64 - Starting - No History


Product 765: 50 - Starting - No History


Order Id 43687: Notifying external system to record new sale


Product 768: record new sale


Product 765: record new sale


Product 768: Reduced by 1


Product 765: Reduced by 2


Caught DivideByZeroException: Throw a demo exception!


Product 768: Added history for Qty of 1


Product 765: Added history for Qty of 2


Product 768: 63 - Ending - History Row Found


Product 765: 48 - Ending - History Row Found
After the latest changes, the exception is now caught by the DivideByZeroException handler instead of the one for the more general ArithmeticException. Moving the InsertHistory activity to the Finally property of the TryCatch activity caused it to be executed regardless of the success or failure of the previous steps.
In this particular case, the results are closer to being correct since the ProductInventory and TransactionHistory tables were both updated. However, it’s not likely that this is the best way to solve this particular problem. If an exception occurred in a real, live workflow, it was probably thrown for a very valid reason. Assuming that the exception meant that something really, really bad occurred, you probably don’t want to continue with additional updates. On the contrary, you probably want to reverse course and roll back the updates that have already occurred. If that is your intent, then the TransactionScope activity (discussed next) is the answer.
Understanding the TransactionScope Activity
The TransactionScope activity is similar to the System.Transactions.TransactionScope class that you might use in your nonworkflow C# code. That class is typically used by defining a C# using block around a TransactionScope instance. The code that you want to execute within a transaction is placed inside the block. At the end of the block, you call the Complete method on the TransactionScope instance. This indicates that all updates that have been applied during the lifetime of the transaction should now be committed. If execution exits the block prematurely due to an exception, the TransctionScope is disposed, and the transaction, along with any work performed using the transaction, is rolled back.
When using the TransactionScope activity, you place the activity that you want to execute within a transaction in the Body property. If the activity completes without throwing an unhandled exception, the transaction is committed. If an unhandled exception is thrown, the transaction is rolled back.
Here are the most important properties of the TransactionScope activity:
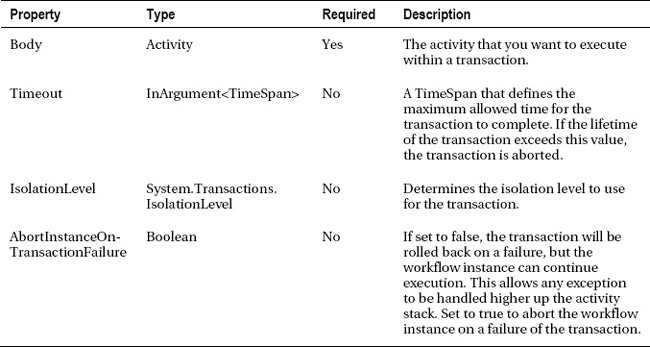
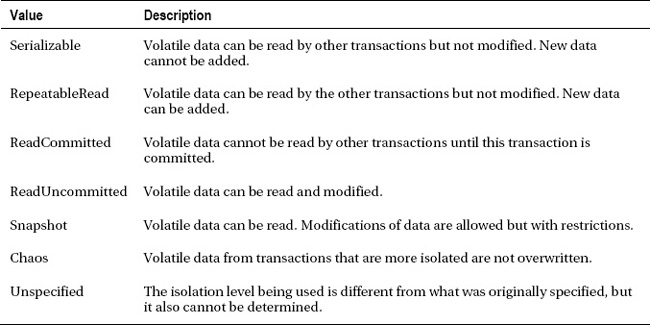
The IsolationLevel property determines the amount of access that other transactions have to the data being updated (termed volatile data in the Microsoft documentation). Here are the valid values for the IsolationLevel property, listed in order from most to least restrictive:
![]() Note The
Note The TransactionScope activity does not support the TransactionOption property that is supported by the System.Transactions.TransactionScope class. This option allows you to specify the type of transaction requested by the TransactionScope instance. In particular, the TransactionOption.RequiresNew option, which forces a new transaction to be created, is not supported. The TransactionScope activity uses the TransactionOption.Required option.
WF also includes a TransactedReceiveScope activity. This activity is designed to be used in workflows that use WCF messaging activities. It allows you to flow a transaction into a workflow that uses WCF messaging. Please refer to Chapter 9 for more information on the WCF messaging activities.
Using the TransactionScope Activity
In this example, you will use the TransactionScope activity to ensure the consistency of the database updates. The updates to the ProductInventory and the inserts to the TransactionHistory will all succeed together as one unit of work, or they will be rolled back. In either case, the database will always be left in a consistent state.
You will complete these tasks to implement this example:
- Make a copy of the
UpdateInventoryworkflow.- Modify the copied workflow to use a
TransactionScopeactivity.- Modify the host application to execute the new workflow.
Declaring the UpdateInventoryTran Workflow
This workflow is a revision of the original UpdateInventory workflow that you declared in the first example of this chapter (not a copy of the previous TryCatch example). Make a copy of the UpdateInventory.xaml file, and name the copy UpdateInventoryTran.xaml, placing the copy in the same UpdateInventory project as the original. As you did previously, open the copied Xaml file in the XML editor, and change the workflow name to UpdateInventoryTran.
After saving the changes, reopen the workflow in the designer view. You can follow these steps to modify the UpdateInventoryTran workflow:
- Add a
TransactionScopeactivity to the workflow. Check the properties for the activity, and make sure that theAbortInstanceOnTransactionFailureproperty is set to false.- Expand the
TransactionScopeactivity that you just added, and add aFlowchartactivity as its only child. Change theDisplayNameof the newFlowchartactivity toTSFlowchartto more easily distinguish it from the top-levelFlowchart.- Return to the top-level
Flowchart, and select a group of four activities:ApplyUpdates,FlowDecision,Throw, andInsertHistory. Right-click and select the Cut option for these activities.- Expand the
TransactionScopeand theTSFlowchartunder it. Use the Paste option to add the four activities that you just cut from the top-levelFlowchart. Verify that the original connections between these activities are still intact. Drag a new connection from the start of theTSFlowchartto the top of theApplyUpdatesactivity. The structure of theTSFlowchartshould look just like theTCFlowchartshown in Figure 13-6. Figure 13-10 shows the finishedTransactionScopeactivity.- Return to the top-level
Flowchart, and drag a connection between theExternalUpdateactivity and theTransactionScope. Figure 13-11 shows the top level of the workflow.

Figure 13-10. TransactionScope activity
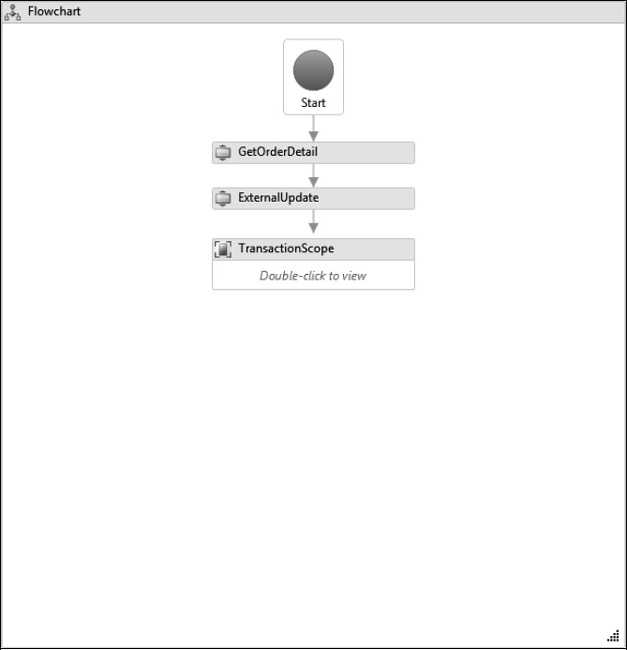
Figure 13-11. UpdateInventoryTran workflow
Hosting the Workflow
Modify the Program.cs file to execute this new workflow instead of the previous one. For this test, you will execute the workflow twice—first without an exception to ensure that everything works correctly and then with an exception. Here are the affected lines of code in the Main method:
using System;

using System.Activities;

using System.Collections.Generic;

using System.Threading;


namespace UpdateInventory

{

    class Program

    {

        static void Main(string[] args)

        {

            Console.WriteLine("UpdateInventoryTran without exception");

            RunWorkflow(new UpdateInventoryTran(), 43687, false);

            Thread.Sleep(4000);


            Console.WriteLine("
UpdateInventoryTran with exception ");

            RunWorkflow(new UpdateInventoryTran(), 43687, true);

            Thread.Sleep(4000);

        }

…

    }

}
Testing the Workflow
When you build the solution and run the UpdateInventory project, your results should be similar to these:
UpdateInventoryTran without exception


Product 768: 63 - Starting - No History


Product 765: 48 - Starting - No History


Order Id 43687: Notifying external system to record new sale


Product 768: record new sale


Product 765: record new sale


Product 768: Reduced by 1
Product 765: Reduced by 2


Product 768: Added history for Qty of 1


Product 765: Added history for Qty of 2


Product 768: 62 - Ending - History Row Found


Product 765: 46 - Ending - History Row Found


UpdateInventoryTran with exception


Product 768: 62 - Starting - No History


Product 765: 46 - Starting - No History


Order Id 43687: Notifying external system to record new sale


Product 768: record new sale


Product 765: record new sale


Product 768: Reduced by 1


Product 765: Reduced by 2


OnUnhandledException: Throw a demo exception!


Product 768: 62 - Ending - No History


Product 765: 46 - Ending - No History
As expected, the workflow that executed without an exception worked perfectly. The updates and inserts to the database were placed within a TransactionScope, causing them to be executed under the same transaction. Since the TransactionScope completed normally (no unhandled exception was thrown), the transaction was committed.
The second workflow triggered an unhandled exception. When the exception was thrown, the TransactionScope rolled back the uncommitted updates that were made by the UpdateProductInventory activity. You’ll notice that the results show the same starting and ending values for each product, proving that a rollback occurred. The updates failed due to the unhandled exception, but the database is now left in a consistent state.
Using a Host Transaction
The TransactionScope activity is the mechanism for declaratively protecting portions of a workflow with a transaction. However, you can execute the entire workflow under a transaction if the host provides one. This works only when you use the WorkflowInvoker class to execute a workflow. That class executes the workflow on the current host thread, just like a method call.
Hosting the Workflow
To illustrate how to execute the entire workflow under a host-provided transaction, you will add a new private method to the Program.cs file and use it to execute the original UpdateInventory activity. For this test, you don’t want to use the version of the workflow that contains a TransactionScope since that won’t necessarily prove that the host transaction is being used.
Here are the affected portions of the Program.cs file in the UpdateInventory project:
using System;

using System.Activities;

using System.Collections.Generic;

using System.Threading;


namespace UpdateInventory

{

    class Program

    {

        static void Main(string[] args)

        {
Replace all the code in the Main method with these lines to execute the original workflow. Notice that the new RunWorkflowWithTran private method is used instead of the RunWorkflow method that you have been using.
            Console.WriteLine("UpdateInventory with Host Tran and exception");

            RunWorkflowWithTran(new UpdateInventory(), 43687, true);

            Thread.Sleep(4000);

        }

…
Add this new private method to execute the workflow using the WorkflowInvoker class. Prior to the workflow execution, a TransactionScope object is constructed to create the transaction. Notice that this is the standard C# class provided in the System.Transactions assembly, not the WF activity that you used in the previous example.
A C# using block is used to automatically dispose of the TransactionScope instance. After invoking the workflow, the TransactionScope.Complete method is called to commit any work that was performed under the transaction.
        private static void RunWorkflowWithTran(Activity wf,

            Int32 orderId, Boolean isDemoException)

        {

            try

            {

                DisplayInventory(orderId, "Starting");


                using (System.Transactions.TransactionScope scope =

                    new System.Transactions.TransactionScope())
                {

                    WorkflowInvoker.Invoke(wf, new Dictionary<String, Object>

                        {

                            {"ArgSalesOrderId", orderId},

                            {"ArgIsDemoException", isDemoException}

                        });


                    scope.Complete();

                }

            }

            catch (Exception exception)

            {

                Console.WriteLine("Exception: {0}", exception.Message);

            }

            finally

            {

                DisplayInventory(orderId, "Ending");

            }

        }

    }

}
Testing the Workflow
After building the solution, you can run the revised UpdateInventory project. Here are my results:
UpdateInventory with Host Tran and exception


Product 768: 62 - Starting - No History


Product 765: 46 - Starting - No History


Order Id 43687: Notifying external system to record new sale


Product 768: record new sale


Product 765: record new sale


Product 768: Reduced by 1


Product 765: Reduced by 2


Exception: Throw a demo exception!


Product 768: 62 - Ending - No History


Product 765: 46 - Ending - No History
The results indicate that the host-created transaction was used, since the database is now back in a consistent state after the unhandled exception. Also notice that the exception that was thrown by the workflow was caught by the try/catch block of C# code, just as if you had called a method.
Executing the workflow under a transaction (using the TransactionScope or providing one from the host application) solved the database consistency problems with the workflow. Now, all updates and inserts to the database are executed as a single unit of work. They all succeed or fail together.
However, one problem still remains with this workflow. The external system is notified of the sale for each product, but it is not notified when a problem occurs. That problem is solved by the use of compensation, which is discussed in the next section.
Understanding Compensation
A transaction is used to ensure consistency for short-lived units of work. You can extend the life of a transaction for a few seconds (or even longer if it is really necessary), but they are certainly not designed to span minutes, hours, days, or weeks. And they are generally not suitable when you are interacting with an external system.
Like transactions, compensation is a way to ensure consistency. But there are differences in the approach that the two mechanisms take. Transactions ensure consistency by preventing inconsistent updates from being committed. Compensation ensures consistency by undoing work that has already been completed.
To support compensation, WF provides the CompensableActivity. This activity allows you to declare an activity that is capable of being compensated (using the Body property). The CompensableActivity also provides multiple handler properties that allow you to declare activities to execute under several situations that might occur later in the workflow.
Here are the most important properties of the CompensableActivity:
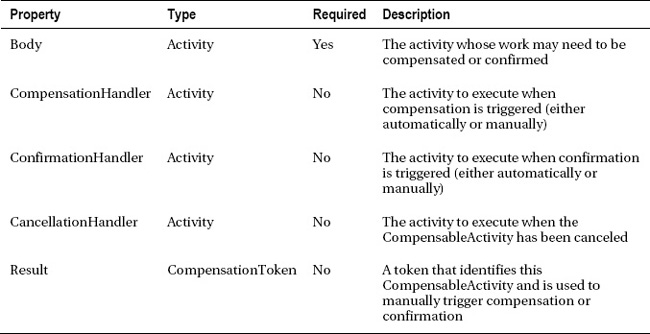
The CompensableActivity also supports something called confirmation. If compensation is the undoing of work that was previously completed, then confirmation can be thought of as confirming that the work was completed and can no longer be compensated. Once it is confirmed, the work is past the point of no return and can no longer be undone. For example, if the product has been shipped from the warehouse, the order can no longer be canceled.
If an activity is declared for one of the handler properties, it is executed automatically when necessary. Compensation and confirmation can also be manually triggered from within the workflow model using the Compensate and Confirm activities. These activities both support a single property:

This table summarizes the conditions under which each of the handler activities of the CompensableActivity are executed if they are declared:
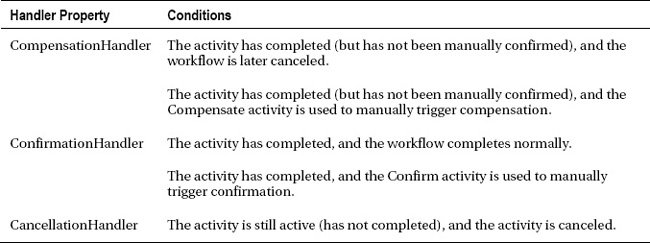
The CompensableActivity also supports the definition of workflow variables. In addition to being used by the Body activity, the variables are also in scope for any handler activities that have been declared.
![]() Tip It is important to note that automatic compensation occurs only when the workflow is canceled. If it is terminated or aborted, compensation does not occur.
Tip It is important to note that automatic compensation occurs only when the workflow is canceled. If it is terminated or aborted, compensation does not occur.
Using the CompensableActivity
In the example workflow, an inconsistency exists since the external system was notified of the sale but was not notified when an exception occurred. In this example, you will revise the UpdateInventoryTran workflow to use a CompensableActivity. This enables the declaration of compensation logic to notify the external system that the inventory update failed.
You will complete these tasks to implement this example:
- Implement a new
ExternalVoidcustom activity.- Copy the
UpdateInventoryTranworkflow.- Modify the copied workflow.
- Host and execute the workflow.
Implementing the ExternalVoid Activity
The ExternalUpdate activity that you implemented at the beginning of the chapter simulates communication with an external system. That activity notifies the external system that a new sale has been processed. Since this is the activity that you need to compensate, it makes sense to implement another activity that reverses the notification.
Add a new Code Activity to the ActivityLibrary, and name it ExternalVoid. This activity will mimic a call to an external system to notify it that the previous sale should be voided. Here is the code to implement this activity:
using System;

using System.Activities;

using System.Collections.Generic;

using AdventureWorksAccess;


namespace ActivityLibrary

{

    public sealed class ExternalVoid : CodeActivity

    {

        public InArgument<Int32> SalesOrderId { get; set; }

        public InArgument<List<SalesOrderDetail>> OrderDetail { get; set; }


        protected override void Execute(CodeActivityContext context)

        {

            String operation = "void previous sale";

            Console.WriteLine(

                "Order Id {0}: Notifying external system to {1}",

                SalesOrderId.Get(context), operation);
            foreach (SalesOrderDetail detail in OrderDetail.Get(context))

            {

                Console.WriteLine("Product {0}: {1}",

                    detail.ProductID, operation);

            }

        }

    }

}
Build the solution before proceeding with the next step. This ensures that the new activity is added to the Toolbox.
Declaring the UpdateInventoryComp Workflow
This workflow is a revision of the UpdateInventoryTran workflow that includes the TransactionScope activity. Make a copy of the UpdateInventoryTran.xaml file, naming the copy UpdateInventoryComp.xaml. Place the copy in the same UpdateInventory project as the original. Remember to open the copied Xaml file in the XML editor and change the workflow name to UpdateInventoryComp.
Please follow these steps to modify the UpdateInventoryComp workflow using the workflow designer:
- Add a
CompensableActivityto the workflow.- Select and cut the
ExternalUpdateactivity from the top-levelFlowchartactivity. Expand theCompensableActivity, and paste theExternalUpdateactivity into theBodyproperty.- Add an
ExternalVoidactivity to theCompensationHandlerof theCompensableActivity. Set theExternalVoid.OrderDetailproperty toOrderDetailand theSalesOrderIdproperty toArgSalesOrderId.- Add a
WriteLineactivity to theConfirmationHandlerof theCompensableActivity. Set theWriteLine.Textproperty to"Confirmation Handler Executed". Figure 13-12 shows the completedCompensableActivty.- Navigate back to the top-level of the workflow and drag a connection between the
GetOrderDetailand theCompensableActivity. Then connect theCompensableActivityto theTransactionScope.
Figure 13-13 shows the completed top-level of the workflow. There are no changes required to the TransactionScope or any of the activities under it.
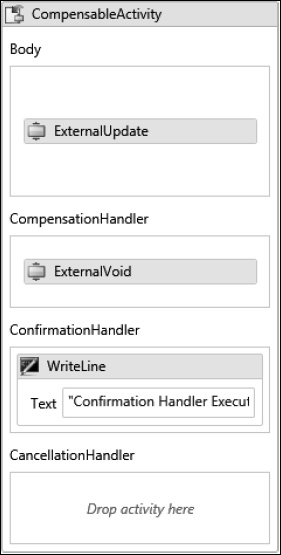
Figure 13-12. CompensableActivity
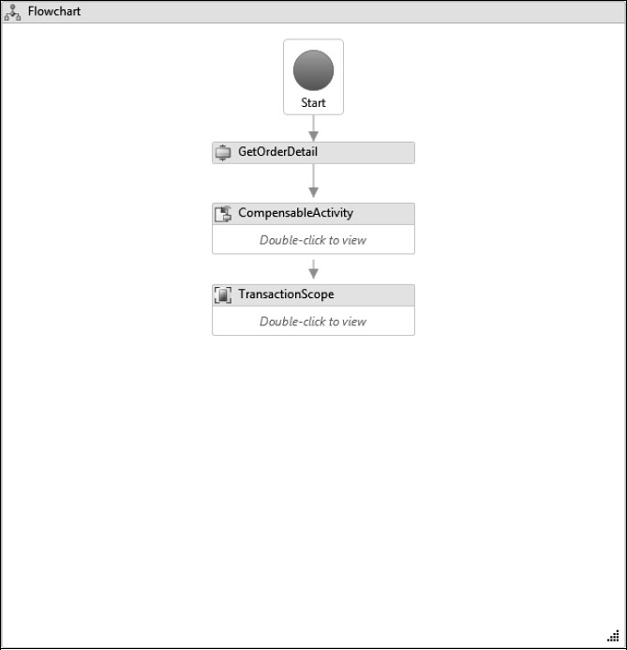
Figure 13-13. UpdateInventoryComp workflow
Hosting the Workflow
Modify the Program.cs file of the UpdateInventory project to execute the UpdateInventoryComp workflow. Here is the affected portion of the Program.cs file:
using System;

using System.Activities;

using System.Collections.Generic;

using System.Threading;


namespace UpdateInventory

{

    class Program

    {

        static void Main(string[] args)

        {

            Console.WriteLine("UpdateInventoryComp without exception ");

            RunWorkflow(new UpdateInventoryComp(), 43687, false);

            Thread.Sleep(4000);


            Console.WriteLine("
UpdateInventoryComp with exception ");

            RunWorkflow(new UpdateInventoryComp(), 43687, true);

            Thread.Sleep(4000);

        }

…

    }

}
Testing the Workflow
If you build the solution and run the UpdateInventory project, you should see results similar to these:
UpdateInventoryComp without exception


Product 768: 62 - Starting - No History


Product 765: 46 - Starting - No History


Order Id 43687: Notifying external system to record new sale


Product 768: record new sale


Product 765: record new sale


Product 768: Reduced by 1


Product 765: Reduced by 2
Product 768: Added history for Qty of 1


Product 765: Added history for Qty of 2


Confirmation Handler Executed


Product 768: 61 - Ending - History Row Found


Product 765: 44 - Ending - History Row Found


UpdateInventoryComp with exception


Product 768: 61 - Starting - No History


Product 765: 44 - Starting - No History


Order Id 43687: Notifying external system to record new sale


Product 768: record new sale


Product 765: record new sale


Product 768: Reduced by 1


Product 765: Reduced by 2


OnUnhandledException: Throw a demo exception!


Order Id 43687: Notifying external system to void previous sale


Product 768: void previous sale


Product 765: void previous sale


Product 768: 61 - Ending - No History


Product 765: 44 - Ending - No History
The first workflow was executed without an exception and completed normally. The only additional element that this version of the workflow introduced was the execution of the confirmation handler. In this example, it merely displayed a message on the console, but it could have invoked any other logic necessary to confirm the original execution of the ExternalUpdate activity.
Notice that the confirmation handler was executed after all other activities were completed (including the TransactionScope and all of its children). This makes sense since the confirmation logic shouldn’t automatically execute until the entire workflow has succeeded.
The second workflow was executed with an unhandled exception. As you saw in the UpdateInventoryTran example, the database was left in a consistent state, thanks to the TransactionScope. But in addition to this, the compensation logic was automatically triggered, and the ExternalVoid activity was executed. The previous call to the external system was hypothetically reversed by the ExternalVoid activity.
Now this workflow performs a proper cleanup of itself when an exception is thrown. The database is consistent, and the external system is properly notified of the problem.
Manually Triggering Compensation
The previous example demonstrated how the automatic compensation logic works. You may also need to manually trigger compensation within a workflow. Since the automatic logic relies upon the workflow being canceled, you will need to use manual compensation if you catch and handle an exception condition internally without canceling the entire workflow.
To manually control compensation, you use the Compensate activity. You can also use the related Confirm activity to manually trigger confirmation. You would need to manually confirm a business process once it reached a point where compensation was no longer possible or necessary. Both of these activities require a CompensationToken as an argument. This token is returned in the CompensableActivity.Result property and should be saved in a variable so it can be referenced by a Compensate or Confirm activity.
![]() Note You also need to manually trigger compensation for nested
Note You also need to manually trigger compensation for nested CompensableActivity instances. The parent activity uses the Compensate activity to trigger compensation for the child instance.
You will complete these tasks to implement this example:
- Declare the
UpdateInventoryManualCompworkflow.- Host and execute the workflow.
Declaring the UpdateInventoryManualComp Workflow
Make a copy of the UpdateInventoryComp.xaml file, and name the new copy UpdateInventoryManualComp.xaml. Place the copy in the same UpdateInventory project as the original, and modify the workflow name within the Xaml file as you have in previous examples.
Please follow these steps in the workflow designer to modify the UpdateInventoryManualComp workflow:
- Add a new variable to the top-level
Flowchartactivity of the workflow. Name the variableTokenwith a type ofCompensationToken. This variable will be used to store theCompensationTokenthat is returned by theCompensableActivity.- Add a
TryCatchactivity to the workflow. Expand theTryCatchactivity, and add aFlowchartactivity to theTryCatch.Tryproperty. Change theDisplayNameof theFlowcharttoTCFlowchart.- Add a catch to the
TryCatchactivity forSystem.ArithmeticException. Add aSequenceactivity to the handler of the new catch.- Add a
WriteLineactivity to theSequenceactivity. Set theWriteLine.Textproperty toString.Format("Caught ArithmeticException: {0}", exception.Message).- Add a
Compensateactivity immediately following theWriteLinein theSequenceactivity. Set theCompensate.Targetproperty toTokento reference the new variable.- Return to the top-level of the workflow, and select the
CompensableActivityand theTransactionScopeactivity at the same time. Select the Cut option and then expand theTryCatchand theTCFlowchartactivities. Paste the two activities that you cut into theTCFlowchartactivity. Drag a connection from the start of theTCFlowchartto the top of theCompensableActivitythat you just added. Figure 13-14 shows the completedTCFlowchartactivity, and Figure 13-15 shows the completedTryCatch.- Select the
CompensableActivity, and set theResultproperty toToken. This will store theCompensationTokenin the variable for use by theCompensateactivity.- Return to the top-level
Flowchartof the workflow, and drag a connection from the bottom of theGetOrderDetailto the top of theTryCatch.
The top-level of the workflow should look like Figure 13-16. The structure of the TransactionScope, TSFlowchart, and CompensableActivity are unchanged in this workflow.

Figure 13-14. TCFlowchart activity
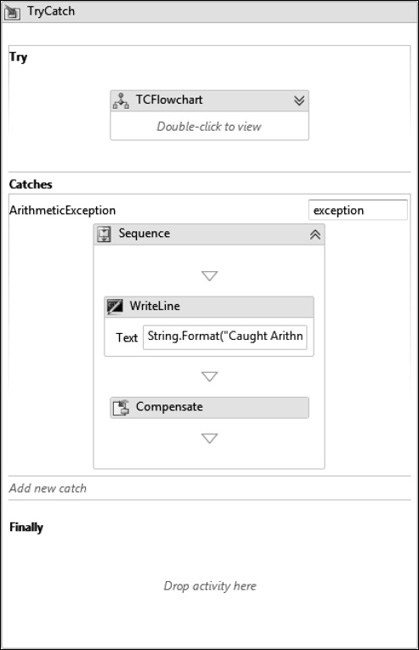
Figure 13-15. TryCatch activity
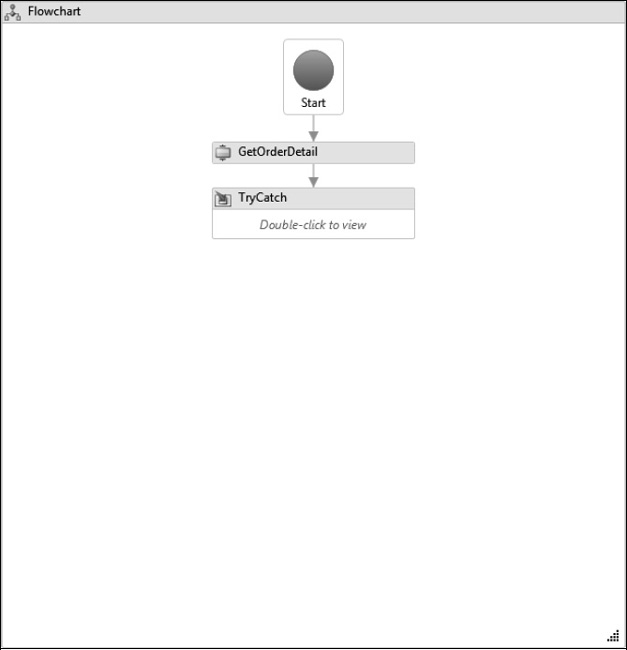
Figure 13-16. UpdateInventoryManualComp workflow
Hosting the Workflow
Modify the Program.cs file of the UpdateInventory project to execute the UpdateInventoryManualComp workflow as shown in this code fragment:
using System;

using System.Activities;

using System.Collections.Generic;

using System.Threading;


namespace UpdateInventory

{

    class Program

    {

        static void Main(string[] args)

        {

            Console.WriteLine("UpdateInventoryManualComp without exception ");

            RunWorkflow(new UpdateInventoryManualComp(), 43687, false);

            Thread.Sleep(4000);


            Console.WriteLine("
UpdateInventoryManualComp with exception ");

            RunWorkflow(new UpdateInventoryManualComp(), 43687, true);

            Thread.Sleep(4000);

        }

…

    }

}
Testing the Workflow
After building the solution, run the UpdateInventory project. Here are my results:
UpdateInventoryManualComp without exception


Product 768: 61 - Starting - No History


Product 765: 44 - Starting - No History


Order Id 43687: Notifying external system to record new sale


Product 768: record new sale


Product 765: record new sale


Product 768: Reduced by 1


Product 765: Reduced by 2
Product 768: Added history for Qty of 1


Product 765: Added history for Qty of 2


Confirmation Handler Executed


Product 768: 60 - Ending - History Row Found


Product 765: 42 - Ending - History Row Found


UpdateInventoryManualComp with exception


Product 768: 60 - Starting - No History


Product 765: 42 - Starting - No History


Order Id 43687: Notifying external system to record new sale


Product 768: record new sale


Product 765: record new sale


Product 768: Reduced by 1


Product 765: Reduced by 2


Caught ArithmeticException: Throw a demo exception!


Order Id 43687: Notifying external system to void previous sale


Product 768: void previous sale


Product 765: void previous sale


Product 768: 60 - Ending - No History


Product 765: 42 - Ending - No History
The results are consistent with the previous example. The only difference is that the exception that is thrown by the second workflow is now caught by the TryCatch activity. In this case, the workflow wasn’t canceled externally by the host application, so the Compensate activity was used to manually trigger compensation.
Understanding the CancellationScope Activity
There is one additional activity that is loosely related to the overall topic of this chapter. The CancellationScope activity allows you to assign a handler activity to be executed when an activity is canceled. You would use this activity when you have special processing that is necessary when the activity is canceled.
For example, you might have a long-running activity that is interacting with an external system and is waiting for input. You might pair this activity with a Delay activity, declaring them in separate PickBranch instances within a Pick activity. The Delay would serve as a safeguard to cancel the activity when too much time has elapsed waiting for the receipt of external input. When your long-running activity is canceled, you may want to execute some additional cleanup logic. That additional logic could be declared using the CancellationScope activity.
Here are the most important properties of the CancellationScope activity:

The CancellationScope is also one of the activities that supports the definition of workflow variables.
Summary
This chapter focused on exception handling and the mechanisms that WF provides to ensure the consistency of work that is performed. After reviewing the default handling for unhandled exceptions, the TryCatch activity was used to handle exceptions declaratively within the workflow.
The TransactionScope activity was then introduced and demonstrated. This activity provides transaction support for activities that can make use of it, such as activities that update a resource like as a database.
Compensation is the process of undoing work that was previously completed. The CompensableActivity, along with the Compensate and Confirm activities, were used to execute declared compensation logic. The chapter concluded with a brief overview of the CancellationScope activity.
In the next chapter, you will learn how to use workflow tracking to instrument your workflows.